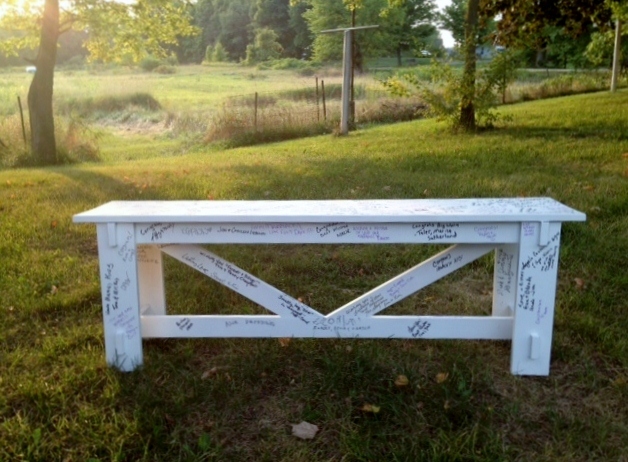
Wedding Bench Guestbook
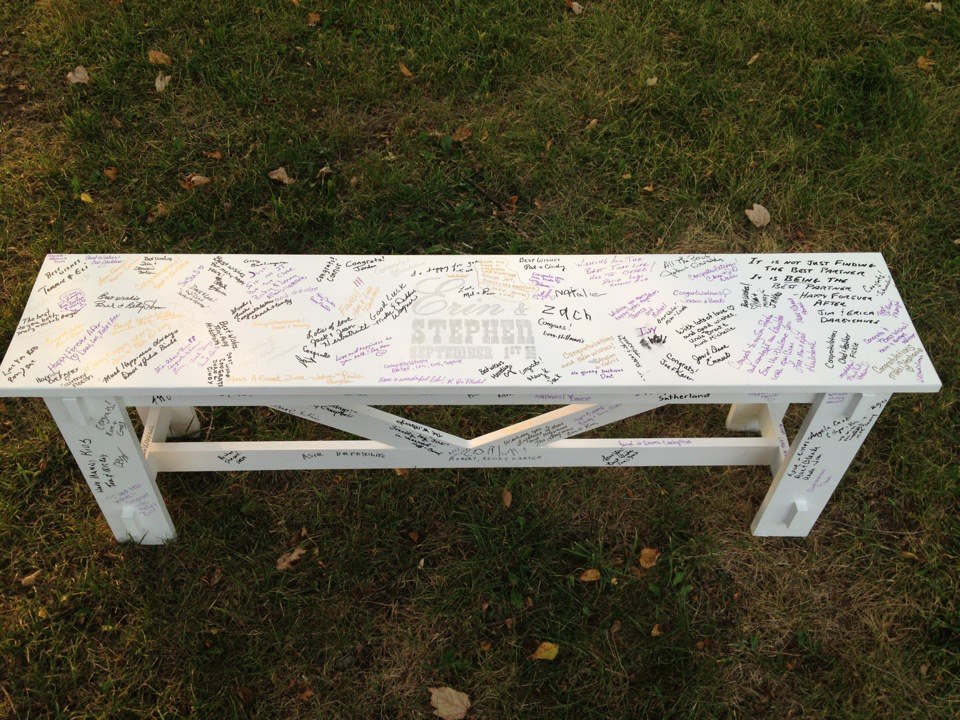
I really loved what brookifer86 did with the Rustic Bench plans here: http://ana-white.com/2011/03/rustic-bench-wedding-guestbook. When my daughter got engaged last fall, I knew that this would be a great wedding gift for the new couple.
It was helpful to read several times through her posts and followups. It took longer to come up with the name design than it did to build the bench, so give yourself plenty of lead time on this part. I was able to create the graphic in PowerPoint and enlarge it on my computer screen so that I could tape paper on the monitor and lightly trace the design for transfer to the bench. My husband suggested the addition of a princess crown over our daughter's name just for fun.
Thanks for the tip to use paint pens instead of markers. I made a sign at the reception with spare paper to alert people to shake the pens and give them a spot to test before writing on the bench.
I am doing a test with a spare painted board and the pens to make sure the application of the poly finish does not smear the signatures before sealing the signed bench.
Many thanks for the idea, Brooke, and thanks to Ana for the great bench plan!


Comments
brookifer86
Sat, 09/08/2012 - 14:26
Wow!
Oh my goodness, it looks so good! I'm so happy that someone else gets this awesome bench to look at forever ;) I know we totally love ours and it's one of my favorite builds in the house. Definitely test your finish, though, because I used ModPodge (horrible idea) and it's already yellowed in spots :( I'm hoping to figure out some way to salvage it and refinish the poly coat
MrsGig
Sun, 09/09/2012 - 16:32
learning from other people's mistakes
Brooke, one of the comments on your posting from the person that used brown permanent markers and then had problems with the poly coat smearing gives me pause for caution. Too bad about the ModPodge yellowing. Everything that I have read so far does not indicate yellowing as a problem with it.
Don't feel bad, even the Minwax Polycrylic website for that product states "Because slight ambering may occur, spot test on an inconspicuous area and let dry to ensure satisfactory results." Because of that, I am leery about using it for my white painted bench.
I am testing Rust-Oleum’s Painter’s Touch Ultra Cover 2x Clear - initial results shows it going on clear and not smearing the signatures.
maharg1231
Sat, 02/16/2013 - 16:55
Beautiful Keepsake!
What a great idea! My niece is getting married in July and I think I might do this for her. I was just curious what your results were with the Rust-Oleum clear coat? Or if you found something that didn't end up yellowing?