

Build your own greenhouse with free plans from Ana-White.com
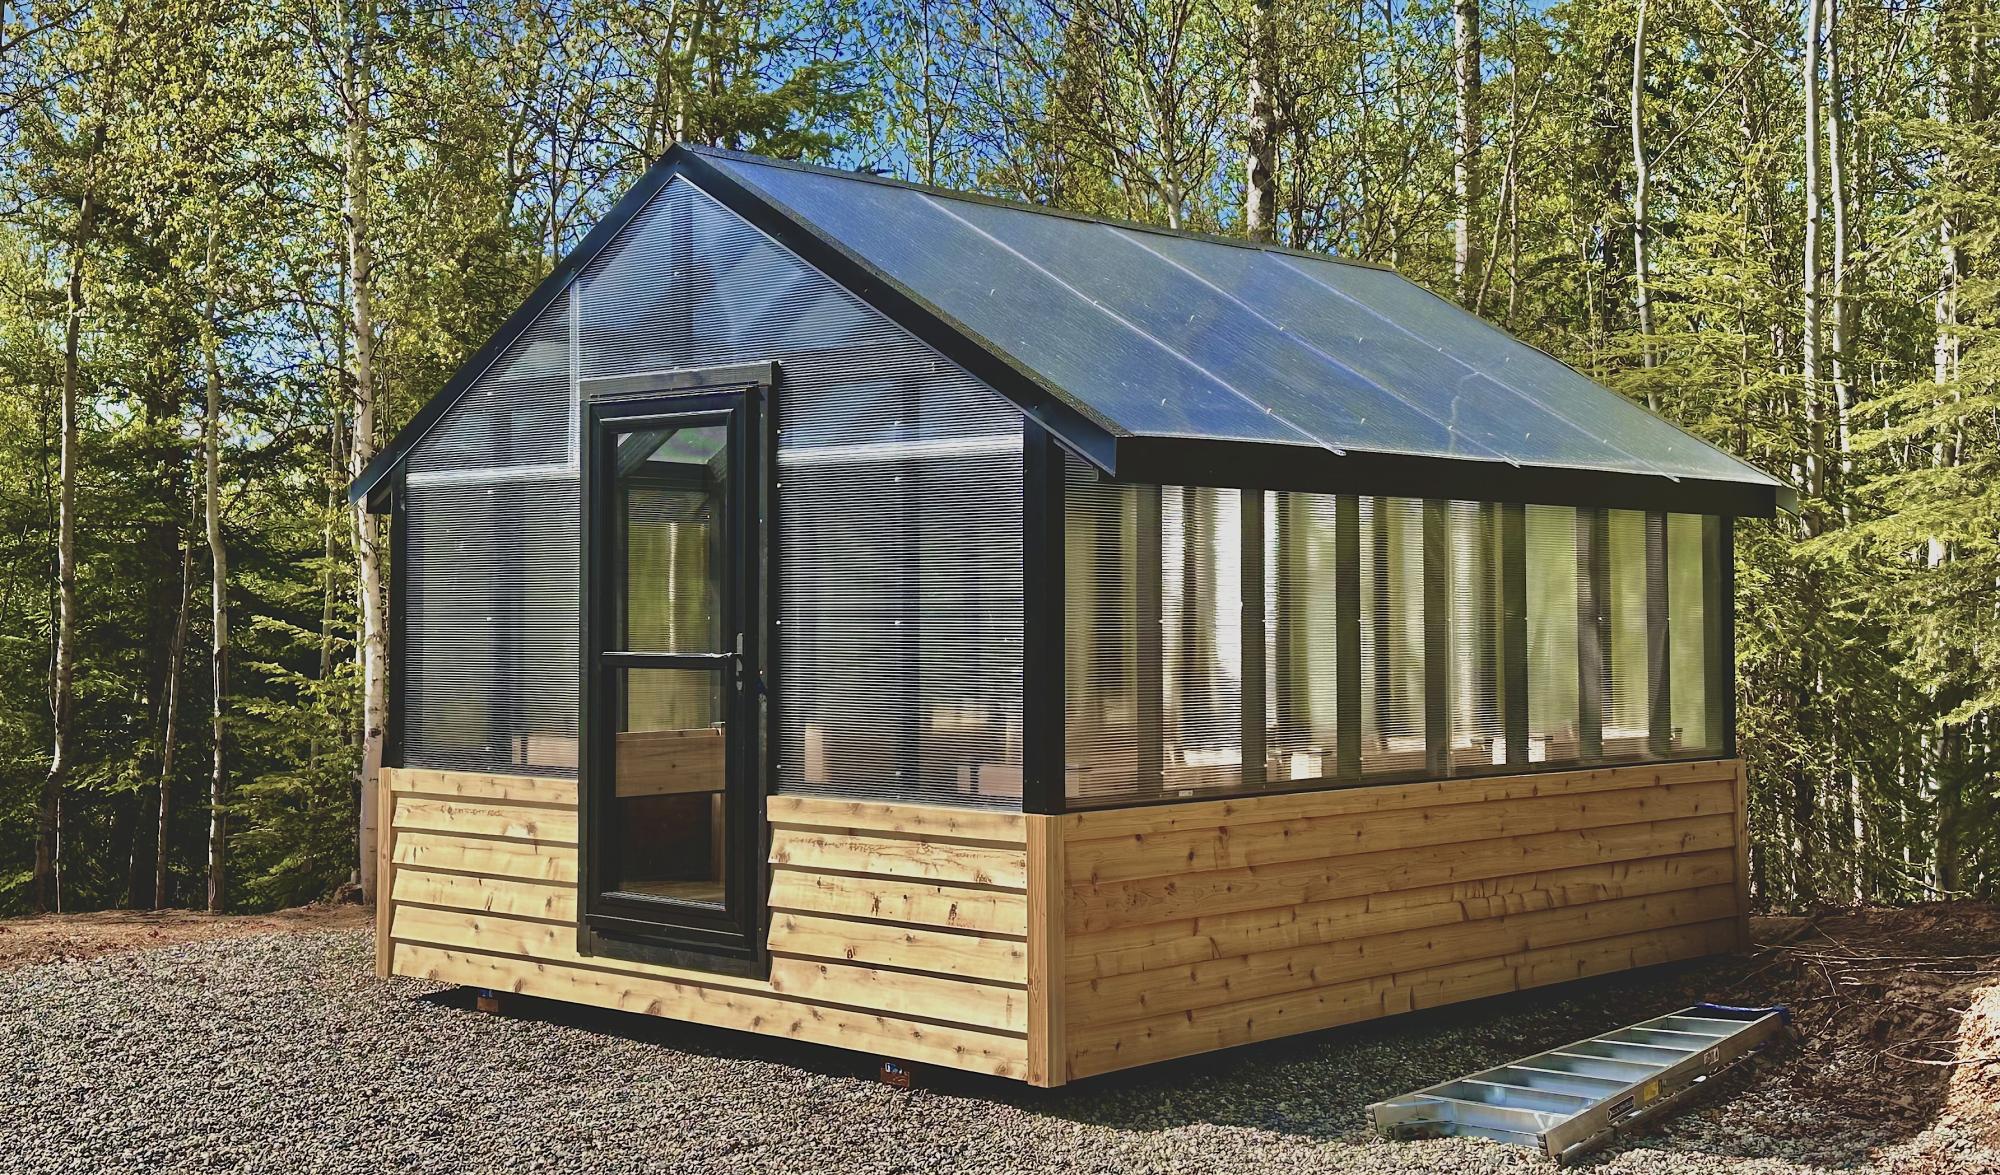
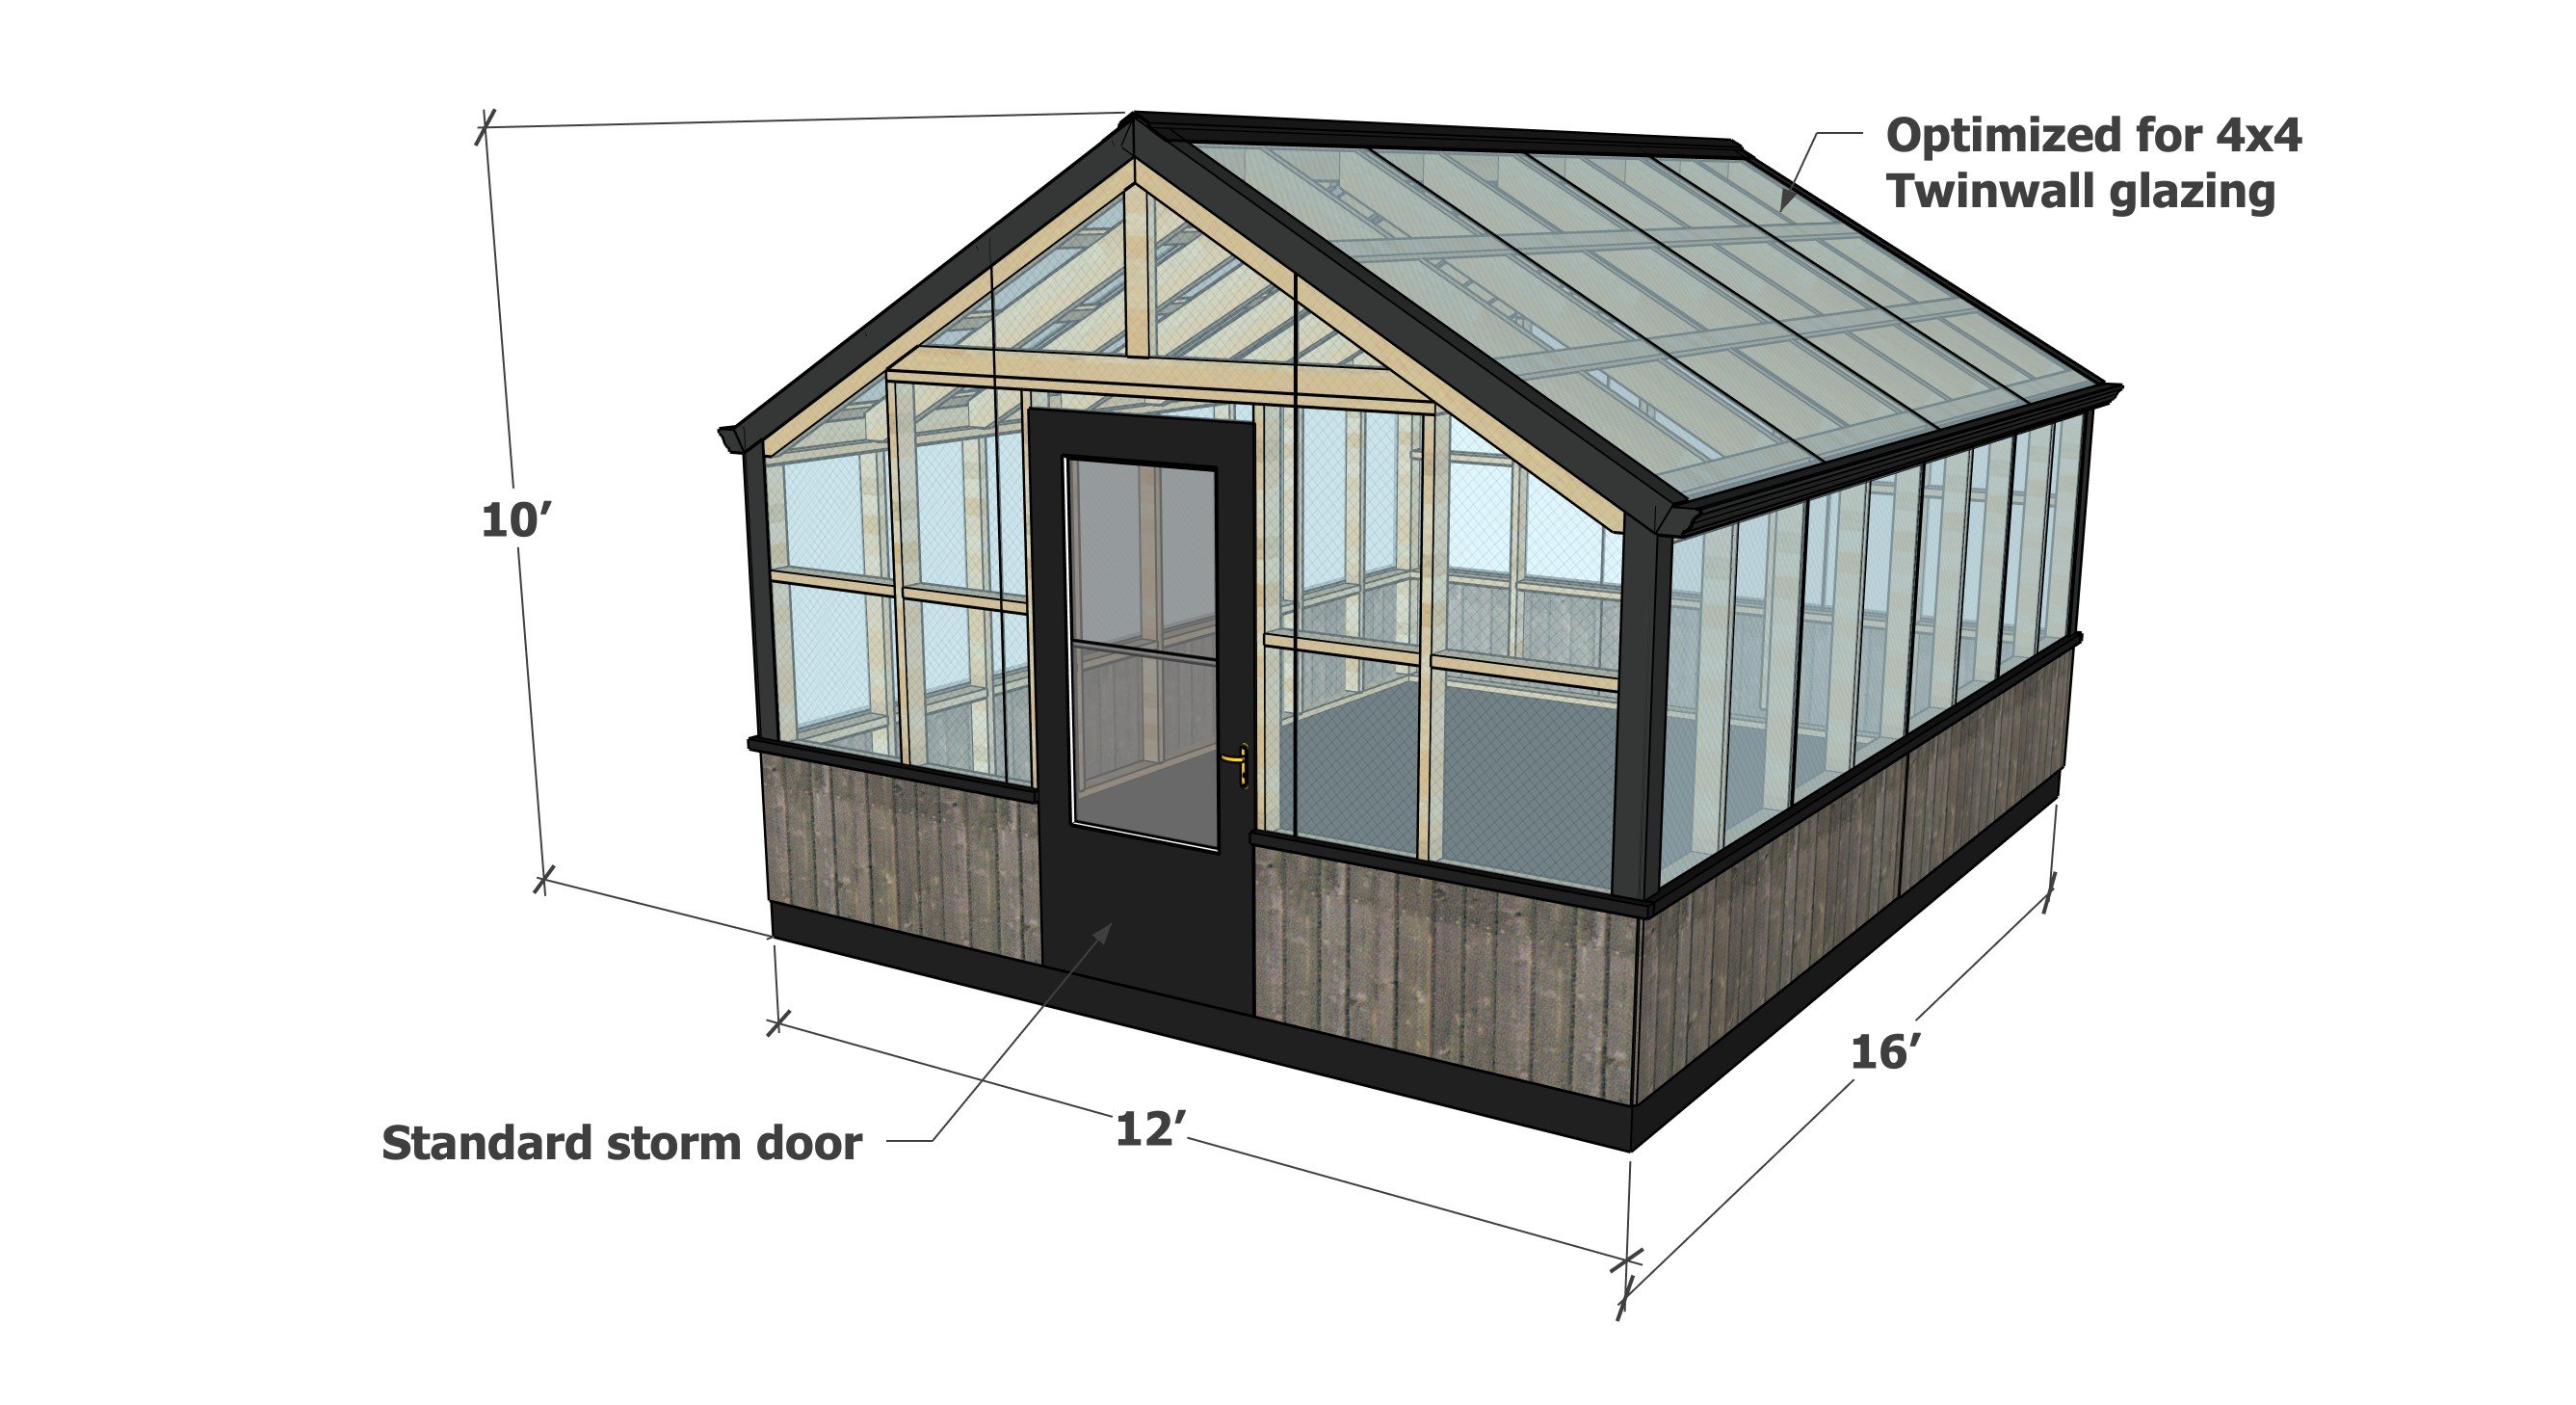
This greenhouse is roomy, measuring 12 x 16 feet at the base. The height is about 10 feet overall, including a floor if using. This greenhouse plan uses standard lumber and framing techniques, and is completely enclosed, so it's dry inside and easy to maintain. We used twinwall polycarbonate panels - this plan is optimized for attaching these panels. The door is sized for a standard storm door.
This plan includes step by step diagrams, shopping and cut lists, and a video showing our build process. The plans have been improved from our initial build to make the building process easier and more efficient, of note overhangs were removed for easy gutter installation, and perlins added to the roof framing to help with installing the glazing.
Pin For Later!
Preparation
- 6 - 2x4 @ 16 feet long (do not cut, need the full length) - may need to make some of these treated if in direct contact with concrete or ground
- 2 - 2x4 @ 12 feet long (bottom plates of front and back walls, may need to be treated lumber if in direct contact with concrete or ground)
- 1 - 2x6 @ 16 feet long (do not cut, need the full length)
- 30 - 2x4 @ 8 feet long (may need more for blocking, but start with 30)
- 18 - 2x6 @ 8 feet long
- 2 - 4x4 @ 12 feet long
- 8 - 1x4 @ 16 feet long (can also purchase 8' pieces but 16' is better)
- 4 - 4x8 sheets of 1/2" thick exterior plywood
- 18 - 4x8 sheets of twin wall polycarbonate
- 11 - 8' long H-Channels pieces, for joining polycarbonate sheets together edge to edge
- Sealant strips for the ends of the polycarbonate sheets (see polycarbonate manufacturer instructions)
- 6 - 4x4 metal corners, 10' long
- 2 - ridgecap for 30 degree pitched roof, 10' long
- 32 feet of rain gutters with downspouts
- storm door for finished opening 36" x 80-1/2"
- Framing nails in both 16D and 8D sizes or exterior self tapping wood screws in 3" #10 and 1-3/4" #8 sizes
- 20 - 2-1/2" exterior pocket hole screws for building roof trusses
- Screws for attaching twin wall polycarbonate (see manufacturers instructions)
- Screws for attaching metal trim and ridgecap
Other considerations:
- We went back and added cedar siding over the plywood
- A vent in the back could be added for increased ventilation
Sidewalls (both)
- 4 - 2x4 @ 192" - top and bottom plates, use treated for bottom plates if in direct contact with ground or concrete
- 14 - 2x4 @ 65-1/2" - studs
- 4 - 4x4 @ 65-1/2" - ends
- 4 - 1/2" plywood @ 24" x 96"
Front and Back Walls
- 2 - 2x4 @ 137" - bottom plates, use treated if in direct contact with the ground or concrete
- 2 - 2x4 @ 87-1/4" - top plate
- 8 - 2x4 @ 79" - studs
- Rip plywood into strips 24" x 96" - then cut to fit as needed for front and back walls
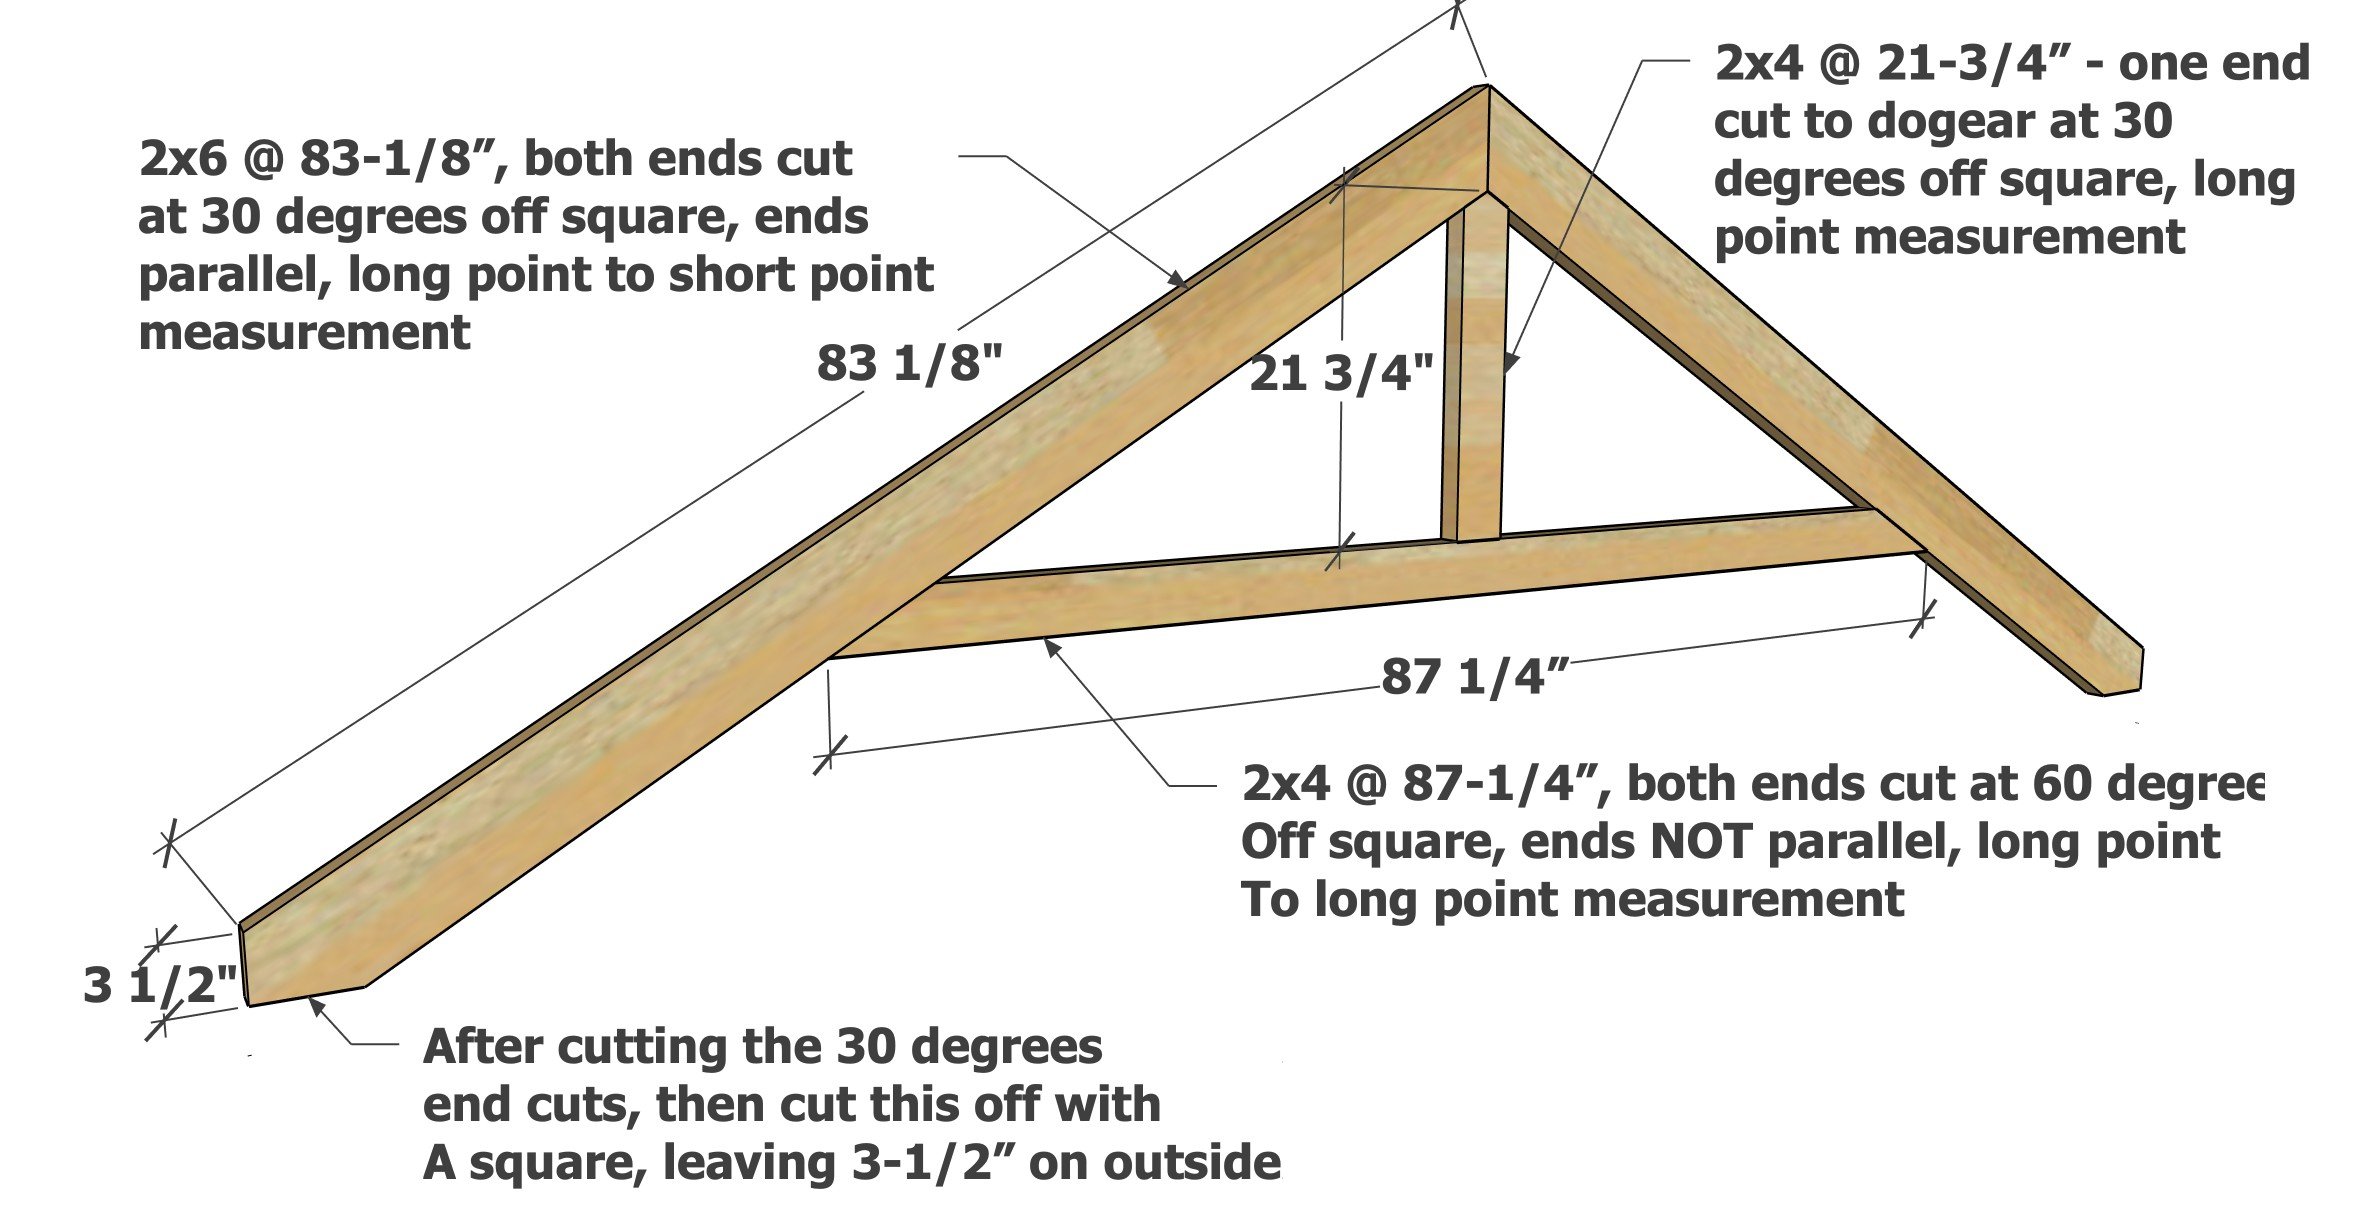
Roof Trusses (build 2 identical)
- 4 - 2x6 @ 83-1/8" - both ends cut at 30 degrees off square, ends are parallel, long point to short point measurement - additional cut is needed at bottom in plan steps below
- 2 - 2x4 @ 87-1/4" - both ends cut at 60 degrees off square, ends NOT parallel, long point to long point measurement
- 2 - 2x4 @ 21-3/4" - long point measurement, top end cut to a point at 30 degrees off square (see diagram in plan for additional cutting instruction)
Roofing Framing
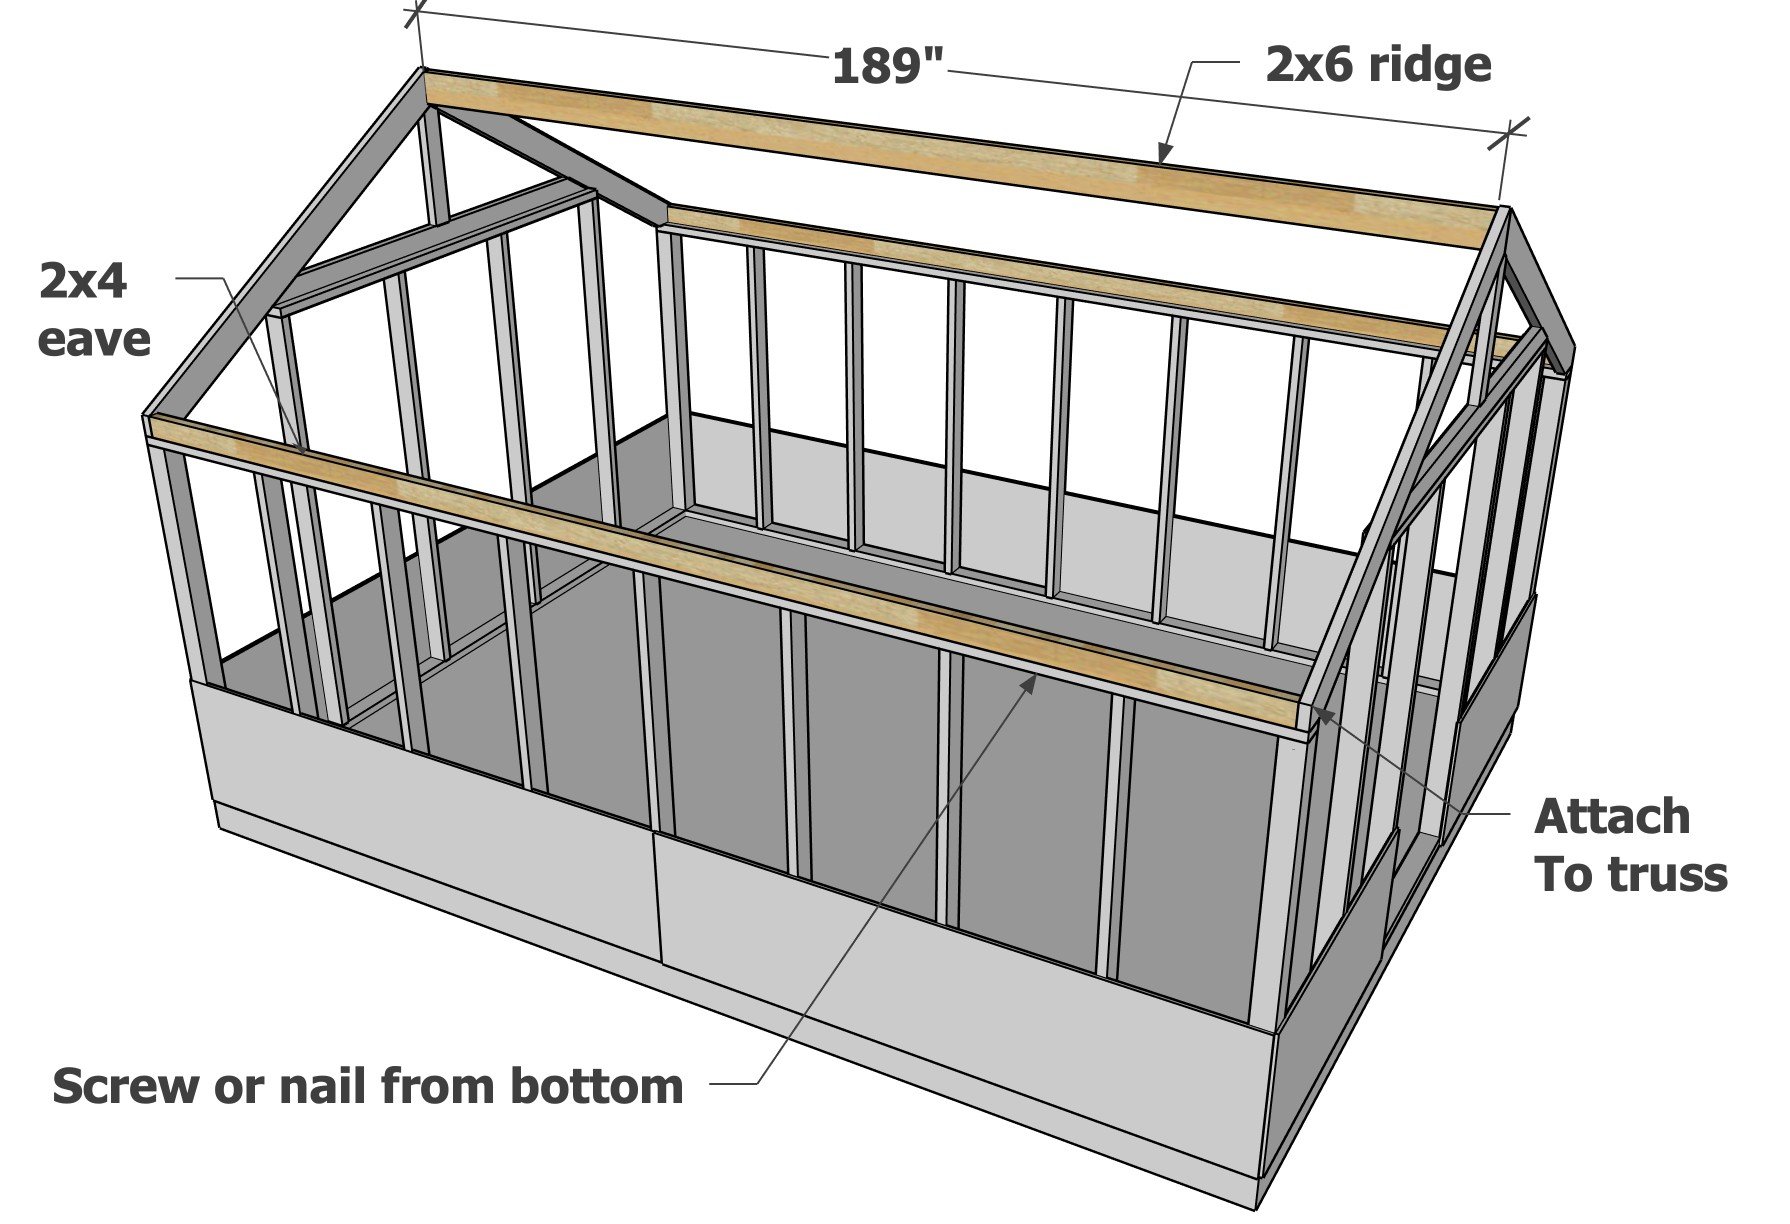
- 1 - 2x6 @ 189" - ridge
- 2 - 2x4 @ 189" - eaves
- 14 - 2x6 @ 80-1/2" - both ends cut at 30 degrees off square, ends are parallel, long point to short point measurement - additional cut is needed at bottom in plan steps below
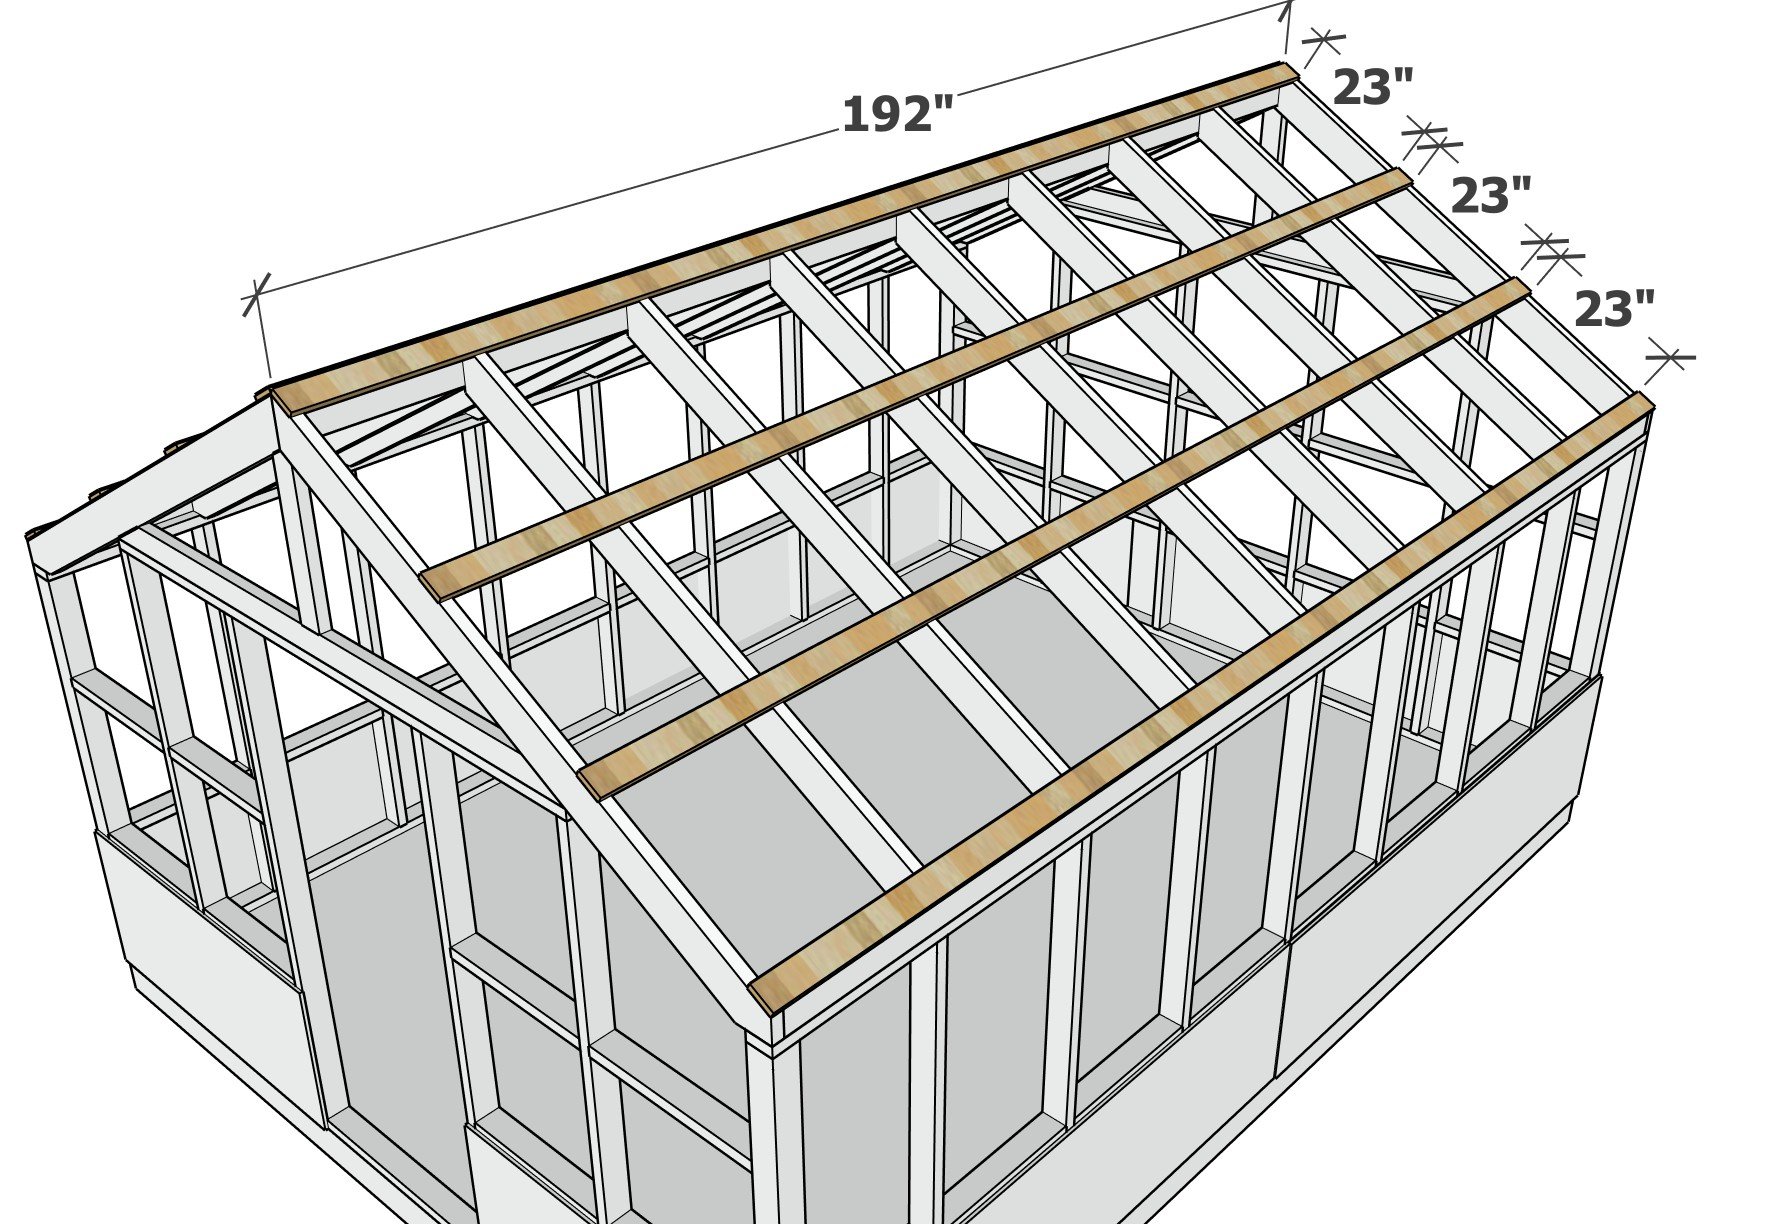
- 8 - 1x4 @ 192" - perlins
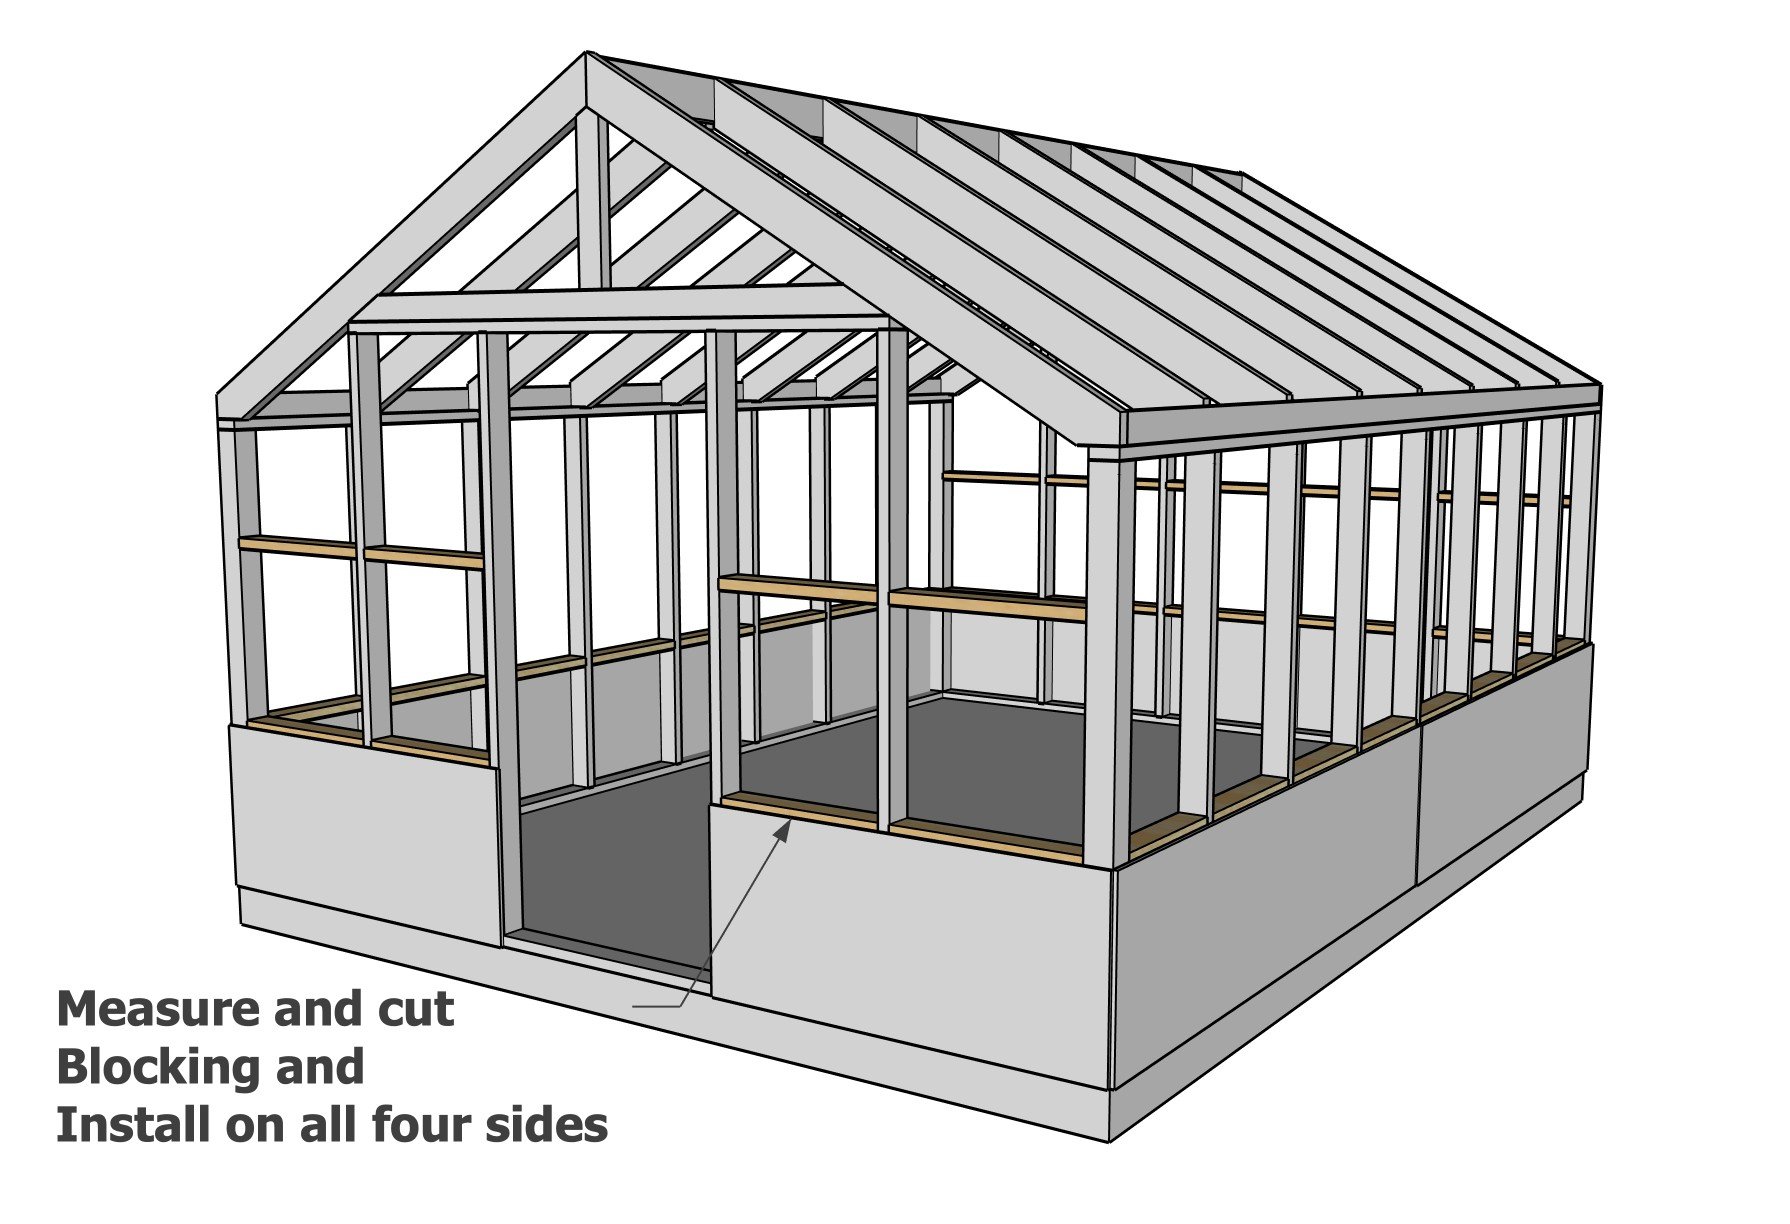
Blocking
- Measure and cut blocking from scrap wood to fit, as need for installing the twin wall polycarbonate


Instructions
Step 1
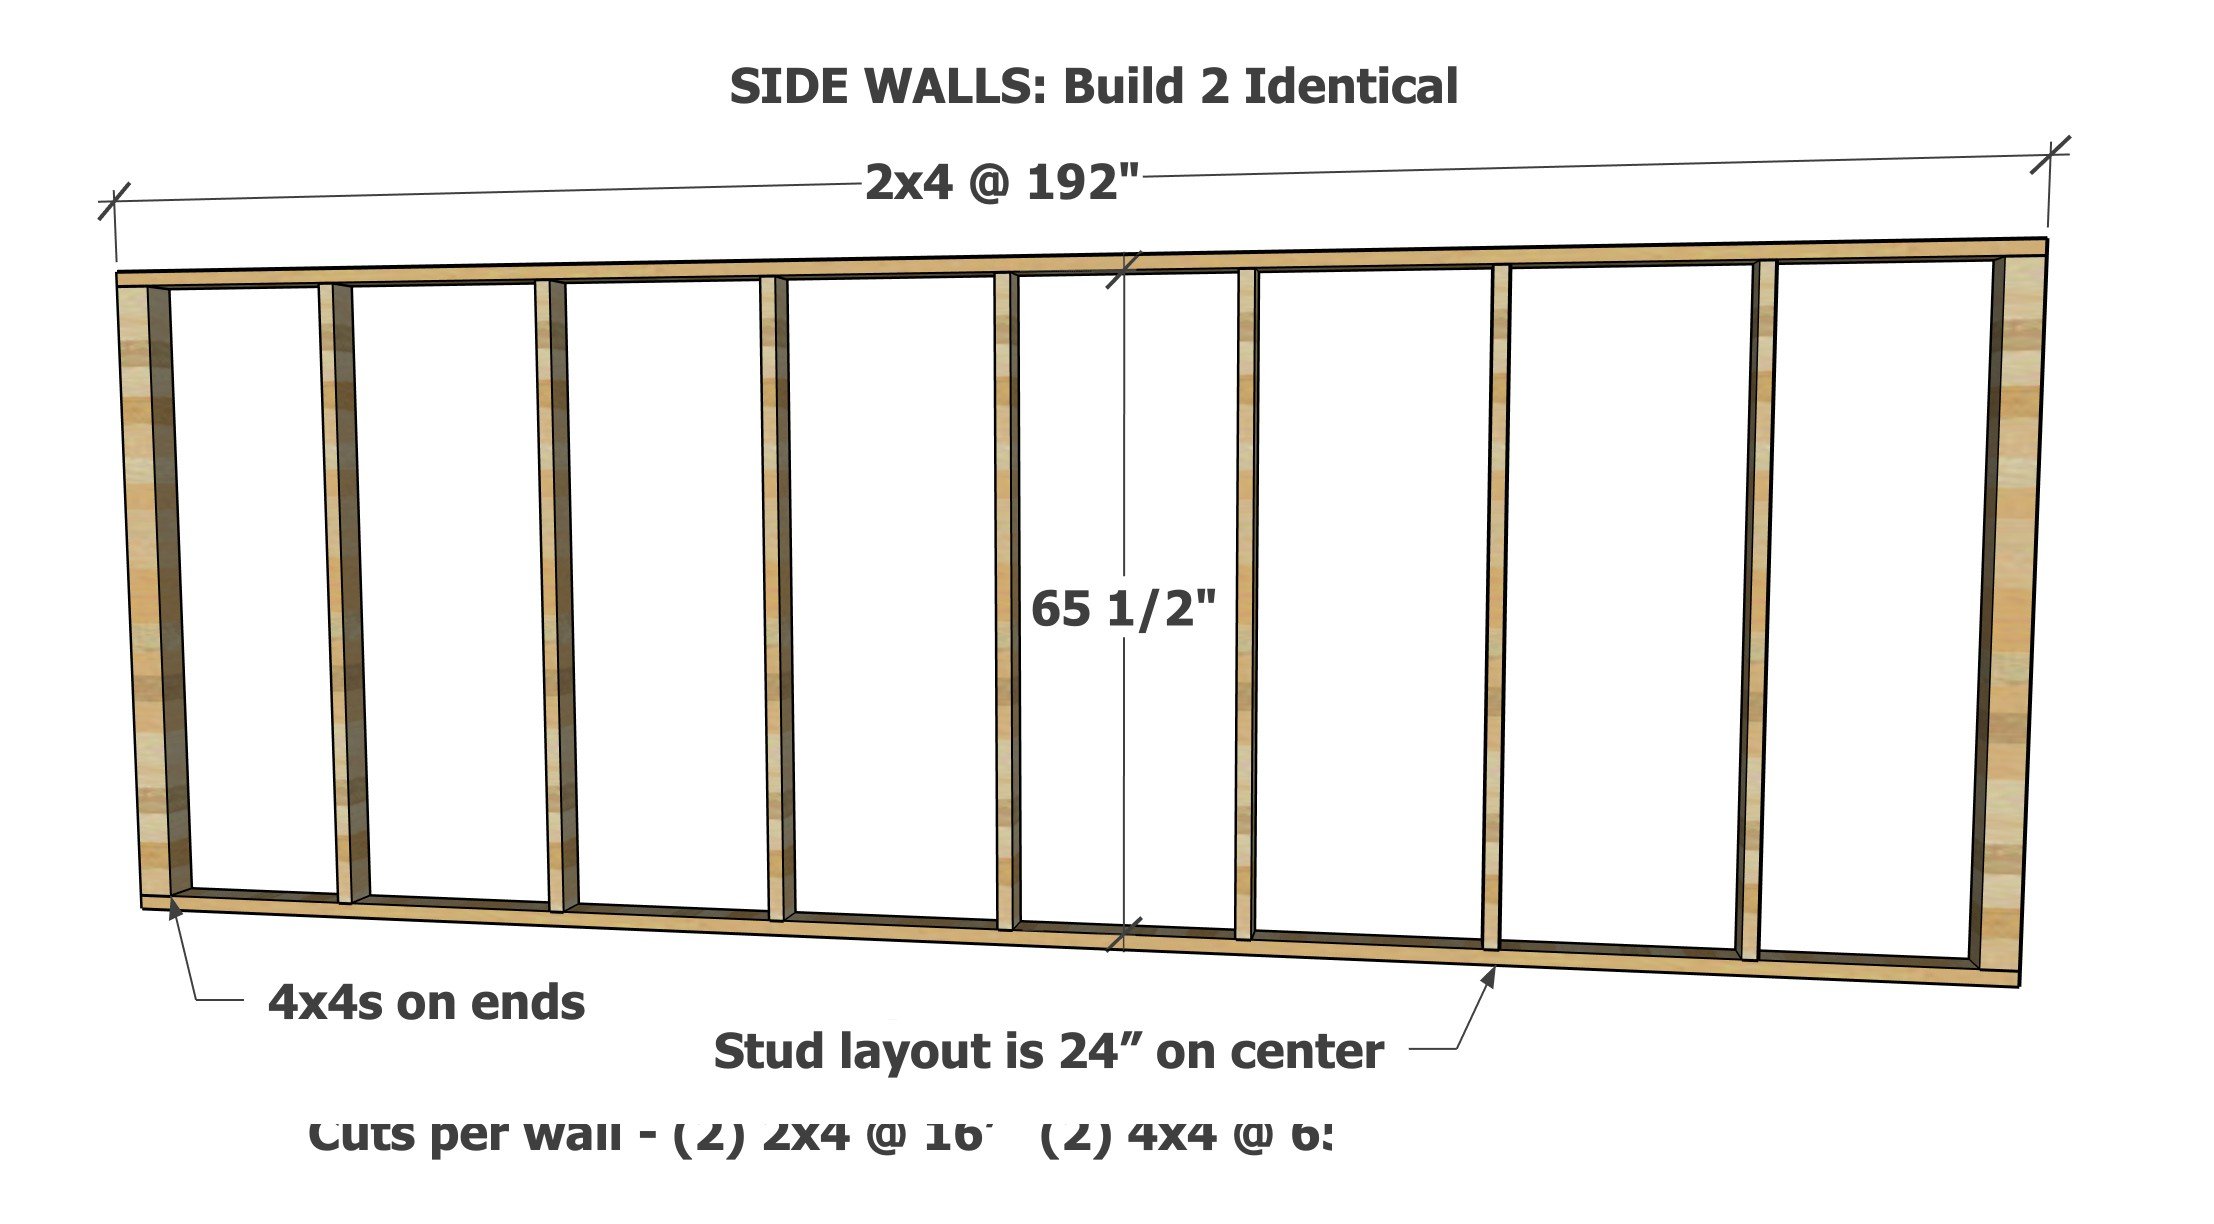
Build two of the side walls as shown, using either the 3" framing nails or 3" exterior screws.
NOTE: If no floor, use treated for the bottom plates of the greenhouse, or add an extra bottom plate that is treated lumber.
Step 2
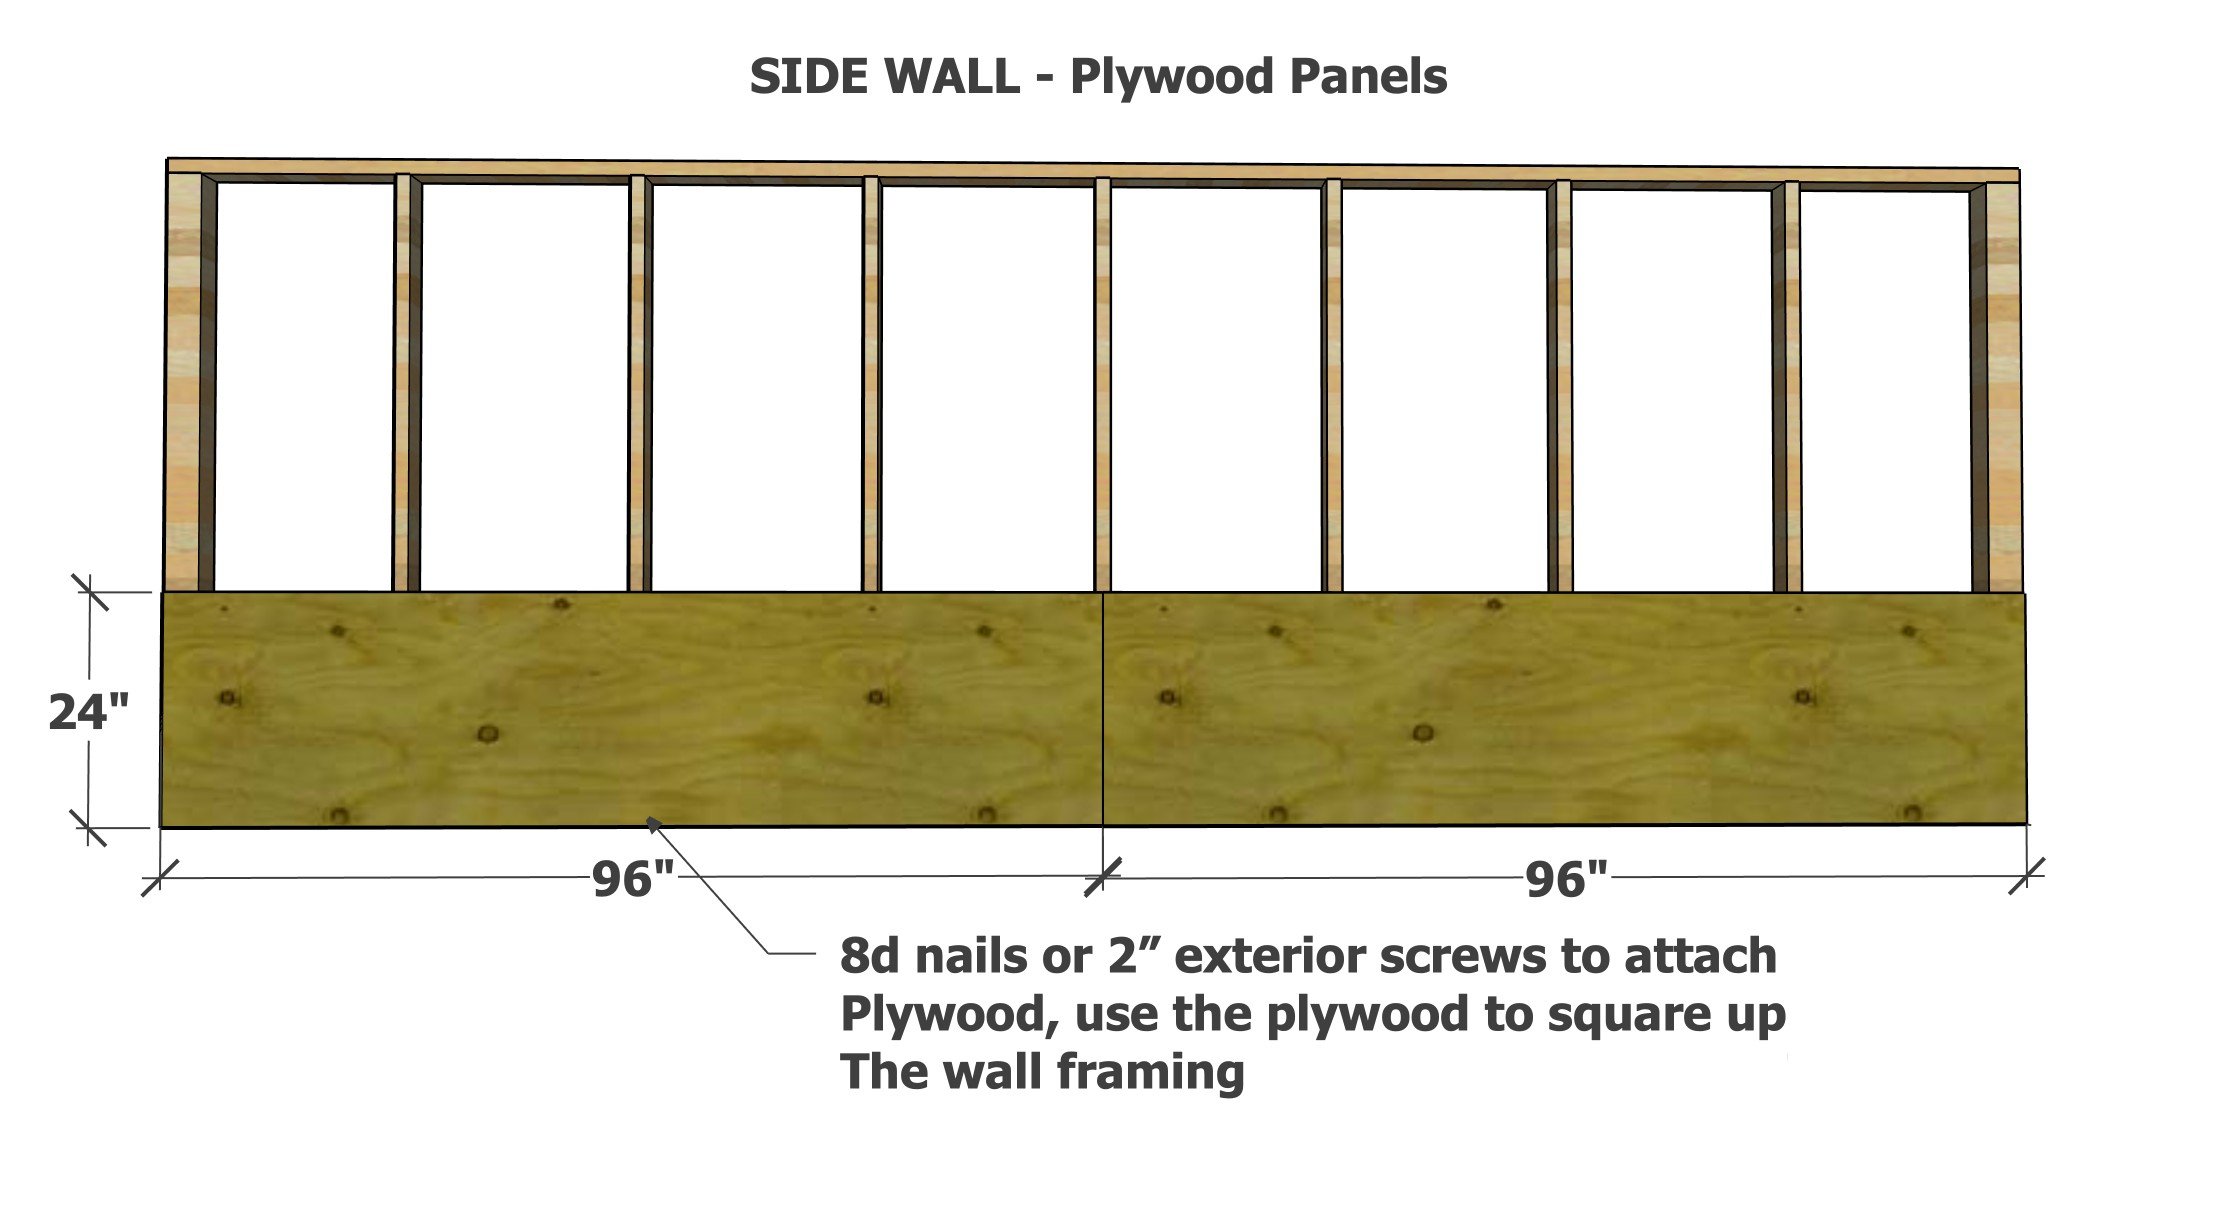
Adjust the side walls for square. Attach the plywood to the base of the wall to hold the wall square. Use 1-3/4" screws or 8D framing nails to secure the plywood to the walls.
Wall can be stood at this time, use 2x4s to brace the walls until the front and back walls are stood and secured.
Step 3
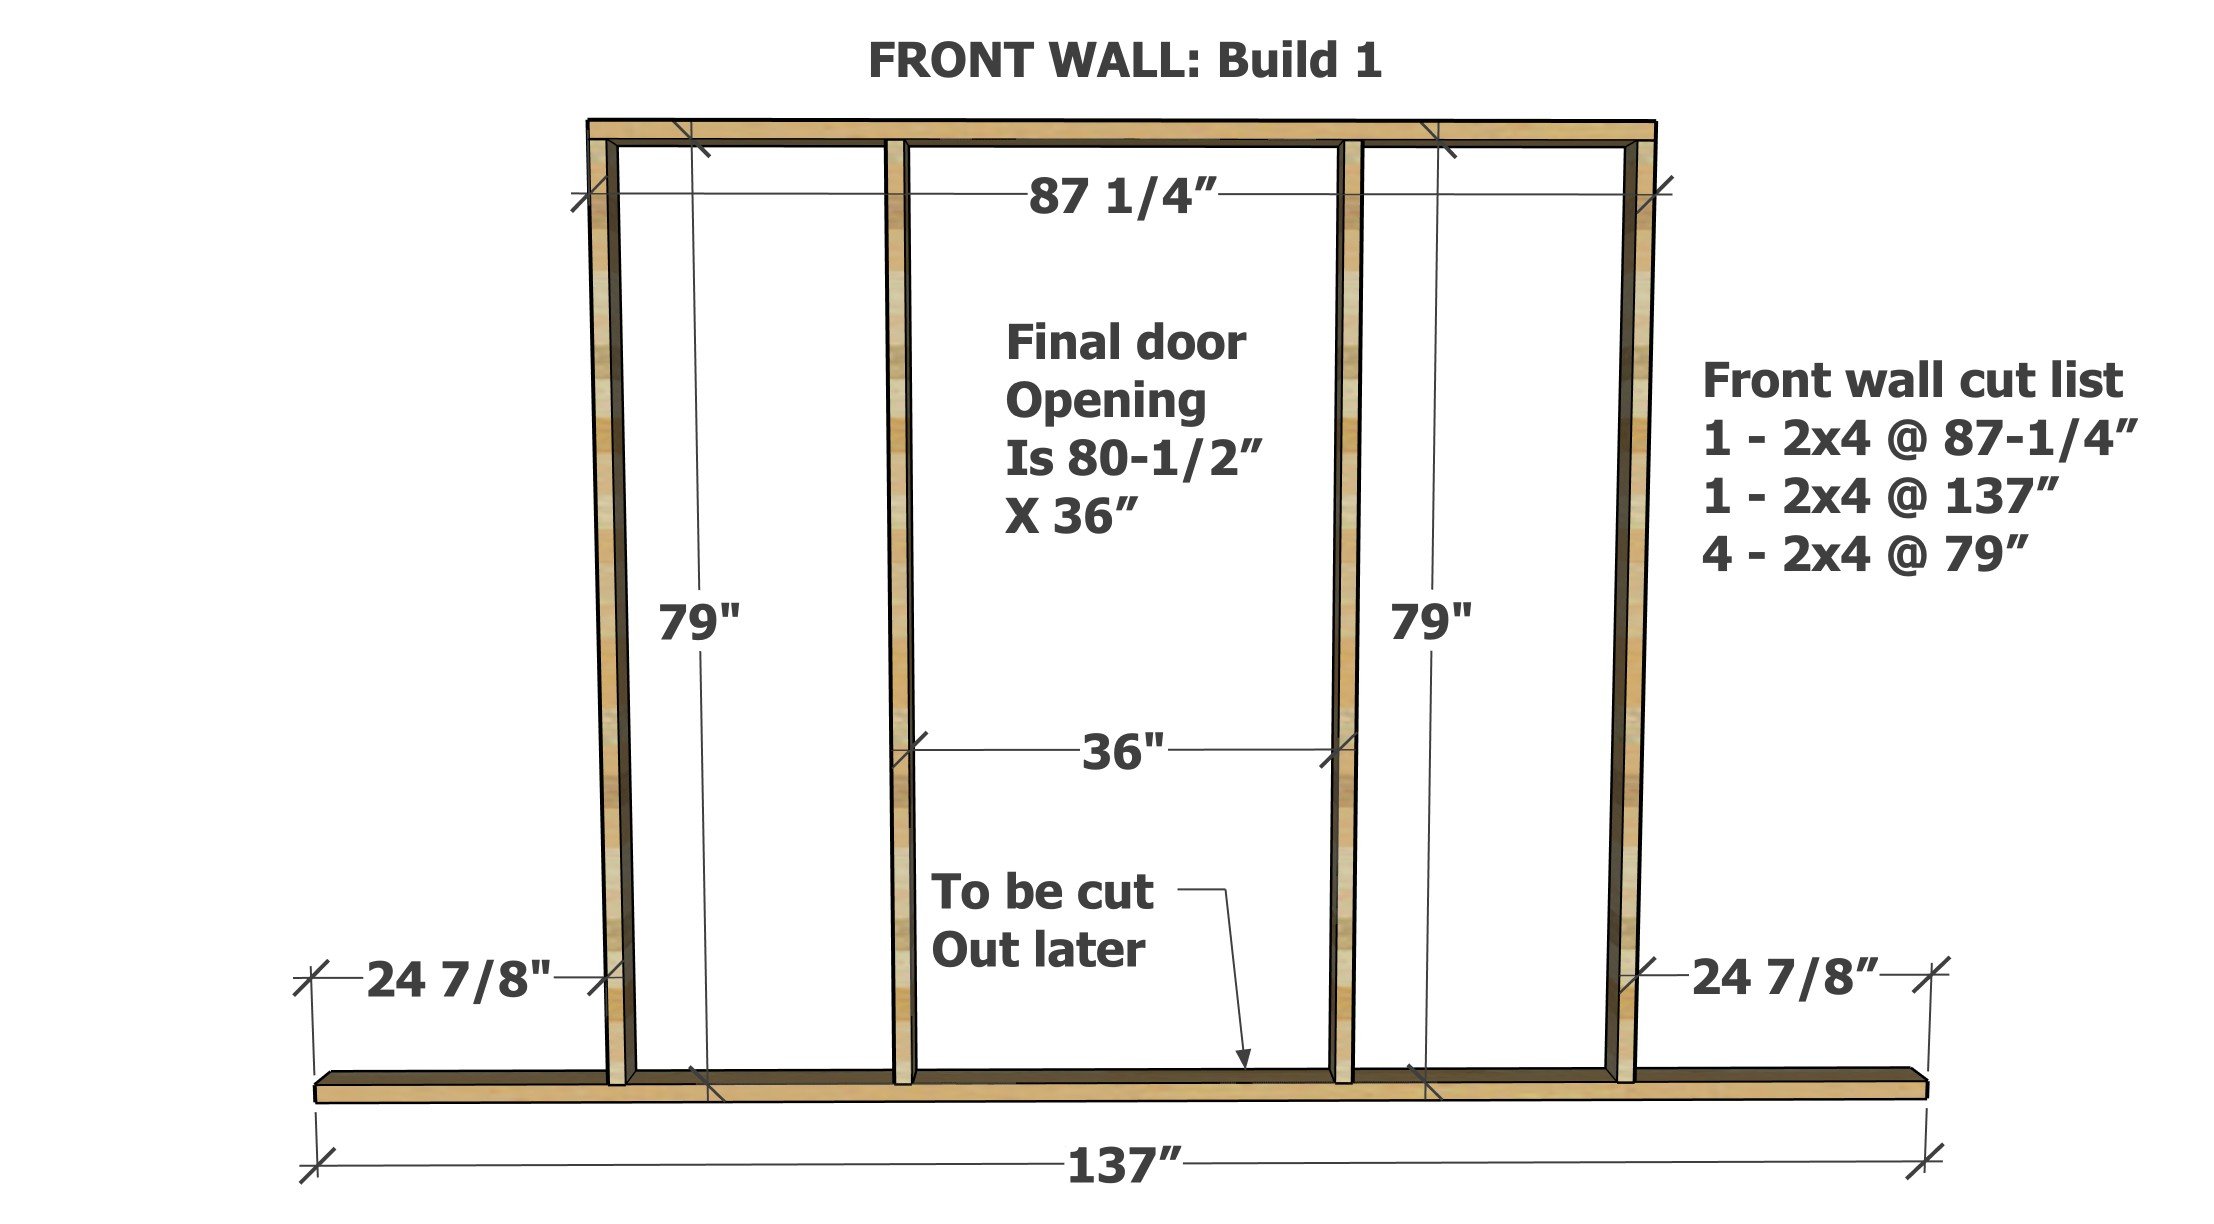
Build the front wall as shown, leaving the 36" space in between for the door (or adjust as needed for a different sized door)
Step 4
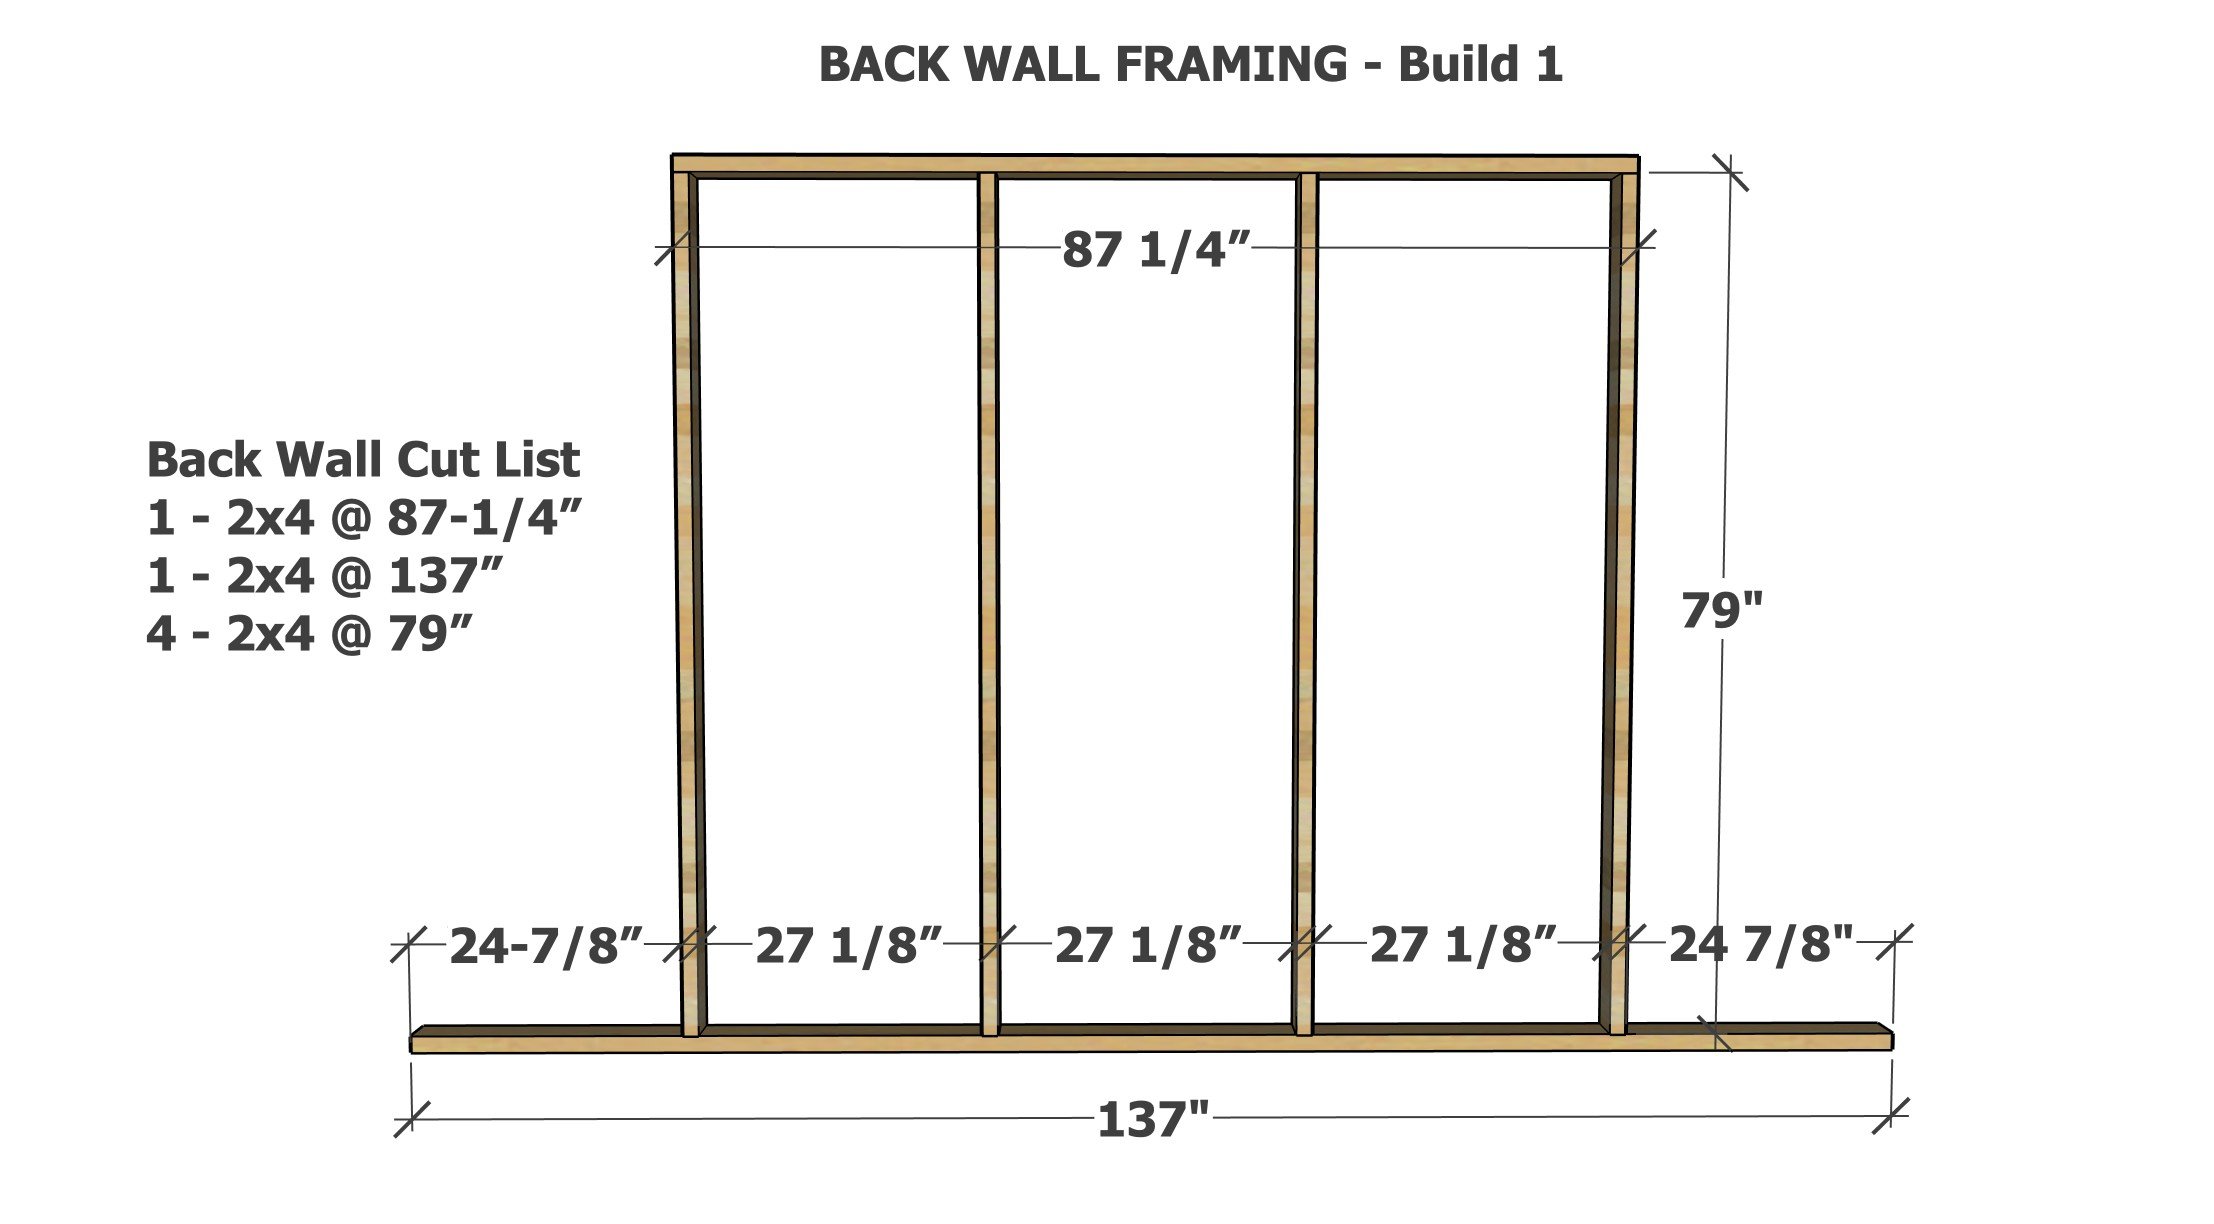
Build the back wall as shown.
Step 5
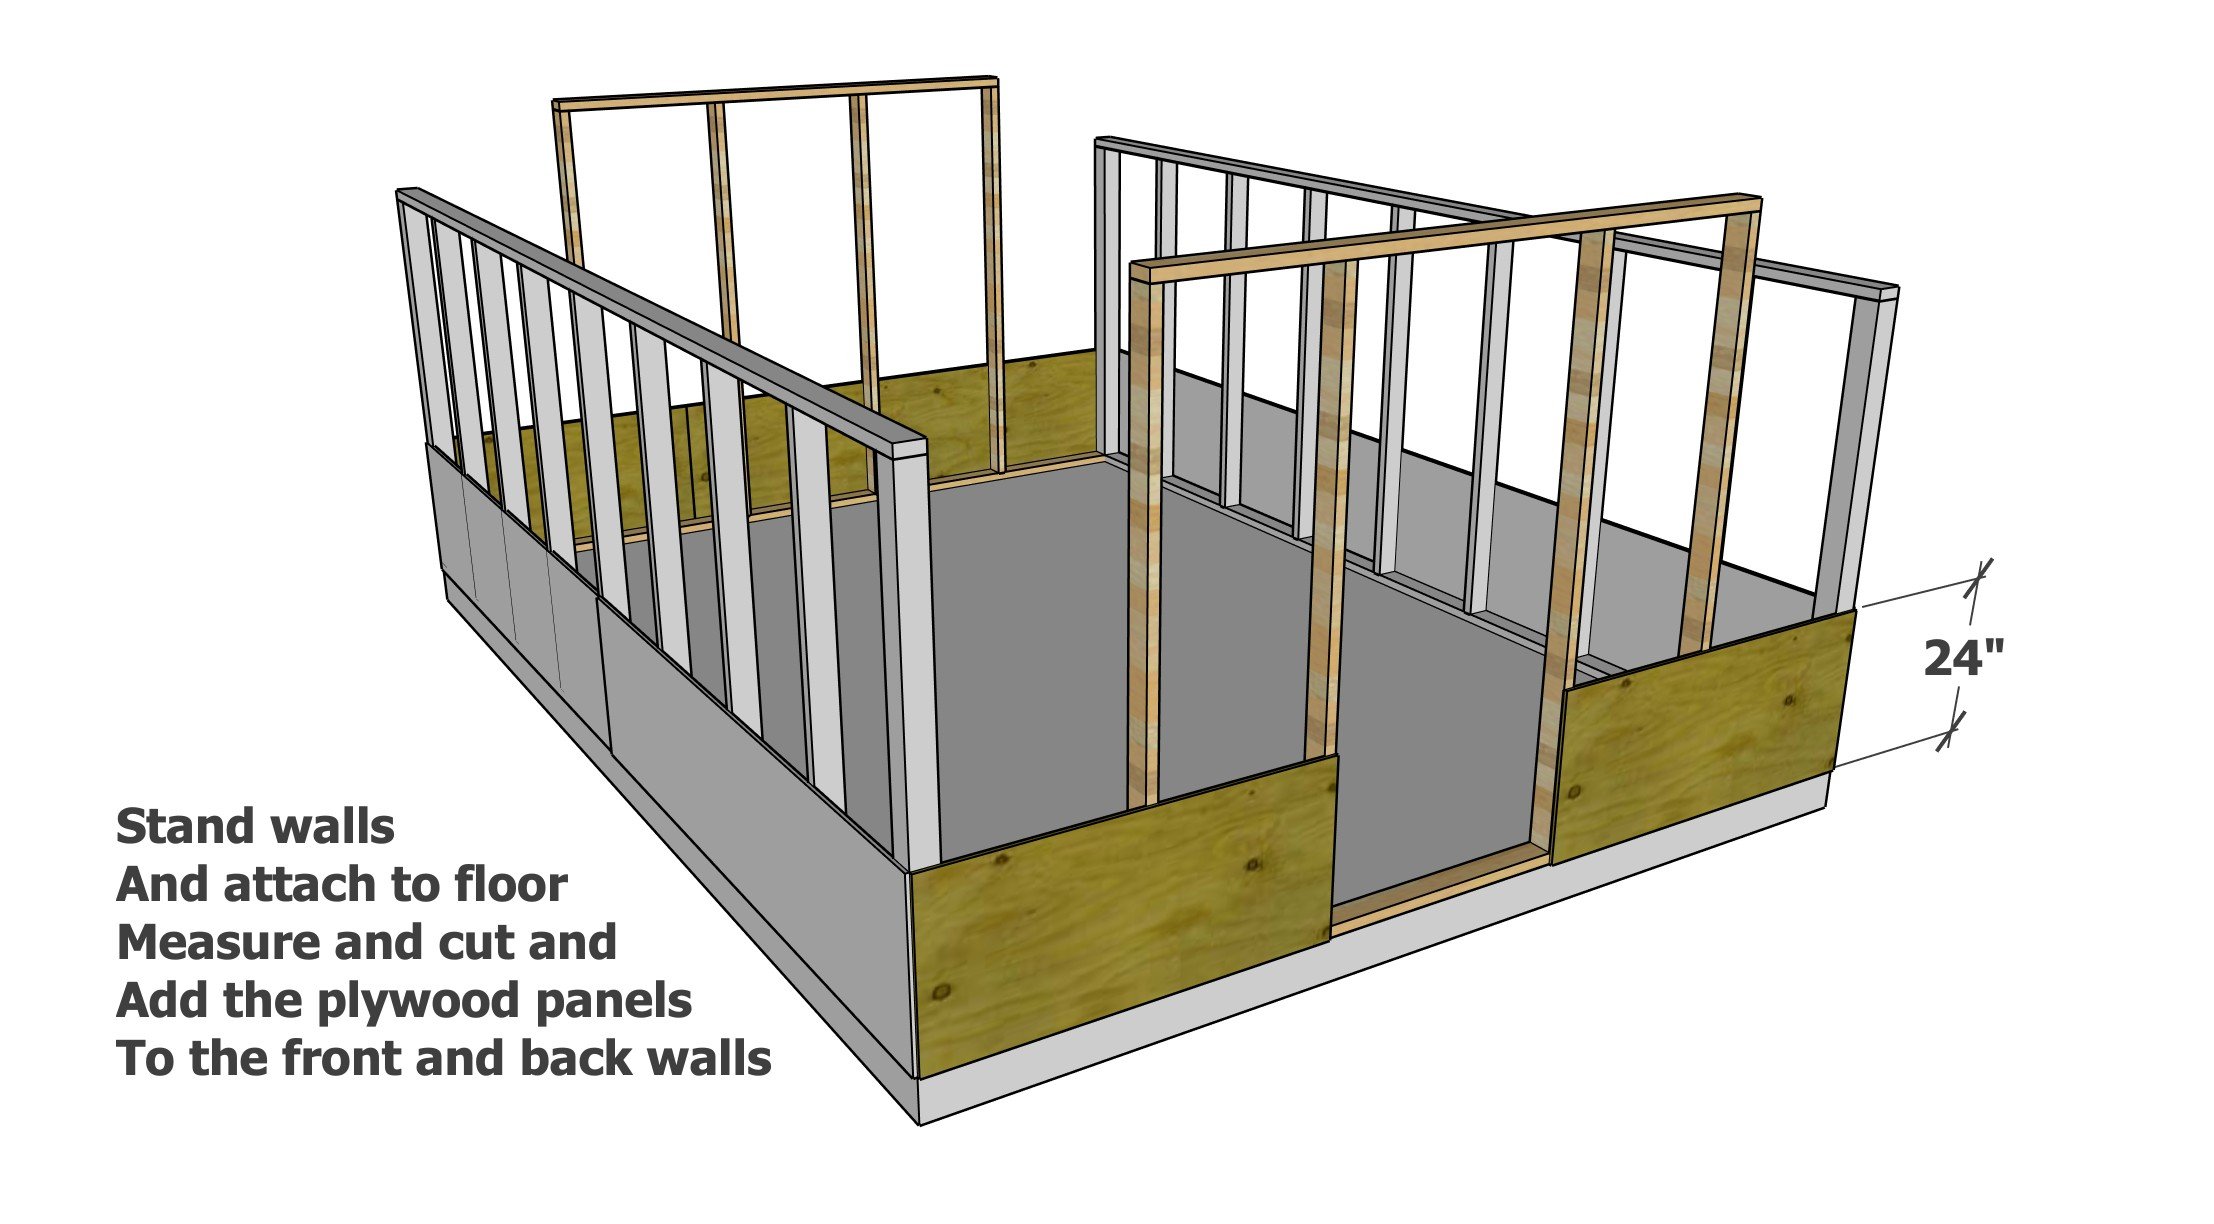
Stand the back and front walls and use a level to make sure all four walls are level.
Attach walls together with plywood and temporary bracing at an angle.
Step 6
Build the two roof trusses using 1-1/2" pocket holes and 2-1/2" pocket hole screws.
Step 7
Screw the roof trusses to the tops of the end walls from underneath. Screw at an angle to attach to top of side walls.
Attach the eave 2x4 to top of sidewalls. Attach trusses to ends of the eave 2x4s.
TIP: Mark the ridge board for rafter placement before installing.
Attach the ridge to the gable trusses - a temporary blocking under the ridge on the gable truss or a metal hanger can be used for additional support and for making installation easier.
Step 8

Cut the rafters as directed in cut list, then cut the bottom foot of the rafter.
Step 9
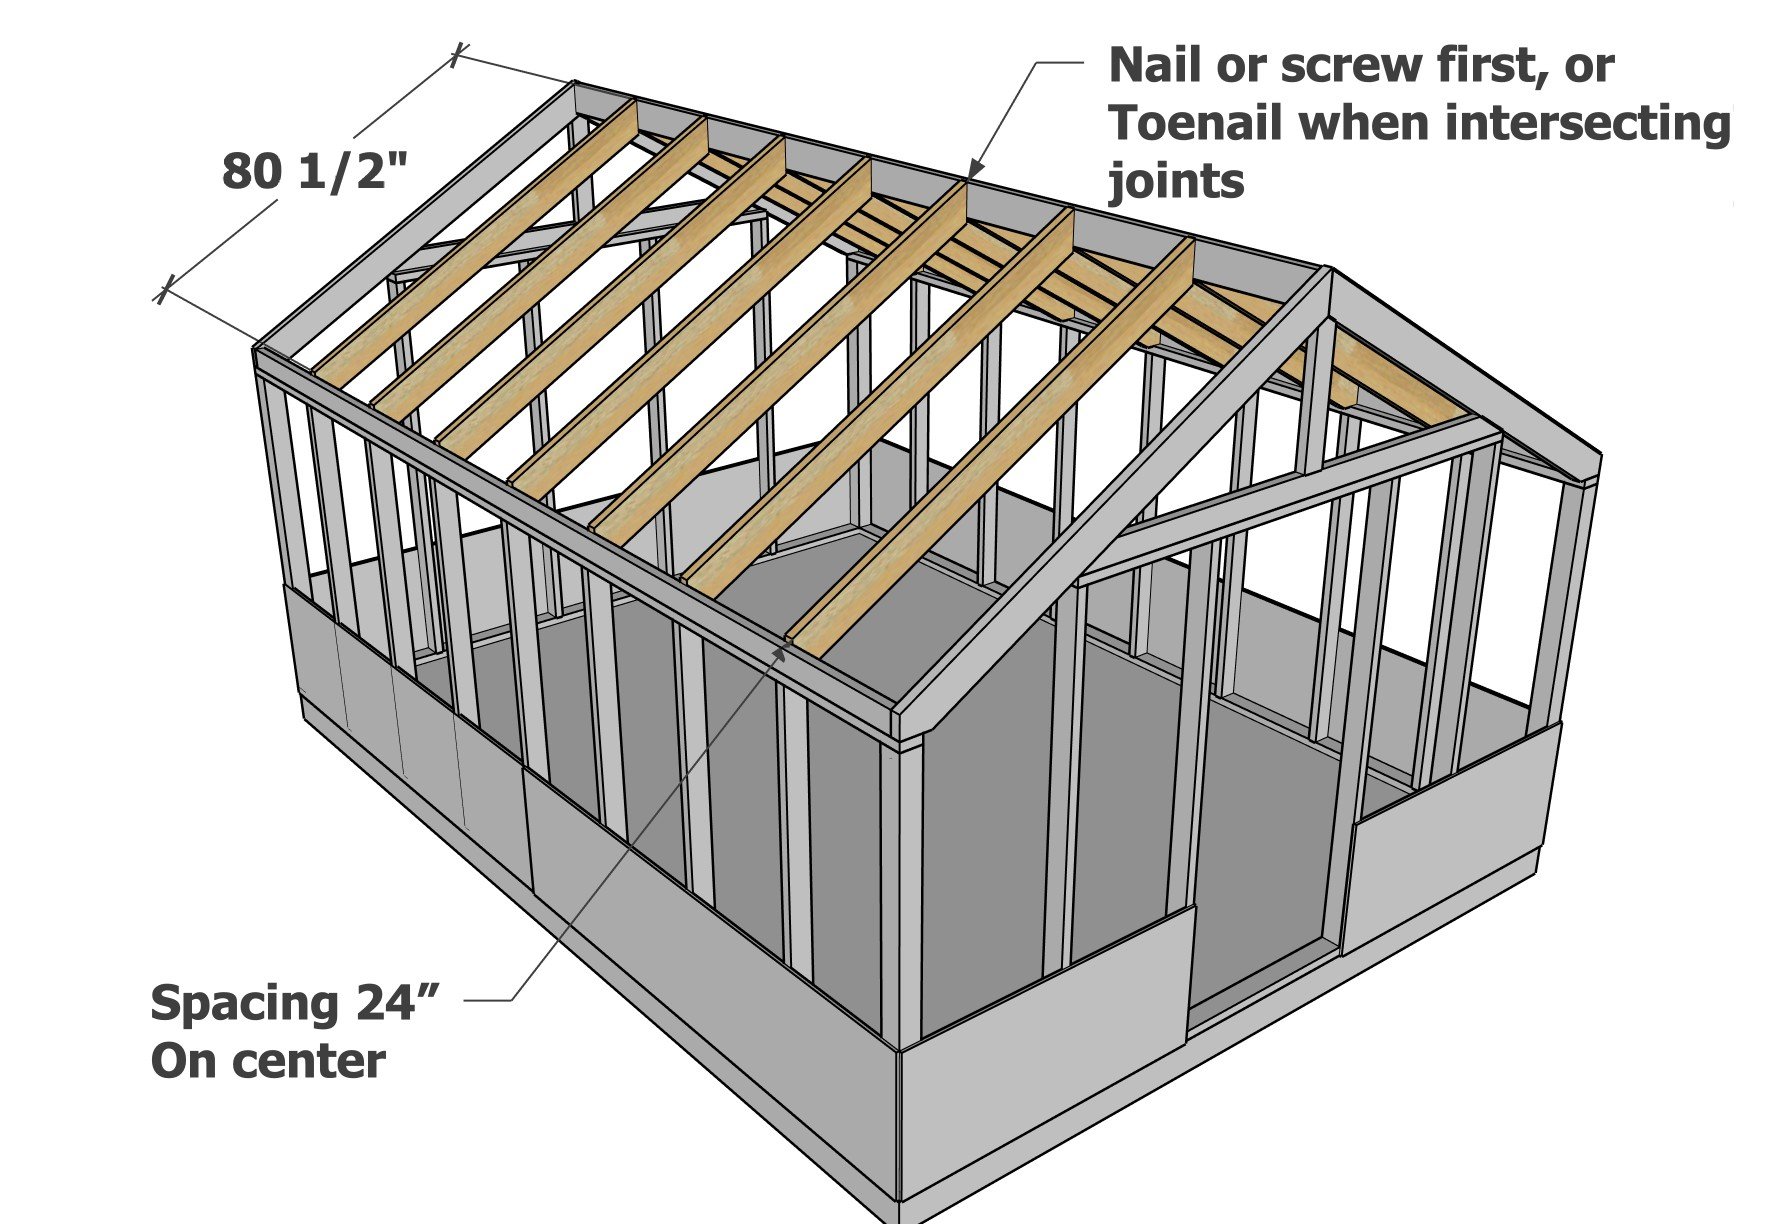
Install the rafters to the eave and ridge, and also screwing from underneath the side walls.
At the ridge, you may need to toenail to attach some of the rafters, as they will intersect.
Step 10
Check the greenhouse and adjust for square as needed. Add temporary bracing to hold square if needed.
Install blocking as shown at front, back and sides of walls.
Step 11
Check the greenhouse for square. Adjust as needed.
Install the roof perlins as shown, working form the bottom perlin upwards, using the shorter screws, two screws per joint.
Step 12
The framing of the greenhouse is complete! It's time to move on to installing the twin wall polycarbonate.
Read the instruction manual with your product, as it may differ from the product that we used.
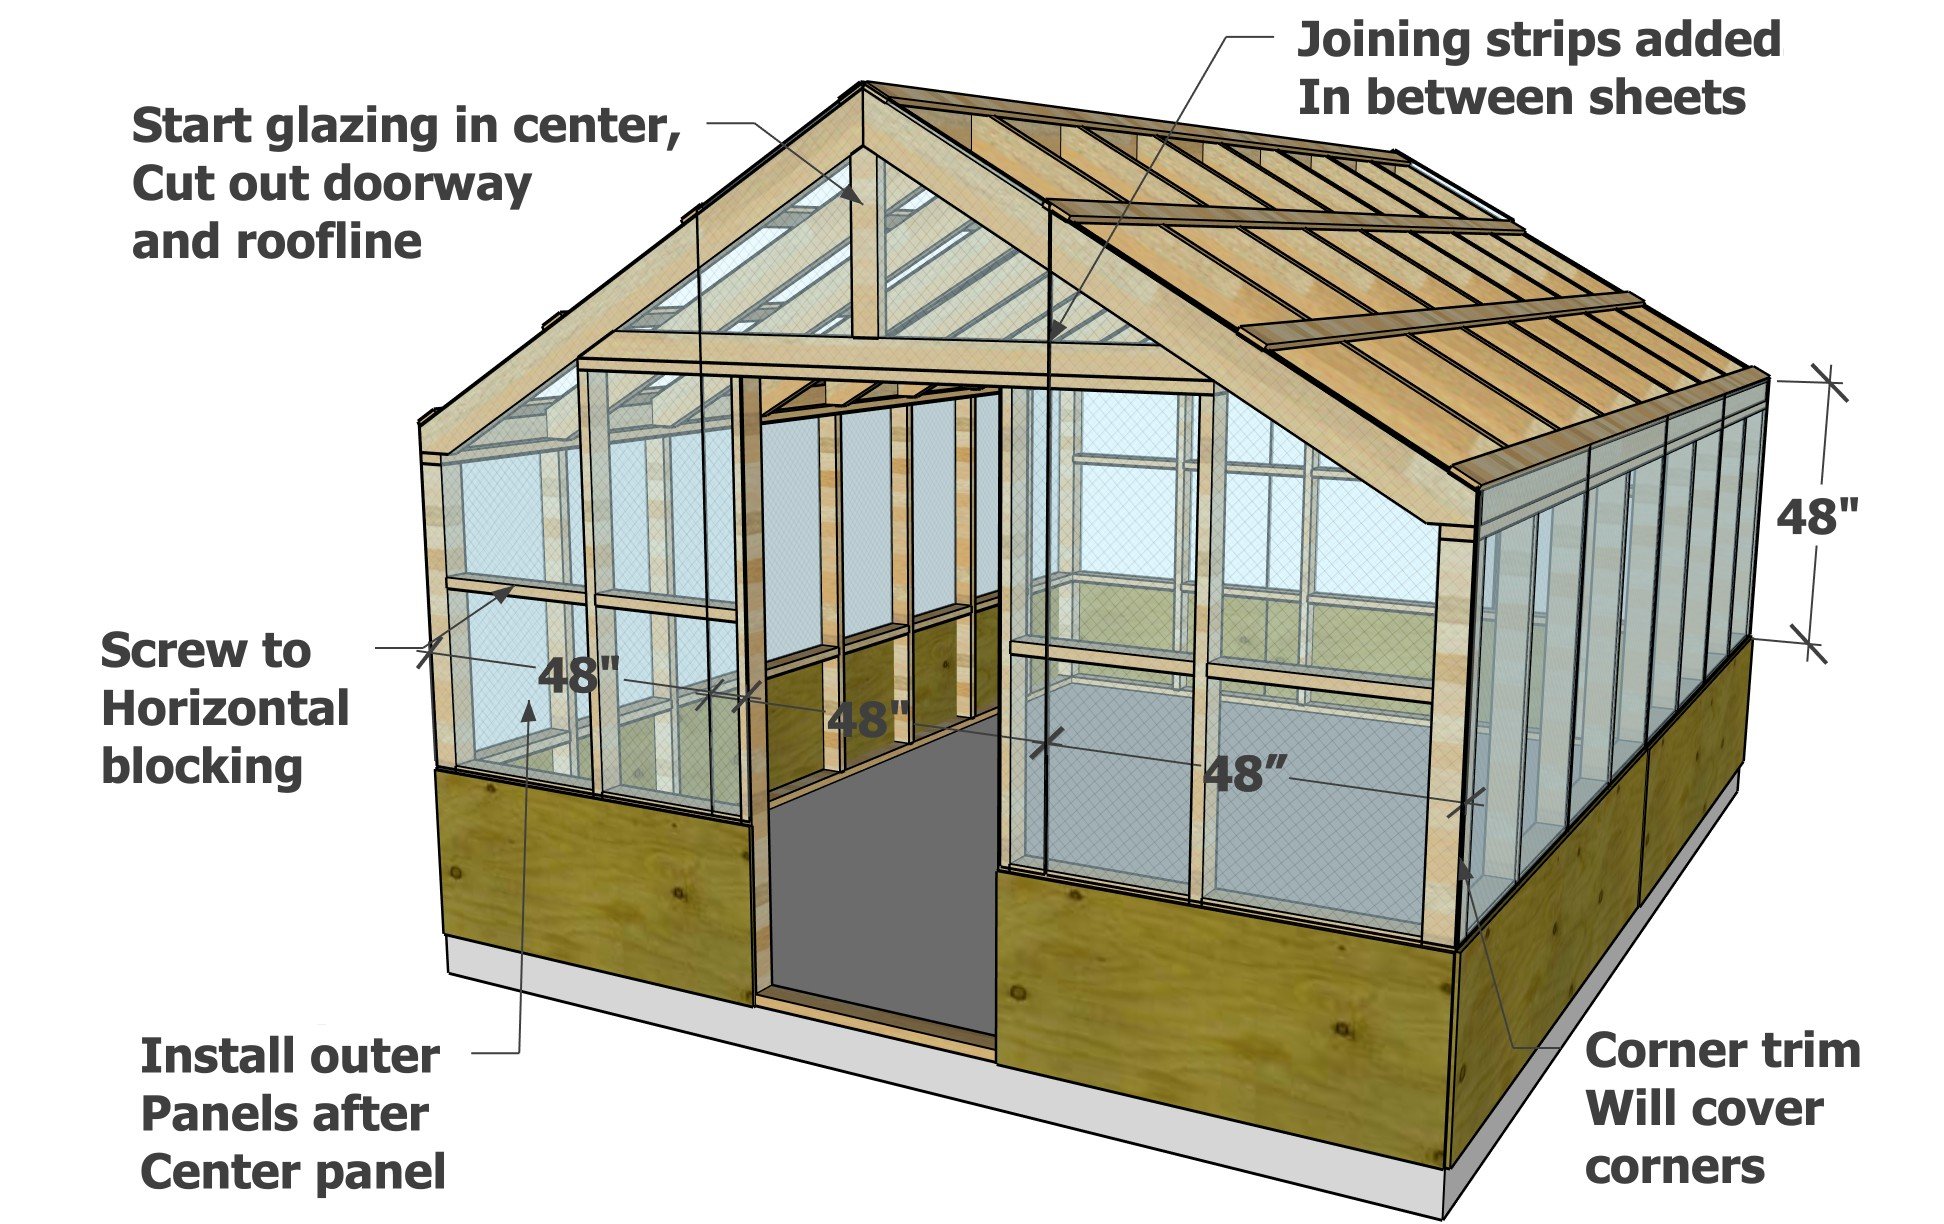
For the front and back, start in the middle with the polycarbonate and work outwards. If there is a shortage, leave the shortage at the corners to be covered by trim in later steps.
Cut the doorway and the angled tops with a utility knife or as directed by the manufacturer.
On the sides, we actually ran our side pieces horizontal (not supposed to), so we just had one seam. The recommended method is to cut into 4" pieces and run vertical.
The top edges of the polycarbonate may need to be sealed.
We used an H Channel piece for joining the polycarbonate sheets edge to edge. It was a pain to put the channels in place, we ended up using a bar of soap to lubricate the edges and help the pieces slide into the H channels. We used the H channels on all edge to edge joints.
Step 13
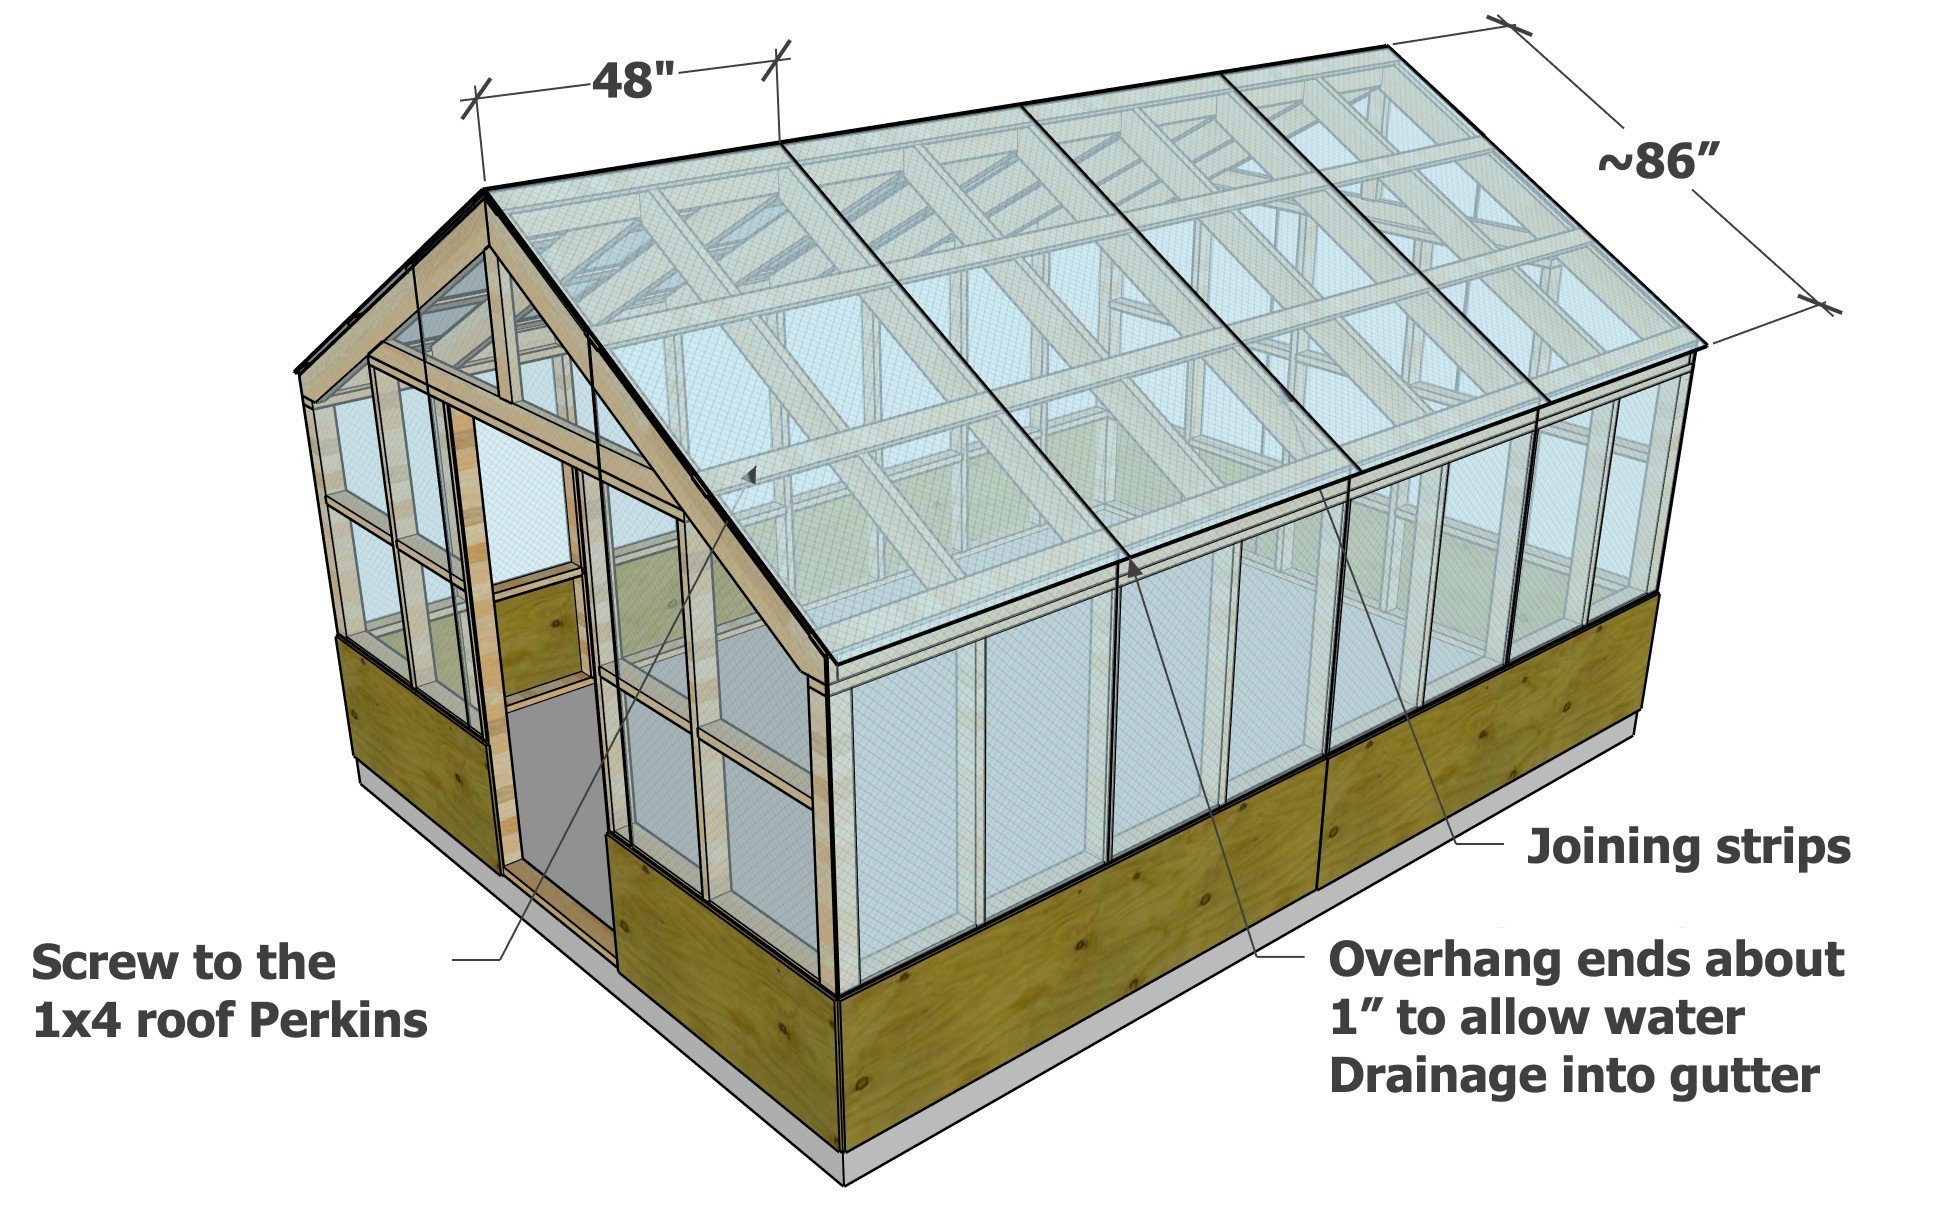
After the sidewalls are done, take a measurement of the length of the roof panels, considering overhangs needed for gutters.
Seal the top edges as instructed by the twin wall polycarbonate instructions.
Install the twin wall polycarbonate, screwing to the 1x4 perlins with appropriate fastener (we used roofing screws with a washer)
Step 14

Work from the bottom up and add the trim pieces as shown.
We used metal corners for the outside corners and eaves, and a ridge cap for the top.
Step 15
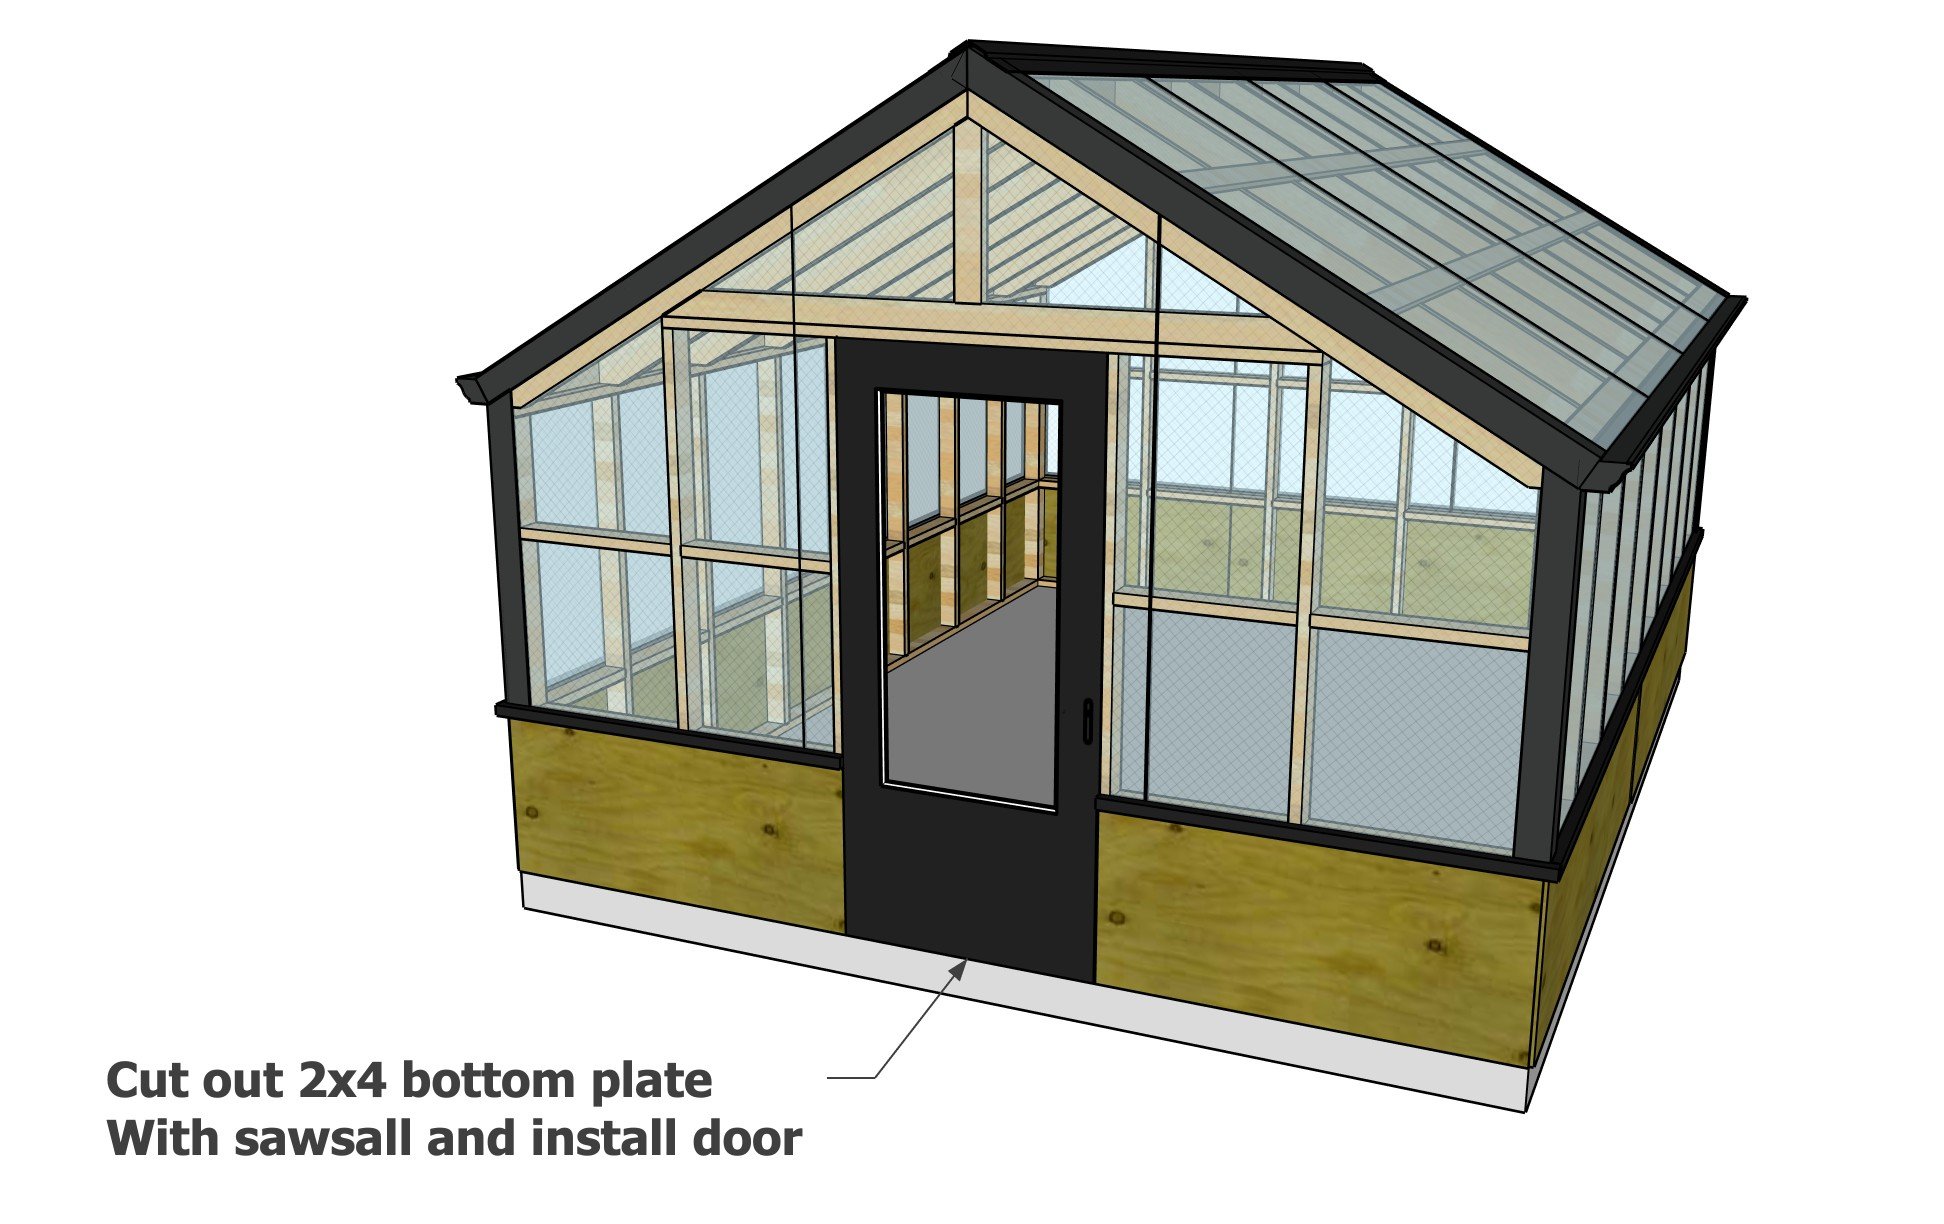
Install the door in the opening.
If desired, add siding over the plywood - we used cedar lap siding.