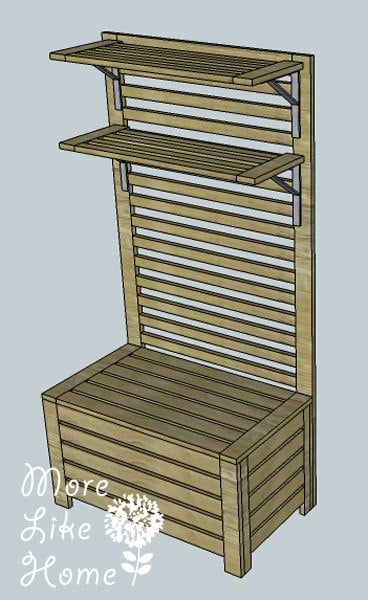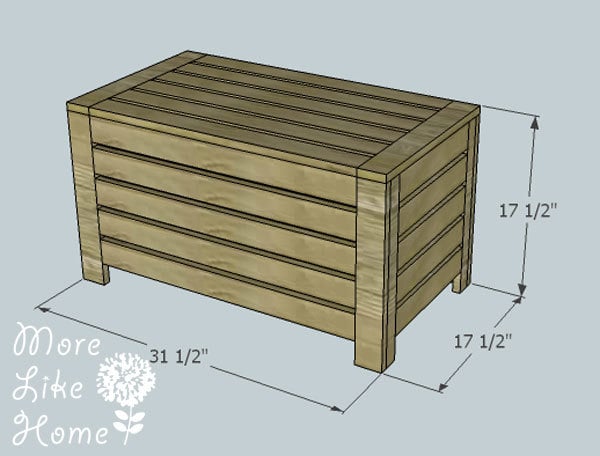
These plans are for an outdoor bench that works with the outdoor wall panel system. It's a great way to add seating and storage to your patio! You can use the bench on it's own or with any combination of panels and shelves from the wall panel system. So go ahead and mix and match! You'll have a summer-ready patio in no time. :) Find the bench plans here: http://www.morelikehome.net/2013/06/diy-outdoor-bench-plans-for-wall-pa… And the wall panel plans here: http://www.morelikehome.net/2013/06/diy-outdoor-wall-panel-system-plans…

Preparation
10 - 1x3s @ 8' long
1 - 1x2 @ 6' long
(A) - 4 1x3 @ 16 3/4" (leg a)
(B) - 4 1x2 @ 16 3/4" (leg b)
(C) - 10 1x3 @ 26 1/2" (front rails)
(D) - 10 1x3 @ 13" (side rails)
(E) - 10 1x3 @ 16" (bottom)
(F) - 2 1x3 @ 17 1/2" (lid sides)
(G) - 6 1x3 @ 26 1/2" (lid slats)
(H) - 3 1x3 @ 15 1/2" (lid supports)
Please read through the entire plan and all comments before beginning this project. It is also advisable to review the Getting Started Section. Take all necessary precautions to build safely and smartly. Work on a clean level surface, free of imperfections or debris. Always use straight boards. Check for square after each step. Always predrill holes before attaching with screws. Use glue with finish nails for a stronger hold. Wipe excess glue off bare wood for stained projects, as dried glue will not take stain. Be safe, have fun, and ask for help if you need it. Good luck!
Instructions
Step 1
Start by assembling the legs. Attach one leg (A) to one leg (B) like in the pic below. Drill through the A piece (the wider leg) into the side of the B piece (the narrower leg). Use 1 1/4" screws and glue to attach the two pieces. Make sure the legs are flush at the top and bottom, as well as down the side. Repeat to assemble the other three legs.
Step 2
Now build the front and back sections. Use five of the front rails (C) to connect two of the legs (turn the legs so the wider piece faces forward and the narrower piece faces the sides). The top rail should be flush with the top of the legs. The rest of the slats should have 1/2" gap separating them, which will leave 2 1/4" space at the bottom of the legs. Keep all the rails flush with the front of the legs and use the Kreg Jig to make pocket holes on the back of each rail to attach them to the legs. Don't forget to use glue! Repeat to build the back section.
Step 3
Now you can connect the front and back sections. Use five of the side rails (D) to connect one end. These rails should line up with the ones on the front & back - flush with the top, 1/2" gap in between each board, and 2 1/4" space at the bottom of the legs. Again use pocket holes on the back of the rails to attach them. Repeat to connect the other end.
Step 4
Now you can install the bottom boards (E). Turn the bench upside down. Use pocket holes in the bottom of each board (so on the top while you're working on the bench upside down. When you flip it over they will be on the bottom) to attach them like in the pic below. Start with the board on one end flush against the side, then leave a 1/2" gap between each board (this will leave a 1/2" gap at the end as well).
Step 5
Now you can make the lid. Use the lid slats (G) to connect the lid sides (F). Use pocket holes on the bottom of the slats to attach them to the side boards. The front and back slats should be flush with the ends of the side boards. The rest of the slats should be spaced with a 1/2" gap between each one.
Step 6
Then add the support boards (H). This will make it sturdier to sit on and keep it from shifting around when it's on the bench. Attach one board on each end with 1" of space around the top, bottom, and outside edges like in the pic below. Use glue and 1 1/4" screws to attach it. Be sure to put screws into both the side board, and each slat. Attach the third board centered on the lid, 11" from each outside board. Leave 1" space above and below it.
Step 7
If you're using the bench with the wall panel system, just set it on top and you're done! You can lift if off or tip it back to access the storage. If you're using the bench on it's own you can add some hinges if you want, but with the bench set against the panel there won't be room for them to work with the system.
Step 8
Like I mentioned before, it's best to finish each board individually before assembling it. Use an outdoor paint or stain it and use an outdoor poly (or use poly on the natural wood color!). For our outdoor sectional I used a tinted deck sealer that has held up really well! If you finished the pieces ahead of time you'll just need to go back and fill your pocket holes with wood filler, sand them smooth, and finish those spots to match. If you waited until now to finish, go ahead and fill the holes first, sand everything down, and paint or stain the whole piece being careful to get the cracks really well.
Step 9
Step 10
And that's the complete outdoor wall panel system! So go ahead and mix and match. Don't forget you can get the panel and shelf plans here: https://www.morelikehome.net/2013/06/diy-outdoor-wall-panel-system-plan…
It is always recommended to apply a test coat on a hidden area or scrap piece to ensure color evenness and adhesion. Use primer or wood conditioner as needed.


