

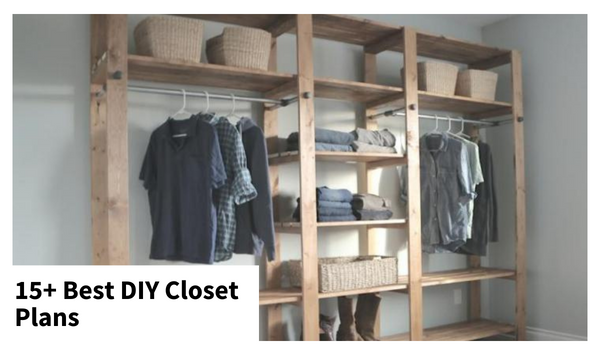
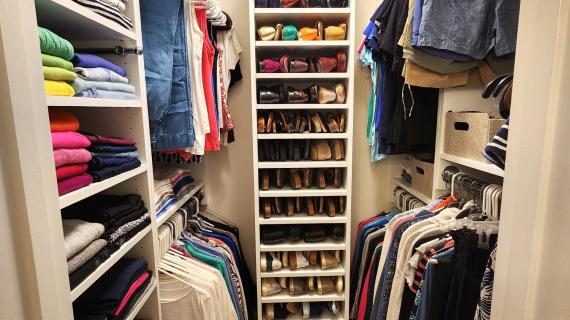
Save hundreds of dollars and build your dream closet with this modular, mix-and-match organizing system! It includes six FREE individual plans designed to work together seamlessly. Easy to build using 1x12 boards and basic tools, simple to hang and install, with free plans, step-by-step instructions, and a full video tutorial!
shown in photo single hanging (2) and tower modular components
Looking for the BEST DIY-friendly way to upgrade your closet on a budget? My free modular closet system set of plans has you covered:
-
✅ Fully customizable — mix and match six different modules to fit your space and style
-
🪚 Super beginner-friendly — all units built from easy-to-find 1x12 boards
-
💰 Budget-friendly — way cheaper than buying! No need to spend thousands on a closet!
-
🔨 Simple to build and install — French cleat system makes hanging a breeze
-
📏 Free plans with diagrams, cut lists, and step-by-step video tutorials
-
🧰 Works for small closets, big walk-ins, or anywhere you need organized storage
-
✅ Designed to fit 11" cube storage bins!
It’s hands-down the easiest and most affordable way to get a custom closet look without the custom price tag. I love this method SO much that I've already built it 3 different times!

shown in closet double hanging and 3 shelf hanging closet components
Modular Closet Components
By using different organizers (that you can adjust in width), you can create the closet of your dreams! Here are the standard modular closet components.
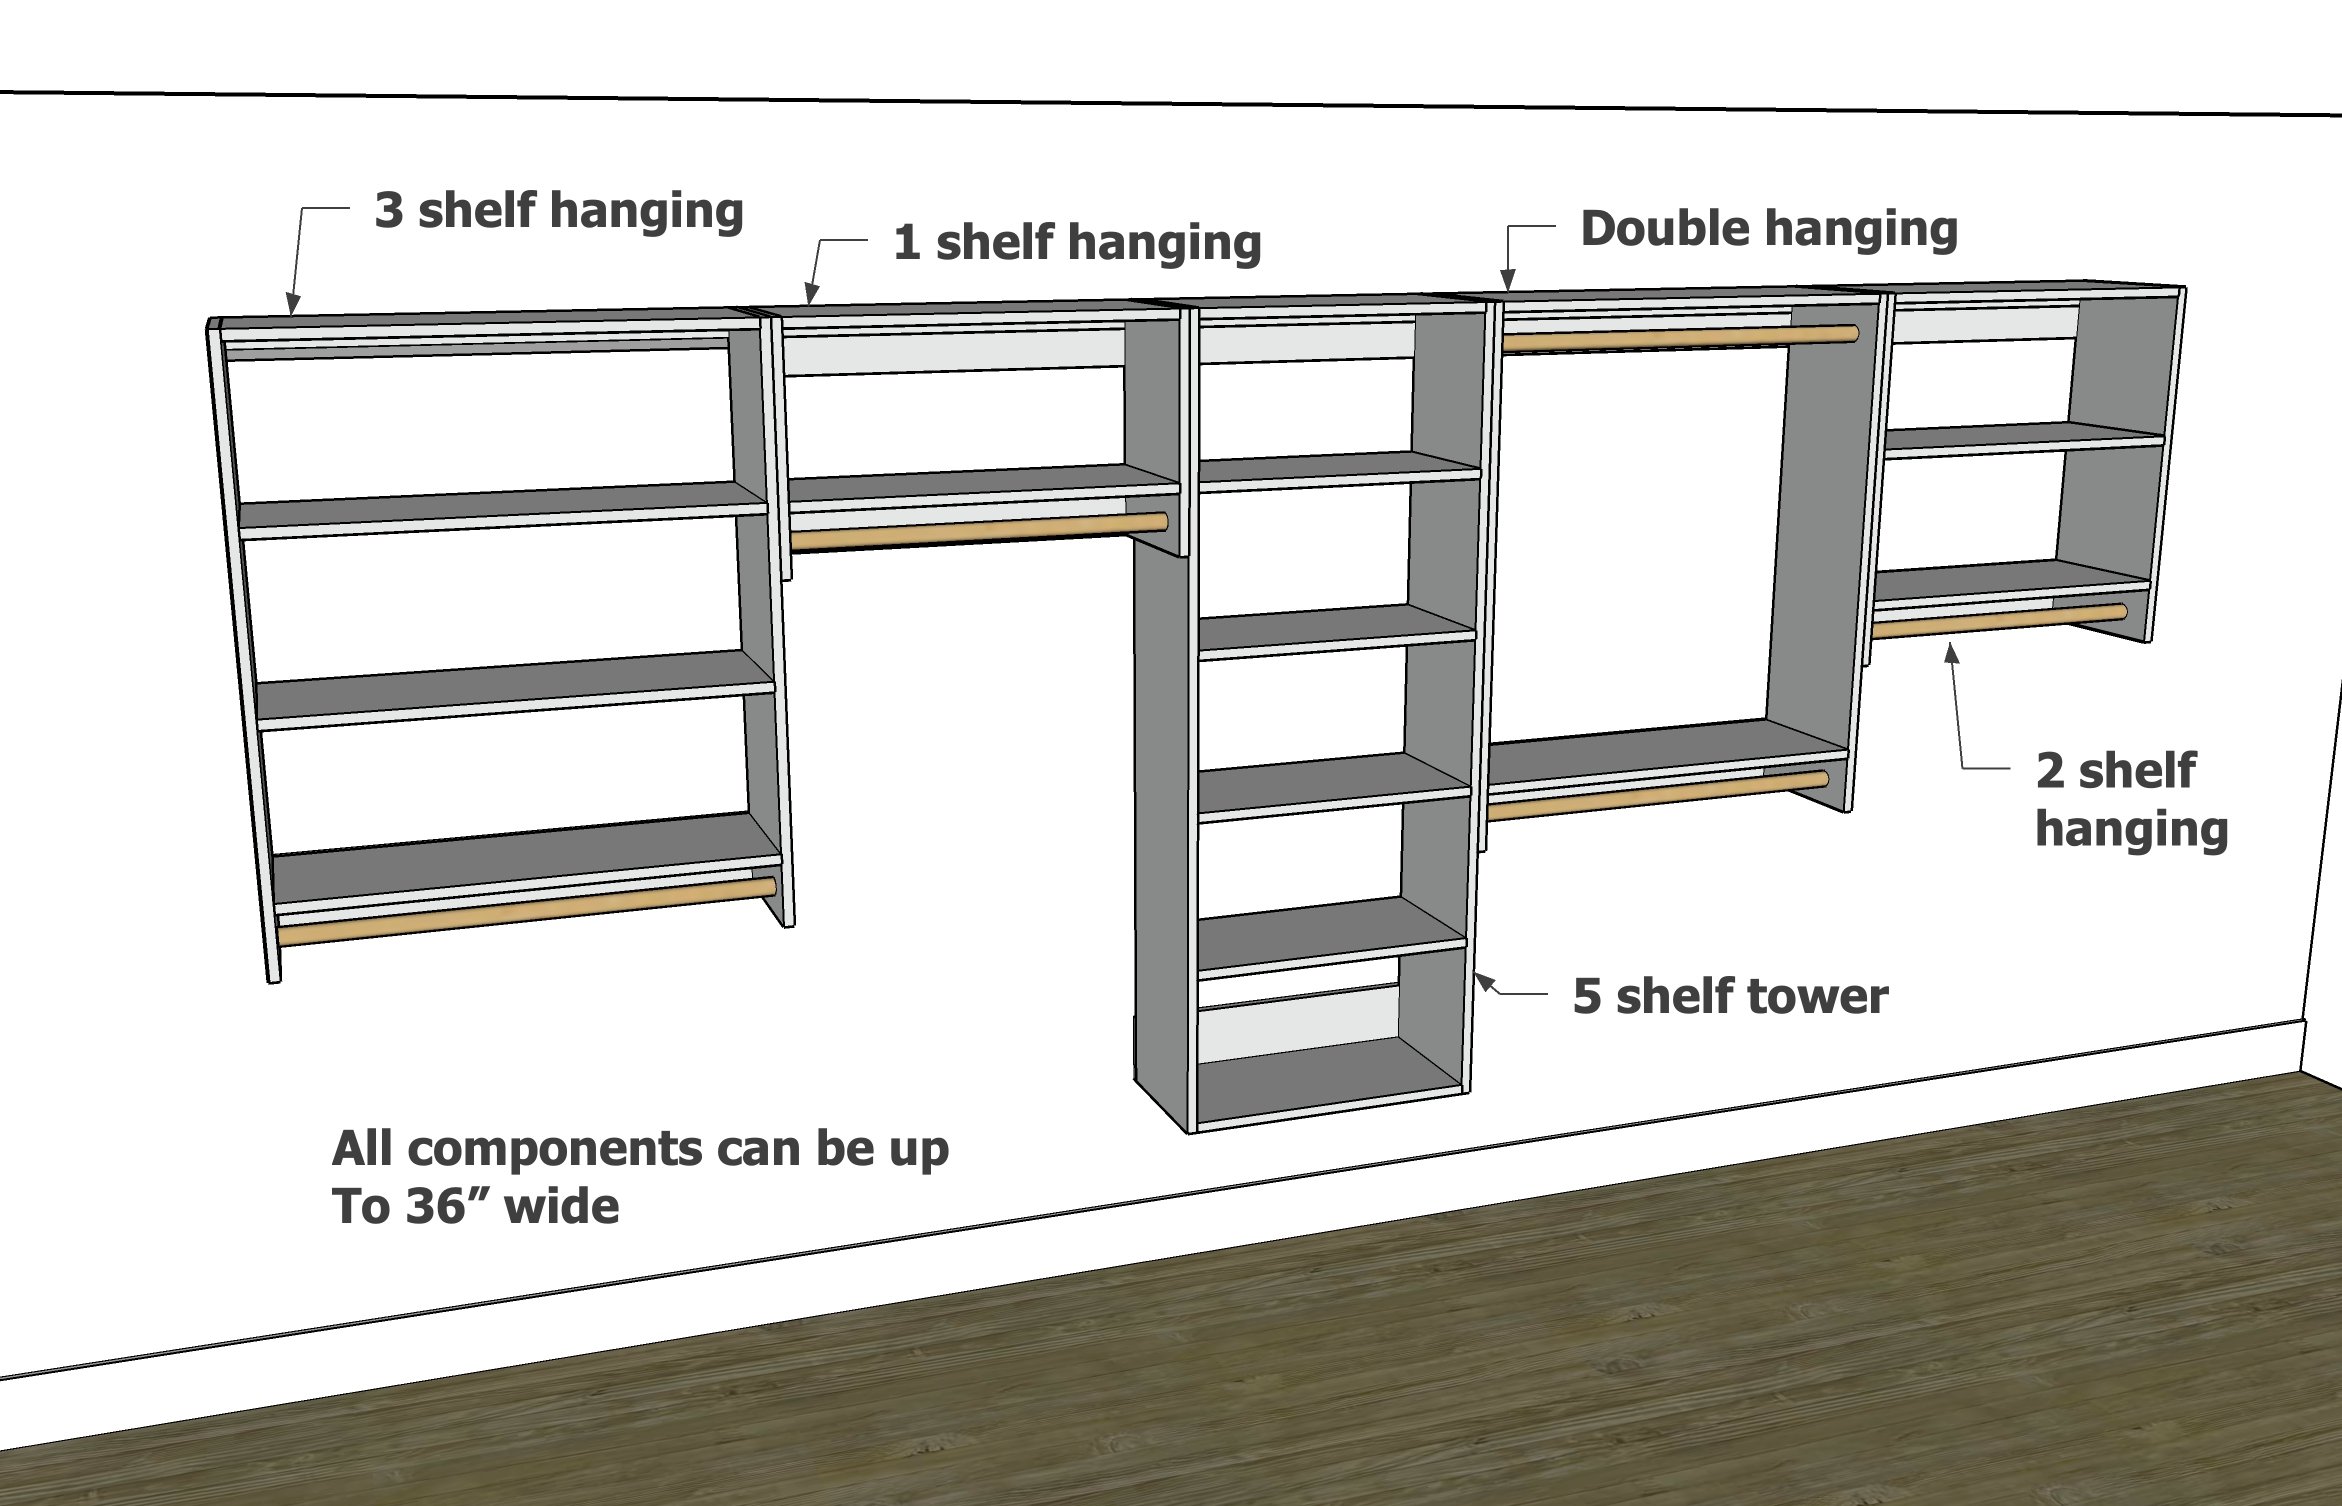
All of the components are constructed with the same steps, the only difference is the length of the sides and the number of shelves. Follow the construction steps below, but use the diagrams linked below to come up with your cut lists.
- 3 Shelf Hanging Modular Closet Organizer Plans - Good for hanging shirts and more shelf space
- 1 Shelf Hanging Modular Closet Organizer Plans - Good for hanging dresses and longer items
- 5 Shelf Tower Modular Closet Organizer Plans - Good for shoes, small items, 11" baskets and bins
- Double Hanging Modular Closet Organizer Plans - Good for maximum shelf hanging of shorter items
- 2 Shelf Hanging Modular Closet Organizer Plans Good for medium length hanging, shelf space
- Filler Top Piece - Good for filling in between organizers at the top, full length hanging
📏 Measuring & Planning Your Closet Components
Before you start cutting boards, take a few minutes to plan your closet layout. A little prep goes a long way!
-
Measure your closet carefully – Take note of the total width, height, and depth.
-
Leave 1" of wiggle room – Always subtract about an inch from the total width to make installation easier, especially if you’re building wall-to-wall.
-
Plan for hanging vs. shelving – Think about what you’ll be storing. Need double hanging for shirts and pants? Or more shelf space for bins and shoes? You can mix and match the units to fit your needs.
-
Stick to standard shelf sizes – Each shelf fits 11" deep storage cubes, so aim for widths like 24" or 36" to keep things simple and efficient.
-
Sketch your layout – A quick drawing (even on paper) helps visualize how the components will stack and fit in your space.
Taking time to plan ensures your closet not only looks great, but functions perfectly for your daily life!
EASY! Hanging Your Closet Organizers
Hanging this closet system is SO easy!!! Just cut a 1x3 board to the full length of your closet, and attach it to the back wall to studs in the wall, with the bottom of the cleat at 72" (or as desired). Then just set the organizers on the 1x3, so the 1x6 back piece sits on top, and then screw the organizers to studs in the wall. This way you can hold the organizers in place, match them all up, and make sure everything is hung level!
Considerations Before Building
I absolutely love my closet organizers, but want to help you make the best decision for your closet space, so here's a few things to consider:
- 1x12 depth is not super deep, so folding adult pants or large sweaters on the narrower shelf depth may not fit well
- The 1x12 depth is not ideal for adding drawers, as the drawers would be shallow. It would be better to add a floor standing dresser underneath a component
- The sides are not completely enclosed, not a problem for a closet, but if freestanding, this could be visible
- If you are looking for a fancy built in, this is not it. This is a practical and cost effective system!
Modular Closet Build Video
I have built this closet plan in full closet systems three times now. It is my go-to plan for easy to build closets (and easy to hang). In this video, I built using a French cleat hanging system (but it is not necessary to hang with the French cleat, you can use the 1x6 method as instructed in the plans).
Preparation
- 1x12 finger joined boards
- 1x6 boards - two times the overall length of the closet (for example, for an 8 foot closet, buy two 8 foot long 1x6 boards)
- 1x3 board, entire length of closet (for example, for an 8 foot closet, buy one 1x3 board 8 feet long)
- 3" long self tapping wood construction screws (star bit)
- 1-1/4" pocket hole screws
- 1-5/8" trim screws
- wood glue
- finishing supplies to include sandpaper, paint, or stain
- closet rod sockets and 1-1/4" wood dowels for closet rods
1 Shelf Hanging Cut List
- 2 - 1x12 @ 18-1/4" - sides
- 2 - 1x12 @ desired width of organizer, up to 36", minus 1-1/2" - shelves
- 1x6 and french cleat @ desired width of organizer
- 1-1/4" closet rod dowel cut to fit
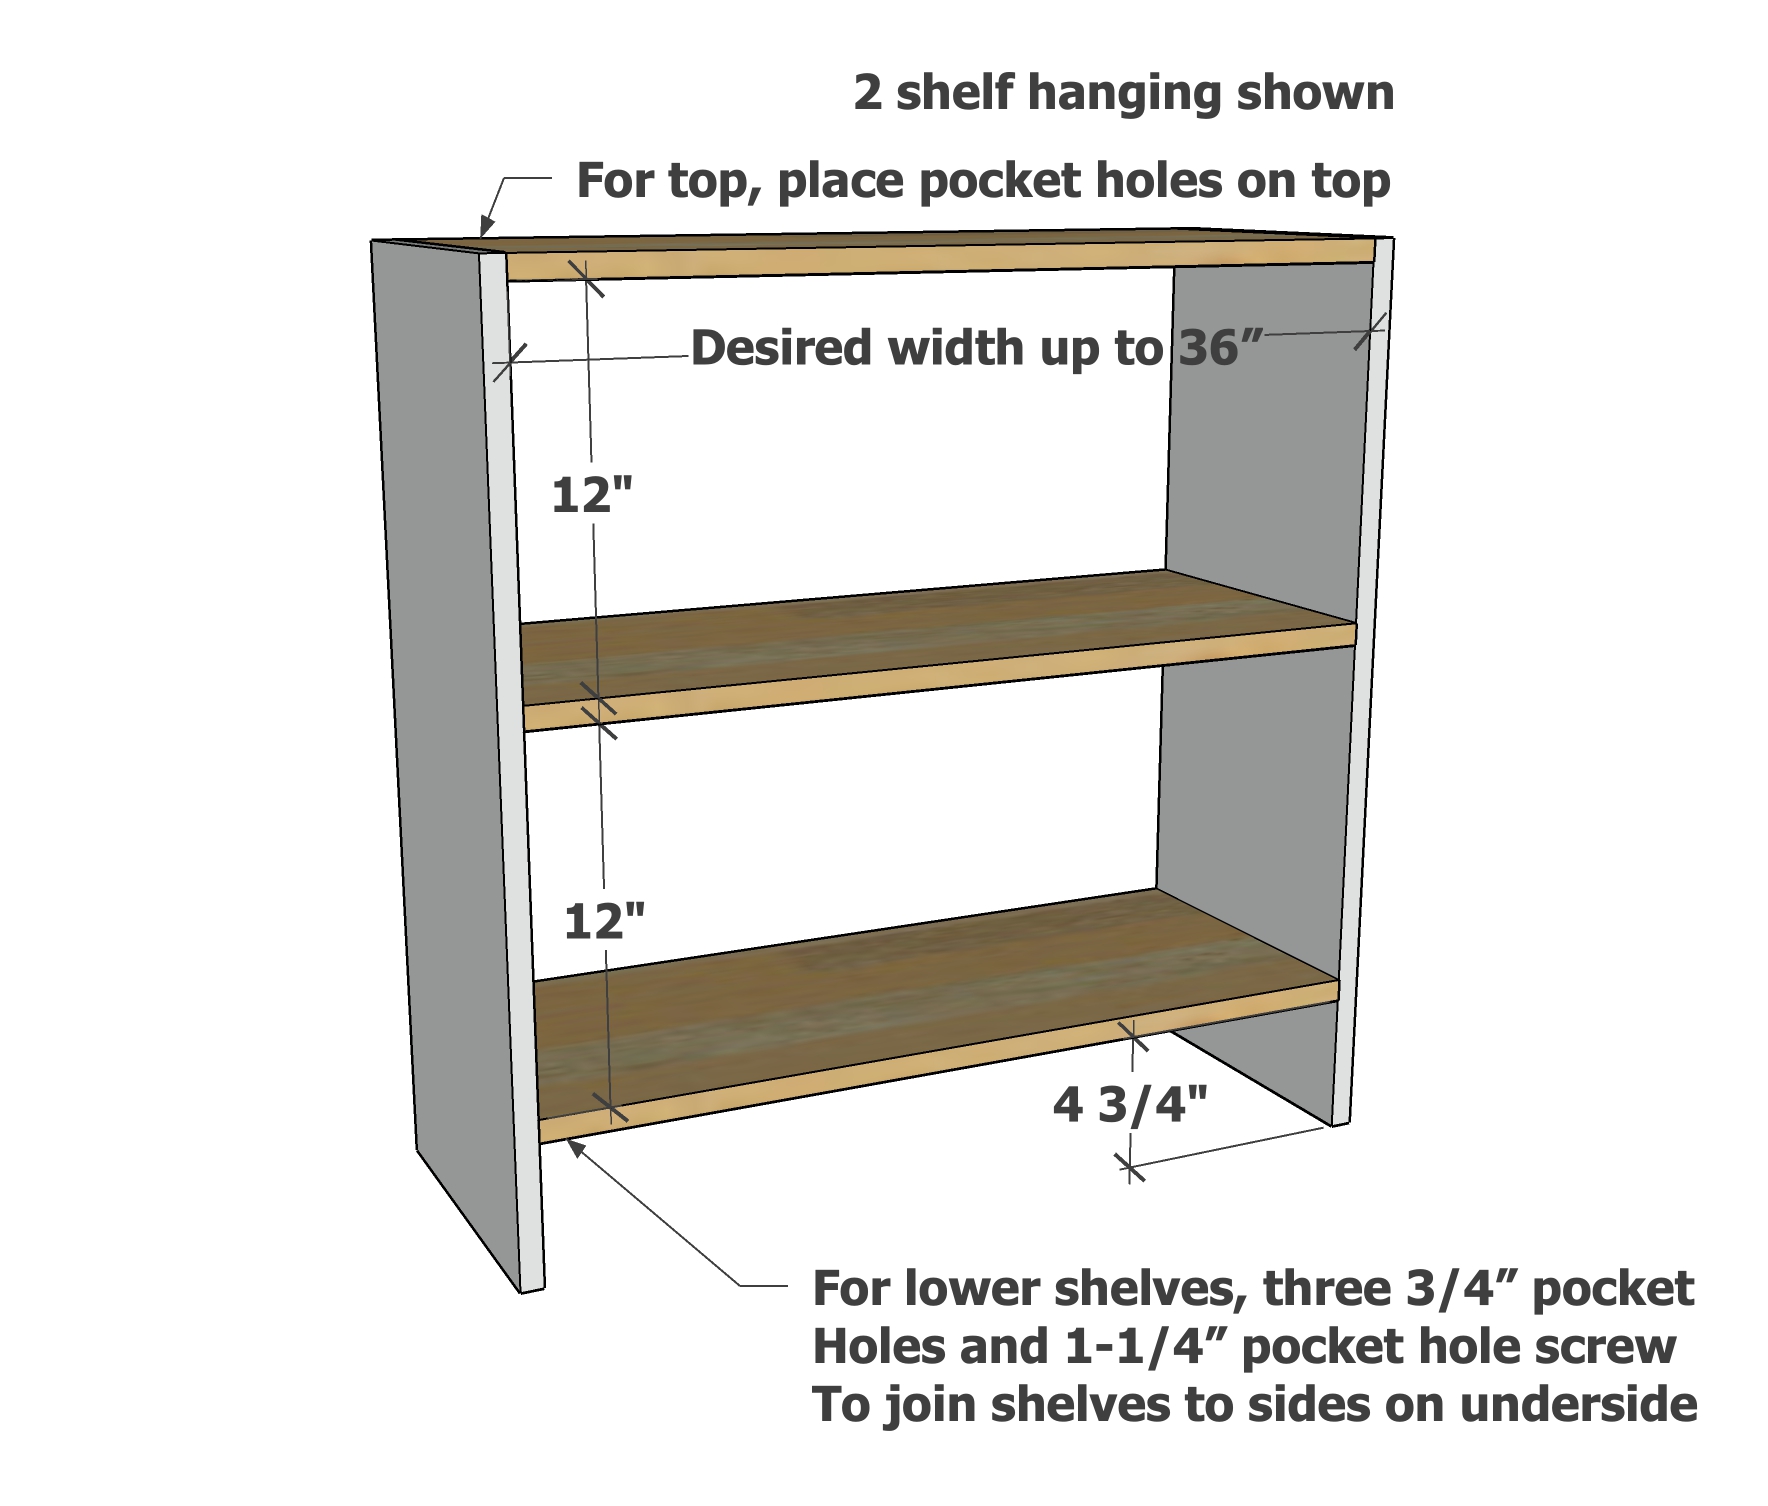
2 Shelf Hanging Cut List
- 2 - 1x12 @ 31" - sides
- 3 - 1x12 @ desired width of organizer, up to 36", minus 1-1/2" - shelves
- 1x6 and french cleat @ desired width of organizer
- 1-1/4" closet rod dowel cut to fit
3 Shelf Hanging Cut List
- 2 - 1x12 @ 43-3/4" - sides
- 4 - 1x12 @ desired width of organizer, up to 36", minus 1-1/2" - shelves
- 1x6 and french cleat @ desired width of organizer
- 1-1/4" closet rod dowel cut to fit
5 Shelf Hanging Cut List
- 2 - 1x12 @ 64-1/2" - sides
- 6 - 1x12 @ desired width of organizer, up to 36", minus 1-1/2" - shelves
- 1x6 and french cleat @ desired width of organizer
Double Hanging Cut List
- 2 - 1x12 @ 43-3/4" - sides
- 2 - 1x12 @ desired width of organizer, up to 36", minus 1-1/2" - shelves
- 1x6 and french cleat @ desired width of organizer
- 2 - 1-1/4" closet rod dowel cut to fit


Originally, I used a French cleat to hang the closet pieces on the wall. But this required the back wall to be very straight and could be challenging in some spaces. So I did away with the French cleat, and now just hang a 1x3 on the wall, set the components on top of the 1x3, then screw each component to studs in the wall through the back 1x6 boards. This is an easier method that produces the same results. Some of the diagrams and video still show the French cleat.
Instructions
Step 1

Hanging the 1x3 Wall Cleat
Locate studs in the wall at about the height you'd like to hang the cleat, remember the closet organizer will sit 5-1/2" ABOVE the cleat. Hanging the top of the 1x3 at 76" is a recommended height.
Attach using 3" long self tapping star bit screws to studs in the wall.
Use a level to make sure the cleat is hung perfectly level.
Add additional screws so the cleat is attached to multiple studs in the wall.
NOTE: Diagram shows some components of hanging as a French cleat as done in the video.
Step 2
Closet Component Carcass Construction
All components follow same building steps, just change the size and number of shelves to create different options.
For each shelf, drill three 3/4" pocket holes on each end of each shelf boards.
No pocket holes are drilled in the side boards.
Attach the shelves to the side boards with 1-1/4" pocket hole screws.
Step 3
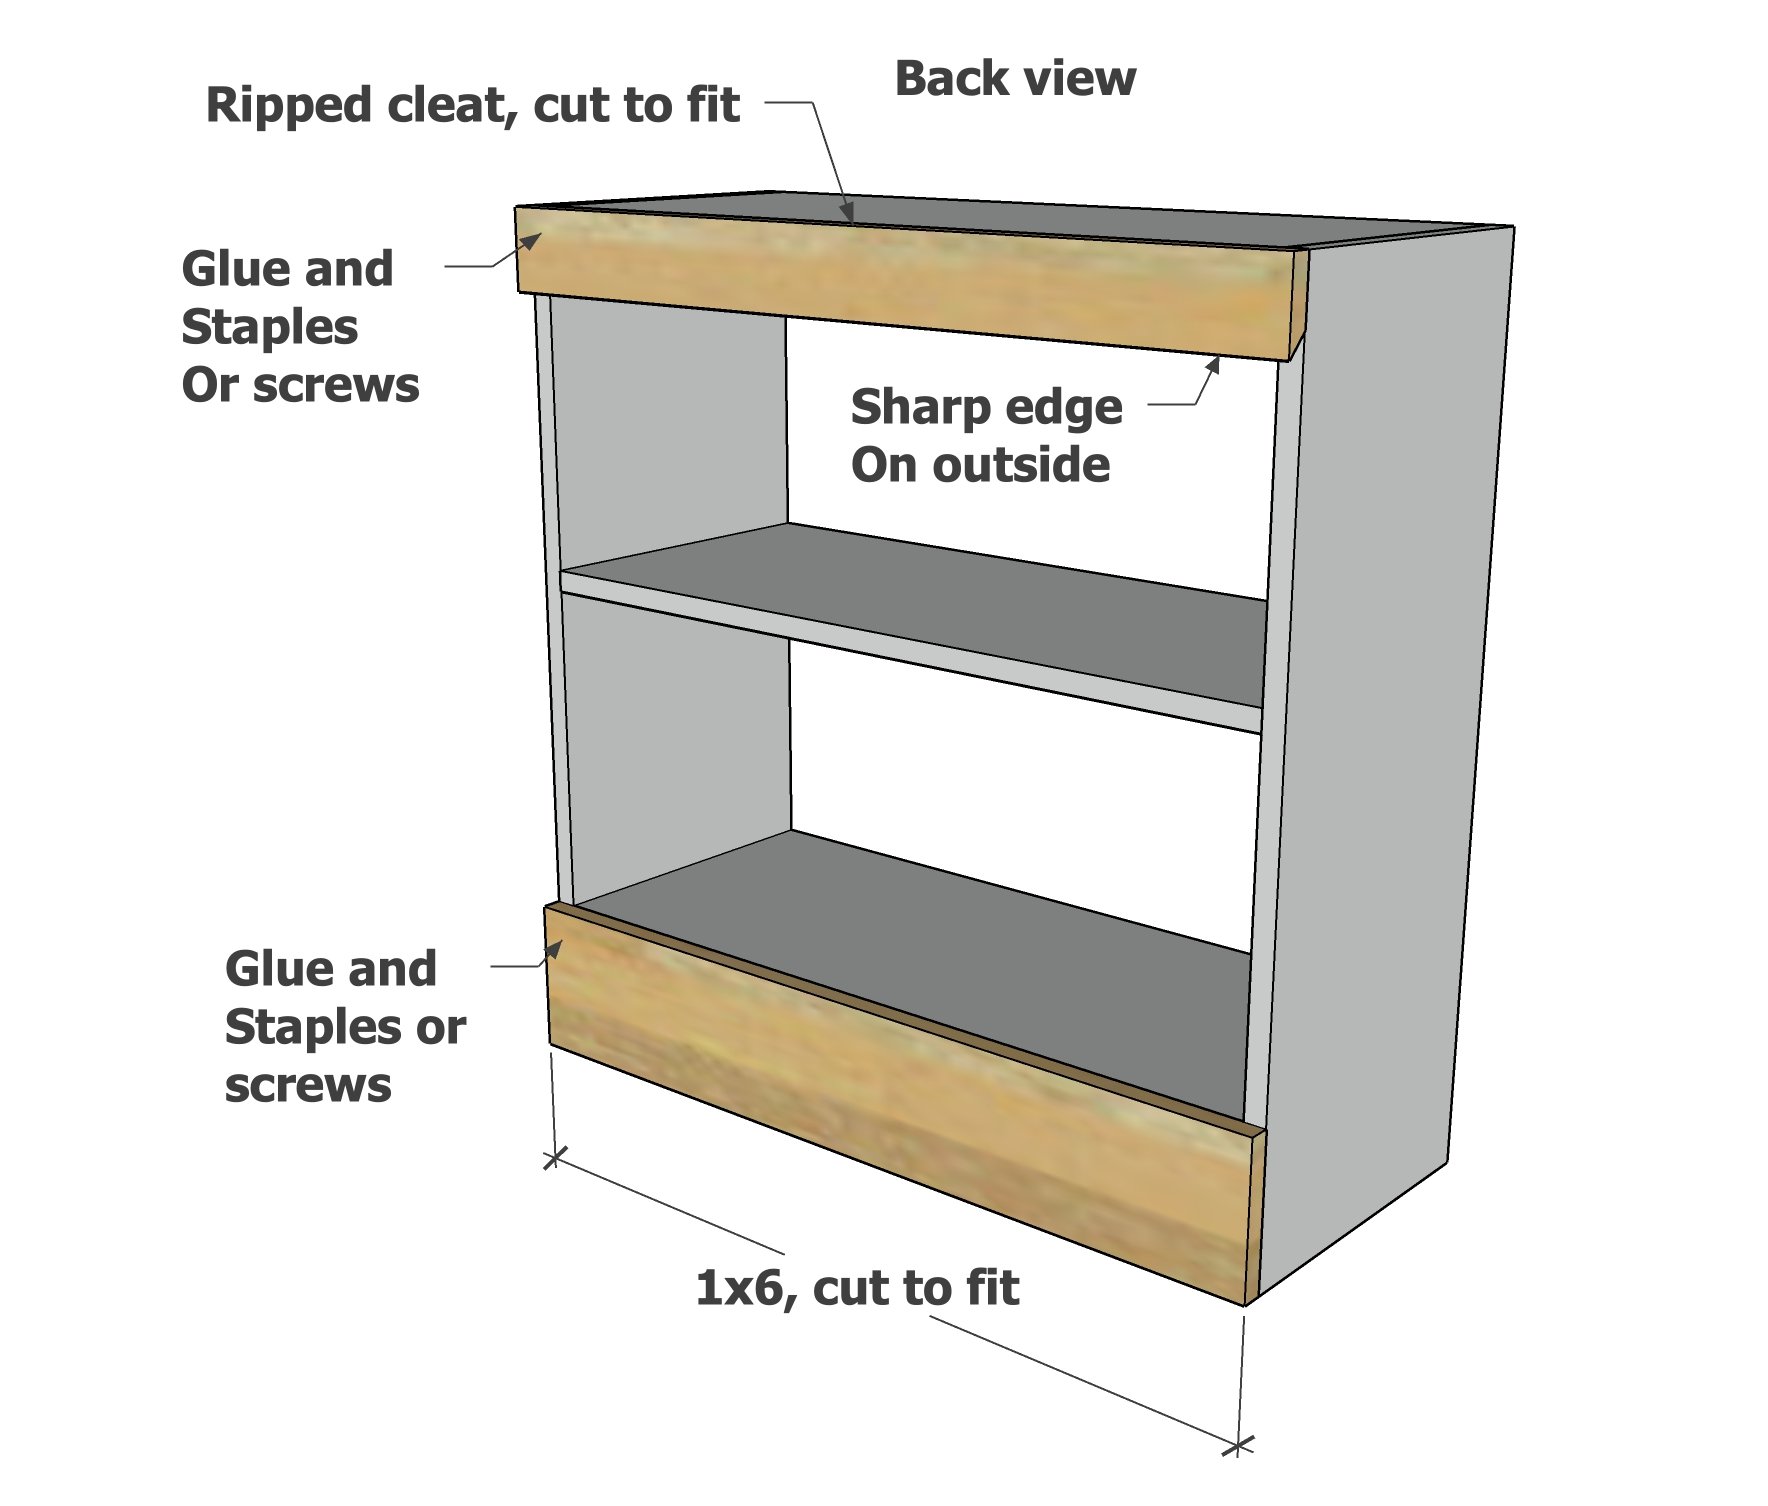
Closet Component Back Pieces
On the top and bottom of the closet components, attach with glue and trim screws 1x6 board, cut to fit. Instead of the French cleat, just attach a second full 1x6 to the top of the closet component.
Step 4
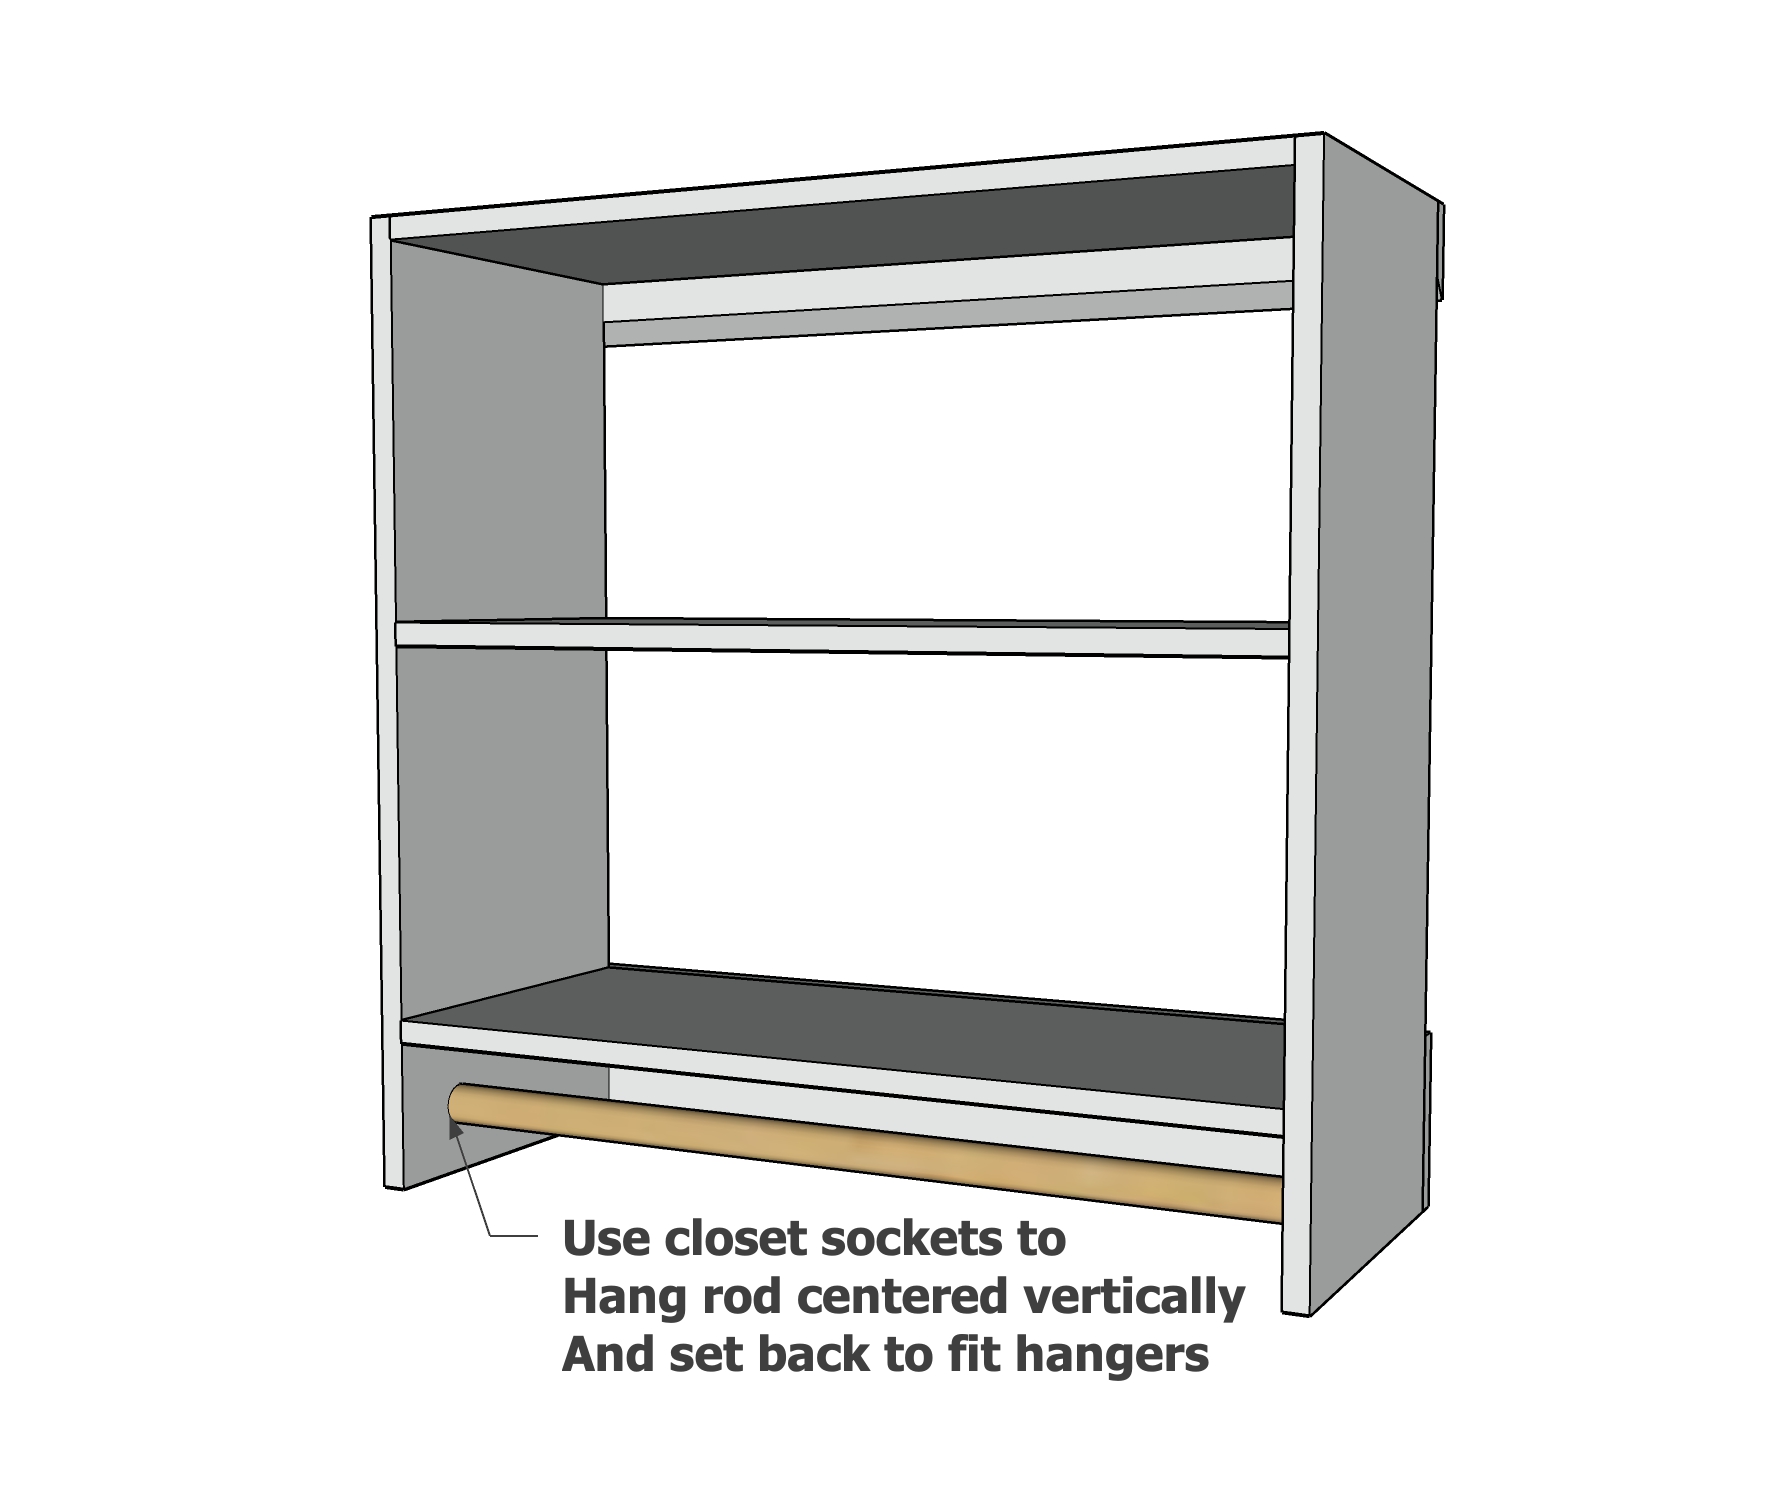
Closet Rod Installation
Use closet rod sockets to hold the closet rods. Install centered vertically, and spaced back to accommodate a hanger (depending on your closet carcass rip depth).
Step 5
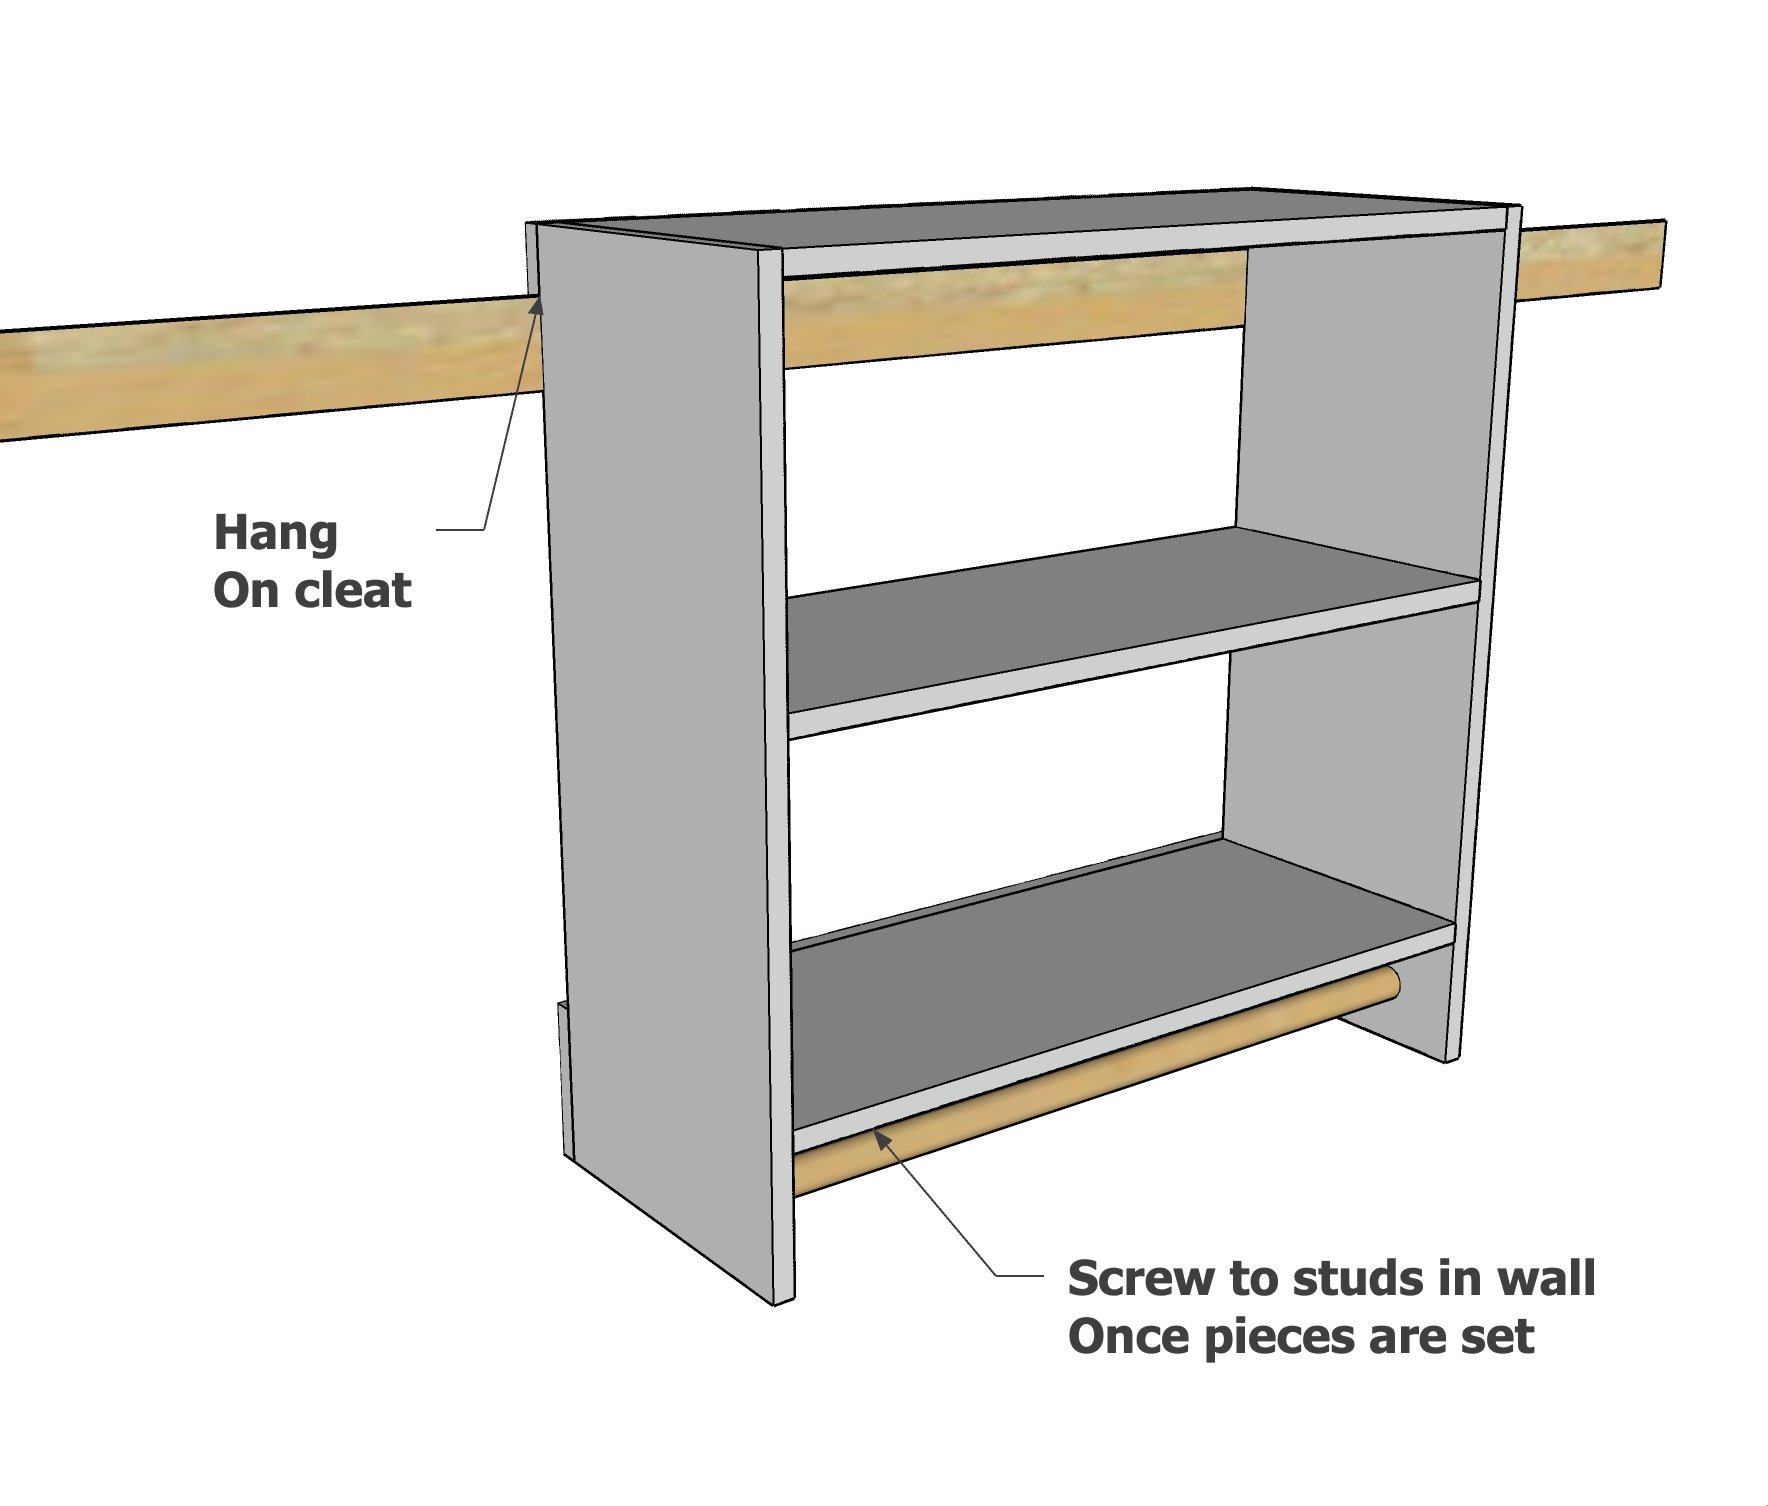
Hanging Closet on Wall Cleat
Set the closet components on the wall cleat and place where you'd like them to go. Screw through the back 1x6s into studs in the wall. For smaller sections that do not cover a wall stud, simply screw to neighboring closet components.
Step 6

Exposed Ends
If the closet has an exposed end, the end can be trimmed out with a 1x2. Attach with 1-1/4" brad nails.


Comments
TheHLT
Fri, 01/20/2023 - 23:01
Clarification on shelf measurement
Hi Ana.
This post comes just as I need to do *something* with my closet because it’s a hot mess but I need clarification on something- the instructions for the shelves:
Is that “up to 36” minus one half inch shelf” OR “up yo 36” minus 1.5” for the shelf “?
Newbie here so clarification would most appreciated.
TheHLT
Fri, 01/20/2023 - 23:05
Correction to original question
That looks like the same thing so let me try again:
“Up yo 36” minus one, 1/2” shelf “
OR
“Up to 36” minus 1.5” so the shelf can be added”
That’s better :)