

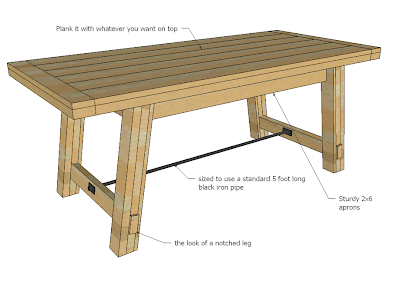
Free step by step woodworking plans to make an industrial style Farmhouse Table. Features metal stretcher and lots of details to make your table interesting and unique.
We also have matching bench plans available here.
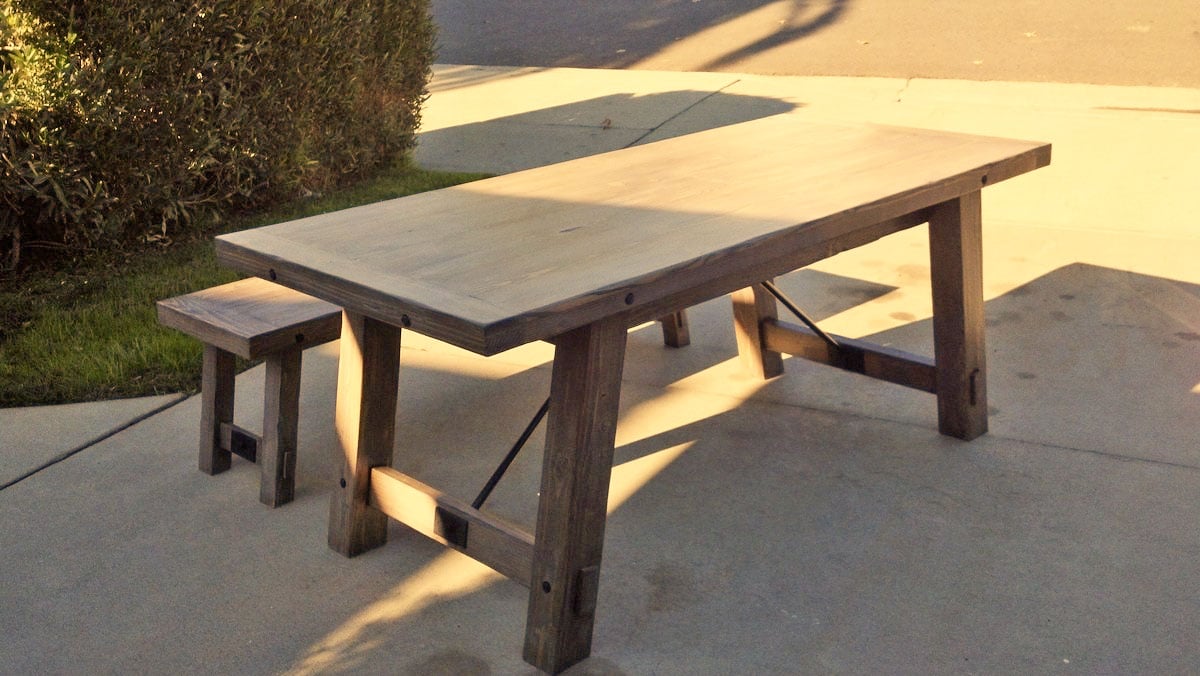
Reader submitted photo by SGILLY
Similar Plan Option
Pin For Later!

Preparation
6 - 1x6 @ 6 feet long
2 - 1x4 @ 8 feet long
2 - 2x4 @ 8 feet or stud length
2 - 1x2 @ 8 feet long
3 - 2x6 @ 8 feet long
3 - 2x2 @ 8 feet long
1 - Black Iron Pipe 60" long, both ends threaded Bolts/Caps and Washers for decorative touches
4 - 6" Black Bolts with washer and Nuts (1/4" would work fine)
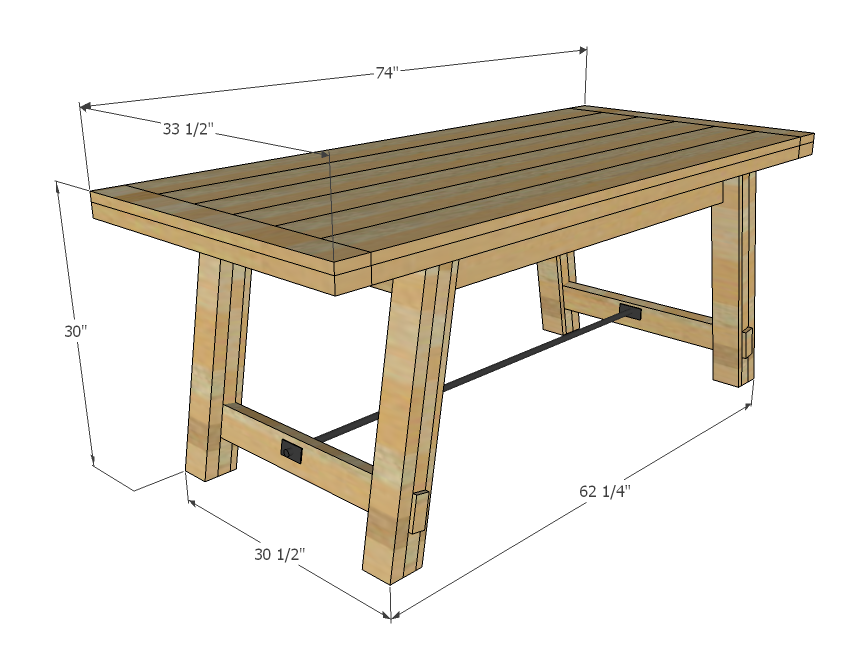
Legs
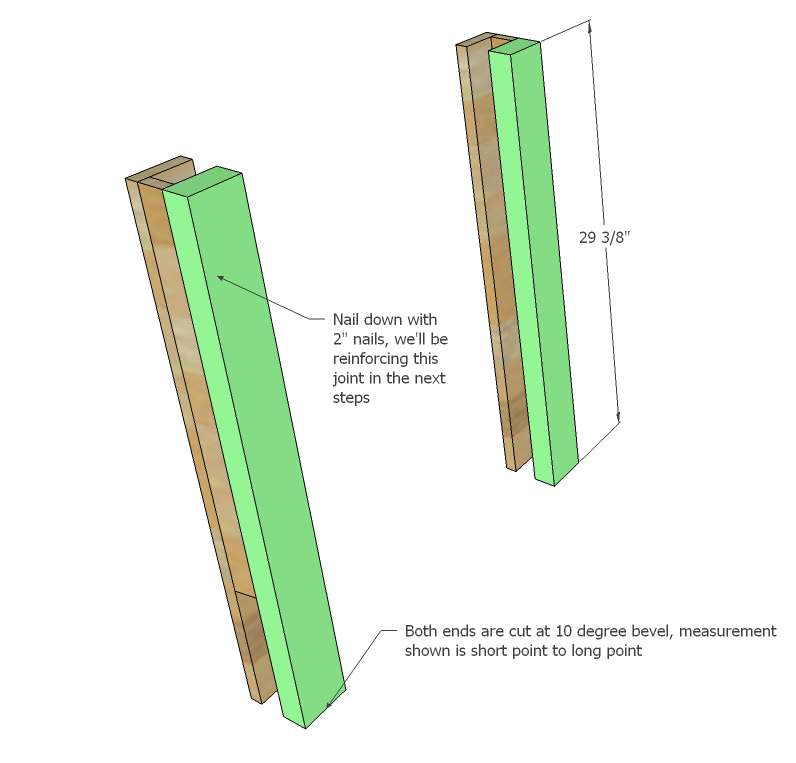
- 4 - 1x4 @ 29 3/8" (Bevel both ends at 10 degrees off square, short point to long point)
- 4 - 1x2 @ 21 5/8" (Both ends cut at angle 10 degrees off square, short point to long point)
- 4 - 2x4 @ 29 3/8" (Bevel both ends at 10 degrees off square, short point to long point)
- 2 - 2x6 @ 28 1/2" (End Aprons)
- 2 - 2x4 @ 31" (Stretcher)
- 8 - 1x2 @ 4 1/4" (One end cut at 10 degree angle, longest point measurement)
- 4 - 1x2 @ 16 1/8 (cut to fit - spacer)
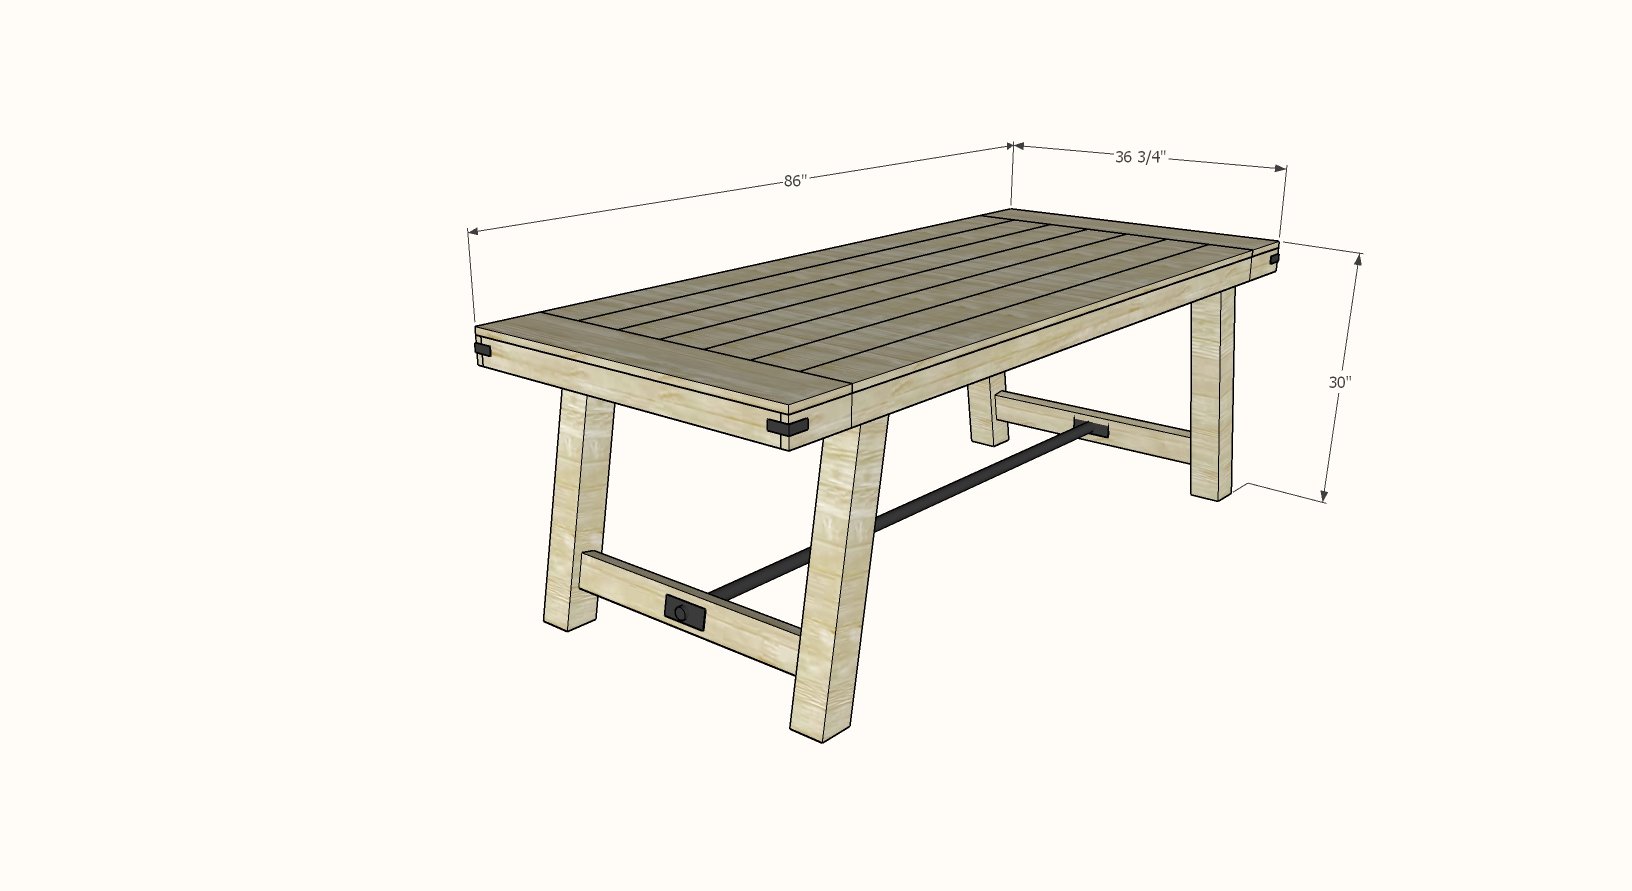
Table
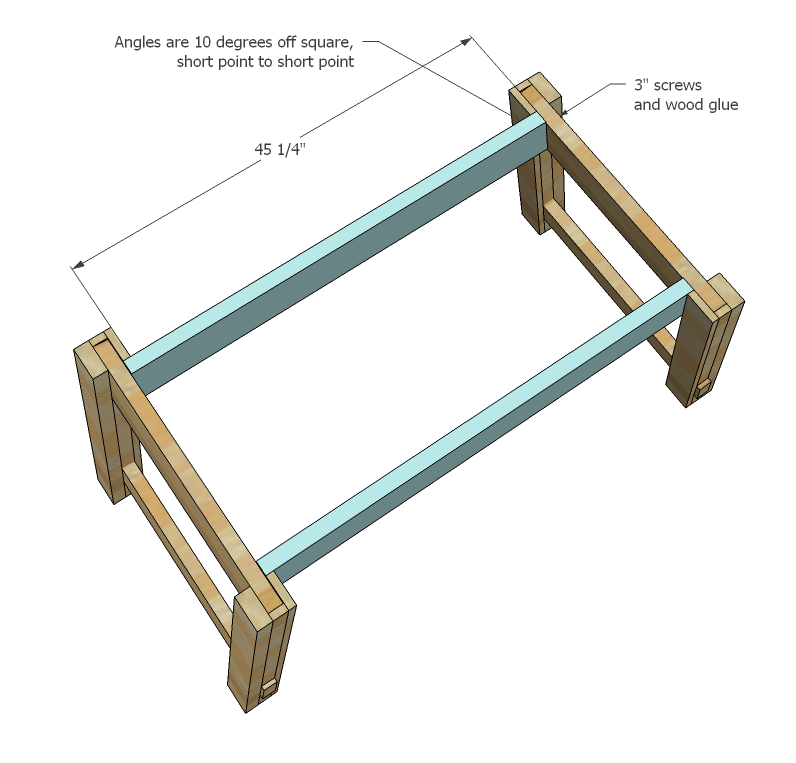
- 2 - 2x6 @ 45 1/4" (Side Aprons - short point to short point measurement, both ends cut at 10 degrees off square)
- 3 - 2x2 @ 20" (Supports)
- 2 - 2x2 @ 67" (Sides)
- 2 - 2x2 @ 30" (Ends)
- 2 - 2x4 @ 33"
- 2 - 1x4 @ 33"
- 6 - 1x6 @ 67 1/8" (cut to fit)


Please read through the entire plan and all comments before beginning this project. It is also advisable to review the Getting Started Section. Take all necessary precautions to build safely and smartly. Work on a clean level surface, free of imperfections or debris. Always use straight boards. Check for square after each step. Always predrill holes before attaching with screws. Use glue with finish nails for a stronger hold. Wipe excess glue off bare wood for stained projects, as dried glue will not take stain. Be safe, have fun, and ask for help if you need it. Good luck!
Instructions
Step 1

We'll start by making the legs. The most important part of the legs is getting your cuts right. Some of the cuts are bevels and some are angles, so pay attention in the diagrams. All angles will be ten degrees off square. Remember, you will need to assemble two sets of legs, and the legs are mirrors of each other. You can use finish nails and glue. Start by attaching the 1x4 to the top 1x2 as shown above.
Step 2
Now attach the 2x4 to the legs as shown above. Use glue and 2" finish nails - don't worry, we'll be further suporting this leg shortly.
Step 3

Now sandwich in the apron and stretcher as shown above. Stretcher will overhang 1/2" on each outside end.
Step 4

And now simply fill in the blanks.
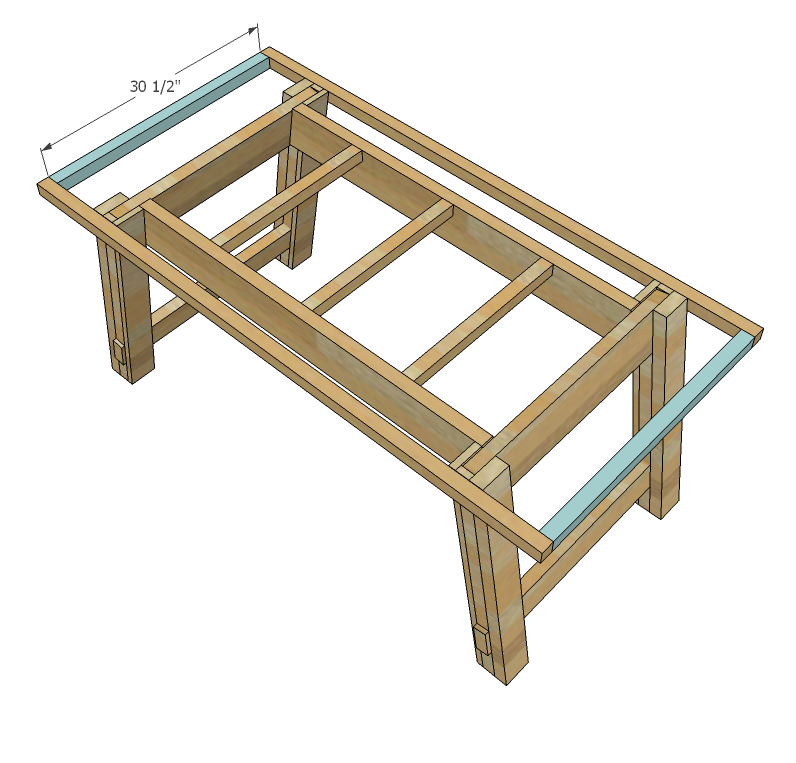
Step 5
Step 6
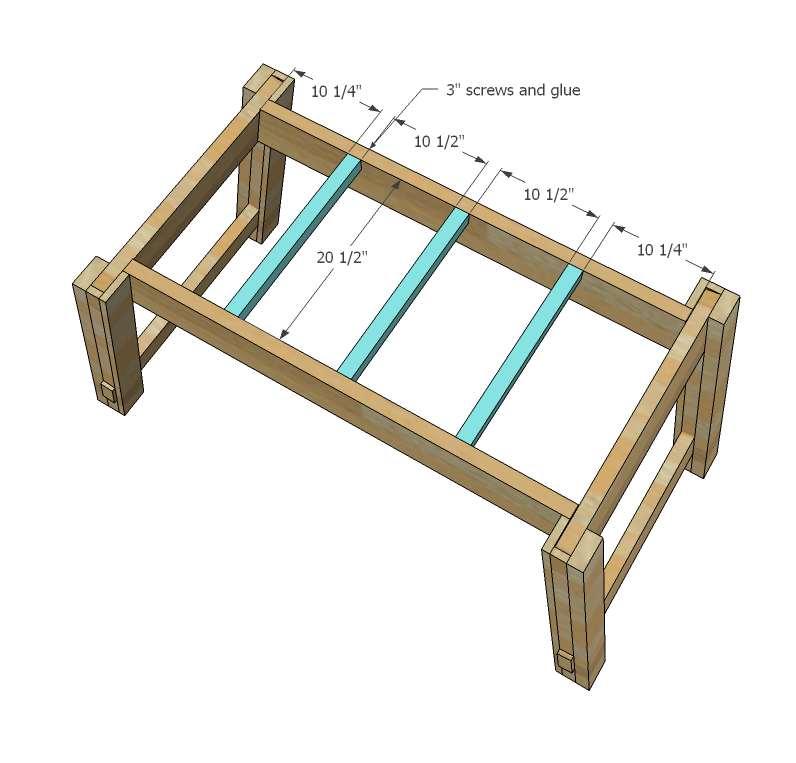
And attach the supports - these will give you something to nail your top boards on too.
Step 7
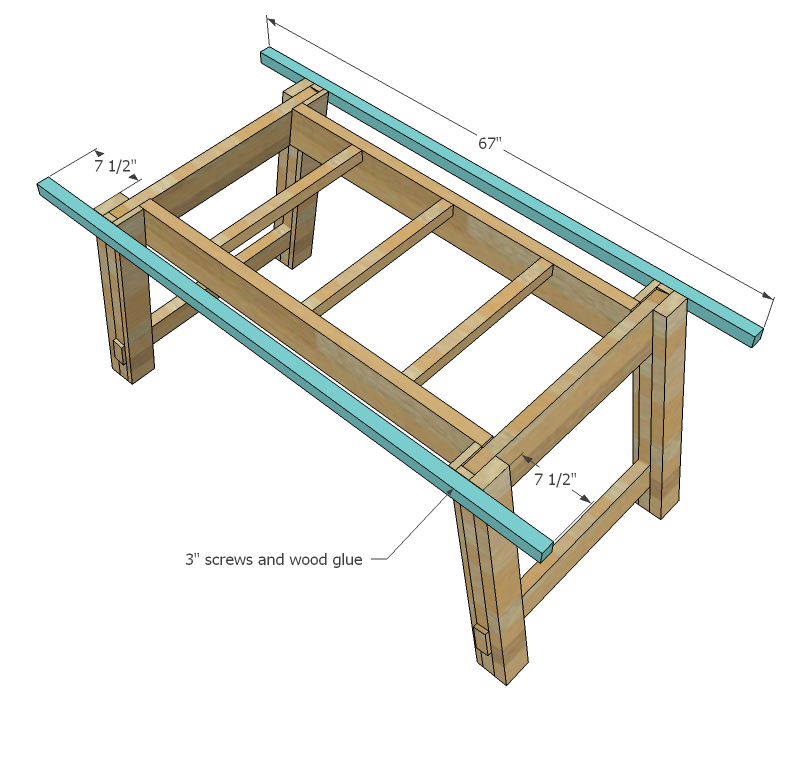
I'd love to see these bolted on with a iron bolt for a little extra touch. Attach with 7 1/2" overhangs on ends.
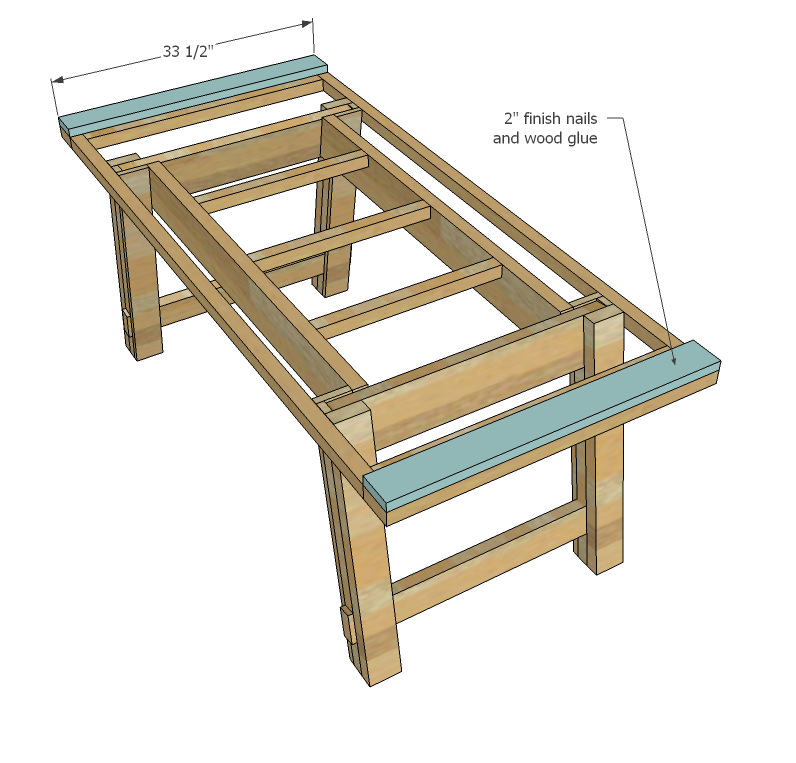
Step 8
Now the end supports. Attach with screws and glue.
Step 9

Bolt the breadboard end on as shown above. Use 6" bolts with washers as done here.
Step 10
Nail down the 1x4 to the ends as shown here.
Step 11
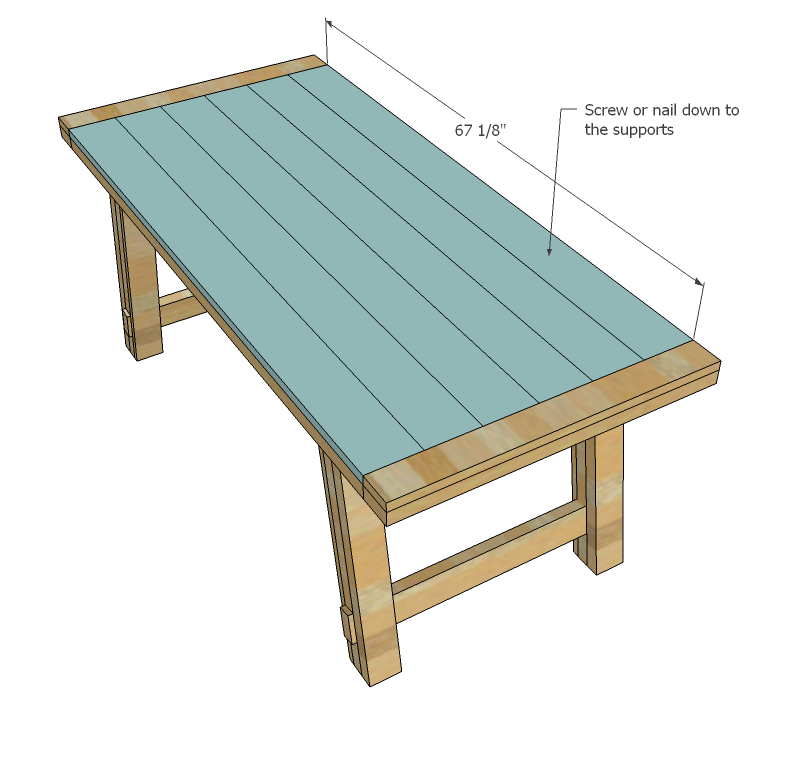
And finally top with the 1x6s. Note, you can use other boards for the top, for example reclaimed wood boards for a more rustic look.
Step 12

Drill holes in the stretchers and add iron pipe. Use fittings to secure pipe in place.
It is always recommended to apply a test coat on a hidden area or scrap piece to ensure color evenness and adhesion. Use primer or wood conditioner as needed.

Comments
momofour09
Wed, 02/12/2014 - 06:38
Cutting.
I'm planning to make this, but I don't want to bevel. If I keep all of my cuts straight, will I have to adjust any measurements with the legs? I'm not so concerned with the top as I'm planning on making it slightly longer and a little wider.
DLeo
Sun, 06/22/2014 - 07:26
Lessons Learned
I'm just a beginner when it comes to woodworking, but I decided to take this table on a few months ago. For any novices out there questioning their ability to do the project, I'd say that you will be just fine with the right tools and some patience. I just wanted to add a couple of things I learned during the process since it might be helpful to other beginners (probably no brainers to more accomplished woodworkers).
1) What type of wood to use? To answer this question, you first need to know how you're going to finish the table and the finished look you're going for. I had no idea that there were so many ways and/or products you could use to stain a table, and the type of wood you choose will dictate what type of finish makes sense (or vice versa). As noted in some of the previous posts, woods have a wide price range, but they also have very different characteristics as far as accepting stains, their grains, and ability to work with. My recommendation would simply be to go to your local lumber yard or Rockler store (probably not Home Depot) and speak to someone knowledgable about the various types of woods and their characteristics. I actually used cherry (table top and bench top) and alder (legs and aprons). But based on how I ultimately finished the legs (painted white with some aging), I shouldn't have wasted the money on Alder. However, I love the look of the Cherry grain coming through the water-based urethane I used.
2) Cost - Similar to the finish, the cost will depend highly on the type of wood you purchase. I probably spent $500-600 given the higher quality woods. I also had to buy a decent amount of tools (paddle bits, compound mitre saw, Kreg pocket hole jig, etc), which probably put me upwards of $1,000 total for the project.
3) Depending on the fastening tools you have, it would save a lot of time and hassle to use 4x4s for the legs. Making all of the bevel cuts and gluing the legs together was time-consuming for me. Of course you would need a good way to make your "mortice and tenon" joints if you used 4x4s, otherwise you will lose any time saved from using the 4x4s.
4) Because of my learning curve, this project probably took me 40+ hours and multiple trips to the hardware store and lumber yard. But as noted above, beginners should take their time so they don't get ahead of themselves on a larger project like this.
Hope this helps anyone looking to build this table.
Kiscunika
Wed, 02/25/2015 - 08:18
Benchright Farmhouse Table
hi! We are going to try to build this table! I'm so excited,my husband is mildly excited. tee hee. we would like to make it shorter to fit our space.. Is there a stain you can suggest that would like similar to the RH dining tables that are called "natural"? The RH tables that are "natural"are not stained and left in their natural condition. We can't do that because the table will certainly be ruined with our family. Is there a wood that you recommend? Thanks muchly!
Ana White Admin
Wed, 02/25/2015 - 11:01
Table
Hello! Check out this tutorial for stain http://ana-white.com/2013/08/rustic-yet-refined-wood-finish
Pine is just fine.
ChillyBaker
Sun, 01/03/2016 - 14:05
Sturdiness with a larger size?
I'm looking to make this in a much larger size (100" x 66" ish). Exactly how sturdy is this table? Do I need to add another leg in the middle on both ends to maintain stability? TIA!
dhoop31
Mon, 01/08/2018 - 06:42
Question about the legs
Just curious about the orientation of the legs. I accidentaly built the legs where the outside face is the 1X4s instead of the 2X4s. It can't be changed because of the angle cuts. I don't see this making a difference in the end result or integrity of the table but I wanted to ask the experts on here? Thoughts?
Love this table. Way to go, Anna!
njmorin
Thu, 03/14/2019 - 14:02
Benchwright Farmhouse Table
I'd love to build the Benchwright Farmhouse Table but need it to be a little bit bigger and wider. I can find 72 in black iron pipe which would make the table another 12 in longer. Has anyone modified the plans to make it longer/wider? I'd love to know if they have and what they did to make the build work. Thanks!