

Add a custom touch to your kitchen with this DIY open end wall shelf! Designed to finish off a run of upper cabinets, this shelf is open on the front and side—perfect for displaying decor, plants, or everyday essentials. It’s a great solution for tricky cabinet layouts, especially where uppers end over a peninsula or near a dining nook. Build it with just a few tools using our free plans, complete with step-by-step diagrams, cut list, and a full shopping list.
🛠️ Why I Built This Open Kitchen Wall Cabinet
For this standard kitchen layout, I wanted to give the upper cabinets a more custom, designer look—and create a spot to add some decor and warmth to the wall. The end of this run of cabinets is located above a peninsula bar, which made a traditional wall cabinet impractical. It would’ve been hard to access and felt heavy above the open space.
This open wall cabinet was a simple, beginner-friendly way to solve all of that. It adds style, easy storage, and makes the space feel more open and intentional.
📸 Photos of This Wall Cabinet in the Kitchen
Above the peninsula bar:
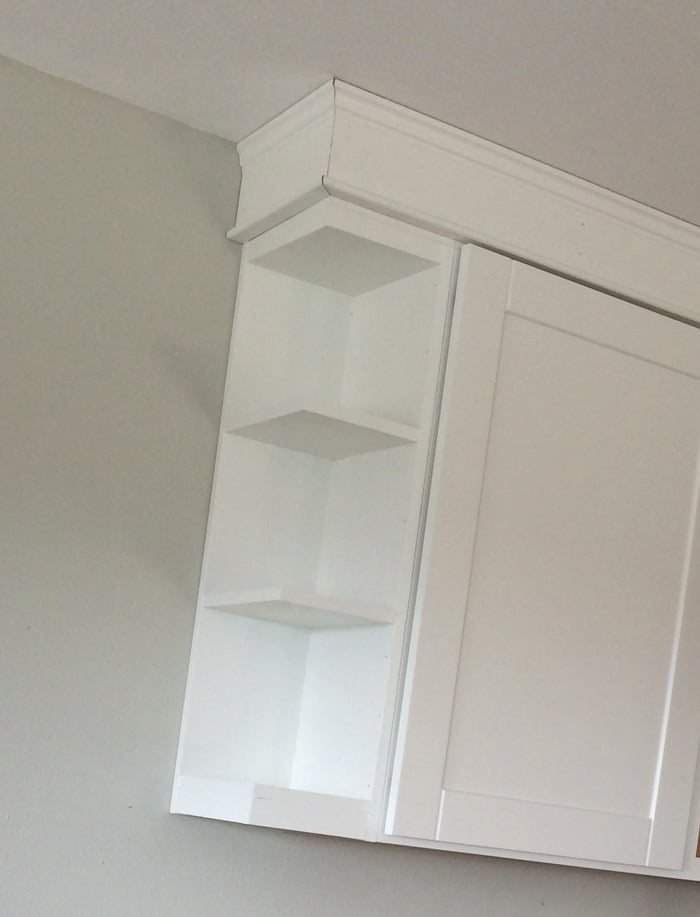
This open end wall shelf wraps the corner and finishes off the upper cabinets without blocking sightlines or making the space feel closed in.
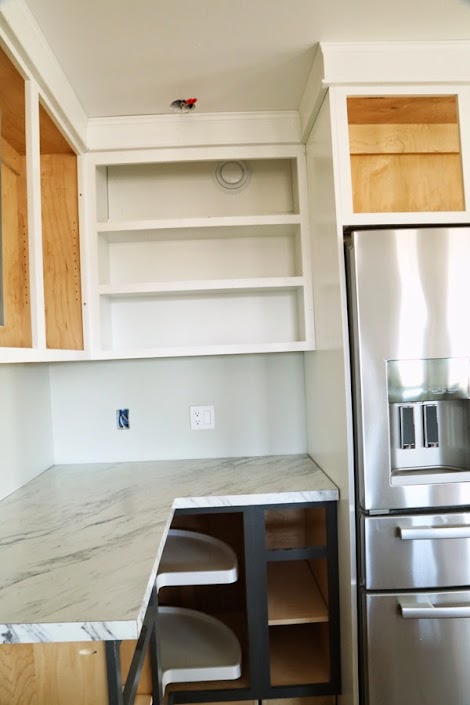
Side view of the wall cabinet and bar area:

The open shelf allows for quick access and easy styling, and it avoids the awkward reach you'd need with a full-depth cabinet.
Balancing the kitchen layout with a second open cabinet:
We added a matching open cabinet on the opposite end of the upper cabinets to keep things feeling balanced and intentional.
✨ Open Wall Cabinet Features
- Open on the front and side – Perfect for corner installs or finishing off a cabinet run
- Beginner-friendly build – Simple construction with just a few tools
- Easy to customize – Paint or stain to match your kitchen
- Great for decor – Display plants, bowls, cookbooks, or everyday dishes
- Works in tricky layouts – Ideal for peninsulas, dining nooks, or small kitchens
- Makes stock cabinets feel custom – Adds that built-in designer look without the cost
📐 Free Plans to Build Your Own Open Wall Kitchen Cabinet
You can build this cabinet with basic tools and a little time!
Our free plans include:
- Step-by-step building instructions
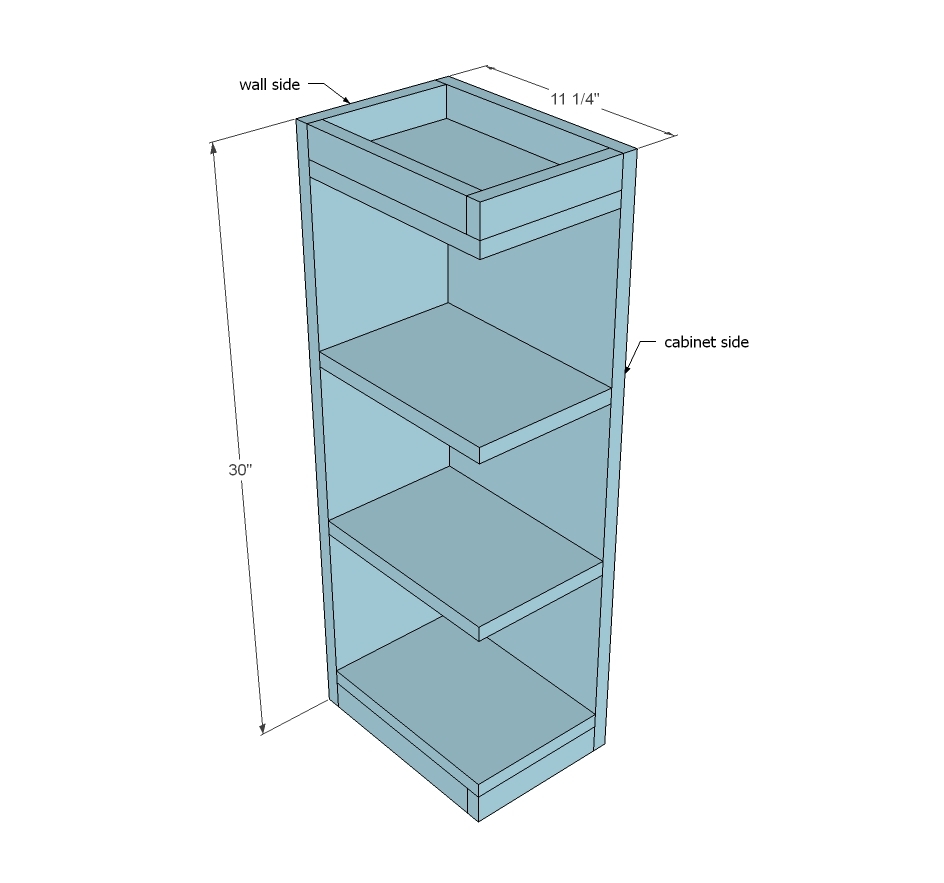
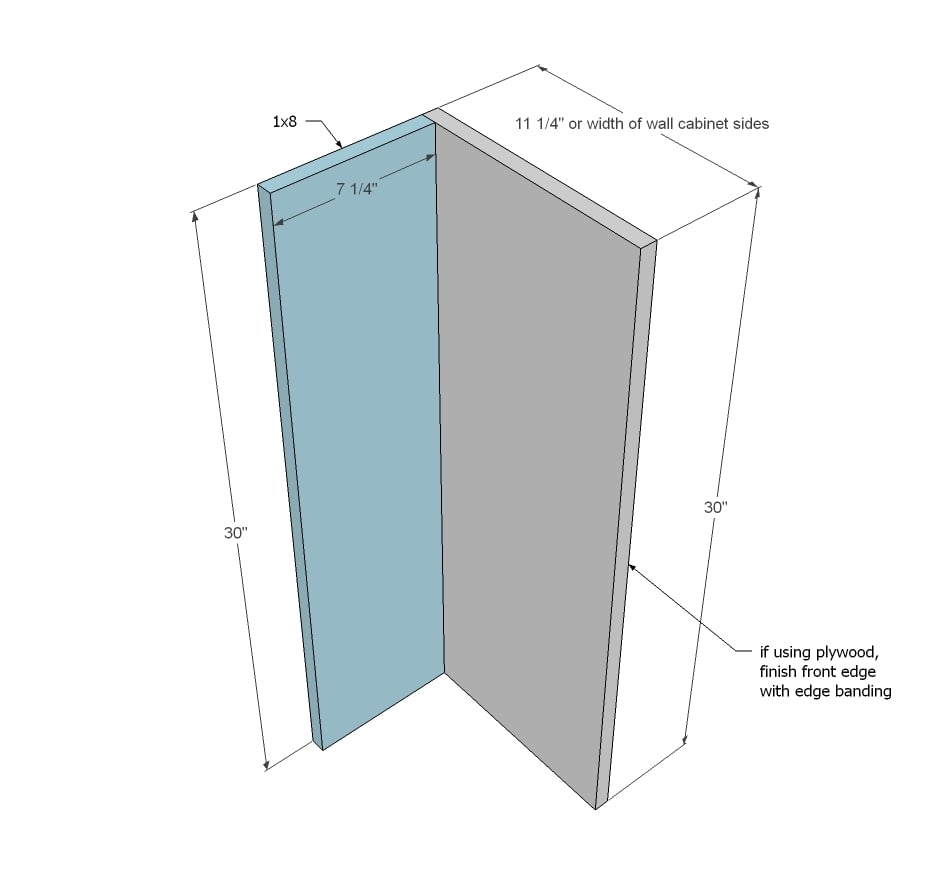
- Detailed diagrams
- Complete cut list and shopping list
This is a super easy way to elevate your kitchen—without the stress of a full cabinet install.
Preparation
- 1 - 1x12 @ 30" long or 3/4" plywood @ 11-1/4" x 30" (MATCH YOUR CABINETS!!!)
- 1 - 1x8 @ 8 feet long
- 1 - 1x2 @ 4 feet long 1-1/4" nails or staples
- Screws for hanging to adjacent cabinet and studs in wall
*For painted cabinets, use poplar For stained cabinets, choose a wood species to match your cabinets or plywood (maple, oak, alder etc)
- 1 - 1x12 @ 30" or 3/4" plywood @ 30" x 11-1/4" (MATCH YOUR CABINETS SIDES!!!)
- 1- 1x8 @ 30" 4 - 1x8 @ 10-1/2" (ADJUST TO FIT!!)
- 2 - 1x2 @ 7-1/4" (or width of 1x8)
- 2 - 1x2 @ 9-3/4" (ADJUST TO FIT!!)


Please read through the entire plan and all comments before beginning this project. It is also advisable to review the Getting Started Section. Take all necessary precautions to build safely and smartly. Work on a clean level surface, free of imperfections or debris. Always use straight boards. Check for square after each step. Always predrill holes before attaching with screws. Use glue with finish nails for a stronger hold. Wipe excess glue off bare wood for stained projects, as dried glue will not take stain. Be safe, have fun, and ask for help if you need it. Good luck!
Instructions
Step 1
We stapled this entire cabinet together because we did not want any pocket holes showing. The cabinet is plenty sturdy. Here we used glue and 1-1/4" staples.
The side panel should match your other cabinets, including a face frame and the back if your other cabinets have one. Also check the height of your existing cabinets - 30" is standard.
IMPORTANT: Make sure you assemble your cabinet in the correct configuration for installation - As shown, we built a cabinet that is open to the left.
Step 2
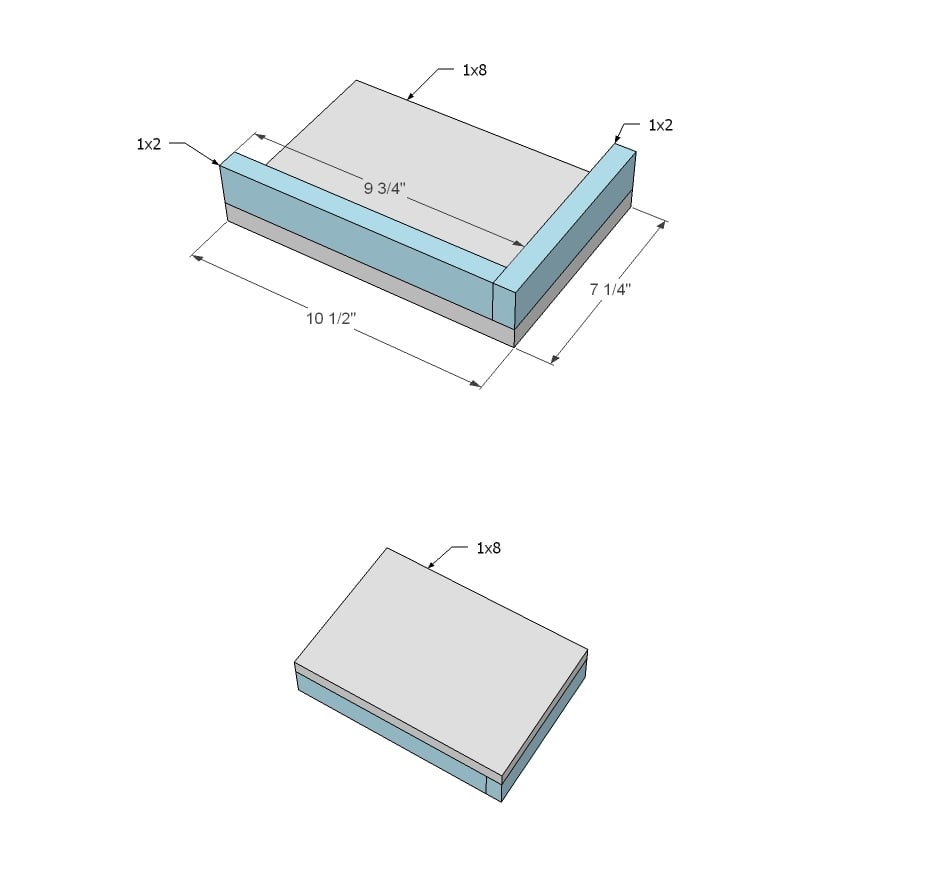
Build the top and bottom shelves first with staples or nails and glue. We used 1-1/4" staples here.
Step 3
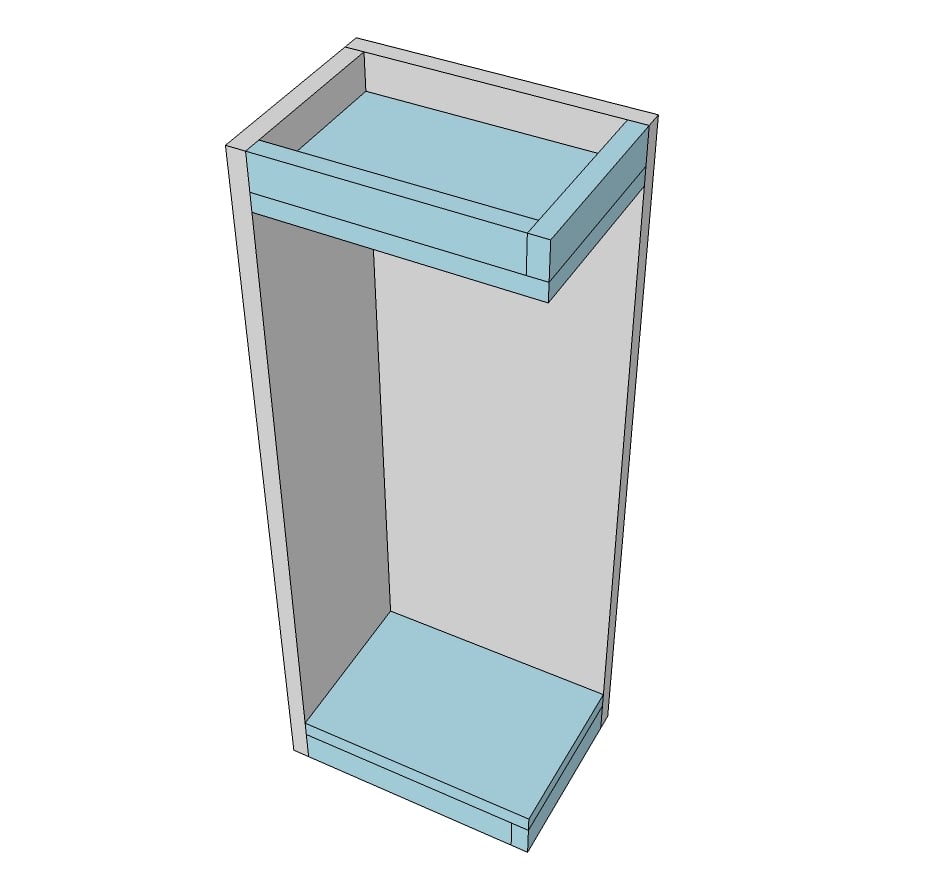
Then we glued and attached the top and bottom shelves to the backs.
Step 4
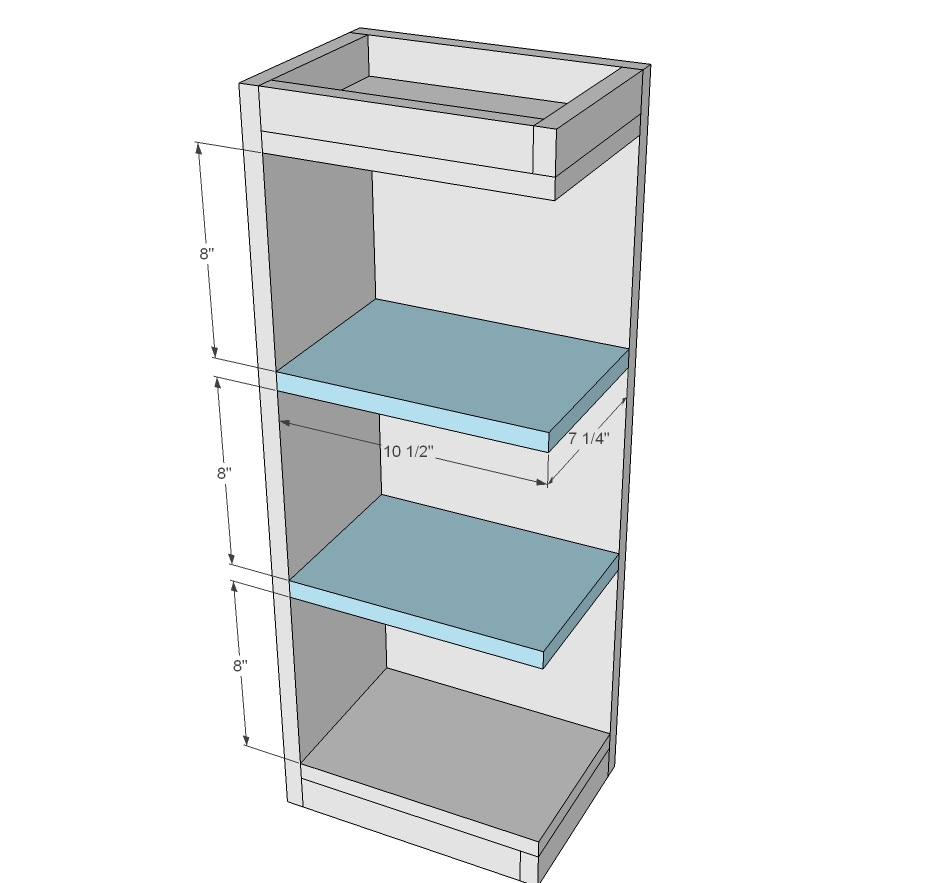
Then we added the remaining two shelves.
We hung the cabinet by attaching it to both the neighboring cabinet and studs in the wall. If no studs, use a drywall anchoring system.
It is always recommended to apply a test coat on a hidden area or scrap piece to ensure color evenness and adhesion. Use primer or wood conditioner as needed.
Comments
JustinTime
Tue, 07/22/2014 - 07:15
Shelves
This looks awesome! I plan on adding one to my own kitchen. How did you attach the two middle shelves, more glue and nails/staples?