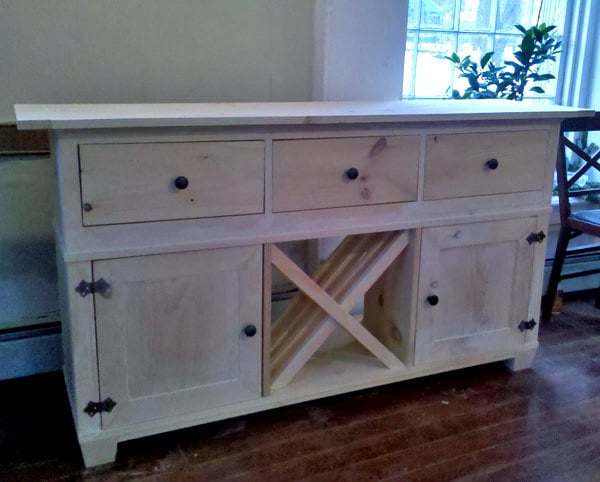


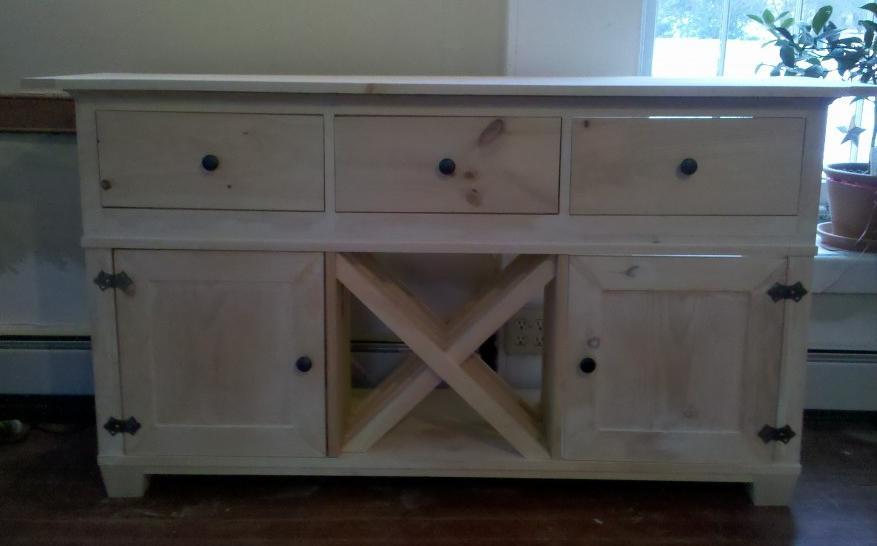
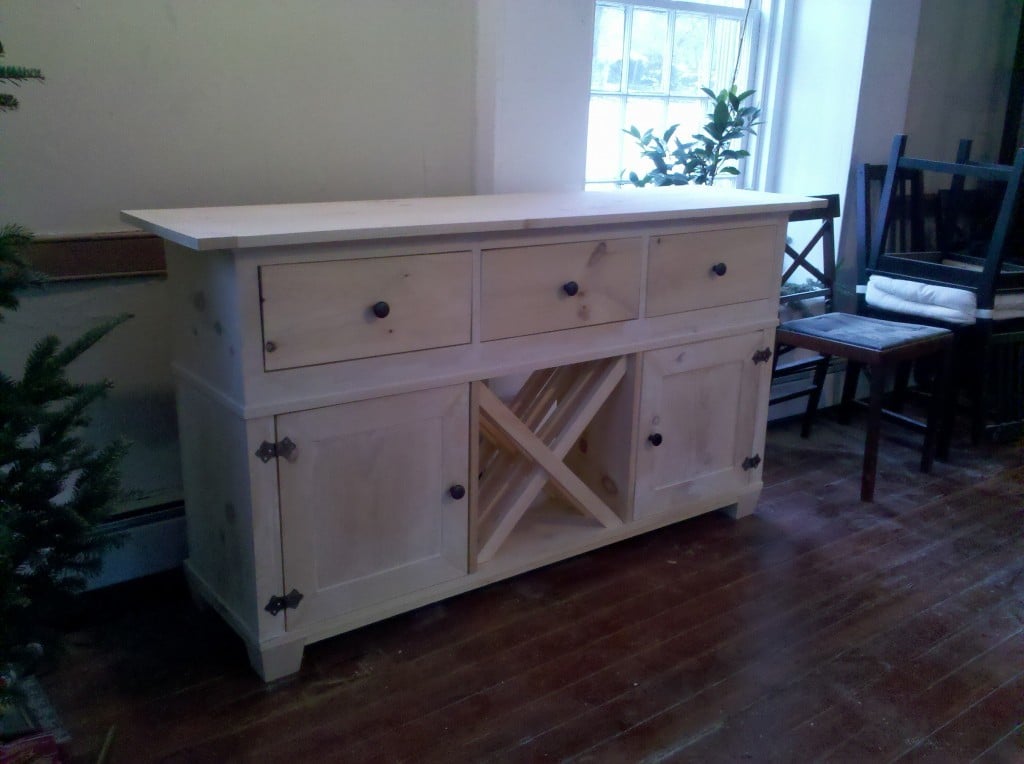
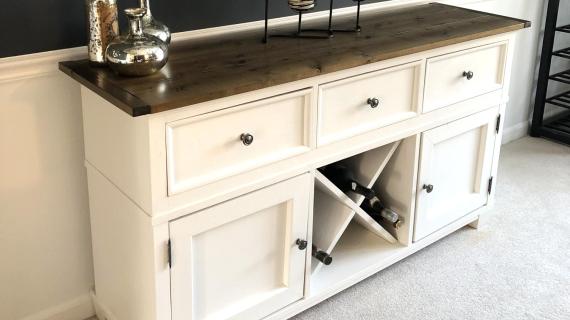
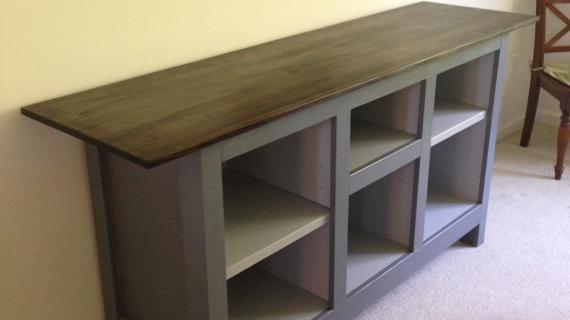
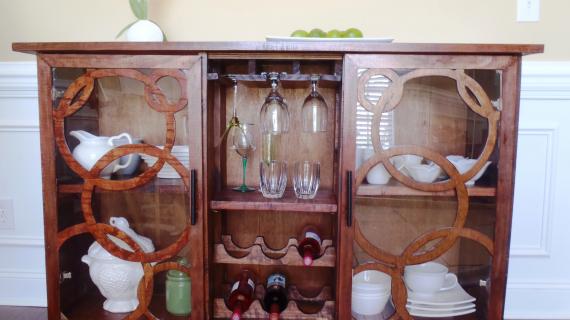
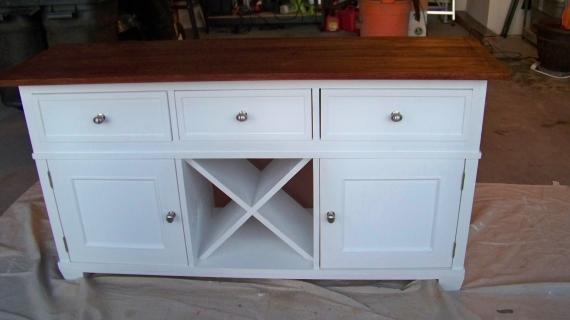
A buffet featuring wine storage, two large cubbies with doors and three large drawers.
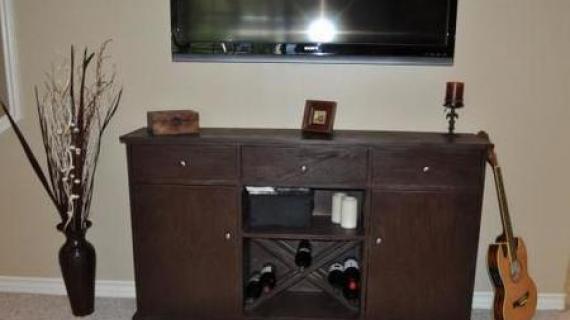
My wife and I love the Ethan Allen Tango Console but didn't want to pay $1,099 for it - almost twelve-hundred dollars with tax! It also didn't fit the space we had for a buffet as perfectly as we wanted so, after my nightstands worked out so well, I was elected to build something close to it.

My wife and I love the Ethan Allen Tango Console but didn't want to pay $1,099 for it - almost twelve-hundred dollars with tax! It also didn't fit the space we had for a buffet as perfectly as we wanted so, after my nightstands worked out so well, I was elected to build something close to it. Voila: the Salsa Console!
The project took me two weekends, but was less complicated than I had thought it would be. I'm calling it an intermediate plan, because it doesn't call for any tools beyond a miter-saw and a pocket-hole jig. Definitely a fun build, and for less than $200, it turned out great.
Preparation
(2) 1x12x8
(6) 1x8x8
(3) 1x6x8
(7) 1x3x8
(10) 1x2x8
(1) large sheet of pressed paperboard
4 Furniture feet from your local big-box store (you can make your own, but I didn’t think I could do better than the stock model.)
3 sets of drawer slides
4 hinges
5 knobs
About 100 thin pocket/wood screws
Wood glue
(1) 1×10 @ 56″ (base)
(1) 1×8 @ 56″ (base)
(1) 1×2 @ 48″ (base)
(2) 1×2 @ 10″ (base)
(6) 1×2 @ 16″ (bottom face)
(2) 1×2 @ 16″ (sides)
(2) 1×12 @ 16″ (sides)
(2) 1×12 @ 26″ (dividers)
(1) 1×2 @ 56″ (belly band)
(2) 1×2 @ 17″ (belly band)
(6) 1×2 @ 10″ (top face & sides)
(2) 2×12 @ 10″ (top sides)
(2) 1×2 @ 6″ (top face)
(2) 1×2 @ 52″ (top face)
(3) 1×6 @ 52″ (top)
(2) 1×2 @ 18″ (top)
(6) 1×6 @ 17″ (drawer front & backs)
(6) 1×6 @ 12″ (drawer sides)
(3) 1×8 @ 17″ (drawer faces)
(2) 1×12 @ 10″ (cabinet doors)
(8) 1×3 @ 16 (cabinet trim)
(6) 1×2 @ about 24″ (wine rack)


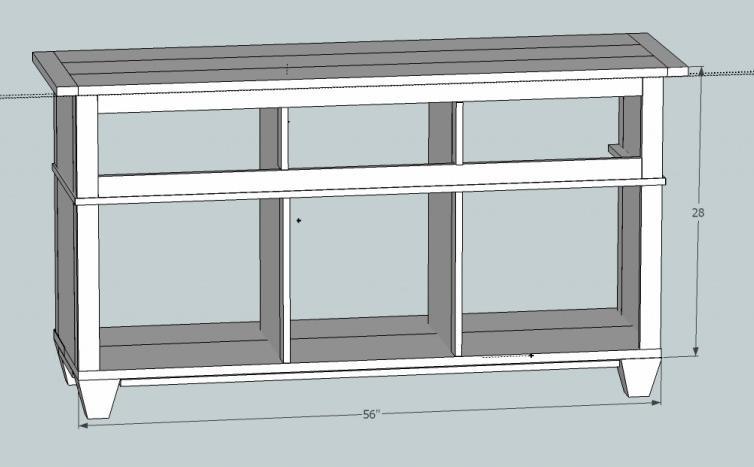
Instructions
Step 1
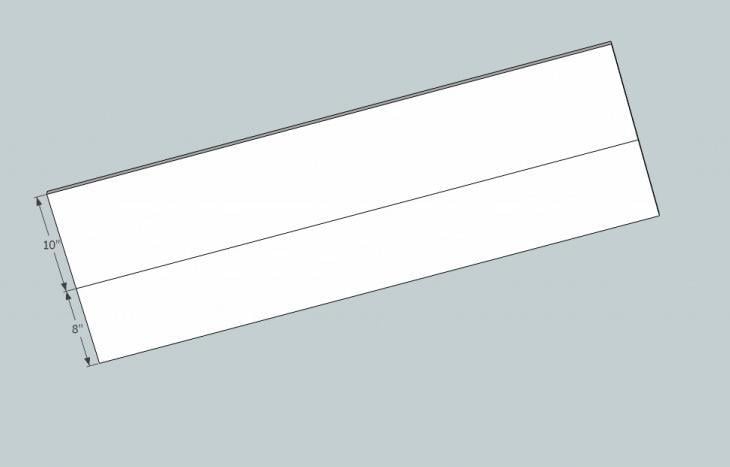
Cut a 1×10 and a 1×8 to 56″. Drill pocket holes into the face of one of the two boards (either or both is fine) and then secure the two boards together with pocket-screws and glue. This joint is going to support the weight of whatever you keep inside the cabinets of the buffet, so don’t skimp on the fasteners or the glue!
Step 2
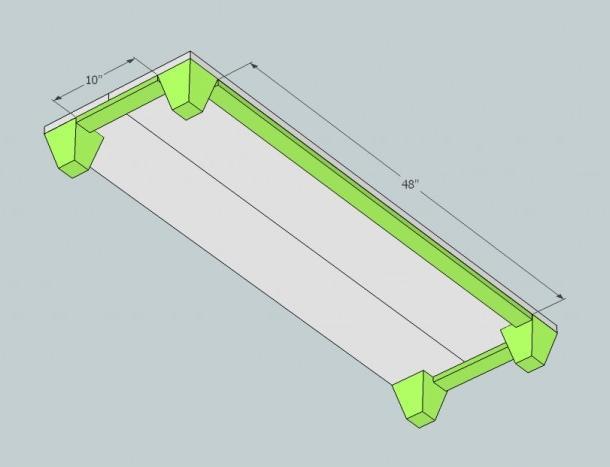
Once the base is dry, flip it so that the pocket holes are exposed. Secure one of the feet at each corner.
My feet were 4″x4″, so I cut a 1×2 down to 48 inches and glued it between the feet. This is now the front of the buffet. I cut another two 1x2s down to 10 inches, and glued them between the side feet. Because my feet had sloping sides, I mitered the 1x2s to match.
IF YOUR FEET ARE NOT 4″x4″ THEN YOU WILL HAVE TO ADJUST YOUR 1×2 CUTS!
Step 3

Next cut six 1x2s to 16″. Flip the base so it sits on its feet. Then fasten two of the 1x2s at right angles, and then fasten the boards to one of the front corners of the base. Then fasten the remaining 1x2s at even spaces between the corner pieces (should be about 17″).
Looking at the original piece, you can see that the base and the belly board extend a little farther out than the face. To match the original, I inset my corners by about an eighth of an inch. Doing so means that you have to shave a hair off of a lot of the measurements, but the difference is so small that you can do it with sand-paper.
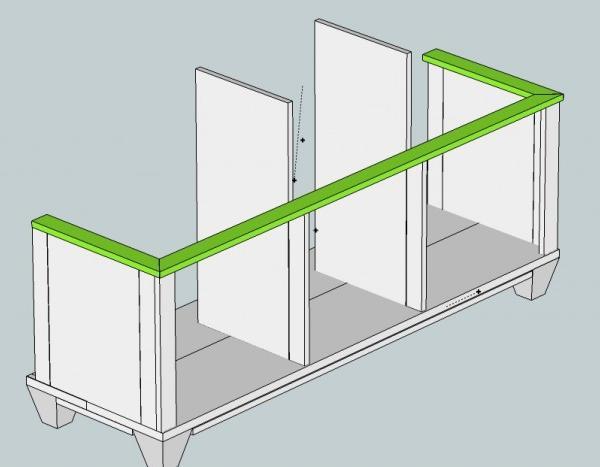
Step 4

Cut two more 1x2s to 16 inches, two 1x12s to 16 inches, and two 1x12s to 26 inches.
Fasten the sixteen inch 1x2s to the sixteen inch 1x12s with pocket-hole screws and wood-glue. Then fasten the new board to either side of the console.
Looking at the original piece, again, you can see that the sides are inset from the face by just a little. I set mine back by an eighth of an inch, so my sides are about a quarter inch from the edge of the base.
Attach the 26 inch 1x12s to the base and the middle 1×2 facing pieces.
Step 5
Step 6
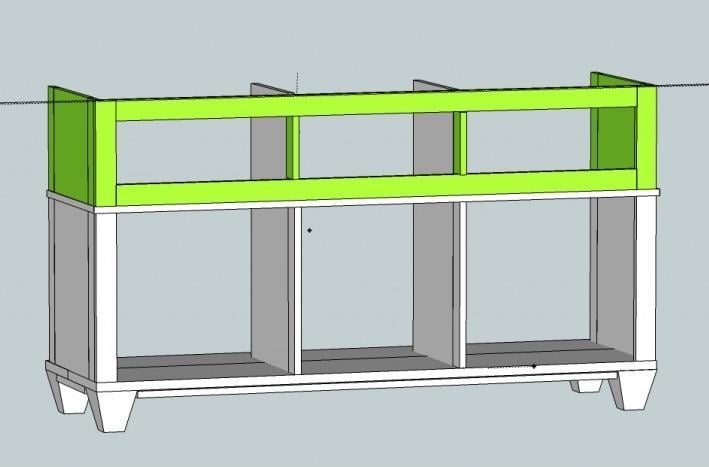
Cut six 1x2s to ten inches, and then cut two 1x12s to ten inches. Secure a 1×2 to a 1×10 to make one top-side of the buffet, then fasten it to the belly-band, flush with the bottom-side – about a quarter inch inset from the face of the belly-band. (I used glue and pocket-hole screws.) Repeat on the other side.
Using the remaining four 1x2s, make right angles as you did for the bottom face, and secure them to the belly-band, flush with the bottom right angles – about an eighth of an inch inset from the face of the belly-band. (Again, I secured them with glue and pocket-hole screws.)
Cut two 1x2s at 52″. Secure one to the front of the belly-board, flush with the facing below.
Cut two 1x2s at 6″. Secure them to the interior dividers with glue and/or with pocket-hole screws. They should be right on top of the facings from the bottom.
Place and fasten the remaining 52″ 1×2 on top of the interior dividers to finish the top facing.
Step 7
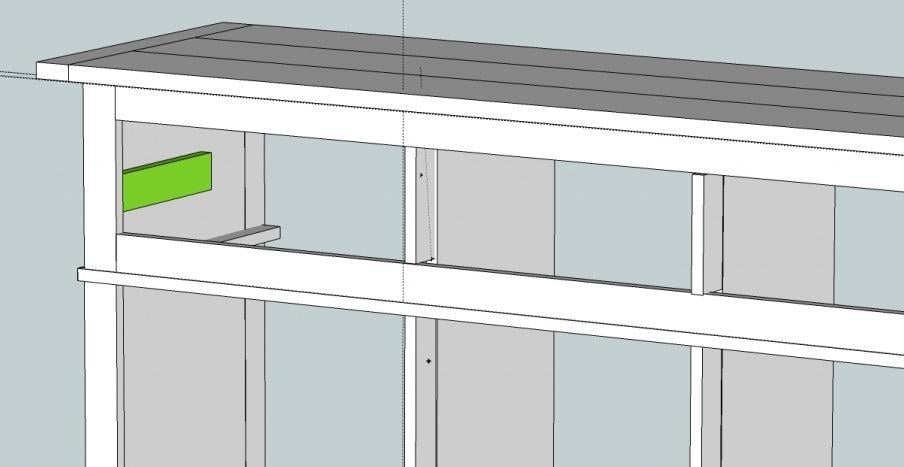
Next comes the interior hardware. You can do it while the top is on, but its easier without, especially if you’re bad at drawer slides (like me.)
First, I furred out the sides with a scrap 1×2 to provide a place for the drawer slides. Then I added the slides, making sure to carefully check for level, and to be sure their fronts were parallel. (It’s trickier than it seems, and it took me a LOT of attempts.
Step 8

Now it’s time to build the top. Cut three 1x6s to 52″, and then fasten them together using glue and pocket-hold screws. Again, these joins are going to have to take a lot of weight, so don’t skimp on the glue or the screws. If you have even a little wiggle in the joints, consider securing the bottom with cleats.
Cut two more 1x2s to 18″, and secure them to either side of the top as trim.
Place and fasten the top on – you guessed it – the TOP of the buffet, and the main unit is complete! I used glue and countersunk finishing nails that I puttied over.
Step 9
Next comes the drawers and cabinet doors.
The drawers are just boxes built from 1x6s, with a 1×8 attached as a face. The dimensions of my are 12″x17″, and I’m using pressed paper-board as a bottom. The advantage of using the 1x6s is that you can attach the drawer slides, and then affix the 1×8 face AFTER the drawer is put in to the unit. That way there’s no guesswork with where exactly to put the interior parts of the slides! Smart, huh?
The cabinet doors are made out of a 1×12 inset and surrounded by mitered 1x3s. I did them with pocket-hole screws and wood-glue. The doors are going to have to close in the space you’ve made for them, so some amount of sanding and re-cutting or sanding is probably inevitable. Measure carefully before you make your cuts, and follow your own measurements before mine.
To be honest, my own design for the doors was mostly put together out of sloth: I didn’t have any wood large enough to cut down into a single-piece door, so I made doors out of five smaller pieces. An alternative is to measure the space for your doors, and cut a piece of plywood to fit precisely. You can add molding to the plywood to simulate the effect of recessed cabinetry. Many local hardware stores will cut plywood to your dimensions, so if you’re daunted by the idea of five-piece door fronts, this might be a good idea.
Once the doors are assembled, you can attach them with whatever hinge hardware you like. If your hinges aren’t self-closing, consider adding a cleat to the inside of the cabinets with a magnet to keep the doors shut.
Step 10
Last, measure the center space diagonally, and miter six 1x2s to fit. The bottom of the 1×2 should be pressed flat against the bottom piece, and the top of the 1×2 should be pressed flat against the wall. If only a tip of the 1×2 touches the bottom, or if only a tip touches the wall at the top, then the pressure will cause a dent when you put heavy bottles of wine there.
Add handles.
I also added a strip of thin crown molding along the top of the piece, that I thought made it look a little less chunky. You can add a paper-board back, I haven’t (but may in the future.)
If you’re like me, there are LOTS of cracks and holes in your buffet, so I went through and puttied EVERYTHING. Let it dry, then sand it with a medium grit sand paper. Then I re-puttied the remaining cracks, and sanded again with a fine-grit paper.
Tonight I’m going to stain it black, and then polyurethane it to match the rest of the furniture in the room.

Comments
Nan Tovar (not verified)
Mon, 01/10/2011 - 07:59
Oh. Wow!!! This looks
Oh. Wow!!! This looks awesome!
And your directions are nice and simple too.
Thank you! One more of many for my to-do list :)
jconnaghan (not verified)
Mon, 01/10/2011 - 08:48
This is gorgeous! I love the
This is gorgeous! I love the doors! but what do you mean by a "1×12 inset and surrounded by mitered 1x3s" when describing how to make the doors. Could you elaborate a bit more by chance?
Allison (not verified)
Mon, 01/10/2011 - 09:13
Wow, what a gorgeous piece!
Wow, what a gorgeous piece! Definitely adding it to the "to be built" list! Thanks for the detailed instructions!
Ana White (not verified)
Mon, 01/10/2011 - 09:25
Thank you for posting this
Thank you for posting this plan, Jack! Not only are you helping out by sharing your plans, you are putting fresh ideas out there, giving people options about building. Thank you so much, and your buffet is just gorgeous! When something looks that good in the buff, it's going to be stunning finished.
However, I don't envy you now. I would be sweating bullets to take a paint brush to this one :)
Michelle (not verified)
Mon, 01/10/2011 - 09:31
Jack, I have to say that I
Jack, I have to say that I think yours looks better than the E-A one. I like that the "x" is not solid, I think it looks fabulous...congrats and thank you
Dianne (not verified)
Mon, 01/10/2011 - 09:34
This is beautiful! Thanks so
This is beautiful! Thanks so much for the sharing! I have sooo many things I want to build! :)
pericles49 (not verified)
Mon, 01/10/2011 - 09:55
Nan: Thanks! jcon: For the
Nan: Thanks!
jcon: For the cabinet doors, I measured the space in which they were designed to fit. I subtracted three inches from each side to account for 1x3 trim. On MY version, that left an area of about 12x10, which I cut out of a 1x12. I then mitered 1x3s to fit around the cut 1x12 board, and secured the whole thing with pocket-hole screws and glue. Instead of screwing it all together with flush faces, though, I used an eighth-inch drill bit as a shim, and inset the 1x12 by an eighth of an inch. It overhangs the trim by an eighth of an inch on the back. An alternative would be to cut the doors exactly to size using ply, and then miter 1x3 scants and glue them to the face of the door. That might be sturdier.
Allison: I appreciate it - good luck!
Ana: Thanks again for the encouragement, and for the many many plans you've posted. As soon as it gets warm, your Adirondack series is going on my patio!
Michelle: Thank you! I really wanted to get the X to look like theirs, but by the time I was done I thought that the slats had more character. I'm glad you agree.
Dianne: Thanks for the kind words!
Jenn Hoff (not verified)
Mon, 01/10/2011 - 10:07
Oh my gosh! This is
Oh my gosh! This is gorgeous! I seriously gasped when I saw it. :) Good job, guys!
Loni (not verified)
Mon, 01/10/2011 - 10:33
Wow! Gorgous piece! Your's
Wow! Gorgous piece!
Your's looks so much better than the ea piece, (there's looks cheap to me, especially with the solid x)
Great great job!
Julie (not verified)
Mon, 01/10/2011 - 12:32
This is absolutely amazing.
This is absolutely amazing. I would love to build this as an island in my kitchen with a drop leaf so I could have stools there when we needed them. Beautiful job--and THANK YOU for sharing the plans and detailed instructions!!
Kim (not verified)
Mon, 01/10/2011 - 12:44
Wow! That is simply
Wow! That is simply gorgeous!!
brookethebuilder (not verified)
Mon, 01/10/2011 - 12:59
Me likey likey!! Thanks so
Me likey likey!! Thanks so much for posting this.
gugs (not verified)
Mon, 01/10/2011 - 16:26
Julie, if you made the base
Julie, if you made the base larger in size, you could also have storage and drawers on the other side.
Jami (not verified)
Mon, 01/10/2011 - 18:40
Haha! Tango...Salsa! Clever.
Haha! Tango...Salsa!
Clever.
bugnbelle (not verified)
Mon, 01/10/2011 - 20:54
I really like this, I looked
I really like this, I looked up the Tango buffet and you got it so precisely! Someday I hope to have the skills to build something like this!
fenn (not verified)
Mon, 01/10/2011 - 21:34
That "X" looks sooo good on
That "X" looks sooo good on your Salsa console, much nicer than the Tango :)
Jen Shorey (not verified)
Tue, 01/11/2011 - 11:34
Absolutely fabulous!
Absolutely fabulous!
Stevi (not verified)
Fri, 01/14/2011 - 16:40
Thank you for posting! I have
Thank you for posting! I have been looking for something like this to store wine. I am still searching for unique was to display wine hint hint everyone(:
Tracy Smith (not verified)
Sun, 01/16/2011 - 11:02
Very Very Nice!!! You gave
Very Very Nice!!! You gave great instructions by the way.. very detailed and thanks for coming back and explaining the door thing... I was a bit lost on that one too, but makes total sense now. I can't wait to start building (waiting on that paycheck) so I can build up enough skills to get to this point! I've already got the Kreg Jig in anticipation - just need the lumber now! Excellent job!!!
Lindsay (not verified)
Fri, 07/22/2011 - 10:15
Building now and wondering...
Hi Jack,
I'm in the middle of building the salsa console now (obviously I LOVE your design) and I have a couple questions:
1) Is the back of your piece "flat?" If I build it using the dimensional lumber specified in the plan, the exterior vertical boards (composed of the 1x12s and 1x2s) are going to be 3/4" deeper than the depth of the vertical interior boards. Am I missing something? I'm worried about putting the paper board backing on and having it lie flat across the back of the piece.
2) For anyone else building, the shopping list is missing the 1x10 you need to build the base in step #1.
Otherwise, things going really well!! Thanks so much for a fun plan!
Joan (not verified)
Sun, 08/21/2011 - 18:55
Granite Top? Open shelves to replace top drawers?
Beautiful and accessible plan, with great results!!
I was wondering if a piece of granite could be used for the top, and just siliconed on in the same way counter tops are...? Also, I'm afraid of drawers and how they rarely fit in the opening evenly. How could I just have open shelves?
Guest (not verified)
Tue, 01/17/2012 - 10:05
shopping list is not accurate
hi
Can you please fix the shopping list and repost it. I am almost done the project and I have:
1. a lot of extra wood of some sizes.
2. no 10" boards at all (another poster noticed this also).
I strongly suggest other people make their own shopping list until this one is fixed.
Guest (not verified)
Mon, 01/30/2012 - 15:15
My wife loves the way this looks
Noticed that Step 1 requires a 1x10 that is shown on the cut list but not on the shopping list. Suggest reading all of the steps and comparing what you have to cut to the shopping list. Had a similar surpise on another project which resulted in an extra trip to the home improvement store.
lazyLiz
Tue, 03/27/2012 - 19:41
AHHmazing!
This has been on my-to-do list and now finally started on building it (with modifications)
Zac (not verified)
Fri, 11/16/2012 - 20:08
Beware
As previously mentioned the Shopping list has you purchasing more lumber than needed (over 5x the 1x8 and 6x the 1x3). Additionally the plans are based on nominal dimensions in addition to numerous dimensional errors (the top will only be 55” long if you follow the instructions). If you are planning on building this you will need to make your own shopping list and make your own plans and cut list. If you follow this as written you will be disappointed.
erik.tillman
Tue, 02/11/2014 - 11:20
shopping list, sizes
can you please adjust the sizes and shopping list, I have had to make quite a few adjustments, I actually had to take most it apart after i noticed most of the time the 1x2 is actually calling for 1x3. other than that thanks for te post and plans.
builder24
Sun, 08/09/2015 - 10:57
Terrible list
Very nice table, but the shopping list is way off. Almost all the 1X2's are suposed to be 1X3's and its missing a 1X10 for step 1! Please update this list
nmccafferty
Fri, 10/21/2016 - 06:11
Please read instructions carefully!
So i downloaded and constructed this console w/o fully going through the plans. Following along the plans quickly leads you to having the incorrect material (a 1x10 for the base but no 1x10 listed in the material list) as well as when the sides are constructed there is a huge gap between the back of the side panel and the back of the floor! I had to add several boards to make everything come together. Also the plans call for a 1x10 and a 1x8 to equal 18", but an experienced builder knows that those two boards equal approx 17.25-17.5". Just doublecheck the plans before building! Otherwise I built a beautiful console!
diamonds1016
Fri, 12/29/2017 - 16:48
GORGEOUS
This is beautiful! I've been looking for something exactly like this only smaller - I have a space that can fit approximately 32" wide. Are there any plans for something like that?
green7274
Sat, 05/29/2021 - 13:57
Beware before using this project!
Warning! This is a very nice table and the creator looks like he did a good job however please beware when following these plans as the cuts and pictures are either not accurate or not descriptive enough to actually follow step by step. We had to make a lot of painful adjustments/buy a lot of different wood to correct the inconsistencies in the plans provided. We ended up using the basic idea and just doing our own thing from there.