
Shaker style dresser
Preparation
4 - 1x2x8
1 - 1x2x6
2 - 1x3x6
1 - 1x5x6
3 - 1x8x8
1 sheet 3/4" birch plywood
1 sheet 1/2" birch plywood
2 sheets 1/4" birch plywood (review cut list below before purchasing)
8 pair 14" euro drawer slides
16 knobs
2" finish nails
1 1/4" finish nails
5/8" finish nails
1 1/4" pocket hole screws
wood glue
wood filler
Side trim:
4 - 1x2 @14 1/4"
Legs:
4 - 2x2 @35 1/4"
Front trim:
2 - 2x2 @ 62 1/4"
Back brace:
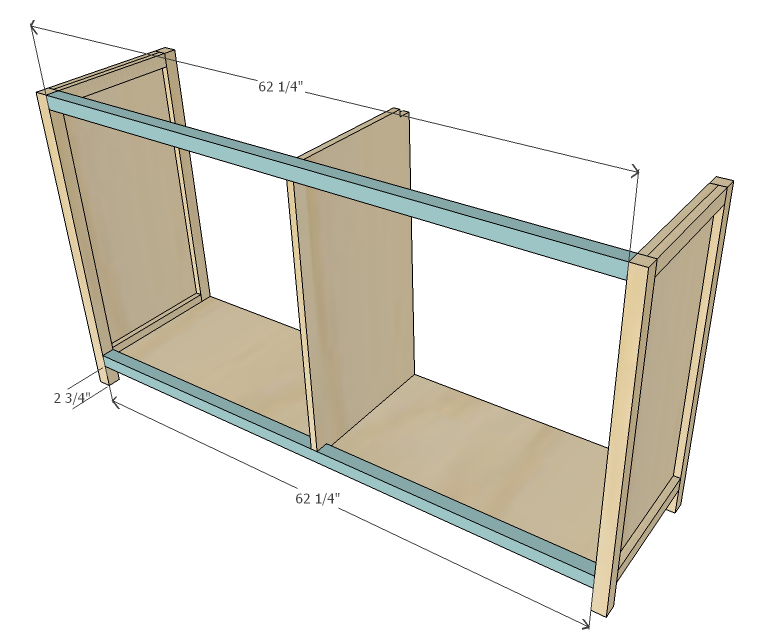
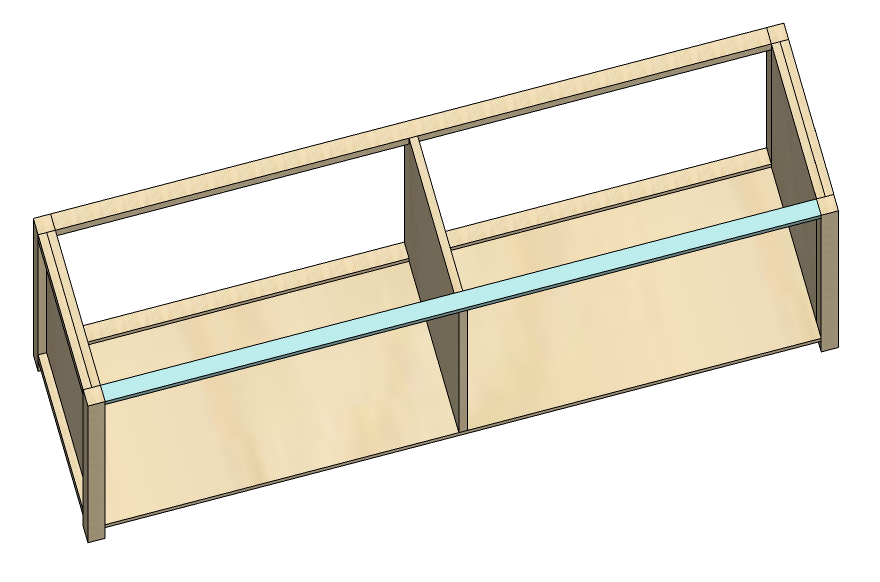
1 - 1x2 @ 62 1/4"
Drawer dividers:
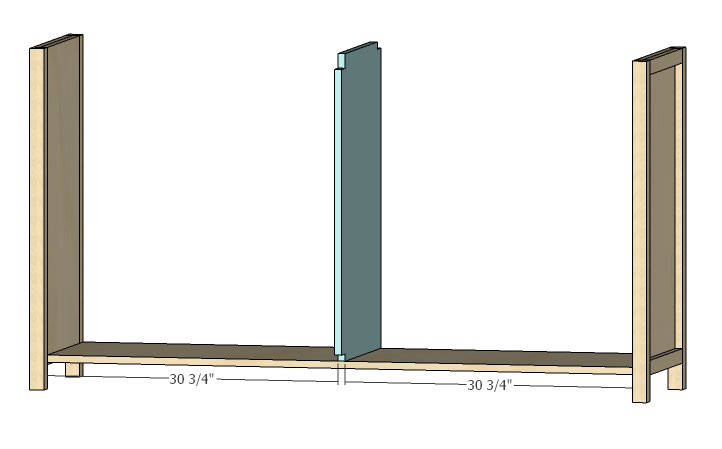
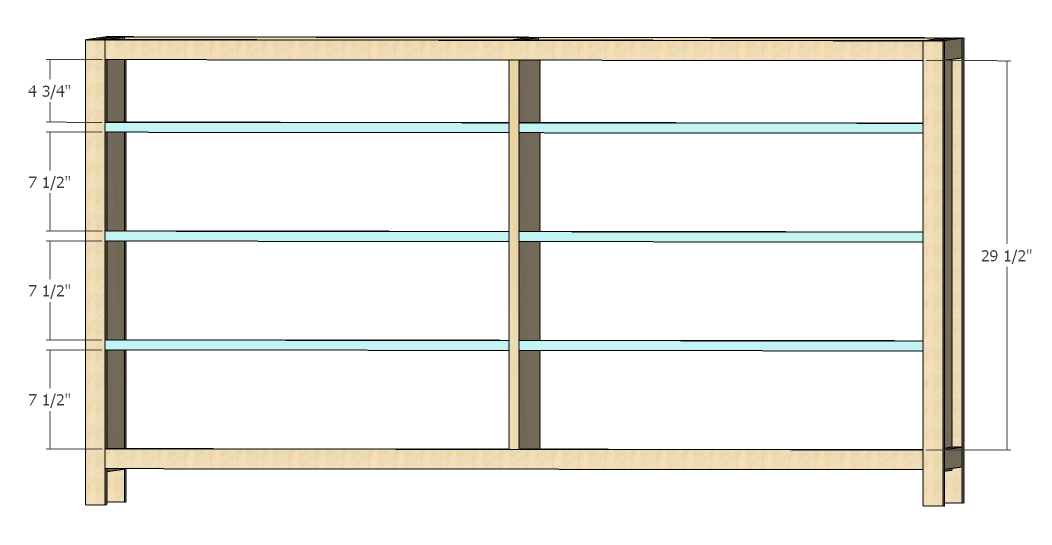
6 - 1x2 @ 30 3/4"
Small drawer fronts:
2 - 1x5 @ 30 1/2"
Large drawer fronts:
6 - 1x8 @ 30 1/2"
Top trim:
1 - 1x2 @ 67 1/4"
2 - 1x2 @ 18 1/4"
CUT LIST - Plywood
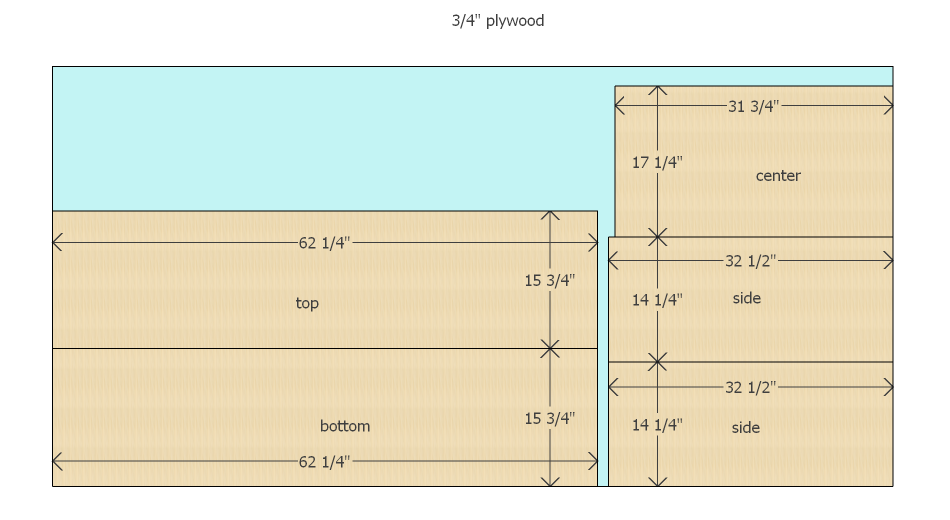
3/4 Plywood:
Sides:
2 - 14 1/4" x 32 1/2"
Center:
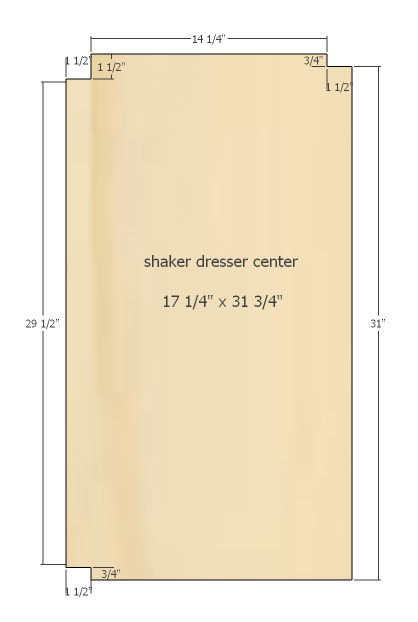
1 - 17 1/4" x 31 3/4"
Top and bottom:
2 - 15 3/4" x 62 1/4"
1/2" Plywood
Large drawer front/backs:
12 - 5 3/4" x 28 3/4"
Small drawer front/backs:
4 - 3 1/2" x 28 3/4"
Large drawer sides:
12 - 5 3/4" x 14"
Small drawer sides:
4 - 3 1/2" x 14"
1/4" Plywood
Drawer bottoms:
8 - 14" x 29 3/4"
Back:
1 - 32 1/2" x 65 1/4"
PLEASE read through the directions entirely before starting this project.
You may not need the second sheet of 1/4" plywood if you have some scrap 1/4" already, so please review the cut diagrams.
If you are doing any of the mods for jigsaw, miter, etc., the cut list and/or shop list will change, so please reviews those steps.
Please use eye and hearing protection as well as any recommended safety features on your equipment.
Please read through the entire plan and all comments before beginning this project. It is also advisable to review the Getting Started Section. Take all necessary precautions to build safely and smartly. Work on a clean level surface, free of imperfections or debris. Always use straight boards. Check for square after each step. Always predrill holes before attaching with screws. Use glue with finish nails for a stronger hold. Wipe excess glue off bare wood for stained projects, as dried glue will not take stain. Be safe, have fun, and ask for help if you need it. Good luck!
Instructions
Step 1
Step 2
These are the drawer sides and front/backs. I like to lightly label each crosscut by its row number. For example, each drawer front/back from the first rip cut would be labeled 'row a.' This way, I know to pair two 'row a' pieces for one drawer which ensures the pieces will be exactly the same length helping to make the drawer box square. If I matched a front/back from row a with one from row b, they might be slightly off in measurement. Likewise, I match sides from the same rows.
Step 7
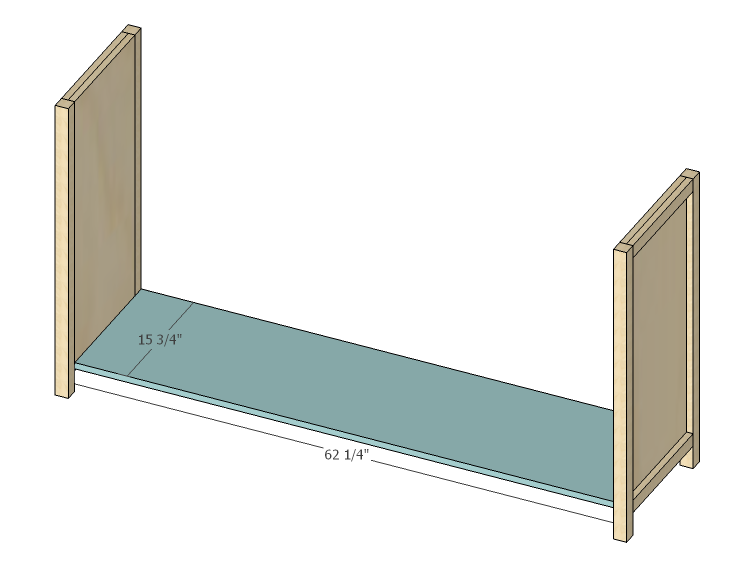
Attach the dresser bottom to the sides keeping the back of the dresser bottom flush with the back legs. There should be a 1 1/2" space at the front. Lay the pieces on the ground like the dresser is on its back. Making sure each corner is square, attach using pocket holes and 1 1/4" screws from underneath.
Step 8
Step 9
***no jigsaw***
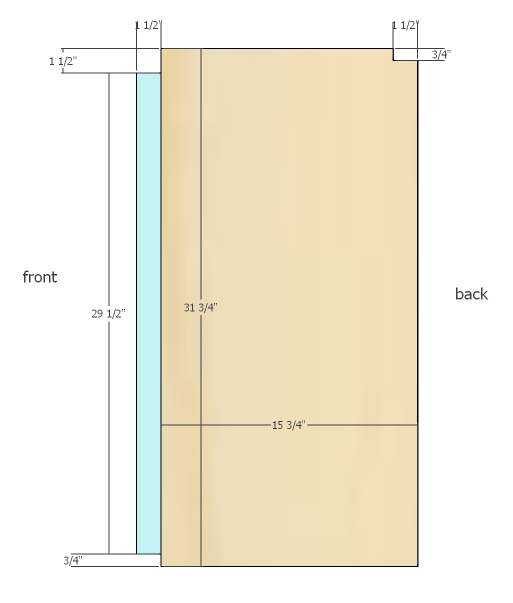
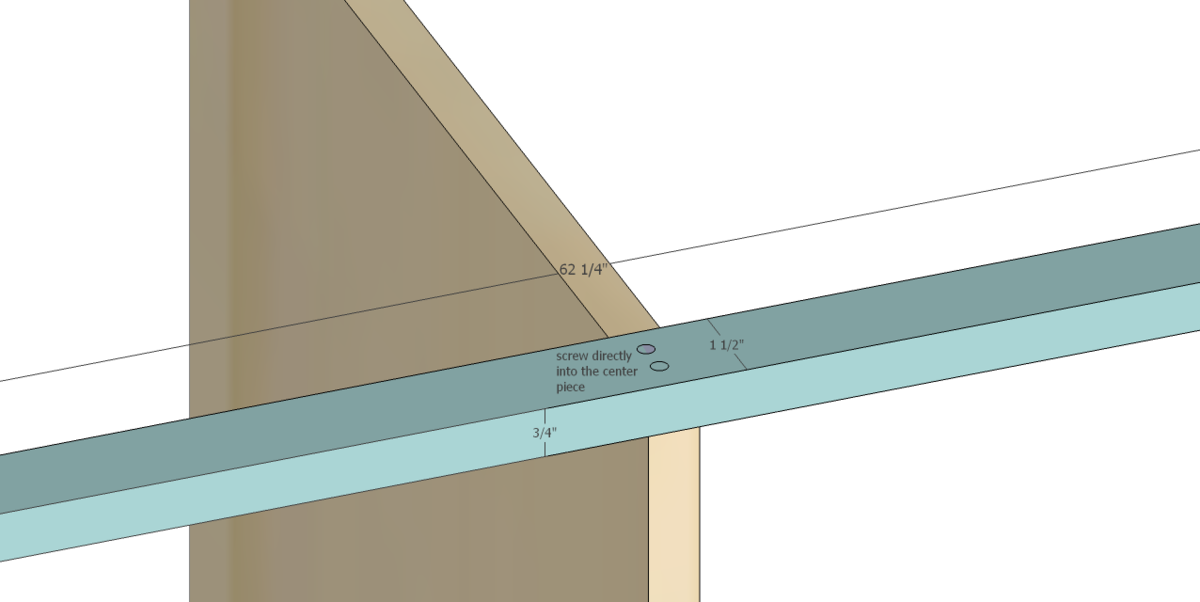
If you don't have a jigsaw, make the center dimenstions as shown below and attach 1x2s as shown. The extra 1x2 cut will be 1@ 29 1/2" and 1 @ 31". Use pocket hole screws to screw from the center section into the 1x2s. Try to place these where the center of the drawers will be to avoid interfering with the drawer divider or drawer slide placement.
Step 10
***staining the dresser***
If you want to stain the dresser, this option will let you avoid sanding the plywood edge to accommodate edge banding and will also keep all the front trim the same type of wood taking the stain more evenly. The extra 1x2 cut will be 1@ 29 1/2". Use pocket hole screws to screw from the center section into the 1x2. Try to place these where the center of the drawers will be to avoid interfering with the drawer divider or drawer slide placement.
Step 11
Step 12
Attach front trim pieces (2x2s) using the cutouts as guides. For the bottom trim, glue and use 2" finish nails or pocket holes from underneath. Screw directly from underneath into the cutout using 2 1/4" screws.
For the top trim, attach with 2 pocket holes on each side underneath and screw directly from the top into the center cutout using 2 1/4" screws. (I also used glue on each cutout.)
Step 13
Step 15
Step 16
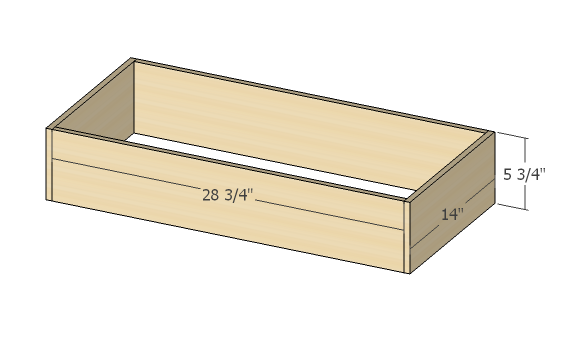
Build large drawer boxes as shown. There should be 6 larger and 2 smaller. Check for square. Put your pocket holes in the front and the very back. The drawer fronts will cover the front pocket holes, and you won't ever see the back holes.
Step 17

Build small drawer boxes.
Step 18

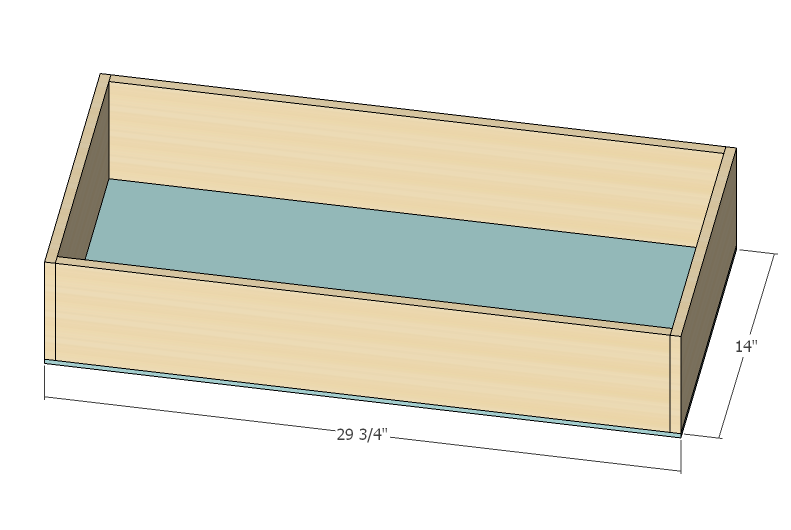
Add drawer bottoms using glue and 5/8" finish nails. Both the small and large boxes are handled the same way.
Step 19

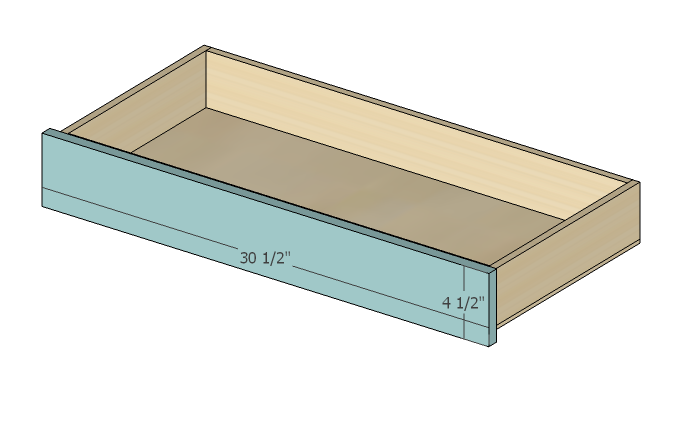
Install drawer glides according to package directions allowing for a 3/4" inset to accommodate the drawer front. Working one drawer at a time, put the large drawer box in the dresser. Using 1/8" craft wood strips as spacers on all four sides, position drawer front and clamp. Attach using a few 1 1/4" nails. Don't put nails where your knobs will be be. I like to write in pencil where the drawer was originally fit (e.g. L4 for left side, 4th drawer down.) I found that the 1x8s I used varied slightly in width. (It's probably overkill, but I wanted to be extra cautious!)
Step 20
Repeat with small drawers.
Step 21
 Attach trim to top using glue and pocket holes from underneath or 2" finish nails. (If you don't want to miter the corners, cut the 2 side pieces to 15 3/4" and do a butt joint with the unmitered 67 1/4" front trim piece.
Step 22
Place dresser top upside down on the ground. Remove drawers, and place dress upside down so that the backs of the dresser and dresser top are flush and there is a 1" overhang on the front and sides. Attach using the pocket holes and 1 1/4" screws. Also, screw through the brace into the top using 1 1/4" screws.
Step 23
Using glue and 5/8" finish nails, attach back to dresser.
It is always recommended to apply a test coat on a hidden area or scrap piece to ensure color evenness and adhesion. Use primer or wood conditioner as needed.





Comments
kmac1036
Mon, 04/30/2012 - 08:10
great
we're hurting for some good dresser / matching designs here. thanks for posting this.
Lukilla
Fri, 03/30/2018 - 07:51
Plans a little off
I just made this dresser, and realized the plans are just a little off. I ended up with an extra 1 x 8 x 8. Also, the cuts for the top trim are on the 1 x 3, not a 1 x 2. Aside from that, this dresser is gorgeous and a lot of fun to build.