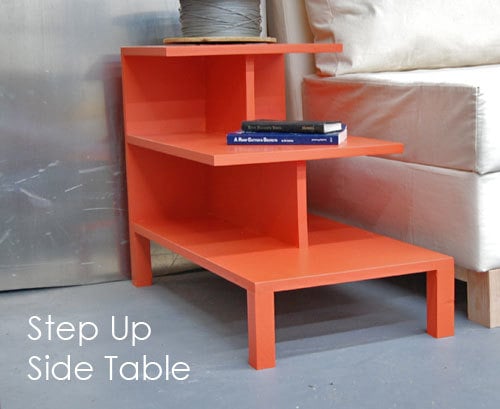
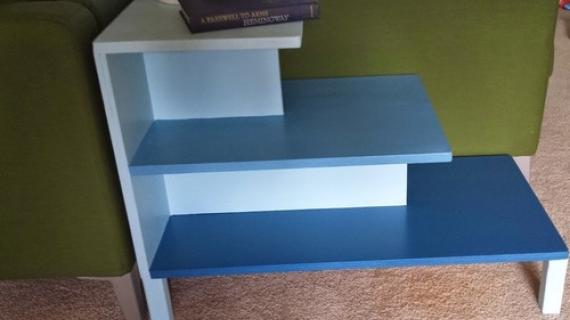
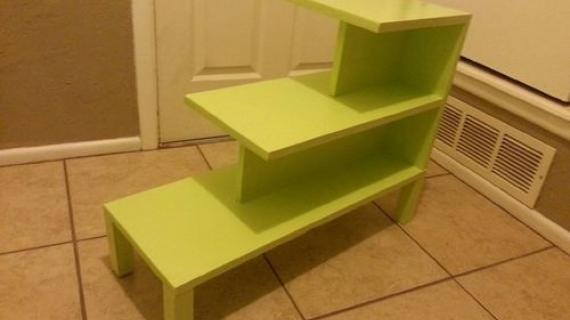
Featuring three shelves in different lengths, this side table provides interesting modern storage. Works as both a tabletop for placing drinks, and as storage and display for books and other things.
I've got a trick that some of you may see me do. It's a trick that I've learned from many of you. It's pretty simple.
Take a simple piece of furniture with an interesting design, paint it a bold color, and you've got instant style on the cheap.
Take this step up table (and yes, is highly inspired by the West Elm one). It is no more than a few boards that I assembled in mere minutes.
But with the addition of a bold paint, this simple table becomes so much more interesting.
And for those of you curious, yes, that is the storage sofa that you can build with these plans.
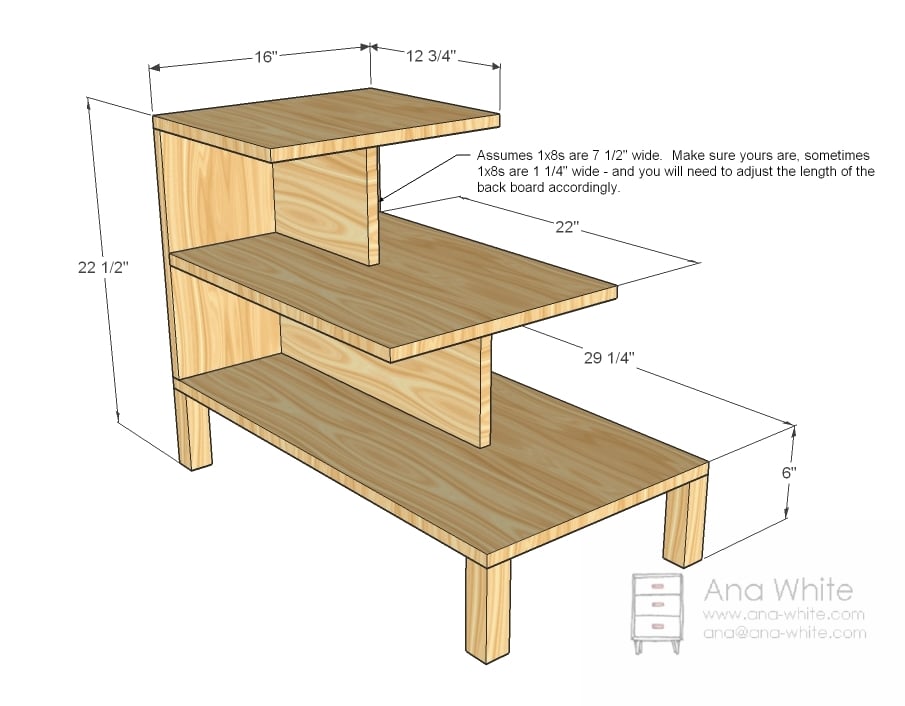
Preparation
16″ wide shelf, 8 feet long OR 8 feet long plywood cut 16″ wide or if you have scraps left over of 1×16 that is 15 1/2″ wide, you can use that too.
1×8, 4 feet long
2×2, 2 feet long
2″ screws or 1 1/4″ pocket hole screws
wood glue
wood filler
finishing supplies
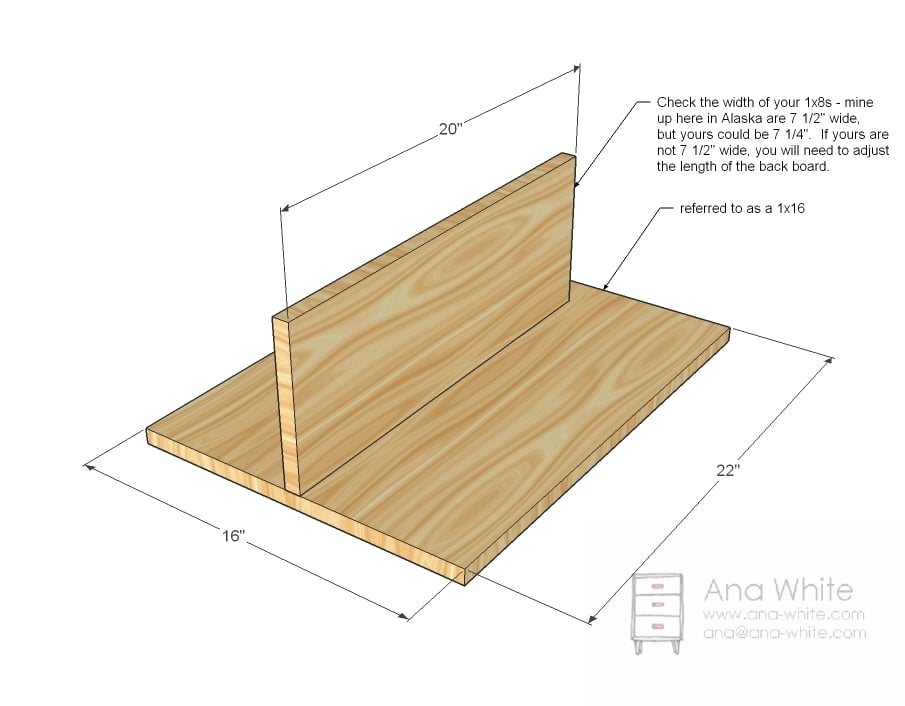
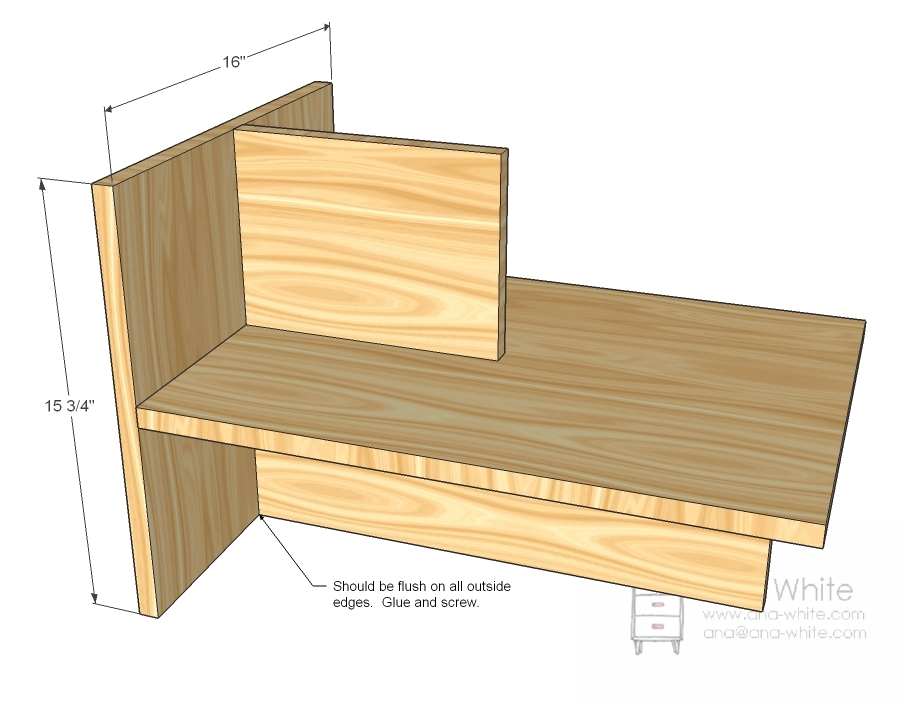
1 – 1×8 @ 20″ (Bottom Partition)
1 – 1×16 @ 22″ (Middle Shelf)
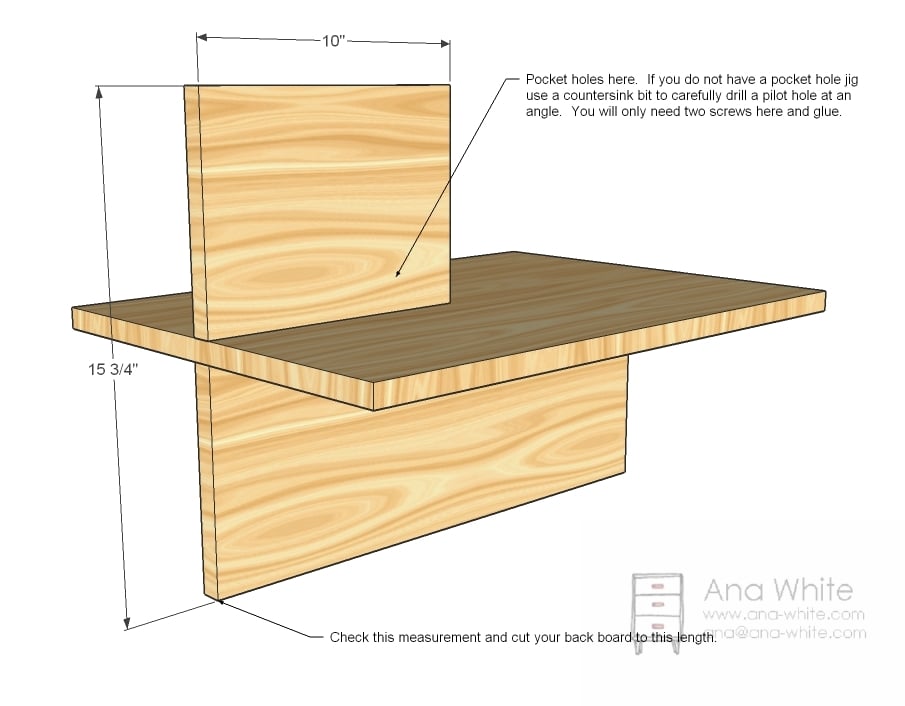
1 – 1×8 @ 10″ (Top Partition)
1 – 1×16 @ 15 3/4″ (Back – adjust if your 1x8s are narrower width)
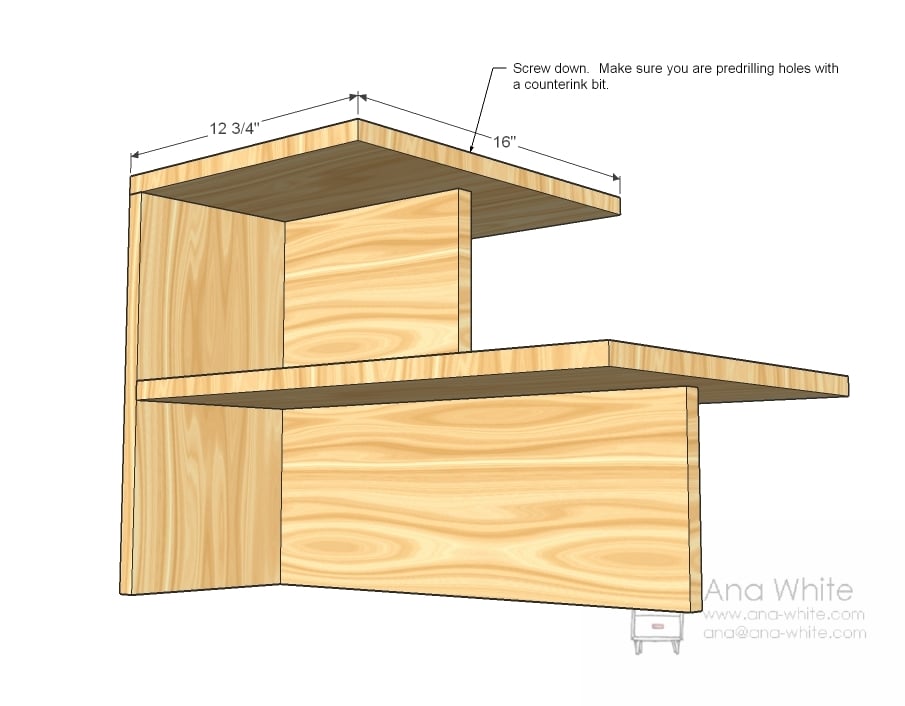
1 – 1×16 @ 12 3/4″ (Top)
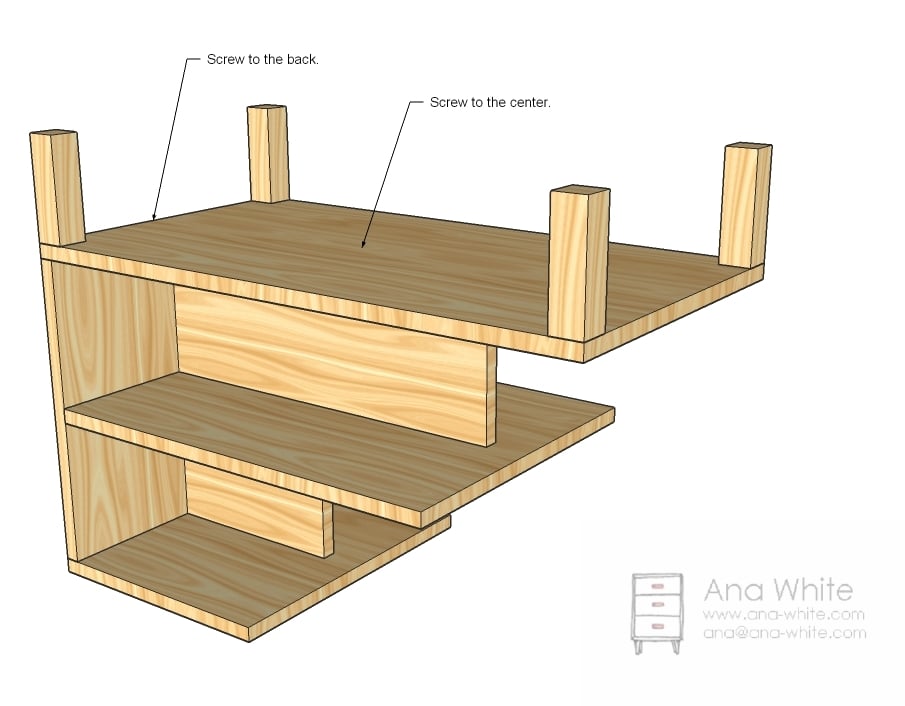
1 – 1×16 @ 30″ (Bottom Shelf)
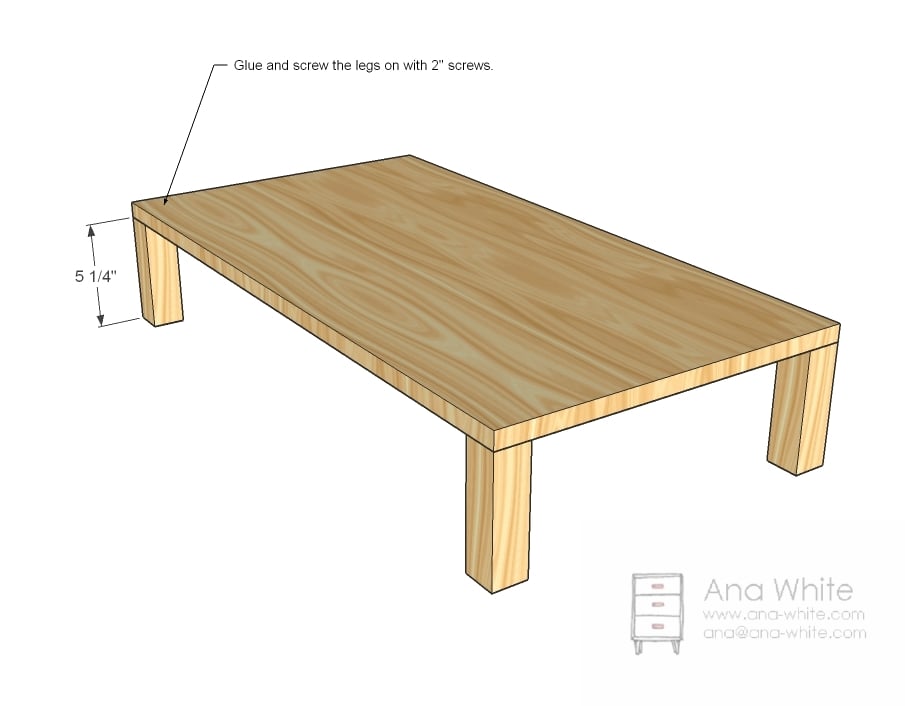
4 – 2×2 @ 5 1/4″ (Leg
Cut all your boards. Always predrill holes before screwing with a countersink bit or Kreg Jig™. Use glue. If you are working with MDF, use drywall screws, as the shafts of wood screws are tapered and tend to split the MDF. Be safe, have fun.
Instructions
Step 1
Step 2
Top Partition. If you have a Kreg Jig™, drill pocket holes and attach. Otherwise, carefully use your countersink drill bit to drill pilot holes at angles, then screw small partition to middle shelf. You don’t need much support here – glue and being attached on the top and back side will be lots of support.


Comments
Lynn (not verified)
Fri, 11/19/2010 - 01:38
This is great! I plan to
This is great! I plan to make some for my cats to use as steps up to higher places! Great plans and I like the idea of using bold colors. All the wood you are making me desire is going to get expensive, but my home will look amazing! Your site is a dream. You are living the life I want...creating useful things for living and doing it in a beautiful environment. I envy that you are in Alaska. Beautiful part of the world.
Sha~ (not verified)
Fri, 11/19/2010 - 01:45
I want to 'remodel' my 22
I want to 'remodel' my 22 year old son's room as his collection of furniture is what we had or found out of necessity when he was a teen. He bought his own Malm bed from Ikea, so I think he will like this style. Looking at that storage sofa too, maybe a love seat size for him that he can take if he ever decides to get an apartment.
Micha (not verified)
Fri, 11/19/2010 - 02:49
What a delicious shade of
What a delicious shade of orange! This side table would make a great night table for our son's room, especially in that color :o)
jill wright (not verified)
Fri, 11/19/2010 - 04:59
I love that you can take
I love that you can take something so easy and make it look so cool:) I am hoping you'll do some more end tables in the future. Maybe something a little curvier?:)) Thanks Ana!
leigh7911 (not verified)
Fri, 11/19/2010 - 06:12
Oh! I like this a lot. Been
Oh! I like this a lot. Been trying to figure out what I'd like for an end table in the living room, and this might be it. Do you think it'll hold up well to someone who will literally use it as a step up though?! :)
Tanjia (not verified)
Fri, 11/19/2010 - 06:40
Wow! I love this table. A
Wow! I love this table. A couple of these and a couple of C tables and my house will be much more efficient. Thank you, Ana!
I really wish I had a work shop.
Bethany (not verified)
Fri, 11/19/2010 - 06:59
Your photography is getting
Your photography is getting better and better! Do you find it challenging sometimes, with the limited light you get in Alaska during parts of the year? I live in Michigan, and by the time I get home from work it's dark outside, so it's tough to find time to take great, natural lit photographs!
This is super awesome. I love it.
Ana White (not verified)
Fri, 11/19/2010 - 08:11
Bethany, thank you! And yes,
Bethany, thank you! And yes, the lighting is a huge huge challenge these times of the year. That's actually why most all of my photos are taken in the garage under - hate to admit it - florescent lighting. Maybe someday I will get my own studio . . .
michelle (not verified)
Fri, 11/19/2010 - 09:16
Yes......totally LOVE
Yes......totally LOVE it......I am going to paint mine Sparkling Apple........Yeah........
Annalea (not verified)
Fri, 11/19/2010 - 09:22
If you assembled this from
If you assembled this from the top down, it seems like it would be easier to attach the shelf supports directly through the shelves. The screws could go through the top into the first shelf support, and then up through the second shelf into that first support, then down through the second shelf into the part of the second shelf support that extends past the first. Screws through the back into the shelves & supports would help give stability in back.
Just a thought for those who don't own pocket hole jigs.
Tsu Dho Nimh (not verified)
Fri, 11/19/2010 - 10:48
Ana - If you have halogen
Ana -
If you have halogen work lights, you can make a quick photo studio. This explains how I make quick "studios" when I'm taking pictures in a factory or other non-studio place.
http://www.associatedcontent.com/article/52513/digital_photography_ligh…
A couple of sheets tacked up for a backdrop, one under the furniture, and you have your studio.
If you want more elaborate sets, make some "flats". http://home.earthlink.net/~rowse/pgs/fltbldng.html
It's just a wooden frame, covered with fabric, hinged together in the rear. You paint the fabric with cheap white glue, then with whatever color latex you want.
Adriane (not verified)
Fri, 11/19/2010 - 19:22
Great tutorial Ana! We've
Great tutorial Ana! We've made a few items ourselves and haven't had a moment to post pictures. We will soon. We appreciate you so much for all that you do..the plans are wonderful and we have the power now to say "hey, I can build that!!" Woohoo!
Kerrie (not verified)
Sun, 11/21/2010 - 04:21
Ana, exactly what color did
Ana, exactly what color did you use. I want to build your apothacary (sp?) cabinet and I'm thinking about painting it orange. I love colors but have a hard time knowing what colors to put together. What other colors would you suggest to use with this orange (I don't want my whole living room orange!) Does anyone else have any suggestions?
Shannon (not verified)
Sun, 11/21/2010 - 13:56
Thank you for sharing this! I
Thank you for sharing this! I absolutely love it, and I will definitely be making it in the future! I think I may try to add a no slip surface on one side so that my little terriers can use it to get up onto our bed.
Jade (not verified)
Sun, 11/21/2010 - 21:13
Ana - Thank you SO much for
Ana - Thank you SO much for posting this. I think you've just given me plans for my daughter's doll house. It will be so much fun decorating those little partitioned rooms and maybe adding a little rooftop swimming area.
~ Jade
CK (not verified)
Tue, 11/23/2010 - 10:33
Fantastic Ana, thank you!
Fantastic Ana, thank you! This is exactly what I've been looking for to sit beside my sofa, I will be shopping tomorrow :)
Ana White (not verified)
Thu, 12/16/2010 - 14:35
Thanks for the info!
Thanks for the info!
Matt Nirt (not verified)
Mon, 01/31/2011 - 02:10
suck my hairy nipples
suck my hairy nipples
Samantha (not verified)
Wed, 02/16/2011 - 05:52
My kids LOVE the step-up
My kids LOVE the step-up table for storing their books. They are 6 and 8 and were able to help me through process of making it--and we painted ours purple. Thanks for the plans! We are trying the High Rise Shelf next!