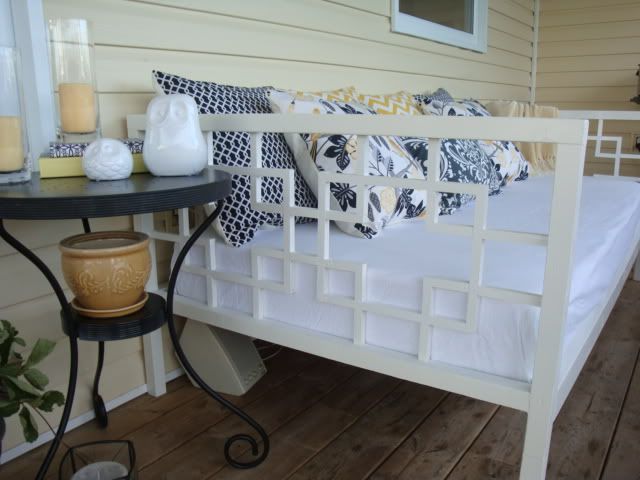
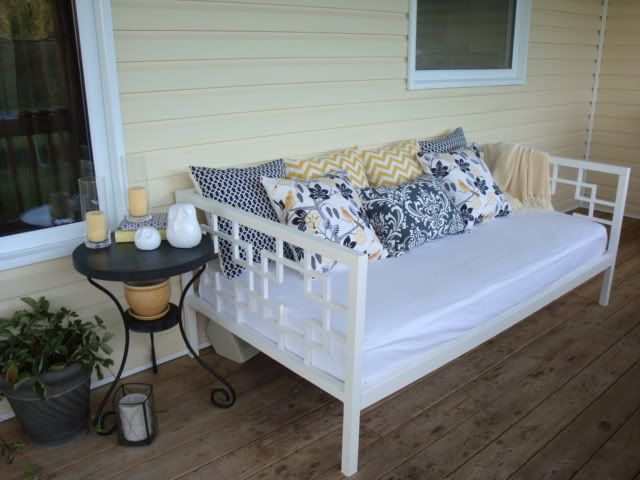
I just recently found this site, and being the cheapskate I am, was incredibly inspired to start making some of my own furniture. My first project was inspired by the West Elm Overlapping Squares Daybed seen here: http://www.westelm.com/product.....ybed-p054/
It honestly didn't take that long, and since I am not only cheap, but also very impatient, I didn't draw up much of a plan beforehand, other than to figure out what I needed for wood. So one trip to HD and $50 later (vs. the $450 the bed would have cost from West Elm), I had my necessities. All in all, it took me about a day and a half to finish, including painting. I made the arm piece first, then set it flat on the ground on a large piece of my kids art paper to figure out the measurements and placement of the decorative pieces within the arms. Figuring out the decorative pattern, measuring the spaces and the wood, and cutting all the little pieces was definitely the most time consuming part of it.
Here's the finished project:
Maria in Maui
Thu, 09/23/2010 - 17:59
It's beautiful! You did a great job!
zoebird
Fri, 09/24/2010 - 23:03
i was totally thinking about this myself. i was checking out the Young House Love blog, and was loving their sunroom, and was thinking about it for my office.
long story short, i think i'm going to do something similar, but make it more narrow, like a normal bench. what does the back look like?
amanda.leonard
Sat, 09/25/2010 - 15:48
Love Love Love it!!!!! I am so impressed. Build one for me too.
Amanda
jrsmrs
Sat, 09/25/2010 - 17:41
Zoebird, YHL IS actually where I first saw it! I loved it immediately, and knew it would be easy enough to make.
The back on the actual west elm piece is a continuation of the squares, but of course I knew mine would always be covered by pillows so I took the lazy way out and just screwed in 6 pieces of 2x4 on the vertical for back support. I think it's sturdier that way anyway, as the pieces of wood I used for the decorative detail were so thin (11/16") that they aren't all that strong and I would worry about leaning back on them heavily. In any case, it turned out fine and you can't even see the back anyway with the way I have it.
mairanellis
Sun, 09/26/2010 - 14:46
I LOVE it! I've also been eyeing this daybed and wanting to make it, but I couldn't figure out how to make the decorative arm piece. How did you do that ornate work? Did you use a Kreg jig? What size wood did you use for the ornate part? Can you give me any additional pointers on how you made those arms? I would sooo appreciate it! Thanks.
jennynicole
Sun, 09/26/2010 - 15:51
Love it! This is the daybed I want and wasn't sure it could be DIYed easily thanks for posting this. I'll definitely be tackling this next!
anawhite (not verified)
Mon, 09/27/2010 - 05:44
Wow! I am so impressed! Can I please please blog and develp a plan? Also, what did you use for the decorative parts, trim or craft boards? Or did you (bless you!) cut out the pieces from boards or plywood? I'm am stunned. Thanks so much for sharing! Ana
megnstuff
Tue, 09/28/2010 - 04:10
impressive and inspiring!
jrsmrs
Tue, 09/28/2010 - 15:14
Thanks so much everyone! I'm glad you like it as much as I do!
I will try and post the plan I made up for this bed sometime this weekend.... hopefully someone else can make use of it and save themselves some moolah too!
FYI, I didn't use anything out of the ordinary for this project- a mitre saw, drill, hammer... that's about it! I had to think through the detail work to get it to work out without any fancy machinery, but I will post more details this wknd. Cheers!
jrsmrs
Sun, 10/03/2010 - 08:26
Ok, so here's my attempt at a plan to show how I made this bed. Hopefully it's clear enough to understand, but if not, just ask. Ana, I'm sure you'd be able to make up a better one, so if you're so inclined, have at it!
FYI, These are very crude drawings, and are not anywhere close to scale!
So this picture shows the dimensions of the arms, which was the part I did first using 2x2s:
Just try and keep things square while first screwing in the top of the arm to each leg. Then screw in the bottom cross-support.
Then what I did was lay the finished arm on level ground (or a table), and fit all the decorative pieces in to place. You do have the option of having the pieces float in the middle of the 2x2 arm pieces (so that there is even spacing on each side of the 11/16"), however I liked the look better- and it was easier- to just lay them right on the ground within the arm, so that they are flush with one side of the arm (which would be the underside that lay on the ground while I was working, and which I then used as the inside of the arm). The decorative pieces I used were 11/16" square, but if you decide to use a different size, that of course will change the measurements. This pic shows all the measurements I used :
As you can see, my squares were not perfectly spaced, as the outside horizontal pieces are 4.5" while the horizontal pieces that separate the 2 squares are only 2.75" so feel free to mess around with the measurements if you want everything perfectly even.
So in order to secure all the pieces, I first nailed/screwed the ones in place as shown here:
Then to fit in the remaining little L-shaped pieces (59mm x 3.5") that fit within the squares, I simply made each L individually by nailing them together and then toe-nailing them (with added wood glue) into the squares. Of course if you have fancy equipment, I'm sure there's an easier way, but as I said, I've got just the basics at the moment.
Finally, when the arm is complete, finish the bed by screwing on the front and back pieces labeled A/B/C here:
I both screwed each piece into the arm and added 1" L-brackets that I got from HD for extra stability. You can see from the pic where I placed them underneath each front and back piece.
As you can see from picture #1, I set the 38.5" bottom arm supports 10.5" up from the ground, so when placing the B and C pieces, I lined them up so the tops of them were flush with the tops of the bottom 2x2s on the arms.
Not shown in the pics, you then need a thin piece of wood to screw onto the inside of each of B and C pieces which will act as a support for your slats that hold up the mattress. I actually had an old twin sized Ikea bed that I took apart for its slats and slat supports, so that was easy enough. If not, any piece of wood 2x2 or smaller would work fine. You will obviously need two of them, and they will each be about 73" long and screwed onto the inside of B and C, 1.5-2.5" (depending on the size of the support you use) below the top of them, so they will allow room for the slats to be concealed and the mattress will sit nicely just below the top of the front piece. If you don't have ready-made slats like I did, several pieces of 1x2 or 3 wood cut to 38" will fit nicely within the front and back pieces B and C, while still sitting on top of the slat supports.
Also, between back pieces A and B, I cut about 6 or 7 16.5" pieces of 2x4 to screw in to act as vertical back rest supports.
After everything was done, I sanded the whole thing really quickly just to get rid of any burrs, filled in nail/screw holes and caulked all the points where the decorative pieces meet eachother just so it would look nice and uniform. Then a few coats of white paint and I was done!
Whew, so hopefully that wasn't too confusing, but if there are any questions, of if I forgot anything, just let me know!
andjarnic
Sun, 10/03/2010 - 11:58
Hey all,
My daughter wants a day bed... this looks great and I am hoping she may like something like this. I am actually making (slowly) the easy twin storage beds for my two younger boys, and was considering something like that for my daughter as well.. but being almost a teen, I'd love to do something a little more like this bed. Question I have is.. what sort of weight can this frame hold? Being the length of it is made up for 2x2s, if I were to use 2x4 lumber, rip it into 2x2s with my neighbors table saw.. will those three 2x2s be strong enough to support a couple kids sitting on the bed, or even myself at (sadly) almost 300 lbs laying in it?
I was thinking some 2x2 slats going across the bottom may give it some extra support, and perhaps a center leg or legs as well?
I can't tell from the drawing, but did you do the same arm patterns along the length of the back side?
Lastly, assuming you didn't apply the arm pattern to the back side, there are only two rails there... so unless you use fairly thick/large pillows, leaning against it wouldn't you fall through between the rails? Kids anyway... and by this I do know it generally will be up against a wall, but given the gap between the top and bottom 2x2s, I am wondering without any sort of pattern to fill it, what do you do to avoid sort of depressing in between the 2 boards?
Thank you. Excellent work!
jennynicole
Sun, 10/03/2010 - 13:22
jrsmrs - Thanks so much for posting these plans! I think this will be one of the next projects I tackle!
tnslb
Mon, 10/04/2010 - 02:27
This is amazing, I love it! I'm tempted to make one to replace the old beat up futon that is currently in the living room (which is really the playroom for my 3 year old son, hence the lack of real furniture).
I'm also curious as to how much weight it can hold, but I'm generally curious about that for nearly any plan, since DH broke a little pressboard shelf/thing we'd been using as a shoe rack, by sitting on it!
jenoside
Mon, 10/04/2010 - 03:21
I'm totally in love with whoever posted this. I have been eyeing this daybed for a while now and I am totally inspired now to try to build one! If only mattresses were also $50, I would be set!
kristen
Mon, 10/04/2010 - 05:57
Wow! You are very inspiring for a beginner like me--that you could just jump in and create this daybed. Beautiful!
jrsmrs
Mon, 10/04/2010 - 09:26
andjarnic, here are some pics that I hope illustrate the 'guts' of the bed a little better....
That shows the back on my bed. On the original west elm bed, their back is a continuation of the decorative squares, but as I said, with pillows always covering the back, I wasn't about to waste SEVERAL hours planning/cutting/fitting the intricate pieces back there, so I simply used some leftover wood cut to fit on the vertical between the back pieces A and B and screwed them in from above and below. They are spaced a foot or less apart, and support my back and pillows just fine. I feel they are sturdier that way as well, as opposed to if I had used the thin decorative pieces. If you wanted to, or if your back would show, you could of course figure out how to continue the squares over the back. Be prepared to add an extra full day to your project, though!
These two show the base of the bed that supports the mattress. As I mentioned, I happened to have a pre-made slat and slat support system from an old ikea bed that I dismantled, but had I not had that, several pieces of 1x2-3" wood cut to the depth of the bed (38" I believe) would be perfect and would support the mattress firmly.
To reassure you, the bed is QUITE sturdy! I was worried about that as well given it is largely made of 2x2s, but was pleasantly surprised. Husband and I both sit on there without any trepidation, and let's just say the both of us combined are closer to the 400lb mark! I wouldn't jump on it given the thinness of the slats, but for regular sitting/laying it's just fine. Just as solid as any twin sized ikea bed, which I say from experience.
Any more questions, feel free to ask!
cassijean
Mon, 10/04/2010 - 11:34
This is so fabulous. I've not known what to do with my spare bedroom as I don't want to keep the current bedframe and this will be perfect! Now to add it to my list of projects and maybe I'll get to it in the spring :)
sunshinecasey
Mon, 10/04/2010 - 18:45
Awesome job! I looked at this before and thought it was too complicated for me but now I am reconsidering. Thanks!!! I also want to know where you got the CUTE owls on your side table! Adoreable!!!
jrsmrs
Tue, 10/05/2010 - 05:34
Believe it or not, the owls were a dollar store find! Of course they were a hideous mix of green and brown shades before I doctored them up with some gloss white spray paint, but I love them now! I filled them with rocks and hot-glued a piece of cardboard over the hole in the bottom, just so they wouldn't blow away (we get some fierce wind back there!) and now they live on my deck. So $3 ($2 for the large, and $1 for the small) and 5 minutes with a can of spray paint later and I've got some cute and super-cheap decor
andjarnic
Tue, 10/05/2010 - 11:28
jsrmrs,
Thank you for the replies and pics. Couple more questions. The intricate design ont he sides... did you just glue all those pieces together? I see where each of the squares are two longer pieces on top connected to two side pieces... were those nailed/glued? If nailed, being 2x2s, did you just use one nail in the center for each joint? I was thihking of using my Kreg Jig.. but then I am left with the large pockets which won't look good on this piece. The smaller pieces as well.. I would assume all glued together?
The other question... my daughter loves the bed, but wanted one end to be left off, so that there is just one arm and the back support, leaving the end of the bed by her feet left open. She plans to grow longer than a twin bed apparently. Anyway, do you think that would be structurally ok.. or leave the one end too weak? I figured with leg supports down there, it probably wouldn't matter, but would like your opinion (or of others that may know).
Thanks.
jrsmrs
Wed, 10/06/2010 - 14:26
If you look back to my post #11 with the diagrams, the third diagram shows how I nailed the detail trim in. The detail work is not done in 2x2s- only the bed frame itself is 2x2s, with the detail work done in 11/16" square trim wood.
I used two nails in each spot shown. I did start out gluing them as well, but the glue was just getting squished out so I gave that up pretty fast, except for with the last pieces (the L-shaped pieces that sit within the 10.5x12 squares) which got toe-nailed and glued.
The frame itself (2x2s) was screwed together (predrilled), with 2 screws at each joint.
andjarnic
Wed, 10/06/2010 - 18:37
Yes, I am sorry.. I did go back and see that after I posted. What is toe-nailed mean?
Do you think the bed would be ok with only one of the arms on.. one left off? My daughter wanted a sort of daybed/lounge hybrid, with the arm at the foot left off. Just wondering if their is any issues with not putting that arm on structurally.
andjarnic
Thu, 10/07/2010 - 05:02
Hi again,
I did have a more general design/wood joinery question to ask, but fits well with the design on the bed arms. I have the ability to do 45 degree bevel cuts... rather than just glue/nailing the various pieces of wood together as you did (and the West Elm bed does), would there be any advantages to using 45 degree bevel cuts on the corners and joining them that way? Perhaps using dowels/biscuits, or some other method? I am thinking in terms of the way it looks, if a 45 bevel would make it look more seamless.. one piece, as opposed to actually seeing the seams a bit where the 2x2s come together to form the squares and little L shaped sections? That could be part of the design too, and looks fine just the way it is. I am just curious for my own knowledge if using 45 bevel joinery might be better structurally, or the look of it as well.
Thanks.
Tsu Dho Nimh
Thu, 10/07/2010 - 05:40
http://chestofbooks.com/home-i.....iling.htmlandjarnic said:
Nailing at an angle to hold one piece of wood at right angles to another. It's used to hold wall studs to the base stud.
http://chestofbooks.com/home-i.....iling.html
It's also a bit tricky to do without splitting the wood, which is why the Kreg jig is such a great tool.
andjarnic
Thu, 10/07/2010 - 05:48
Ah, ok..I thought it might have been that. I have the Kreg Jig.. which works great in many scenarios, but this particular piece I would think the holes the Kreg Jig produces would be visible. Unless you buy the caps to cover them. Then it may work as well, which I thought about doing. That was also why I asked about doing the 45 bevel miter cut if that might look better (less visible seam), and/or stronger joint depending on how it was put together.
WendyB
Fri, 06/03/2011 - 13:50
My husband and I are in the
My husband and I are in the process of building this daybed (we made plans to add squares to the back too). How can we build it in a way that it can come apart for easy transport? From the plans it looks like it is screwed together into one big piece. It would be nice to have the option to move the daybed to another room without worrying about it fitting through doorways/hallways/etc. Any help would be greatly appreciated!! :)
I Play Outside…
Sat, 07/23/2011 - 22:57
Impressed!
That is totally awesome!