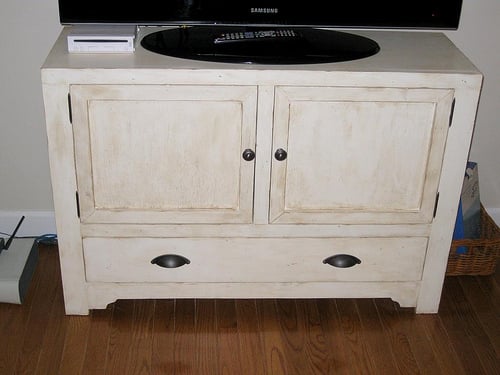


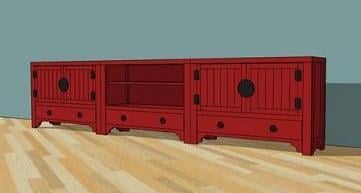
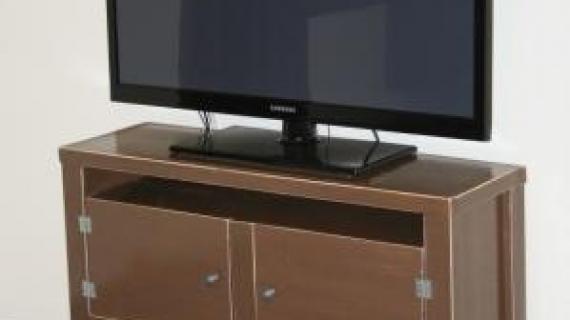
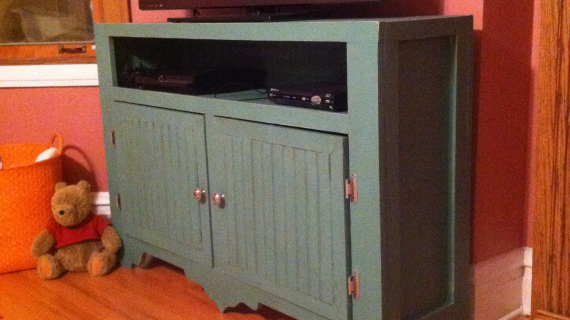
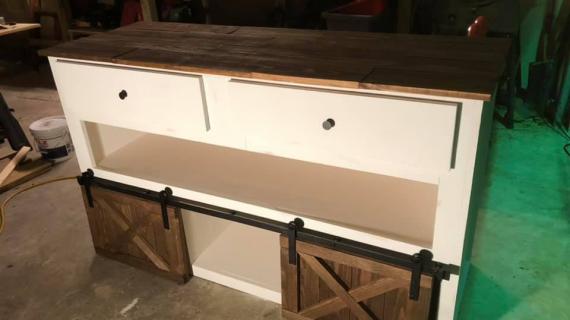
This simple closed media console can be built with or without drawers. Add a rustic finish and hardware, and create a beautiful spot for your tv - or use as a console table.
Preparation
3 - 1x12 @ 8 feet long
4 - 1x2 @ 8 feet long
2 - 1x3 @ 8 feet long
1 - 1x4 @ 4 feet long
1 - 1x6 @ 8 feet long
Hardware
Plywood for back (optional)
Cut List for the Cabinet
2 – 1×12 @ 23 3/4″ (Sides of Cabinet)
3 – 1×12 @ 38″ (Shelves)
2 – 1×12 @ 1″ (Drawer Guides)
1 – 1×12 @ 39 1/2″ (Top of Cabinet)
2 – 1×2 @ 11 1/2″ (Top Side Trim)
2 – 1×2 @ 41″ (Top Front and Back Trim)
4 – 1×2 @ 26 1/2″ (Sides of Legs)
4 – 1×3 @ 26 1/2″ (Front and Back of Legs)
1 – 1×2 @ 36″ (Back Bottom Trim)
1 – Beadboard Plywood 41″ wide x 25 1/4″ tall
2 – 1×4 @ 8 1/2″ (Side Footer Piece, Cut Out Design)
1 - 1×4 @ 36″ (Front Footer Piece)
1 – 1×2 @ 36″ (Front Middle Shelf Trim)
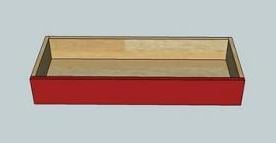
Cut List for ONE Drawer
1 – 1×12 @ 34 1/4″ (Drawer Bottom)
1 – 1×6 @ 34 1/4″ (Drawer Back)
2 – 1×6 @ 12 1/4″ (Drawer Sides)
1 – 1×6 @ 35 3/4″ (Drawer Front)


Instructions
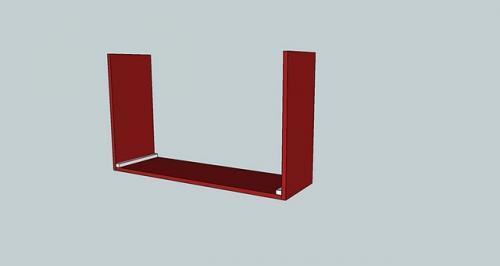
Step 1

Start by attaching with 2″ nails and glue the sides to the bottom shelf. Use one of the shelf pieces. Nail through the sides into the end edge of the shelf. Line up bottom edges.
Step 2
Next, attach with 1 1/4″ nails and glue the drawer guides. The drawer guides need to sit 1″ wide by 3/4″ tall.
Step 3

After the drawer guides are in place (not shown in the rest of the diagrams), add the middle shelf, as shown, 7 1/4″ from the bottom of the cabinet to the bottom of the shelf. Use 2″ nails and glue.
Step 4
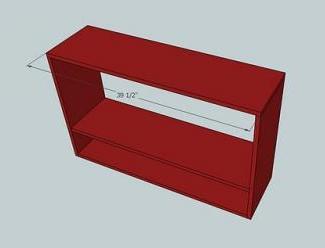
Nail the Top of Cabinet in place, as shown above. Use glue and 2″ nails and nail through the top of the cabinet into the top edges of the sides. Now is a good time to check for square. (If you do not know how to check for square, see the HOW-TO section).
Step 5

Step 6
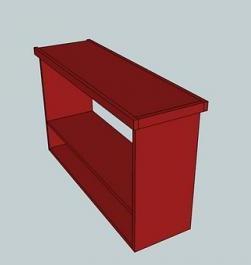
Attach the front and back top trim pieces as shown, keeping top and outside edges flush. Secure to the top of the cabinet piece and the side trim pieces with glue and 2″ nails.
Step 7
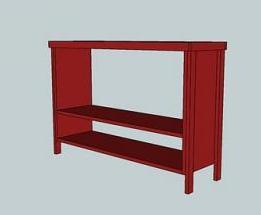
Now add the sides of legs, as shown above, keeping the front and back edges flush. Use 1 1/4″ nails and glue.
Step 8

Now add the front and backs of legs, as shown above, keeping outside edge flush with the sides of leges. Nail the front of the legs into the shelves, the sides, and the sides of the legs. This will keep the cabinet together.
Step 9

Cut the footer pieces, as shown above. Use your own creativity here! Once one piece is cut, you can use it as a pattern to cut the other pieces. Nail the footer piece in place, as shown above and below.
Step 10
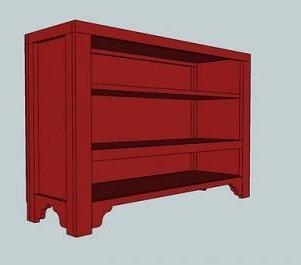
Attach the Front Middle Shelf Trim Piece, as shown above. Keep the top edge flush with the middle shelf. Also shown in this diagram is the adjustable shelf. You can add this now, or later. I use shelf brackets and add later so I can adjust the shelf to the perfect height.
Comments
Jori Hodgson (not verified)
Thu, 01/21/2010 - 22:12
I hope you don't mind, but I
I hope you don't mind, but I have a couple of questions on this piece too! :)
- What type of wood?
- Do you know where a good inexpensive (as possible) place would be to look for hardware like that?
- Have you posted plans for the cabinets with doors yet? I didn't see them, so I wanted to check with you.
Ana White (not verified)
Fri, 01/22/2010 - 05:08
I would use pine. Especially
I would use pine. Especially if this is your first project, it's cheap and easy to work with. And because you are painting, knots and wood grain are not going to be as important. Pine is also easy to distress, and comes in a variety of off the shelf widths.
For the hardware, I would check out the gate and door wrought iron hardware at your local hardware store. If you look closely at the hardware, it's simply a pin threaded through three loops, with a back plates.
The door plans are not up. I will be posting a general "how to build doors" post at some point.
LouAnn (not verified)
Mon, 02/15/2010 - 11:00
Wow - I found this site
Wow - I found this site through infarrantly creative blog. We just got a 46" flat-screen TV and desperately need a stand, but they are so expensive. Do you think this would support a 46"??? Right now it's on a white plastic table... real attractive. :)
smardeepants (not verified)
Tue, 06/01/2010 - 17:18
Anna, I would LOVE LOVE LOVE
Anna, I would LOVE LOVE LOVE the door plans for this one! It's gorgeous, and I've already got a spot in mind for it!
LauraV (not verified)
Wed, 06/16/2010 - 02:56
Ana -i love your site.
Ana -i love your site. Usually furniture plans involve complicated joints, plans and tools. Yours are simple and understandable even for the beginner like me. I love the rustic red media cabinet and I will build it!
Tami (not verified)
Fri, 07/09/2010 - 19:31
Any idea how much weight the
Any idea how much weight the "legs" on this cabinet can support?
LauraV (not verified)
Thu, 07/29/2010 - 09:12
Its Laura V again- and I did
Its Laura V again- and I did build this cabinet. (My husband helped- a lot!)
Couple of things- the top side trim shows 11 1/2" - it needs to be 12". The drawer sides show 12 1/4". Ours had to be 12 3/4".
Thanks again Ana- as soon as I am through painting I'll post pics.
Love ya!
Rustic Media C… (not verified)
Mon, 01/10/2011 - 15:13
[...] in Brag Blog Put on
[...] in Brag Blog Put on my TO-DO List Save as PDF Print this PostShare/Bookmark Builder: graphicboi Experience Level: Some Experience Estimated Cost: $120 Estimated Time Investment: a few hours spread over a couple of weekends… From Plan: http://ana-white.com/2009/11/plan-tao-open-media-cabinet-knock-off.html [...]
Console Table/… (not verified)
Mon, 01/24/2011 - 08:41
[...] in Brag Blog Put on
[...] in Brag Blog Put on my TO-DO List Save as PDF Print this PostShare/Bookmark Builder: Krystle Blog or Website:http://alwaysanotherproject.blogspot.com/2011/01/look-what-i-can-do.html Experience Level: Some Experience Estimated Cost: $100-ish Estimated Time Investment: 12 hours (including finishing) From Plan: http://ana-white.com/2009/11/plan-tao-open-media-cabinet-knock-off.html [...]
KaceeT (not verified)
Tue, 01/25/2011 - 10:23
I really must be needing
I really must be needing glasses, but for the life of me I can't seem to find the plan or the area that you refer to in the following…
"Here is the plan, just click on READ MORE below."
I would love to build this.
What am I missing…be polite.
Guest (not verified)
Fri, 04/08/2011 - 15:15
Lowes on 1x2 and 1x3's
Poor guys....I decided to have them cut this plan. Took 30 minutes and they didn't seem pleased. I got home and the 1x2's and 1x3's are allllll off. I assume it is because the wood was slightly bent. I tried to find the best boards. Needless to say, cut your own small boards!
Patty (not verified)
Sun, 04/10/2011 - 19:43
Doors??
This project is missing measurements for the doors. I just finished cutting all my wood. Do you have the measurements, etc?
Patty (not verified)
Sun, 11/06/2011 - 11:09
Doors
Hi! Was hoping to finish this project today. It has been sitting in my garage for a year--waiting on the doors. Are the door plans ever going to become available? I know I could do it myself but would like verification since I am a beginner. Hoping someone reads this before Thanksgiving....when I plan to have all tables and projects finished. Thanks!!
Ainhoa (not verified)
Wed, 11/09/2011 - 05:11
I'd love plans for the doors
I'd love plans for the doors as well! The cabinet is gorgeous.