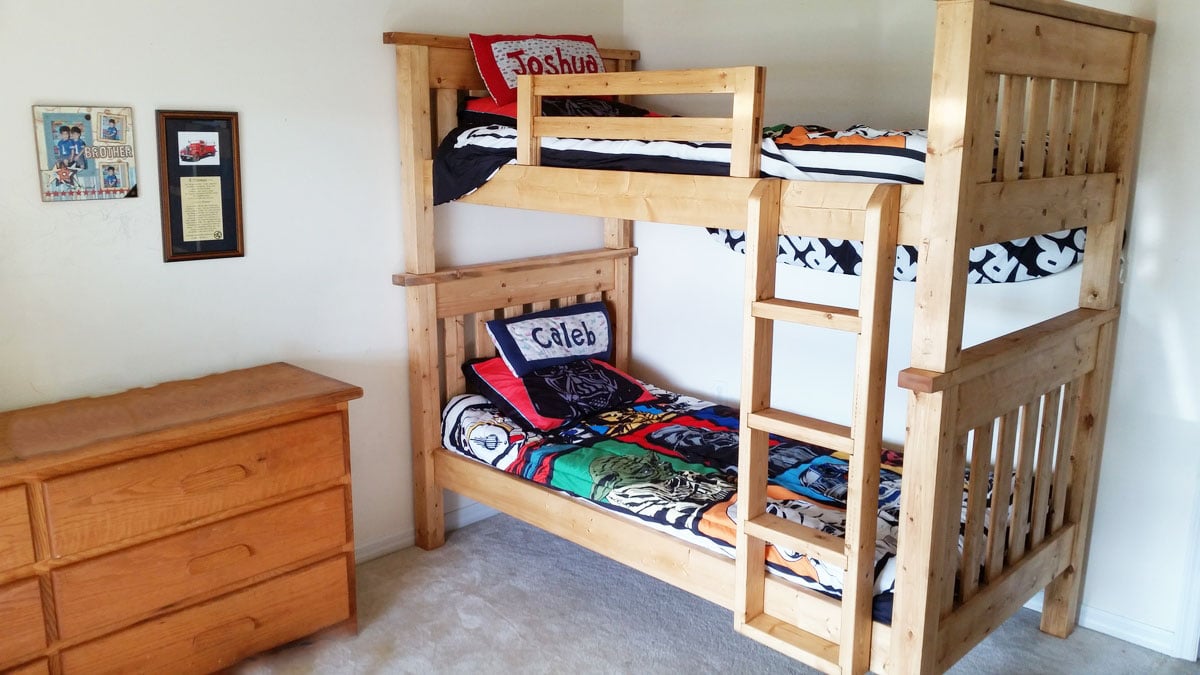
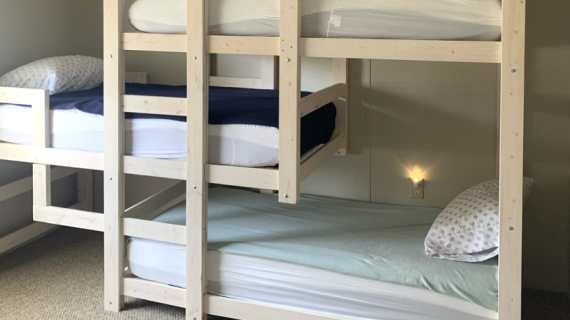
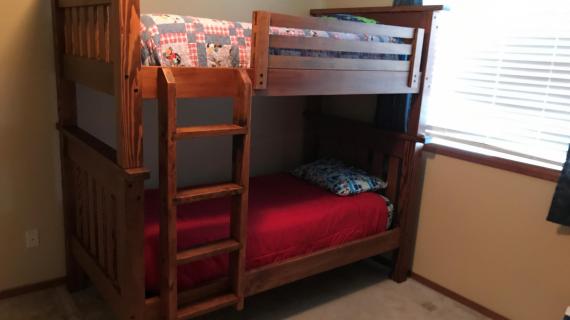
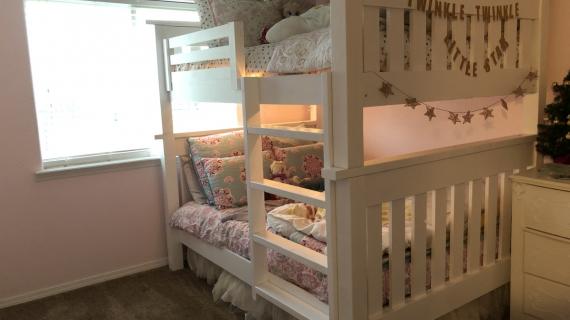
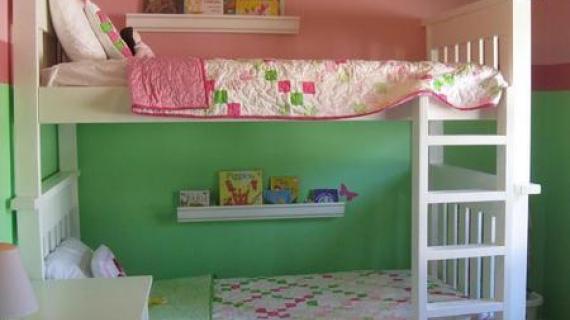
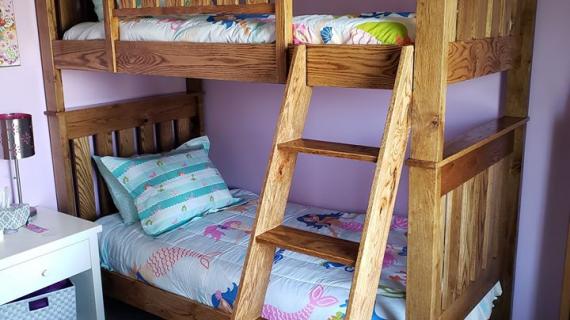
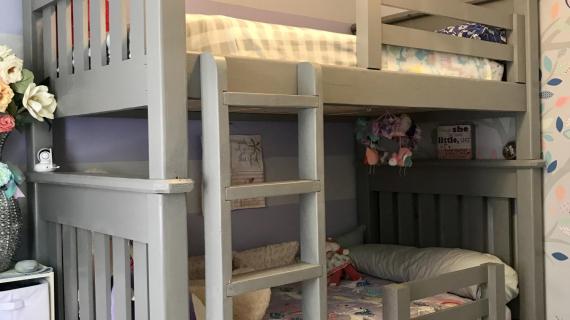
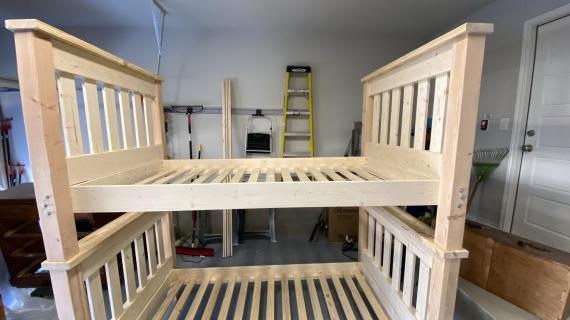
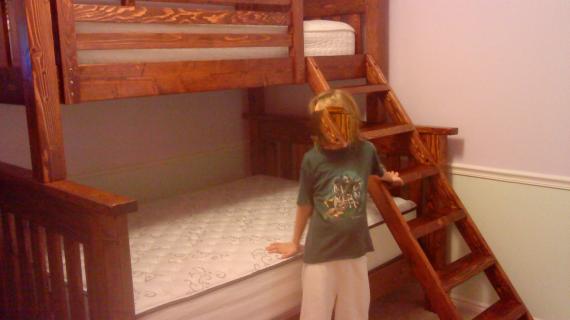
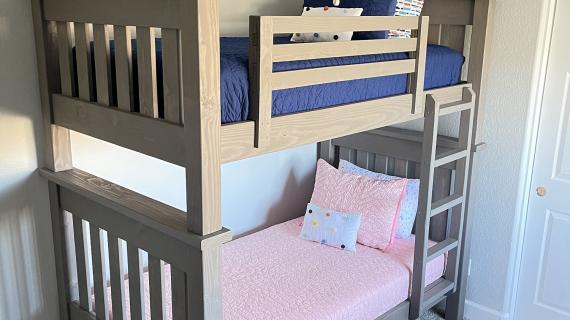
This Simple Bunk Bed is basically two Simple Beds stacked to make bunks! The beds can be used as twins as well. Super sturdy design, classic slatted styling. Our free step by step plans include diagrams, shopping lists and cut list. Lots of reader submitted photos!
We also have plans for a twin over full version of this bunk bed.
Preparation
Materials and supplies to make two Simple Beds
Follow the Cut List for the Twin Simple Beds
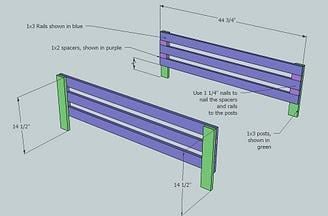
Cutting List for 1 Guardrail
A) 3 – 1×3 @ 44 3/4″ (Rails)
B) 2 – 1×3 @ 14 1/2″ (Outer Posts)
C) 4 – 1×2 @ 2 1/2″ (Spacers)
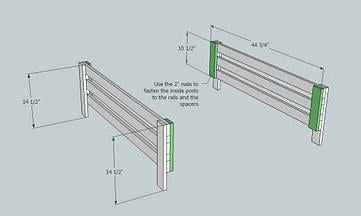
D) 2 – 1×3 @ 10 1/2″ (Inside Posts)
Cut List for the Ladder
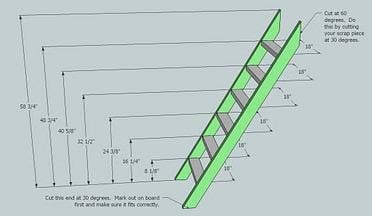
2 – 2×4 @ 58 3/4″ (Sides, ends cut at 30 degrees and 60 degrees as shown in the diagram below)
6 – 2×4 @ 18″ (Treads)
You will need to begin by making two Simple Beds from these plans.
Instructions
Step 1
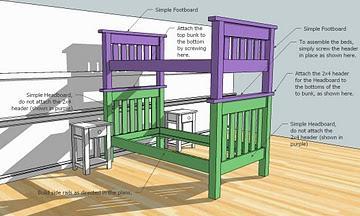
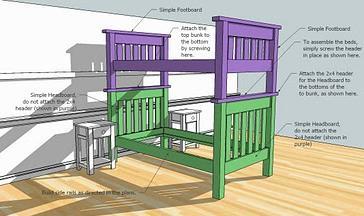
Build two simple beds, but construct the beds with both footboards to the top bunk, and both headboards to the bottom bunk. Notice how the header for the bottom bunk is shown in purple? That’s because the easiest way to join these two beds is to attach the bottom bunk’s headers to the bottom of the top bunk, as shown in the above diagram. Then when you assemble the bunk beds, simply screw through the top of the header into the top of the bottom bunk headboard. Super easy! To do this, first attach the bottom bunk’s header to the legs of the bottom bunk using 3 – 4″ screws per leg. Predrill first. When you assemble the beds, make sure you countersink and predrill the header into the bottom bunk’s 1×6 trim. Also for each of the legs, screw at an angle from the top of the header into each of the bottom bunk’s legs. In this method, you can also unassemble the bunk beds and use as twin sized beds later.
Step 2
Step 3
Cutting List for 1 Guardrail
A) 3 – 1×3 @ 44 3/4″ (Rails)
B) 2 – 1×3 @ 14 1/2″ (Outer Posts)
C) 4 – 1×2 @ 2 1/2″ (Spacers)
D) 2 – 1×3 @ 10 1/2″ (Inside Posts)
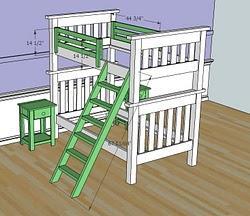
This cut list and instructions is for 1 guardrail, 44 3/4″ long. You may wish to increase the length of the guardrail to fit your needs. You may also wish to sand all of your pieces prior to building the guardrail. Attach the top rail, spacer, middle rail, spacer, and bottom rail to the outer posts as shown above. Keep the top rail flush with the top of the outer posts. Use 1 1/4″ nails and glue. Nail from the inside into the inside edge of the outer posts. Keep end edges flush. Check for square (See HOW-TO section)




Comments
melissa (not verified)
Fri, 01/15/2010 - 20:35
thank you, thank you, thank
thank you, thank you, thank you! this is awesome. i will send pictures/feedback along as soon as we are done building these bunkbeds for our girls! i am beyond excited!
Ana White (not verified)
Fri, 01/15/2010 - 23:00
I just want to make everyone
I just want to make everyone aware that commercially produced bunk beds must meet specific safety standards. While I did build this plan very close to the dimensions of the Land of Nod Simple bed, this is not exactly the same bunk bed. This bed has not been tested to those specific standards. Build at your own risk. The information provided is purely a representation of how I would build a bunk bed, and not a recommendation of any sort.
Marcella (not verified)
Fri, 01/15/2010 - 23:27
thank you ana! i can't wait
thank you ana! i can't wait to build these!!
Kimara@weefolkart (not verified)
Sat, 01/16/2010 - 05:19
I am so excited to have found
I am so excited to have found your website several days ago. I'll be linking on FaceBook. Thanks for your time and generosity.
Anonymous (not verified)
Sat, 01/16/2010 - 05:32
Are there any mattress cross
Are there any mattress cross supports in these plans? I'm not seeing them.
Laree (not verified)
Sat, 01/16/2010 - 06:05
ACK! I had decided to just
ACK! I had decided to just make the stratton day beds for my kids, since I couldn't find bunk beds that I liked. Now I totally have to re-evaluate my whole plans. Too many options!
You are amazing!
Miranda (not verified)
Sat, 01/16/2010 - 07:22
These are beautiful! My kids
These are beautiful! My kids already have bunk beds though, but what caught my eye were the book holders hanging on the wall for each child. Any chance you could do some plans for those?
jdreier (not verified)
Sat, 01/16/2010 - 07:40
Ha! I was thinking the very
Ha! I was thinking the very same thing about those book holders!!! I gotta have some!
Kim & Corey Nasfell (not verified)
Sat, 01/16/2010 - 07:56
THANK YOU!!!!!! Oh I can't
THANK YOU!!!!!! Oh I can't wait to show my husband (and convince him to build me a set)! :) So...since we've never built ANYTHING before would you mind telling me what kind of wood you would recommend buying pretty please?
Ana White (not verified)
Sat, 01/16/2010 - 09:52
Slats for the mattress. See
Slats for the mattress. See the plans for the simple bed. You will simply need to attach 2x2s every 1 1/2" to the cleats on the inside edge of the side rails. You can of course use a bunk bed box spring (which is essentially the same as the 2x2s but covered in fabric).
Also note you will need to use a top bunk mattress on the top bunk. This can be different than a regular mattress - top bunk mattresses are thinner.
Ana White (not verified)
Sat, 01/16/2010 - 09:54
Wood - check out Toni's bed
Wood - check out Toni's bed on the bragging board, it's made of pine. Of course you can use any type of wood you choose. But pine is cheap, strong, and readily available.
Ana White (not verified)
Sat, 01/16/2010 - 09:58
Plans for Collector Shelves
Plans for Collector Shelves from Pottery Barn kids, similar to the shelves shown in the Land of Nod photo can be found here:
http://knockoffwood.blogspot.com/2009/11/plan-collector-shelf-knock-off…
Save your scraps. You won't need much to build these collector shelves! Enjoy!
~ RM (not verified)
Sat, 01/16/2010 - 11:02
Oh, this is great. Thanks
Oh, this is great. Thanks for the plan.... Although, haha, I couldn't help but think of Stepbrothers and their bunk bed fiasco! lol
Sandy (not verified)
Sat, 01/16/2010 - 11:34
I'm a new visitor to your
I'm a new visitor to your blog and I'm blown away. I love all the tips ( getting home depot to do the cutting) and great ideas.Just to let you know I'll be back.
Jen Kesler (not verified)
Sat, 01/16/2010 - 14:47
Thank you so much for sharing
Thank you so much for sharing all of your fabulous ideas! What a HUGE treat!!!!!!!
Wishful Thinking (not verified)
Sun, 01/17/2010 - 09:38
Wow, I've recently come
Wow, I've recently come across your blog and I'm blown away. You're so inspirational. I have just started a blog about what I call "bumbling through domesticity" because I'm always messing up home-care projects. However, I rarely mess up twice in the same way! Now your website has given me something to work toward. Instead of saving money over time for some really nice piece of furniture, I can save up knowledge and courage (yes! I'm scared of saws right now!) to make it myself. Thanks a lot!
http://somethinimpractical.blogspot.com/
Gretchen (not verified)
Sun, 01/17/2010 - 11:10
I just spent half the day
I just spent half the day going through your blog. Nearly everything I've wanted to make from PBK is here! I'm so excited. I think DS's bed will be a simple bed when he is ready for one.
On the guardrails, how are they attached to the bed? I read a few times but can't figure it out. They look much nicer than a toddler rail and may add those on just to keep him in.
Thanks!
The Hatch's (not verified)
Mon, 01/18/2010 - 10:43
I had just come to your blog
I had just come to your blog to ask you how we night go about making the simple bed into bunk beds and voila you already had it up. Thank you Thank you Thank you!! I love your blog!
Ana White (not verified)
Mon, 01/18/2010 - 15:20
FASTENING GUARD RAILS
FASTENING GUARD RAILS >>>>>>>>>
The easiest and cleanest way to fasten guard rails is to position the rails where you would like them to rest, and then from the inside of the side rail, using 2 1/2" screws, predrill and fasten through the side rail into the guard rail outer post. This will hide your screw holes and make removing the guardrail a cinch.
Chatter (not verified)
Fri, 01/29/2010 - 08:57
Thank you, thank you, thank
Thank you, thank you, thank you!! I have been on the search for bunk beds for my boys. However, I'm going to (with the help of my hubby) modify the bottom to be a full size bed. Any tips or suggestions?
I was just given your blog 2 days ago and I'm loving all the projects we will hopefully tackle soon. Thank you so much for sharing your knowledge with us!! Much appreciated :)
Chandra
p.s. I'll try to post our progress once we get started.
Jenny (not verified)
Tue, 02/02/2010 - 07:57
Quick question...what height
Quick question...what height are we to cut the headboard and footboard 4x4's now??? In the Simple Bed plans, the headboard and footboard are different heights.
Jenny (not verified)
Tue, 02/02/2010 - 07:59
NEVERMIND! I see now that
NEVERMIND! I see now that you used both footboards as the headboard and footboard on the top bunk...DUH!
Clarke (not verified)
Fri, 02/12/2010 - 04:34
I recently came accross your
I recently came accross your blog and have been reading along. I thought I would leave my first comment. I dont know what to say except that I have enjoyed reading. Nice blog. I will keep visiting this blog very often.
Melissa (not verified)
Wed, 02/17/2010 - 12:49
Would it work to do the same
Would it work to do the same thing with the full size simple bed plans to have full over full bunks? I'd love these in my boys' room and the twin size in the girls' room. I'm hoping to build the two sets of bunks this spring when it warms up.
lindsy (not verified)
Wed, 02/17/2010 - 20:35
You are amazing! I love your
You are amazing! I love your blog. Do you think I could make these bunk beds in the Farmhouse Twin style? It looks like the measurements would be a little different (leg lengths). Anything else I would need to do differently? Thank you!! I can't wait to start!
Joanna (not verified)
Wed, 03/03/2010 - 05:51
These bunk beds look amazing!
These bunk beds look amazing! I am definitely putting these on my to-do list when we need to add another bed to the room. Thanks!
Anonymous (not verified)
Sun, 03/14/2010 - 17:17
Ana, you're amazing! My
Ana, you're amazing! My husband has just started woodworking again. He has a beautiful bench he just finished for my son and daughter-in-law. My grandson is just 16 mos. old but this bunkbed is certainly in his future. Our comments inspire you and you inspire us!
Anonymous (not verified)
Tue, 03/16/2010 - 14:23
I was wondering if you could
I was wondering if you could make this bed into a type of mid height loft bed?
Wendy (not verified)
Wed, 04/21/2010 - 03:51
Love the bunkbeds. Any hints
Love the bunkbeds. Any hints on how to adapt these plans to a single over a double or queen size? It will look great in our now empty bunkhouse at the cottage. Thx. Great blog.
Ana White (not verified)
Wed, 04/21/2010 - 05:43
To do a full over twin,
To do a full over twin, simply build two twin foot boards and two full headboards and assemble the bunk as directed in the plans. A reader in the brag board already did!
Karen (not verified)
Sat, 05/01/2010 - 15:12
Thanks so much for posting
Thanks so much for posting these plans (and all the other awesome plans)!!! I built and painted this bunk bed set over the past 2 weeks, and my husband and I are assembling them now. One tiny problem though... in the diagram it shows a ladder of 67"ish, and the plans are for a ladder that is 58"ish... I'm guessing it would match the other bunk bed you've got up here, but it is too short for the simple beds as bunk beds (or I managed to somehow misread the directions and end up with a perfect but too short ladder). We will rig something up to make this work, possible incorporating another step that can be used separately for potential future use for a not yet existing toddler when the bed is not bunked. Just thought I should mention my situation for others to consider when building. But I will post pictures when it is all finished (It's really beautiful!). I'm so proud of it, and I can't wait to brag :) Thanks again, Ana!!
Jen Morris (not verified)
Thu, 06/24/2010 - 20:35
you don't happen to have
you don't happen to have plans for the turquoise bunk bed in the middle of this blog, do you?
Laura (not verified)
Wed, 07/28/2010 - 05:13
Hey Anna,Was wondering if you
Hey Anna,
Was wondering if you could tell me how movable this bunkbed is? I really need a bunkbed for my boys, but my husband is in the military, so I need to make sure I have something that can be taken apart and be put back together without too much hassle. Thanks!
Laura
Brandi Barnes (not verified)
Sat, 07/31/2010 - 08:29
Karen, I wish I would have
Karen, I wish I would have read your comment about the ladder before we built ours. Our son went out of town overnight with my in-laws and we have been working like crazy to get his bunk beds assembled only to find that the ladder is way too short once we got the beds stacked. That meant another trip to the lumber yard this morning and I just got the first coat on the new ladder. Other than the wrong length for the ladder everything has gone together great! I love the beds and can't wait to share some pics!
Brandi
PLANS: Easy Mo… (not verified)
Wed, 09/08/2010 - 08:02
[...] converted to twin
[...] converted to twin beds. If you would like plans for twin beds that can be converted to bunk beds, go here. Also go here for plans for the ladder and guardrail. Shopping List 13 – 2×6 Boards, [...]
The Perrins (not verified)
Sun, 10/31/2010 - 11:16
Hi Ana!
Hi Ana!
The Perrins (not verified)
Sun, 10/31/2010 - 11:17
Hi Ana! Lovely bunk bed
Hi Ana!
Lovely bunk bed design! My husband and I can't wait to try this plan out. We are hoping to add a trundle bed underneath the bottom bunk. Do you have any plans or ideas for this addition? Thanks for your website, we love it!
Trees (not verified)
Sun, 11/21/2010 - 20:54
I'm glad i found ur blog.Not
I'm glad i found ur blog.Not everyone can provide information with proper flow. Good post.
I am going to save the URL and will definitely visit again. Keep it up.
Gina (not verified)
Sun, 12/12/2010 - 13:26
I too had trouble with the
I too had trouble with the length of the ladder. Since I've only invested 3 2x4s, I can easily redo it, but could you possibly give a modified cutting length, as well as the distances apart that the rungs should be? I love your site & have already made 8 bookshelves, a desk, the entryway system, and 2 nightstands!
Chris (not verified)
Sun, 12/19/2010 - 06:20
I'm getting ready to do a
I'm getting ready to do a twin over full. I love having found this blog! Regarding the ladder, the cut length should be close to 68". Looks like the height of the ladder is 58 3/4", but since it is at an angle, the length of the ladder needs to be 67.83" (ah, trigonometry). I think making this adjustment and keeping the rung spacing as indicated *should* work. I'll hopefully be able to post my results in the next month.
rene (not verified)
Fri, 12/31/2010 - 07:59
Thanks ana, we're sure to use
Thanks ana, we're sure to use your basics for our sons bed... measurements to be adjusted slightly, but the groundwork you did it very well!
Many thanks..
Twin over Full… (not verified)
Mon, 01/03/2011 - 07:49
[...] Guardrails and more
[...] Guardrails and more information, you can check this post out. Or see the entire Simple Bedroom [...]
brittaniewest (not verified)
Wed, 01/19/2011 - 17:41
Oh my gosh! I am so excited
Oh my gosh! I am so excited to get started on my list of projects!! Thank you so much for all of your hard work. I love your website and am so motivated by it. =) I was looking at these simple bunk beds and was curious how easy it would be to replace the slats on the headboard and footboard with wood paneling (wainscotting?? I don't know if that's the right word!). Here is a link to the bunk beds I saw at Land of Nod with the solid wood: http://www.landofnod.com/family.aspx?c=51&f=5277
I've been trying to figure out how I would do that. Any advice? Thank you so so so much!!
Super Bunk Bed… (not verified)
Wed, 02/02/2011 - 12:53
[...] in Brag Blog Put on
[...] in Brag Blog Put on my TO-DO List Save as PDF Print this PostShare/Bookmark Builder: Brandi Blog or Website:http://brandibarnes.typepad.com Experience Level: Intermediate Builder Estimated Cost: $150-$200 Estimated Time Investment: Weekend From Plan: http://ana-white.com/2010/01/plans-how-to-modify-the-simple-bed-to-a-bu… [...]
davefinney
Tue, 03/22/2011 - 23:56
Weight Limit
Has anyone tried these on older boys(13 & 17)? I am planning on starting a set this weekend but have concerns with the weight limit. By the way, GREAT SITE ANA!!! Love all of these plans.
Guest (not verified)
Sat, 04/02/2011 - 13:09
Loft bed
Ana, is it possible to turn this bed into a loft instead of a bunk? I've got 3 girls in a room and I'm almost done building the bunk bed set. Now I'd like to build the 3rd bed as a loft. Any suggestions on what modifications would need to be made and how to make it safe?
Thanks!
Guest (not verified)
Fri, 04/08/2011 - 17:01
Simple Bunk Beds
Perhaps I am missing something, but can someone tell me what the dimensions are for the bunk beds? Thanks!
mom of 6! (not verified)
Mon, 06/13/2011 - 06:28
triple bunk?
Hello, I am now expecting our 6th child... We live in a small home and I need to make 2 triple bunks. Do you have any plans for that?
Thanks,
Heather
Guest (not verified)
Tue, 08/09/2011 - 05:04
pictures w/dimensions blownup??
I was wondering id there anyway I could get copies of the pictures with the dimensions larger??? When I try enlarge them, I still can't read the dimensions on the pictures!! We are planning on doing these bunkbeds Full over Full and I really need to be able to see the dimensions on the pictures. Thanks!
Marie T (not verified)
Mon, 01/02/2012 - 01:13
OMG!!! I am so excited. We
OMG!!! I am so excited. We are preparing our home to become a foster/resource family and in our state we are allowed to use bunkbeds since the rooms are smaller. So I have been looking for bunks in a price range we can afford and not something that could be damaged. I just remembered today all of the amazing things you have on here and BAM...the PERFECT bunkbed! Thanks for sharing all of these plans and I am ready for a Home Depot trip...hope they are ready for me! LOL I am changing up the slates though and using sturdy plywood and a regular mattress top. Probably cover the plywood with fabric to make it fun for the young'un sleeping on bottom! Thanks again!