

Build a modern style office, inspired by West Elm, featuring simple styling. Made of eco friendly formaldehyde free plywood, this contemporary office furniture is easy to build, affordable, and made with simple tools and off the shelf materials.
Well, we have yet another reason to DIY our own furniture.


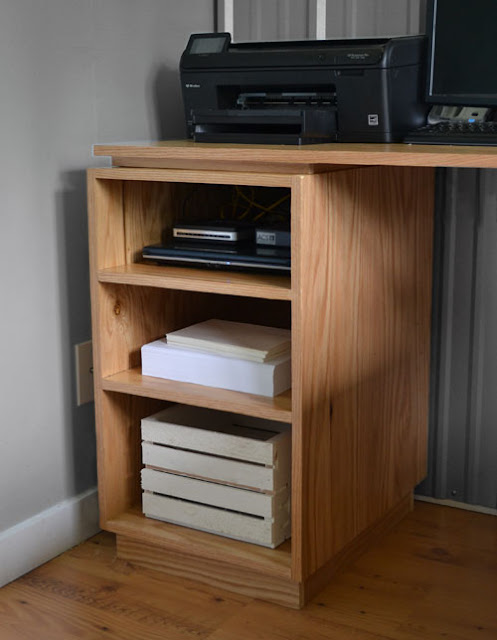
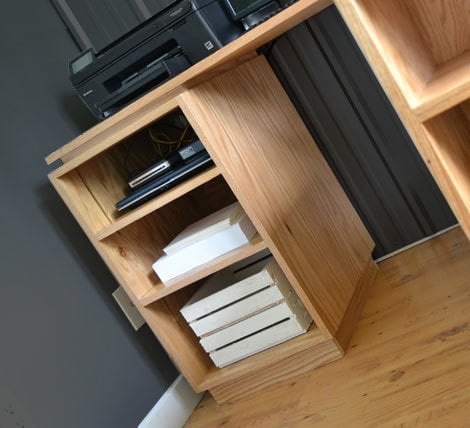
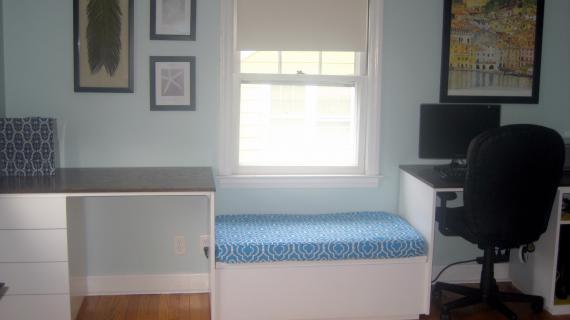
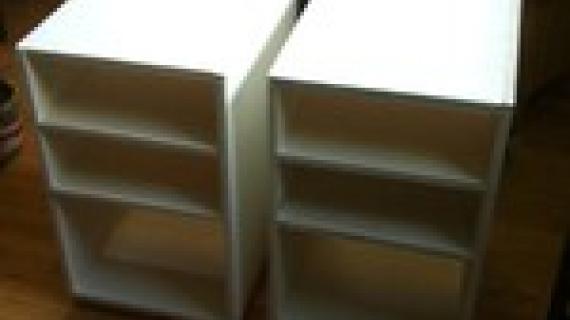
There's quite a few plans in this collection, but today, we'll start with the Open Shelf Base - useable for an office base, as a bookshelf, or even a modern style nightstand.
Special thanks to Columbia Forest Products and PureBond Plywood for providing me with the beautiful plywood and the backgrounds for this site.
Preparation
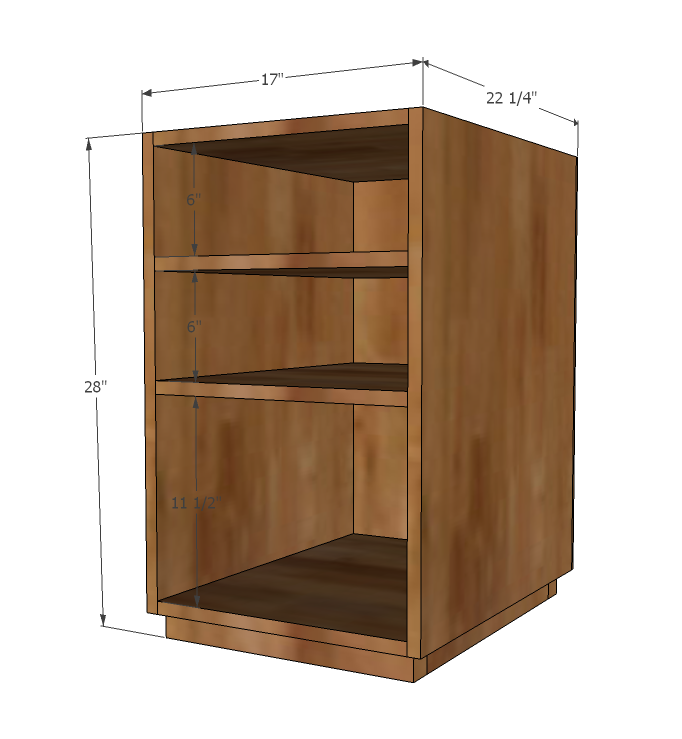
1 - Sheet 3/4" Hardwood Plywood
1 - 1/4" sheet 1/4" hardwood plywood
1 - 1x2 @ 6 feet long (optional, see step 3)
Edge Banding, 1 25' long roll, in matching wood grain
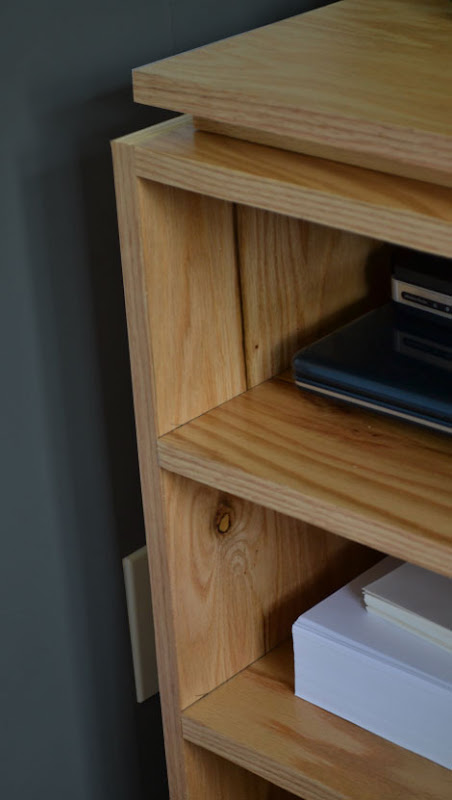
4 - 3/4" plywood 22" x 15 1/2" (Shelves)
2 - 3/4" plywood 22" x 26 1/2" (Sides)
1 - 1/4" plywood @ 17" x 26 1/2" (Back)
2 - 1x2 @ 15 1/2"
2 - 1x2 @ 19"


Please read through the entire plan and all comments before beginning this project. It is also advisable to review the Getting Started Section. Take all necessary precautions to build safely and smartly. Work on a clean level surface, free of imperfections or debris. Always use straight boards. Check for square after each step. Always predrill holes before attaching with screws. Use glue with finish nails for a stronger hold. Wipe excess glue off bare wood for stained projects, as dried glue will not take stain. Be safe, have fun, and ask for help if you need it. Good luck!
Instructions
Step 1

There's more to cutting plywood than a chalk line and a circular saw. First of all, you have to consider the direction of the wood grain. And then you have to take into account the saw blade width. And then it's about conserving plywood for future projects and cutting tight, square corners - without having to finish the cuts with a jigsaw or handsaw. For plywood projects, I still like to treat pieces like "boards" - it makes the project that much easier and your wood grains will match right. You can use the scraps above to build a drawer (we'll get to that) or door, or even a desktop organizer. Save your scraps - it's the silver lining.
First rip your plywood into two 22" wide strips, 8 feet long. And then from these strips, cut your sides/shelves, treating the strips like boards.
Step 2
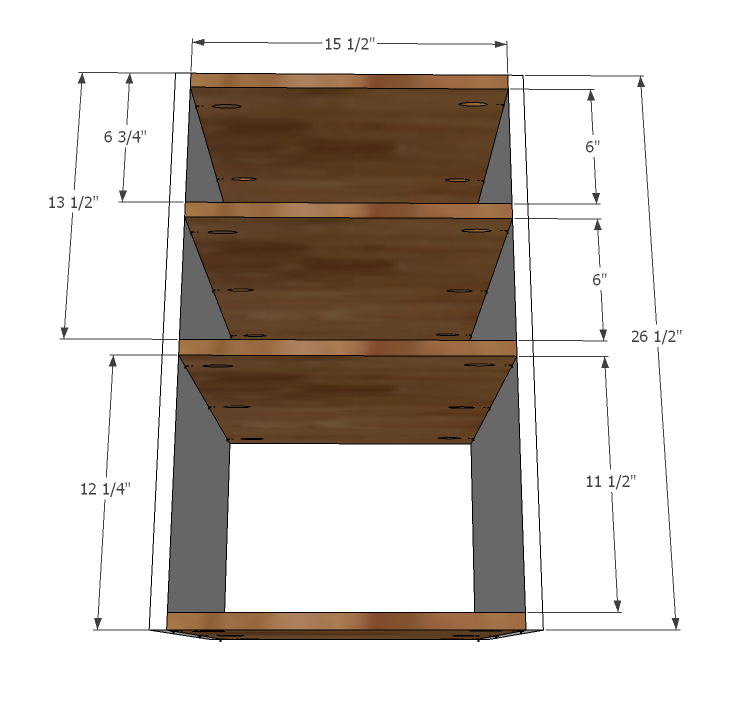
Build your cabinet as shown above. If you are using the Kreg Jig, use 1 1/4" pocket hole screws and wood glue, drilling holes set for 3/4" stock. You can alternatively use countersunk screws and wood glue.
Step 3

Adjust your shelf for square and attach the back. Make sure you attach to shelves too.
Step 4
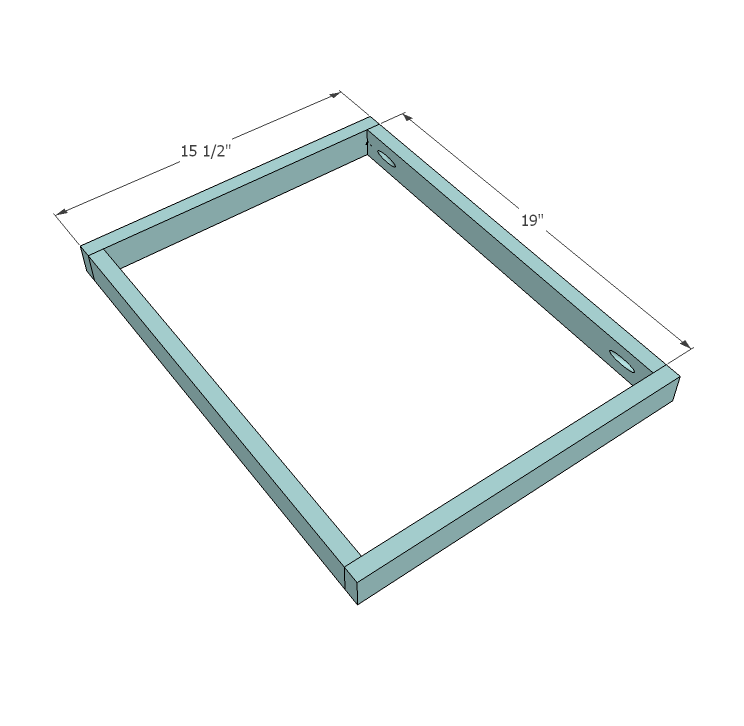
From your scrap plywood, you can rip a 1 1/2" wide strip, and then use these for the base, or buy 1x2s and build the base that way. Your call.
Step 5

Step 6

Apply edge banding according to manufacturer instructions - it's easy to do.
It is always recommended to apply a test coat on a hidden area or scrap piece to ensure color evenness and adhesion. Use primer or wood conditioner as needed.
Comments
Guest (not verified)
Tue, 06/28/2011 - 09:35
My Home Depot doesn't carry
My Home Depot doesn't carry PureBond :(
Guest (not verified)
Tue, 06/28/2011 - 10:32
I am usually excited just to
I am usually excited just to see the new projects (it causes soo much inspiration) BUT, in this post, I was just more THRILLED to see that they labeled formaldehyde as a carcinogen!!!!!! I did a little dance, which is out of my character, so I really was excited about that. Now I am just waiting for the turn in the cosmetics and other chemicals to take place. It's already exciting that they are changing certain products w/o the HFCS. The consumer really does have more power than we think and I am thankful for those who do not turn the blind eye and stand up for our health! :)
LoL, I am done raving now...and now I will actually read the rest of the post as was intended.
BTW, you really have inspired me to really make my own products. I have a power tools savings jar and hopefully, with the possible renting of a house next month, I can get to work! My husband is excited too it seems and I think it'll be a blast. I love that you make the rendered drawings easy for us. Keep it up!! I am very grateful :D
UTDrea42 (not verified)
Tue, 06/28/2011 - 12:22
No PureBond for me...
Was really excited at the prospect of formaldehyde-free plywood so I could build a headboard that wouldn't try to kill me in my sleep. Even more excited when the Pure Bond website said Home Depot had PureBond! Not only does my local Orange not carry it, they also had never heard of the product, and refused to put in a request to add it to stock. Big time bummer.
In reply to No PureBond for me... by UTDrea42 (not verified)
Ana White
Tue, 06/28/2011 - 12:50
Totally understand where you
Totally understand where you are coming from . . . up here in Alaska, same problem, begged my local Orange, and actually the plywood ended up getting shipped directly from Columbia Forest Products. Check out the PureBond website at http://purebondplywood.com/ to see about special delivery. Another thought, if enough of us bug The Home Depot, maybe they will stock it everywhere! We ALL deserve reasonably priced beautiful Formaldehyde free plywood.
UTDrea42 (not verified)
Tue, 06/28/2011 - 14:17
Good call!
I checked out the Columbia website again, and it looks like the Pro Desk at Orange could special order it... according to them, no minimum quantities either! I will investigate and see what I can figure out. Also, I just want to say thanks to you, Ana! I never would have considered building my own furniture or finding greener alternatives to pressed-board furniture if it weren't for you and this amazing website.
Jackie (not verified)
Tue, 06/28/2011 - 14:41
LOVE this project!
I am sitting at an old, falling apart, pressed board desk, drooling over this project! I will definitely be visiting the Special Order Desk at Home Depot & putting in a request for the Pure Bond to be on the shelves! I can't wait to see the other components :)
jenny lisk (not verified)
Thu, 07/14/2011 - 08:45
question - floating top
Hi Ana - love this! Am in the process of making a desk for my daughter inspired by yours. It's smaller, of course, and has bookshelves on each end that are turned 90 degrees to face the outside, and has a center drawer under the desktop.
My question is about the floating top. (If you posted the instructions somewhere I apologize, I could not find them.) How wide did you rip your plywood for the spacer pieces? They look narrow, perhaps 3/4 - 1"? Also how far did you set them in from the edges of the lower cabinet?
Thanks so much for all you do...you are truly an inspiration!
Jenny - Bellevue, WA
Guest (not verified)
Sat, 07/16/2011 - 13:46
Floating top
Hi Ana
Love the new desk plans, but I also have a question about the floating top? Did you just not post that piece yet? I love the newest plan with the file drawers, but I can't ask my husband to make it without knowing how to do the top!
TiffG
Mon, 08/08/2011 - 11:23
eco office desktop help?
Hi everyone- Ana's new desk plans here for the eco office pieces are fabulous, but there's nothing for how to do the desk top. Anyone have an idea? SO want to build this for our new desk, but I don't want to go forward without knowing how to finish it!
In reply to eco office desktop help? by TiffG
Ana White
Mon, 08/08/2011 - 11:34
Hi TiffG, sorry, been meaning
Hi TiffG, sorry, been meaning to post, but just haven't got the photos quite yet! I'll give you a quick rundown, since it's super easy.
Basically, for every piece you have, build a base like the one in this plan, from 1x2 material (can be actual 1x2 boards measuring 3/4" x 1 1/2" or 3/4" PureBond Plywood ripped into 1 1/2" widths) for the top. Attach to tops, as you did the bases. I'd go from the underside of the bases to hide screws.
Then rip a piece of PureBond Plywood to a 22" width and any desired length (mine's the full 8 feet) and attach to the tops. We used pocket holes to hide all joints, but finish nails would be easy to cover.
I'll be adding the plan, sorry to make you wait!
Thank you so much, and good luck.
TiffG
Sat, 08/13/2011 - 06:13
Thank you Ana!
Thank you so much Ana! Now that I can show him how to end the project, we can start :) You're so awesome, and so are your plans. It's so fabulous of you to share your expertise and experience, and give us a place to share as well- good luck with the momplex!
LindseyinAK (not verified)
Tue, 09/13/2011 - 21:01
I just found your page and
I just found your page and I'm so excited. I just started the home ownership journey as a single girl with her father handyman living thousands of miles away. I have some basic building skills thanks to my dad, and your designs make sense to me. Nothing too scary, but still beautiful end results! I have a feeling I'll be a repeat visitor. Random question. I love your paint color in the pictures of your desk. Do you remember the brand/color name?
RBear
Fri, 10/21/2011 - 13:25
Edge Banding Question
If I plan to paint my desk, do I still need edge banding?
I have never worked with plywood as the main wood in a project. I am a beginner. I have used plywood for drawer bottoms and cabinet backs only.
I think this desk can be adapted to work perfectly in my daughter's room. I will be painting
it white.
Ana, you are amazing! I had never built anything before finding your site. Never dreamed
it was something I could (or would want to) do. But now I have built 4 projects from your site and I'm having soooooo much fun. I am about to build all new furniture for my daughter's room.
Thank you, Thank you, Thank you!!!!!
claydowling
Fri, 10/21/2011 - 17:36
Edge banding
Edge banding is one option, but another is solid wood facing. If you use a good grade of plywood and face it with pine or poplar, it will look great painted or stained. Solid wood facing is also more durable than edge banding.
When my parents were first married my parents made a couch with a plywood base and pine facings. I had that couch until I was married, thirty years later, and it hadn't worn. It was also still ugly and uncomfortable, which is why I don't have it now.
jasonSims
Tue, 05/10/2016 - 18:25
Question about attaching bottom to the base
I'm using pocket holes to join the 15 1/2" and 19" bottom pieces, but I'm at a loss as to how to attach the bottom to the base using pocket holes. Will I need corner bracing regardless?