


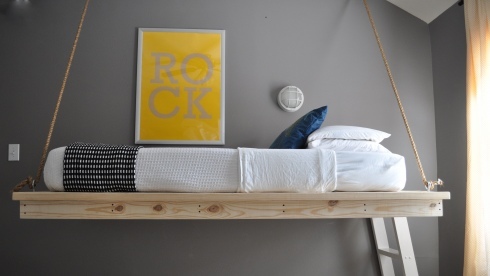
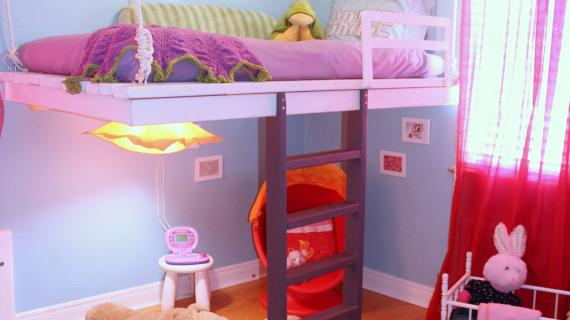
A hanging daybed big enough to fit a standard twin mattress. It has extra room on all sides to hold drinks, books, phones and maybe even a snack.

I've had these plans drawn up for quite a while now, and just haven't posted them. Because I thought that they were too simple. Imagine that, too simple. I wondered how the hanging daybed would look.
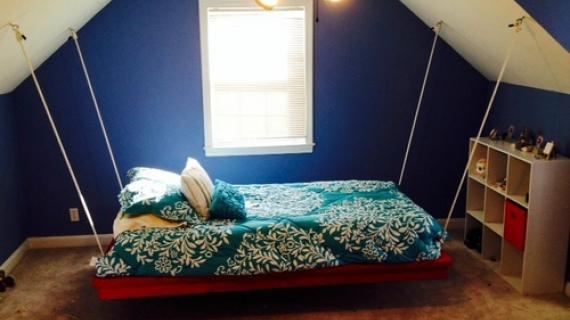
 |
| photo by Ana White, Hanging Daybed designed and built by Jacob and Ana White |
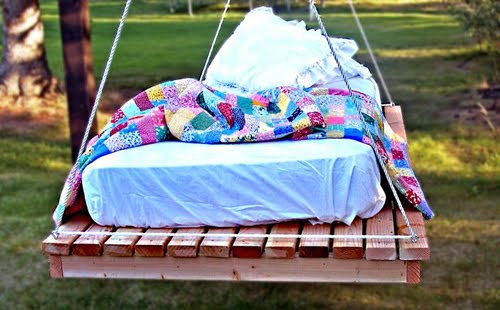
And then a major media company called and asked if I would build this bed and photograph it for them. So I enlisted the hubs help and we started building it one evening. It only took about an hour, without a miter saw (my beloved saw is at the lake, miss ya!) and as we were building it, these are some of the ideas that we had: 1. Let's turn it into a picnic table top 2. Let me just burn it. We need to have a bonfire. (that was NOT me) 3. Oh, Mom, you made me a deck for my swimming pool! (again, NOT me) 4. Don't put too many screws in it, then we can disassemble it and use the lumber for something else (maybe that was me). You get the idea. We weren't in love with it. So I kept repeating to myself, never judge a project until it's finished. Even though I was looking at 17 scrap stud 2x4s put together with 100 screws in the most basic and simple way. Talk about not a lot to work with. So we threw it all together, threw Grandma's handmade quilt and threw Aunt Sherry's retro ruffled pillowcases on top, and I tell ya, I was ready to throw myself on too!
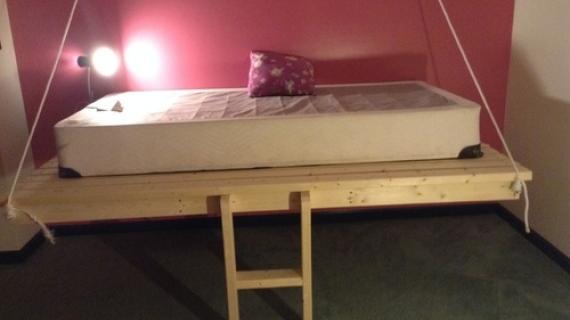
 |
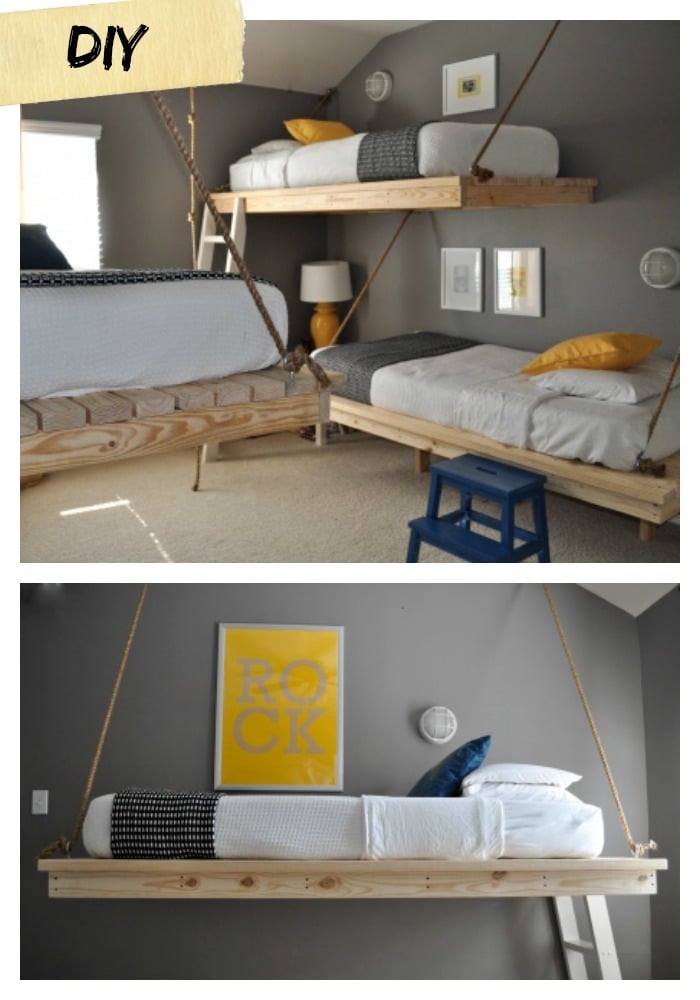
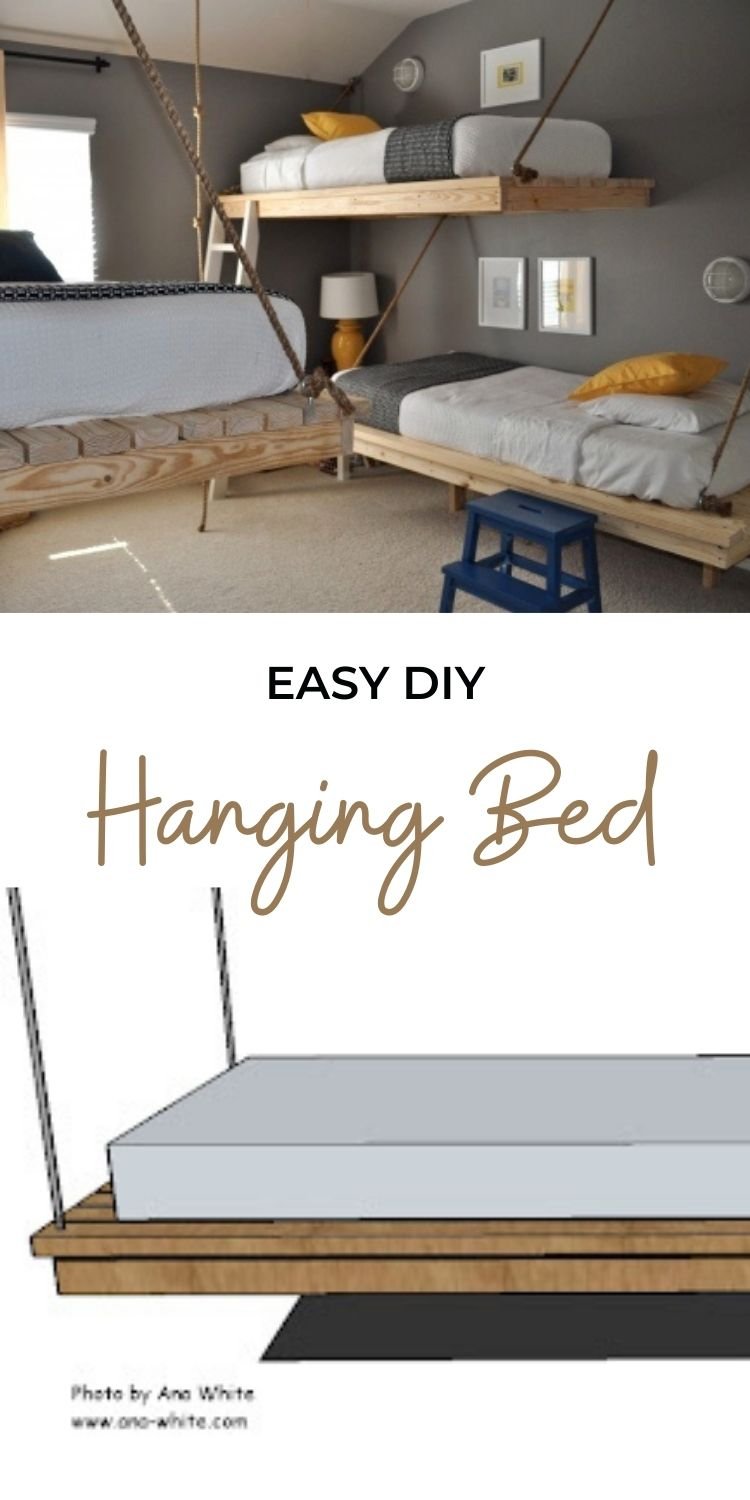
| photo by Ana White, Hanging Daybed designed and built by Jacob and Ana White |
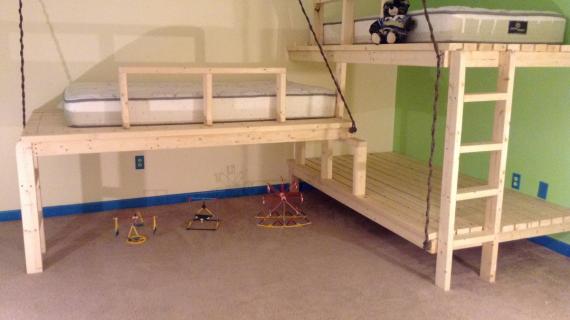
 |
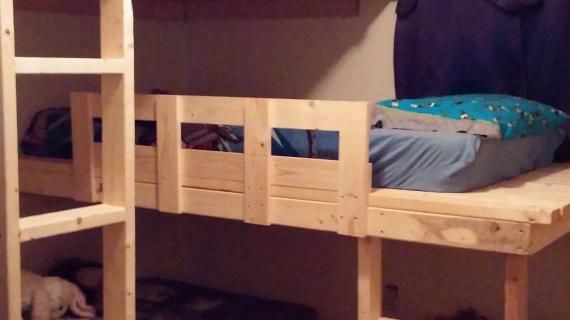
| photo by Ana White, Hanging Daybed designed and built by Ana White |
It looks good, but oh my, it feels amazing. Even I, who is often the butt of duct tape and fishing jokes (as in the only way I will relax is if I'm duct taped to the boat) found myself enjoying a quiet swaying. If you don't have a hanging daybed, do yourself a favor. Buy 17 2x4s, 100 3" wood screws, 50' of chain or rope and 8 eye bolts and skip your workout and build this. You won't regret it. And here's how.
Pin For Later!
Preparation
17 – 2×4 studs (should be less than $2 each)
100 3″ wood screws
50′ of rope or chain with a load limit of at least 200 pounds (for an 800 pound capacity)
4 – Eyebolts (8 if you also need bolts for the ceiling mount too)
Finishing Supplies as desired Drill with a countersink and drill bits to match the eye bolts and the screw heads
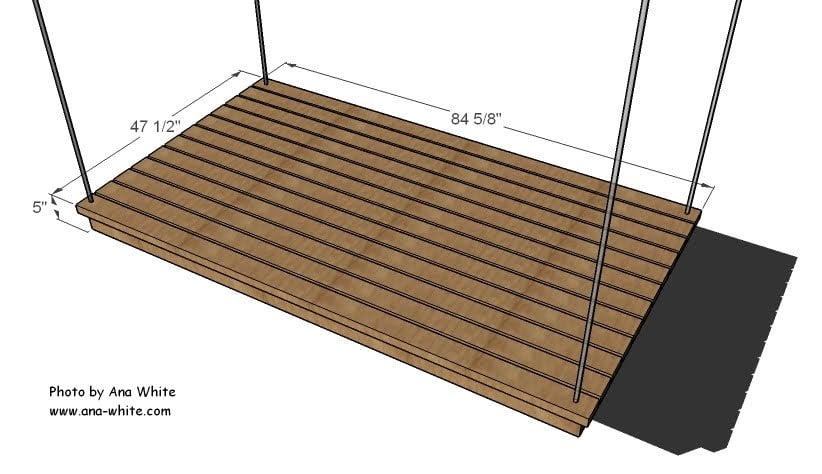
2 – 2x4s @ 82 3/4″ (Frame Sides)
6 – 2x4s @ 42 1/2″ (Frame Joist)
12 – 2×4 @ 84 3/4″ (Deck Boards)


Instructions
Step 1
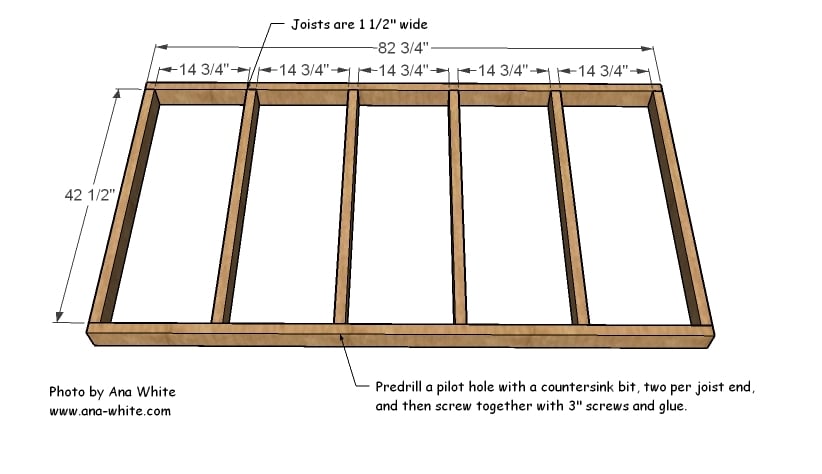
Cut your frame sides at 82 3/4″ long. Mark the sides with a carpenter’s square every 14 3/4″ as shown above, leaving a 1 1/2″ gap between the marks for your studs. Then in those 1 1/2″ gaps, predrill two holes with a countersink bit. You can even start your screws. Then screw the studs to the frame sides with 3″ screws.
Step 2
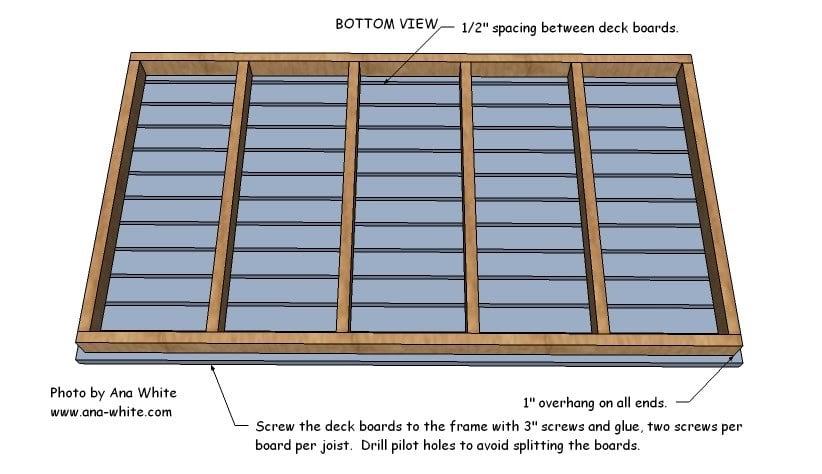
pply glue to the top of the bed frame and lay the deck boards on the frame. Adjust so that the deck boards overhang 1″ on all sides as shown in the diagram above. Space the deck boards 1/2″ apart and screw down, 2 screws per deck board per joist.
Step 3
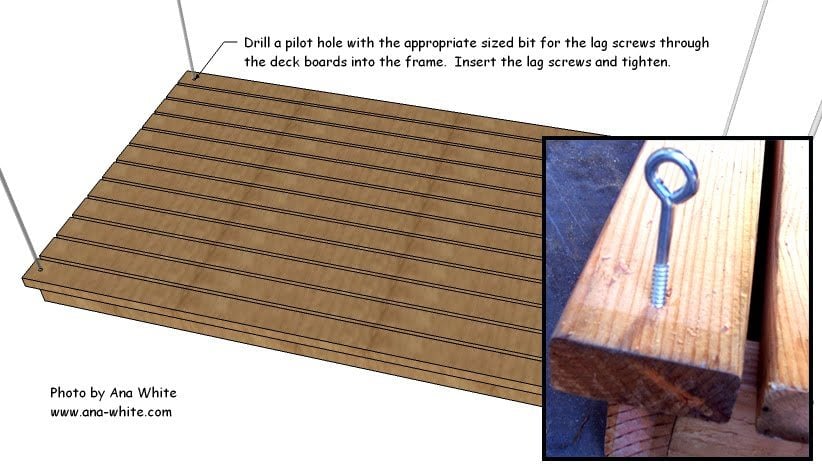
Drill a hole with the appropriate sized drill bit for the lag screws in the corners of the daybed. The pilot hole must be drilled over the bed frame. Apply glue to the pilot hole and screw the lag screw into the bed, securing tightly. TIP: Avoid over tightening and stripping the wood and creating a weak joint.
Step 4
See finishing instructions.


Comments
winkblink (not verified)
Thu, 11/24/2011 - 08:00
Question on chain amount
This was what I was looking for! I am building a castle loft bed for my son and I would say it is a frankenstein of beds. We started with a 2x4 college loft bed and then added sides that look like a castle. We decided to remove the legs and add chains to suspend it from the wall but weren't sure how much chain to purchase.
The 50' of chain in your materials list is for hanging it from the ceiling?. What would the length be if we are attaching the chain to the wall instead? We are going to cut it at orange and want to be sure we do it right. I'm going with 3/8" chain, which is overkill but chose it cuz it looks cool for the castle theme but it could get spendy if I cut it wrong.
Guest (not verified)
Thu, 12/08/2011 - 18:05
I love this bed but i am
I love this bed but i am wondering if i can make it a bit bigger but i need the measurements and will it support the new measurements
Malissa Sanders
Wed, 12/28/2011 - 07:45
PERFECT!!!
I have a 7 yr old girl and a 5 yr old boy who currently share a room. I have been redoing their room with different projects from this site. I was thinking about bunk beds but that turned into a huge fight over who was getting the top bunk! =) This is perfect because now they can both have a "top" bunk! Plus it goes with the original idea of redoing the room for separate spaces. We have a 100+ year old farm house, which I LOVE, but it does make it hard to do interior decorating. My kiddos room is 24' long and 12'3" wide, with a closet smack dab in the middle of the room on one side. I am thinking of removing the closet, it would free up a lot of space. I would like to have separate armories with a cubby system for both of them. Any ideas or suggestions are very much appreciated!
madsurratt
Sat, 01/14/2012 - 11:21
Would this work with a full
Would this work with a full bed?
Guest (not verified)
Fri, 01/20/2012 - 19:28
for the whole family
I love the idea of the suspended bed. At first I wanted one just for me, but seeing the ones you made against the wall I now want them for my kids too. I'm going with a beach house theme for the home I eventually get and I think these will work well. Can this be used with a full sized bed?
iwantbdphotogr…
Tue, 04/24/2012 - 20:27
we did it!! thank you1
we LOVE how it turned out. our first project was the farmhouse doll bed and now this x2, hung bumper crop style. we
Vicki S (not verified)
Tue, 07/10/2012 - 19:18
Hanging bed room paint color
Hi there! I love this plan and I plan on making it for my boy's new room in our new house. Can you tell me what the paint color is on the wall? The grey is perfect!
AmyFarrell (not verified)
Fri, 07/20/2012 - 03:57
Inspiration
Thank you for the inspiration! We can not mount to our plaster walls so I adapted the suspended look and added support and a ladder. My son has been away at camp all week. This surprise will be waiting upon his return! How do I post a picture?
Twisted Vixen (not verified)
Fri, 08/03/2012 - 01:46
AmyFarrell- How to post a photo
@AmyFarrell I uploaded mine to Photobucket(dot)com and copy and pasted te html link in the same box as my comment.
Twisted Vixen (not verified)
Fri, 08/03/2012 - 01:44
AmyFarrell- How to post a photo
@AmyFarrell I uploaded mine to Photobucket(dot)com and copy and pasted te html link in the same box as my comment.
christy matthews (not verified)
Wed, 08/22/2012 - 18:39
i really want to do this but will it hold?
hi, i have a 10 year old, a 8 year old and a 5 year old boy who share a room atm. at the moment the 2 younger boys share bunk beds and my eldest has a single bed, my partner and i have been in discussion of what we can do with their room, it always seems cludded and messy, case of the lack of space. the idea was just to buy 3 seprate single beds, but i have always been interested in getting the 3 bed bunks, i have found some but they are very expensive. I do think that this is an awesome idea and love it, but my only concern is that maybe they wont hold the weight of my children. they are not heavy kids my youngers probably weighs the same amount as my eldest, probably around 27kgs, so that doesnt worry me much, but i am concerned that my walls are not thick enough to support the beds as well as the children dispite by objections from time to time they do tend to jump around on their beds a bit also. so the last thing i would want is for them to fall down in the middle of the night and the children get hurt. so can anyone help reasure me that these will be ok and safe, and where would be the best place to have them fitted too? i probably will have to fix one to the wall some where. How do i find the beams in the walls and the roof? my partner loves to build things and these look easy. thanks for the idea.
JessicaR
Wed, 08/22/2012 - 21:11
Storage Beds
If I were you, I'd consider this plan instead:
http://ana-white.com/2010/05/twin-storage-captains-bed
Make 3 of them and that should provide you with plenty of storage space for their stuff.
Kayla Dominguez (not verified)
Wed, 01/09/2013 - 14:03
Can the bed frame be made
Can the bed frame be made bigger to fit a queen sized mattress?
Marina
Sun, 02/24/2013 - 13:05
Hi, I am from Brazil and I
Hi, I am from Brazil and I really love your site!
I wanna know how the bed is fix on the wall, on the photo there's a bed with only 2 ropes but on the plans there are 4 of it, so I would like to know how I can make with 2 ropes and fix the bed on the wall, it is just supported or there are some nails and screws that we can't see?
Another concern is about the weight, how much the bed can support? An 80kg (173.4 lb) man could sleep in one of this? Using an orthopedic matress?
namiano
Fri, 12/05/2014 - 16:51
Full or queen
I was wondering if this plan could be altered to support a full or queen mattress for inside? if another set of ceiling supports should be added. So there is 6 instead of 4 cables, or is using 4 cables and bracing it to the wall would be enough to distribute the weight to support a larger frame size.
bethanyblntn
Mon, 02/23/2015 - 10:32
"Big" bed
I have been looking EVERYWHERE for a bed like this that is a queen that I could build in my room (for extra space). If you mounted two of the sides to the wall and used chains instead of rope would it support the weight of two adults (and made the platform larger of course)? I have YET to see anyone do a DIY like that or any adult size hanging bed AT ALL and its starting to really frustrate me. :/