
Kitchen Cabinet Building Innovations Used in This Tutorial
We have built over a dozen kitchens from scratch! This is countless individual cabinets, drawers, doors, and accessories. We gained vast knowledge in the process on how to build kitchen cabinets from scratch. Here's some of the innovations we use to make building easier, faster, and more precise:
- 2x4 base under the cabinets - This method shown here uses a 2x4 base, that can be connected to the cabinet or built as one continuous base to support a row of cabinets. It's easy to then level up the base with shims, and your entire row of base cabinets is level. The 2x4 base also makes your side panels under 32". Why is this important? Under 32" means you can get three pieces out of an 8' long plywood run instead of two, greatly optimizing your plywood and reducing scraps.
- Face frames - face frames can be considered extra work (but so is edge banding). Face frames add a considerable amount of strength to the front of your cabinets, supporting heavy countertops and wide spans in shelves, and help keep cabinets square. I always recommend a face frame for higher end cabinets. They are easier to finish and hang doors on too.
- Plywood Conserving Layouts - using this method, you can get the most out of your plywood sheets - even using up the scrap pieces in the middle.
- Factory Edges - This method keeps a factory edge so you can always have that to make sure your front edges of the cabinets are square and straight. You can leave any cutting discrepancies on the back, even holding the cabinets off the wall! Countertop will cover any gaps left at the back.
- No Toekick Cutting - Cutting a toe kick is always unnerving because you are cutting into the finished face of the side panels with a jigsaw. That's never going to be perfect. This method relies on straight cross cuts.
- Easier Installation - It's easy to just level up the base and set the run of cabinets on top and screw together - it's like having a foundation for your kitchen cabinets!
More Photos and Video of Building This Style of Cabinet

How We Build Kitchen Cabinets Using a 2x4 Base
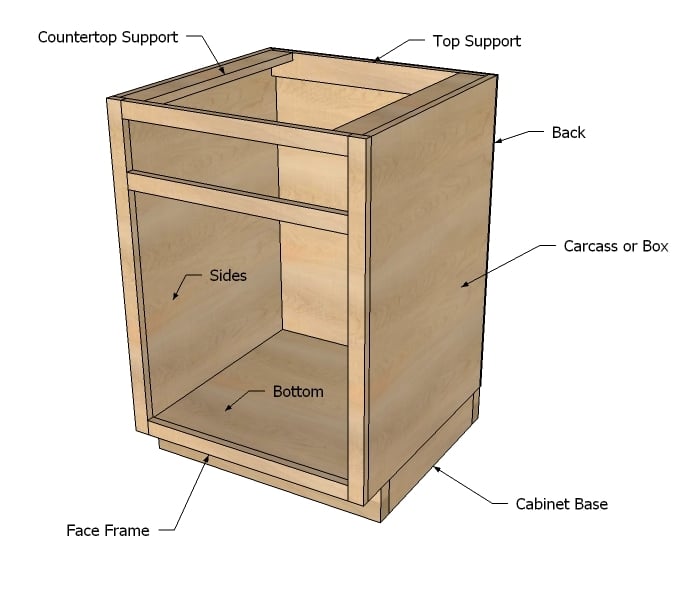
Terminology
- Cabinet Base - raises the cabinet up for a toekick and elevates bottom shelf. On our cabinets, the base is separate and can be swapped out for store bought leg levelers. Once all cabinets are installed, a toekick is installed over all the bases.
- Carcass or Box - the carcass or box is simply the plywood structure of the cabinet.
- Supports - the supports are made from scrap plywood from the carcasses and are used for supporting and attaching the top and back.
- Face Frame - Face frames add support and finish front plywood edges.
- Back - for these cabinet plans, we just use 1/4" plywood on the back. You can also use 1/2", or even 1/2" inset, but the 1/4" is more than enough support on these cabinets.
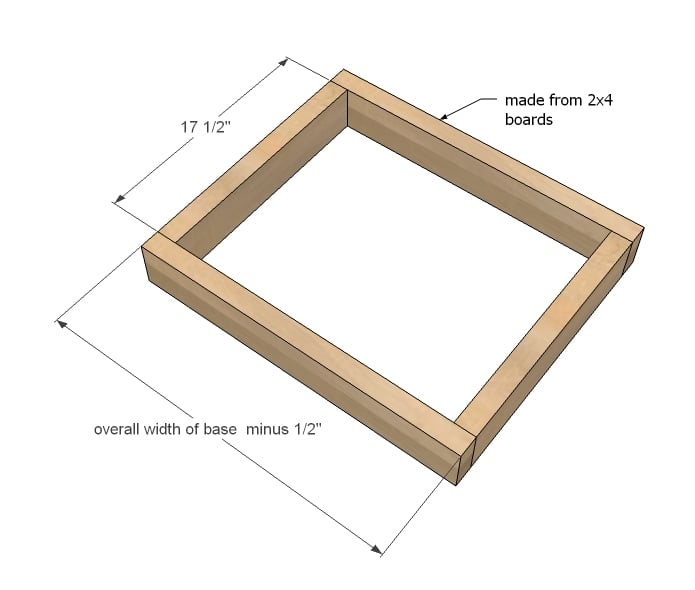
Bases
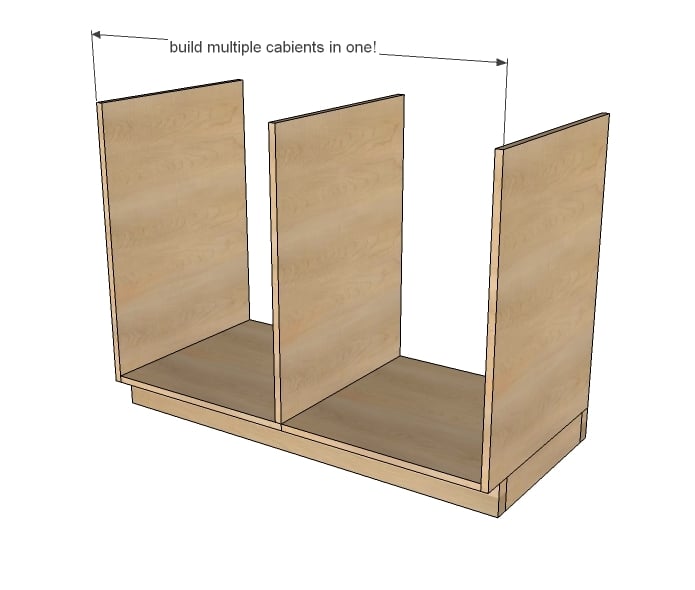
<h1>Townhouse Style</h1><div>If you had to build a row of houses, all side by side, would you build ten houses and stack them next to each other? Or would they share walls like townhouses do? And foundations? </div><div><br></div>Having a base allows you to fully support the cabinets, and enables you to easily build multiple cabinets in one. Let's say you have a row of cabinets, with no appliance interruptions. You could build just one long cabinet, with dividers, and place on the same base.<div><br></div><div>Reason why you can't just build two ends with a toekick notched out, and divide up? there's no support in the center. Sorry, we don't build saggy cabinets. Keep the cabinets less than 36" between dividers to minimize sagging.<br><div><br></div><div>Saves time, saves materials.
Note of caution - if you are using full overlay doors, you'll need to do some figuring on how the doors overlay face frames, most likely using 1 1/4" overlay hinges on ends and 1/2" overlay hinges on center cabinets.</div></div>
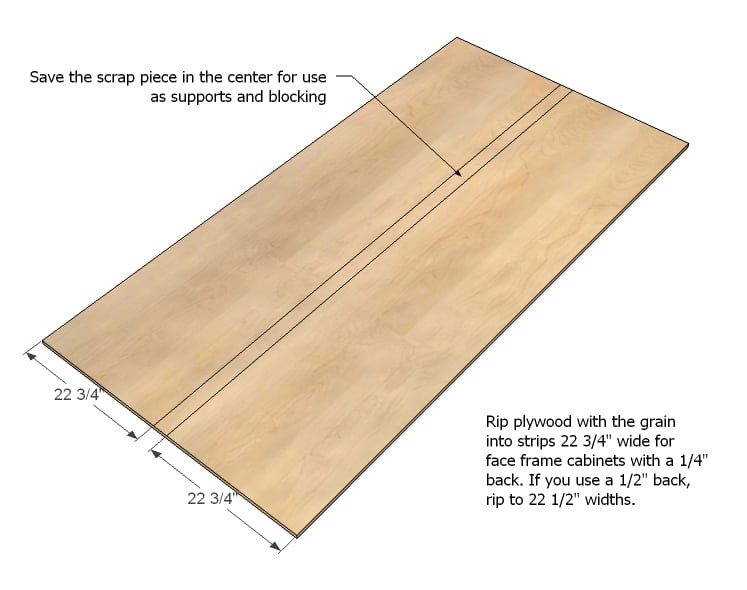
<h1>Plywood Cutting
</h1><div>We've really given a ton of thought on how to easily and precisely cut your plywood pieces. You will want to rip your plywood into strips 22 3/4" wide for face frames with 1/4" backs. This way, your plywood grain is always in the right direction and the widths are always the same. Save the center scrap piece to use for supports. It's not waste.</div><div><br></div><div>Also, using this method, you can rent a tablesaw and make all your cuts in just a few hours. Or even ask the home improvement store to make cuts if you can trust their track saw.</div>
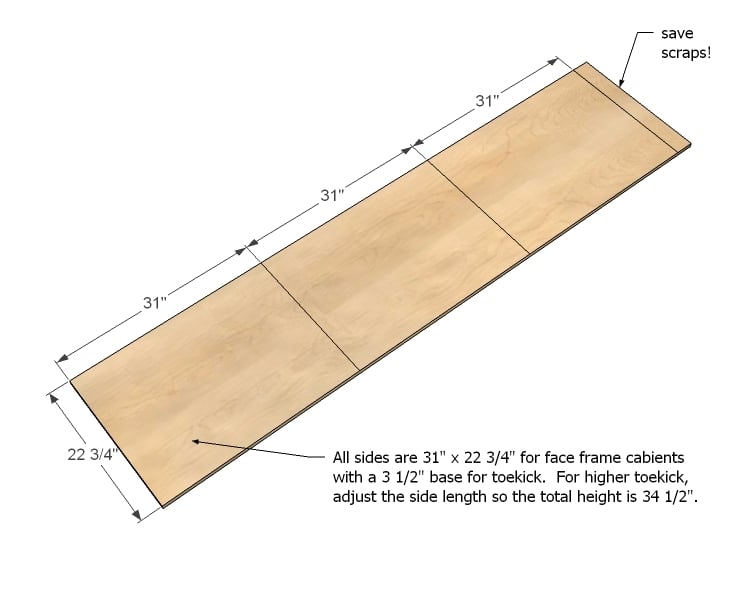
<h1>Cutting Sides</h1><div>Then with your strips, cut all your sides. These will be just simple cross cuts. You will be able to get 6 sides per piece of plywood. </div><div><br></div><div>Remember, the overall cabinet height is 34 1/2". With a 3 1/2" toekick, your sides are 31" tall.</div>
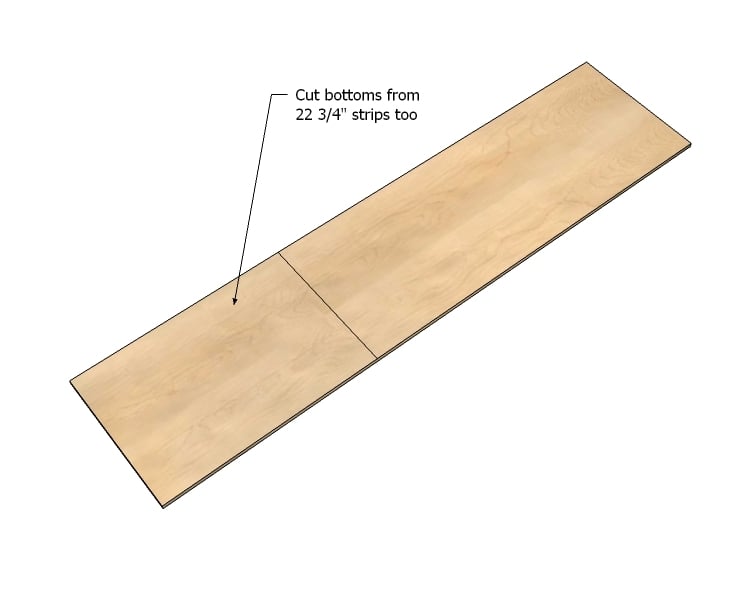
<h1>Cutting Bottoms
</h1><div>Bottoms are cut from the 22 3/4" wide strips as well. Bottoms should be 2" less in width than your overall cabinet width. 1 1/2" for the sides, and then another 1/2" for your face frame to overextend your carcass. We'll talk more about the face frame/carcass sizing in a bit.</div>
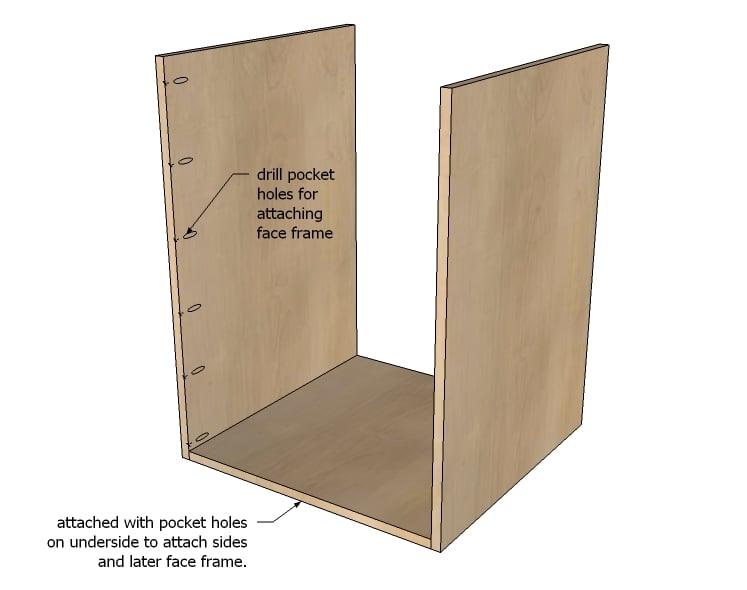
<h1>Box Construction</h1><div>Once your pieces are cut for the box, you drill 3/4" pocket holes along inside front edges of sides, and on bottom, front and side edges. </div><div><br></div><div>Alternatively, you can nail the face frames on, but you will have to hide nail holes. This is up to you.</div>
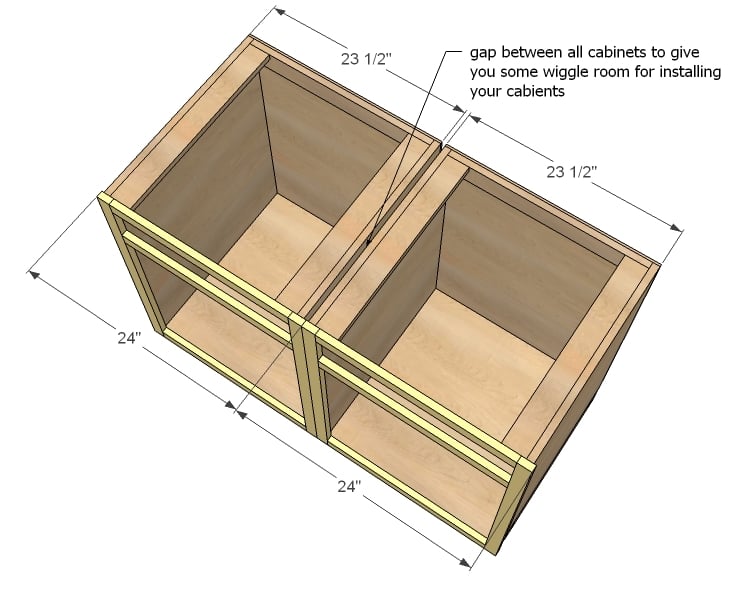
<h1>Face Frames</h1><div>Face frames are just simple 1x2 frames, built with 3/4" pocket holes and attached to the face. BUT there is a catch ... the face frames are the full width of the cabinet, and over extend the box by 1/4" on each side.</div><div><br></div><div>This is done for four main reasons.</div><div><br></div><div>1. <b>Crooked Walls </b>- if your walls are crooked, the space between the cabinets allows you to "fudge" a little with the cabinets, resulting in the face frames lining up perfectly, even if the boxes are a little off.</div><div><br></div><div>2. <b>Imperfect Boxes</b> - Let's say your plywood bulges out just a tiny bit in the centers. When you go to line cabinets up, you will have trouble pulling the cabinets together so your face frames are completely seamless. With the gap in the center, you have some room to account for wood being less than perfect.</div><div><br></div><div><b>3. Finishing Ends</b> - And finally, on the ends, you can cover up the 2x4 bases by cutting 1/4" plywood and gluing over the end. It will be hidden behind the face frame, so no edges exposed, and you'll be left with a beautiful finished end! NOTE: You may wish to extend your face frame a tiny bit more on ends to allow a little more room for the 1/4" plywood.</div><div><br></div><div><b>4. Appliances Abuse</b> - It's a good thing to have a little space between your cabinets and say, your oven. Having the extra space will also allow a little wiggle room when installing your dishwasher too.</div><div><br></div><div>So remember, your face frames are the cabinet's true width, and your boxes are 1/2" less in width.</div><div><br></div>
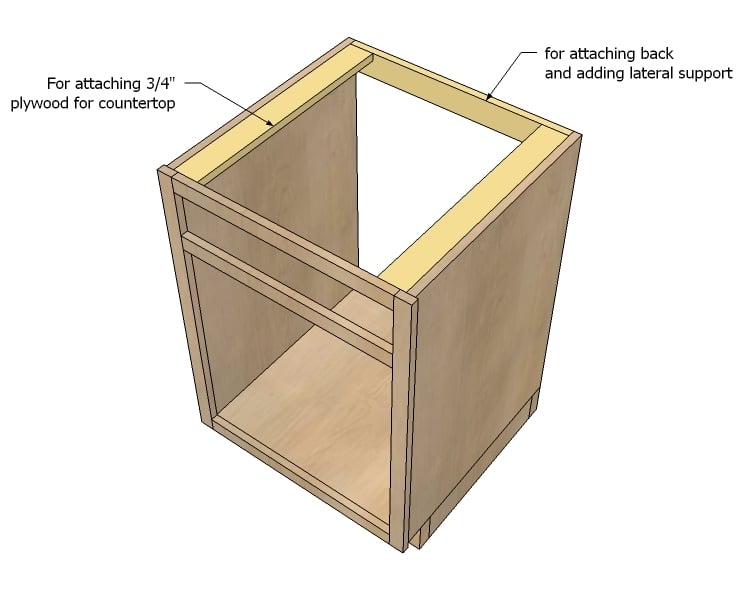
<h1>Supports</h1><div>Use up your plywood scraps to save money for the supports. </div>
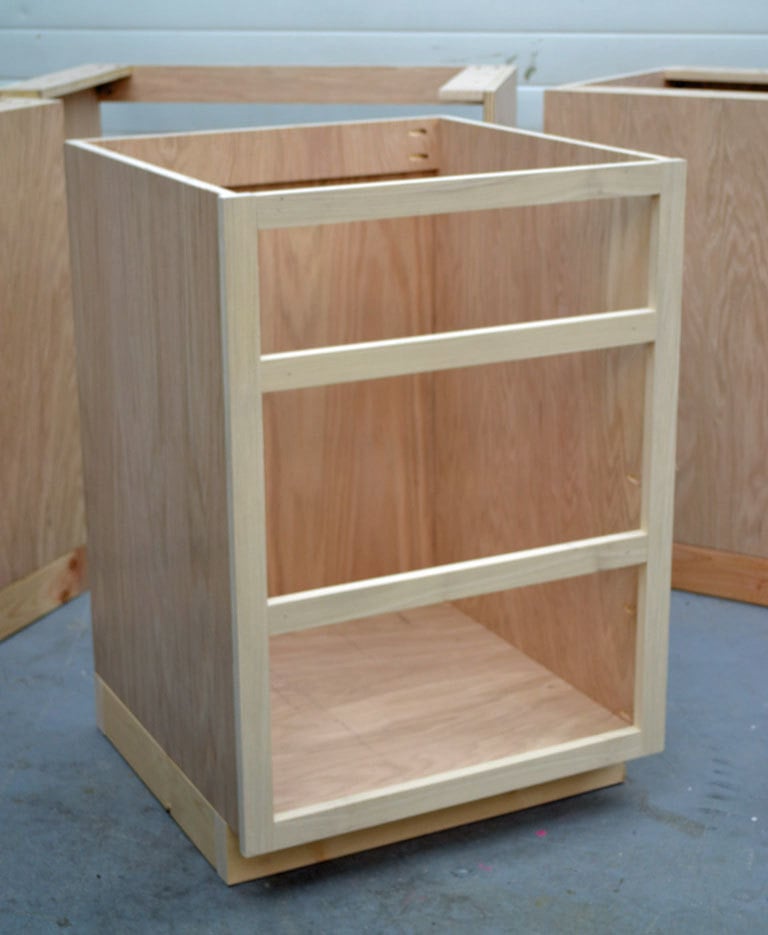
<h1>Results</h1><div>Once the plywood is cut, each cabinet takes about half an hour to make. We were able to make both 24" wide drawer bases that flank the range from a single sheet of plywood. Add some boards for a face frame, a 2x4 for the base, and 1/4" plywood for the back, and we are into each base for about $50. The drawers of course are going to double that number, if not more depending on the slide quality, but comparing apples to apples, 3/4" plywood cabinets glued together and fully assembled with a hardwood face frame, I'm saying building your own cabinets is the way to go!</div><div><br></div><div><br></div>
<h1>Special Thanks to PureBond
</h1>
Special thanks to <a href="http://cfpwood.com/ana-white/" title="" target="_blank">PureBond </a>for providing the Formaldehyde Free Plywood for these cabinets. Not only is Mom getting beautiful cabinets, but also healthy green ones! For the month of January 2012, PureBond is giving away a $100 Home Depot gift card EVERY SINGLE DAY of the workweek to help you get started on your projects! It's easy to enter -<a href="http://ana-white.com/2012/01/huge-giveaway-purebond-plywood" title="" target=""> all the details are here</a>.
Comments
Laura Fama
Wed, 01/04/2012 - 14:44
So exciting!!!
annalea
Wed, 01/04/2012 - 14:59
Can you say: happy dance?
In reply to Can you say: happy dance? by annalea
Ana White
Wed, 01/04/2012 - 15:36
Thank you for supporting us
Heather I. (not verified)
Wed, 01/04/2012 - 16:02
Thank you!!!
birdsandsoap
Wed, 01/04/2012 - 16:42
I can't wait for the next
ChantelleJ (not verified)
Wed, 01/04/2012 - 18:37
So Thankful . .
Maria in Maui
Wed, 01/04/2012 - 18:37
Size of Kitchen?
In reply to Size of Kitchen? by Maria in Maui
birdsandsoap
Thu, 01/05/2012 - 19:51
I believe it is a ten by ten
dee
Wed, 01/04/2012 - 18:52
very exciting!
Sarah @ Misadv… (not verified)
Wed, 01/04/2012 - 18:55
Great timing!
Sarah @ Misadv… (not verified)
Wed, 01/04/2012 - 18:55
Great timing!
Guest (not verified)
Wed, 01/04/2012 - 20:05
Hi Ana! What type of wood are
kahrani
Wed, 01/04/2012 - 21:18
This is great, Ana! So
Tim Daniels (not verified)
Thu, 01/05/2012 - 05:13
A great suggestion.
claydowling
Thu, 01/05/2012 - 06:12
CAD Program
Guest (not verified)
Sat, 01/07/2012 - 04:17
It may not be intended this
Polysoup
Sat, 01/07/2012 - 17:18
Actually I believe clay was
Guest (not verified)
Sat, 01/07/2012 - 17:26
I don't think it was meant
In reply to It may not be intended this by Guest (not verified)
claydowling
Sun, 01/08/2012 - 07:20
Contextual failure
Guest (not verified)
Thu, 01/05/2012 - 06:38
Kreg Jig plans around here somewhere..
Rick (not verified)
Thu, 01/05/2012 - 14:32
I never found the book on
Sunny (not verified)
Thu, 01/05/2012 - 13:18
Thanks Ana! I'm remembering
Sara (not verified)
Fri, 01/06/2012 - 14:53
I was thinking about that
Rick (not verified)
Thu, 01/05/2012 - 14:29
Pocket Holes
Ginna (not verified)
Fri, 01/06/2012 - 08:57
Melamine vs. Plywood?
In reply to Melamine vs. Plywood? by Ginna (not verified)
Ana White
Fri, 01/06/2012 - 11:43
Hi Ginna, thank you for such
Guest (not verified)
Fri, 01/06/2012 - 15:51
Concrete Counter Tops
In reply to Hi Ginna, thank you for such by Ana White
tracysmith
Sat, 01/07/2012 - 06:41
Faceframes
In reply to Faceframes by tracysmith
Ana White
Sat, 01/07/2012 - 11:10
Hi Tracy, the face frame you
ElectroVoice (not verified)
Fri, 01/06/2012 - 16:11
Terminology
AmandaB (not verified)
Tue, 01/10/2012 - 07:12
thanks
Grampa (not verified)
Sun, 01/15/2012 - 18:30
Cold!!!!!!!!
Guerrina
Mon, 01/16/2012 - 19:07
Hope All Is Well
Randy W (not verified)
Wed, 01/18/2012 - 15:03
It may have been touched on
YankeeBelle
Tue, 01/24/2012 - 17:16
I'm in Complete Awe!
Guille (not verified)
Sun, 01/29/2012 - 23:52
I found an excellent blog,
Guille (not verified)
Sun, 01/29/2012 - 23:58
Diagrams melamine kitchen
orangesugar
Tue, 01/31/2012 - 15:24
Drawers
Eric Page (not verified)
Mon, 02/13/2012 - 23:31
Build drawers in the base of the cabinet
katieevans140@… (not verified)
Fri, 03/02/2012 - 16:16
Drawers in the Base of the Cabinet
Eric Page (not verified)
Wed, 03/14/2012 - 05:08
DRAWERS IN THE BASE OF THE CABINET
pjhisted
Sun, 02/26/2012 - 08:42
connecting face frame
katieevans140@… (not verified)
Fri, 03/02/2012 - 16:23
Confused Over Townhouse Concept
craigdattons (not verified)
Fri, 04/06/2012 - 03:13
steel section sheds
WebErika (not verified)
Mon, 04/09/2012 - 09:20
Fantastic Post! Garage Cabinets here we come!
fariha ali
Sun, 07/22/2012 - 02:11
Granite for CounterTop
pblomberg
Mon, 09/09/2013 - 06:07
Screws -
stivewatson123
Wed, 01/15/2014 - 22:12
Information about Household
stivewatson123
Wed, 01/15/2014 - 22:12
Information about Household
jemparker@gmail.com
Fri, 03/07/2014 - 08:28
Learning all the dimensions
mrchandler
Wed, 11/25/2015 - 10:59
base cabinets
Why do you drill the pockets on the outside of the cabinet? Wouldn't it be better to hide them on the inside?
In reply to base cabinets by mrchandler
JoanneS
Wed, 11/25/2015 - 13:28
Base Cabinet Pocket Holes
Hi Mrchandler,
When the cabinets are attached together the pocket holes are hidden in between, so they won't need to be filled in. The visible cabinet end would be covered with a thin (1/4 thick") piece of matching plywood cut to size, to cover the base as well as the pocket holes on the end. If I'm making a stand-alone cabinet without the extra plywood outsides, I put the pocket holes on the inside. Happy Thanksgiving! Joanne
Alyssa Giles
Mon, 08/22/2016 - 06:02
Screw type
Hello,
In the plans, 3/4" pocket screws are used. However, Kreg seems to only make 3/4" Fine thread pocket screws. Since we are using plywood, Kreg says to use course thread pocket screws. I'm unsure what to do. Please advise.
Thanks,
Alyssa
LUnwin
Wed, 01/10/2018 - 18:50
Late to the party...
I know this is an old post, so I don't know if you're still answering questions... But I tried to expand the comments above and couldn't -- I think someone already asked this, but I can't see the answer. I am confused by the townhouse part. Are you saying not to do it that way? I have a space that is 54" and I'd like to do a built-in sideboard of sorts. I'm thinking these plans are what I need. They're so easy to understand (except for the question above!). Thank you for taking the time to write this out and making it feel possible. :)
jimssolidwoodp…
Thu, 06/27/2019 - 13:44
Cabinets
Ana, how much for plywood per base cabinet, you get your plywood free how would pkywood be for adouble base cabinet buying plywwood
Jim
haikugreen
Tue, 04/14/2020 - 05:08
What size plywood?
Hey Ana, what size plywood are you using, I can't find a reference to it in the body. Some of the HTML/CSS is a little busted so its slightly harder to read. THANKS!
I_am_Finney
Sun, 01/22/2023 - 07:49
Townhouse Concept
Using the “Townhouse” concept, what width face frame do you use between the sections. And if you are using full overlay doors, do you need different hinges when you are mounting the “middle” doors from the hinges used on the “ outside” doors?
Do you have this detailed anywhere? Is it coved in the purchased plans?