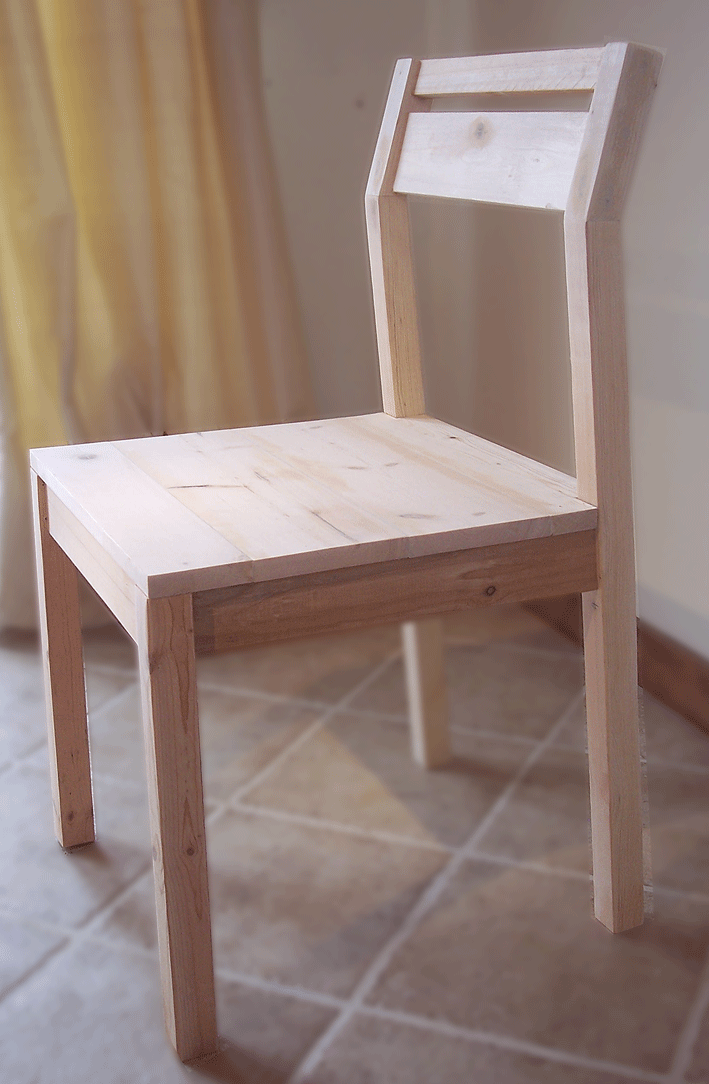
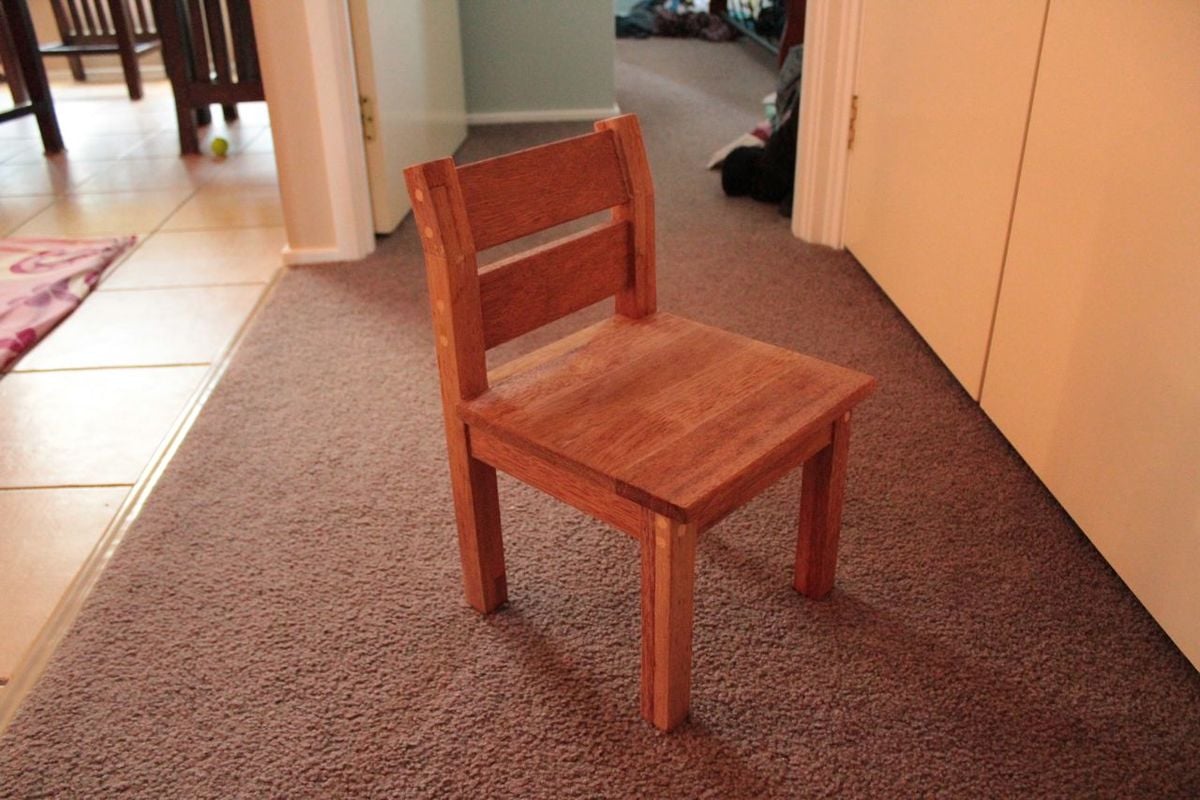
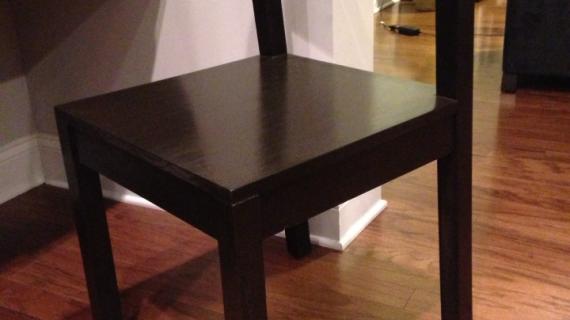
Chairs can be very difficult to build just right because cutting back legs requires precision and often special tools. With this simple project plan based off of pocket hole technology, anyone can create surprisingly comfortable and modern style chairs. Special thanks to our readers for sharing their photos.
Preparation
2 – 2×2
1 – 1×3
Scrap 1×2 and 1×4 15″ Long
Project Panel 18″ x 18″ (Purchase a 36″ x 18″ for 2 seats)
2″ Screws
Wood Glue
Wood Filler
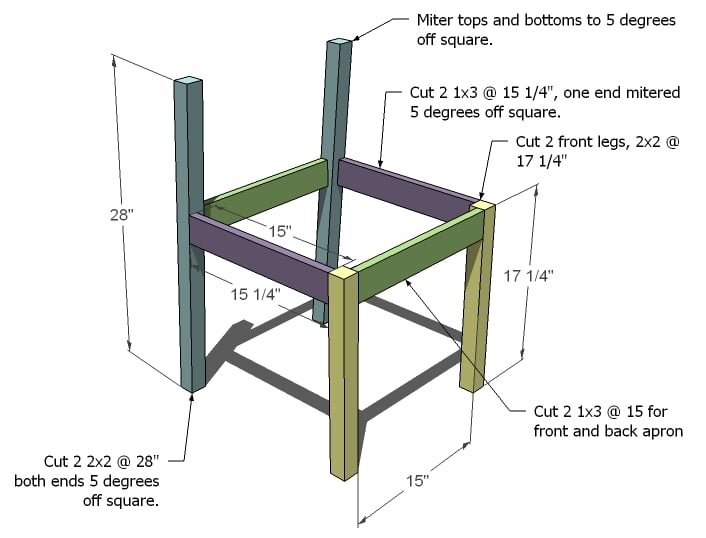
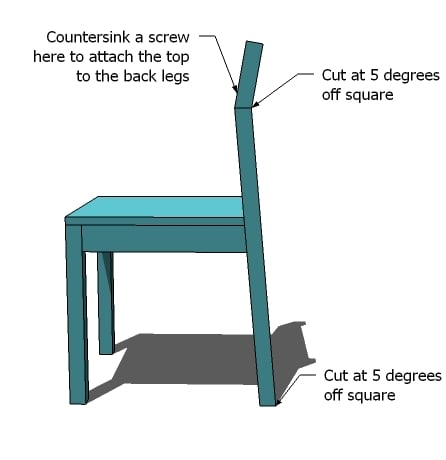
2 – 2×2 @ 28″, Ends Mitered at 5 degrees off square, short point to long point (Back Legs)
2 – 2×2 @ 17 1/4″ (Front Legs)
2 – 1×3 @ 15 1/4″, One End Mitred down 5 degrees off square (Side Aprons)
2 – 1×3 @ 15″ (Front and Back Apron)
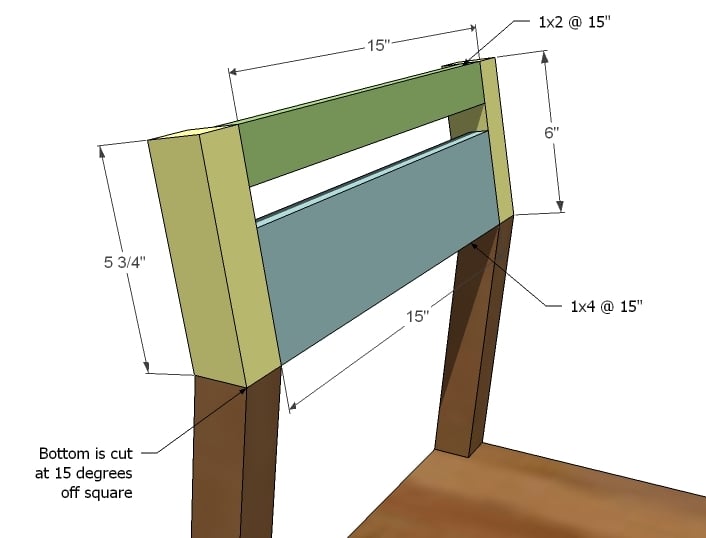
2 – 2×2 @ 6″, Bottom end mitred down at 15 degrees (Back Rest)
1 – 1×2 @ 15″ (Top Rail on Back)
1 – 1×4 @ 15″ (Bottom Rail on Back)
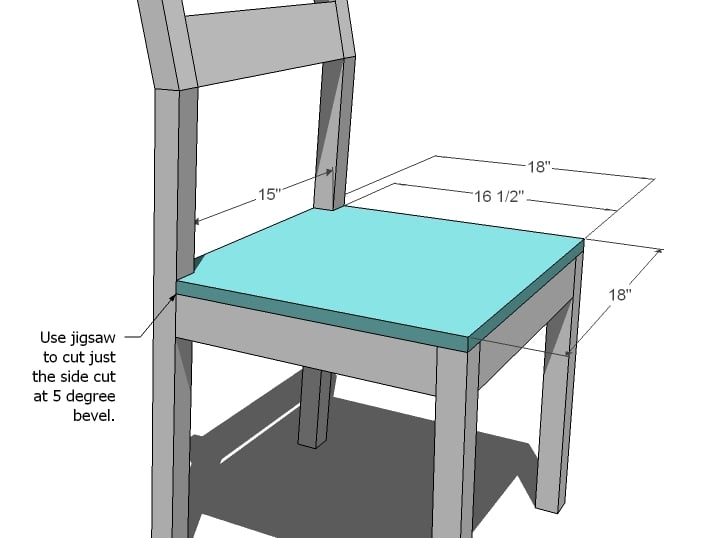
Pine Project Panel Cut at 18″ x 18″ or Boards Joined to create a surface 3/4″ thick 18″ x 18″ (Seat)
Instructions
Step 1
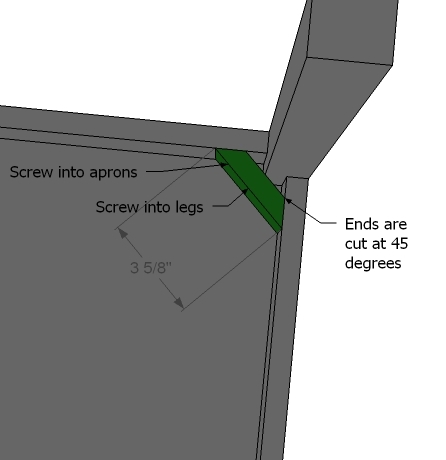
Build the Chair Frame. I started with the front legs and with my Kreg Jig™, fastened the front apron to the front legs. I used a 1/4″ piece of plywood to inset my aprons from my legs by placing the apron on the plywood and not the legs to create a 1/4″ difference. Then I fastened the side aprons to the front legs in the same manner. The I used a level rested on the side apron as I fastened the side apron to the back legs. Finally, using the Kreg jig, I fastened the back apron to the back legs. You can predrill and countersink screws without the jig. Just make sure you add corner bracing (which I did anyway).
Step 3
Back Rest. Build the back rest first by attaching the rails to the sides, as shown above. I attached by screwing together with the Kreg Jig™ but you can also predrill and countersink your screws to fasten. I also centered my back rails on the sides, leaving a 3/8″ gap on both the front and back.
Step 4
Seat. First cut your seat at 18″ x 18″. Then notch out the sides 1 1/2″ x 1 1/2″ on the backs as shown above. I ended up not cutting the back angle at 5 degrees and my chair looks great. I attached the seat from underneath using the Kreg Jig™, but you could also attach the seat by simply screwing through the top of the seat into the aprons. Also, if you have a Kreg Jig™, you can use it to join 1x stock together to get a seat that measures 18″ x 18″ (this is what I did).




Comments
Okay (not verified)
Tue, 04/20/2010 - 00:51
love that chair and kreg
love that chair and kreg tool.
Rebecca (not verified)
Tue, 04/20/2010 - 01:17
I think I finally got my
I think I finally got my husband on board with building furniture. I want this table & chairs, we'll start with the chairs. (He has worked construction so I'm okay starting with advanced). All it took was telling him he may get a new tool out of it. If I knew it was that simple I'd have told him that as soon as I found your blog and who knows how many pieces I'd have checked off my wish list.
Tracey (not verified)
Tue, 04/20/2010 - 01:38
These look great! I'm also
These look great! I'm also looking forward to the table plan promised. We're moving in a few weeks, and our table is in terrible condition. My husband declared that we are NOT bringing that table to the new house or we'll NEVER buy a new one. I'll do him one better and BUILD a new one...with your help!
Kevin (not verified)
Tue, 04/20/2010 - 01:42
Can you state which way 5
Can you state which way 5 degree angles go for us older easily confused builders?
looking forward to building a few of these....
merideth (not verified)
Tue, 04/20/2010 - 02:36
okay, that 5 degree off
okay, that 5 degree off square . . . does that mean if the leg is tilted forward (toward front legs) by 5 degrees, the bottom and top are now parallel to the ground?
Margo (not verified)
Tue, 04/20/2010 - 02:37
We love our kreg jig! It has
We love our kreg jig! It has been used for several projects inspired by your blog!! My to do list gets bigger everytime I visit your blog! Keep up the great work!!! :O)
Ashley (not verified)
Tue, 04/20/2010 - 02:52
I LOVE your website!! I
I LOVE your website!! I cannot wait to try making one of your beds! (Once I get some extra time!!) and the Kreg Jig looks awesome! I think before I start ANY one of your projects, that is a must buy!
Lacking Productivity (not verified)
Tue, 04/20/2010 - 04:25
I gotta get started on
I gotta get started on practicing so I can feel gutsy enough to do the advanced projects, because I TOTALLY want to build your chairs (I am always gushing over the outdoor ones, and I may or may not come back several times just to look at them).
Karen Scott Welker (not verified)
Tue, 04/20/2010 - 04:54
Please let Kreg know that
Please let Kreg know that your blog has sold one more jig. Just purchased from Amazon and I'm super excited to get to work.
Viola (not verified)
Tue, 04/20/2010 - 04:54
Thank you Ana for the chair
Thank you Ana for the chair plan. It is a great design. I love your new profile picture and logo. Thank you again for all that you do and your hard work.
Ana White (not verified)
Tue, 04/20/2010 - 05:22
The five degrees off square
The five degrees off square simply means to set your miter saw at five degrees and cut your board. Measure 28". Then slide your board down (do not turn, flip, rotate, etc, just slide the board down) and make another cut. The two cuts will be parallel. I will add another side profile photo so you can see what I'm talking about.
Ashley (not verified)
Tue, 04/20/2010 - 05:45
Much to my husband's dismay,
Much to my husband's dismay, your plans/posts have been a huge inspiration to me lately. He's just grumpy because I have more hobbies than he does. :D
Brent (not verified)
Tue, 04/20/2010 - 05:53
I love my kreg jig. I adapt
I love my kreg jig. I adapt most of your plans so I use pocket holes instead of some of the standard joining. It really does make a solid joint. And it is fast!
Amanda (not verified)
Tue, 04/20/2010 - 05:54
HOW many readers wrote to
HOW many readers wrote to Kreg Tool and told them they need to advertise with Ana?!
I was one of them. I'm wondering if this is why they sent you the tool to test it out?! I hope they choose to advertise on your site soon!
LOVE the chairs! We also just recently bought the Kreg Jr. The original one was out of our price range.
Karla (not verified)
Tue, 04/20/2010 - 05:57
I wish I needed chairs...:(
I wish I needed chairs...:( They look great! But I too, have switched from Uggs to Bogs. I just wish they made them for dogs... ;) Happy breakup...almost?
Erin @ The Imp… (not verified)
Tue, 04/20/2010 - 06:10
First the Youngsters extole
First the Youngsters extole the virtues of the Kreg jig and now you ... I'm thinkin' I may need one of those.
Great looking chairs, and I would have never believed they were comfortable if you didn't say it!
Kate (not verified)
Tue, 04/20/2010 - 06:18
awesome! i finally got some
awesome! i finally got some tools to make a table for my dining room, and am so pumped to see that i can now make chairs to go with it too! thanks!
Grover (not verified)
Tue, 04/20/2010 - 06:33
Glad you were finally able to
Glad you were finally able to get the Kreg Jig. They are great. I highly recommend them. Great job on the chair.
Kevin(Grover)
groverwoodworks.blogspot.com
TaylorClan (not verified)
Tue, 04/20/2010 - 06:37
We love our kreg jig-we have
We love our kreg jig-we have built cabinets with it, shelves for our garage, etc, etc. So fun.
jgoepel (not verified)
Tue, 04/20/2010 - 08:06
Anna,For the joint between
Anna,
For the joint between the support legs and the "back", why not countersink from the back and put the screw "up" into the back? That would keep the fronts of the chairs looking even nicer.
Krieger12 (not verified)
Tue, 04/20/2010 - 08:20
Anna, I love your blog, my
Anna,
I love your blog, my wife is constantly priting out things for me to make... which is good because I like working in my shop...
I have the smaller kreg kit and found these at Rockler:
http://www.rockler.com/product.cfm?page=22178
It's a clamp that uses the holes you drill for the screws to clamp the pieces together while you screw the screws in. It honestly helps quite a bit. Jus thought that anyone that is looking to get(or has a kit) should think about picking one(or two) up.
Ana White (not verified)
Tue, 04/20/2010 - 08:26
jgoepel, that is absolutely
jgoepel, that is absolutely possible. I choose to fasten thought the top because I wanted the top to be super strong, and though fastening through the back could create a weaker joint. But in hindsight, there is very little leverage at this point when the chair is being used, and fastening from the back would have been just fine. Or the insides or sides with the Kreg Jig.
Krieger 12, thanks for the heads up, will have to check out the clamps. LOVE clamps, especially the ones that came with the Kreg Jig!
Fred (not verified)
Tue, 04/20/2010 - 08:48
Is it true that the use of
Is it true that the use of the Kreg jig on a joint obviates the need for glue?
Ana White (not verified)
Tue, 04/20/2010 - 08:51
Hi Fred, that's what they
Hi Fred, that's what they say, and I didn't use glue on this chair and it is absolutely stable. My husband is quite heavy and he thought the chair was plenty strong enough. I however like to use glue regardless - unless I plan to take something apart later.
Kathleen (not verified)
Tue, 04/20/2010 - 09:28
I bought the small Kreg jig
I bought the small Kreg jig kit around 3 months ago, and I love it. I couldn't believe it when I figured out that the pocket-hole assembly that the Kreg allows you to drill the angle holes for a joint BEFORE clamping the joint together. Brilliant! And so much easier for those of us without a real wood shop, who are doing our construction in our driveways or on sawhorses.
I'm not a fan of excessive product placement in blogs, and I wouldn't want Knock Off Wood to become crowded with lots of tool endorsements. But I think that the Kreg is a total winner for this blog, because it allows inexperienced woodworkers to make sturdy, invisible joints.
kch (not verified)
Tue, 04/20/2010 - 14:52
Love this plan! I'm gonna be
Love this plan! I'm gonna be building a gigantic dining table and will be needing 12 chairs. These will be WAY less expensive than purchasing chairs as I had planned. Thanks!
Any idea if a biscuit joiner could be used in place of the jig on any of this plan?
Ana White (not verified)
Tue, 04/20/2010 - 14:55
Hi KHC, yes, you can use a
Hi KHC, yes, you can use a variety of other methods to join this chair, by no means do you have to use the Kreg Jig. I wanted to test out the jig, so I used it and was delighted with the results, but that doesn't mean this chair could not be constructed with other joinery methods.
This post was not sponsored by Kreg Tools, and I was just giving my honest opinion of the tool.
Jules (not verified)
Tue, 04/20/2010 - 15:20
Love these chairs. Cannot
Love these chairs. Cannot wait to get plans for the table! It's exactly like the ones from West Elm and Crate and Barrel that I love.
gkey (not verified)
Tue, 04/20/2010 - 15:59
dear AngleAna,No matter the
dear AngleAna,
No matter the angle, I LOVE everything you are building!
I had to laugh at the tool/husband part of this post: I too am married to a carpenter-brain-guy.
love,
still dreamin' and schemin'
in
NE
Suze (not verified)
Tue, 04/20/2010 - 17:06
Seriously companies should be
Seriously companies should be paying you for their rise in sales. I've invested in my "beginner" tools, thanks to you, and now I want one of these Kreg Jigs. It looks so easy to use too.
I haven't built anything yet, but these chairs have now made it close to the top of my list. I've been waiting for something like this.
Thanks again Ana!
natalie a (not verified)
Tue, 04/20/2010 - 18:20
I have been needing your
I have been needing your site... I always design furniture and then get stuck when I try to figure out how to build it. I am so excited to try something on your site and learn the basics I need to make my dreams a reality!!! You are amazing!!!
So- what do I need first? Is there a past post that discusses the first thing to buy, or the most useful tools, or start this way?
* Nancy * (not verified)
Tue, 04/20/2010 - 19:17
I'm liking this new tool -
I'm liking this new tool - Kreg jig, and awesome chair!
But like Natalie A. I'm not sure what tools I need to start out with. Someone please help. :)
Ana White (not verified)
Tue, 04/20/2010 - 19:27
Hi ladies, welcome. For
Hi ladies, welcome. For tools, I would start with a drill. Besides using a drill for building, it will come in very useful for all sorts of life necessities, like hanging curtains to putting together toys. The Kreg Jig works with the drill, and you could fasten most of your projects with the jig and drill. I would if you can afford to, invest in a compound miter saw, preferably a sliding double bevel. THese tools and a sander were the only power tools I used to build this chair. I do have a label TOOLS that gives alot more information on my tools, the different saws, and what type of nailer to use.
That said, if this is your first project, I would be very very cautious. Chairs are easy to get wrong, despite looking so easy. The problem is getting all the pieces square and level at the same exact time to get a chair that does not wobble and is strong. I'm not saying it can't be done, I'm just hoping you don't become discouraged if your project is more challenging than you might assume.
Can't wait to see what you build. Good luck!
Her Royal Highness (not verified)
Tue, 04/20/2010 - 19:31
my dad left his miter saw at
my dad left his miter saw at our house this weekend. I have to admit that I am really excited about it but I'm so busy the next few weeks that I'm not sure I'll get to build anything before he comes back for it! I really want to try and build a new TV stand or outdoor table for us.
Karen (not verified)
Wed, 04/21/2010 - 00:04
Good morning Ana. I am so
Good morning Ana. I am so glad you and your husband love the Kreg Jig, it was my pleasure to get you this. I did it as a thank you to you for all your sharing. I am sure Derek wil be thrilled to see it is already starting to help others as well. Good luck with everything.
* Nancy * (not verified)
Wed, 04/21/2010 - 03:52
Thanks for your reply Ana. I
Thanks for your reply Ana. I don't plan on making the chairs as my first project, more like a bookcase, a headboard and the list goes on! :)
James (not verified)
Wed, 04/21/2010 - 06:10
Wow Ana, after your glowing
Wow Ana, after your glowing writeup I couldn't resist ordering a Kreg jig of my own, and after just a couple of test joints I can tell it's every bit as good as you found!
My first project with it is going to be a rebuild of my ratty tool shelving unit and beyond that, who knows? I've been drooling over haberdashery cabinets for years and all of sudden they don't seem so difficult to build!
Kelley (not verified)
Wed, 04/21/2010 - 06:12
Yay! I've been DYING to
Yay! I've been DYING to refinish my dining table, but have been putting it off because the chairs are not refinish-able, and I can't afford to replace them. Now I can hop to it! But, judging by the "advanced" tab, I'll have to solicit my husband's help...and maybe my father in law's...still SUPER excited! Thank you again!
Sindy (not verified)
Thu, 04/22/2010 - 15:42
Yes!!!!! I am building a
Yes!!!!! I am building a window seat to cover up a damaged floor in our living room. I had to make over 40 pocket holes for the face frame and I found the Kreg jig at our local Lowe's. That little jig made it quick and easy and professional! Love it!
Sindy
Heather (not verified)
Thu, 04/22/2010 - 16:49
I made 1 chair tonight and I
I made 1 chair tonight and I have a couple of questions about it. I am not happy with the quality of the 2x2's at either of my local store, what would you replace them with if 2x2's aren't an option? Also I didn't see project board in 18x18 or 18x36, the only close sizes are 16 and 20 inches. This was at Orange and Blue. I bought enough wood for 3 chairs and spent $50 in case anyone was wondering.
Ana White (not verified)
Thu, 04/22/2010 - 17:04
You are going to want good
You are going to want good 2x2. If you look closely at the 2x2 hardwood boards, you may notice that they are merely 2 1x2s laminated together. You can absolutely do this, just make sure the seam runs facing forward and not to the side of the chair. You can laminate by glueing and clamping, I would recommend a couple of fasteners on the ends (either nails or screws neatly hidden on the insides).
I've noticed that Orange with carry 16" x 36" and then Blue will carry 18" x 36" at my local stores. You can of course use the 20". If you are using a Kreg Jig, like I did, you can also use 2 - 1x6 boards and 2 - 1x4 boards to equal 18" width, just make sure the 1x6s are 5 1/2" wide and the 1x4s are 3 1/2" wide.
Good luck with your chairs.
Heather (not verified)
Thu, 04/22/2010 - 17:21
Thanks so much for the fast
Thanks so much for the fast reply!!! My anniversary is Sat and since my husband is deployed I'm having a bunch of friends over and it turned out to be more people than I have chairs! I needed to make chair for our new table anyway so I need to work fast! I will use the idea of combining the 1x2s because the 2x2's are terrible, it would take me hours of sanding to make them decent. The chair went together very quickly and I think they are going to look great. I might change some things around with the seat because I want them to be padded. I do have the jig and it's fabulous, I think I'll use the 1x6's like you suggested. Thanks again!!!!
Ana White (not verified)
Thu, 04/22/2010 - 17:24
You're welcome, how exciting.
You're welcome, how exciting. Check out the DWR profile chair in the post above (link), it's padded. If you choose a padded seat, you can actually use plywood for the seat (or even no sag springs or webbing).
Heather (not verified)
Mon, 04/26/2010 - 09:11
I finished the 3 chairs on
I finished the 3 chairs on Friday. All together it took be around 5 hours to build the chairs plus time for the glue holding the 1x2s to dry. I just used scrap plywood for the seats and we sat on towels to avoid splinters! With buying the extra 1x2's instead of 2x2's I spent a total of $80 on 3 chairs minus the seats. I'm planning to make 3 more and cover the seats so I should come out to around $200 for 6 chairs. Not bad at all.
Richard (not verified)
Wed, 05/12/2010 - 06:09
Ana, That is an excellent
Ana, That is an excellent article on your chair project. Your pictures and graphics make it very understandable plus your detailed explanations. I, unfortunately, left my Kreq jig at my winter shop and articles like these increase my regret at that fact.
the decor diva (not verified)
Wed, 05/19/2010 - 12:15
Hi Anna,I just recently
Hi Anna,
I just recently started my blog and I wanted to let you know I posted about this project of yours. Hope you can stop by and take a peek sometime.
http://thedecordiva.blogspot.com/
Thanks for all the inspiration. I am "officially" becoming a follower :)
Take Care.
Jen
Jeremy Burlingame (not verified)
Tue, 06/29/2010 - 06:11
Kreg links didnt work for me,
Kreg links didnt work for me, but saw this really simple version of the jig for $20 at Amazon.
Susan (not verified)
Sat, 07/10/2010 - 17:58
Anna - did you ever post the
Anna - did you ever post the table showed as a companion to these chairs? I looked through the tables since this date and haven't seen it, so wondered if I was missing it! :) I'd really love to see the plans and try to convince hubby to build the whole shebang for me! :D
Sarah (not verified)
Wed, 07/21/2010 - 02:34
Any recommendations if
Any recommendations if someone wanted to turn these into more of a bar stool height? My mom is looking for some stools to accompany a breakfast bar in her kitchen.
Carrie Nelson (not verified)
Sat, 08/28/2010 - 03:24
I have some Ikea bar stools
I have some Ikea bar stools that have lasted 5 years and 8 years, but the kids are destroying them. I'm going to remake them using the back legs and slats here! I'll post when they are done!