

How to build a fire truck loft bed. Free step by step plans to build a fire engine loft bed.
Thank You!
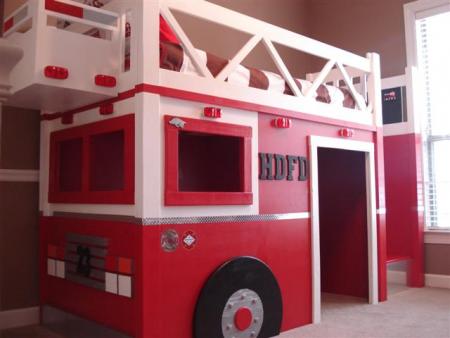
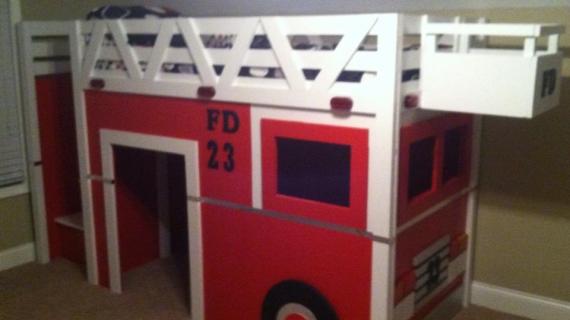
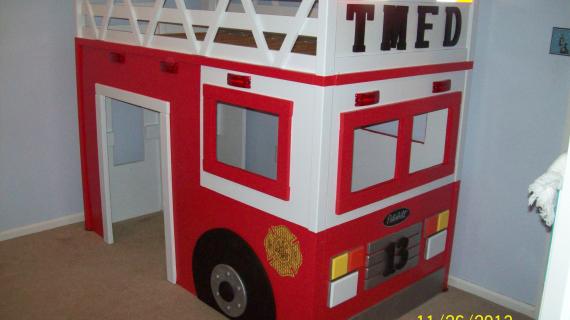
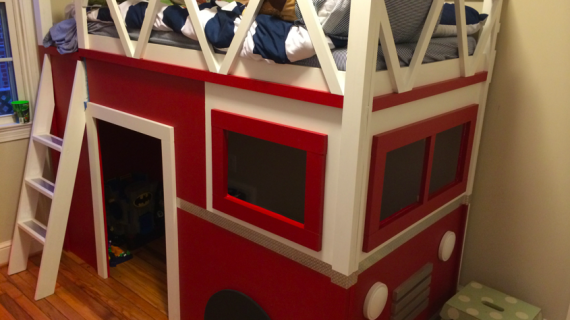
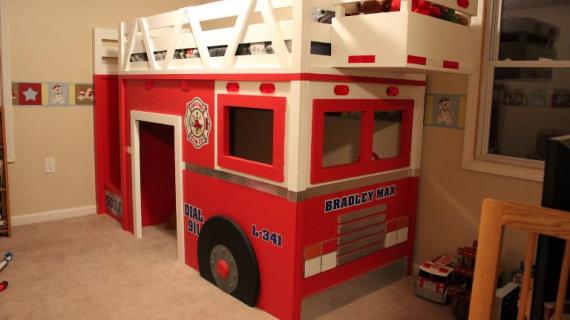
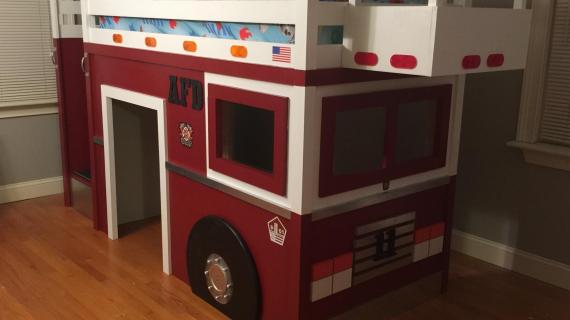
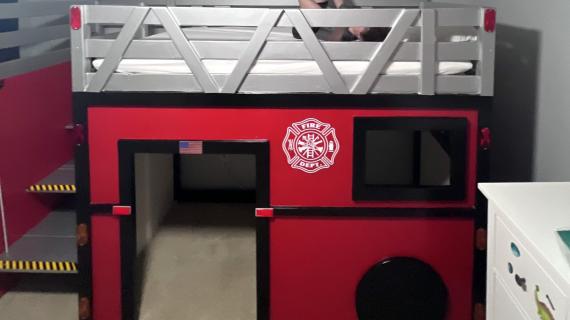
Fire Truck Bed

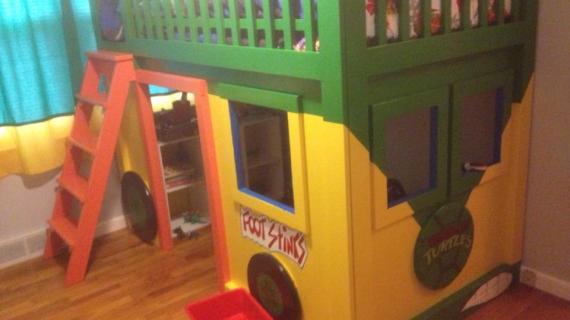
Awesome Inspires Awesome

Some Design Notes
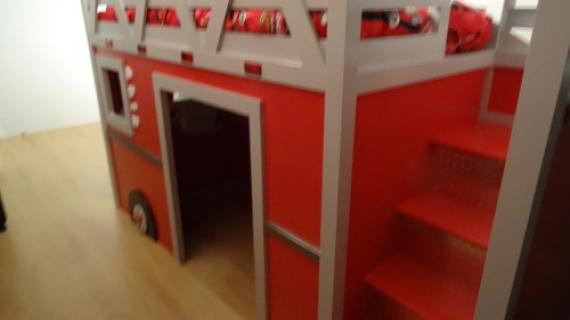
- This plan is for the loft bed. If you want to add the stairs, you can use this plan for modifying the loft bed for stairs.
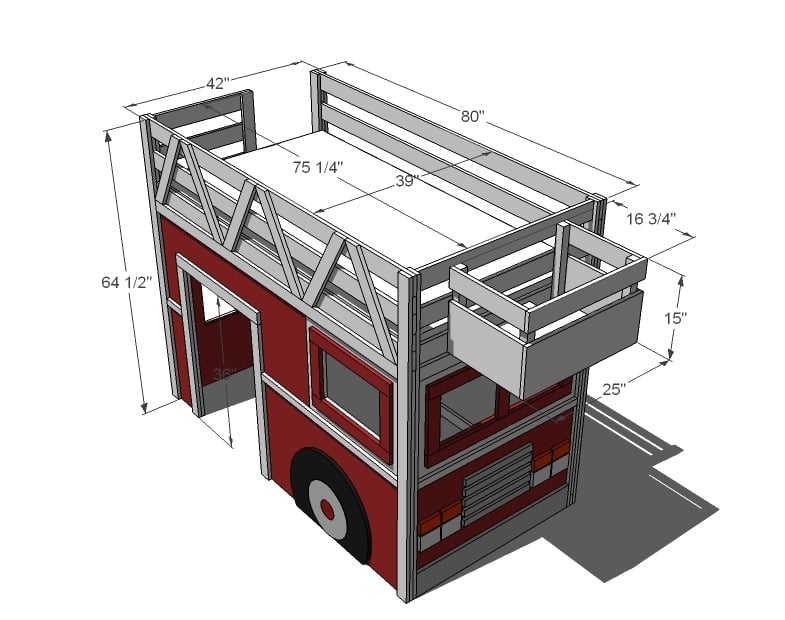
- This bed is a tad shorter than other beds at 64 1/2" tall overall. The sides are designed to conserve plywood at 48" wide. You can add an extra railing.
- The bucket is not for climbing in. But does it ever work great as a nightstand!
- I've put the cut list together per wall so you can build one wall at a time. But be careful to cut your longest boards first, and use up scraps for trim and details to conserve materials.
Preparation
2 - sheets 3/4" plywood or MDF
4 - 1x2 @ 8 feet long
16 - 1x3 @ 8 feet long (does not include slats)
8 - 1x4 @ 8 feet long
2 - 1x6 @ 8 feet long
1 - 2x2 @ 4 feet long (add two more for 2x2 cleats for slats)
1 - 1x10 @ 6 feet long
3" bolts for bolting bed together
FRONT WALL


Please read through the entire plan and all comments before beginning this project. It is also advisable to review the Getting Started Section. Take all necessary precautions to build safely and smartly. Work on a clean level surface, free of imperfections or debris. Always use straight boards. Check for square after each step. Always predrill holes before attaching with screws. Use glue with finish nails for a stronger hold. Wipe excess glue off bare wood for stained projects, as dried glue will not take stain. Be safe, have fun, and ask for help if you need it. Good luck!
Instructions
Step 1
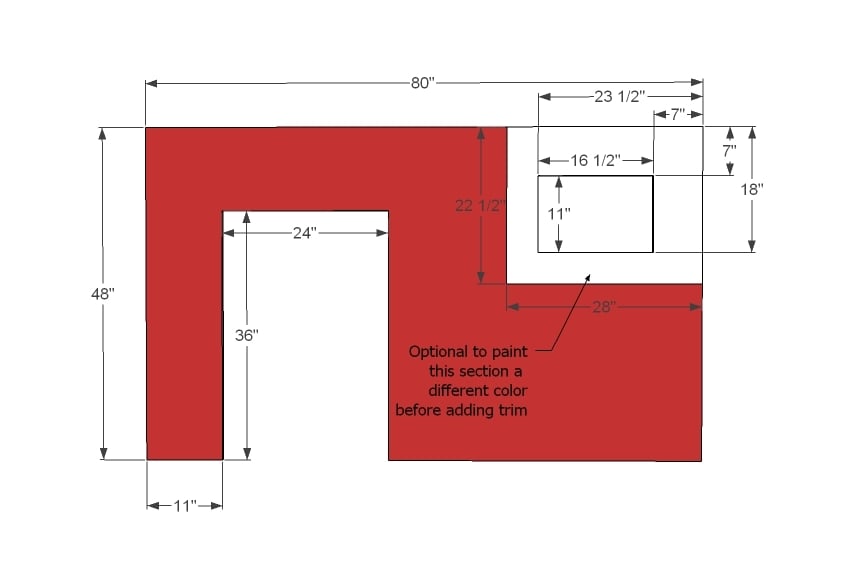
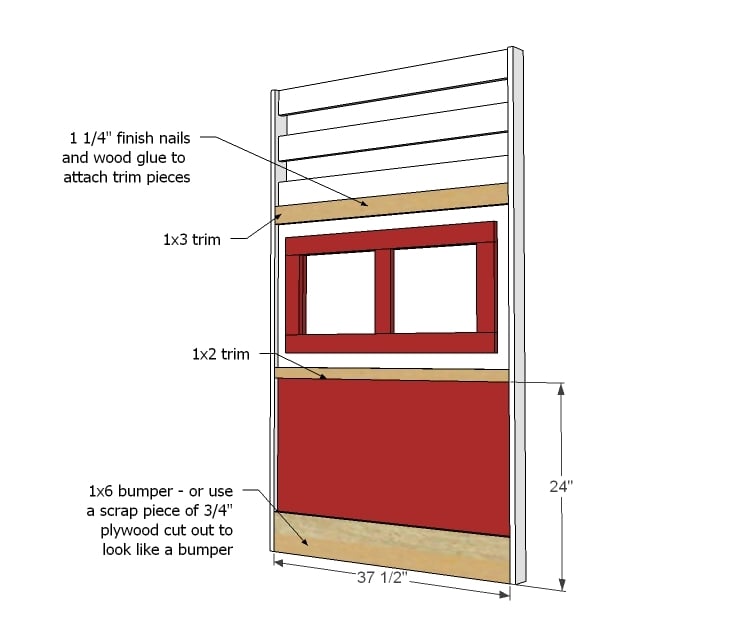
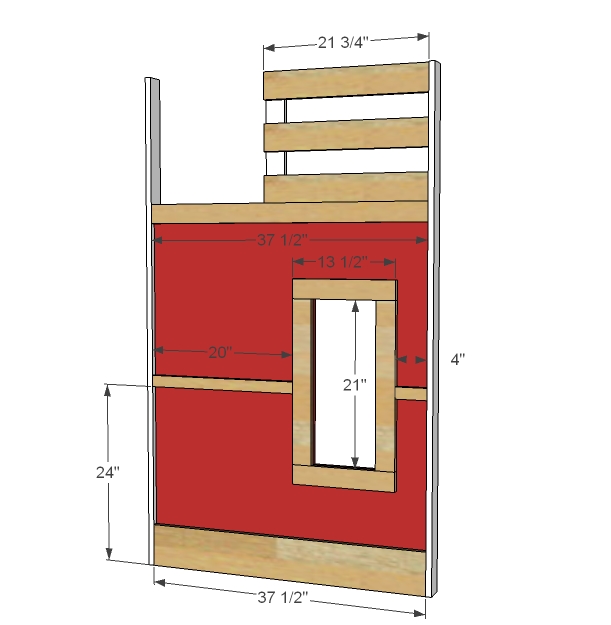
Start by cutting out the front panel carefully as shown here. If you want, you can paint the plywood first - thus the white square around the window.
Step 2
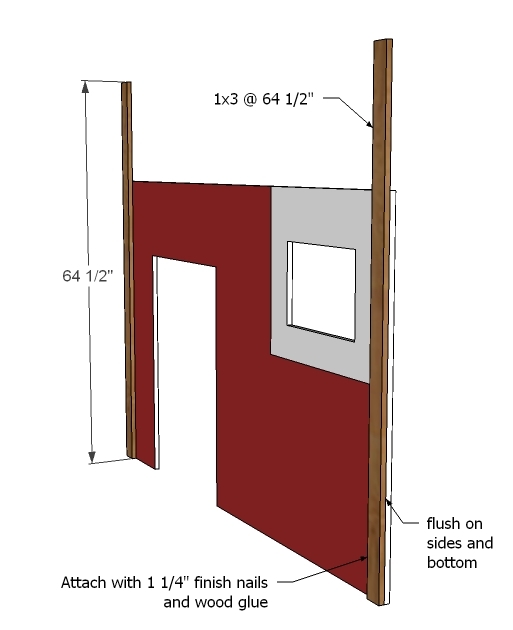
Next add the legs to the outside. You can nail from the back side to hide nail holes. Keep outside and bottom edges flush.
Step 3
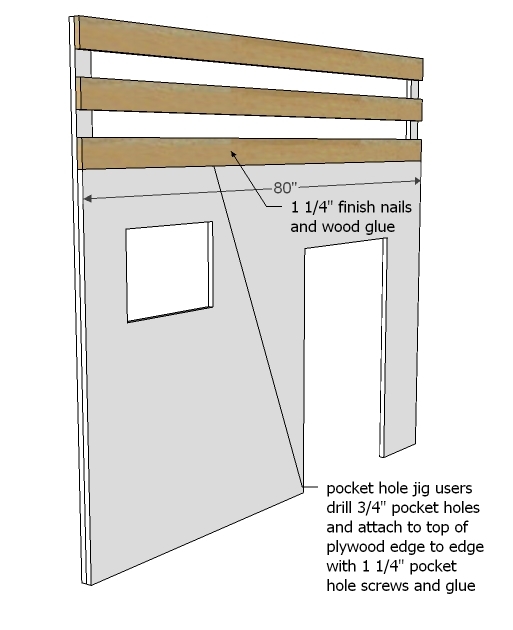
Now add the railings to the top. If you have a Kreg Jig, drill 3/4" pocket holes facing downward along the bottom edge of the railings to attach to plywood. If you don't have a pocket hole jig, no worries, in the next bit, we'll reinforce the plywood to bottom railing joint.
Step 4

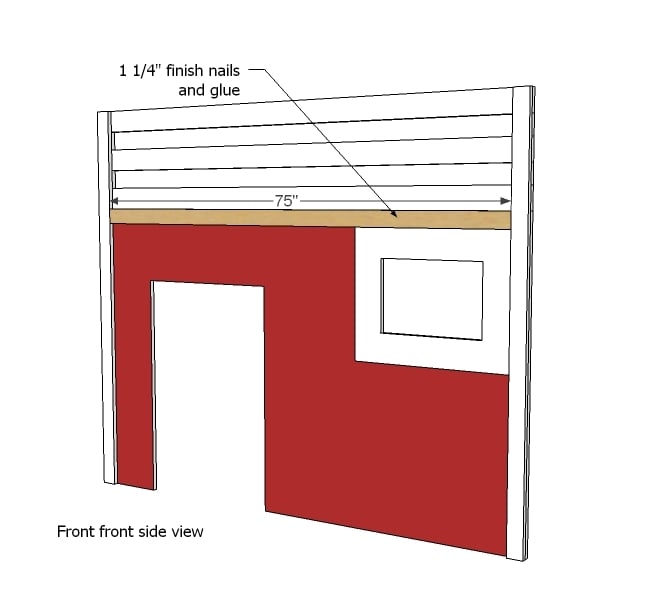
Fill in the legs with spacers. I'd cut these to width for the perfect fit.
Step 5
Step 6
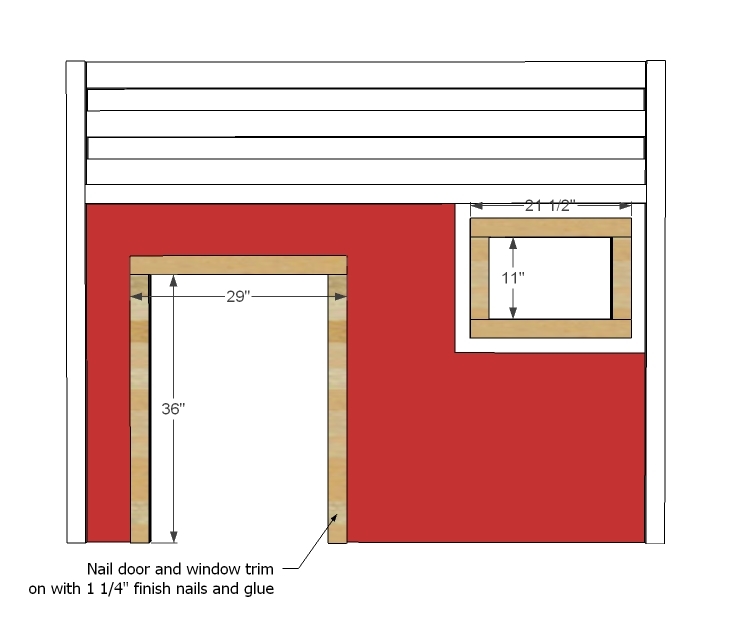
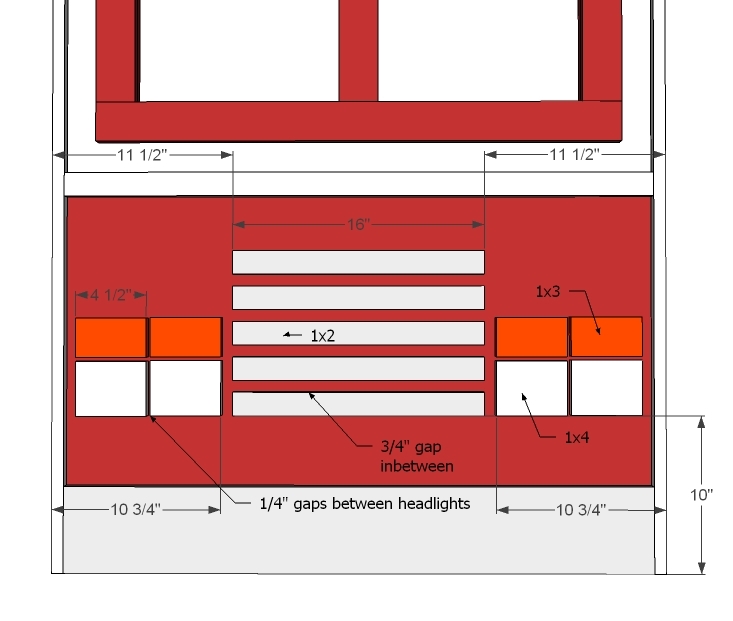
Now simply trim out windows and doors. If you have a pocket hole jig, you can build the frames separate, and then attach as a single piece.
Step 7

This trim is optional, but I added it for the ladder side and also to give you a clean spot to start and stop painting. What about painting it silver?
Step 8
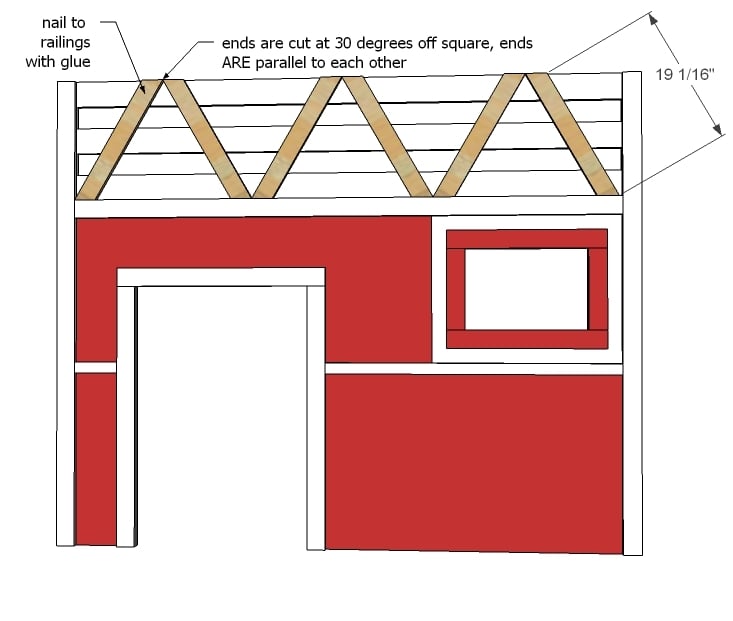
These pieces are decorative as well, but do help to hold the front railings together. And they look like a ladder! Brilliant Jeff!
Step 9
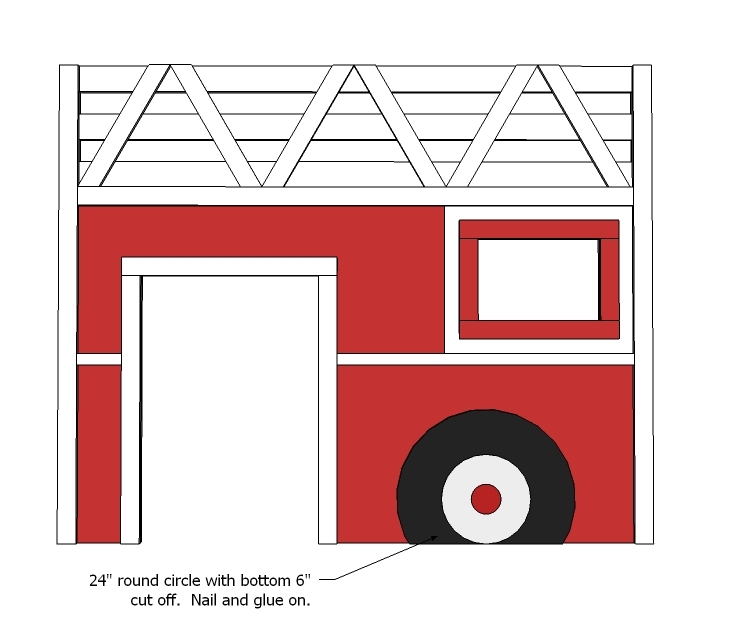
Jeff used a 24" round from the home improvement store and cut off the bottom six inches to create the wheel. You can also use scrap plywood to cut out the wheel.
Step 10
Now we are on the windshield side.
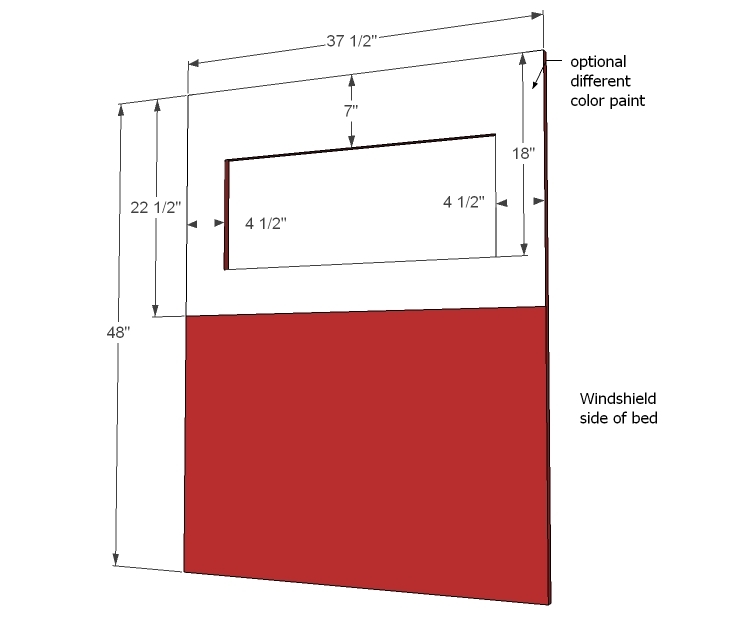
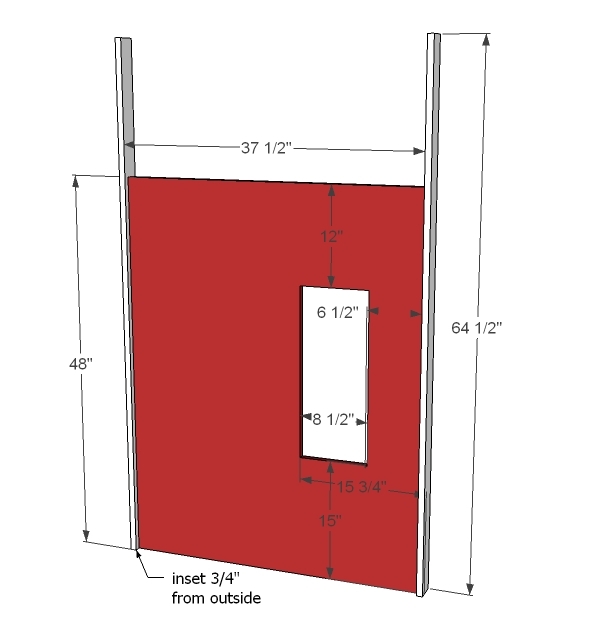
Cut out the windshield as shown here. NOTE for those of you without a pocket hole jig - you may wish to leave a 2 1/2" strip of plywood down the center for the center of the windsheild trim (see step 12).
Step 11
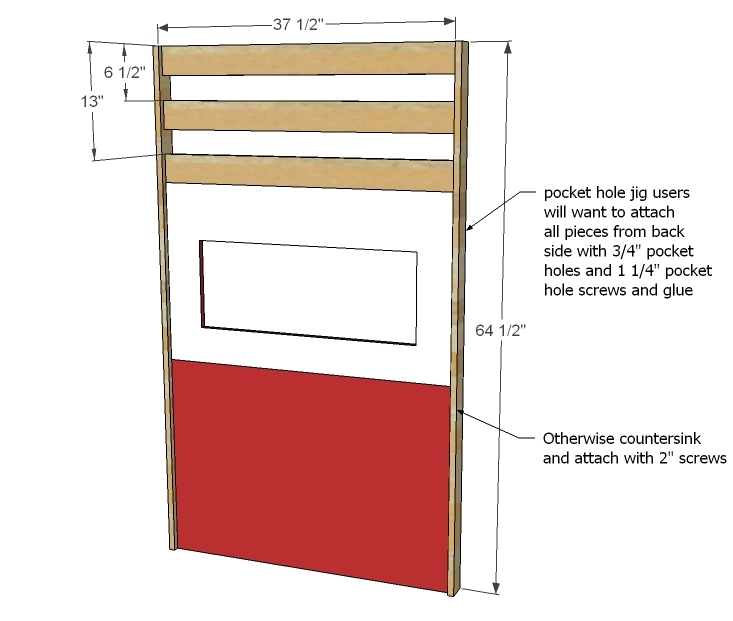
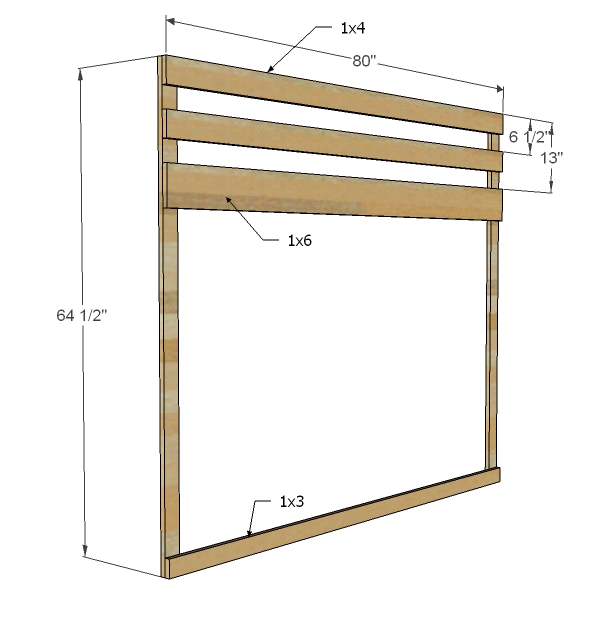
Now add the legs and top railings.
From the outside, plywood is inset 3/4" on legs. Just use a scrap 1x board as a spacer to guide you.
Step 12
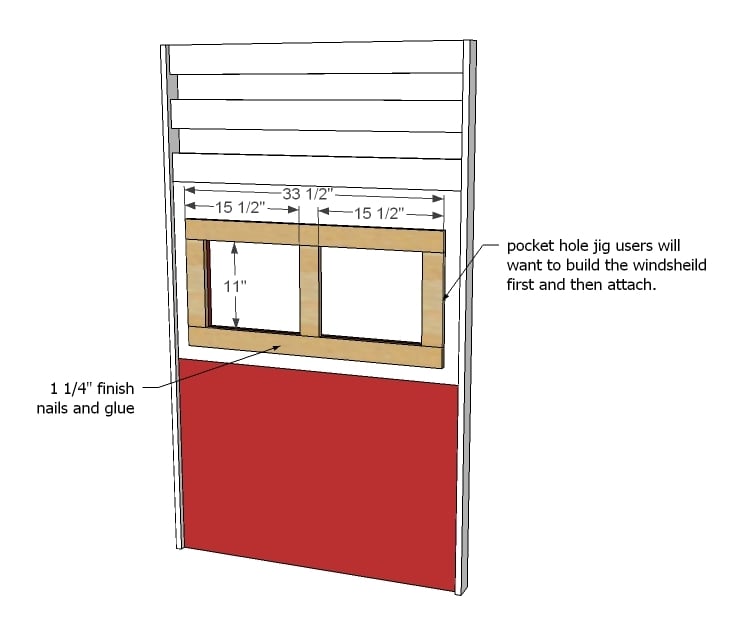
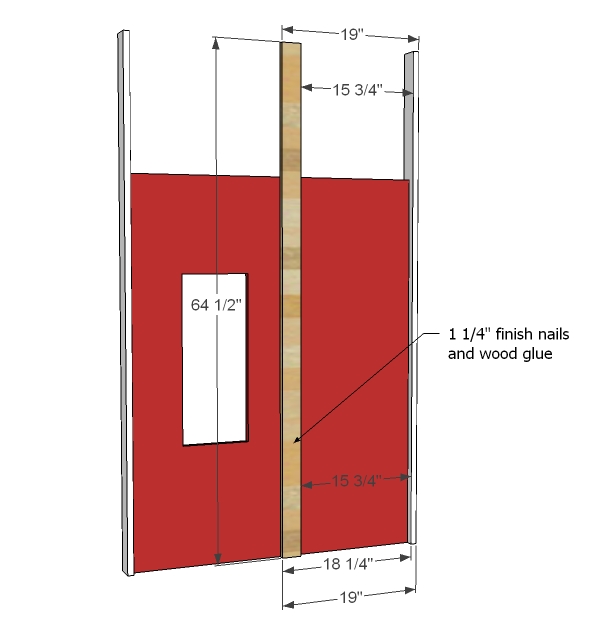
Build your windshield and then attach as shown here.
Step 13
And now trim out the front. Keep the top 1x3 trim level with the 1x3 trim added on the front side to cover the plywood to bottom railing joint.
Step 14
Tim to use up some of those scraps!
Step 15
Now we are on the ladder side. Cut out the plywood and window and attach legs, 3/4" inset from outside side.
Step 16
Make sure the ladder support is square all the way up to the side legs.
Step 17
Add trim and railings.
NOTE: you can also fill in railing spaces with 1x3 scraps.
Step 18
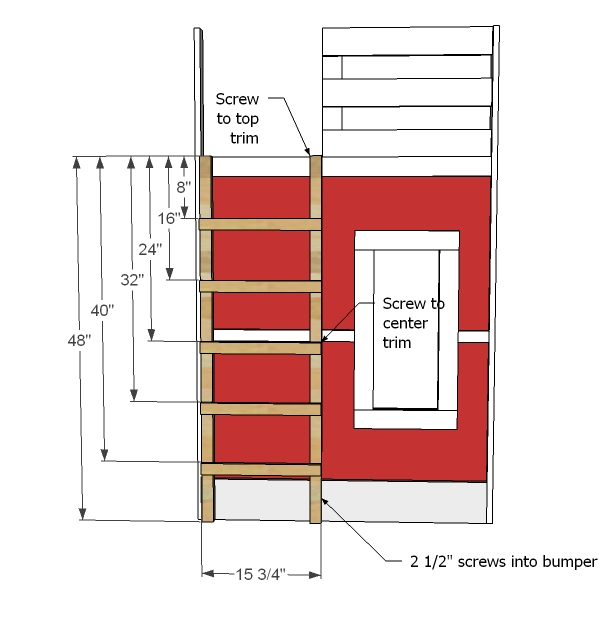
Build ladder as shown and attach to trim with screws or bolts.
Step 19
 Now we have moved to the back wall. Attach railings and base trim to the legs. Take a diagonal and make sure your back wall is square.
For heavier loads, consider adding an additional leg down the center.
Step 20
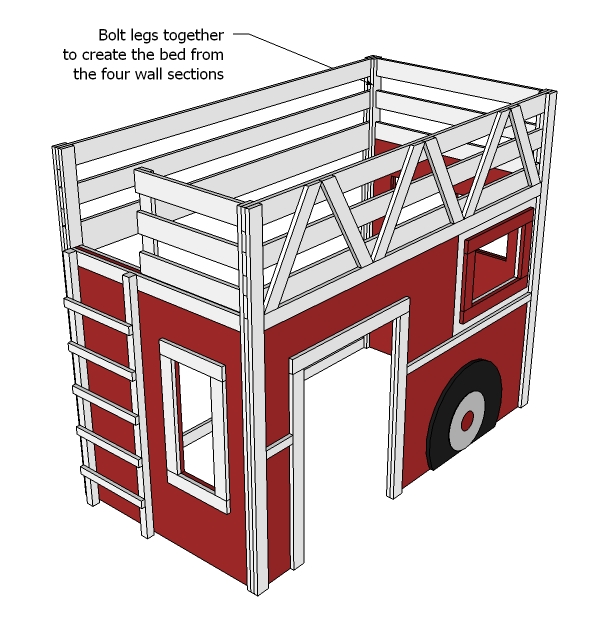
Now the bed is ready for construction. You can do this in the room ... after you have painted. I recommend bolting legs together for the easiest assembly/disassembly.
Step 21
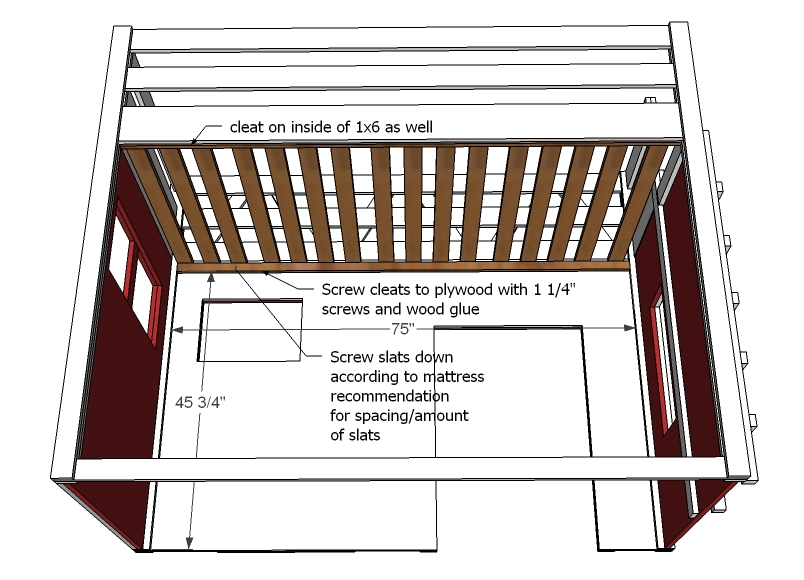
Attach cleats (use 2x2s with 2" screws and glue for more "meat" to screw the slats down) evenly and then your mattress support system.
Step 22

By this time, building the bucket is going to be a no brainer!

It is always recommended to apply a test coat on a hidden area or scrap piece to ensure color evenness and adhesion. Use primer or wood conditioner as needed.


Comments
Caroline88 (not verified)
Mon, 03/05/2012 - 11:03
Shame on us. Ana you have
Shame on us.
Ana you have helped so many people, are taking on the craziest DIY project of all in the Momplex and you are in last place for best DIY blog. We can do better. Just signed up for an account to vote for you, it is the least I can do fir all you have done for me.
Cate888 (not verified)
Mon, 03/05/2012 - 11:32
Vote everyone!!
Come on everyone, Ana deserves many, many votes!!
jcmcclure77
Mon, 03/05/2012 - 11:38
Thank you!
Ana, thanks again for putting the plans together. Excited that others can build a even better version of the one I built. Of course, if anyone has any questions all they have to do is contact me. Contact information is on the blog.
Good luck!
Jeff
heather moxley (not verified)
Tue, 11/20/2012 - 16:59
fire truck bed
what size nails do you use? please email me if you would heathermoxley@yahoo.com thanks
aimee4775
Sat, 01/31/2015 - 15:38
full size
I was wondering if this could be converted for a full size bed? and what would I need to change to accomplish that?
Heidi Gorton-Rigazzi
Wed, 09/21/2016 - 16:41
Bunk bed possibility?
Hello,
I am in awe of your and Ana's amazing work on the fire engine beds. I would love to make one of these for my boys. Do you have any suggestions on how best to convert these plans into a twin over twin bunk bed instead of a loft bed?
Thank you so much!
Kind Regards,
Heidi
Guest (not verified)
Mon, 03/12/2012 - 06:26
Is this a twin bed size bed?
Is this a twin bed size bed? And will it fit through doors in a house?
Sea Story (not verified)
Mon, 03/19/2012 - 18:20
fire truck loft bed with ladder
Great plans up to step 17, then the drawings stop. Where are the drawings for the remaining steps? Step 18 says "build ladder as shown" but nothing is "shown." I love the bed and want to get it done ASAP. Please fill in the blanks after step 17, or point me in the direction to find them and finish it off. thanks!
Ana White
Mon, 03/19/2012 - 18:39
Sorry about the problem with
Sorry about the problem with images - not sure what happened. I am fixing right now.
Sea Story (not verified)
Mon, 03/19/2012 - 22:27
That was QUICK!!! Thanks for
That was QUICK!!! Thanks for the help
ha00andersen (not verified)
Mon, 03/26/2012 - 15:34
fire engine bed
I want my hubby to build this SO BAD!!! I need to know how to modify it to make it into a full size bed for my adventurous 3 yr old twin boys. Is that even possible?
nick felter (not verified)
Thu, 04/05/2012 - 17:31
question about fire truck bed
i love this bed and am attempting to build.... just wondering if someone could give some advice on where to place the bolts when bolting together
maggie_nelson@… (not verified)
Mon, 04/23/2012 - 09:09
Kreg Jig
Is it possible to build this without a Kreg Jig??
maggie_nelson@… (not verified)
Mon, 04/23/2012 - 09:09
Kreg Jig
Is it possible to build this without a Kreg Jig??
Elizabeth Whitchurch (not verified)
Fri, 06/08/2012 - 20:04
Re fire truck bed
This looks great! I wonder about the bucket.... Was thinking that I would have a slide coming down from the bucket... But how to reinforce it so it could withstand it??! How much weight would it hold- maybe put a 4 x 4 under it ... Don't know... Any ideas?
Jodie (not verified)
Sat, 07/07/2012 - 13:21
i love this
i love this
Jamie.Ivanov
Tue, 07/31/2012 - 10:29
Very nice work, but...
This is a rather impressive look and my girlfriend is absolutely in love with it. But I do have a couple of thoughts if I may.
Because there are thinner boards that go all the way around, the bed may be susceptible to lateral movement, torsion, and other sheering stresses. Securing a longer side to a wall will help with potential lateral weaknesses but it would need to be secured from a long side as well as a short side to reduce stress. Either of those two could result in weakness or instability in one or more parts of the structure and become a potential safety concern.
My thoughts...
* Use a 1x4 or 2x4 to lay flat along the bottom inside to make a frame with a cutout for the entry to the lower cabin. 45 degree angles can be used to make a tight and solid joint.
* Use 4x4's vertically in each of the four corners on top of the frame (made in the above mentioned), two on either side of the entry to the lower cabin, and two under each of the primary bucket supports (details below).
* Use 1x4's to make a top frame to the 4x4's similar to the bottom.
* Use two 2x4's to go from from the rear end of the be top frame to past the front, far enough for the length of the basket. I think laying it with the 2" height in mind would suffice, but can be modified to use the 4" height instead. Ideally, the center of the 2x4 laying with the 4" width being horizontal should be placed at the maximum width of the basket. Secure with 1-2 angle ties [1] on either side.
* Use one 1x4, with the 4" being vertical, that extends the same length. Place it directly in the center. When making the calculation, the 1x4 should be placed within 1/2" on either side of the middle mark. Secure with angle ties [1].
* Use 2x4's placed in a fashion to get the 4" height from a distance of being flush with the inside of the top frame to the end of the proposed guard rail of the basket. This will be your outside edge supports for the baskets and will not take the full weight of the basket. But these must be anchored by 2 angle ties [1] on BOTH sides of this board to ensure proper weight/energy transference to the remaining structure. A third may be placed in the middle of the two primary supports (that extend the length of the structure), but anchored in the same way.
* Use 1x2's or 2x2's (or 4's if you elect the other option in the previous suggestion) to build the rest of the top frame. This will match the height of the basket supports. You will need to cut out chunks to match the spaces in-between the basket supports. You can increase the height of the wall plates for the bottom to cover the top or cut separate plates to fixate to the outside of this additional frame.
* Use additional 4x4's in the four corners of the loft to support the guard rails. Do not place them flush with the exterior of the walls but in line with the other 4x4 supports; that distance should leave the room necessary to complete the rails. Make sure to make enough room for the front basket entrance if there would be an inkling that it would be occupied by a person or used for a slide/eagle's nest.
* Continue to build the mattress/floor supports for the loft. Thinner wood could be used here such as 1x4 or 1/2x4 height planking with a width of. These will be supported by the additional exterior frame to match the basket supports as well as the basket supports themselves in the middle. An option would be for a solid basin using tongue and groove flooring for that much more support. Truncated pieces will be necessary for the front and rear of the loft floor in-between the guard rail supports.
* Use 1x4's vertically from the outside of the main 2x4 supports. Join two 1x4's together in an "L" formation, which the inner two 1x4's will need to be got 4" shorter to account for the 2x4 supports, while their outer counterpart will not be truncated. Secure with 2 angle ties [1] each.
* If an opening is to be made in the basket for a slide or entrance to a portal leading to another dimension, use two 2x4's. The trick is that you will need to notch the end of the two by for to remove a chunk that is 4" long and 1" deep. That will give you 1" of the support secured to the outside of the main supports as well as enough to use an angle tie [1] on the inside of the basket, but on the outside of the opening. You will also need to cut an additional notch to account for the flooring, but you do not want to make all the way through, only 1/2" deep but the length will have to be flush with the height of the flooring. Do not use the angle ties on the inside of the opening or a child may slide over the bracket and get a scrape or friction induced injury. That will also leave enough room to mount a slide or other as flush as possible without having to take into account the angle tie.
** You will need to lay down the flooring before using angle ties [1] to secure supports. If properly done, there should be nothing except the bracket itself exposed, posing very little risk for cuts/injuries. Inexpensive rubber cushioning may be adhered to the brackets as added precaution.
Two problems present themselves at this point.. The first being it is going to be top heavy. The second being that the windows are not reinforced very well with the original design. Kids will lean out of the windows, flip over them, climb through them, and who knows what else. There is a way to resolve both issues while adding additional structural integrity...
* Use additional 2x4's to create vertical supports from the top of the bottom frame to the bottom of the top frame. Make room half way for a horizontal support to extend across all 4 walls (the 2x4 will be placed within a margin of 1" on either side of that center measurement).
* The exception to that would be for the windows. The top and bottom horizontal supports are the most important and most remain solid when intercepting a vertical support. Basically, you have a window in the wall so you place a 2x4 meeting the outside edge of the of either side of the window. This 2x4 must be 4" short because you will then lay another 2x4 on top of that for the bottom window support. This support needs to be the length of the window with an additional 4" on either end (8" total to accommodate the size of the other supports). Two additional 2x4's will sit on top of the bottom window support with the edge flush with the outer edge of the window on either side. A top support, with the same dimensions as the bottom, will sit on top of those two. From there, if any room remains, an additional vertical support will need to be made from the top support to no higher than the top edge of the loft outer frame. Any higher and the loft flooring will not sit properly, plus this adds additional loft flooring supports.
* These will be held in place by additional ties (angle ties won't be necessary on the inside corners of the window if held together via flat ties).
Examples of various ties to use to hold the structure together can be seen in [1] [2] [3] [4] [5] [6]. You can also strategically drill appropriate wills large enough to support bolts/rods to prevent additional sheering force that may but stress on the ties.
[1] http://www.homedepot.com/Building-Materials-Builders-Hardware/h_d1/N-5y…
[2] http://www.homedepot.com/Building-Materials-Builders-Hardware/h_d1/N-5y…
[3] http://www.homedepot.com/Building-Materials-Builders-Hardware/h_d1/N-5y…
[4] http://www.homedepot.com/Building-Materials-Builders-Hardware/h_d1/N-5y…
[5] http://www.homedepot.com/Building-Materials-Builders-Hardware/h_d1/N-5y…
[6] http://www.homedepot.com/Building-Materials-Builders-Hardware/h_d1/N-5y…
This particular design would prevent lateral movement as well as preventing torsion. It will also reduce sheering stress while distributing and dissipating weight forces. Kids will be kids, they will swing, jump, shake, rattle, roll, spontaneously combust, hit, kick, etc. Nobody wants anyone to get hurt if all unintended options of a design are not considered; a single failure point could cause one or more components to fail immediately or in time; failures can result in injuries; especially true if considering some children with special needs. This design also can support and distribute the stress of additional functions and features that may not have been considered. Internal walls over the larger supports can be made also allowing for the running of wiring for lighting, fans, LCD TV, etc and keeping it out of the way of children. Additional weighting via the use of bricks can be used in-between supports and inner/outer walls as ballasts if floor anchoring is not an option; this design does not need wall anchoring if floor anchored or appropriate ballasting.
As an added bonus, throw on some shutters and anchor to the floor, this could double as a storm shelter (humorous comment, not a tested fact nor a suggestion).
Over-engineered? To some, maybe. But when it comes to the safety of my children, I will leave nothing to chance. This is not a complete amendment as I just threw this idea together in a few minutes on my lunch break. I don't mean to be rude by any means, These are just my thoughts. I'm merely a geek with a keen interest in physics. If there is interest in a more structurally sound design based on this one here, I am can sit down and take the time to draw out a complete design with more reasonable and accurate dimensions, parts, instructions, etc. As of right now my suggestions are conceptual.
shortcircuitaz
Wed, 09/12/2012 - 10:52
my concern
My concern, is the basket on the front.. without proper support.... the children are going to see that and try to "rescue" something IN the basket and fall...
I would suggest a not-so-hidden support... you could tie the support into the bed slats but would be less chance of children getting injured...
regarding Jamie.Ivanov
if you use the optional stair case. I think the bed woudl be plenty sturdy however the easiest way to brace for the torsion would be to simply put in some cross braces under the bedslats...
then you could use the x braces to hang fabric or something inside to reduce the possibility of children poking holes in the mattress. it would also give support for those kids who like jumping on the bed...
Richie (not verified)
Sat, 09/29/2012 - 13:52
cost
I would love to build this, just wondering an estimated cost of materials.
Shelly Geezbees (not verified)
Fri, 10/12/2012 - 22:05
Modifications for a bunk bed
Any ideas of how this design could be modified to be a bunk bed yet still be recognizable as a firetruck? I really want to build this for my two youngest boys but it must be a bunk. I prefer a more open side on the bottom for ease of making the bed.
Toni B (not verified)
Fri, 12/21/2012 - 11:28
Modifications for a bunk bed
I'm with Shelly Geezbees - would love to see this (or the Surfboards bed) as a bunk bed.
Toni B (not verified)
Fri, 12/21/2012 - 11:29
Modifications for a bunk bed
I'm with Shelly Geezbees - would love to see this (or the Surfboards bed) as a bunk bed.
JHJackson
Sat, 06/01/2013 - 12:28
Bunk bed plus slide
I have not read every comment or searched through every plan, so please point me where I need to go...
I have 2 boys and we plan to have more. I love this idea and want to do this but it would need to have two beds, will a standard twin bed fit on the bottom?
I also want to put a slide on the truck thoughts and ideas?
I really look forward to hearing back.
eclezi
Wed, 06/12/2013 - 10:15
Conversion of Dimensions
This bed is ABSOLUTELY AMAZING! I would love to build this for my son but would need dimensions for a full size bed. Is this information available? He's a tall kid and wouldn't get much use out of the twin size bed.
sylviafriedsam
Mon, 11/04/2013 - 18:21
Full Size
Ana, do you possibly have measurements for a Full size bed?
Slmiller
Thu, 01/16/2014 - 15:47
Weight
Any idea about how much the bed weighs when it is complete? I want to build this for my son but I am not sure if my floor will hold it. Thank you!
adkison84
Tue, 07/22/2014 - 22:39
Full size conversion
I notice a lot of people ask for a full size conversion, but I've never seen a reply. Is there a plan that makes this a full size bed?
beaton1
Thu, 08/07/2014 - 08:36
Full Size Lofted Firetruck
I would also like a full size bed conversion of the firetruck.
Will-I-am
Sun, 11/02/2014 - 03:07
hi there,
hi there,
anyone know what weight this bed can handle ?
Cause the bed itself is only connected to the plywood... ?
greetings
William
aimee4775
Sat, 01/31/2015 - 15:36
firetruck bed
I was wondering if there were plans for a full size bed?
akmom
Fri, 01/29/2016 - 00:17
Omg
Ana I am a new Alaskan mom and new to wood working. I actually found your site and have been following you long before I knew you were in Alaska! I am so excited about this fire truck bed for my budding firefighter. Do you do any workshops near Anchorage?
In reply to Omg by akmom
Ana White
Sat, 01/30/2016 - 16:00
We are thrilled that you
We are thrilled that you found us! We do not have a workshop in Anchorage,
we live in the interior. Be sure to share the bed when you build it!