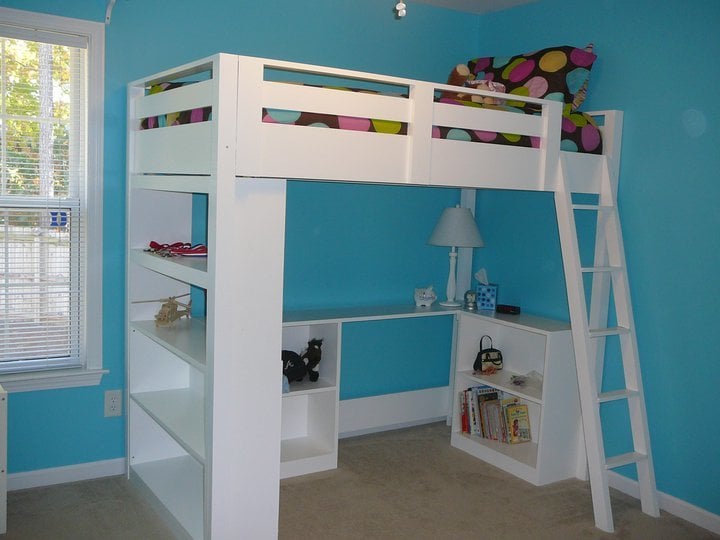


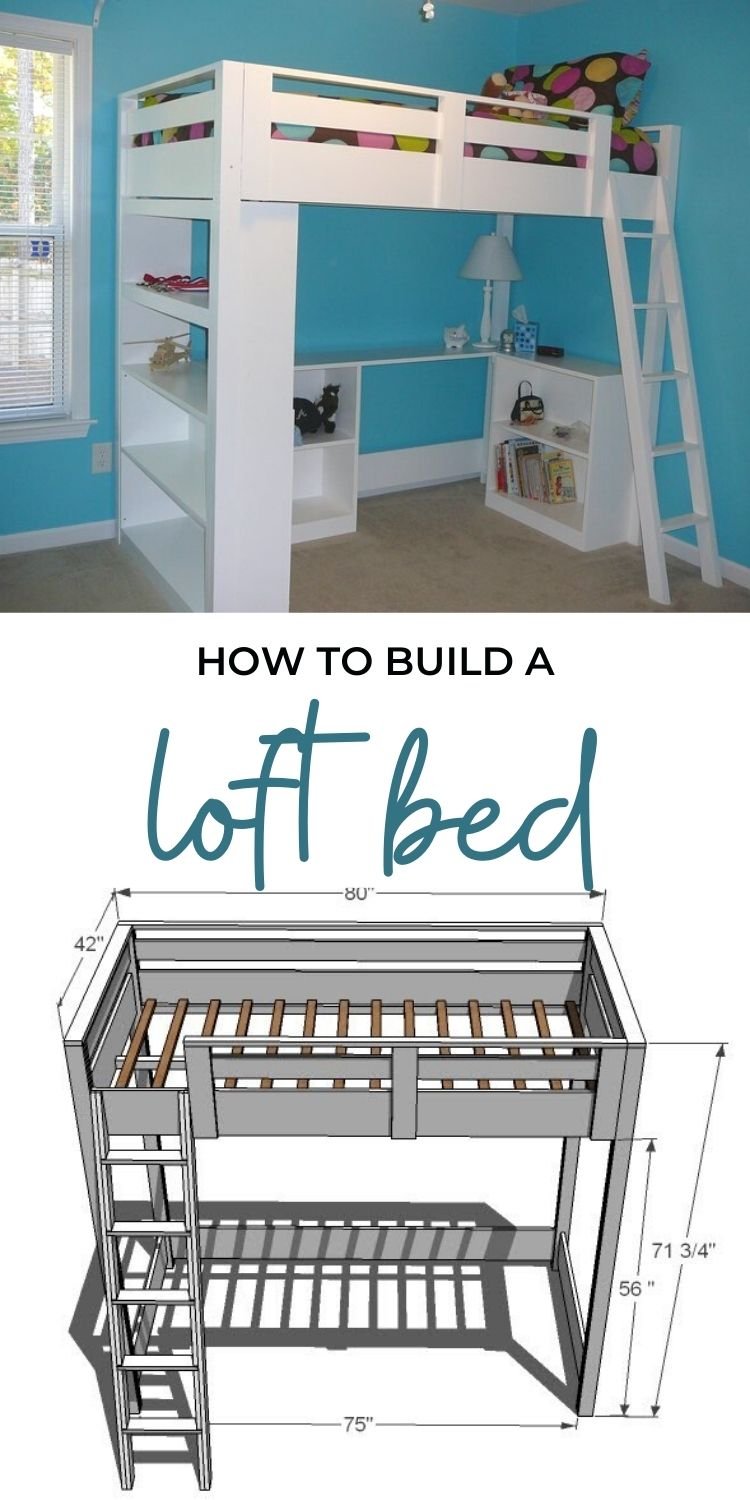
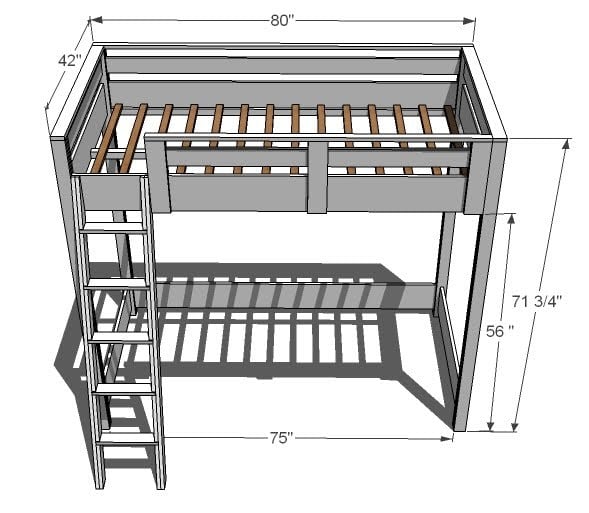
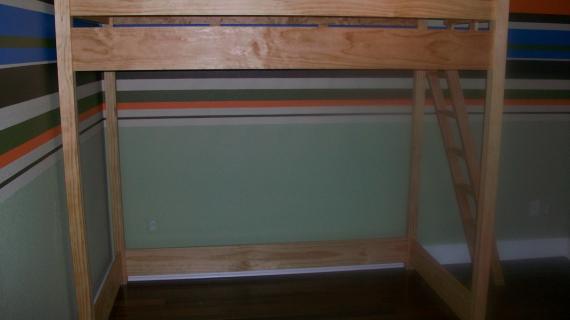
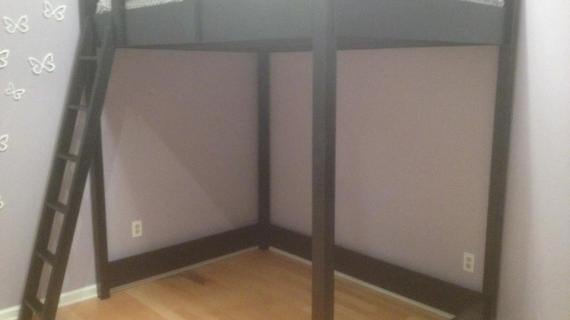
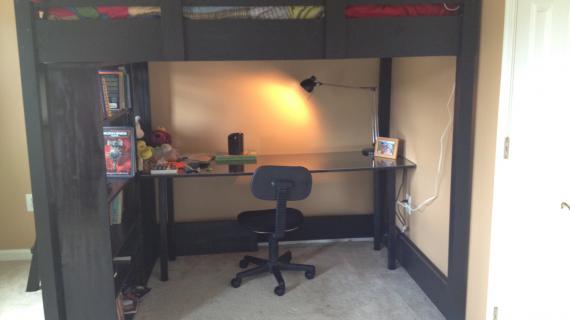
A loft bed that works with an entire system of plans to get your teen more space and storage in their room. Step by step plans from Ana-White.com
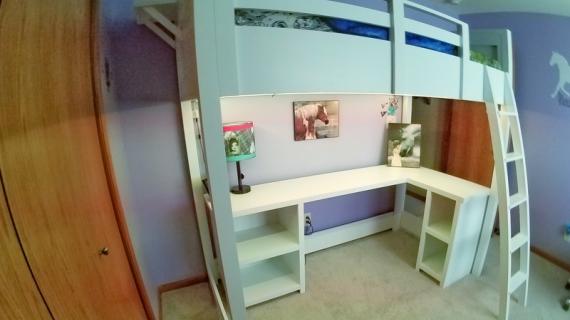
This plan works with our Loft Bed tall bookcase plan and our Loft Bed desk and small bookcase plans.
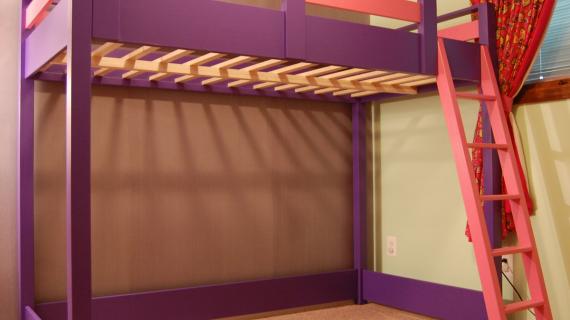
 Special thanks to Anne for sharing her photos from this plan.
This plan is just for the loft bed. You can customize the storage underneath by adding a tall bookcase and a desk system. (plans linked)
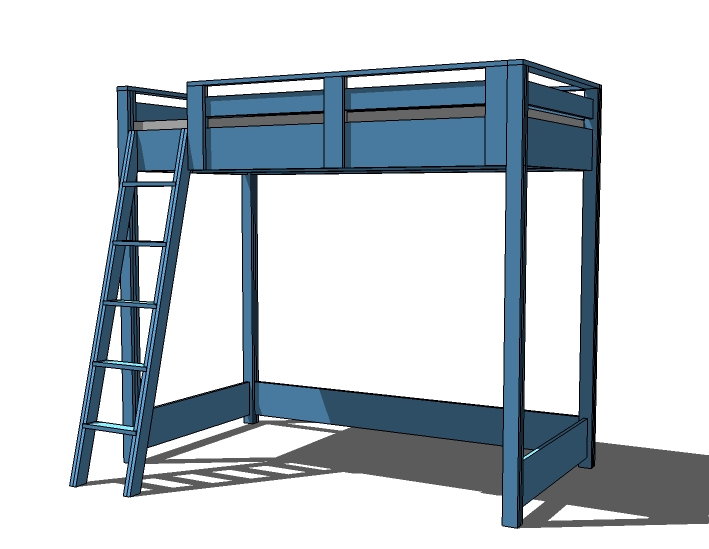
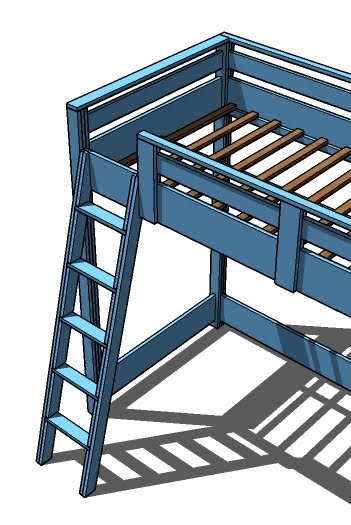
This plan uses a built in slat system as shown. You can use any type of 3/4" material - check your mattress recommendations for slat spacing. I usually will burn up scrap wood here.
Pin For Later!
Preparation
- 15 – 1×3 Boards, 8′ Long
- 3 – 1×8 Boards, 10′ Long (cut one long and one short cut from each)
- 1 – 1×8 48″ Long (cut 1 short cut from this one)
- 3 – 1×4 Boards, 8′ Long
- 1 – 2×2 Board, 8′ Long
- 11 – 1×2 Boards (Less if you have a bunkie board or box spring), 8′ Long
- 1 1/4″ self tapping screws (can also use brad nails and glue)
- 2″ self tapping screws
- Wood Glue
- Finishing Supplies (Wood Filler, Sand Paper, Paint, Brushes, etc)
Cut List for Loft Bed
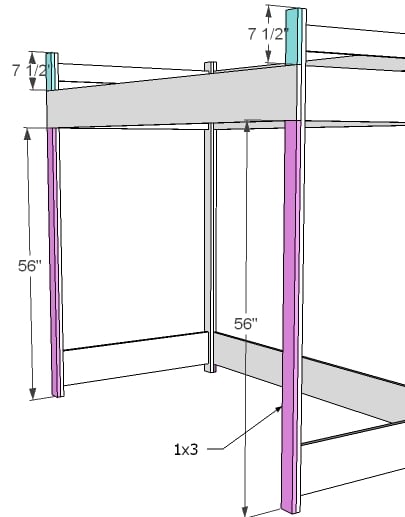
- 8 – 1×3 @ 71″ (Inner Legs and Outer Legs)
- 4 – 1×8 @ 37 1/2″ (Large Planks, Ends)
- 2 – 1×4 @ 37 1/2″ (Top Planks)
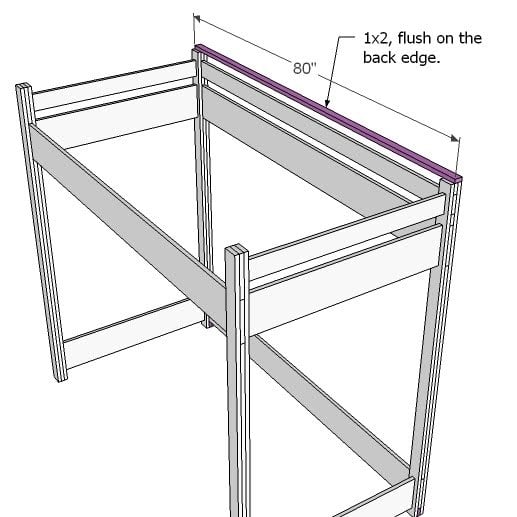
- 3 – 1×8 @ 80″ (Front and Back Rails)
- 1 – 1×4 @ 80″ (Top Back Rail)
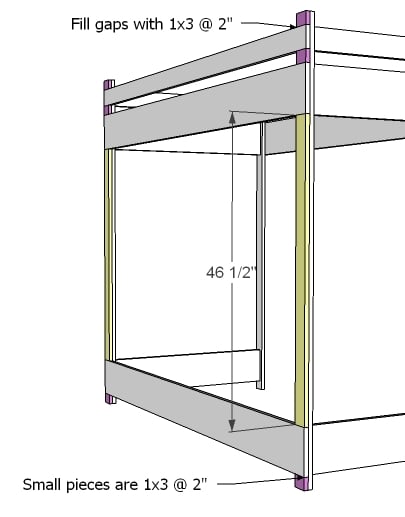
- 2 – 1×3 @ 46 1/2″ (Back Filler Piece, Long)
- 6 – 1×3 @ 2″ (Back Filler Piece, Short)
- 2 – 1×3 @ 56″ (Front Filler Pieces, Long)
- 2 – 1×3 @ 7 1/2″ (Front Filler Pieces, Short)
- 1 – 1×2 @ 80″ (Back, Top Piece)
- 2 – 1×3 @ 40 1/2″ (End, Top Pieces)
- 2 – 1×2 @ 75″ (Cleats)
- 1 – 2×2 @ 76 3/4″ (Center Support)
- 14 – 1×2 @ 39″ (Slats)
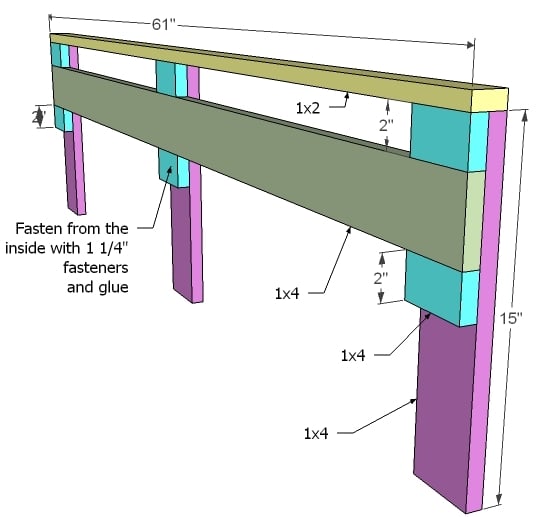
Cut List for Guard Rail
- 1 – 1×4 @ 61” (Rail)
- 1 – 1×2 @ 61” (Top)
- 3 – 1×4 @ 15” (Uprights)
- 6 – 1×4 @ 2” (Filler Pieces)
Ladder Cut List
- 2 – 1×3 @ 65 3/4″ Overall (Bottom end cut at 15 degrees off square, top at 75 degrees off square)
- 10 – 1×3 @ 10 3/8″ (Spacers, ends cut parallel at 15 degrees off square)
- 5 – 1×3 @ 12 1/2″ (Treads)
- 2 – 1×3 @ 10″ (Top Spacer, cut to match top sides)
Converting to Full Size This bed can easily be converted to full size. You will simply need to add 15″ to all boards that run parallel to the ends. This includes the planks, end top pieces and the slats. Shopping list will need to be adjusted as well.


On a large project such as this one, it is crucial that you build straight and square. To do this begin by working on a clean level surface. Select boards that are straight and free of cracks or other imperfections. Check for square after each step. Predrill and countersink all of your screw holes to avoid splitting the wood and to hide your screw heads. Use glue unless otherwise directed. Of course, you should be safe and have fun! Remember, you can click images for larger views.
Instructions
Step 1
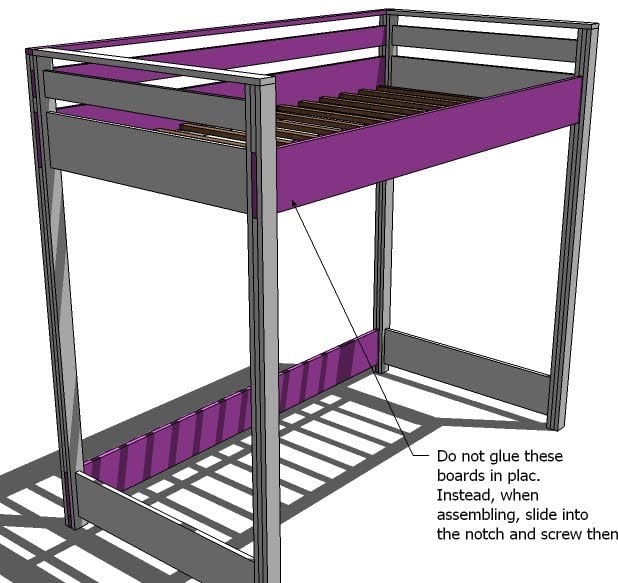
UPDATE: If you have narrow door opening (or are building the bed in a full size) you may need to assemble the bed in the room or not use glue so that the bed can be assembled and disassembled. The boards shown above in pink are not to be glued to the bed, and will be inserted in the slots on assembly. You will then on assembly use screws to fasten the rails to the bed ends.
Step 2
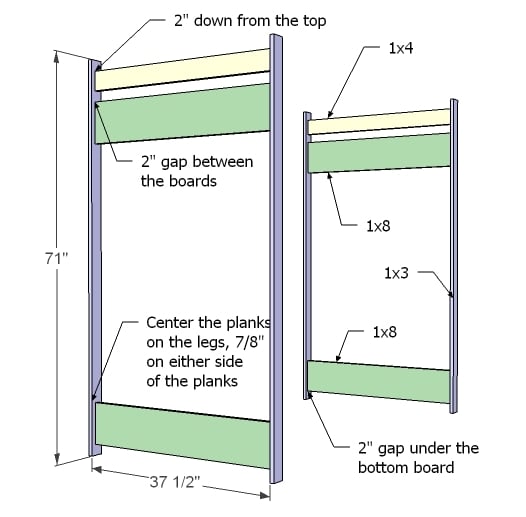
Ends Begin building the ends by screwing with 2″ screws and glue the planks to the inside legs. Center the planks on the inside legs, leaving 7/8″ on either side of the planks. Use the measurements above to guide you. Glue these pieces.
Step 3
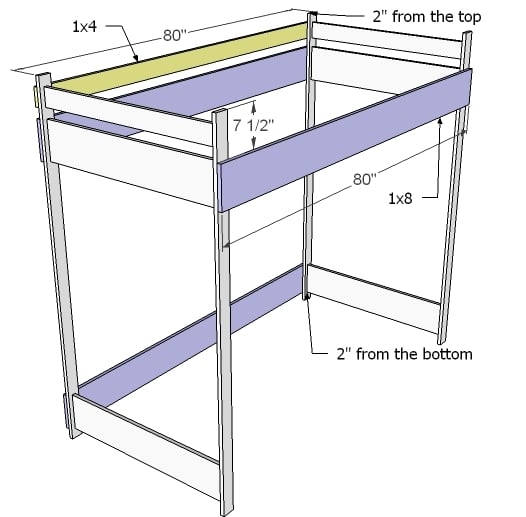
Front and Back Rails Instead of fastening the front and back rails, mark their positions on the ends, as shown above. You can use one or two screws to fasten each board in place temporarily.
Step 4
Back Filler Pieces Measure and cut your filler pieces to fit the back as shown above. You can save yourself quite a bit of time by gluing and clamping these pieces in place. When you fasten the outer leg on, it will secure these pieces with screws. If your nailer is handy, a few 1 1/4″ nails would hold everything in place. You can use glue in this step. The filler pieces will hold your rail boards (the one’s you did not glue down in step 2) in place for now.
Step 5
Step 6
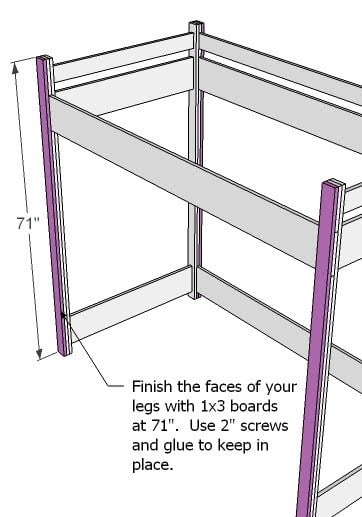
Outer Legs Pieces First unscrew the rail boards that you loosely screwed in step 2, and remove. Then, using 2″ screws and glue, predrill and countersink your screws as you fasten the outer leg boards to the inner leg boards. If you are staining or leaving natural, I highly recommend using a measured bolt pattern or screwing from the inside of the legs on this step.
Step 7
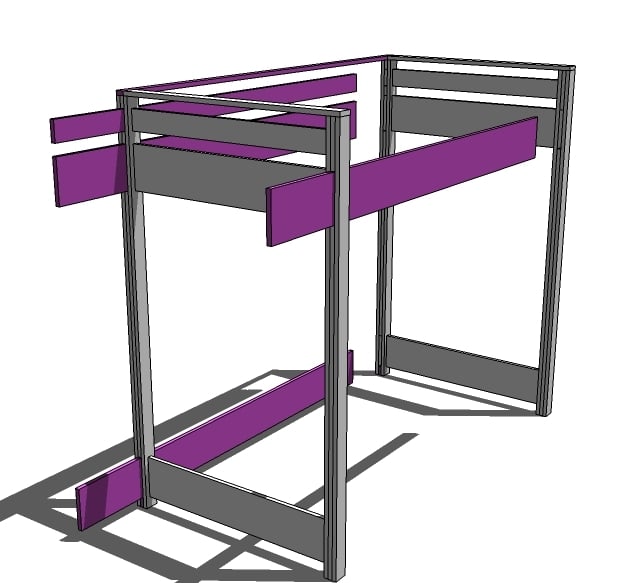
DO NOT FASTEN in the gaps left for the rail boards. Test fit your rail boards to make sure they fit in the opening. The diagram above shows how the rail boards should be removable.
Step 8
Back, Top Using 2″ screws, fasten the back top piece to the tops of the legs. The back top piece will be flush with the outside of the legs, but not the inside. Do not use glue. This board will be removed to move the bed through a doorway.
Step 9
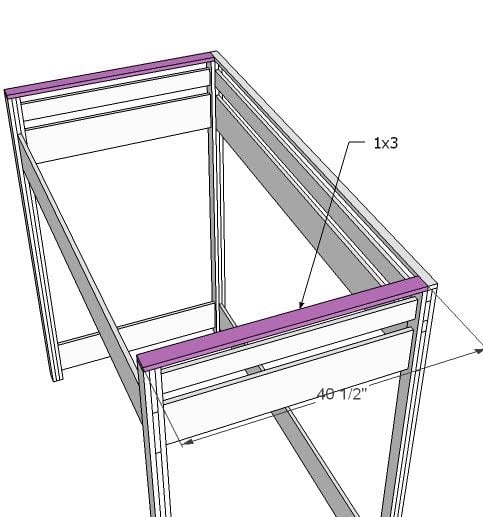
Top, Ends Using 2″ screws and glue, fasten the top end piece to the top of the ends, as shown above.
Step 10
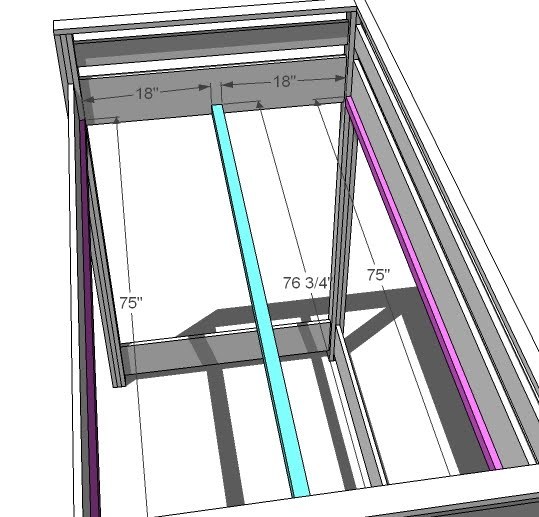
Cleats On assembly, fasten your side cleats to the side rails, flush with the bottom edge. Use 1 1/4″ screws. Then fasten your center cleat to the end planks, flush with the bottom of the 1×8 plank, using 2″ screws and NO glue. Center the support on the plank.
Step 11
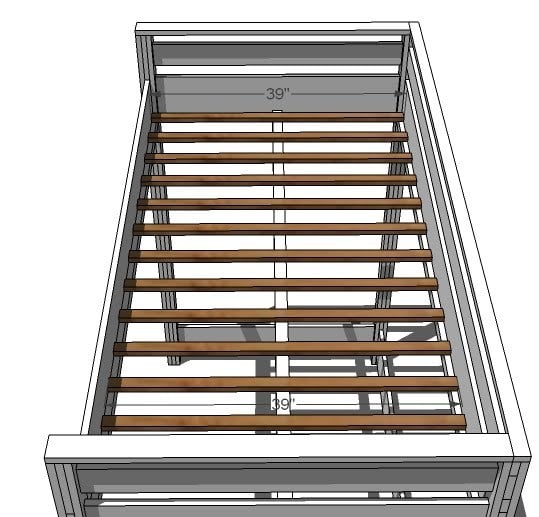
Slats Position your slats with approximately 4″ gap between the slats. TIP: Cut 2 1×2 scraps at 4″ and uses as a spacer between the slats as you are assembling. Screw the slats down with 1 1/4″ screws. For extra support, you can also screw a couple of the center slats from the outsides of the 1×8 rails using 2″ screws.
Step 12
Guardrail Use 1 1/4″ fasteners (nails would work just fine) to build your guardrail. Fasten from the inside to hide holes. Then add the 1×2 top, keeping all outside edges flush.
Step 13
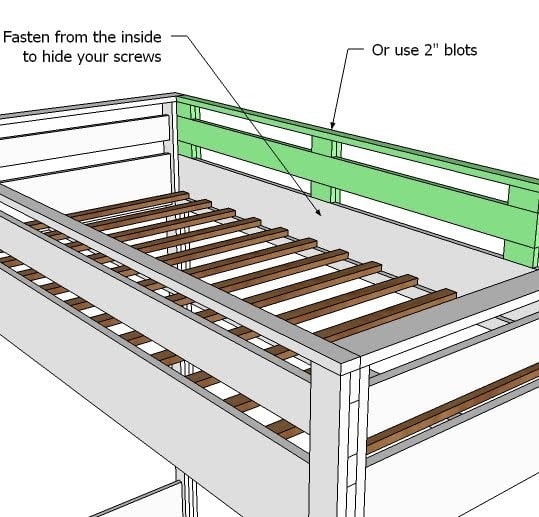
Guardrail Attachment Attach the guardrail to the bed as shown above. From the inside, use 1 1/4″ screws. Don’t use glue so you can remove it.
Step 14
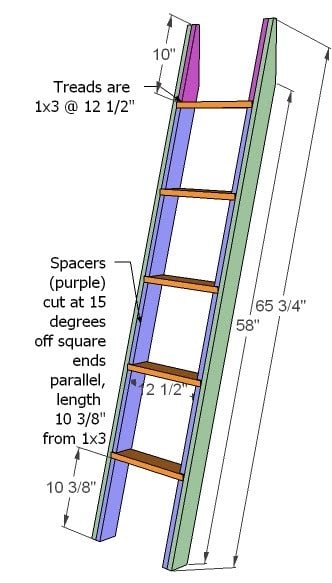
Ladder So cutting the top of the sides is going to be a little tricky. Think of it this way, you are leaving a 15 degree angle on the top of the board, then trimming off the top 2 1/4″ to remove the sharp pointy end. The best way to do this is FIRST cut your top angle at 75 degrees off square (leaving 15 degees on the board). You will need to use a jigsaw or circular saw. Then snip off the top 2 1/4″ at a right angle (90 degrees) from the back of the top (where the leg rests against the bed. THEN measure down the leg 65 3/4″ and cut your 15 degree angle on the bottom of the leg. Then use the top as a pattern when cutting the top filler pieces. Construct your ladder as shown above, using 1 1/4″ screws when joining the filler pieces to the leg sides, and 2″ screws to join the treads to the leg sides. Don’t forget your glue. See an exploded view below.
Step 15

Step 16

Assembly The boards shown in pink above are removable and are not glued down. You should be able to slide the boards out of the notches to disassemble the bed and move. Slide the boards back into the notches to assemble and use 2″ screws to screw from the outside of the leg into the rail boards. Also screw the back top to the top as show above. In this method, you should be able to easily assemble and disassemble the bed without destroying the finish.


Comments
Amy Ripato (not verified)
Mon, 02/27/2012 - 19:17
Lovin the Loft
I ordered a very similar bed from Walmart.com. Paid 650 for kit. Another 200 for mattress. Took me three days to assemble by myself. Hired a "handyman" to assemble it. He came, looked at the instructions, laughed and left. When we moved this summer, the bed broke in many pieces while disassembling for the move. This plan will be MUCH sturdier than a pre-fab kit and cannot be any more difficult to construct. Wish I'd seen this two years ago.
Guest (not verified)
Thu, 03/22/2012 - 19:42
Measurements
So...for the front legs, the overall length is 71". If I add up the lengths, starting at the top and moving down - 7.5" for top filler + 7.25" for the width of the rail + 56" for the bottom filler = 70.75". And indeed, when I line up the pieces, I'm 1/4" short. Did I get "cheated" on the widtth of my rail, or is the 1/4" built in for making it easier to slide the rail in and out? If it matters I'm using select grade pine...
Michelle2265 (not verified)
Mon, 05/14/2012 - 21:20
Cutting Instruction...?
Please, Oh, Please!
I just realized as I am gathering the items to make this that I actually need this information as if it were for a Queen Size Bed. I looked and realized there was the measurements for a Full and not for the Queen. I am moving into a studio with HIGH ceilings and not much space...hoping that this will open up space for me!
Please if possible help me with the measurements! :)
Greg (not verified)
Mon, 05/28/2012 - 11:32
loft bed
I just finished this bed yesterday and it was a real joy to put together.
Some of the measurements were off due to all lumber being in metric sizes.
The cut list was awesome, and all i needed was a power miter saw and a good drill and nailer and this went together with ease.
I used the top rate pine from Menards and this cost me about $350 using some refinements from the plans.
Thanks for the plans, my daughter just loves the bed.
Dan the Man (not verified)
Thu, 05/31/2012 - 08:45
Instructions for Screw placement
I am planning on building this for my twin 9 year old daugthers and I have two questions.
1. Is this high enough to put a standard twin perpindicular underneath this bed to use as a bunk bed. I am assuming there is enough clearance, but just want to be sure.
2. How did everyone place their screws throughout the project. I don't want to overdo it and put too many screws in, but I also want to make sure there is enough to properly support it.
Thanks!
Kad050209 (not verified)
Wed, 06/06/2012 - 15:10
Shorter Loft
I want to shorten the bed for my 3year old. How would I go about shorten the ladder? Just shorten that too or would the angle be all wrong? Thanks
decoguy (not verified)
Thu, 06/07/2012 - 11:45
you make this look so easy =)
you make this look so easy =) but i love how creative and step-by-step this is great job! would you recommend this project for beginners and how much did everything cost?
Danaelle McIntire (not verified)
Fri, 06/15/2012 - 10:51
material & cutting list
Is there a Shopping list and Cutting List for builing this loft for a full sized mattress. I saw the reference to adding 15" to boards, but I have never tackeled anything like this and want to make sure I get it all right the first time. Thanks for your help.
Danaelle
Danaelle McIntire (not verified)
Fri, 06/15/2012 - 11:19
Shopping List & Cutting List
Is there an exact shopping and cutting list for building a Full loft bed? I read the comments about adding lenght, but I have never tackeled anything like this and want to make sure I do it right the first time. Im great at following directs, but have a hard time without it spelled out for me. Help. Thanks - danaelle
Chrisie (not verified)
Fri, 06/15/2012 - 11:21
Price & Savings
My daughter and I live in a small mobile home and I really need to up the space for her and I was looking at your plans for the loft bed. How much money would it cost to do this project? Compared to buying a bed like this, how much would you save?
Danaelle McIntire (not verified)
Fri, 06/15/2012 - 11:23
The actual pottery barn study
The actual pottery barn study loft will run you $1800.00 I have not bought the supplies yet, but i can guarentee they wont be more than a few hundred dollars.
claydowling
Fri, 06/15/2012 - 16:21
Savings Calculation
There's no good way for somebody else to figure out how much you'll save. We don't know what lumber costs are in your area, and we don't know what tools you have available to you, or what tool selections you'll make.
You can take the cut list and the tool list from Getting Started to a lumber yard (avoid the home center), get their pricing on materials, and figure it out for yourself. You may also need to build some tools, such as a circular saw cutting guide.
Elgin Combs (not verified)
Thu, 06/21/2012 - 11:32
Great bed!
I just completed this project for my daughter, who is 5 and 1/2. She is going to love it! Plans were great, and everything worked out how it was supposed to. Btw, I am NOT a carpenter, and had never done stuff like this before. Thanks!!!
-Elgin
chris stogran (not verified)
Tue, 07/10/2012 - 17:48
I am also planning on making
I am also planning on making this bed for my 5 year old but i am wondering if it is sturdy. I would like to make sure it can hold her and I with out feeling shaky are the legs strong enough?
Cooper (not verified)
Mon, 07/09/2012 - 13:03
Loft Plans for an XL Twin Mattress
Can anyone supply modified plans that would accommodate an XL twin mattress?
chrissto (not verified)
Tue, 07/10/2012 - 14:30
Can anyone that has actually
Can anyone that has actually built it comment on how sturdy this is. We are concerned that it may be wobbly if multiple kids are on it. should i beef up the legs? has anyone put more than 250# up top with no issues; i want to make sure i can still climb up there and read to my daughter.
chris stogran (not verified)
Tue, 07/10/2012 - 14:37
Can anyone that has actually
Can anyone that has actually built it comment on how sturdy this is. We are concerned that it may be wobbly if multiple kids are on it. should i beef up the legs? has anyone put more than 250# up top with no issues; i want to make sure i can still climb up there and read to my daughter.
Hillary (not verified)
Tue, 07/10/2012 - 15:17
strong legs
I built the modified (smaller) version and both my girls were up top with my husband when we first built it. We've had no problems with stability and I can't envision problems with the full sized version. The legs end up being 2 1/4x 2 1/2 -- they're pretty strong.
Erin Schreck (not verified)
Tue, 07/10/2012 - 23:57
.pdf file
I really want to make this bed, it doesn't look too difficult and is a good looking bed, but right now the .pdf file version is not working. Is there any way that this can be fixed or that you can email me a .pdf version? If I try printing it out on the printer-friendly version, it's still 27 pages and half of each page is blank. Thanks so much!
Clayton M (not verified)
Wed, 07/25/2012 - 14:34
Using parts of your design
This is a great design. There is an existing platform bed in my daughter's room (she's in a crib now). I plan to use the design for the guard rail and fasten it to the platform. It's perfect and just what I was looking for!
In the original pictures, it almost looks like the whole thing is covered by white laminate. Is that the case, or is it just high gloss paint?
Thanks.
Alex (not verified)
Mon, 08/06/2012 - 06:45
Can plywood be used?
I'm wondering if a couple of sheets of 3/4" plywood can be used? I'm thinking Birch to keep it cost affective. I would not cover/tape the edges. If cut well and a quick sand, the layers make a nice design detail. I have a friend who made all his kitchen cabinets and all edges are exposed.. look good.
WannaMakeA LOFTBED (not verified)
Mon, 08/06/2012 - 22:33
HELP!!! Questions!
I'm planning on making this bed. Does anyone know a price range for making the bed, desk, and bookshelf?
Also, what is the weight limit on this bed. I am 14 now and am planning on keeping this bed for a while.
WannaMakeA LOFTBED (not verified)
Tue, 08/07/2012 - 01:56
Supply List--- IM CONFUSED
These are in the supply list.
3 – 1×8 Boards, 10′ Long (cut one long and one short cut from each)
1 – 1×8 48″ Long (cut 1 short cut from this one)
What does "cut one long and one short cut from each" and "cut 1 short cut from this one" mean?
Kelley- (not verified)
Sun, 08/19/2012 - 16:03
Question about Beds
I found this accidentally from another site. I have been looking forever for a bed for my 8 yr. old. I would absolutely love to make one, but gosh the work into it and then there are bureaus too. I love the loft one with the play area underneath. My son is 8 though. But he has sensory so it would be great for him. Do you have any suggestions?
Brian. Magee (not verified)
Thu, 08/30/2012 - 09:43
Help
Awesome plan. I can't download the PDF. It seems to be a dead link. Is there a plan for this bed with the one end made into bookshelves like in the first picture. Are there plans for the desk? Any help would be greatly appreciated.
Tina Bucci (not verified)
Mon, 09/17/2012 - 06:44
loft later?
Is there any way to build this bed so that it can lie on the floor when the child is young and then loft it later? I love this style but my daughter is only 1.5yrs and I'd rather not buy her a toddler bed now and then a bunk when she's older. Any suggestions?
CGBee (not verified)
Sun, 01/20/2013 - 20:40
Loft Later = Fort Bed
Hi Tina!
Not sure if this is too late for you or not, but just wanted to point you in the direction of Anna's Fort Bed. It's exactly what you are looking for, sits on the floor for a Toddler bed (and you can make this part "girly" and put curtains on like a canopy bed! hehe), and then you can flip it up to a loft with a play area underneath. Hope this can help!! :)
Regards!
Mellemhay (not verified)
Thu, 09/20/2012 - 18:59
Weight Limit
We built the loft bed for one of our daughters and love it! My question for you is do you know the weight limit for this loft? I am wanting to build one for my older daughter but don't know if it will work. Thanks for your great plan and your help!
Stacy (not verified)
Sun, 10/14/2012 - 20:59
not using filler pieces
I just want to say that I love your plans and have already built a few things I will have to post someday! But now I am looking at building this loft bed and then adding the bookcase under neath. But my question is can you use 2 x 4 pieces for the legs instead of all the filler pieces and just pocket hole all the side boards to that instead? Kind of like on the clubhouse bed? I built 2 of those and feel that it is very sturdy and like the way it went together better than all of the gluing of filler pieces. Thank you so much for all of your hard work! God bless you!
Reni (not verified)
Thu, 11/29/2012 - 13:37
Our Loft bed
Thank you so much for the help you gave us in building the best ever loft bed for our girls! They are so happy about it and love it so much!And the plans are really easy to understand,despite the fact that I had not seen the size chart earlier and had to convert everything in metric size on our own...(my mistake again).
I wish I could show you what does it look like,but am not quite sure how to upload the photos...
My husband made it himself and it was really cheap for us as we live in a european town where timber is not hard to find and he used to be a carpenter years ago.It took us approx one week from A thru Z :)
We panted it blue and yellow-awesome!
Thank you again and good luck!
Chris J (not verified)
Mon, 12/03/2012 - 08:17
Awesome set of plans
I built this bed, book shelf and desk project over the weekend for my 9 year old. Let me say thank you so much for such a wonderful set of plans!! The plans were spot on accurate and included all the details needed to successfully complete the project. I remember reading some people concerned about the stability of the bed. Let me tell you that I weigh about 285lbs and it will easily support me plus more. My son absolutely loves it!! The whole project took about a day and a half to complete. I made the bed and the ladder on Saturday and then built the book shelves and the desk on Sunday. I changed the desk and book shelf layout slightly from the plans. Rather than building one tall bookshelf and one half bookshelf, I built two shelves at 29" and then used a solid sheet of plywood for the desktop that wrapped all the way around. I then made one more short shelving unit which I placed on top of the left side of the desk. The whole project cost approximately $250 at Lowes using a 10% off coupon which you can get via their website when searching for the moving discount. Once again, I loved making this project and can't wait to search this site for my next one. I'm not sure how to post pictures but I've got some on Flickr at: http://www.flickr.com/x/t/0096009/photos/cjohnson10731/sets/72157632158…
getrichangel
Mon, 09/01/2014 - 20:11
Desktop
Chris,
I was wondering if you built that has a full size bed or a twin size bed? Did you add a piece of plywood on the end of the desk by the window?
a father of two (not verified)
Tue, 12/04/2012 - 07:18
I'm looking for an L-shaped bunk
I love this presentation with its step-by-steps, its "to cut" list and its diagrams. if you know of a similarly presented blueprint for an L-shaped bunk, please let me know.
Lis P. (not verified)
Thu, 12/27/2012 - 17:53
Time estimate?
Do you have a rough time estimate on how long this project might take for someone who doesn't do a lot of woodworking on a regular basis? Like... 3-4 hours, or a whole weekend? Those are the things I need to know before I can convince my husband to try this out! :D
Jbarclift (not verified)
Sun, 12/30/2012 - 21:11
I have just discovered your
I have just discovered your page. I have been looking for a bed like this and was so excited to find your plans. Are plans for a double bed available? Have I just overlooked them? Thanks a bunch!
DGolas (not verified)
Tue, 01/01/2013 - 15:47
Just finished the build! Thanks.
I just finished the build and it went pretty smooth. The most challenging part IMO was the ladder. My wife wanted solid oak so it's getting varnish, no paint. I thought the plans were great. We modified it to fit a full size mattress just like the instructions said, no problems. Thanks again for providing these wonderful resources. My family is very happy you did.
Robin Howell (not verified)
Sat, 01/05/2013 - 10:21
How much weight will this bed hold?
Hi Ana, this is a WONDERFUL bed and we are going to try to build it this spring for our 11 year old son. His bedroom is super small (width and height) so we can't buy a loft bed anywhere. My concern on this one is, what would be the weight limit on it??
Luxuryhometrend (not verified)
Wed, 01/09/2013 - 05:55
Loft bed
I amazed to see this, it's an amazing idea to provide a great bed to kids.
Alan (not verified)
Thu, 01/17/2013 - 10:07
Just started
I just started this project for my cousins little boy. I am so happy I have the ability, space and time to do this for her family. I'm thankful for this website and Ana to help people like us help each other.
Mark A Lewis (not verified)
Mon, 01/21/2013 - 09:07
Built Mine!
Built one of these this weekend. Overall, even for someone who is no woodworker, it wasn't too bad. Couple of suggestions:
1) CHECK and DOUBLE CHECK the quality of your lumber. Since the legs are built up, bows and warps REALLY show up. Clamps can help this some, but easier to start with straight lumber if you can get it. A friend with a tablesaw can also rip down a 1x4 into a 1x3, slightly wasteful, but better results.
2) Build a jig for the repeated and complicated cuts. I used one for the spacers on the ladders. Made it much easier to cut lots of them that match. I also used a simple one for the slats, to make sure they were all the exact same length.
3) Many of the screw sizes in the shopping list were not available in my area. Be careful when driving them with a drill or driver or you will end up with points poking through.
4) Dry fit before gluing the legs. I had one that the middle piece that supports the bedframe ended up 1/2" too short somehow. Would have cost 3x as much to fix had I glued. Instead, I shortened it by a foot and added a piece of scrap to bring it to the correct length.
Cost for me for lumber and fasteners was just under $200 in North Central WV. Lowes had everything I needed except the 2x2. I used a 2x4 instead.
raymon1969
Sun, 03/03/2013 - 15:31
loft
I also built the loft for my granddaughter. Couldn't find 1X3 lumber, so I bought 1X4's and used these in place of the 1X3. My middle piece for the leg was also 1/2" to short. I think the plans figured that a 1 X 8 is 7 1/2" wide, when it is actually 7 1/4". This will effect the height of the shelve unit that would go under the one end of the bed. I also made the top piece of the guardrail longer, so it would lap onto the post. If painting the bed, make sure that you don't paint the end of the boards that slide into the corner post. Otherwise, you will have a difficult time assembling the bed in the bedroom.
caitlin
Mon, 03/18/2013 - 11:59
Converting to a Queen?
I am really excited to create this for my home and new underneath, home office. Do you have plans or suggestions to convert this plan from a twin to a queen? Thanks for your help!
Sparky9292
Mon, 03/18/2013 - 15:05
Full size matress dimensions...
Hi, great site. You said "Converting to Full Size This bed can easily be converted to full size. You will simply need to add 15″ to all boards that run parallel to the ends. "
The problem is that it makes the inside width dimensions 37.5" + 0.75" + 0.75" + 15" = 54" Full size beds are 54" wide. (Source: Serta and Wikipedia) You really need to say 15.75" added to all boards.
Ok, never mind, this adds to 54" inches which is USA
(However, if you live in the UK, a Double is 48", and a Twin is 36")
gwyndill
Fri, 05/31/2013 - 08:32
Plans for desk & bookshelves
I had trouble tracking down the plans for the additional bookshelves & desk so thought I'd put the links in a comment. Hope this helps someone else out!
Desk & small bookshelf - http://ana-white.com/2010/06/loft-bed-small-bookcase-and-desk
Large bookcase - http://ana-white.com/2010/06/plans/what-goes-under-loft-bed-how-about-b…
CandiD
Sun, 06/30/2013 - 19:30
Can this be modified to use Kreg Jig, maybe solid leg posts?
I'm new to building but pretty good with my Kreg jig, could this bed be built using solid lumber for the leg posts (maybe 2x4's?) instead of pieced together and held together with pocket holes? I'm looking to build it in the full size. Thank you so much!
Phil O'Connell…
Wed, 07/10/2013 - 18:21
A four year old's dream!
It took a while to build this with a four year old helping out but it was worth the effort. A present for him just before he became a big brother - we had to lower it a bit because neither mum or I were comfortable with him quite as high as the plans called for, but otherwise direct, straightforward build!
Thanks again!
LexiH7
Fri, 07/26/2013 - 05:59
With the height of this, the
With the height of this, the bed would be too close to the ceiling, would I be able to change the height of the posts without causing problems?
How much did this project cost for a full size bed?
kristyyoung
Mon, 07/29/2013 - 22:21
Sturdiness and ladder options
Just wondering, like many others, how sturdy this is? What the weight capacity is? My daughter is 120 pounds and I want to make sure she and a friend can sit safely on top of the full size version. I also would like to know if there are any suggestions for making the end pieces the ladder instead of adding a ladder, she does not want the ladder in front. She just wants the end of bed to be her access point. Oh and also wondering how or if I can make it a little taller so there is at least 60 preferably 65inches or as close to it, under bed. And 30 to 35 inches headroom with 9ft ceilings.
mthomson
Sun, 01/12/2014 - 09:54
Bookcase
Did you just purchase the bookcase or did you build it? I really want to include that. If I missed where anything regarding the bookcase in previous posts I apologize.
Thanks!