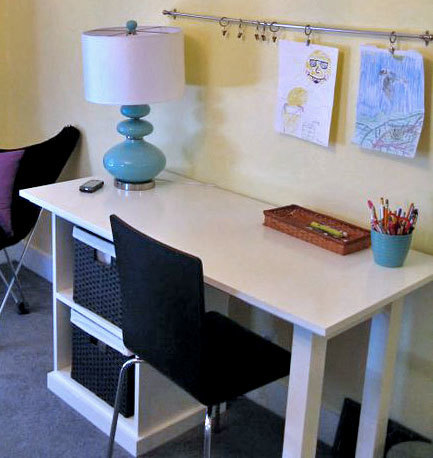
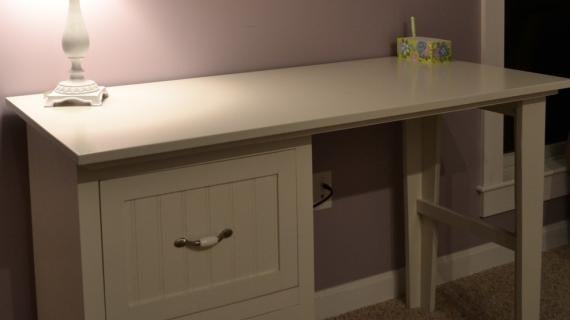
Special thanks to Anna at Take the Side Street for the fabulous photo. Make sure you visit Anne for all the details.
Preparation
1 – 1×24 52″ in length
2 – 1×2 Boards, 8′ Length
3 – 1×3 Boards, 8′ Length (you actually will only need 2 and a 17″ scrap piece)
1 – 2×4 (You will only need 17″)
1 1/4″ Nails
2″ Nails
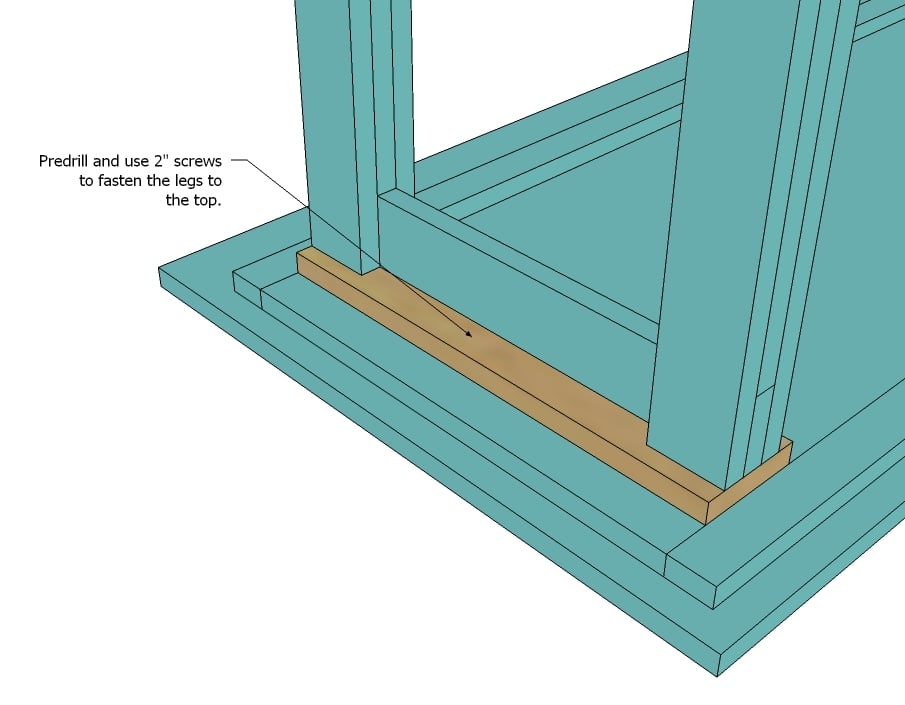
2″ Wood Screws (about 5)
3″ Wood Screws (about 5)
Wood Filler
Wood Glue
Finishing Supplies
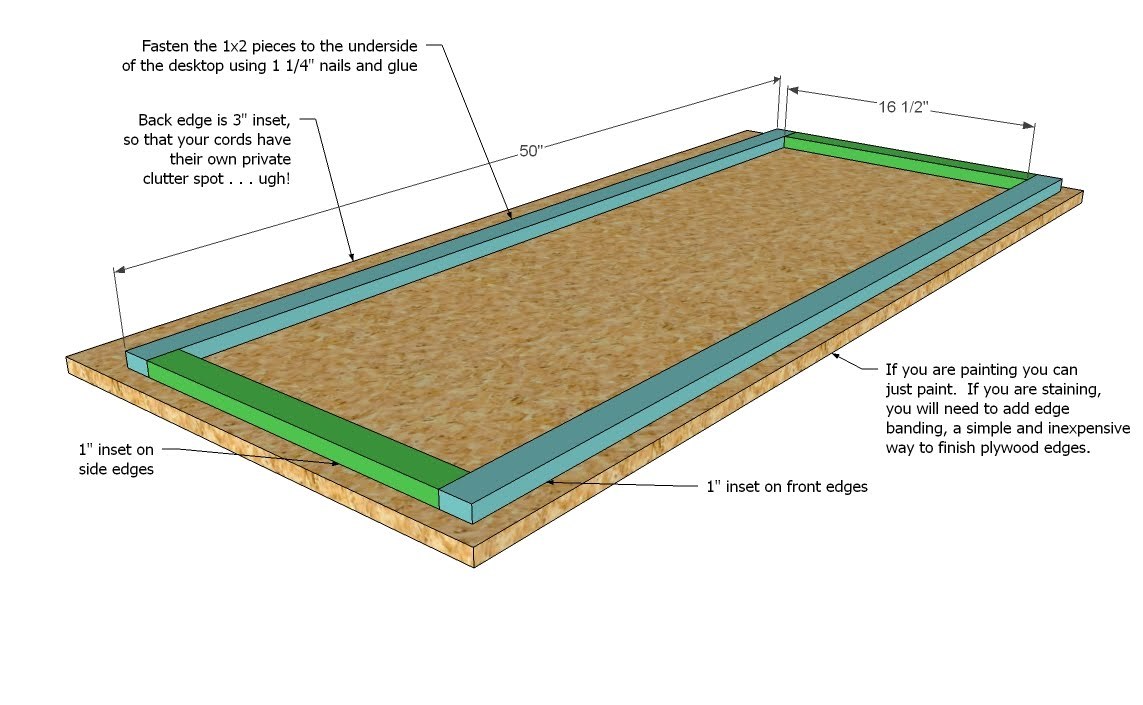
2 – 1×2 @ 16 1/2″ (Side Trim, underside)
2 – 1×2 @ 50″ (Front/Back Trim, underside)
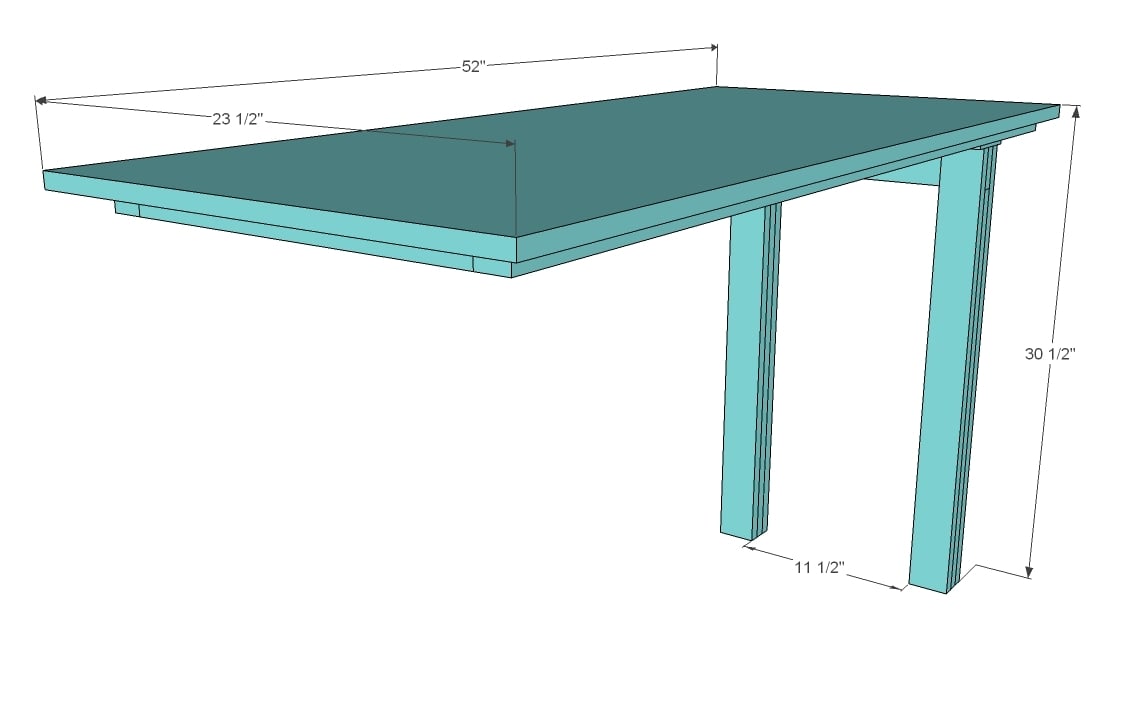
1 – 1×24 @ 52″ (Desktop)
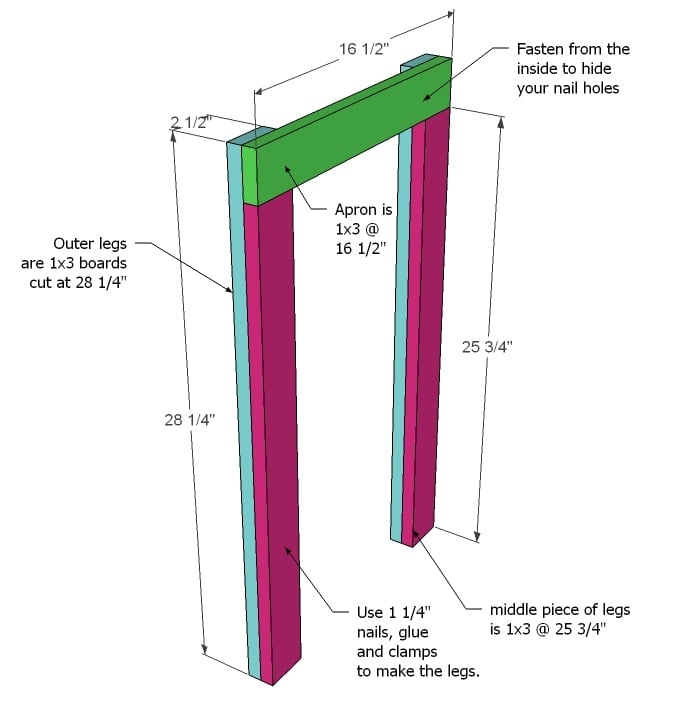
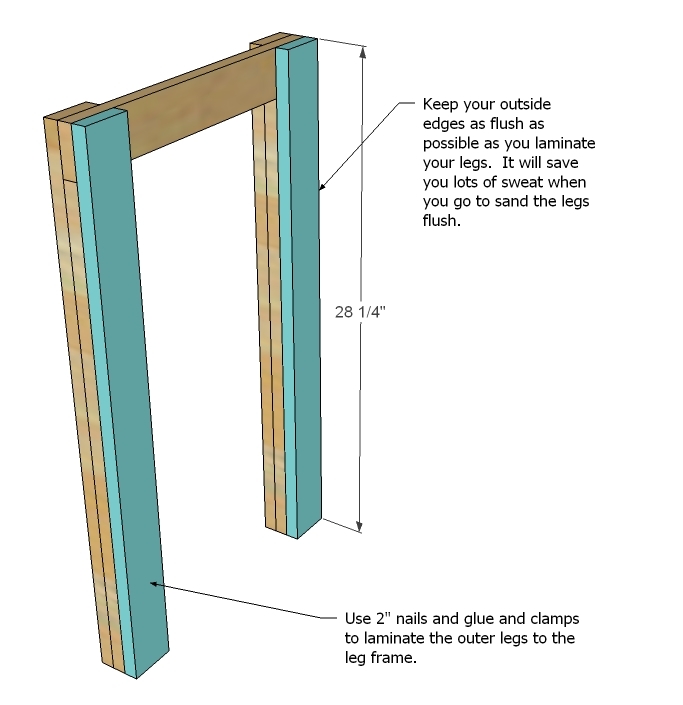
4 – 1×3 @ 28 1/4″ (Outer Legs)
2 – 1×3 @ 25 3/4″ (Middle of the Legs)
1 – 1×3 @ 16 1/2″ (Top Apron)
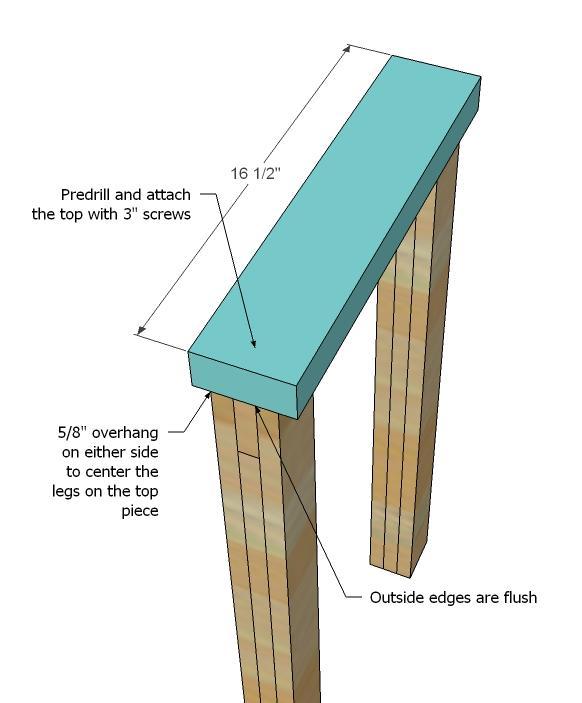
1 – 2×4 @ 16 1/2″ (Top of Leg Unit)
Instructions
Step 1
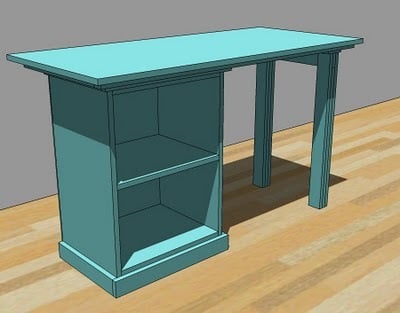
This project fits on top of the Narrow Open Base for the Modular Office Collection. You can modify as you see fit.
Step 2
Step 3
Leg Construction. Clamp the middle leg piece to the outer leg piece, keeping bottom and outside edges flush. Use glue and 1 1/4″ nails. Keep the outer edge as flush as possible. Do not clamp so tight that you loose all of your glue. Let dry. Then add the top apron piece in the same method. As you add the top apron, check for square. One thing to note if you plan on staining, avoid any glue seeping out, this will cause the stain to discolor.


Comments
Tracy D (not verified)
Fri, 02/26/2010 - 08:59
Doin the HAPPY DANCE!! This
Doin the HAPPY DANCE!! This is perfect! Thank you so much :-)
Transmission Service (not verified)
Wed, 07/11/2012 - 22:45
hello
My partner and I absolutely love your blog and find a lot of your post's to be just what I'm looking for. Would you offer guest writers to write content to suit your needs? I wouldn't mind writing a post or elaborating on a number of the subjects you write in relation to here. Again, awesome weblog!
lindaray4u
Fri, 09/21/2012 - 00:22
Really nice style and
Really nice style and design and excellent idea to save the space.
How Do I Get Him Back
Get Your Ex Girlfriend Back
Pull Your Ex Back
Chelsea (not verified)
Fri, 02/26/2010 - 09:20
WOHOOO! LOVE this desk! It IS
WOHOOO! LOVE this desk! It IS perfect! Thanks so much, Ana!! Now all I have to do is just build it... :)
MommaP (not verified)
Fri, 02/26/2010 - 09:25
It's so funny the timing on
It's so funny the timing on this whole desk project. About 1-2 weeks ago my hubby took some graph paper and tried to design what he would want a desk to look like because he's a computer man he is pretty particular about how it should look and fit together and everything. So this is perfect how it's in pieces so we can customize it how we want and now we can use your measurements a little and plans to help us build the desk we need desparately in our office. Thank you again...I just can't say it enough. :)
Floyd the Wonderdog (not verified)
Sat, 02/27/2010 - 02:36
I was planning on moving my
I was planning on moving my roll top desk from the bedroom to the computer room and ditching the old shabby computer desk. My wife informed me that the roll top part would have to be removed so as not to block my daughter's oil painting. Then I ran across your blog. So now I'm doing measurements so that I can build my own components for the desk. My daugher's oil painting is that good.
Christina (not verified)
Sat, 02/27/2010 - 03:43
This is perfect! I know I can
This is perfect! I know I can build things but never new what exactly what I would need. So thank you! My first project is going to be the Bedford small desk. I have been looking for one for awhile, but everything is to expensive. Even looked for used to fix up, but never found the right thing, and this is exactly what I was wanting!:)
Catherine (not verified)
Wed, 03/03/2010 - 09:33
Hooray! So excited about
Hooray! So excited about this collection. We want to build the larger version of this desk this weekend...the one with the 2 file drawer base on one side and the other side supported by the 3 drawer base (bottom file drawer, top two smaller drawers). Will you be posting plans for that base and the larger desktop?
jodimichelle (not verified)
Mon, 03/08/2010 - 15:37
I can't wait to build this
I can't wait to build this for my 5 yo as she's entering school next fall, but would you mind pointing me to the plans for the base part of this? There's quite a few different "cubes" on the site now and I'm not entirely sure which one should be used to support this desktop.
thank you - I have a laundry list of items I'll be building in the next few days as my hubby will be out town! CAN'T WAIT
AshleyS (not verified)
Sat, 03/13/2010 - 07:11
A work friend showed me your
A work friend showed me your blog, and i am blown away! I've just found my new hobbie which is sewing, but i just dont have the right desk for it (im using the end of a computer desk in the guest bedroom). all the ones at PB and such are so expensive. This one is going to be perfect :) ill post pictures when its done!
-jodimichelle, i think this is the base to be used with this desk: http://knockoffwood.blogspot.com/2010/02/plans-back-to-bedford-open-fil…
Maulana (not verified)
Tue, 07/13/2010 - 09:47
i am often confused by
i am often confused by calculating how wide and high my own furniture.
i try to make my own with simpl components.
i like it, because i can get design same as my character.
this blog is detail and graet.
thanks.
by http://www.ergonomicdeskchair-s.com/small-computer-desk
CaliValleyGirl (not verified)
Tue, 07/20/2010 - 12:43
I think there is a mistake
I think there is a mistake with the height of the legs for the table...the height of the filing cabinet cube is 30 1/4" and the legs are only 29 1/2 ". I slid a piece of 1x3 under the feet to make up the difference. Oh, I just realized that maybe the open file base is too high, because the other bases seem to be 29 3/4". Anyhoo, thanks for the plans! I have two of these desks now!
Banki (not verified)
Mon, 10/04/2010 - 08:03
I am a frequent reader of
I am a frequent reader of your blog posts. I liked the recent one and other posts on your blog so much that I have subscribed to the blog’s RSS feed in Thunderbird. Even thinking of stealing some ideas and put them to work. Keep all the good work going by posting more informative posts. Thank you. Time well spent on this post.
Banki (not verified)
Wed, 10/06/2010 - 08:37
What hosting company are you
What hosting company are you using for your blog?
Ana White (not verified)
Wed, 10/06/2010 - 08:51
Banki, I'm on Godaddy, but it
Banki, I'm on Godaddy, but it isn't the greatest. Do you have a suggestion?
Donna (not verified)
Thu, 10/28/2010 - 08:28
OMG, I just found this
OMG, I just found this website today and I've spent hours looking at projects! This is exactly what I was looking for because I need 3 of these!
youtube-software (not verified)
Sun, 10/30/2011 - 00:24
ana-white.com is amazing
I love to come back to ana-white.com everyday
[url=http://www.youtube.com/watch?v=jbnq2UeB8PU]youtube bot[/url]
Nadine Carroll (not verified)
Mon, 04/30/2012 - 11:10
Type of plywood
What type of plywood do I use for this desktop if I want to stain it?
steelrange5
Mon, 05/20/2013 - 02:38
s
I was pleased to find this information , I want you to thank for your time of this wonderful read!!! I definately enjoy every little bit of it and I have you bookmarked to check out new stuff of your blog a must read blog!!!!
bollywood latest movies
bollywood latest movies
hom2it
Mon, 09/16/2013 - 11:05
help with questions
I am a boy scout and I picked a project to replace the desks and computers at the senior center in our county. I came across this site and really liked the detailed instructions and simple designs - I picked this design to build a long table to hold 3 computers for the seniors.
I submitted my proposal and have been asked a load of questions :(
I am hoping someone can help me with some answers
Q1 Has this table design been rated for weight capacity (The weight of computer and monitor is likely around 10 lbs).
Q2 Is this design stable from lateral stress? (if rammed by a wheelchair from the side will it hold up? If rammed from the front, will the two straight legs require additional support to prevent front-to-back
collapse?)
Q3 The illustration describes AI Plywood, what is A1-plywood and what differentiates it from any other variety?
Q4 The drawing indicates a height of 30.25" for the shelf unit and 30.5" for the top of the desktop unit; I assume that the desktop will be thicker than the 0.25" suggested between these. Please explain.
Mpalazola
Fri, 08/28/2015 - 13:26
Covering up seams on legs
I wondered what others did or used to cover the seams on the legs to stain them? Veneers? Could you used a thinner piece of wood or something?