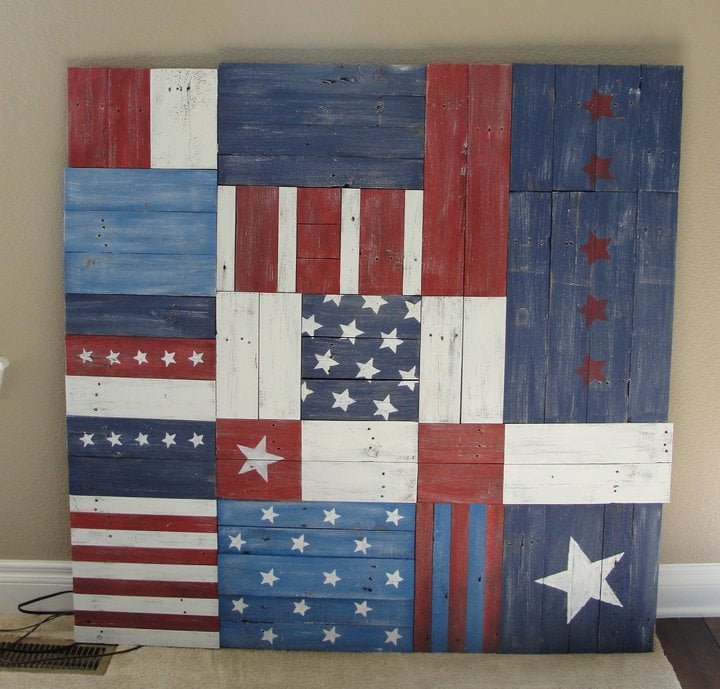
A beautiful wall art (and huge) project that can bring a festive spirit to your summer living space. Uses scrap boards. Distressing required.
 So who here has a scrap pile? Made up of mostly 1x4s?
GOT 1x4s?
If you've been building outdoor furniture, the odds are good that you've got quite a pile of 1x4s laying around. Don't throw them away! I'm working on a collection of plans to make good use of all those scraps.
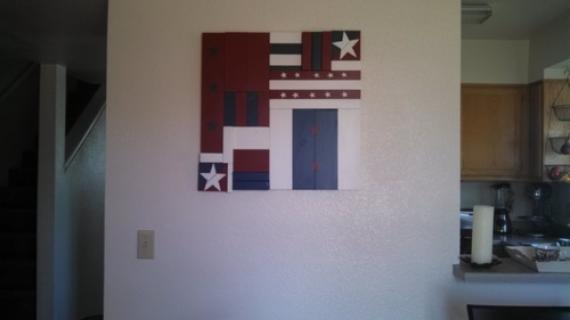
Today, we will start with this room maker Liberty Wall Hanging (or I could see it propped up against the wall on the floor too!). We loved Pottery Barn's Planked Patchwork Flag, but not so much the price.
If you quilt and are crafty, this is definitely the project for you. In fact, I feel like I am quilting with wood on this project!
Well, you know we love pallets. Since this project is mostly made up of 1x4 boards, if you have the time and gumption, taking apart a few pallets will provide most of the boards for this project. The pallets will also add tons of character to the project because of the distressing. Most pallet boards are 1/2" thick as opposed to 3/4", so there will be a nice depth contrast between the pallet boards and the 1x3s and 1x2s. You will need approximately 10 pallet boards at 40" long, so about 1 to 2 pallets worth.
This is a good project to master your distressing skills. I recommend painting the pieces before assembling, distressing prior to assembly. I also love the idea of using a hammer and nails to attach the boards to the back plywood (and glue of course). I like to use little brad nails with shiny silver heads.
like these ones from Lowes
That way you can see the shiny heads!
I would love to see someone modge podge old blue jeans to the wood and bright fabrics, mixed in with some painted wood or some naked pallets to get this look.
Preparation
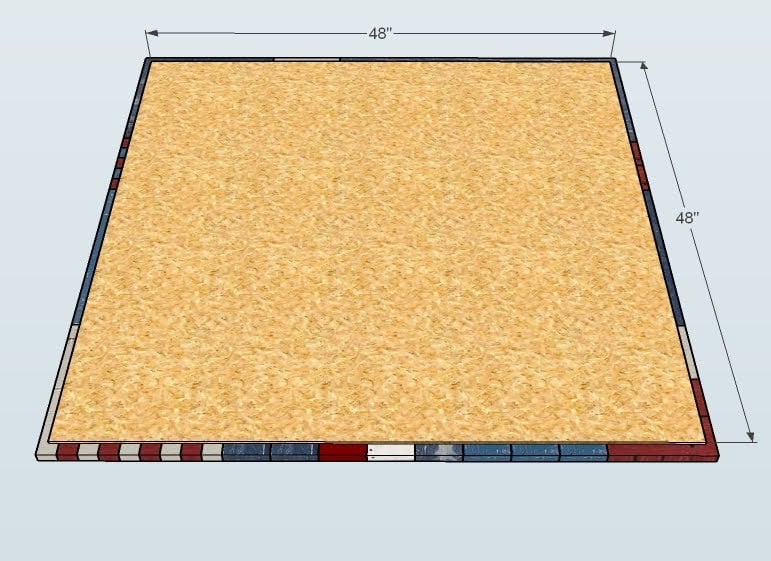
1 – 4′x4′ sheet of plywood, 1/4″ to 1/2″ thickness (can be OSB)
5 – 1×4 Furring Strips, 8′ long
3 – 1×2 Furring Strips, 8′ Long
2 – 1×3 Furring Strips, 8′ Long
Scrap 1×6
1″ nails
Glue
Paint and Distressing Materials
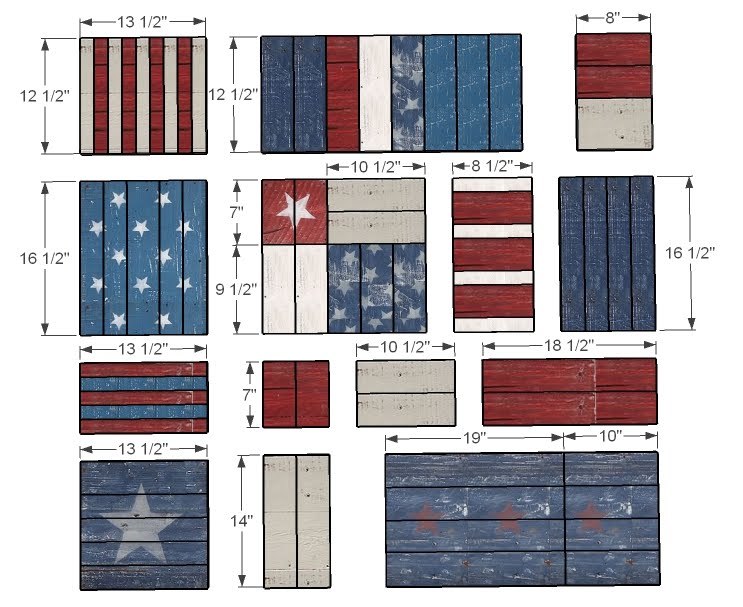
9 – 1x2s @ 12 1/2″
8 – 1×4 @ 12 1/2″
2 – 1×4 @ 8″
1 – 1×6 @ 8″
4 – 1×3 @ 16 1/2″
1 – 1×4 @ 16 1/2″
2 – 1×4 @ 7″
2 – 1×4 @ 10 1/2″
5 – 1×4 @ 9 1/2″
4 – 1×2 @ 8 1/2″
3 – 1×4 @ 8 1/2″
4 – 1×3 @ 16 1/2″
5 – 1×2 @ 13 1/2″
2 – 1×4 @ 7″
2 – 1×4 @ 10 1/2″
2 – 1×4 @ 18 1/2″
1- 1×4 @ 13 1/2″
4 – 1×3 @ 13 1/2″
2 – 1×4 @ 14″
4 – 1×4 @ 19″
4 – 1×4 @ 10″
Instructions
Step 1
CUTTING AND LAYOUT
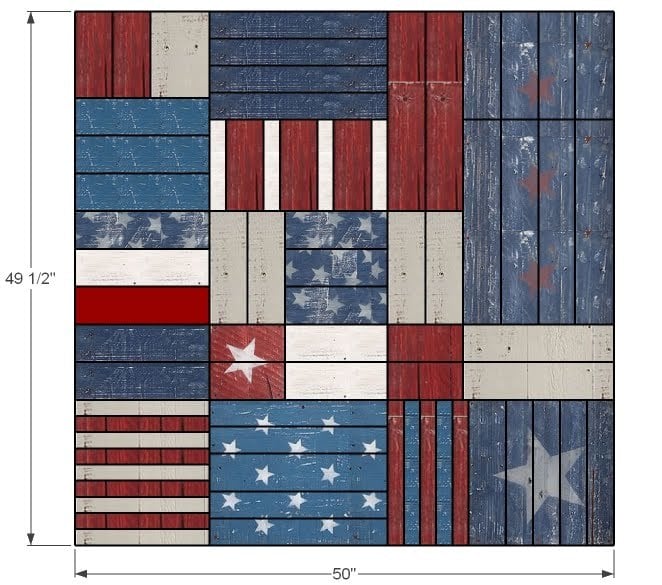
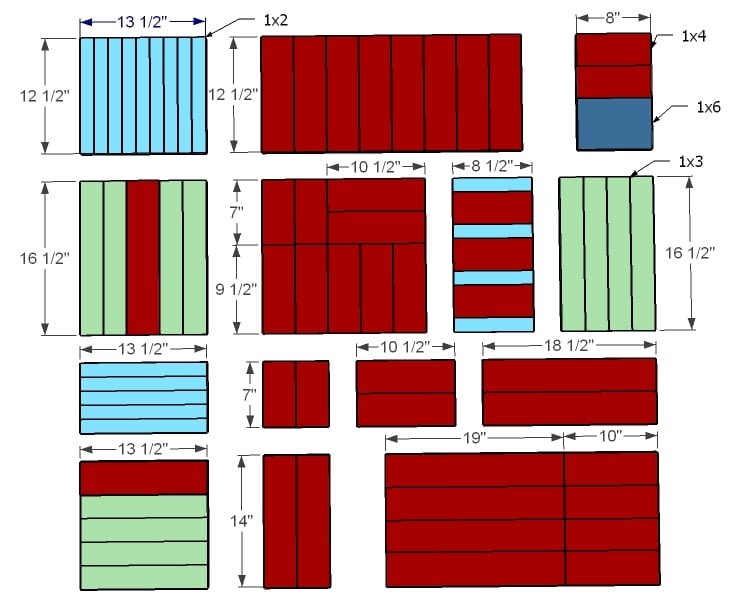
The diagram above shows the board widths in the project. The red boards are 1x4s, the turquoise are 1x2s, the green are 1x3s and the one blue board is a 1×6. Layout as shown above. Don’t stress if the boards don’t come out exactly even, part of this projects appeal is the hand made character.





Comments
elei (not verified)
Tue, 06/15/2010 - 22:35
Oh my gosh..this is soooo
Oh my gosh..this is soooo cool!!!!
Chris (not verified)
Wed, 06/16/2010 - 00:40
This is great! I had been
This is great! I had been thinking about how I could replicate that for my boys room. You are awesome Ana!
Missing RMP&B … (not verified)
Wed, 06/16/2010 - 01:58
This would make a great
This would make a great headboard....
April McCoid (not verified)
Wed, 06/16/2010 - 03:05
This project totally just
This project totally just reminded me that I have a basket of chunky foam paint stamps, including a few with stars, that would be PERFECT for something like this! I also have a stamp with a watering can, and another with leaves... I'm imagining a wall art piece for my Mom's gardening shed :-) And using up scraps? Can't get much better than that! Thanks Ana!
Marti (not verified)
Wed, 06/16/2010 - 04:46
This is a great idea. I was
This is a great idea. I was just wondering where you keep all your scraps. I don't build that much and I've filled a bin with the short stuff and made a shelf to hold the long stuff.
Emilee (not verified)
Wed, 06/16/2010 - 05:44
This reminded me of PB
This reminded me of PB Painted pieced woodwork ~ http://www.potterybarn.com/products/painted-pieced-woodwork/
I have been wanting to make it, I hope you will consider including this in your collection of plans to use up scraps.
The Klauers (not verified)
Wed, 06/16/2010 - 13:19
My mother in law loves
My mother in law loves quilting. I am definitely making this for her. Thanks for the plans Ana!
Bit (not verified)
Thu, 06/17/2010 - 01:12
WOW, It's a barn quilt! Love
WOW, It's a barn quilt! Love it!
The Klauers (not verified)
Sat, 06/19/2010 - 16:56
Ana, I cut all my pieces to
Ana, I cut all my pieces to make this. On your cut list you have (3) 1x4 @ 3 1/2 inches. I think that is suppose to be (3) 1x4 @ 8 1/2 inches. Thanks for the plans. It's going to be awesome when done!
canngil (not verified)
Sun, 07/04/2010 - 20:54
If you make use of scrap
If you make use of scrap pallets, be sure you know what has been carried on them. Even though hazardous materials are nominally properly transported, and disposed of, the pallets they get shipped on may get re-used. (Seen it done) Paints, hydrocarbons, resins soaked in pallets that aren't usually considered hazardous can still out gas toxic fumes, etc that you don't want in the house.
That said, if you have a pallet factory in your area, they may have a free for the taking scrap wood bin.
Large commercial glass companies often receive shipments in wood crates another source of good CLEAN wood.
Labor Day Deco… (not verified)
Fri, 09/03/2010 - 03:17
[...] holidays, why not make
[...] holidays, why not make your own wooden flag? Ana White (of Knock-Off Wood fame) made a great tutorial on how to make a flag with scrap wood that you should definitely check [...]
FaveDaughterInLaw (not verified)
Sat, 03/17/2012 - 19:54
Favorite Daughter-In-Law
My In-Laws are farmers, and they were just commenting the other day on wanting to buy a barn quilt. I think this idea would be perfect! (I would have to make four of them though, to be the standard barn quilt size, but that would probably look even cooler!)
But first, before I tackle such a large project, I think I will try to make one using scraps of his old blue jeans and flannel shirts and adhering them with Modge Podge, then give it to him for his Birthday!
Thank you for the pattern that will make me the Favorite Daughter-In-Law!!
Juanita_r (not verified)
Thu, 04/19/2012 - 23:12
LUV IT, MORE IDEAS PLS!!!
Hi all. Ana I love everything here!!! You are very brave and creative! With 4 kids incliudng 1 bub & 1 toddler, i just don't seem to have the time to do this sort of stuff like i want to.... how do you make the time! Any who.... I love this and would like to do something for my 2 older boys, and altho i think this looks awesome I'm not really into the American flag theme [we are in Australia ;) ], sooo..... all those creative minds out there, what else could i do? Thanks again!
Marco (not verified)
Fri, 11/09/2012 - 01:53
Love it!
Hi Ana, I love this project and want to build one!
It's quite difficult anyway to convert from inches to cms.
One question, did you paint white under the blue and red?
Regards,
Marco