

How to build your own kitchen wall cabinets. Free easy tutorial from Ana-White.com
We simply cannot leave you hanging on kitchen cabinets, can we?

Or perhaps I should say "not hanging" because we've got you covered with the base cabinet plans, but no wall cabinet plans yet! We'll fix that today!
Do you remember last week when BOOM! Brooke knocked our work boots off with her amazing country/vintage DIY kitchen, made from plans we collaborated on and posted here? Of course you do!
If you somehow missed it, don't worry, you can catch up by reading this post here.
Thank you so much for the tremendous positive response! After all of your feedback, I can't wait to develop more kitchen plans for you! And of course, first up, we've got to get the wall cabinet plans up!

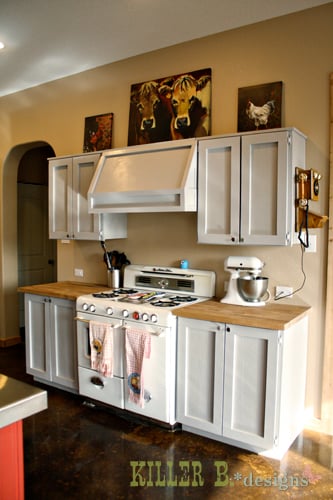
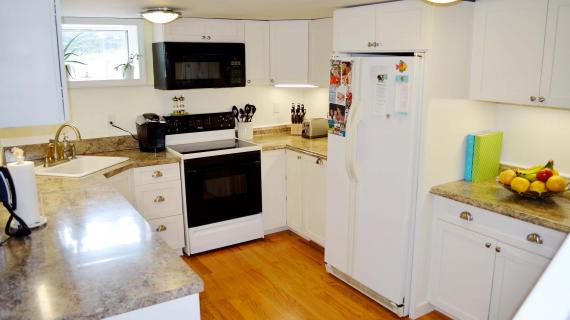
Before we get to the plans, let's take a second to drool over what Brooke cooked up in her kitchen ... mmmm ... can you smell the sawdust? I love how Brooke made tray dividers for her upper cabinets because let's just face it, baking cookies is definitely something you should do Every. Single. Day. Might as well take any back strain out of your chocolate chippies!
I could go on and on about Brooke's DIY kitchen ... oh the stove, the wood countertops, but really, you just need to go check it out yourself! Please take a second to stop over and read from Brook about building her wall cabinets here.
And of course, we've got you covered with the DIY plans for wall kitchen cabinets following! Enjoy the plans!

Preparation
3/4" hardwood plywood ripped into strips 11 3/4" wide for cabinet carcasses (Brooke used Purebond) **We'll call these 1x12s in this plan
1/4" plywood for backs in matching species
1x2s for face frames and supports in matching wood species
Recommend edge banding for stained cabinet shelves
1 1/4" pocket hole screws (fine threaded for hardwood)
Optional Crown moulding (if you opt for crown, you may wish to increase the size of your header to a 1x3 or 1x4 on face frames)
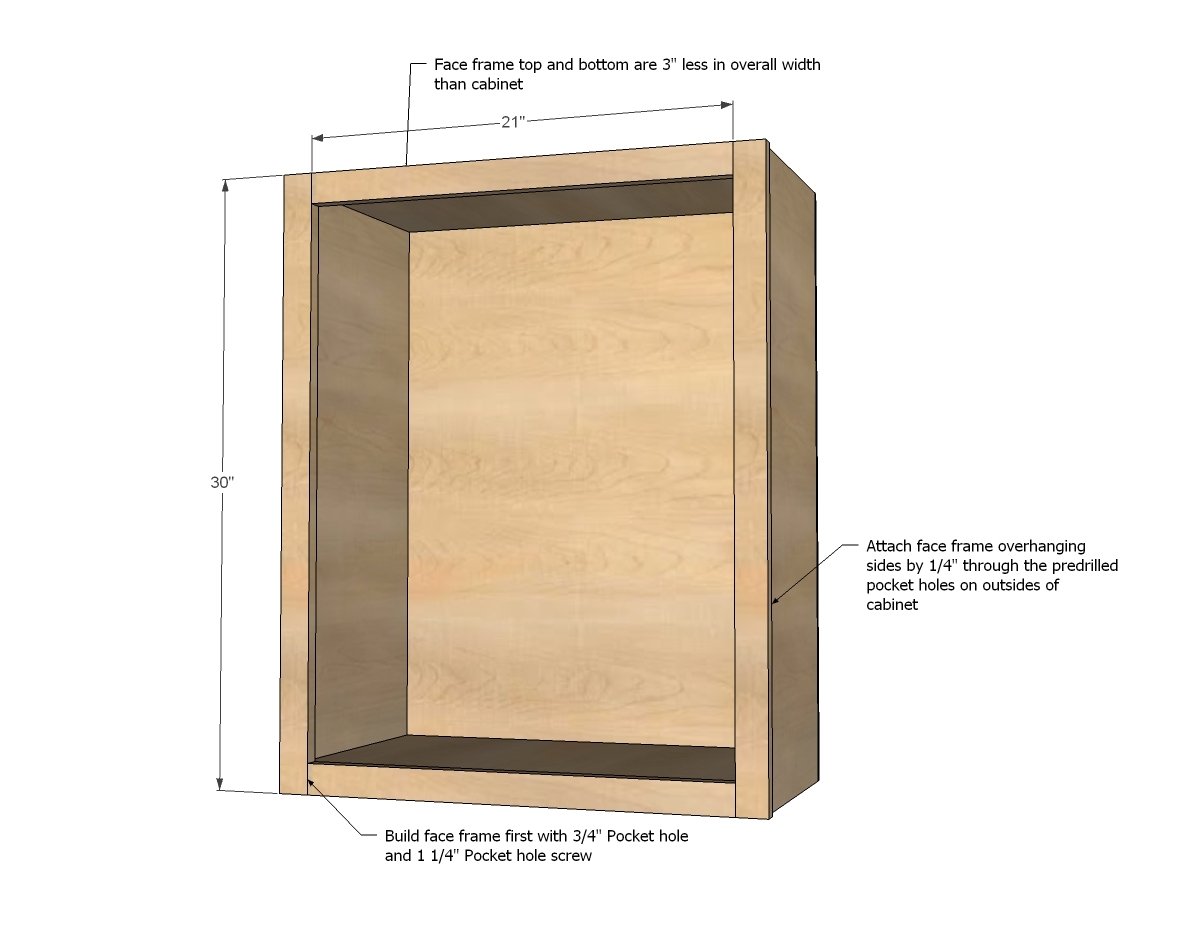
Find your overall desired cabinet width and modify this cut list to fit your dimensions. Cabinets are shown standard 30" height but can be made taller or shorter as well - just adjust side cuts.
MAIN CARCASS
SIDES: 2 - 1x12 @ 30" or height of cabinet **These are the plywood strips ripped to 11 3/4" widths. You can actually use any width, 11 3/4" just minimizes plywood scrap waste.
SHELVES: 2+ - 1x2 @ CABINET WIDTH - 2" (you'll need a top and bottom + any shelves)
TOP CLEAT: 1 - 1x2 @ CABINET WIDTH - 2"
BACK: 30" x CABINET WIDTH - 1/2"
FACE FRAME
2 - 1x2 @ 30" or height of cabinet
2 - 1x2 @ CABINET WIDTH - 3"


Please read through the entire plan and all comments before beginning this project. It is also advisable to review the Getting Started Section. Take all necessary precautions to build safely and smartly. Work on a clean level surface, free of imperfections or debris. Always use straight boards. Check for square after each step. Always predrill holes before attaching with screws. Use glue with finish nails for a stronger hold. Wipe excess glue off bare wood for stained projects, as dried glue will not take stain. Be safe, have fun, and ask for help if you need it. Good luck!
Instructions
Step 1
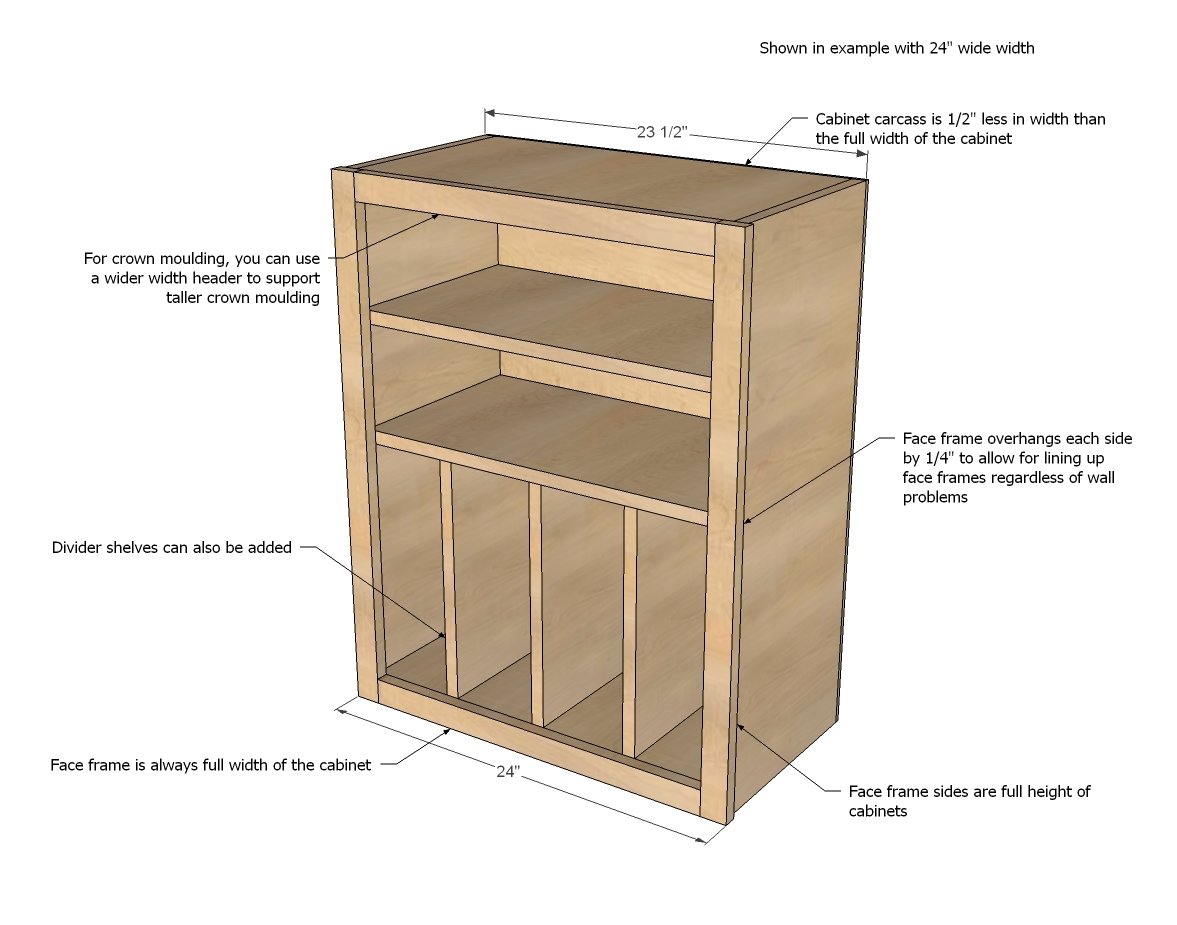
Take a second to sketch out each cabinet on graph paper and write out a cut list specific to each cabinet. Note that the face frame is the full size of the cabinet, but the carcass actually is 1/2" total less in width (1/4" on each side). This is done so you have a little wiggle room when installing the cabinets to get the face frames to line up perfectly, even if your wall is less than perfect.
Before you cut out all of your cabinets, choose a smaller cabinet to start with and build it first to get the "hang" of it :)
Step 2
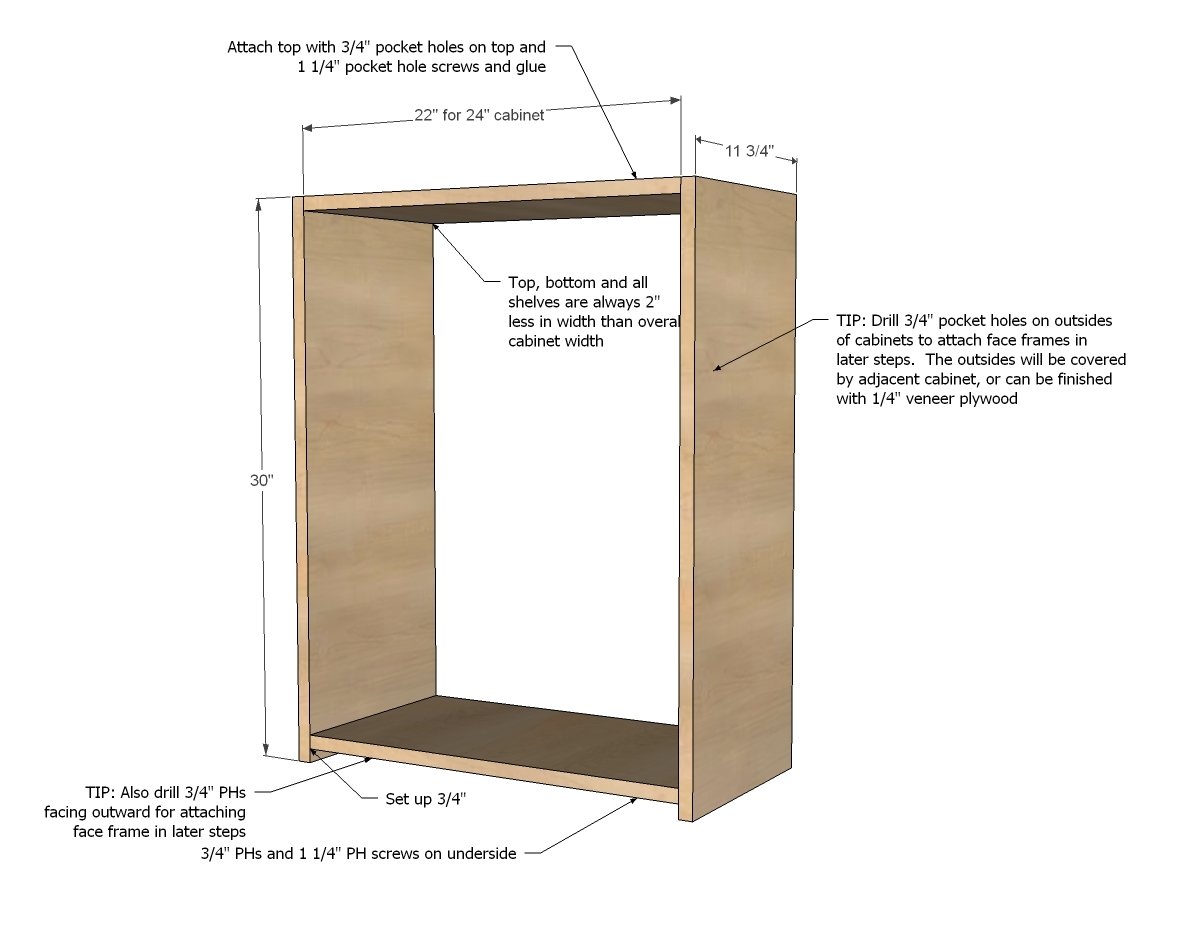
Next, build your box. I recommend drilling both pocket holes for attaching face frames and shelf pin holes for adjustable shelves at this stage or before assembly. TRICK: Place pocket holes to outsides as the adjacent cabinet will cover, and for the end cabinet, you will apply a 1/4" plywood veneer to end to finish off.
Step 3

You'll need something strong and solid to hang the cabinets on the wall. I like to add a small 1x2 cleat to top, inset, to give me something to screw the cabinet to the wall. You can add more of these under fixed shelves if desired. Easiest way to attach is 3/4" pocket holes on back side and 1 1/4" pocket hole screws.
Step 4
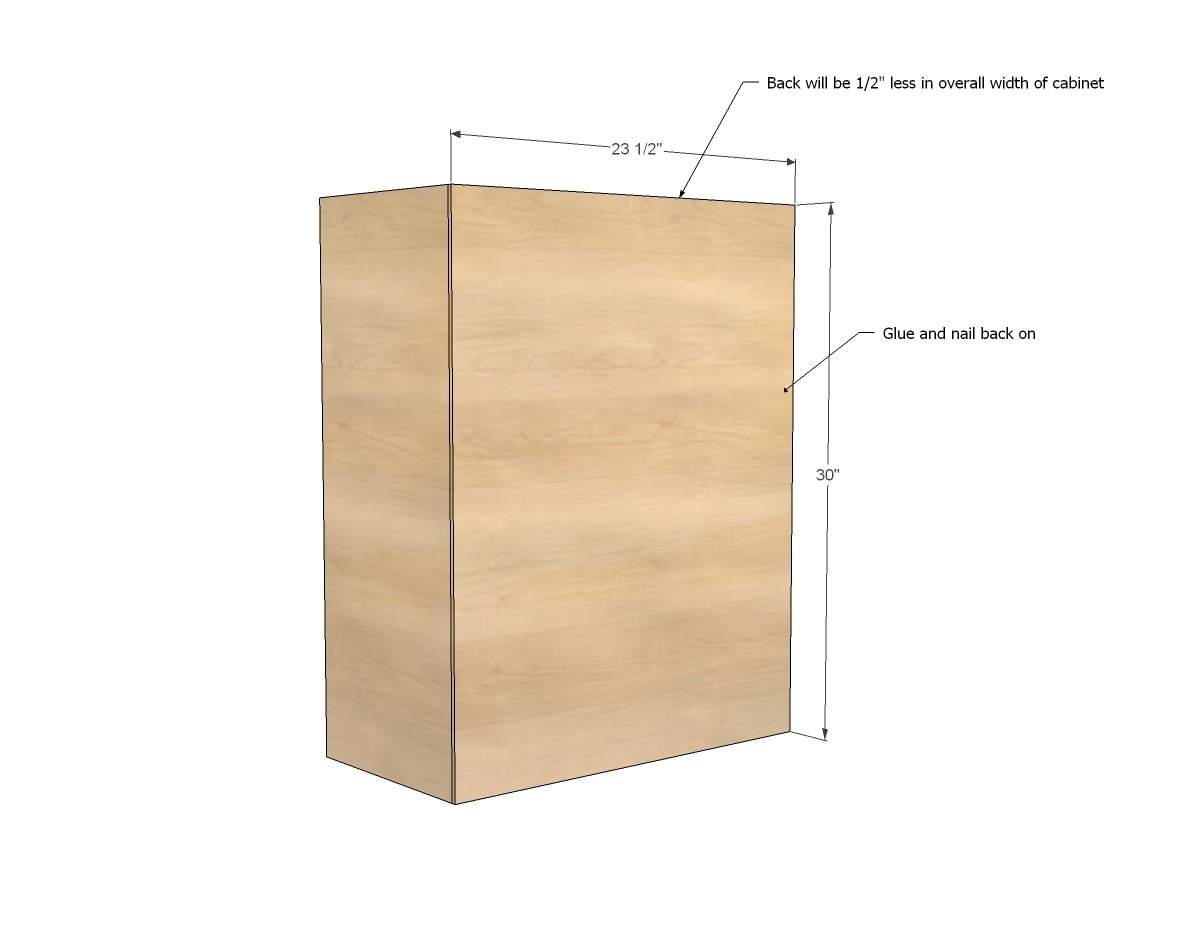
Square up your cabinet when you attach the back plywood. Use glue and nails - If find 1" nails to work pretty well, but this is all a matter of preference.
Step 5
Step 6
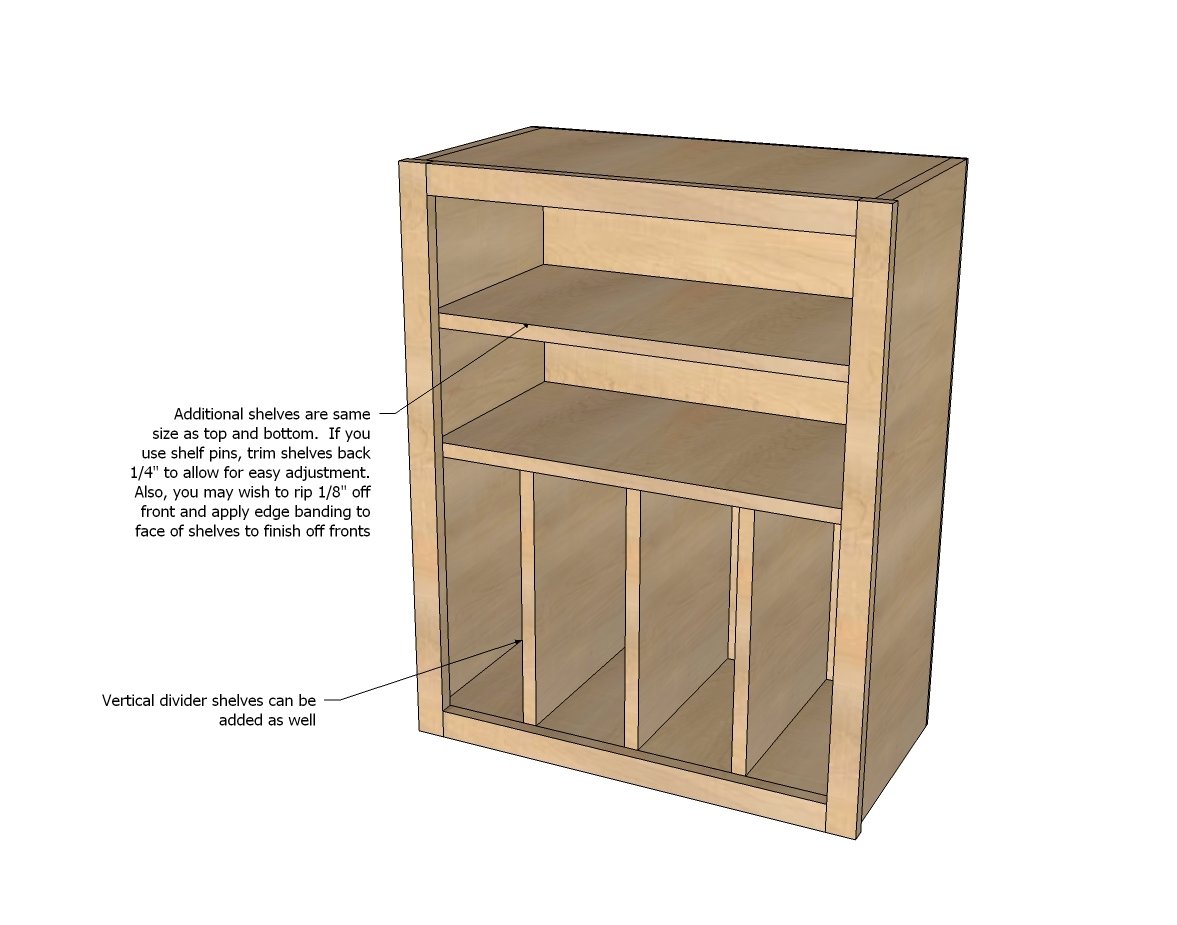
Add any shelves now. If you have fixed shelves, you can add with pocket holes. For adjustable shelves, I recommend trimming shelves down 1/4" to make them easy to place. Also, you can apply edge banding to fronts of shelves for stained finish (you may need to rip off a tiny bit of the shelf face edge or sand down to get the edge banding to fit in there).
Step 7
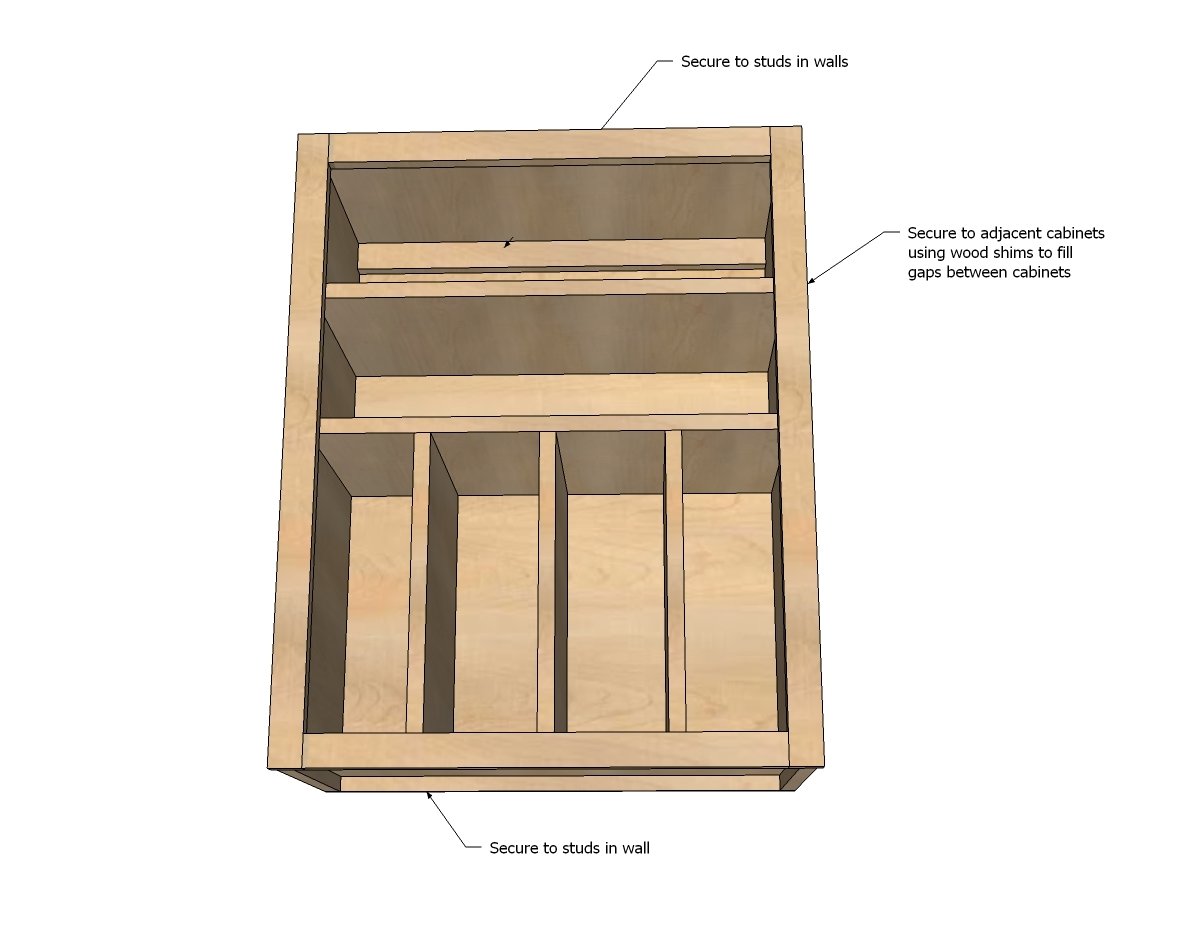
When you hang the wall cabinets, you just hang to a stud in the wall. This is very important. And also, it's a good idea to attach neighboring cabinets with cabinet screws.
Step 8
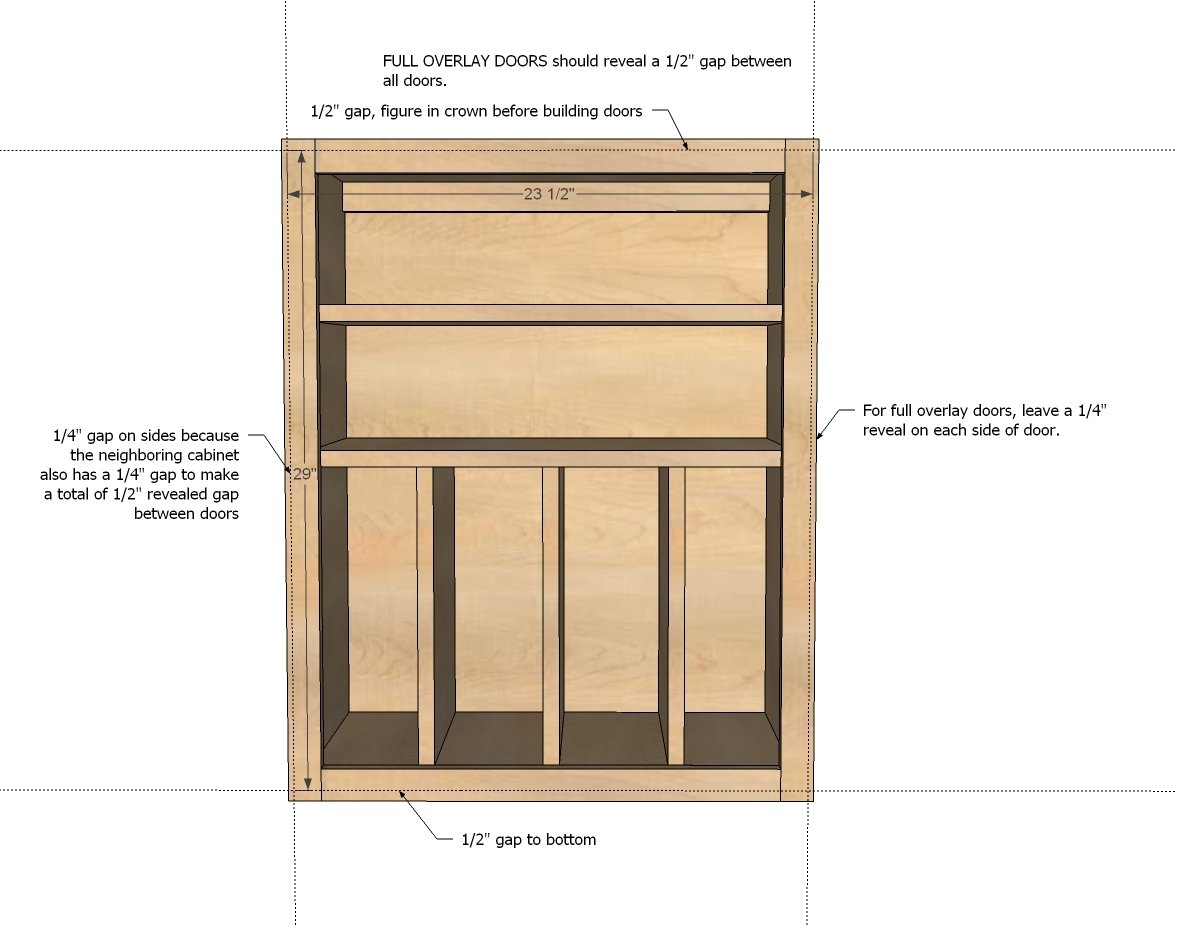
For full overlay doors, the gaps need to be 1/2" between all doors. Use full overlay face frame euro style hinges for hanging the doors.
It is always recommended to apply a test coat on a hidden area or scrap piece to ensure color evenness and adhesion. Use primer or wood conditioner as needed.

Comments
Quintin79
Tue, 01/29/2013 - 21:27
Im in love with her island
Im in love with her island and stove. They really bring the kitchen together and show off the rest of the cabinets
trailsingr
Wed, 01/30/2013 - 03:55
just in time to change my plans
Ana and Brooke, you have my admiration and thanks! These plans are completely changing my ideas about how to rehab my kitchen.
I am getting a vintage Tappan stove from 1950 to be the hearth of my kitchen, so I hope you can include plans for that beautiful range hood cover.
Then all I'll need to figure out is how to make a corner wall cabinet so I can turn the corner in my tiny kitchen....
JoanneS
Thu, 01/31/2013 - 15:44
LOVE these cabinets!
I think I've looked at the plans and Brooke's blog about 10 times drooling over these cabinets! Ana, your plans are brilliant! Brooke, AWESOME kitchen! Love these!
tracysmith
Sat, 03/02/2013 - 20:34
I'm building some uppers and
I'm building some uppers and base cabs for my laundry room. I'm wondering when we're going to get a tutorial on the doors! :-) As if you don't have enough to keep you busy, Ana! Looking forward to that one though!!!
robertmccarson
Wed, 03/13/2013 - 19:03
See Ana's post about doors for media console
I have been looking for this too but this how I built my doors. I ripped 1x6's to 2 1/4 stiles and rails then ran them across a dado blade on my table saw that cuts a grove 1/4 wide and 1/4 deep.
I assembled them with pocket hole screws and then cut Purebond plywood to the size of the hole in the frame you have created plus 1/2 inch on the width and length.
Screw all but one of the stiles and rails together and then slide your cut plywood into the grove, capping it off with the last piece of the frame and wah la, a Shaker floating panel door.