


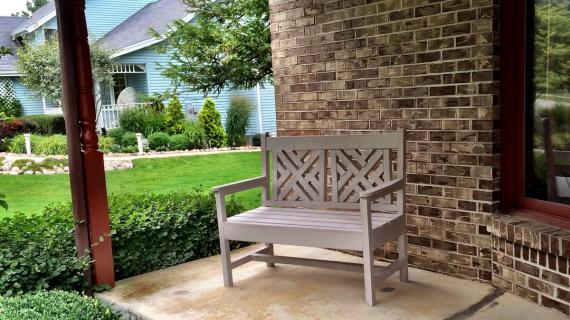
Free plans to build a woven back bench from Ana-White.com
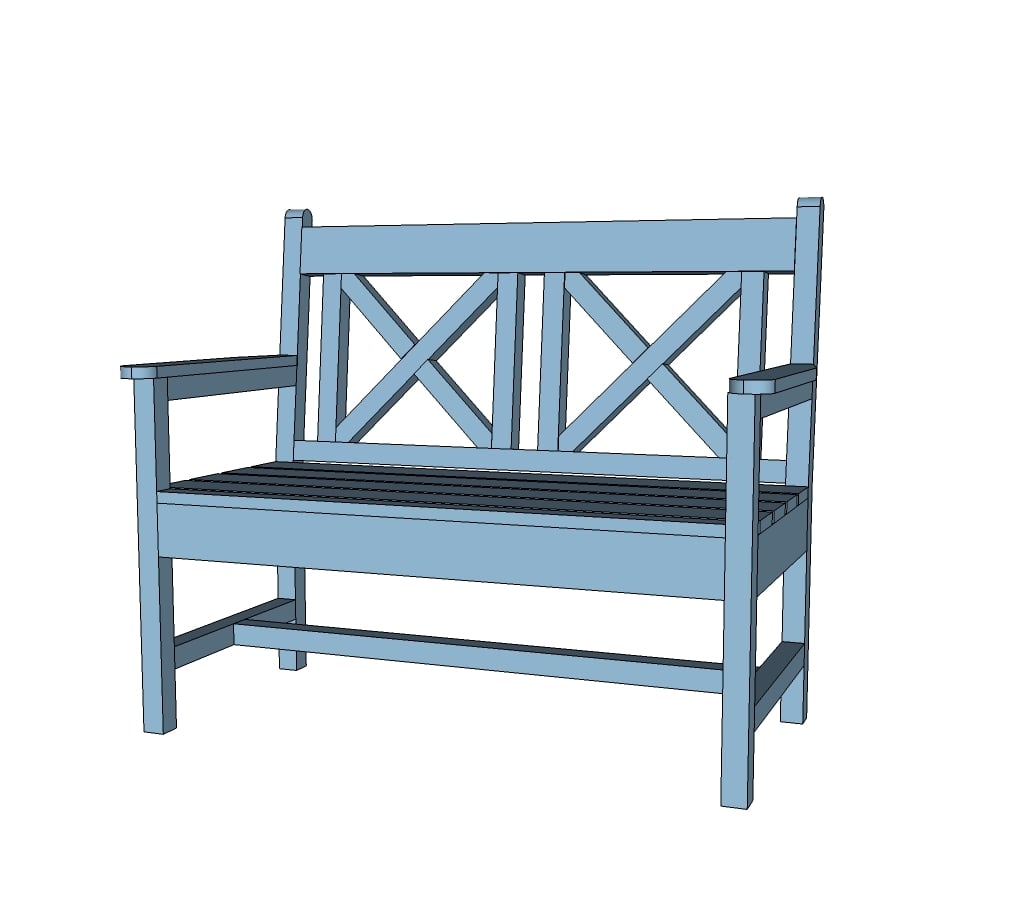


It's time to build outdoor furniture!!!
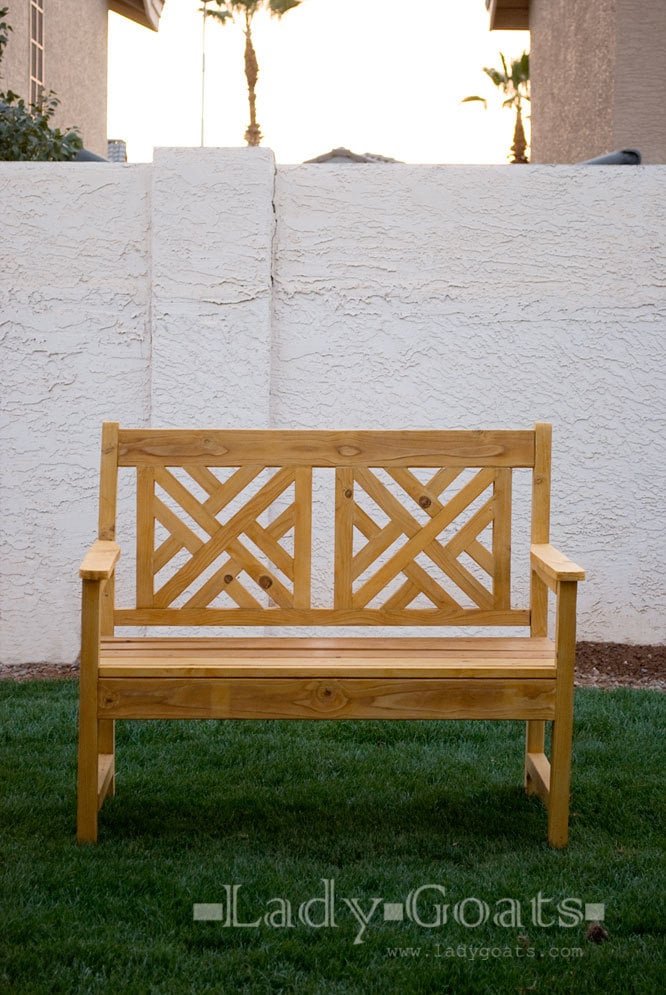
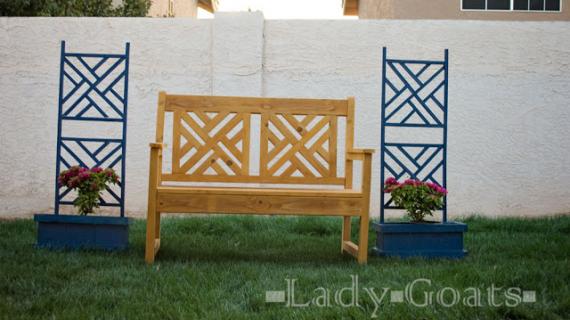
My friend and DIYer Extraordinaire Gina from Lady Goats has been wanting to build a bench with a basket weave pattern for a back. I was so honored that she asked for my help in coming up with a plan that we could share with you!
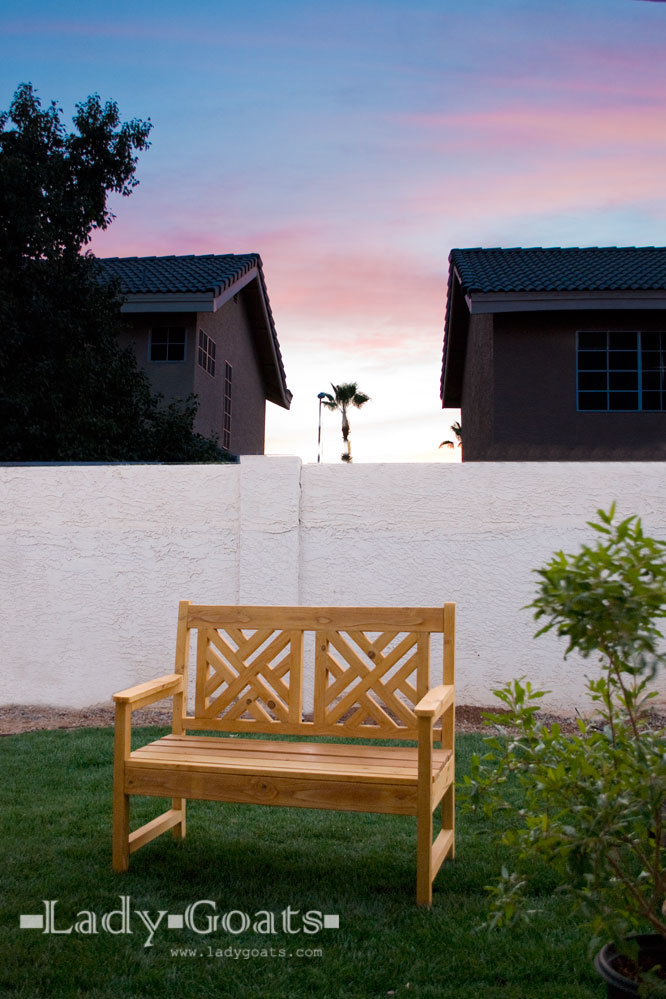
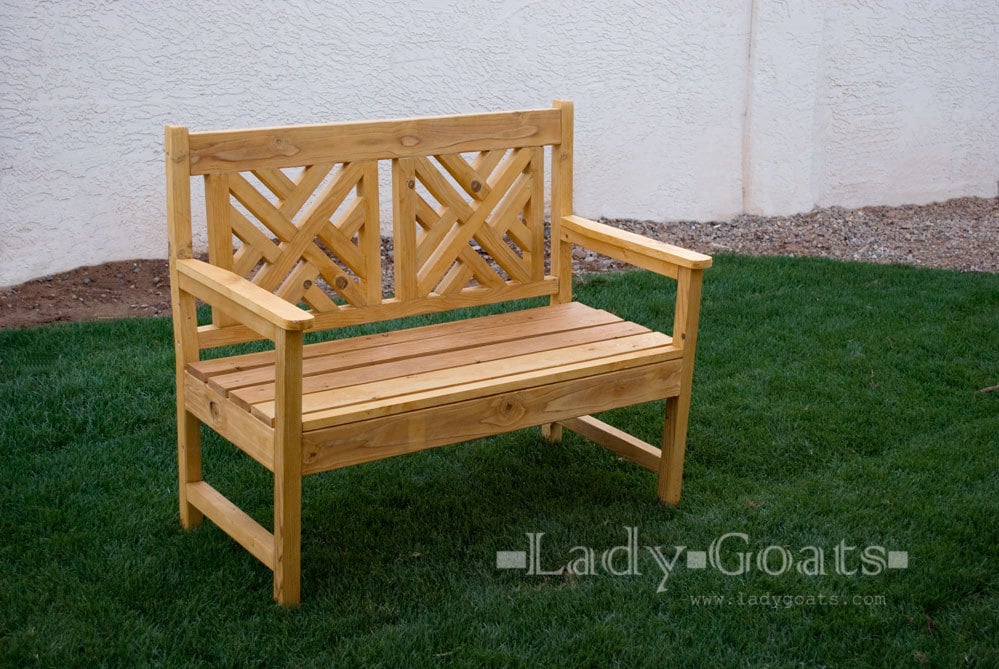
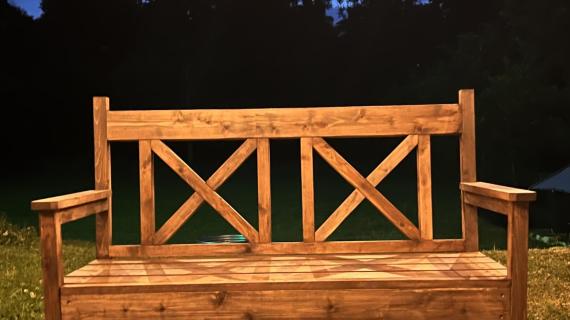
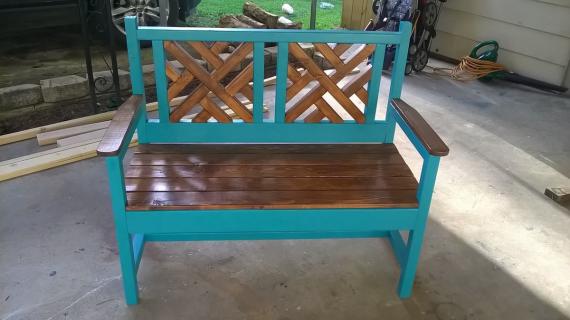
About $30 and a day later .... this is what built!

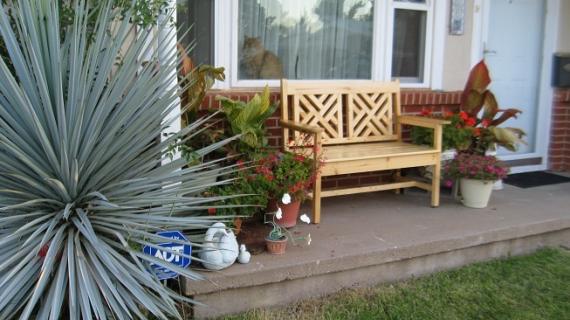
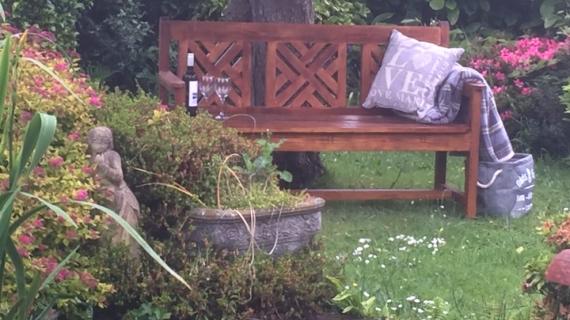
Isn't Gina's bench just beautiful?
I love the woven wood look on back

But if you prefer an X back, no worries - just skip the added Y pieces!
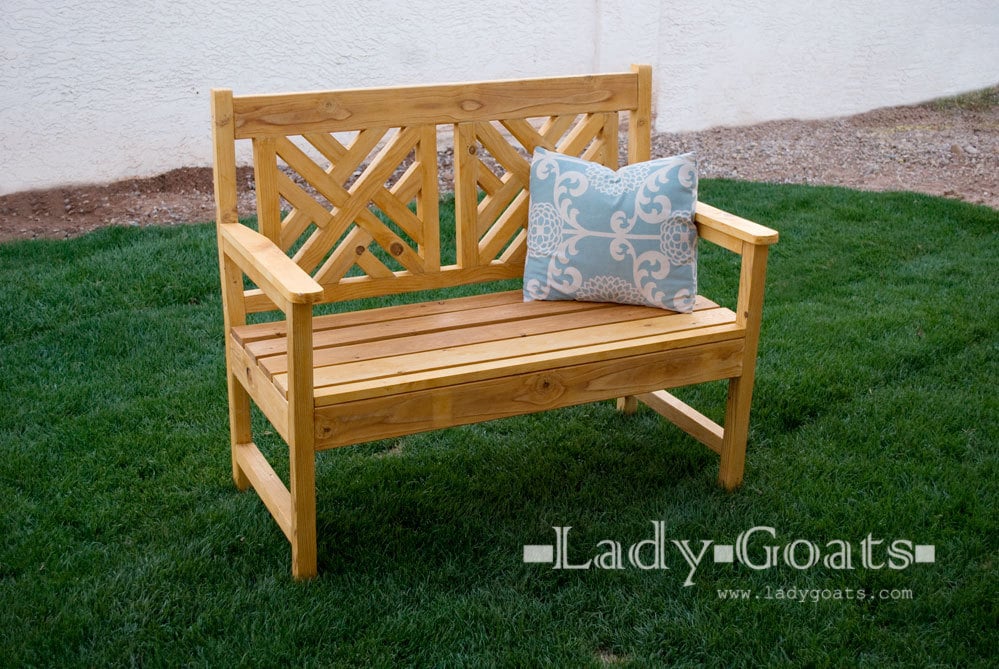
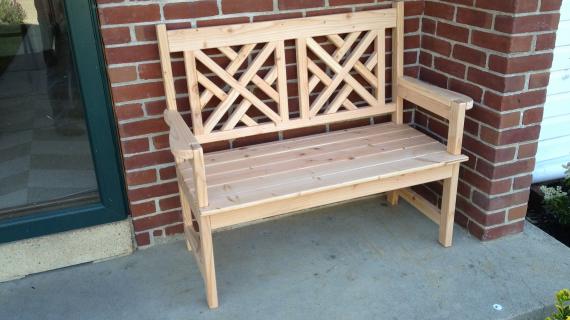
Of course we've got you covered with the free step by step plans. But please take a second to go visit Gina at Lady Goats for lots more pictures and information on how she built her bench.
Thank you Gina!
Preparation
3 - 2 x 4 studs
6 - 2 x 2 x 8
1 - 1 x 4 x 8 (furring strip)
1 - 1 x 2 x 8 (furring strip)
1 - 1 x 3 x 8 (furring strip)
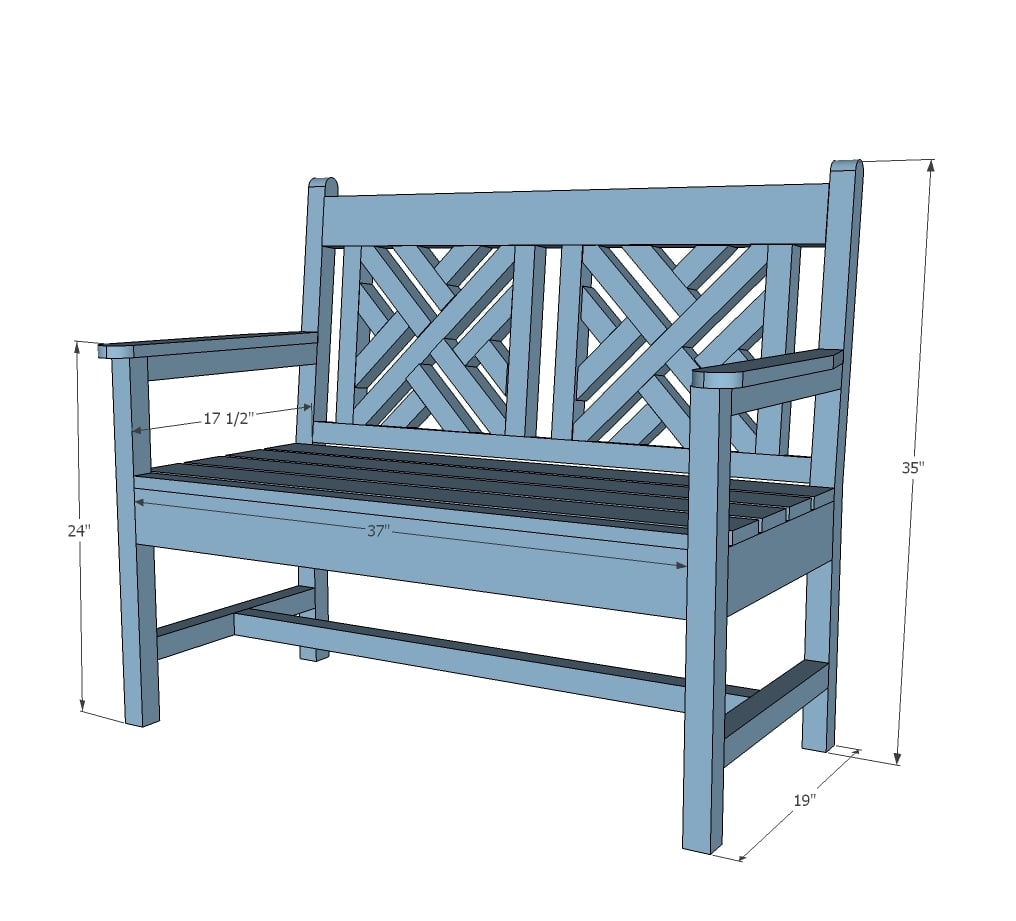
2 - 2x4 @ 35" (backs - cut backs from these)
2 - 2x2 @ 23 1/4"
2 - 2x2 @ 16"
2 - 2x4 @ 16"
2 - 2x2 @ 16 3/4" (longest point measurement, one end cut at 6 degrees off square)
3 - 2x4 @ 37"
2 - 2x2 @ 37"
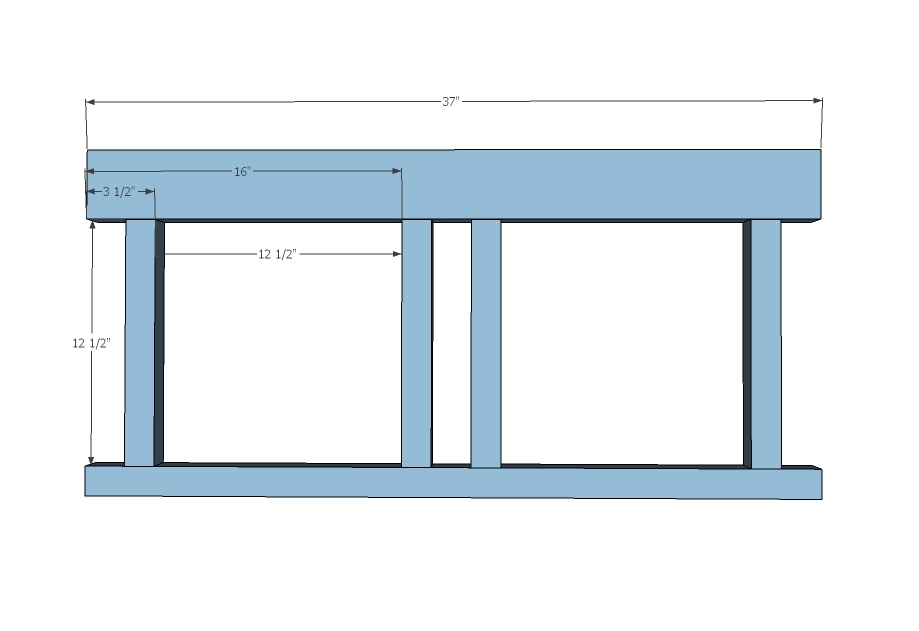
4 - 2x2 @ 12 1/2"
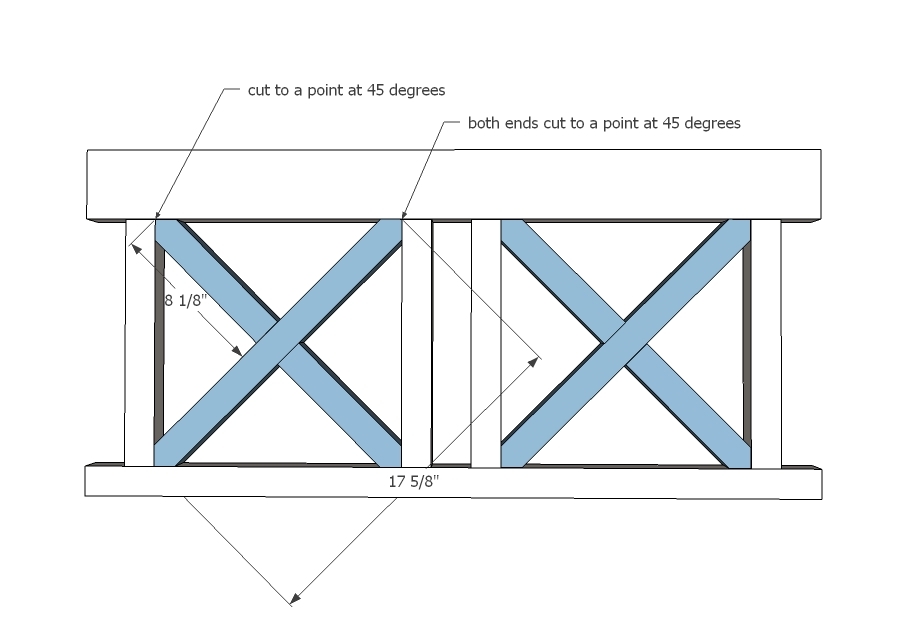
2 - 2x2 @ 17 5/8" (ends cut to 45 degree points, longest point measurement)
4 - 2x2 @ 8 1/8" (one end cut to 45 degree point, longest point measurement)
8 - 2x2 @ 6 1/4" (longest point measurement, one end cut at 45 degrees off square)
8 - 2x2 @ 3 5/8" (longest point measurement, one end cut at 45 degrees off square)
4 - 1x4 @ 40"
1 - 1x2 @ 37"


Please read through the entire plan and all comments before beginning this project. It is also advisable to review the Getting Started Section. Take all necessary precautions to build safely and smartly. Work on a clean level surface, free of imperfections or debris. Always use straight boards. Check for square after each step. Always predrill holes before attaching with screws. Use glue with finish nails for a stronger hold. Wipe excess glue off bare wood for stained projects, as dried glue will not take stain. Be safe, have fun, and ask for help if you need it. Good luck!
Instructions
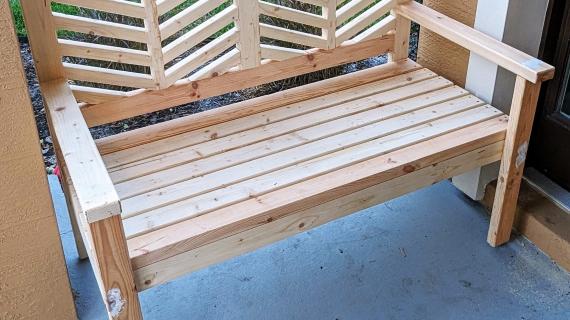
Step 1
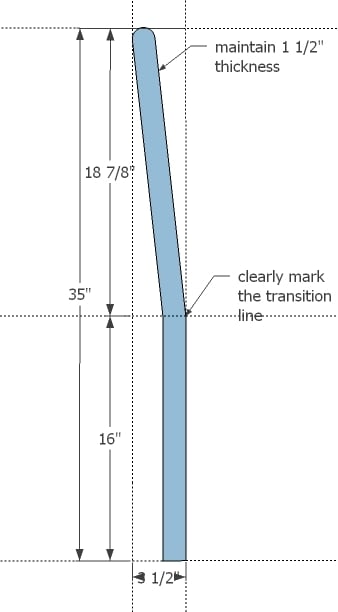
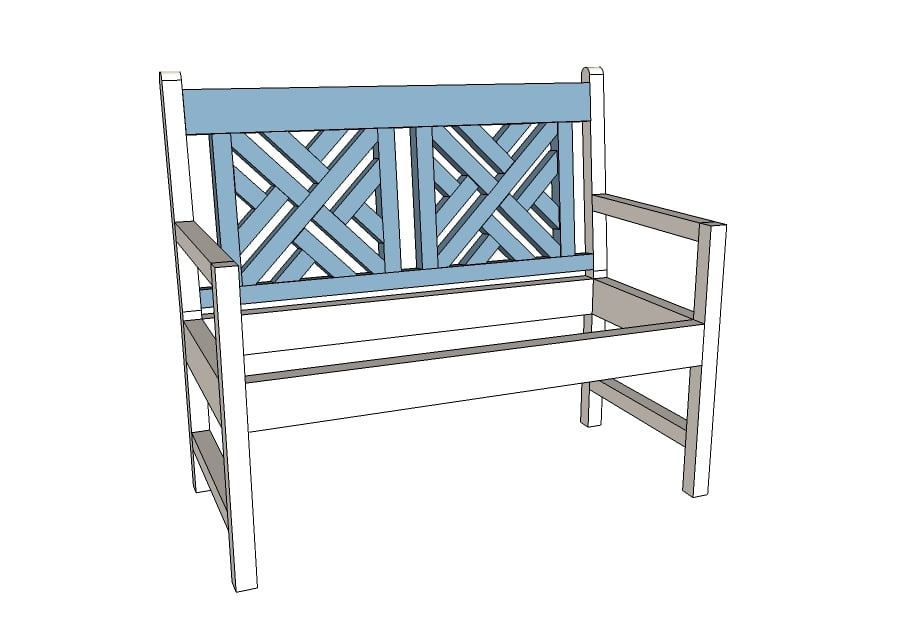
Start by cutting the back legs out. I recommed cutting the long straight cuts with a circular saw, and then finishing the cuts with a handsaw or jigsaw, but you could make the entire cuts with a jigsaw as well. Just make sure you have the right blade, it's sharp, and you go slow and sand the cut edge well.
You'll need to cut two. Make sure you mark the boards as shown in diagram before cutting.
Step 2
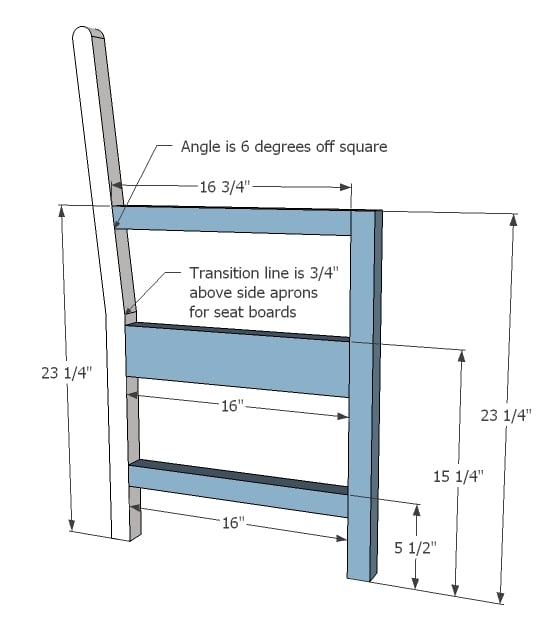
Next, add to the back legs the front legs, seat support, arm rest support and bottom stretcher. Make two and make sure they match. Easiest way is 1 1/2" pocket holes and 2 1/2" pocket hole screws and glue but countersunk screws could work too. If using pocket holes, try hiding on underside whenever possible to prevent water pooling in your pocket holes.
Step 3
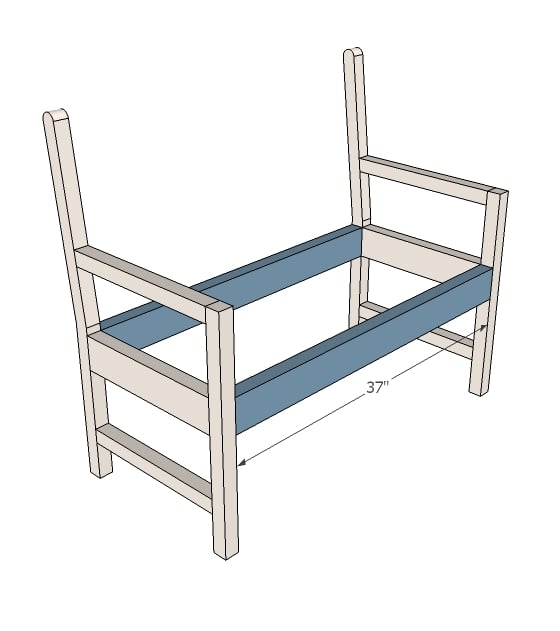
Once you have the two legs done, join together with 2x4s. With the bench frame complete, let's set aside and work on the back.
Step 4
I'd lay all the boards out first just to make sure everything fits. And then start assembling. For a painted finish, pocket holes on the back sides will work great.
TIP: Hide pocket holes on insides of the 2x2s - will get covered up in next step.
Step 5
Step 6
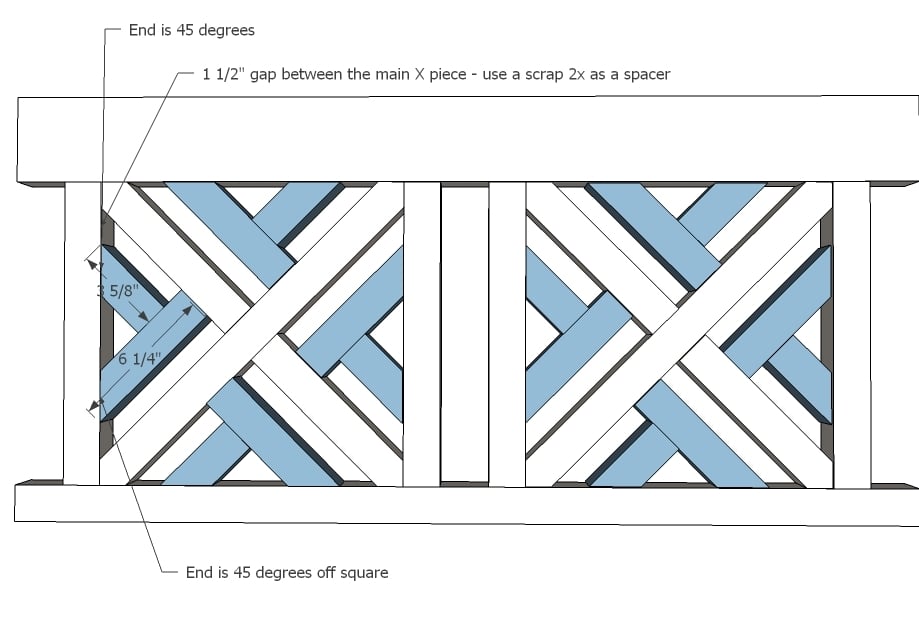
And then make up 8 of these little Y guys and attach in place. These are more decorative than anything, so a good outdoor glue could even be used to secure.
Step 7
And then attach to back.
If you used pocket holes, I highly recommend filling any exposed holes with plugs.
Step 8

Attach bottom stretcher to base.
Step 9
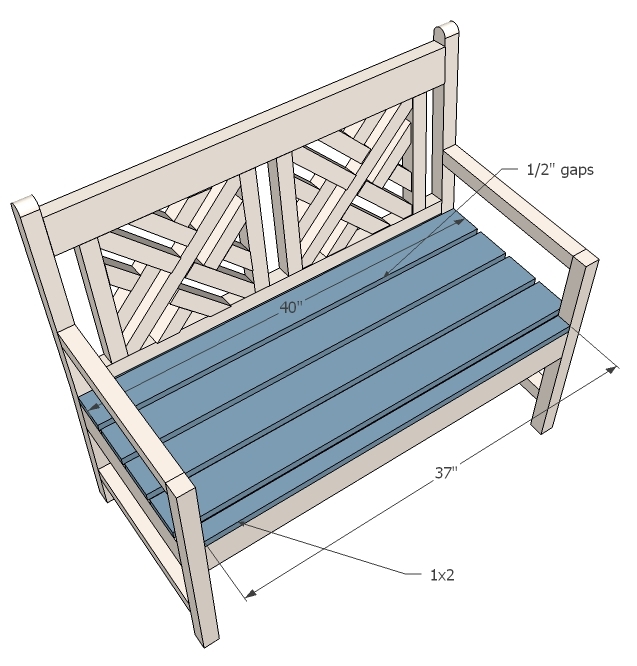
And finally, add the seat slats on top.
These can be attached from underside with 2" screws and glue to hide screw holes.
Step 10

Don't forget the arm rests! You can attach these from the underside with 2" screws and glue to hide any holes.
It is always recommended to apply a test coat on a hidden area or scrap piece to ensure color evenness and adhesion. Use primer or wood conditioner as needed.


Comments
ConnPhoto
Thu, 04/04/2013 - 13:24
PDF link
This looks like the perfect project for Mother's Day! I can't wait to get started. Thanks!
However, the PDF link doesn't seem to be working.
In reply to PDF link by ConnPhoto
jimssolidwoodp…
Mon, 04/08/2013 - 15:27
Mothers day gift excellent thought thanks
My mom gone to be with the lord, but my wife, daughter, daughter inlaw and a special 79 year old lady l like to help out, they all would lover this.
In reply to Mothers day gift excellent thought thanks by jimssolidwoodp…
Lady Goats
Wed, 04/10/2013 - 08:49
I was thinking the same thing!
This would make an amazing Mother's Day gift. I was trying to think of some moms to build this for :-) Brilliant.
dmcarwin
Thu, 04/04/2013 - 15:34
Um, I love this!
I have a serious obsession with benches and I totally want to build this one! Not sure when I can get to it, but I am pinning for sure! Thanks ladies! I love the beautiful back! And you make cutting the back legs look so doable!
tracysmith
Thu, 04/04/2013 - 20:48
Omg I love this!
Holy crap!!! I love this!!! This is amazing and I'm gonna build this for sure!!! I was looking for something to put in the courtyard I'm going to be building near my new customer entrance and this is it baby!!! Good job on this it's gorgeous!!!
spiceylg
Fri, 04/05/2013 - 04:50
Wow Gina!
Awesome bench you, two! Fabulous build Gina. Love it!
hopekeeper
Fri, 04/05/2013 - 20:18
pdf link not working
Love this bench. It's beautiful. Would love to make a couple of them for my yard, but I can't get the pattern to download for pdf. :(
Daisies and Crazies
Wed, 04/10/2013 - 21:37
Gorgeous
This is beautiful, Ana and Gina!
dinifam
Wed, 04/17/2013 - 08:18
The woven pieces
I am trying to build this and am stuck with how to attach the cross pieces and the y pieces to the frame Pocket holes split the wood at the angles...I am thinking nails and glue but not sure if it will hold up. Am I just doing something wrong with the kreg jig? It looks gorgeous all dry fitted I just can't figure out how to attach it all...ideas??
In reply to The woven pieces by dinifam
Lady Goats
Wed, 04/17/2013 - 12:50
Woven pieces
Hi dinifam! Since these boards aren't structural, I'll teach you my cheat for when my 2x2s keep splitting. Set your jig for 3/4" stock instead of 11/2", and use 1 1/4" screws. This'll hold the boards very firmly in place while the glue dries, and provide some support. I don't use this method for structural boards, but use it frequently for decorative boards that split. Hope this helps!
dinifam
Sat, 04/20/2013 - 20:54
Splitting boards
Thanks Gina:)
I tried it on the second half of the back and it worked:) the other half I used nails and glue. I am just finishing it up now and it looks fantastic! Thanks for sharing ur cheat!
mikejillnelson
Tue, 08/13/2013 - 11:21
Help with point cuts!
I am cutting the back now. I can't seem to get my 45 degree point cuts perfect which is throwing off the fit. Can someone help me with tips to measure, mark and cut the ends so the 45 degree cuts are perfectly center? i am using a miter saw but must be making my measurements wrong... The difference is minor but keeps all the pieces from fitting without a lot of filling or caulking. This will hopefully be a gift so i don't want to do that! Thank you
In reply to Help with point cuts! by mikejillnelson
herzo1852
Tue, 08/13/2013 - 13:50
Are you using an electric mitre saw?
I tried this with a hand version and was horrible, but my compound mitre saw does it perfectly - it was a great investment since I have used it numerous times now, but if you're already using one, then I'm not sure!
In reply to Help with point cuts! by mikejillnelson
Lady Goats
Tue, 08/13/2013 - 14:12
Mitered cuts
Hi mikejillnelson, I responded to your comment on my blog post. Can you check there and see if that's any help?
AtHomeDad
Tue, 10/01/2013 - 14:08
It's almost done.
I'd been looking for a bench to fit a spot between some new citrus trees. This fit the bill so I've taken it on as my challenge for the week. Almost done with the final build but not sure how to secure the seat slats. 2" screws won't do much through the 2x4s. Am I missing something? Any help is appreciated. Will post pics when done.
jkendig
Mon, 05/12/2014 - 22:44
Shopping List is incorrect?
Any one find that the shopping list incorrectly lists the need for 1 1x4x8 furring strip when in fact you need 2 of these in order to cut the 4 seat planks? Not a huge deal, but It now requires an extra trip to the store. :-( I also had an extra 2x2 but that's good to have in case I screw up a cut or two. Measured everything tonight. Cutting tomorrow. And hopefully assembling it all on Wed, Thurs night. Fingers crossed.
In reply to Shopping List is incorrect? by jkendig
jbayer80
Mon, 09/29/2014 - 19:48
1 - 1x4x8 Missing from Shopping List
You are correct! Amazing how you are the only one to point that out. This site is amazing but I find that is a problem on a lot of these plans. I will say if all it costs me for the plans is a 2nd trip to HD, I'm good with that!!
Hope your bench turned out like you visioned!
shondaS
Mon, 07/06/2020 - 10:14
Yes! Thankfully I just…
Yes! Thankfully I just ripped a 2x4 in half to save me a trip. And the extra 2x2 was needed for me since I cut my double 45° angle wrong and made the piece too short. Also, there is mention of a 1x3x8 but I don't see use for it on the cut list.
ChrisPDavies
Wed, 06/18/2014 - 15:06
Furring boards & studs
Could someone please enlighten me with regard to the furring boards and studs mentioned in the parts list? What are they, what are they used for and when in the plan are they meant to be used?
Thanks in advance.
tryonce-ler
Thu, 05/07/2015 - 17:49
2X2X? the top piece
So when you are cutting the top piece that the back will be attached to (See pic above Step 1) the bottom piece is a 2X2X16" but the top one says that the length is 18 7/8" not sure what piece that one is. :( I have marked all of them and the only one that I can think of would be 2X2X16 3/4" is that the one? Just kinda lost on this. My husband will be helping me but kinda mad at him at the moment and don't want to ask him for help...you know that whole I'm am right you are wrong thing...trying to make a point thing...yeah sucks when you actually need their help :/ but thank goodness for you all here to answer this question. So yeah before I go hog wild on cutting the wood just want to make sure that I did mark all of my wood to be cut.
Thanks!
ihadmail
Sat, 05/09/2015 - 00:53
The two pieces that you are
The two pieces that you are asking about are actually one solid piece of wood. This is cut from a 2x4 to achieve the change of direction at the point 16" up from the bottom while still maintaining 2x2 dimensions.
If you look at the first image below the cut list, the dotted lines are the outline of a 35" long 2x4 and the solid lines are your cut lines. I hope this helps you out some.
invaderk2
Sun, 06/28/2015 - 17:47
Longer bench
Im going using these plans but I'm planning on making the bench roughly 52 inches long. Should I add another leg in the middle on both front and back 2x4s for additional support or should the original plan be sturdy enough?
In reply to Longer bench by invaderk2
Lady Goats
Sat, 07/04/2015 - 12:10
Extra leg
The extra leg probably isn't necessary, but you may want to add a support underneath the seat slats, in the middle, so they don't sag under any weight.
phantom1
Sun, 06/28/2015 - 17:51
1 1x4x8
Not sure if I'm missing something but the plan calls for 4 pieces of 1x4 at 40".... Do I need to rip one of the 2x4's? 1 1x4 isn't enough
In reply to 1 1x4x8 by phantom1
Lady Goats
Sat, 07/04/2015 - 12:12
1x4
You're right, one isn't enough. I don't know if it was me that put one (you know, those numbers sure are close together on the keyboard ;-) ), but there should be two 1x4s. Sorry about the error.
juliekayg
Sat, 04/30/2016 - 12:09
1x3x8?
Where does the 1x3x8 come in? Is that for the arm rests? I don't see it on the cut list.
WeigelWiggle
Thu, 12/14/2017 - 05:56
3/4 Wood
Would I be a bad Idea to build this out of 3/4 wood?
keitho66
Tue, 11/24/2020 - 02:47
Rocker/Glider
I made one of these for my Mom and added rockers to the bottom of it. Is there any way I can turn one into a glider?
Cainee
Sun, 02/20/2022 - 10:03
1x3's in Bench with Woven Back.
Hey Ana, great plans for the bench. I have everything cut except for the arms. No mention of the 1x3's in the shopping list. I am guessing that is what is used of the arms? Thanks,
gene