
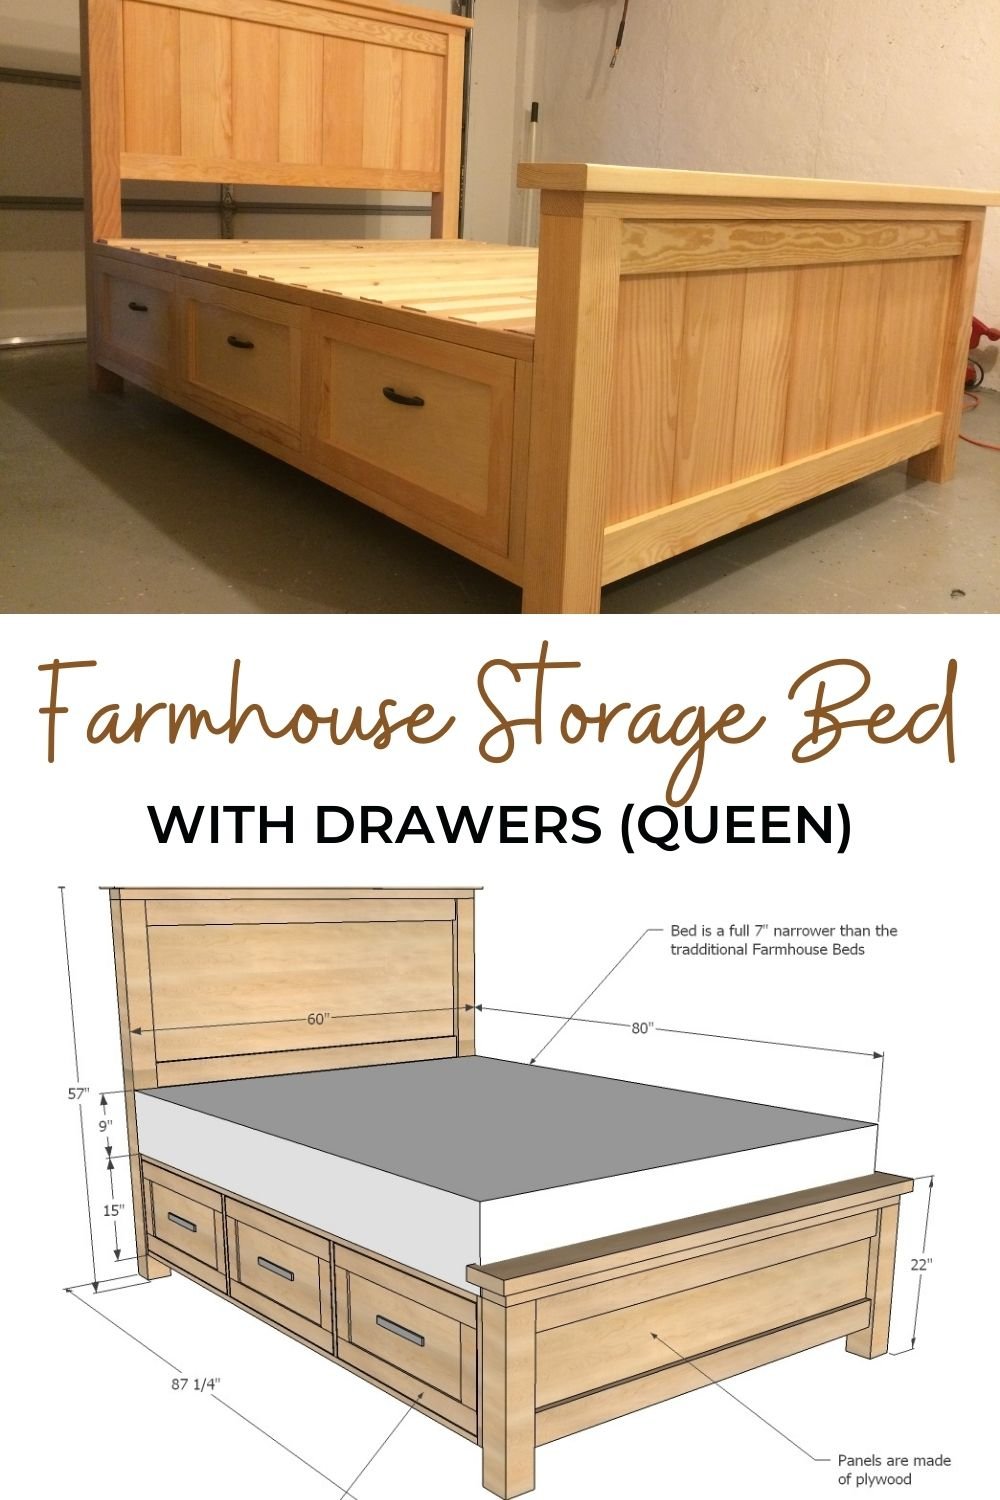
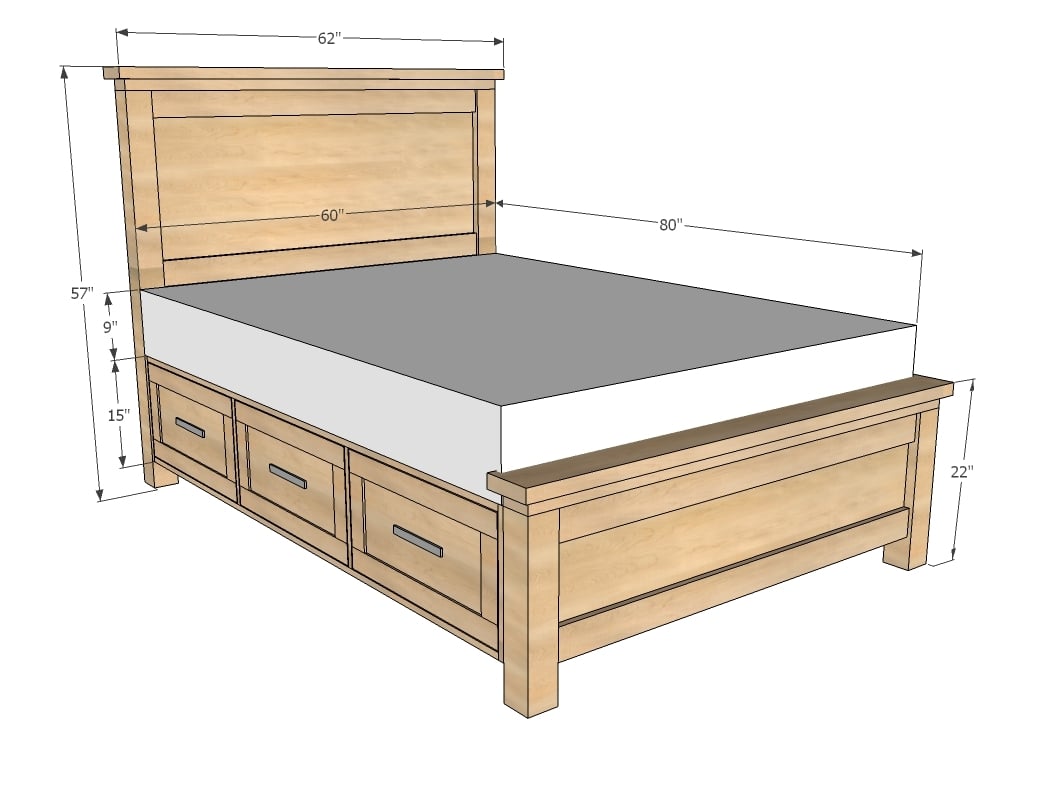
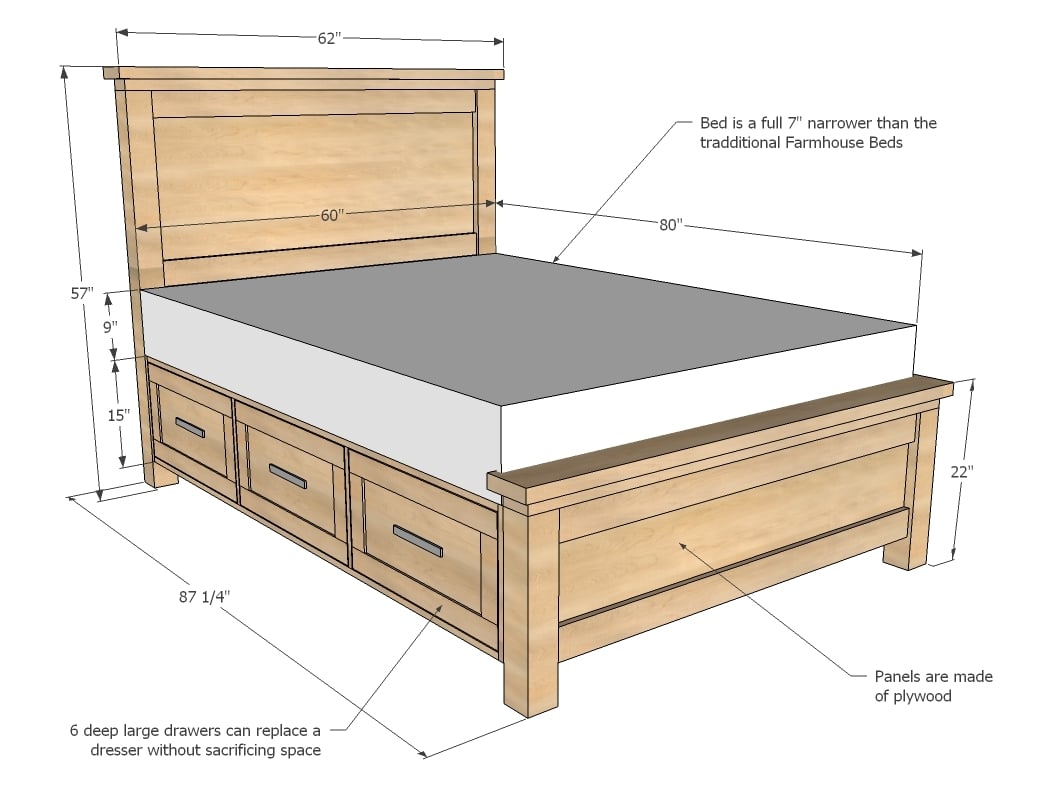
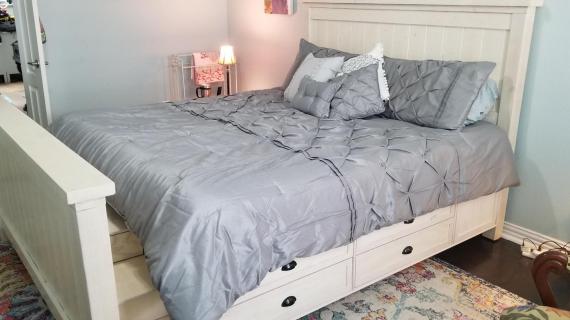
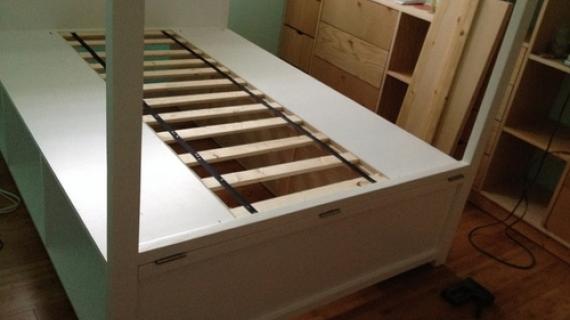
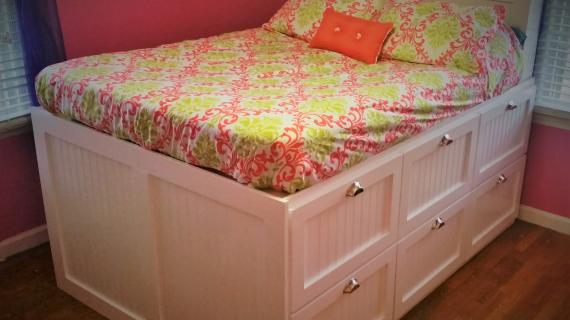
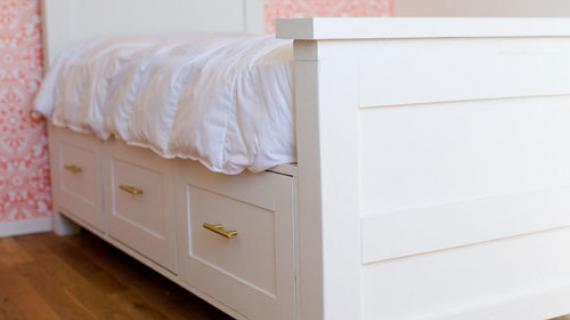
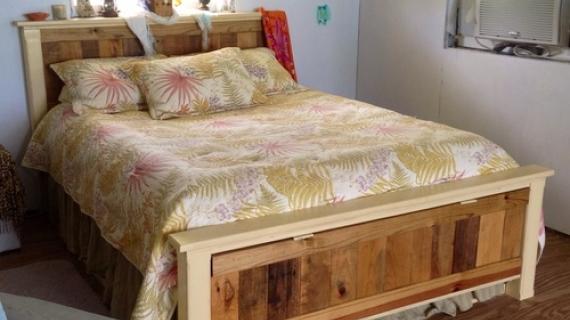
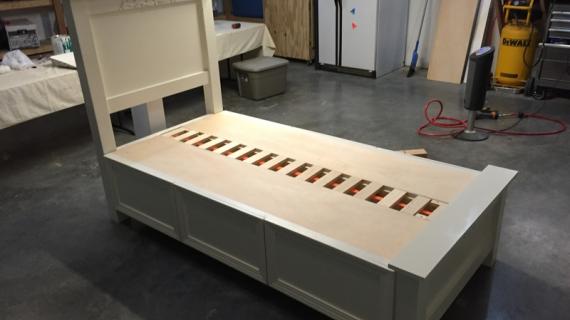
Farmhouse Bed plans for a small space! This bed packs lots of storage in a more compact profile. Detailed step by step plans to help you build your own DIY Farmhouse Bed in queen size.
Also check out our Full and Twin Farmhouse Storage Bed plans.
Pin For Later!
Preparation
- 3 - Sheets 3/4" Plywood or other sheet goods
- 1 1/2 - Sheets 1/4" Plywood or other sheet goods
- 2 - 4x4 post, 7 feet long
- 2 - 1x4 @ 10 feet long
- 3 - 2x4 @ 10 feet long (cut longest first!)
- 5 - 1x10 @ 8 feet long (OR 1 sheet of 3/4" plywood cut into 5 strips 9 1/4" wide)
- 6 - Euro Style Drawer Slides (the cheapo white ones) 14" long, medium to heavy duty rating
- 2 - 2x6 @ 6 feet long
- 3 - 2x2 @ 8 feet long
- 9 - 1x3 @ 8 feet long
- 5 - 1/4" hobby stock, 2 1/2" wide @ 8 feet long (OR 1/4" plywood cut into strips 2 1/2" wide)
- 4" Screws (if you are not using a pocket hole jig and will be attaching 4x4 legs to panels with screws)
- 6 Knobs or handles
NOTE: Drawers are optional - can be added later or just used as storage shelves. The shopping list DOES include materials for the drawers, so if not building drawers, please adjust shopping list accordingly
HEADBOARD
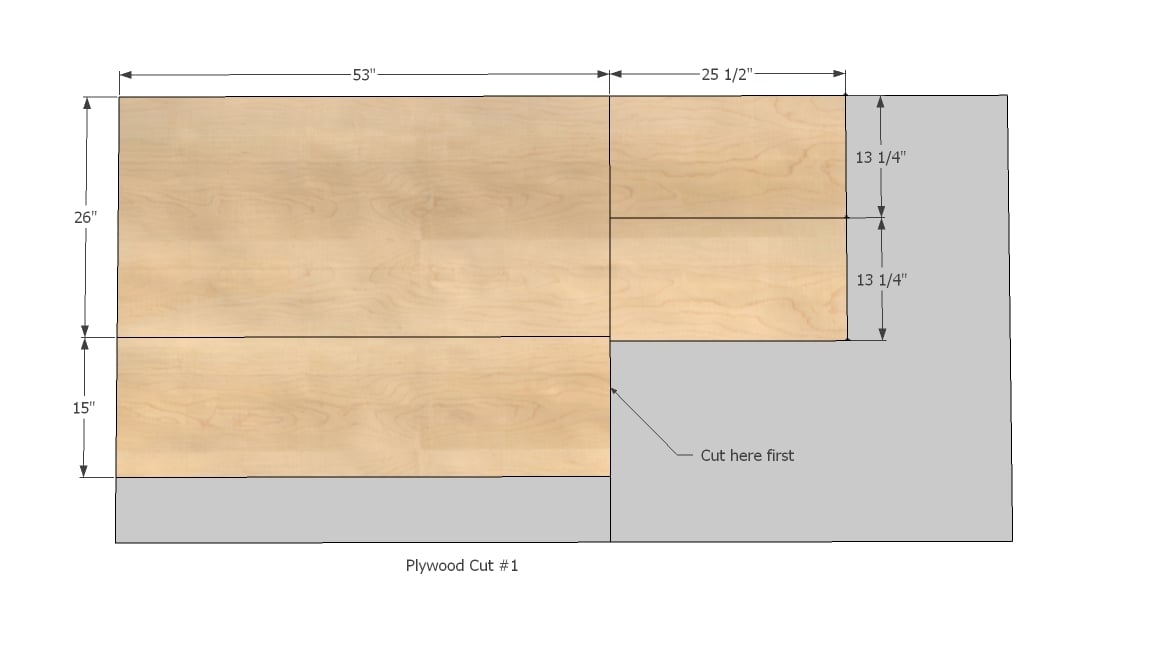
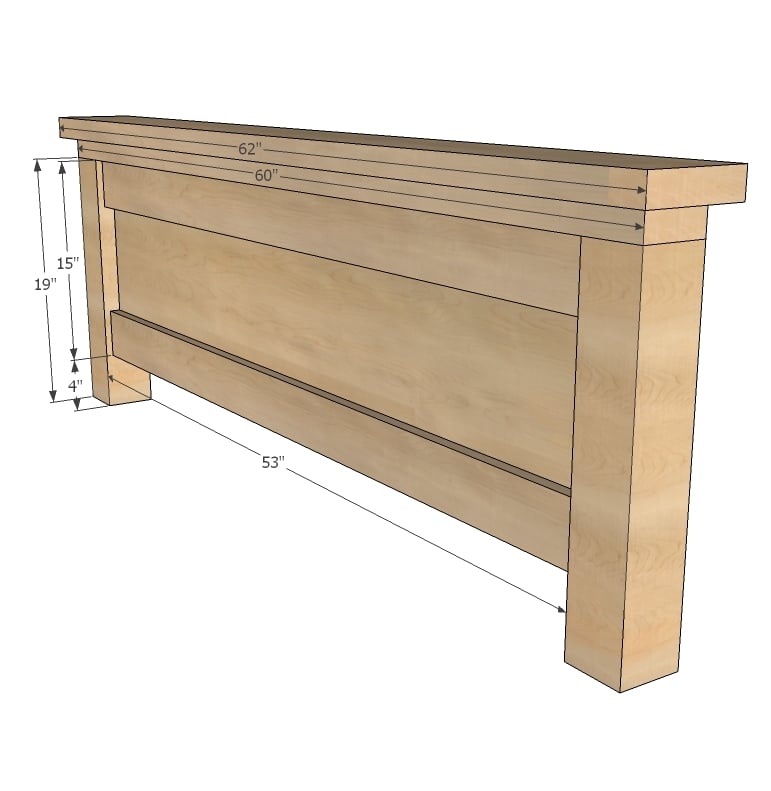
- 1 - 3/4" Plywood @ 26" x 53" (Can substitute planked wood for panel to create a more authentic "farmhouse" look)
- 2 - 1x4 @ 53"
- 2 - 4x4 @ 54"
- 2 - 2x4 @ 53"
- 1 - 2x4 @ 60"
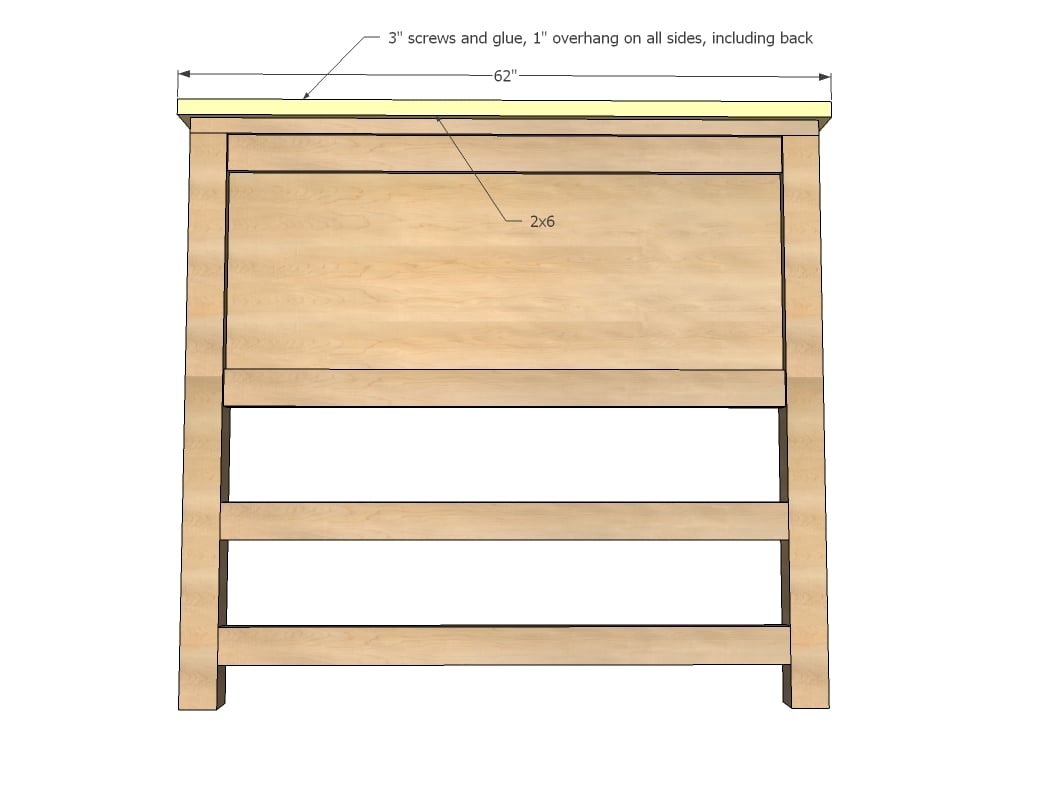
- 1 - 2x6 @ 62"
FOOTBOARD
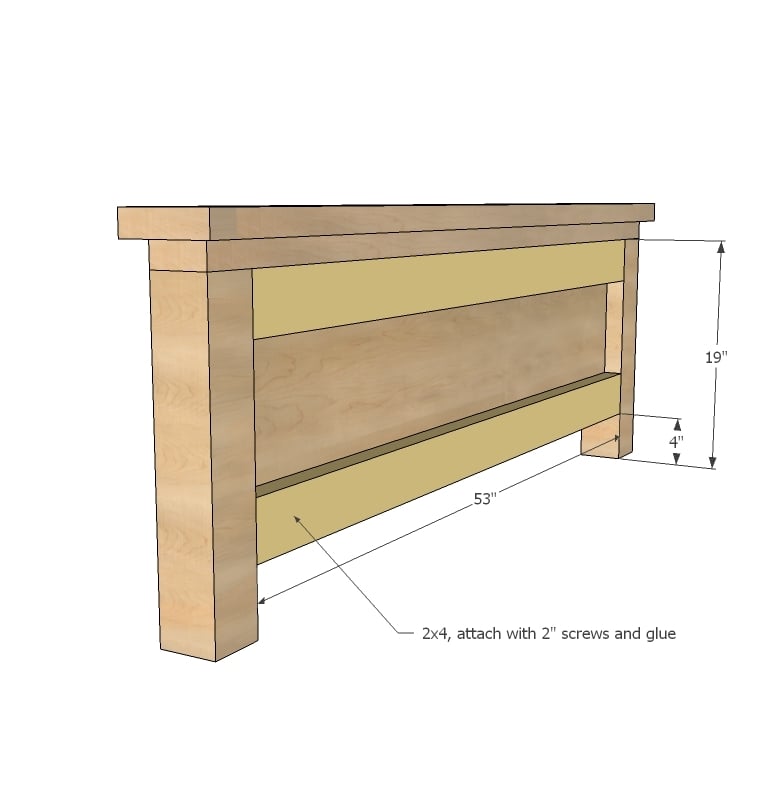
- 1 - 3/4" Plywood @ 15" x 53" (Can substitute planked wood for panel to create a more authentic "farmhouse" look)
- 2 - 1x4 @ 53"
- 2 - 4x4 @ 19"
- 2 - 2x4 @ 53"
- 1 - 2x4 @ 60"
- 1 - 2x6 @ 62"
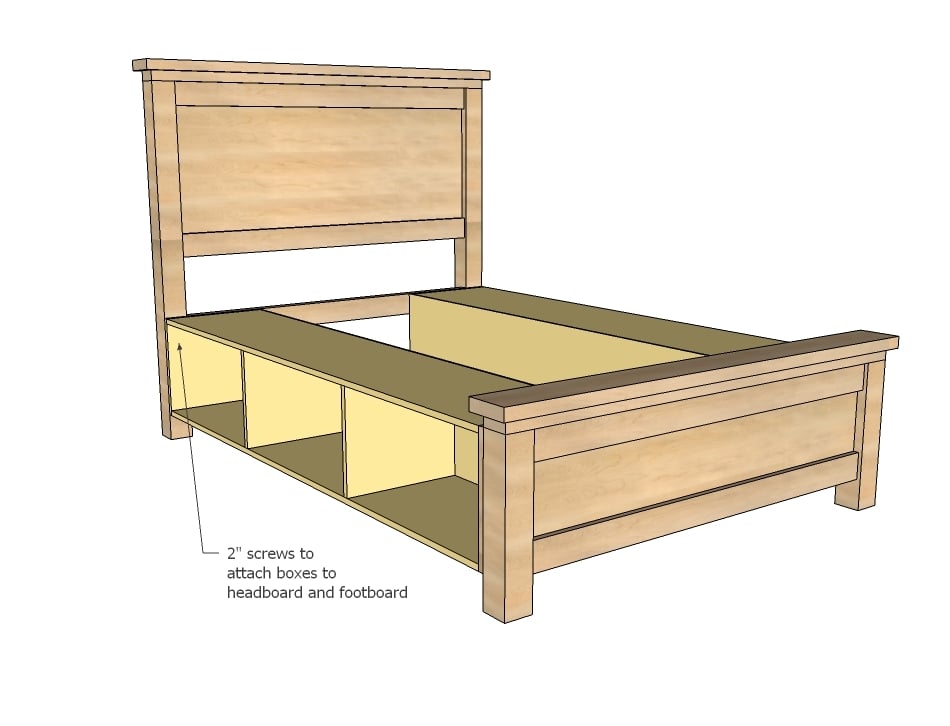
STORAGE BOXES
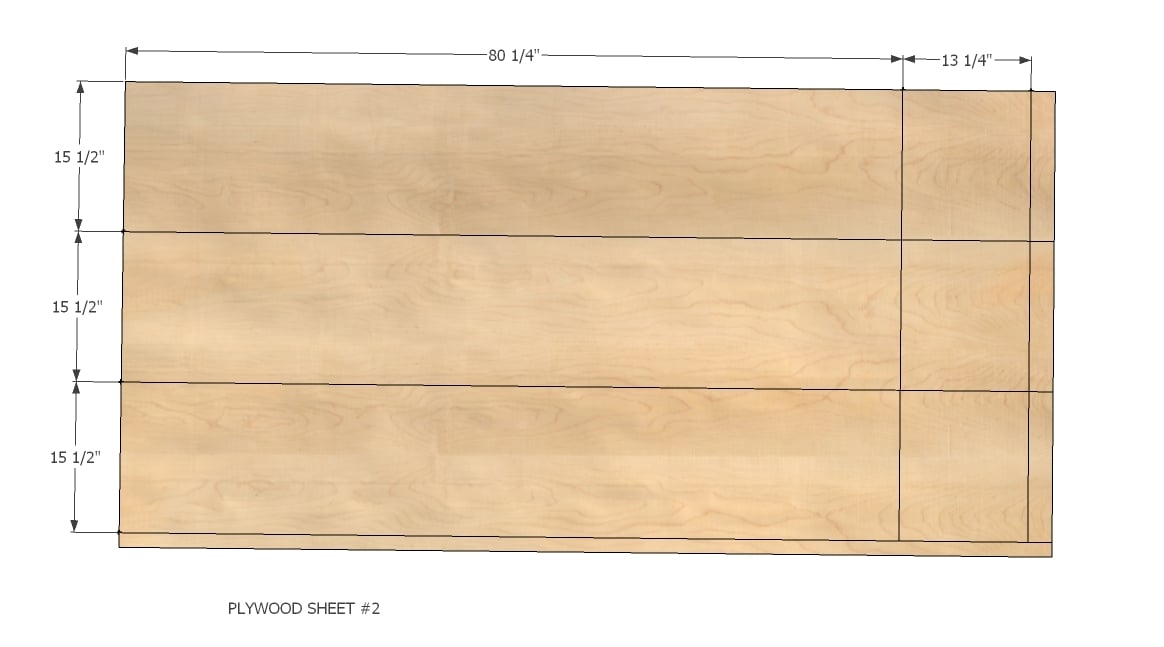
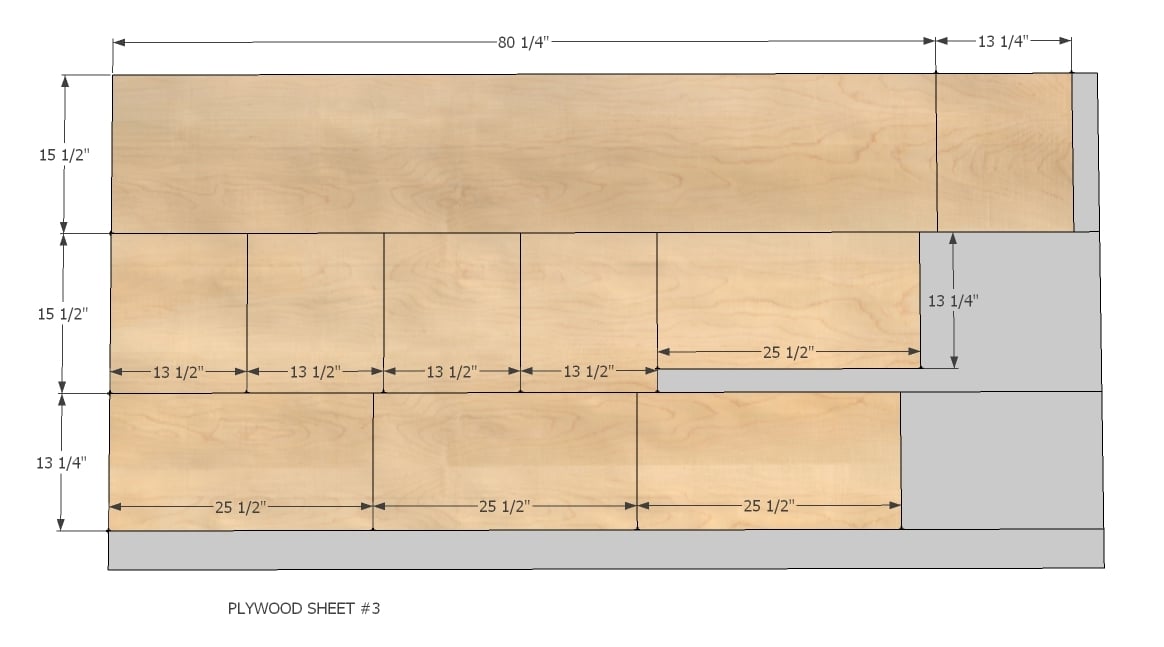
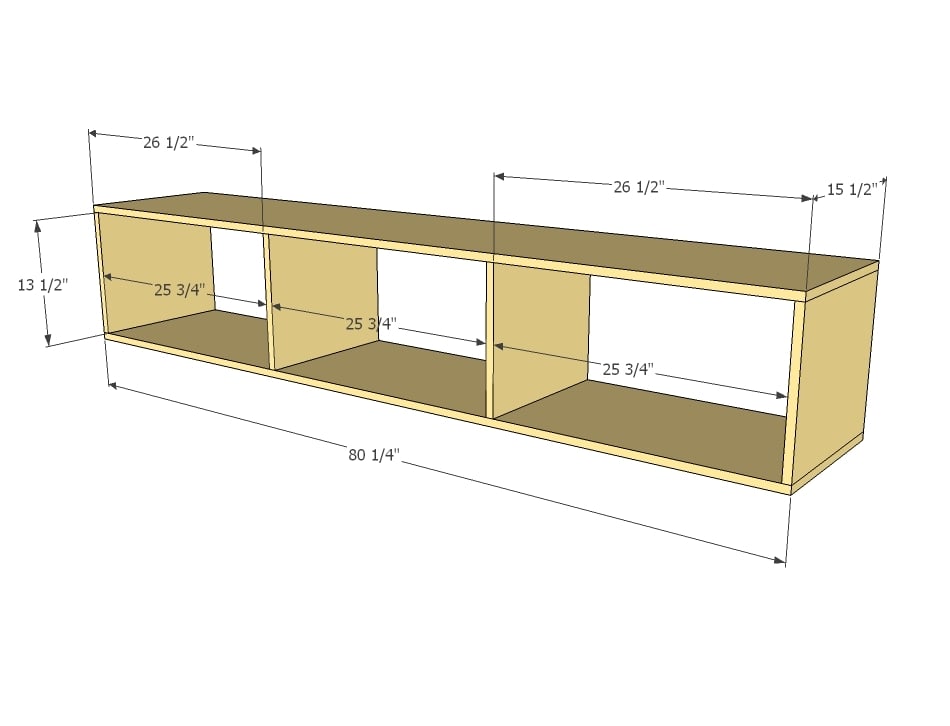
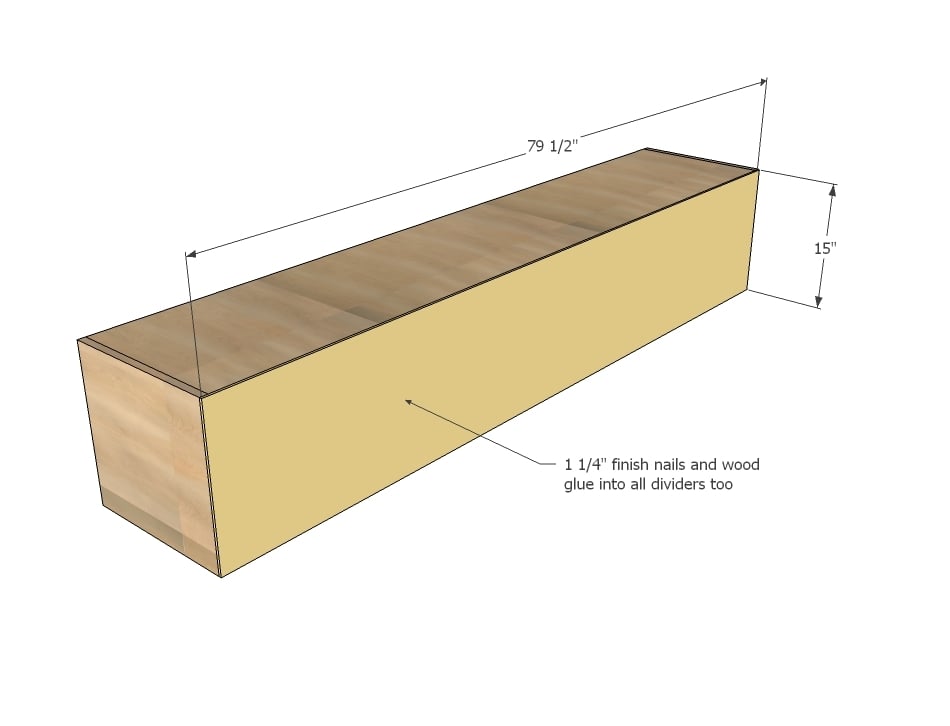
- 4 - 3/4" Plywood @ 15 1/2" x 80 1/4"
- 8 - 3/4" Plywood @ 15 1/2" x 13 1/2"
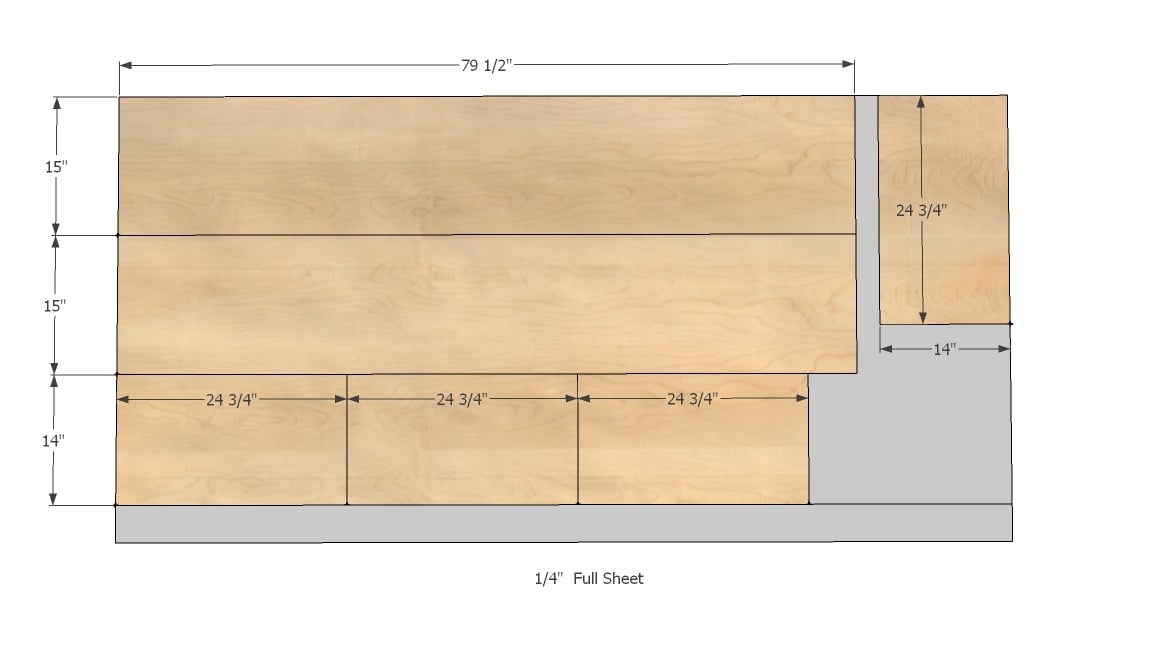
- 2 - 1/4" Plywood @ 80-1/4" x 15"
SUPPORT & CENTER
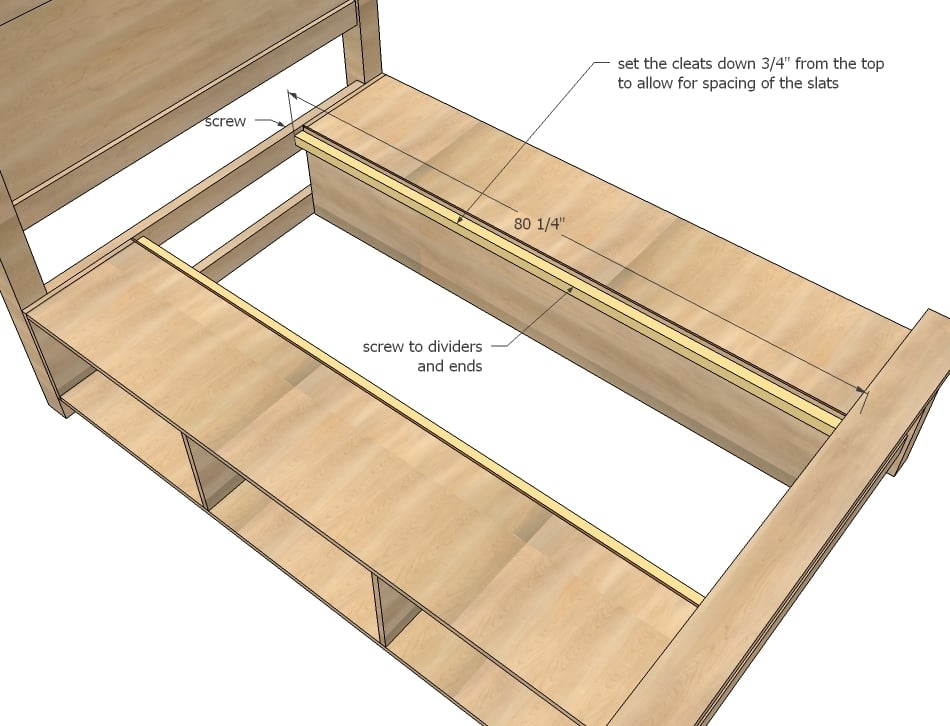
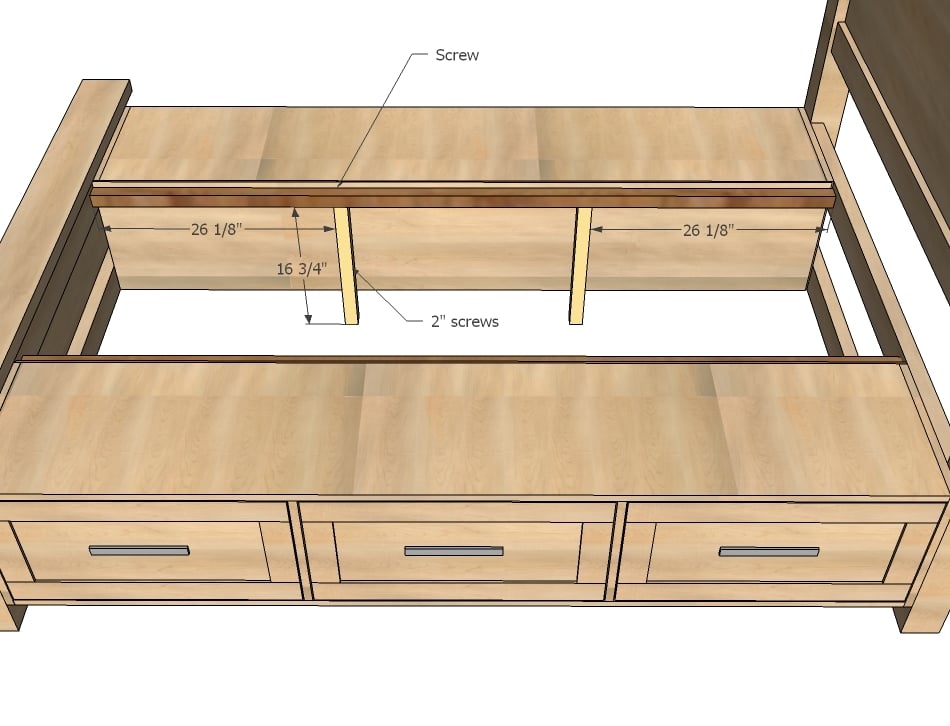
- 2 - 2x2 @ 80 1/4"
- 4 - 2x2 @ 16 3/4"
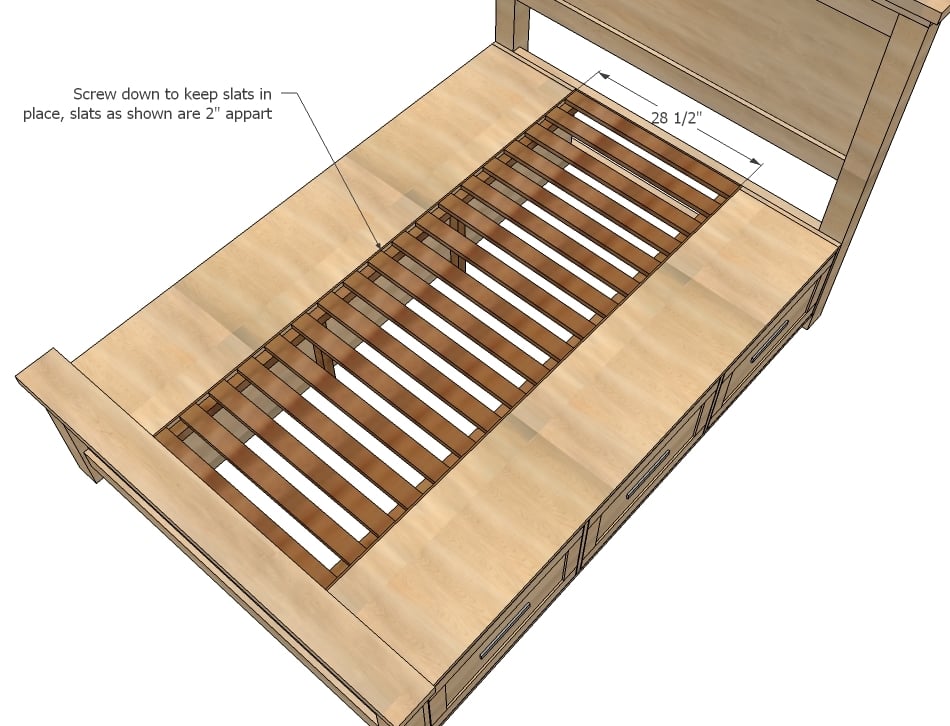
- 18 - 1x3 @ 28 1/2" (Slats to mattress specs)
OPTIONAL DRAWER BOXES
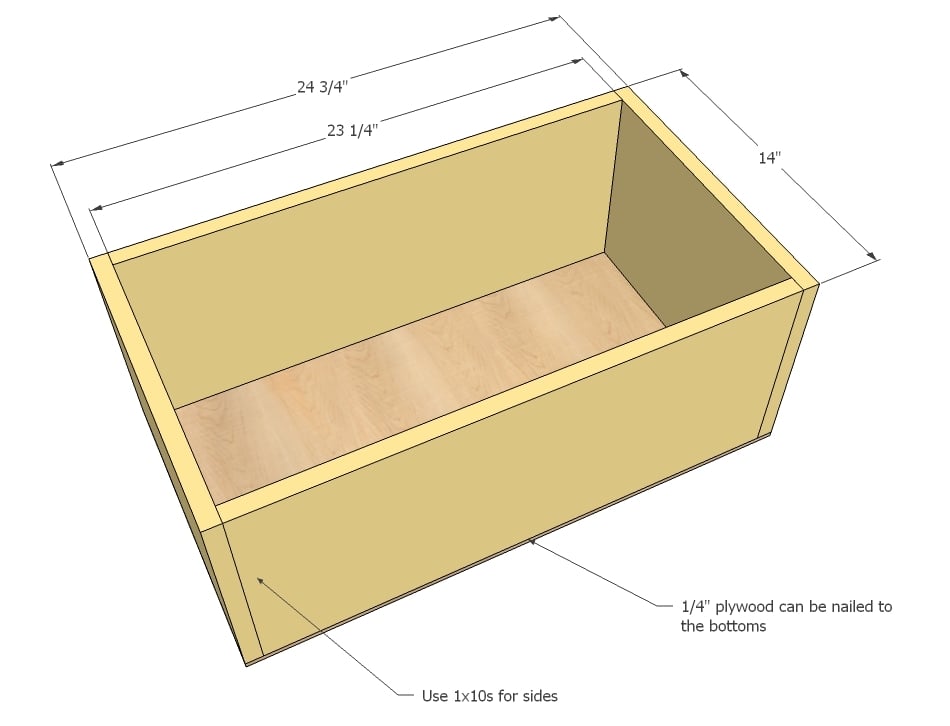
- 12 - 1x10* @ 23 1/4"
- 12 - 1x10* @ 14"
- 6 - 1/4" Plywood @ 24 3/4" x 14"
*Plywood cut into 9 1/4" strips can be substituted for 1x10s, use at least 1/2" thick plywood; for direct conversion to cut list use 3/4" thick plywood
OPTIONAL DRAWER FACES
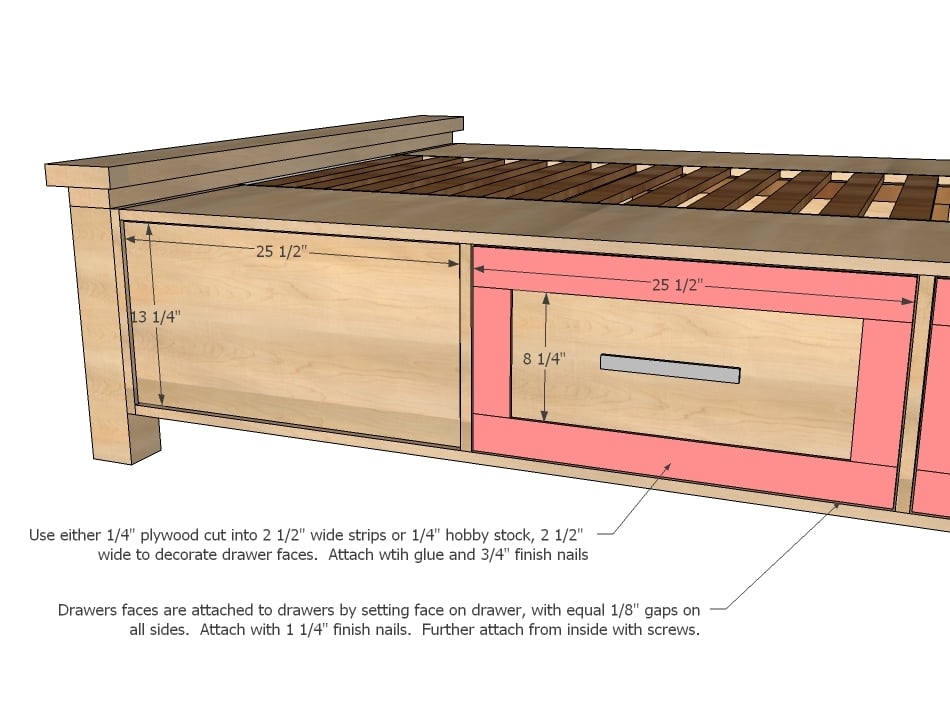
- 6 - 3/4" Plywood @ 25 1/2" x 13 1/4"
- 12 - 1/4" hobby stock, 2 1/2" wide @ 8 1/4"
- 12 - 1/4" hobby stock, 2 1/2" wide @ 25 1/2"
Please read through the entire plan and all comments before beginning this project. It is also advisable to review the Getting Started Section. Take all necessary precautions to build safely and smartly. Work on a clean level surface, free of imperfections or debris. Always use straight boards. Check for square after each step. Always predrill holes before attaching with screws. Use glue with finish nails for a stronger hold. Wipe excess glue off bare wood for stained projects, as dried glue will not take stain. Be safe, have fun, and ask for help if you need it. Good luck!
Instructions
Step 1
Step 2
Step 3
Step 4
Step 6
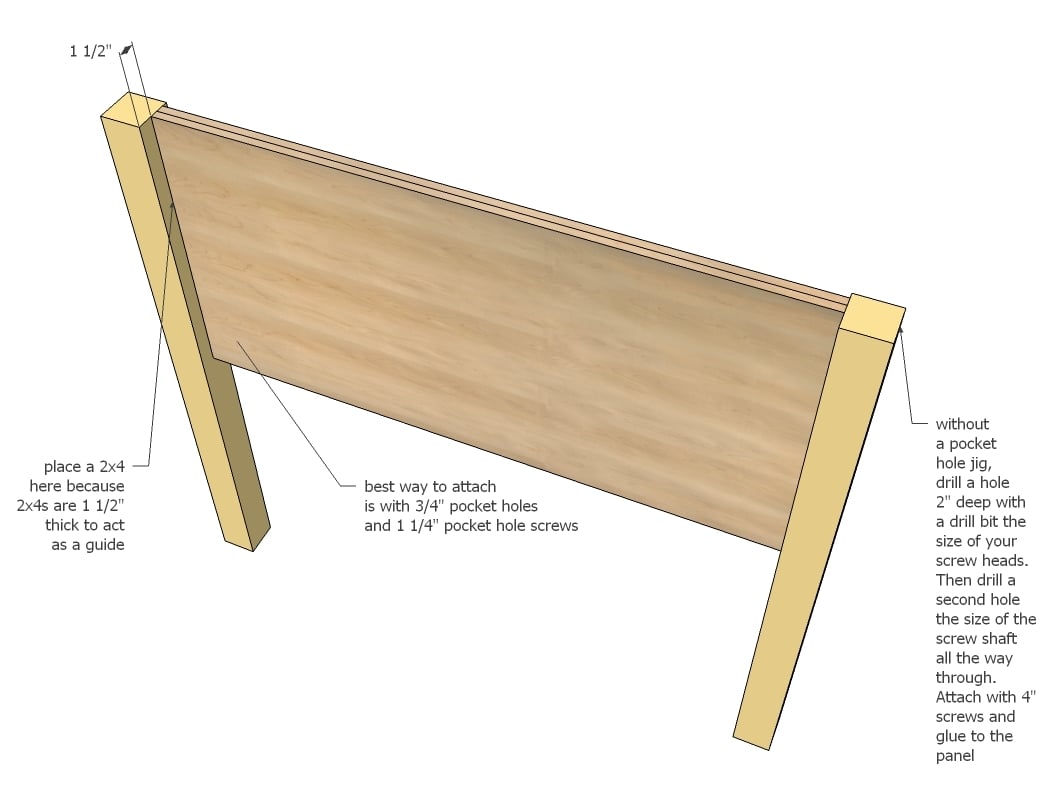
This is a relatively easy task if you have a Kreg Jig - simply drill 3/4" pocket holes along sides of panel and attach to legs. Make sure you are leaving 1 1/2" to the back of the panel as shown above (Very important with footboard).
Step 7
Step 10
Step 12
Step 13
Step 14
Step 16
Step 17
Step 18
Step 19
It is always recommended to apply a test coat on a hidden area or scrap piece to ensure color evenness and adhesion. Use primer or wood conditioner as needed.







Comments
jackielw (not verified)
Fri, 08/03/2012 - 19:05
How much did this cost (using
How much did this cost (using plywood) or using more expensive wood?
How long did this take everyone?
Im thinking of putting my bf on this task as a similar bed i want online is $1600 and takes 12 weeks ( made by amish)
jackielw (not verified)
Fri, 08/03/2012 - 19:07
How much did this cost
How much did this cost everyone to make?
How many hours did it take?
In reply to How much did this cost by jackielw (not verified)
birdsandsoap
Sat, 08/04/2012 - 23:08
Way cheaper than an amish bed!
I made a similar bed (without the drawers) for under $250. I used plywood for the storage boxes too. It would cost a little extra to construct the drawers and buy the gliders.
You could do this in a weekend or two.
http://ana-white.com/2011/07/farmhouse-storage-bed-hinged-footboard
Kim Lavoie (not verified)
Fri, 08/17/2012 - 19:00
Twin version needed
I am updating my son's room and will be adding another son in there. Ana, can you please make a set of these plans for twin size? Pretty please! :)
Marie D. (not verified)
Sat, 09/01/2012 - 10:54
Plans for twin size
Awesome bed! Among others would love to have twin size instructions needed for 2 grandson with small bedrooms - thanks a million! Marie D.
Bobbi Jo (not verified)
Mon, 09/03/2012 - 08:47
Plans for double drawers
I am anxious to make this bed with a few alterations. I'll be making it king size. Here's what I'm thinking. First off, I want to double the drawers by making the cubbie spaces 24" high and running 2 drawer glides. I would also like to make the drawers 24" deep. I plan to use 3/4 plywood on the back of the cubbie as well just to add strength, I will also build the 2' x 4' support frame for under the boxes. Any suggestions on how this make work or potential pitfalls would be greatly appreciated.
zannej
Tue, 08/27/2013 - 03:33
Great Idea, Bobbi Jo!
I love the idea of having double drawers instead of single drawers underneath.
Lisa G. (not verified)
Wed, 09/12/2012 - 09:52
Full-size Plans
I would also like to put together a full-sized version of this bed. I'm moving into my own apartment in about a month and have been looking to build my own frame. This storage frame is just the kind of space saver I need!
I'm assuming that the dimensions for these plans are for your average 60x80 Queen mattresses, seeing as the dimensions for the base frame itself are 60x80. Average Full mattresses (in North America) are 54x75, yes? How involved do you think it would be to just do a little math and downgrade all of the dimensions in proportion to each other?
Thaylok (not verified)
Wed, 09/26/2012 - 09:37
Re: Full-size plan
Consider this:
If the extra length does not bother you, then the only real change is in the support boards which connect the two drawer sections. You can narrow those as you see fit.
Additionally, I do believe the Full Size plans are also in this site compliments of the great Ana-white.com creator/maintainer.
Is it too involved? I don't believe so, but then I'm one to modify things continually. I am using these base dimensions and modifying "horrifically" for deeper, longer drawers (to hold comforters). Also incorporating the fold-out drawer (shoe dresser) for storage up where the nightstands sit beside my bed. Lastly, No feet. My bed will be flat on the floor to control dust and dogs from getting under there.
If you don't have it, invest in the Kreg Pocket Hole Jig as well as the Kreg circular saw attachment for ripping wood, Well worth he cost.
zannej
Tue, 08/27/2013 - 03:36
fold out drawers
What sort of hinges do you use for those? Just regular hinges? I'd love to see the plans for that. Also, thanks for the recommendation of the pocket hole jig and circular saw attachment.
jasongroce
Tue, 12/08/2015 - 11:40
Full Size Plans
So I wanted to create this in a Full Size so it fit a mattress we already owned. I determined that the best way was to shrink the width by 6 inches, the height of the headboard by 2 inches, and the length by 3 inches.
This will leave two inches in length longer than a full sized mattress but simplifies the math with the drawers.
Here’s the cut list:
Headboard:
1 – 3/4” Plywood @ 26” x 47
2 – 1x4 @ 47”
2 – 4x4 @ 52”
2 – 2x4 @ 47”
1 – 2x4 @ 54”
1 – 2x6 @56”
:- Lay the 4x4 posts flat and temporarily lay the 2x4’s between the 4x4 where the plywood needs to go. This will allow you to pocket screw the plywood into the 4x4 posts at the correct height on the 4x4. Pocket screw the plywood where you are going to add your 1x4 to save on a pocket plug and hide the screws. Add your 1x4 with glue and 1 ¼ nails. Finish the headboard by connecting the 2x4’s used in the spacing of the plywood to the bottom of the 4x4 where the plan calls for them.
Footboard:
1 – 3/4” Plywood @ 15” x 49”
2 – 1x4 @ 47”
2 – 4x4 @ 19”
2 – 2x4 @ 47”
1 – 2x4 @ 54”
1 – 2x6 @ 56”
:- Same as the headboard. Lay down your 4x4’s. Place your 2x4’s behind there you are going to add your plywood. Pocket hole your plywood to the 4x4’s. Add the trim with nails and glue. Flip it over and attach the 2x4’s with pocket hole screws where the plan calls for them.
Storage Boxes:
4 – ¾” Plywood @ 15 ½” x 77 ¼” (Outside top and bottom)
8 – ¾” Plywood @ 15 ½ x 13 ½” (Sides and center support)
2 – ¼” Plywood @ 77” x 15” (Backing of box)
Support and Center:
2 – 2x2 @ 77 ¼”
2 – 2x2 @16 ¾”
18 – 1x3 @ 22 ½”
Drawer Boxes:
12 – 1x10 @ 22 ¼” (Front and back of drawer box)
12 – 1x10 @ 14” (Sides of drawer box)
6 – ¼” Plywood @ 23 ¾” x 14” (Bottom of drawers)
* ¾” Plywood sheet cut into 9 ½” strips will be the same size as the 1x10’s. It was cheaper for me using plywood.
Drawer Faces
6 – ¾” Plywood @ 24 ½” x 13 ¼”
12 – ¼” hobby stock, 2 ½” wide @ 8 ¼”
12 – ¼” Hobby Stock, 2 ½” wide @ 24 ½”
This should be a conversion from this Queen down to a Full.
Michael Robinson (not verified)
Sat, 10/06/2012 - 15:57
Wood Selection
I would like to build this and stain it. What kind of wood would be best and won't break the bank?
James H (not verified)
Tue, 10/09/2012 - 13:20
Project Cost
Here in Northern CA, I just estimated the cost of this project at $375. That's lumber from a local building supply. If I get everything at Home Depot the estimate was over $400. This is just materials and no tools. I think our lumber prices are too high.
Jesi (not verified)
Fri, 10/12/2012 - 07:19
Storage Headboard
Ana, I'm in LOVE with this bed! My Dad is DIYing an apartment for my son and me on my parent's property. I'm strapped for cash and have NO furniture, which I'm actually excited about because I can BUILD all my furniture, and design exactly what I want for my tiny space! I don't want much more furniture in my bedroom than my bed, but I need even MORE storage. When I was in Macy's one time, I happened to pass their bedding department and saw one of their display headboards which I really loved. It was deep, and there were long handles on the sides which almost looked like bars hand towels. It reminded me or a drawer handle, and I thought, "why couldn't I build a deep headboard with drawers on the sides? Then I could use the top of my headboard like a shelf, too!" I wonder if you could draw up plans like that... That would be the ULTIMATE in a storage bed! :)
I just LOVE your site, by the way. It's empowering, knowing that I can build nice furniture I can be proud of. Thank you, and keep up the amazing work!
Courtney C (not verified)
Mon, 12/03/2012 - 12:15
can you put up dimensions for
can you put up dimensions for a king size bed
Meredithbr (not verified)
Tue, 01/08/2013 - 15:55
If I already have a ton of
If I already have a ton of 1/2" plywood, can I use that? Will anything turn out significantly different? I haven't had a half hour to look at this plan thoroughly yet. Thanks.
RG (not verified)
Sun, 01/13/2013 - 00:31
Bigger Drawers?
Is there any problem with making the drawers deeper instead of using slats? Making them each half the width of the bed?
Thanks so much - I love this site!!!
Aaron (not verified)
Mon, 01/21/2013 - 15:09
Headboard/Footboard confusion
Hi Ana,
I love this bed and I'm trying to adapt it to a King size version, assuming 76" for the width of the mattress. Based on your plans, I'm wondering if there's an extra inch added into the headboard/footboard panels by mistake? The plans have the headboard/footboard panels spec'ed at 53". Including the posts, from their outside to outside, the plans say 60". The headboard crown length says 62", with the 1 inch overhangs on each end.
If the headboard/footboard panels are 53", and the posts are 4x4s, then the headboard width, from outer post to outer post, cannot be 60". It would be 61" (53+4+4). This would make the crown 63".
Please advise Ana. I'm trying to spec out the king size version. The dimensions below are what I have so far. The rest will be easy once I figure out where the extra inch came from. Or if I'm crazy!
Headboard/Footboard panel: 68"
Headboard/Footboard outer post to outer post: 76"
Headboard crown: 78"
Thanks again,
Aaron
ctespinosa
Wed, 01/30/2013 - 07:04
Farmhouse finish
I'm planning to build the farmhouse storage queen, with some modifications to the height and drawer depth. I'm planning on using oak plywood for the boxes, and staining them. How are people finishing the visible edges of the boxes? Do pine 2x4's, 2x6's finish out to look okay, or is it worth the quadruple cost of buying oak?
Timothy Simpson
Mon, 03/04/2013 - 05:49
Strength
I've already built the traditional farmhouse bed, for my own home. It's a beautiful bed, which is as solid as the rock of gibraltar. Couldn't be happier with it!
Here's the thing: some good friends of mine, after seeing that bed, have asked me to build one for them. However, they're more interested in the storage version of the farmhouse bed, shown on this page. My concern, as well as theirs, is how strong is this design, compared to the other one? The original farmhouse bed is framed with 2x10 rails, and 2x6 supports spaced 16" on center, all tied together with a 3/4" plywood top. In comparison, this storage version of the farmhouse bed, has no rails at all. I'm concerned with bending/bowing of the plywood cabinet boxes, particularly at the outside edges (as in, when he/she sits down at the edge of the bed, putting their entire body weight directly over an unsupported piece of plywood spanning 26"). The couple I'm building this bed for, is on the large side.
So, my question is, has anybody who's built this bed, experienced any bowing or sagging issues? Does anybody have any ideas for how I could reinforce it, without significantly altering the plans?
One more question: what have other users done, to hide all the plywood end grain in this design? I don't see anything in these plans for applying any edge banding, or hardwood strips, so I'm just wondering how others have worked around this.
Thanks a bunch!
Breatherguy
Thu, 04/18/2013 - 19:37
Farm House Bed
To cover the plywood end grain, I used screen molding to cover, glue and nails.
To help protect the paint from wear, last coat was clear poly.
Got a deal on baskets that had glides so I did not make drawers.
geophyrd
Thu, 05/23/2013 - 03:39
To the gentleman or lady who was asking about this bed
I built it. I altered the design a couple of ways. I put blocks under the 'boxes' that are the storage units where they abut against the headboard and foot board. That way, I knew they would be easy to take off and put back on again later without having to hold the boxes looking for screwholes. I used 3/4 plywood, primed and painted, glued and screwed.
I also did some substantial carving on the legs, head and footboard and backlit a headboard insert with LED lighting.
All in...VERY strong. If you want to see pictures of the bed and the build, you can click the link below. Its my facebook page. I posted this on Ana's site, but I didn't get much response. Its possible that I somehow didn't make the couple of pics public or something.
https://www.facebook.com/media/set/?set=a.10150844261192960.416336.6516…
zannej
Tue, 08/27/2013 - 04:27
Great job, Geophyrd!
Wow! That is amazing. Do I even want to know how much that carving machine costs to buy? Does it require a computer or something?
You said Ana made mistakes in her plan. Can you outline what mistakes she made and what you did differently?
Thanks!
leverknight1
Thu, 06/20/2013 - 21:59
King size?
I love all the plans for the storage beds on here but we are looking to get a king size to build one for.
BriFrerich518
Thu, 08/08/2013 - 22:07
Mattress size?
Is this design plan for a queen sized bed? Does anyone know? If not, could someone please tell me how I figure out how to change dimensions for a queen?
Thank you!
zannej
Tue, 08/27/2013 - 04:42
multiple questions
I have a few questions about this plan:
How would you stop the mattress from sliding? Even though my mattress weighs 90lbs, it tends to slide.
Where can I find the plans for the Full version of this bed?
Are there any plans for double drawers (one on top of the other) instead of just single drawers?
What about the space in the middle of the bed? It looks like it could be used for storage-- what options are there for accessing that storage?
(I love Birdsandsoap's hinged footboard idea).
What modifications could be made if I wanted to use something like SUSPA® 100 LB Gas Spring/Prop/Strut/Shock to have the top lift up to access storage under the mattress?
Are there any better ideas for accessing that space?
Instead of a footboard, what about a footboard dresser like the Lea Industries Dillon footboard dresser?
http://www.ivgstores.com/prodimages-cdls/LA/la-906-241.jpg
If I wanted to have this sit on the floor so nothing could get underneath, but wanted it propped up on something with a toekick on the sides instead, what would I have to change?
Are there diagrams of suggestions for more support in the middle?
Thanks for these plans. It really is giving me a lot of ideas. I admit the storage part and platform are the part that I am looking at the most since I love my existing headboard. I do not currently have a footboard though.
In reply to multiple questions by zannej
darkjuan
Tue, 08/27/2013 - 05:41
re-multiple questions
Hello Zannej,
I don't have all answers for your questions, but I can suggest for the 1st question about preventing the mattress for sliding, I can guess that using some wood shims would stop the sliding. Also, unless you have pleennnttyyy space on the side if you want to make the drawers with more depth.
For the other question about using double drawers, you may want to reconsider it, as you may be getting the bed level way to high. I speak from experience, my in-laws have a solid wood king size bed with double drawers and doors opening on the footboard to access the "middle" storage area. My wife have to open the bottom drawers in order to "climb" to the bed.
Just my 2 cents.
zannej
Wed, 08/28/2013 - 12:59
Thanks, Darkjuan.
I was thinking of making shallower drawers or of having single drawers but the faces would give the illusion of double drawers. I have a 14" mattress but I used to have a 24" mattress. For awhile (before I was able to remove the old one) I had the new mattress stacked on top of the old on on top of the box spring which is on a metal frame. That was actually a bit too high for me, but I could easily add another 10" of height to my mattress and have it be comfortable. It's actually easier for me to get in and out of that way.
But you do have a good point. I wouldn't want the bed to be too high since I'm only 5'5".
Now, for my brother's bed it can afford to be higher because he's about 6'3".
Doors on the footboard would be another option as well. I wish the hydraulic lift thing was easier to figure out because that way we could access storage near the headboard.
geophyrd
Tue, 08/27/2013 - 05:35
Catching up
Ok, so six months later...bed is still every bit as strong. I did add on item: I cut a piece of plywood the exact size of the bed and threw it on top of the boxes,under the mattress. It has been described as the most comfortable rock ever...
To the person asking and the carving machine, its around 1,500 which sounds like a lot, but I've made five pieces of furniture with it and its the gift that keeps giving (not really a gift, my wife was gonna kill me when I bought it). But seriously, I have no talent for carving and what I wanted, it was the easiest we to get closest. If you're interested, you can go to CarveWright.com to see about the carving unit.
now into the next project!
zannej
Wed, 08/28/2013 - 13:01
carving machine
Thanks for the info on the carving machine, geophyrd. It sounds like you've made good use of it.
I did a little hand carving in woodworking class although it was nothing spectacular.
paulaandmatt2010
Sat, 11/02/2013 - 01:04
Queen box-spring, mattress and 4"memory foam
So it's time for a new bed frame and I've located this idea and LOVE it!! My only question...due to back issues we need to use a box spring, mattress, and memory foam for our bed, can this combination work on a platform style bed. Also, would the dimensions/cuts/etc. need to be adjusted to fit the extra height/weight of those items??
Thanks!
geophyrd
Sat, 11/02/2013 - 10:12
Hiya Paula and Matt
That's a whole lotta mattress going on. Here's some suggestions:
If you insist on mattress, boxspring and foam, your head and footboard will need to be higher to compensate. Doesn't sound like a big deal, but the ones I made would have been nearly all lost to the mattress if I'd put on a boxspring. Not a big deal, just prepare for it!
Build everything on Google Sketchup first. Awesome program, though it does have a bit of a learning curve. But the first time you touch wood, you'll know exactly what you're doing and be confident in your design.
Last, I put footers under the boxes, blocks of wood screwed to both frame and boxes for some extra support. I don't know that they're doing much, but i'm much more confident in my build because I know they're there!
Good luck! Post some pics when you're through!
toddr
Sun, 03/02/2014 - 22:28
Gonna modify
I'm going to use this as a base design but I will be reusing waterbed drawer pedestals and the headboard.
Buddylab59
Sat, 03/08/2014 - 19:44
Farmhouse bed
I REALLY want to build this for my granddaughter. Do you the plans for a twin??
Thia
Thu, 04/03/2014 - 18:15
Assembling and Disassembling
What a great project! I was looking for plans to make myself one, the only thing is that I'm going to move eventually and would need to be able to disassemble it into parts (headboard, footboard, left drawers, right drawers, something like that). Do you have any suggestions how I could manage that?
lisa64
Sun, 04/06/2014 - 17:22
Farmhouse bed storage
Do you have the plans on how to make the storage boxes for a twin size bed. I would love to have these under my son's bed that I am planning to build for him. It will be his first real bed in his own room.
Thanks
lisa64
Sun, 04/06/2014 - 17:22
Farmhouse bed storage
Do you have the plans on how to make the storage boxes for a twin size bed. I would love to have these under my son's bed that I am planning to build for him. It will be his first real bed in his own room.
Thanks
jewels101
Sun, 04/13/2014 - 14:44
Farmhouse Storage bed, twin plans?
Are there any plans for the storage farmhouse in twin size?
balloongal247
Mon, 04/14/2014 - 08:18
Plans Search
If you click the "Plans" button at the top of the page, on the blue bar, you can search for specific plans. I had thought that I'd seen farmhouse twin storage bed on here before, but that may have just been a brag post that modified it, because I don't see it. There's a plan for a non-storage Farmhouse Twin Bed, and several other storage twin beds though. I recommend looking through the options, you may find another one you like, or you may be able to combine plans to try to create your own farmhouse twin storage bed.
Lord_0verkill
Fri, 04/18/2014 - 08:25
Slightly altered plan built with Maple
http://ana-white.com/2014/04/farmhouse-storage-bed-solid-maple
sonicblaze
Mon, 09/15/2014 - 13:02
Edges
Looking through your pictures, I love the color/how you did it. A few router questions...can you tell me what you did for the edges of your boards?
Did you use a 45degree router bit on the edges of some of the boards? It looks like the 4x4's for the footboard had that done to them...or the lighting is making it look like that
And a roundover on the crown of the headboard/footboard?
And your 2x4's and such are nice and squared on the edges. Did you have to do that, like rip down from 2x8's?
Honeymother
Sun, 07/06/2014 - 13:50
Twin Farmhouse Storage Bed????
PLEASE, PLEASE, PLEASE make plans for a twin farmhouse storage bed. Thank you, Thank you
Honeymother
Sun, 07/06/2014 - 13:50
Twin Farmhouse Storage Bed????
PLEASE, PLEASE, PLEASE make plans for a twin farmhouse storage bed. Thank you, Thank you
sonicblaze
Mon, 09/15/2014 - 13:04
Sketchup File
Do you have the SketchUp of this available for download somewhere that I missed? I'd like to expand your existing design for a kingsize bed, and It'd be nice to start from your plans so I don't reinvent the wheel.
Thanks!
RedRoof
Fri, 11/07/2014 - 04:46
Full size?
Hi, Ana! I love this stoage bed! Will you be adding the dimensions and instructions for converting this to a full size bed? :)
jasongroce
Tue, 12/15/2015 - 12:09
Here's a full size for you
So I wanted to create this in a Full Size so it fit a mattress we already owned. I determined that the best way was to shrink the width by 6 inches, the height of the headboard by 2 inches, and the length by 3 inches.
This will leave two inches in length longer than a full sized mattress but simplifies the math with the drawers.
Here’s the cut list:
Headboard:
1 – 3/4” Plywood @ 26” x 47
2 – 1x4 @ 47”
2 – 4x4 @ 52”
2 – 2x4 @ 47”
1 – 2x4 @ 54”
1 – 2x6 @56”
:- Lay the 4x4 posts flat and temporarily lay the 2x4’s between the 4x4 where the plywood needs to go. This will allow you to pocket screw the plywood into the 4x4 posts at the correct height on the 4x4. Pocket screw the plywood where you are going to add your 1x4 to save on a pocket plug and hide the screws. Add your 1x4 with glue and 1 ¼ nails. Finish the headboard by connecting the 2x4’s used in the spacing of the plywood to the bottom of the 4x4 where the plan calls for them.
Footboard:
1 – 3/4” Plywood @ 15” x 47”
2 – 1x4 @ 47”
2 – 4x4 @ 19”
2 – 2x4 @ 47”
1 – 2x4 @ 54”
1 – 2x6 @ 56”
:- Same as the headboard. Lay down your 4x4’s. Place your 2x4’s behind there you are going to add your plywood. Pocket hole your plywood to the 4x4’s. Add the trim with nails and glue. Flip it over and attach the 2x4’s with pocket hole screws where the plan calls for them.
Storage Boxes:
4 – ¾” Plywood @ 15 ½” x 77 ¼” (Outside top and bottom)
8 – ¾” Plywood @ 15 ½ x 13 ½” (Sides and center support)
2 – ¼” Plywood @ 77” x 15” (Backing of box)
Support and Center:
2 – 2x2 @ 77 ¼”
2 – 2x2 @16 ¾”
18 – 1x3 @ 22 ½”
Drawer Boxes:
12 – 1x10 @ 22 ¼” (Front and back of drawer box)
12 – 1x10 @ 14” (Sides of drawer box)
6 – ¼” Plywood @ 23 ¾” x 14” (Bottom of drawers)
* ¾” Plywood sheet cut into 9 ½” strips will be the same size as the 1x10’s. It was cheaper for me using plywood.
Drawer Faces
6 – ¾” Plywood @ 24 ½” x 13 ¼”
12 – ¼” hobby stock, 2 ½” wide @ 8 ¼”
12 – ¼” Hobby Stock, 2 ½” wide @ 24 ½”
This should be a conversion from this Queen down to a Full.
soapdish
Tue, 12/09/2014 - 16:27
Errors in the plans?
I'm looking over the cut plans and I'm wondering if the 13-1/4"x15-1/2" cuts on plywood sheet #2 and #3 shouldn't be 13-1/2" x 15-1/2" cuts for the Storage Boxes.
fubar911
Sat, 03/07/2015 - 18:11
The Errors
I noticed the error too. From just looking through the plans you can see the 2x4s on the headboard are spaced 15inches (19 from the floor to the top board and 4 up off the floor equals 15inches) Part 7....The picture looks like the drawers are flush with the top and bottom of the 2x4. If you cut the plywood at 13.5 you then add the 3/4 for the bottom piece and 3/4 on the top piece which equals 15 total.
I hope that makes sense to people.
I will be trying to make this soon. I will probably add a 2x4 frame to the floor on the inside and attach it to the backs of the drawers. I weigh 260lb and that plywood will bow at some point. I was tempted to put it flush to the floor but wanted the air flow because a vent is by the bed. Also, I will cover the plywood ends with nice trim and just inset the drawer frame and shrink the drawer size.
Klombers
Sun, 03/22/2015 - 14:24
Perfect for my daughter - making it in a FULL size
Are the dimensions for a full sized version already available anywhere? If not, I will make this and submit them!
In reply to Perfect for my daughter - making it in a FULL size by Klombers
Ana White
Sun, 03/22/2015 - 17:00
We would love for you to
We would love for you to share!