In between working on the dollhouse, changing lots of diapers, and burning dinner ... we've been up to something else.
Momplex Unit A. Man do things ever slow down when you have a baby in the house, don't they?
We finished up Momplex Unit B and got Grandma who likes to sew moved in last winter.
Unit B has a garage almost twice the size of Unit A, and there's storage under the landing (Unit A has the utility room in the garage and a pressure tank under the landing). So to increase storage in Unit A, we decided we had to claim the area under the stairs for storage.
We'll be building a closet under the upper stairs that can access the area under the lower stairs. We'll drywall it in and put a door on the front.
There was a lot of figuring and planning involved, but finally, we decided that we'd build the closet wall under the upper set of stairs (as opposed to between the two runs of stairs). First up, we made sure the two sets of stairs were exactly where we want them.
We decided to build the wall in place. We started by putting the bottom plate down and attaching the top plate to the underside of the upper stairs. (NOTE: If you are building basement walls, treated lumber is recommended for the bottom plate - it's just a day's drive for us to get treated lumber).
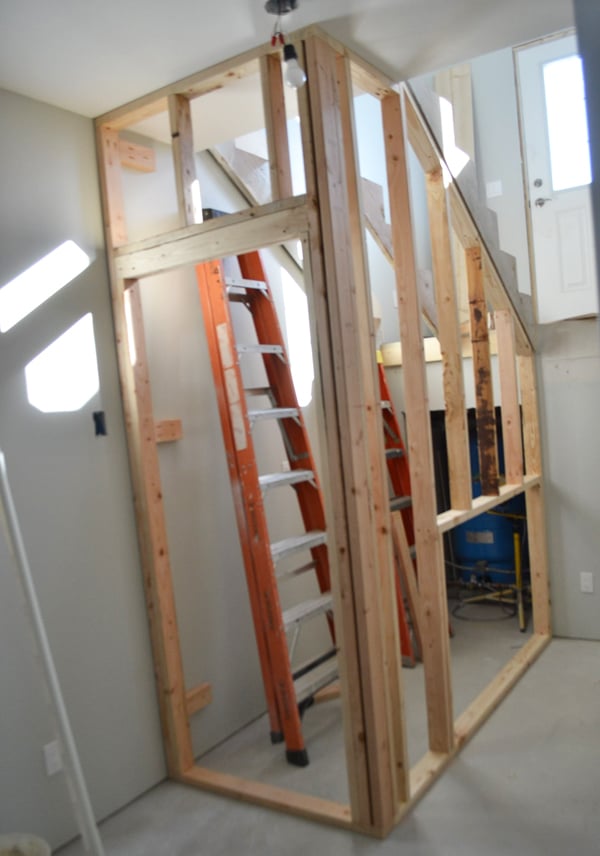
Then we started adding studs, spaced 16" on centers, between the top and bottom plates, cutting the tops at the upper stair angle.
We also put a header in so the space under the stairs will be accessible.
Then we just filled in the remainder of studs in the wall.
We pulled the lower stairs out here so we could more easily work on the wall. Notice the opening in the wall for access under the lower stairs. It's not much storage, but could definitely hold a few totes or store suitcases or Christmas decorations.
We tied in a second top plate for where the wall extends past the stairs, and on to the flat downstairs ceiling.
Also notice that we held the wall in 1/2" from the outside of the stairs stringer. That way when we add drywall (1/2" thick) to the wall, the finished wall will be flush to the outside of the stringer. We'll later trim out the joint and the stringer.
Then we framed in the door. We'll be using a regular door for access to the closet, but installing the door to swing out instead of swinging in. We'll cut out the bottom plate later on, after drywall in installed.
We cut the drywall with a utility knife down to the length needed,
And then held the pieces in place and marked them, took them back down, and cut the angles off the top for the stairs.
Then we screwed the drywall to the studs in the wall.
After the drywall was attached, it's flush to the outside of the stairs so it will be easy to just throw a skirt over this joint.
Here's the under the stairs closet, with the drywall hung.
Now for the not so fun part ..... we've been dreading this.
The only part of the Momplex that we hired out was the drywall finishing, and we never regretted it. But for this small of a job, there's no getting out of it.
Since it's a small job, we used quick setting mud - that way we don't have to wait hours for coats of mud to dry.
We just mixed up small batches,
For the first coat, bedded the joints,
And added drywalling tape.
Then pressed the tape into the mud.
We did the same on the inside corners.
For the outside corners, we used metal bullnoses, filling the inside of the bullnose with mud, and then setting on the outside corner.
We started with a small drywall knife, and with each coat, used a larger knife,
Until eventually the mudding covered most of the drywall.
To match the texture of the existing drywall, w sprayed on wall texture. That stuff actually works pretty good!!!
Once the texture was dry, we rolled paint on the walls,
And that's how we added another closet to the Momplex Unit A!
It was quite a bit of work, but definitely worth it to have this closet. And the drywall on the stair side will make finishing out the stairs SO much easier than Momplex Unit B's stairs.
We are currently working on replacing the stairs and finishing them out - will be sharing that post soon!
Thanks for reading!
XO Ana + Family

Comments
EmmaWilson
Thu, 04/03/2014 - 03:32
Outdoor Furniture