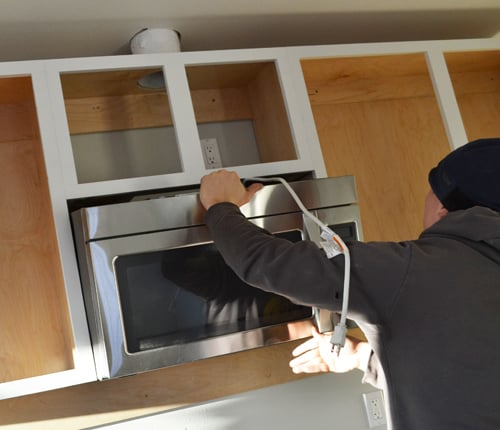
It took us two tries to get you all the deets on installing the Microhood ... good thing we got two moms and two Momplex units to finish up!
Microhoods to me are like toilets or power lines or my big toes.... function over form here, especially when space is at a premium.
The good news about every microhood I've been a part of installing is they come with pretty darn good instructions and hanging hardware.
The template fits right in the space above the range,
We taped it in place per instructions,
And then attached the wall cleat to studs in the wall, using the template to guide us.
The cleat supports the bottom of the microhood.
Now on to the poor cabinet over the microhood ...

Remember how we already modified it by running it through the table saw?
Yeah, it's back in surgery today.
Because our wall cabinet bottoms have a 1/2" lip underneath, we have to nail up some blocking where the microhood will be screwed to the upper cabinet.
And then since we are venting the microhood outside, we've got to cut a vent hole in the underside of the cabinet.
Sawzall to the rescue!
Not the prettiest cut you've ever seen,
But it'll do. The cabinets are ready for the microhood, but we have a few things to do to the microhood itself before it's mounted.
For both microhoods, on both sides of the Momplex, we change the venting so it vents outside by removing the top plate,
And switching the vent around so it pushes air out, instead of through the internal filter.
The white microhood is ready to go.
But on the other Momplex unit (the one we are currently working on), we've got one more really big issue.
Can you guess what it is???
The sides of the stainless microhood are black, and will show because the cabinets are less deep than the microhood.
Can't have that, can we?
Not when the fix costs about $5.
We taped off the microwave and sanded the metal so the spray paint will have something to bond to.
Then we cleaned up the area and let it dry,
And started spraying!
Much better!
Once the paint was dry, we (as in we the Ram - hey I gotta take pictures for you!) hoisted her up there ....
Once the microhood caught on the cleat, it just pivoted in place,
The dang cord was quite a pain to thread through,
But what good would be a microhood not plugged in?
To secure in place, special bolts (included with the microhood) are used to secure through top into the microhood.
Popcorn anyone?
We'd like to send a special shout-out to our babysitter for helping us make this post happen.
XO Ana + Fam

Comments
lawilder23
Wed, 02/12/2014 - 13:22
Momplex
Ana White
Wed, 02/12/2014 - 14:38
Thank you so much for taking
cincimama
Wed, 02/12/2014 - 15:55
Great finished projects!
dnieves33
Tue, 02/18/2014 - 15:27
Thanks
Teresabphoto
Thu, 04/03/2014 - 17:48
Ceiling light fixture