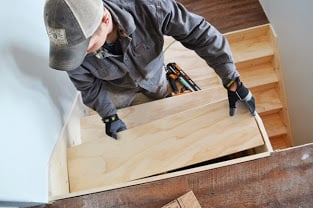
This set of stringers is going to get put in a skirt and heels - er, risers and treads today.
But before we start putting our Sunday's best on these stairs, let's take a second to remember where these stair boards have been.
We originally spent $400 on 2x12 boards,

Yep, at one point, they were new, not gray and old looking at all.

Until we poured concrete in them. That's where the gray staining comes from.

The boards came in handy when we poured the concrete ICF walls,

And we used them as scaffolding.

Some of the boards got used up when we built the stair landings,

And the rest got cut up into stringers and construction treads.

We've already replaced the stair treads and risers in Momplex Unit B with finished treads and risers,
So this is it. The last time you will see these boards.
This time around, we framed up a closet under the stairs and drywalled it in.
Then we replaced the stair stringers, and it's time to dress them up.
First up, we are going to put a skirt on the stairs.
This is how a carpenter makes a skirt.
First you put the uncut skirt board up, resting the top edge on the finished upstairs floor.
Then you bring the bottom corner past the bottom of the stairs the width of your tread cuts - probably around 11-1/2". This places the skirt at the same angle as your stairs.
Then you use a level to mark level lines at the top and bottom of the board, where the board touches the two finished floors.
Notice that the landing floor isn't finished, but we have the skirt resting on a piece of the finished flooring.
Then to bring the skirt down to fit between the stairs and the wall, the height of your stair risers (from top of tread to top of next treads - somewhere between 7-8") is cut off the bottom of your skirt bottom.
Our Rigid saw has a laser line that helps us find the angles to cut the skirts,
After the skirts are cut, we can just slide the skirt right into place.
We then cut an identical skirt for the other side of this run of stairs.
We screw this skirt from the inside to the stair stringers.
On this skirt, we were smart, and marked the top edge level with the finished upstairs floor.
Remind me again why we didn't do that here too?
Using a level,
We mark the excess off the top of the skirt,
And then cut it off with a saws-all. Definitely recommend cutting before than in place, but it can be done.
On the lower set of stairs, there's drywall on both sides. So we built our stairs a little small for the opening, so we could fit the stairs in without damaging the walls. Then we attached the skirts to the walls in place. Notice that gap between the skirt and the stringer?
Well, you definitely want to attach the stringer to the studs in the wall for extra support. So we shimmed between the skirt and the stair stringer,
Treads and risers will cover everything up.
With the skirts done,
We started cutting our risers. Since our rise is 7-1/4", we just used 1x8 boards,
And nailed them to the stringers.
The bottom riser is always a tread's width less than the rest,
So we ripped a 1x8 board down on the table saw,
To finish the bottom riser.
NOTE: The top riser is then a tread's width more than the rest of the risers. We ripped our top risers out of a 1x10 board.
With all the risers done, it's time for the treads!
We cut each tread to fit, working our way from the bottom of the stairs (the saw is downstairs), to the top.
Then once we got to the top of the stairs, we started at the top, and working downward, removed each tread,
glued under each tread,
Nailed each tread down with 15 gauge nails,
And worked our way downward.
We'll let the glue fully dry over the weekend,
And you won't believe we are going to do to these stairs next.
Have a great weekend!
XO Ana + Family

Comments
Jacques Remy
Mon, 04/07/2014 - 12:59
great
Tsu Dho Nimh
Fri, 04/25/2014 - 09:30
The last time? Let them live on!