

Make your own desk with bookshelf base plans from Ana-White.com for HGTV Saving Alaska
This moment.

One of the hardest things I've ever done in my life was seven weeks after giving birth to a baby, bring that newborn baby onto a television set, and film this pilot episode.
What you saw is what we got. There was no midnight crew making magic while we rested. In fact, long after the crew had gone home, we had promised to add more insulation under the crawlspace, so at 10:00 PM, with the newborn asleep in the car seat and the producer watching the baby, Jacob and I crawled down underneath into the crawlspace and added that extra insulation.
It was -30 below zero, without wind chill.
And then we packed tools up, and it was off to film the next episode.
All with nursing newborn in tow.
It was tough. One of the toughest things I've done, ever.
But so worth it.
Those smiles. That mom tearing up.
I'm praying HGTV picks up our pilots for a series, and we get the chance to see more of those smiles. And hopefully, a tear or two.
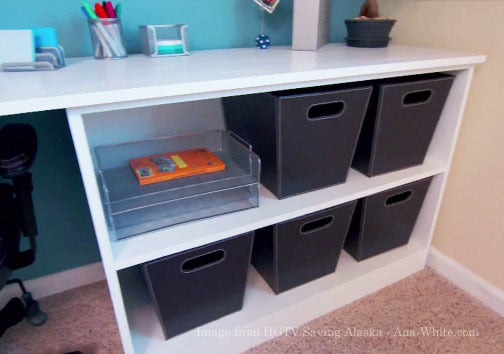
For this episode, one of the rooms we helped with was Aaron's teenage room. He wanted a space he could chill in, but his bedroom was under 100 square feet.

For about $1000 we took this blank slate room, and turned it into this:
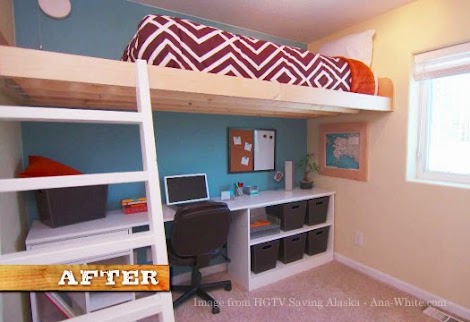
With all new materials. All DIY.

Well, except for the producer's laptop you see in there :)

The desk system was awesome. I loved how it turned out.

I shared with you the plans and how we built CPU base with drawer here.

Don't be intimidated by the drawer, it is not difficult.

Today I'm sharing with you the plans for the bookshelf base to match the desk.
Thanks for all your support, we appreciate it!
XO Ana + Family

Preparation
1 - 1x2 @ 8 feet long
1 - 1x4 @ 8 feet long
12 feet of 3/4" plwyood cut into strips 15-3/4" wide (about 1/2 sheet, we used the other 1/2 sheet for making the CPU base)
2 - 3/4" plywood @ 15-3/4" x 29-1/4" (sides)
2 - 1x4 @ 39-1/2" (bottom footer)
2 - 3/4" plywood @ 15-3/4" x 39-1/2" (shelves)
2 - 1x2 @ 39-1/2" (top supports)
Desktop minimum of 16" wide x 41" long
Rip plywood into strips 15-3/4" wide x 8 feet long. Use these strips for the sides and shelves.


Please read through the entire plan and all comments before beginning this project. It is also advisable to review the Getting Started Section. Take all necessary precautions to build safely and smartly. Work on a clean level surface, free of imperfections or debris. Always use straight boards. Check for square after each step. Always predrill holes before attaching with screws. Use glue with finish nails for a stronger hold. Wipe excess glue off bare wood for stained projects, as dried glue will not take stain. Be safe, have fun, and ask for help if you need it. Good luck!
Instructions
Step 1

We built this with our Kreg Jig, all on the 3/4" setting with 1-1/4" pocket hole screws. We attached the 1x4s to the bottom to the sides with pocket holes.
Step 2
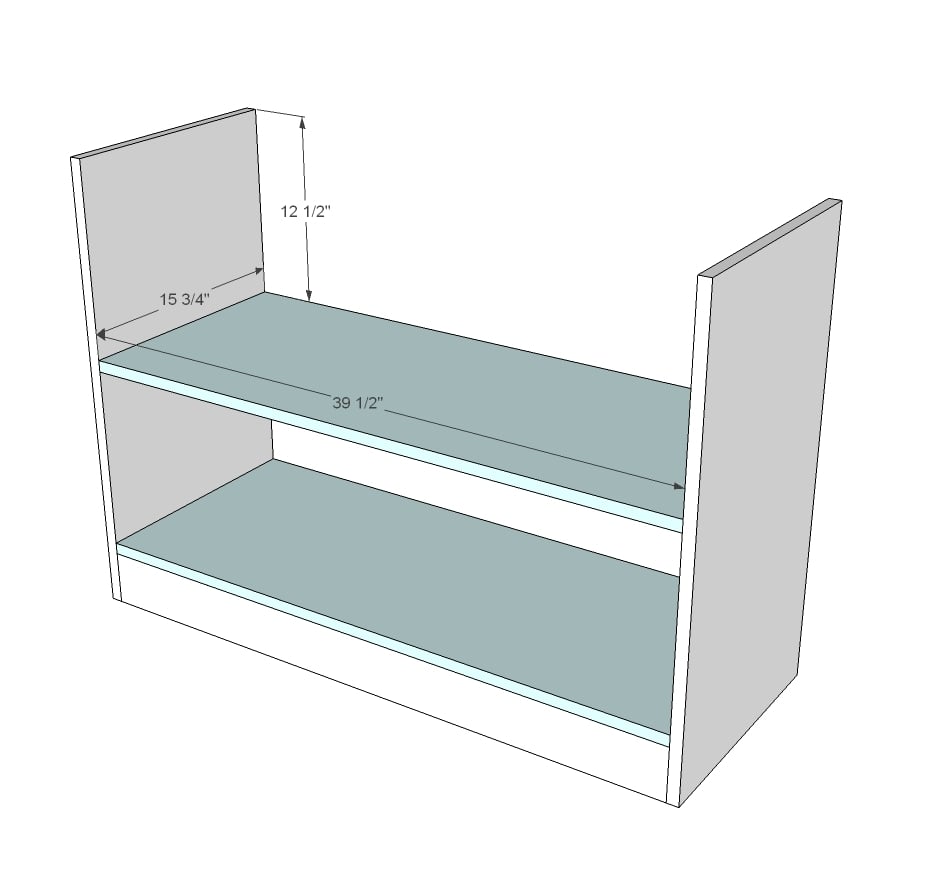
We made these shelves fixed with pocket holes as well. We also attached shelf to the 1x4s with 1-1/4" finish nails and glue.
Step 3
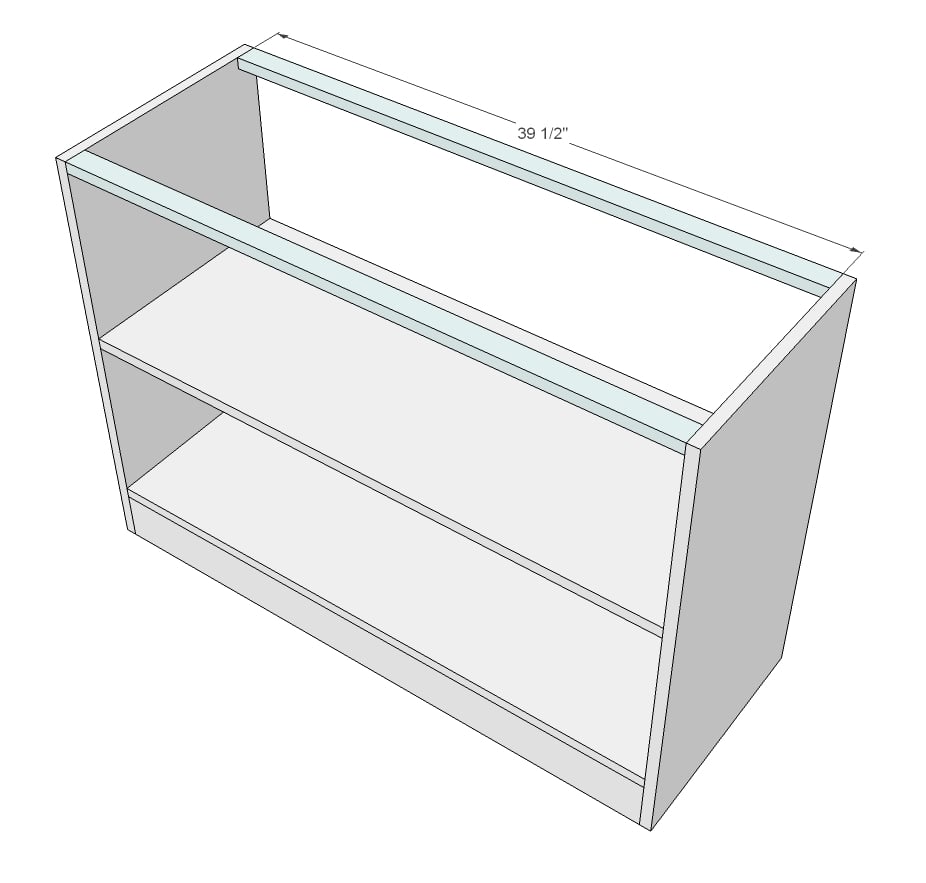
We attached the 1x2s on the top with pocket holes on the top (desktop will hide them). Desktop is attached from underside to these 1x2s.
We also added a back out of 1/4" plywood, attaching back to the center shelf for additional support.
It is always recommended to apply a test coat on a hidden area or scrap piece to ensure color evenness and adhesion. Use primer or wood conditioner as needed.
Comments
nvarnell
Fri, 08/08/2014 - 20:39
And people say women are weak. Psh.
Seven weeks after delivery AND while nursing! That is no easy feat in of itself. You are AMAZING!! I just finished the Clara table and thumbhole chair for my (almost) three year old, but this! THIS DESK! This will be his big kid desk!
kmatt55
Sat, 08/09/2014 - 11:35
TYPO - Correction
The depth of this piece should be 15 3/4 like the CPU base, not "24 1/2". Thanks for the plan. I have a perfect spot for this in my home.