


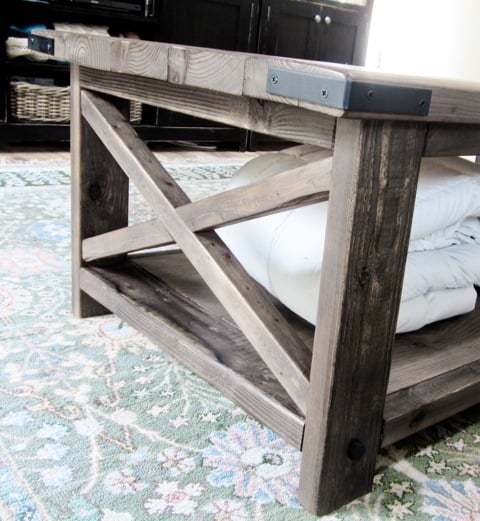
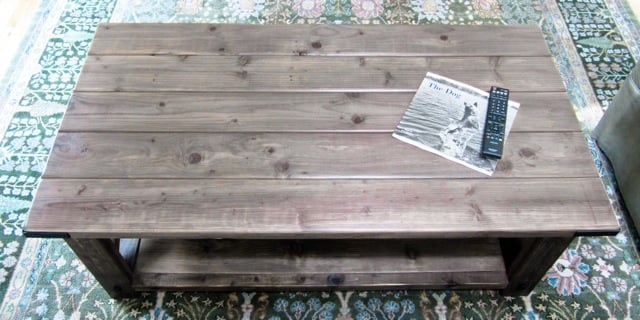
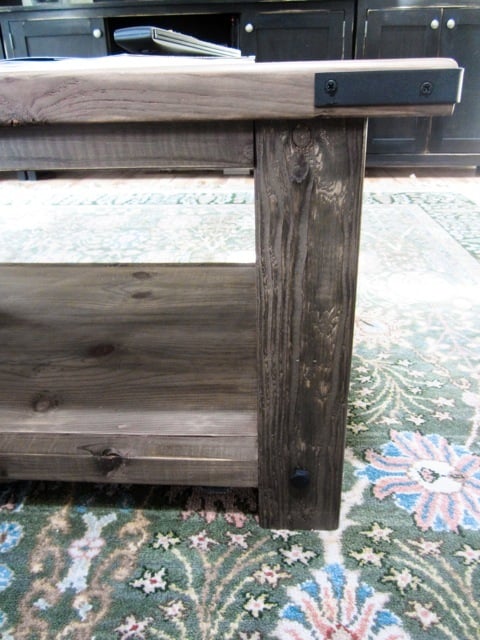
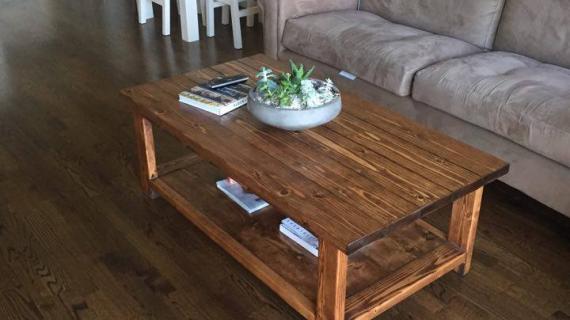
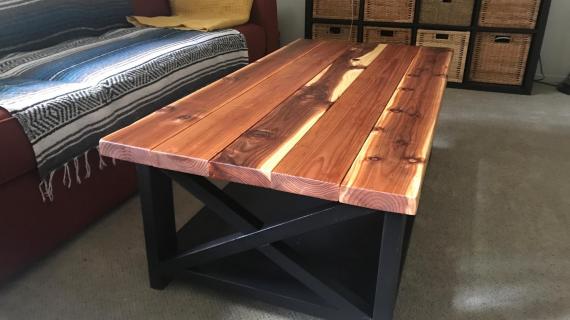
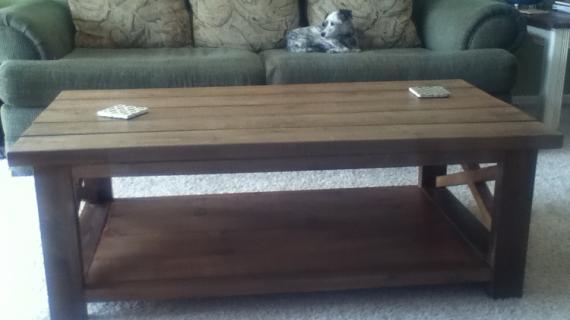
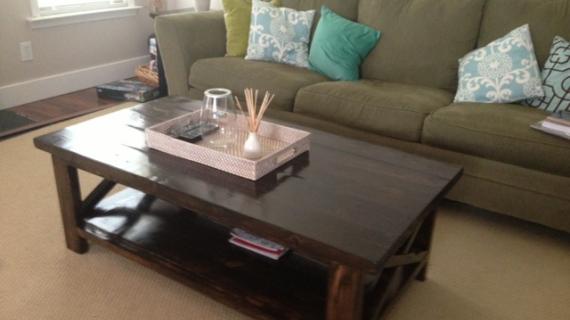
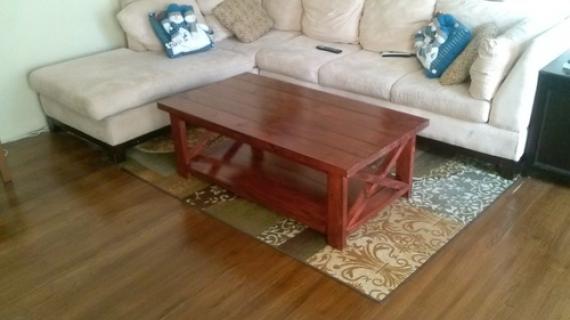
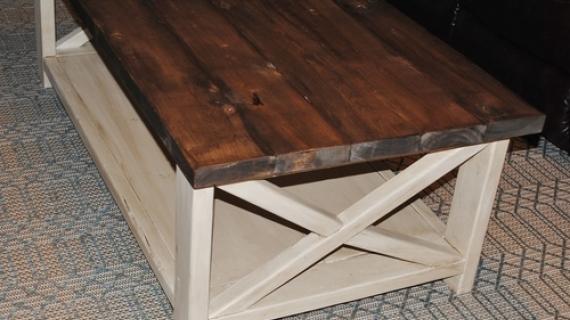
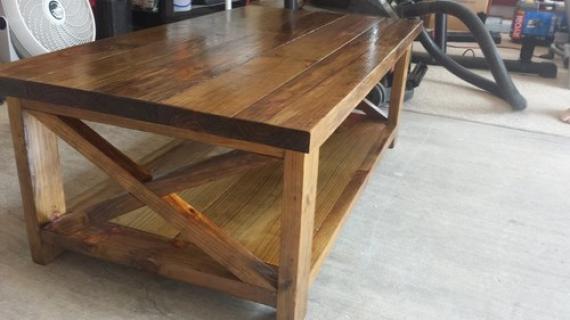
You can build a beautiful coffee table out of lumber! For about $50 in materials, this solid wood coffee table with it's X detailing could be yours. Our free plans include step by step diagrams, shopping lists and cut list - everything you need to get started.
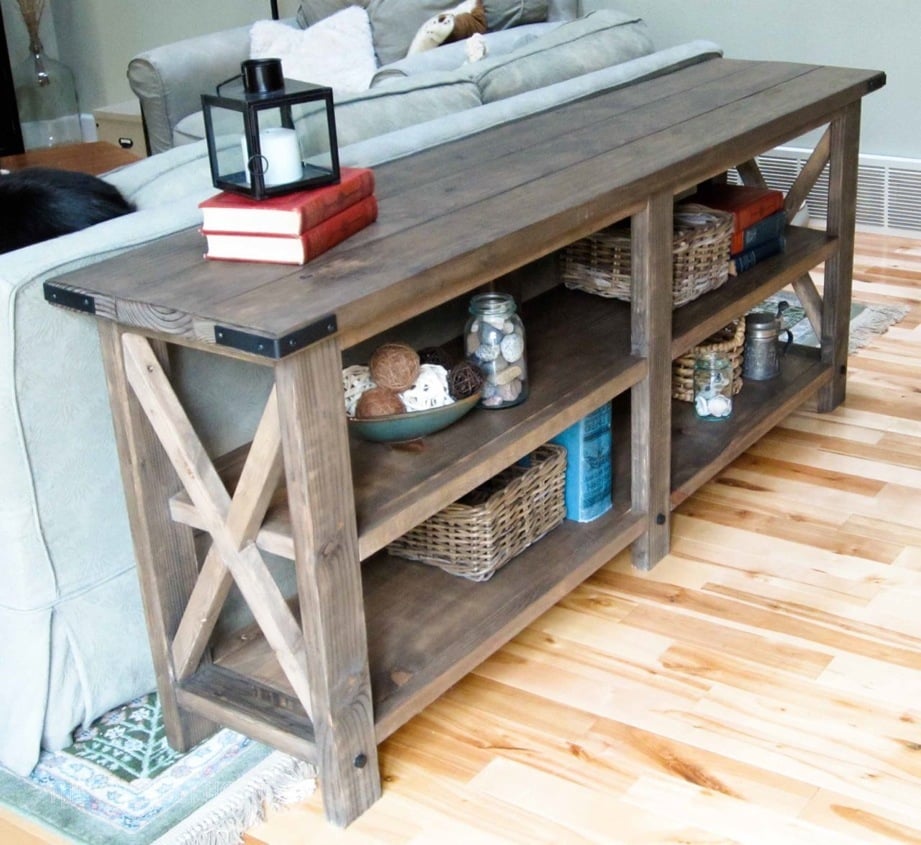
Also in this collection: Rustic X Console Table, Rustic X End Table, and Rustic X Bench Plans


Beginner Friendly Option
With the popularity of this plan, we have created a Beginner Friendly plan that is very similar. It uses less tools and the overall cost is under $40.

The beginner plan is slightly smaller and has a slatted bottom shelf. You can find the plans here.
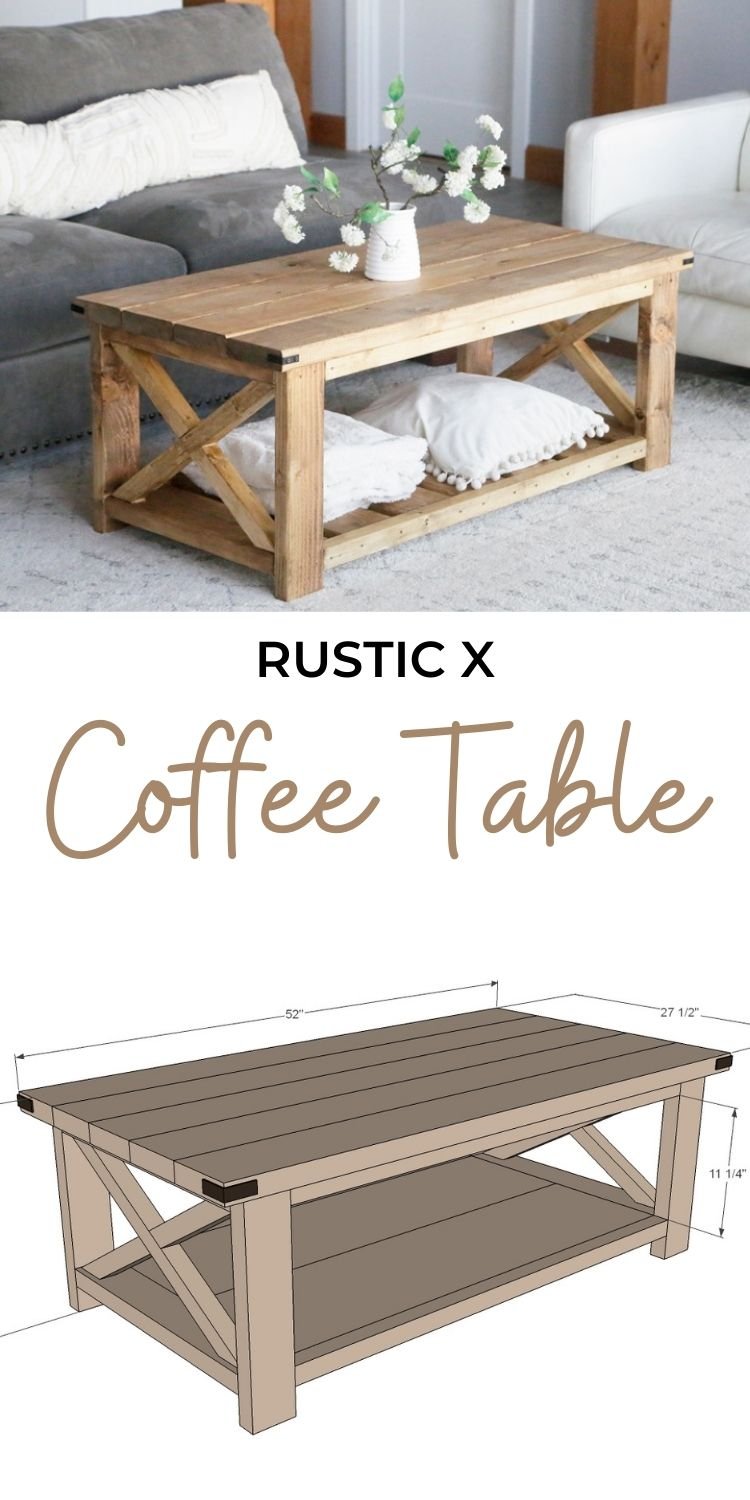
Rustic X Coffee Table Plans
Remember a bit back when Hillary from The Friendly Home built this amazing Rustic X Console Table from 2x4s?
We've had so much interest from readers, we thought we'd add a coffee table plan to the collection.
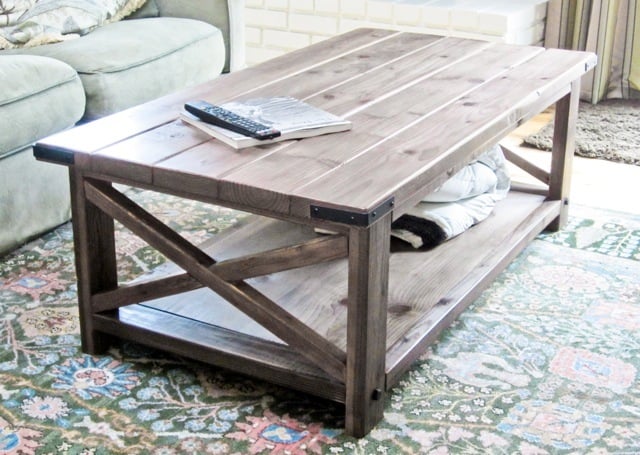
This coffee table is so gorgeous, it's hard to believe it's made from standard off the shelf lumber!

I ENCOURAGE you to stop over and visit Hillary and read about how she battled a wild fire to build this coffee table!
PS - Hillary is also sharing her finishing tutorial.
Pin For Later!

Preparation
- 2 – 2x4 – 8 feet or stud length
- 4 – 2x2 – 8 feet
- 1 – 1x12 – 8 feet long
- 5 – 2x6 – stud length
- 1 ¼” and 2 ½” Pocket Hole screws
- 4 – 2x4 @ 16 ½” (legs)
- 4 – 2x2 @ 41” (side trim)
- 4 – 2x4 @ 22 ½” (end trim)
- 2 – 1x12 @ 41” (bottom shelf)
- 2 – 2x2 @ 22 ½” (both ends cut at 60 degrees off square, long point to short point, ends are parallel)
- 4 – 2x2 @ 11 ¼” (long point to short point, one end cut at 60 degrees off square, other end cut at 30 degrees off square, ends are not parallel but are cut in same direction)
- 5 – 2x6 @ 52” (tabletop boards)


Please read through the entire plan and all comments before beginning this project. It is also advisable to review the Getting Started Section. Take all necessary precautions to build safely and smartly. Work on a clean level surface, free of imperfections or debris. Always use straight boards. Check for square after each step. Always predrill holes before attaching with screws. Use glue with finish nails for a stronger hold. Wipe excess glue off bare wood for stained projects, as dried glue will not take stain. Be safe, have fun, and ask for help if you need it. Good luck!
Instructions
Step 1
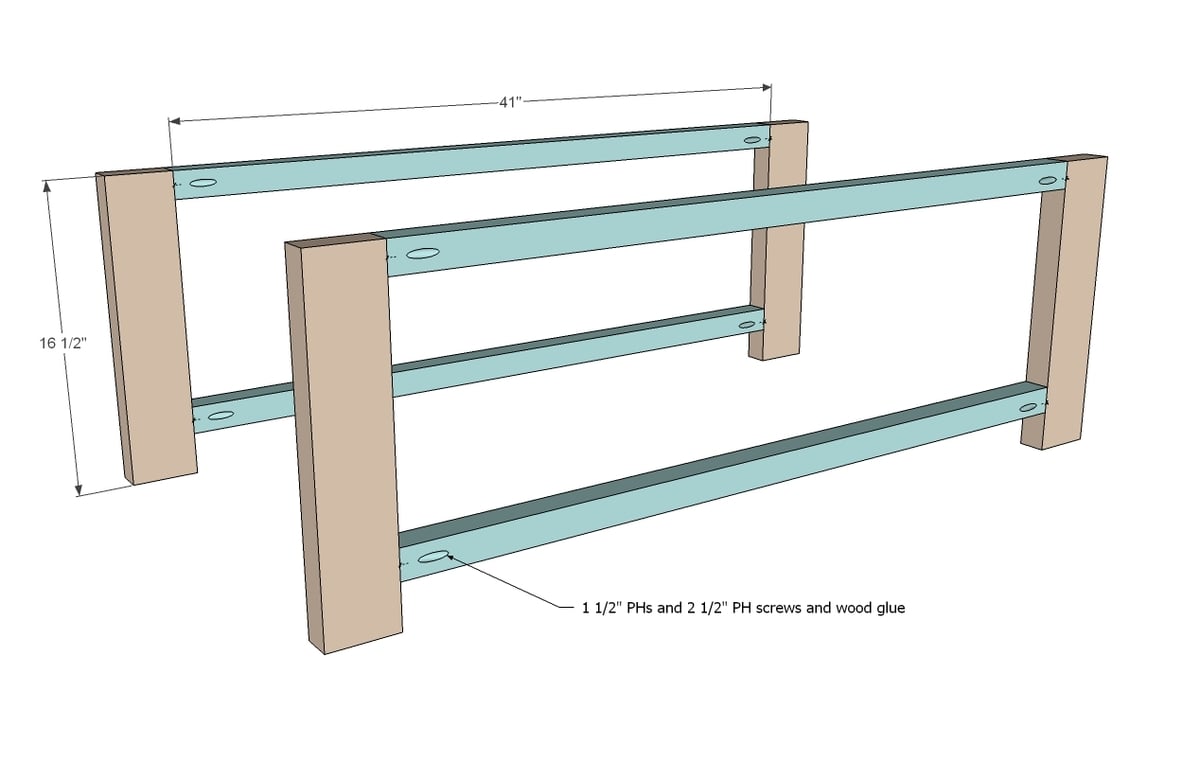
First build the two side trim pieces.
Step 2

Then connect together. Hide top pocket holes on top, bottom pocket holes on bottom. NOTE: This plan is sized for 1x12 boards measuring 11 1/4" wide - measure your 1x12 boards, double that number, and cut your side trim to fit - see next step.
Step 3
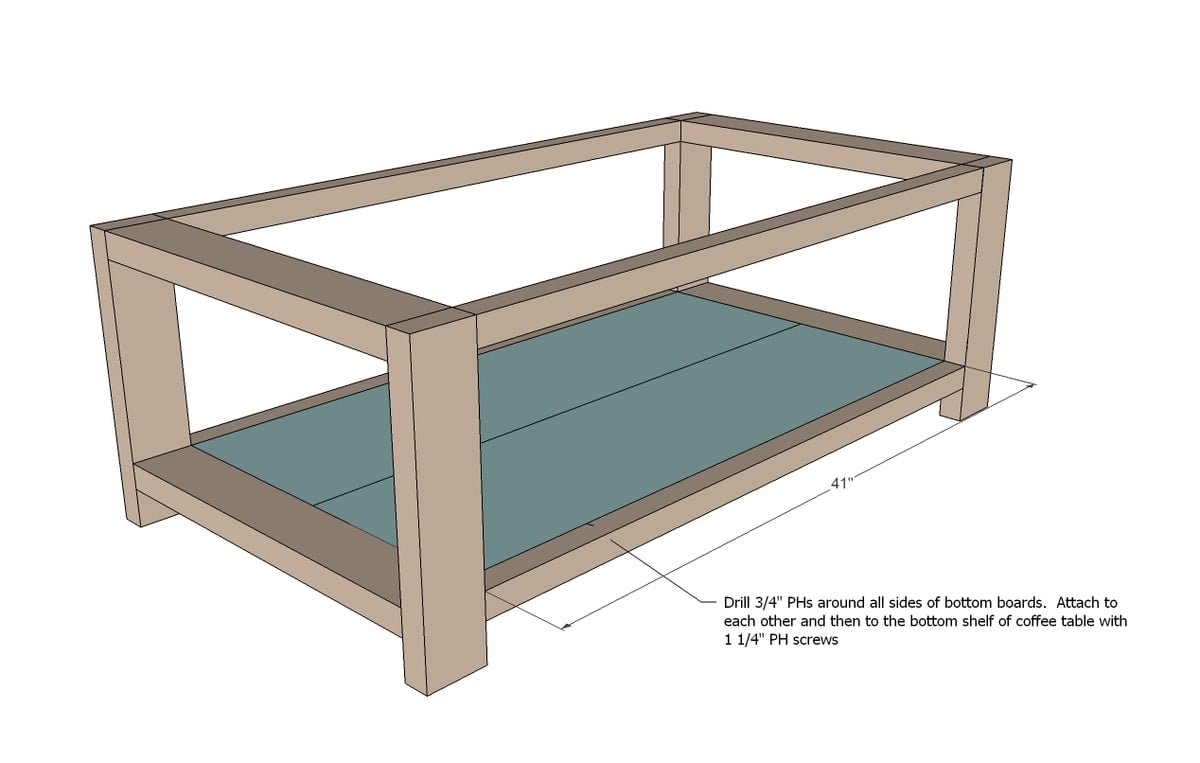
Build your bottom shelf with 3/4" PHs/1 1/4" PH screws down center. Then drill 3/4" PHs around all outside edges and attach to the bottom shelf.
Step 4
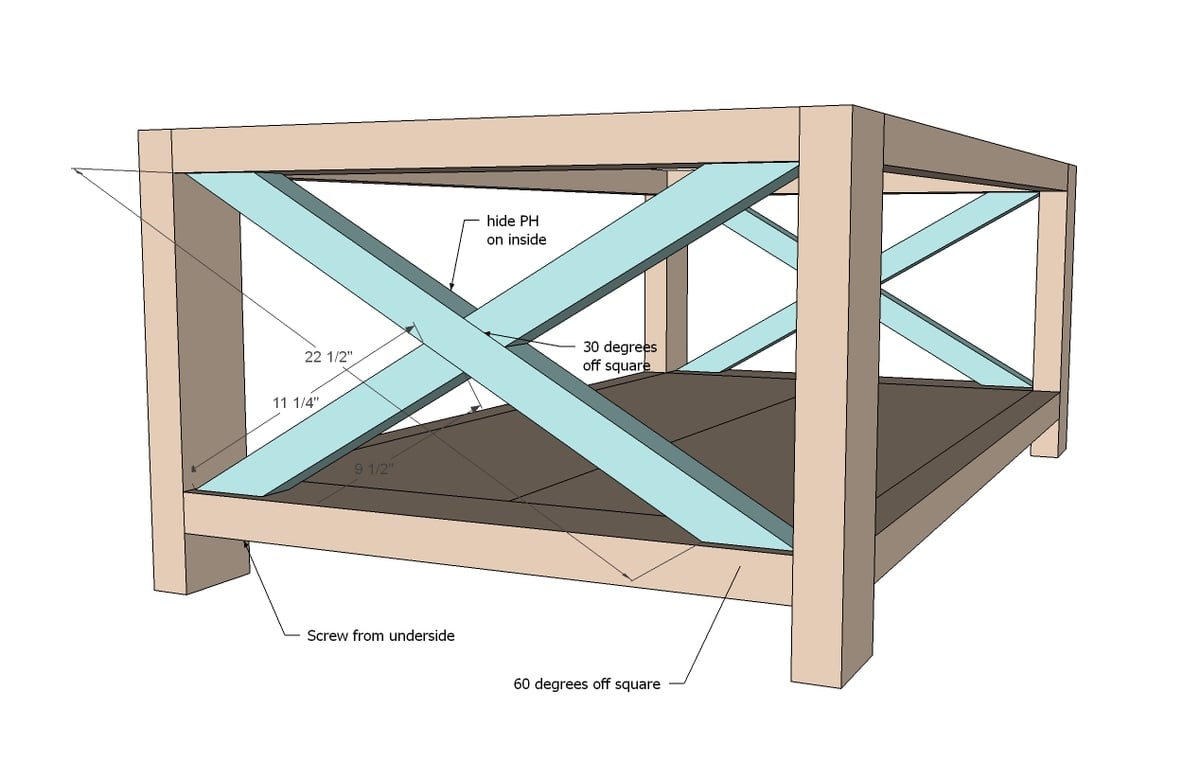
Now attach cut and build the X braces. Attach in place. These are mostly decorative, so don't stress about getting them super screwed in place. Some good glue and screws will do the trick.
Step 5
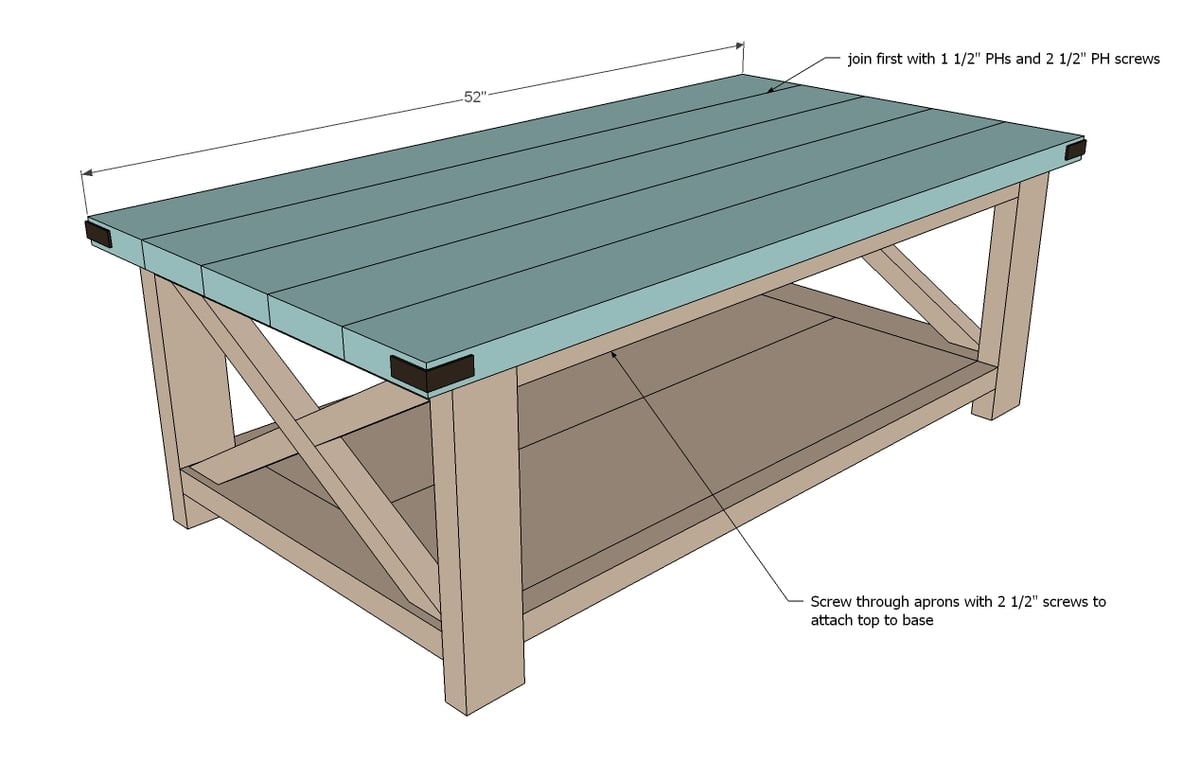
For the top, we recommend building the entire top with 1-1/2" pocket holes and 2-1/2" pocket hole screws on a flat level surface.
Then attached the completed top to the base.
It is always recommended to apply a test coat on a hidden area or scrap piece to ensure color evenness and adhesion. Use primer or wood conditioner as needed.
Comments
chrisman19
Fri, 01/13/2017 - 22:27
wood and stain?
I was wondering...what type of wood and stain did you use to make this one? Is it pressure treated wood?
jirvin26
Mon, 01/16/2017 - 09:43
Hardware for the Table
Where can i go to find the decorative hardware on this table? I am having difficulty finding it.
Jesska5105
Sat, 01/21/2017 - 16:10
Metal accents
Where did you find the metal accents for the corners?
DebbieJo
Thu, 02/16/2017 - 18:35
What kind of wood
What kind of wood did you use? I've made the end table and was able to use pine but can't find 2x4's or 2x6's in anything other than Douglas fir to make the sofa table.
dkl8602
Fri, 07/07/2017 - 19:16
Hardware
Can you tell me where to buy the decorative corner hardware and bolts? Thanks!!
Slurped slurpee
Tue, 12/26/2017 - 15:39
Help!
I am quite new to woodworking. I have built a few tables before, but they were vary basic and not good. For all of the tables, I would just go to home depot and get some pine wood and use that, but pine wood is ugly. Do you guys use pine wood and then coat/ paint or something or do you buy nice wood from somewhere?
thanks in advance!
392guy
Tue, 12/26/2017 - 16:44
What is ugly about pine to
What is ugly about pine to you? If you stain pine and it is coming up with blotches all over you need to add a pre stain to the wood before applying stain. That will even the coloring out along with sanding the wood with 150 or 220 before applying the prestain. Also if being used inside think about a topcoat. Wood working is easy to throw stuff together but to make it look the best and long lasting you need to do research and there will be alot of trial and error to get your finished product to look the way you like.
Sackbut80
Fri, 01/12/2018 - 10:35
Wood
is there any special type of wood to make this with?
Kelseamarie
Mon, 02/19/2018 - 15:01
Wood stain
Beautiful! I love it what color/brand stain did you use?
beerengineer
Mon, 07/22/2019 - 10:09
Finish
What kind of stain did you use to finish it with?
softballmamma
Mon, 08/05/2019 - 07:09
Rustic x tables
I just made this and the two end tables yesterday. I used Valspar heavy cream for the frame and used min wax espresso for the tops and bottom shelves. I also did not use wood conditioner prior to stain. I put on with a foam brush and wiped of immediately, I absolutely love them. I find that the coffee table is too high for use as a coffee table. So I am now using as a TV stand and will rebuild a coffee table better suited.
softballmamma
Mon, 08/05/2019 - 07:09
dakota008
Wed, 11/20/2019 - 16:59
Smaller Rustic X Versions
Hello! I love all of the "rustic x" templates. However, they are too large for my space. The coffee table will hopefully work. Can you provide a template for the farmhouse size but with the regular rustic x design (without the slats)? Same thing with the console table. Can you provide the dimensions/template for a smaller version? Also, can you do a template/build for a tv stand with the rustic x design? Sorry for being so needy!! Thank you for any help you provide!
mcclintock75
Sat, 11/23/2019 - 16:09
Does anyone know the color…
Does anyone know the color of stain used in the picture?
the_jones_circus
Sun, 12/29/2019 - 18:35
Where do you use the Brad…
Where do you use the Brad nailer? I cant figure out where that would be used for.
haggent
Tue, 01/28/2020 - 11:32
Wood movement
How is wood movement accounted for in the bottom shelf? Wouldn't the framed in 1x12s be constricted and possibly break?
Tkoski
Fri, 02/07/2020 - 10:18
I love this coffee table…
I love this coffee table. Great build
Alienz17
Mon, 03/23/2020 - 02:12
Love it.
Finished my coffee table the other night after working on it here and there on the weekends for the past 3 weeks. Turned out great. A little harder then I thought but love it. Finishing matching end tables now. Got one done already. Much easier after doing this table.
bigskyvideo
Wed, 04/22/2020 - 18:38
Help With Bottom Shelf
I'm building this in the next few days, but I don't understand the bottom shelf. Is there really nothing to support the middle seam of the bottom shelf? It seems like it will flex and collapse with any weight.
bigskyvideo
Wed, 04/22/2020 - 18:40
Help With Bottom Shelf
I'm building this in the next few days, but I don't understand the bottom shelf. Is there really nothing to support the middle seam of the bottom shelf? It seems like it will flex and collapse with any weight.
CKam0011
Sat, 05/23/2020 - 20:24
Wood Type
What type of wood has everyone been using for this project?
scrocchi
Sat, 05/30/2020 - 22:59
Wood Stain
Does anyone know what wood stain was used for the coffee table? The link that's been posted previously doesn't work anymore.
sallison20
Wed, 08/05/2020 - 18:42
Hardware
What hardware is shown in the example picture? I didn't see hardware listed in the buy list.
jacksonm
Thu, 08/27/2020 - 08:05
Decorative Hardware
Hi.
I love your table. I just recently purchased all the wood I need to build it.
I have a question regarding the decorative bolts and corner braces. Where did you buy them? I've been looking around but have had no luck. I'd appreciate your input.
Thanks so much!
ascrockett
Tue, 03/09/2021 - 15:48
Corner L Brackets?
What are the L brackets called on each corner? Thanks.
blue1307
Wed, 08/25/2021 - 16:55
Stain
What color is this stain? I love it
thatguy15
Thu, 08/26/2021 - 02:46
Inch to cm
Hi all, I want to build this table but as I am in the UK we use cm instead of Inch. I have tried to buy the wood but as the measurements are in Inch's I don't quite know what sizes to do them in CM.
Has anyone else worked this out?
Many thanks
tk11790
Fri, 01/14/2022 - 23:36
Stainless color
Does anyone know the stain colors or finishing methods on the main picture. I am gonna modify this a bit and make the frame white but I love that color in the picture and the links to finishing are not working for me