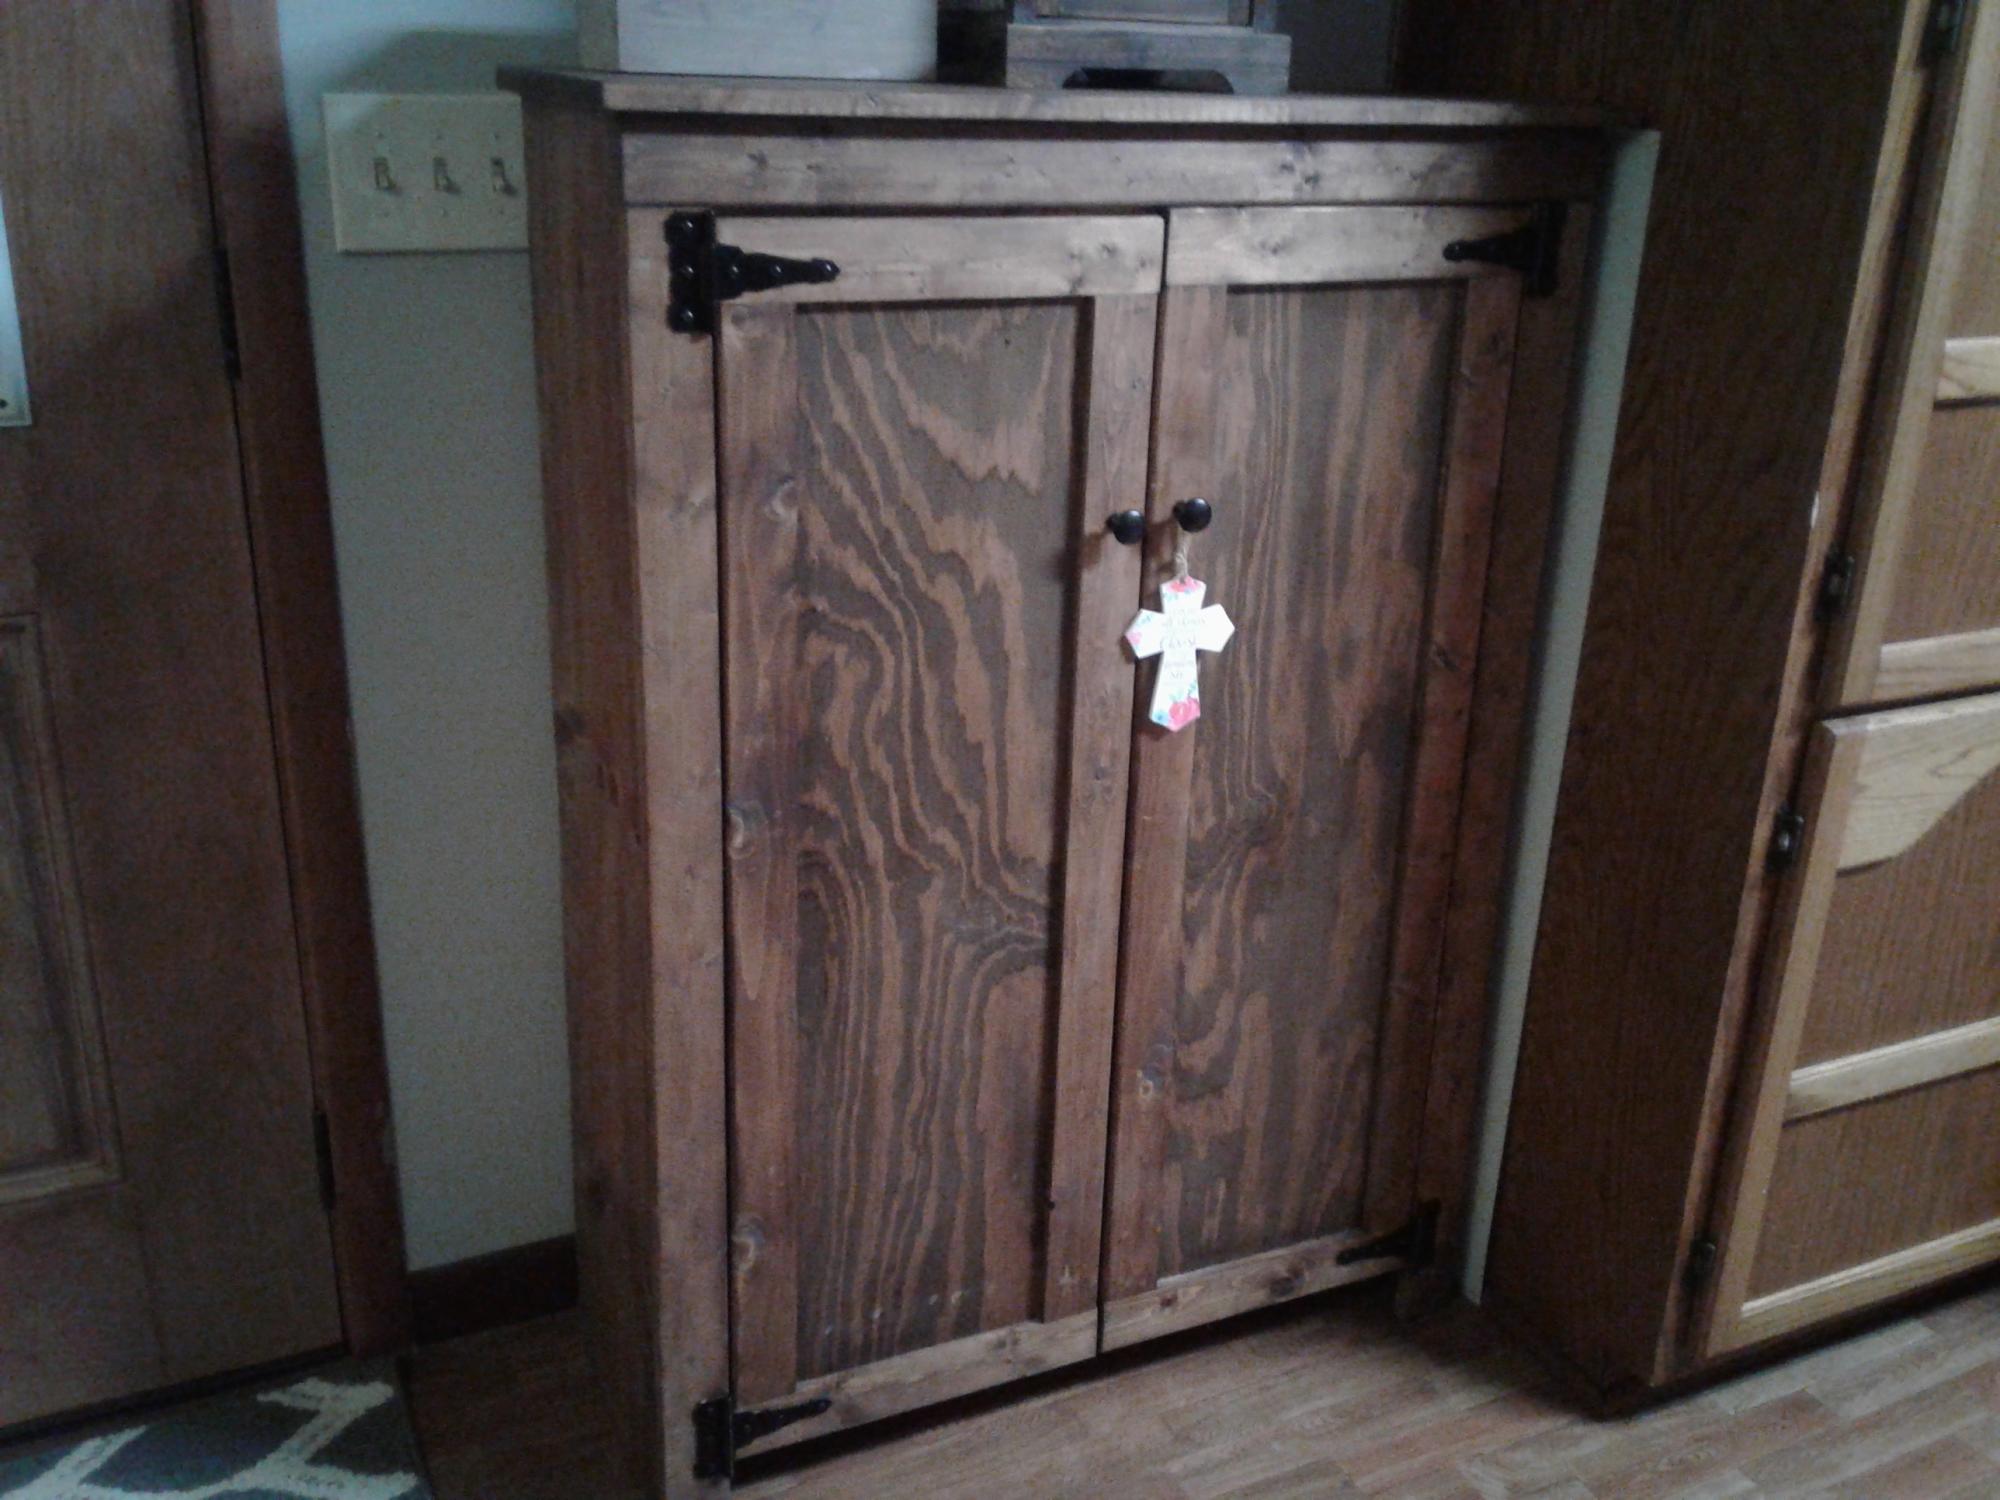
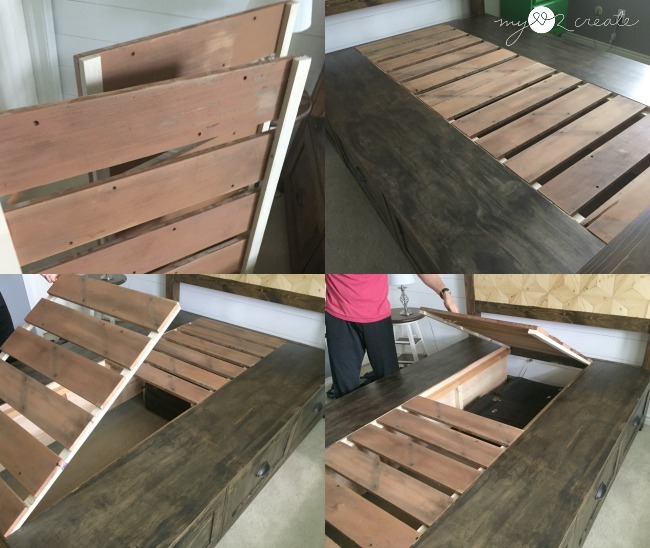
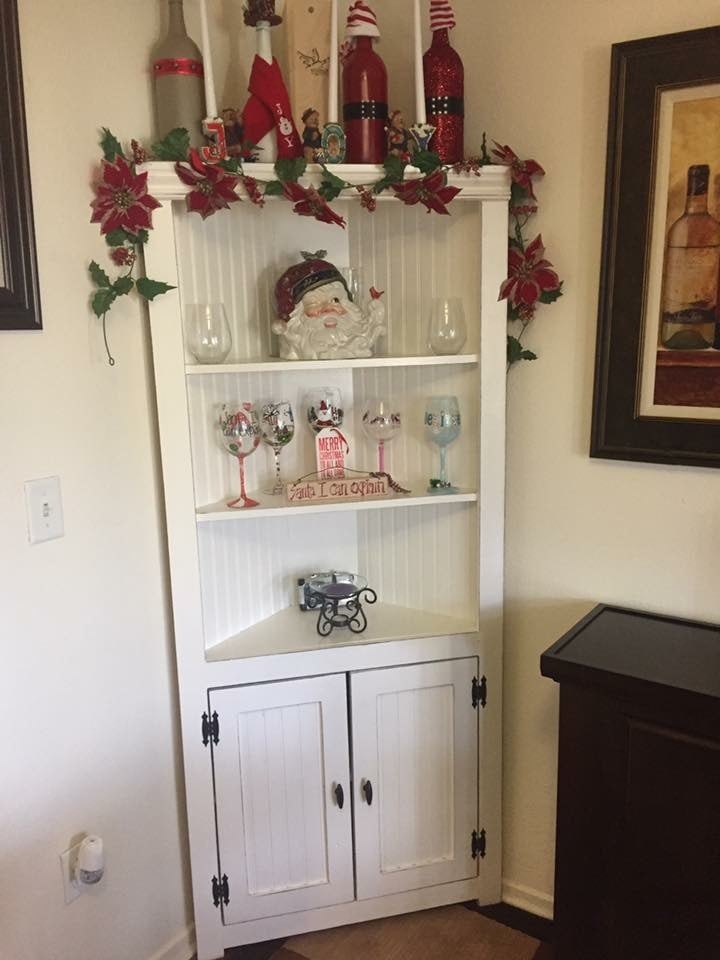
Modern Park Bench
![](/sites/default/files/IMG_20190628_172628_0.jpg)
This is my second project using Ana's plan. Plans were easy to follow.
![](/sites/default/files/IMG_20190628_172633_0.jpg)
This is my second project using Ana's plan. Plans were easy to follow.
I built this for one of my friends that gave me the dimensions he needed. He gave me complete control with the only caviat of needing 2 drawers. I used Premium Pine from Menards, Minwax True Black stain and Minwax Satin Polyurethane. This one came out better than I expected!
My wife wanted a farmhouse dining room table for our new house, I wanted to get into woodworking so these plans were a perfect fit. Bonus was adding a few tools to my collection! Revised plans to two pedestals and shortened about 2 feet. If I were to do over I would have stained and poly'd separately, but I tried to save steps because I was finishing inside the house and didn't have time for separate steps before leaving town. Ran into a few hiccups along the way but both my wife and I are happy with the end results.
Worked with a client to create a boot bench with adjustable shelves. The Essential Entryway Bench was a perfect starting point! I extended the top trim to home the 4” cushion. I love Ana’s plans! Thank you!!!
Made for daughter from your plans,made console longer and a little higher.
This was my first building project! I had so much fun with it ... for a guy that can't even hang a photo on the wall! My dad helped and he had all the tools. I spent a few weekends with him so not only was a good father/son project we had something to show off at the end. I think I've caught the woodworking fever.
Sat, 12/21/2013 - 18:55
Your bed turned out beautiful. I love the finish, that grey stain ads so much character!
Mon, 12/23/2013 - 12:10
I really like the look of the stain. I would be interested to know what changes you made to the original to achieve this look. Also, where did you find the lumber? I can't find knotty alder around here.
Thu, 10/23/2014 - 06:32
Is there a way to find the materials needed and specific instructions on how to make this bed? I LOVE IT!
Tue, 11/25/2014 - 19:22
Hello,
This is awesome, I've been looking to build a bed frame for my new apartment. Does anyone know where I can find the plans for this project.
Similar to the person above me, I am new to this and not quite sure what to do. If anyone can provide me with a little insight to this project I would really appreciate it!
Thanks!
Sun, 11/30/2014 - 20:41
I would love to see the plans for this bed. Please post them if you can! Thanks
Tue, 12/23/2014 - 09:23
Here is the plan http://ana-white.com/2009/10/farmhouse-bed-save-158100_7467.html
Thu, 02/26/2015 - 15:36
Love the bed! Where did you get the lumber? Specially ordered or just regular pine from the store like Lowes or Home Depot?
Wonderful project! Very fun. Built a bench from scrap 2x4s (left in the garage by our home's previous owner, so they were free!) and a piece of MDF shelving. Perfect for our entryway. The bench itself was incredibly easy to build. The hard part, in my opinion, was finishing it. So many pretty things to choose from! I used a piece of 2-inch foam plus a double layer of batting for the top, some striped upholstery fabric, and 160 nailheads to finish it off. Love it.
Tue, 02/14/2012 - 12:45
This really came out nice, and lovely selection of fabric.
Sun, 02/19/2012 - 12:54
Love it! Wondering if I could build it and have some type of slipcover on it. (house with three kids under 5 years old does not go well with permanent upholstery! haha)
Fri, 03/09/2012 - 09:06
If you check out Ana's original plans for the Easiest Upholstered Bench, you'll see that she DID use slipcovers! You could make different ones for each season, or for holidays like Christmas or birthdays...
Wed, 10/30/2013 - 08:36
Hi Katie, I am having a difficult time finding fabric (hard to believe)! did you get yours online? How wide are the stripes? most fabric I am finding is not wide enough to cover the top and sides. Thanks for the help! Great build!
I built this to accommodate my miter saw but I also wanted a place for my band saw. I added drawers to make the table level with the miter saw and they add some extra storage space.
Mon, 03/07/2016 - 14:14
I can see a lot of work getting done there, great job and thanks for sharing!
Finally built my daughter a chair and she loves it
Hello! Thank you so much for providing information and inspiration. I was looking for a very specific couch and I found one. However it was $3000 and had to ship from CA to FL and then I had to assemble it to decide if I liked it or not. Some friends directed me to your site where I found your plans for the outdoor sectional. I modified them to fit my desired outcome and wow! I'm so happy about this. Thanks again!
someJabr0ni What I used:
36 - 2x4x10s
1 - 4x4x8
A whole bunch of screws
Foam cushions from foamfactory.com
Cushion covers from slipcovershop.com
Minwax jacobean stain (finish on top tbd)
Nursery photo ledges. Shortened the shelf depth using a 1 x 2 instead of a 1 x 3.
We modified the plans a little we made the 2 pieces together instead of separate. We used a 2” hole saw to cut out the oven knobs, then drilled holes a tad bigger than the screw so they would still turn once attached. We also made the back splash taller to accommodate our faucet that had to attach on the back splash instead of the counter top. We used all pocket holes to attach everything it makes it look so much nicer but doesn’t need to be done that way. We bought vinyl circles for the burners on the stove. A dog bowl for the sink and a laundry room faucet for the faucet.
Links to products we used
Faucet - https://www.amazon.com/gp/product/B01KRCTHEA/ref=ppx_yo_dt_b_asin_title_o07_s00?ie=UTF8&psc=1
Oven hinges - https://www.amazon.com/gp/product/B004K7V8UU/ref=ppx_yo_dt_b_asin_title_o08_s00?ie=UTF8&psc=1
6 – 4 inch circles matte black Stove vinyl - https://www.etsy.com/listing/713062039/circle-circles-pack-set-vinyl-decal-car?ref=yr_purchases
Sink 56oz dog food bowl - https://www.amazon.com/gp/product/B00H6OXRN0/ref=ppx_yo_dt_b_asin_title_o01_s00?ie=UTF8&psc=1
Oven handle - https://www.lowes.com/pd/Sumner-Street-Home-Hardware-Vail-10-in-Center-to-Center-Matte-Black-Pull/1001368422
I followed the plans exactly, except I didn't put the trim pieces on the lower shelves sides. I really like the way it turned out, and my wife painted it with Annie Sloan Chalk Paint, color "Paris Grey" and then used Annie Sloan finishing wax (both clear and dark wax) to protect the piece and age it. I think it turned out great! Thanks for the plans!
Nothing was to difficult with these plans, at least not if you have a Kreg Jig. I would add that I used pocket screws on the top pieces not only to join them to the breadboard end pieces, but also to each other. That made it really strong!
Love this stain and how it makes the grain stand out!
My son was too big for his toddler bed and had been spending his nights in the guest bed, instead. For his Christmas gift this year, his grandparents were going to get him bedroom furniture, but I insisted on building it instead! I love the rustic theme, saw the rustic dresser on wheels and thought it was perfect for him and perfect for us since we move so much with the military. Hello, a dresser on wheels? Like, no man labor trying to carry the thing out of the house? Just roll it? SOLD! I HATE the wheels that I put on it, but I really did not want to dish out $100 for the spoked wheels. I think I may change them one day and put the wheels on that will make it look ten times better, but for now, these will do. The wood for the dresser was pricey, but it was my first time buying plywood and I didn't realize that I could buy nicer plywood in smaller amounts that would have been a little cheaper since I didn't need to buy entire boards! Otherwise, it wouldn't have cost as much I am sure. I built a bed and a night table to match the dresser (as seen in the pictures), and frankly, I am very pleased with this set that I built! (CHECK OUT MY BED! http://ana-white.com/2014/02/rustic-twin-bed-upholstered-headboard-matc…) It was quite a difficult project for me, being the first time I had built drawers and because I didn't have more than a few hours in a week to get outside to work on it, but I finally finished :-) I also had a very small space to work in, since my husband consumes the garage with his man "stuff" and it was cold, so I needed the door closed with the space heater ;-). This project could definitely use some good amount of workspace!
Today I’m sharing this unexpected addition to our kitchen! Everything about the construction of this furniture-style kitchen island seemed to be charmed. There is usually a lot of trial and error that goes on behind the scenes during our projects- but everything seemed to just kind of fall in to place. We enjoyed it while it lasted, since we know it won’t be that easy again! ;) Without a real plan for the island, we found the beautiful marble slab on Craigslist for a steal. While the slab was having it’s edges finished, I began comparing island legs. The ones I decided on came from Osbourne Wood, they are called The Grand Harvest Island Posts. I liked the chunky style in order to support the heavy marble. We are so so happy with the quality of the legs that we plan on using this company for all future furniture building projects. For the specifics on how to build the island, we were a bit stumped. We were just kind of going to wing it. Then, when I was daydreaming about a completely unrelated project, I stumbled across the kitchen island plans in Ana‘s book The Handbuilt Home. The dimensions were almost perfect for the slab! We modified the plans slightly- we didn’t need casters, and our island needed to be a bit narrower than the plan in the book, and we swapped out the 2×4′s for 2×6′s in some places- but the length was perfect, so we were still able to use most of the materials list (a huge time & money saver!) to maximize yields. We ordered a Kreg Jig, like Ana recommended, and I have to say- I love it! This island was so much fun to build and finish- and it makes a huge statement in our DIY renovated kitchen!
In reply to Charming is right! by Ana White
Fri, 02/28/2014 - 07:57
Thank you so much Ana, and you are very welcome! Thank you for the wonderful plans :)
Fri, 02/28/2014 - 08:00
Thank you! To attach the marble, we used silicone caulk per the recommendation of the fabricator who finished the edge for us. I hope that helps!!
Mon, 03/03/2014 - 17:24
Unbelievable! Great accent to the kitchen. You mentioned you used both pine and maple... can you specify which parts were pine v. maple? Beginner here... Thanks
My home office remodel was inspired by a post from Ana White a few years ago. For this project I ended up using IKEA bookshelves and cutting the tops off and flipping them upside down. I used some crown mounding to cover the base of the cabinets on the tops. The desk top bases are file cabinets I found at the office supply store and the desk tops are edge glue pine. Overall I think I only had to make 8 cuts for the entire project. Saving me a ton of time and money. Thank you Ana for all of the wonderful post!
Mark Danreiter on Facebook
I did this project 99.97% alone (if you call "alone" with a 1-year old and 3-year old nearby). This was a challenging project that took longer than expected (one full week, working well into the night after the kids went to sleep). I used furring strips for the 1x3s and 1x4s. They cost about $2 less per board! Total cost of this project includes paint, screws, etc.
Tue, 05/29/2012 - 03:00
What a beautiful room. The bed looks just perfect in there. I love everything from the bed, to the bedding, to the wall color!
Mon, 10/22/2012 - 20:40
I have been looking for something similar to this but with a futon in the bottom. Anyone seen plans for such a critter?
Thu, 06/20/2019 - 11:46
AMAZING! I can't believe you tackled this with toddlers!
I followed the plans pretty closely. I added dividers to make 3 drawer units but I didn't find it necessary to have the top shelf go all the way to the back since it would never function as a shelf. I used scrap pieces for that and they weren't big enough to be full shelves.
I used 1/2" MDF for the bottom, sides, and backs of the drawers to cut down on weight, cost, and general bulkiness. I used this free app called Cut List to figure out the easiest way to have the guys at Home Depot cut all the drawer panels after I learned I'm not that good with a circular saw. I used a hack saw to cut aluminum bars for hanging files and used scrap wood to make the little brackets to hold the bars upright in the drawer. The full extension drawer slides are functionally and asthetically better but it would have been so much easier to put in basic bottom mount slides.
I wanted a wood grain top and ended up with common pine boards over more expensive poplar or oak and I would use pine again without hesitation. I used Google SketchUp to figure out the widths of boards I needed to make the top with minimal cuts. Then joined them with glue and mending plates and sanded the hell out of them. I altered the dimensions slightly to make it the same size desktop as the Bedford desk. My two wing sections are 23" x 23" but I should have made them 23" deep by more like 24" or 25" long. I had to hack the bottom bracing to make a spot for the drawer units to slide into. If you alter the dimensions make sure you can secure a brace between the main body and the wing of the desktop and still have room for the brace at the edge of the wing.
My cost includes things like a Kreg jig, saw blade, clamps, paint brushes etc. so you may be able to do this for less. I could have gone with a middle of the line paint I think. This project was a beast for me because a) I'm not a furniture maker b) I don't own a table saw which would have been amazing c) I picked the hardest way to make the desktop and d) I modified some of the dimensions from the basic plans. I worked on this thing for weeks (granted sometimes I didn't touch it for several days or a week). But it was a fun and rewarding project.
Tue, 08/27/2019 - 19:28
This is AMAZING!!! I'm so sad I did not see this earlier. Thank you so much for sending in pics!
This is a quick and easy cheap build. I priced planters this size at the store and they were about $75 with a trellis. I built this one for under $20. Thanks Ana!
I got tired of both the clutter under the kitchen sink and how often bottles of random cleaning solutions would tip over and make a mess. Based on Ana's plans, I made these organizer shelves so that all of our most-used stuff would be at the front. Found some scrap pieces of beadboard from another project for the backing, and put the whole thing together with glue and my finish nailgun. I'm pretty pleased with this small Saturday project. Thanks, Ana!
Sean Payne