Search Results

… Sliding Barn door TV ConsoleRead More
Brag Post
Barn Door ConsoleRead More
Brag Post
Barn Door hardware consoleRead More
Brag Post
… Modified Grandy Barn Door ConsoleRead More
Brag Post
Barn Door ConsoleRead More
Brag Post
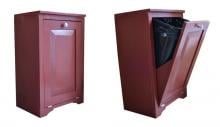
… placing the center back support until after you install the tilt out door. … Attach front trim with brad nails to the front of the cabinet. … Build the door frame with 1x3s using pocket holes. … Drill pocket holes along … at a 45 degree angle. Drill two pocket holes on sides. Attach to door panel and to the bottom. … Cut the 1/4" plywood panel to fit inside … Read More
Project Plan
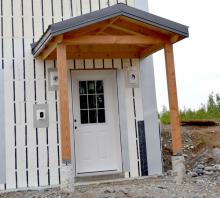
… than a standard 2x6 wood framed wall.  So we will need a special door jamb to fit the wider walls. The doors are late to go in because we wanted to DIY the door jambs themselves.  To just order the door slab, and then hang the doors on our own jambs that are 11 1/2" … Read More
Blog Post
… build your doors first (see step 6) and then measure the finished door, add 1/2", add another 1 1/2" for the face framing, and this will … If the 1x4 boards are too wide (not likely) you could build the door and then trim it down to fit. A final option is to just go ahead … the appearance of a past board to board joint. … Midcentury Modern Console / Buffet Cabinet … Read More
Project Plan
… you cut your boards, make sure you measure the exact opening of your door, and leave 1/8 gap for a tight fit, 1/4″ (total gap, so that’s 1/8″ all the way around) for a roomier door. If you have a pocket hole system, build the door frame as shown … Please don’t attempt as a first project. Happy Building! … Media ConsoleRead More
Project Plan
… you cut your boards, make sure you measure the exact opening of your door, and leave 1/8 gap for a tight fit, 1/4″ (total gap, so that’s 1/8″ all the way around) for a roomier door. If you have a pocket hole system, build the door frame as shown above. You can use a countersink bit or wood dowels … Read More
Project Plan