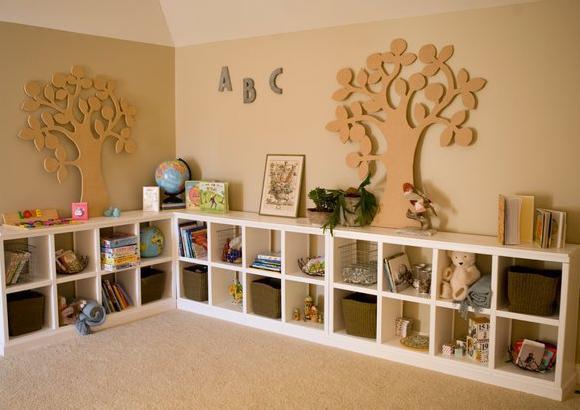


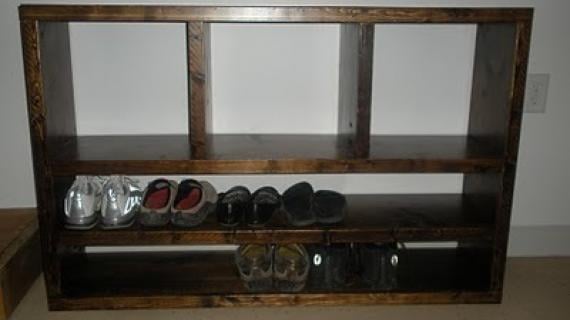
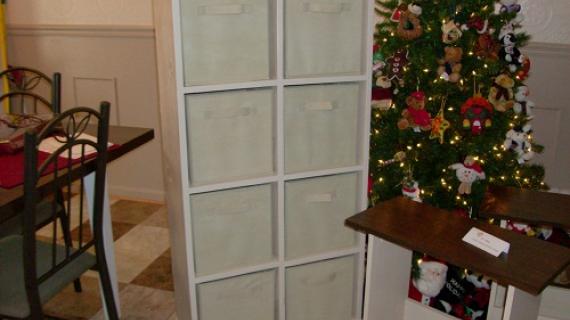
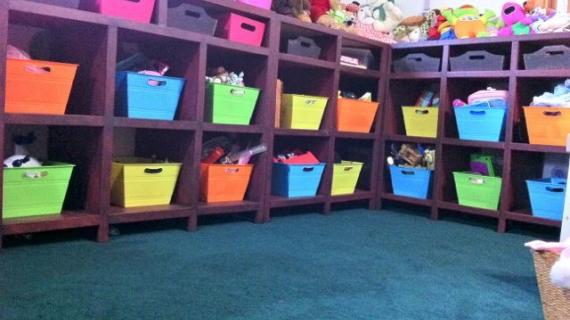
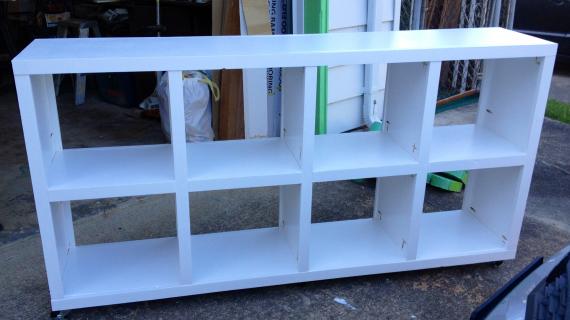
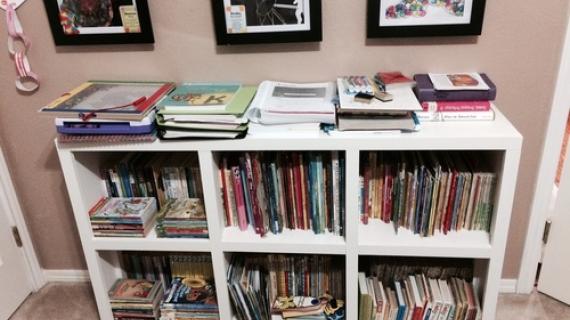
This console height cubby unit can be used as wall storage or as one of our readers did (inspired by DIY Magazine) an entire wall of storage! Special thanks to our readers for sharing their photos.
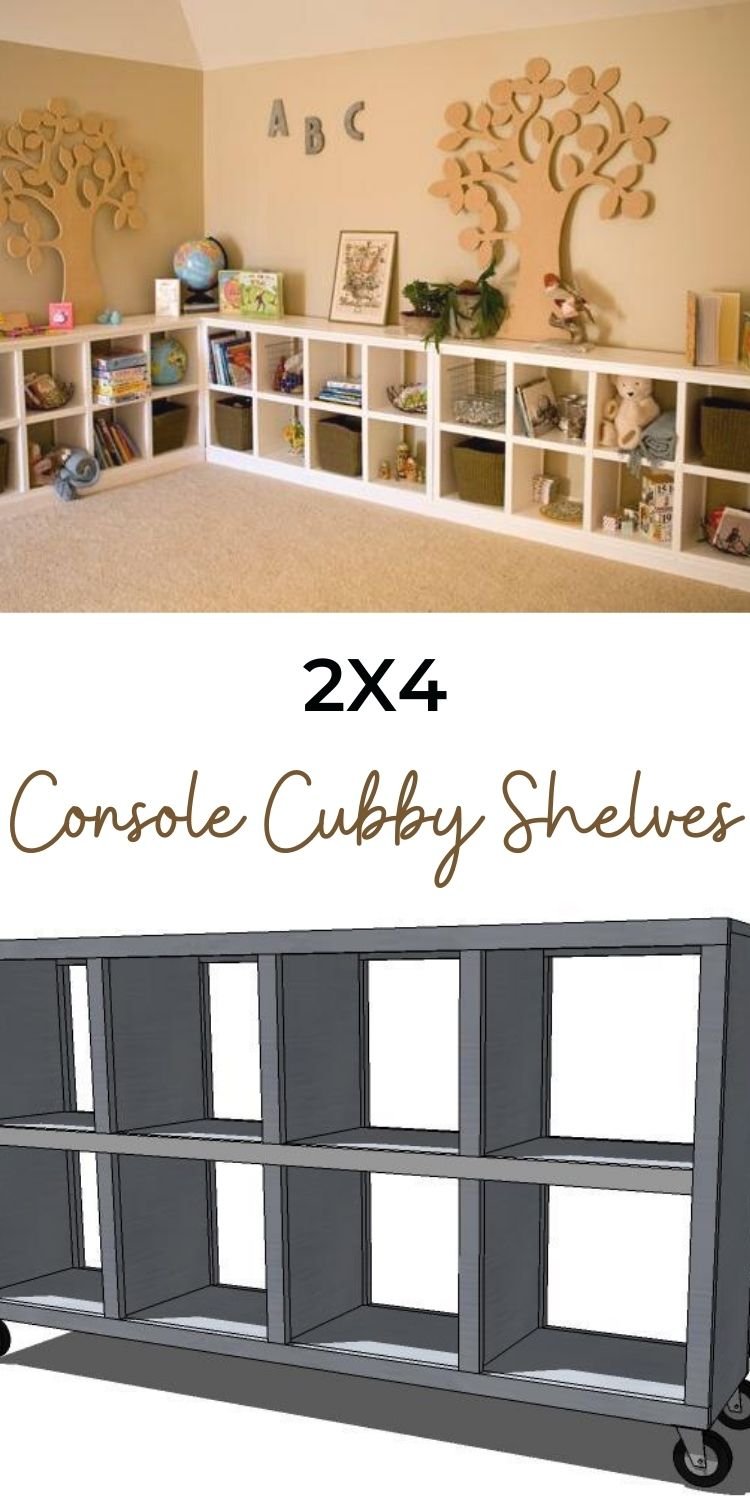
Pin for Later!
This stack of magazines from our trip to the bookstore have been waiting to be blogged for a couple of weeks, and just yesterday it occurred to me that the April editions are probably now available. So not to overwhelm you with magazines, but I wanted to show you the reason I bought the Better Homes and Gardens DIY magazine for March 2010

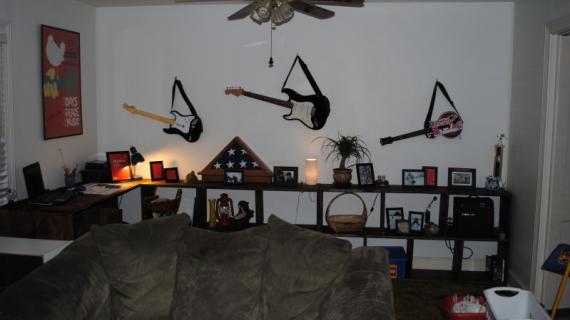
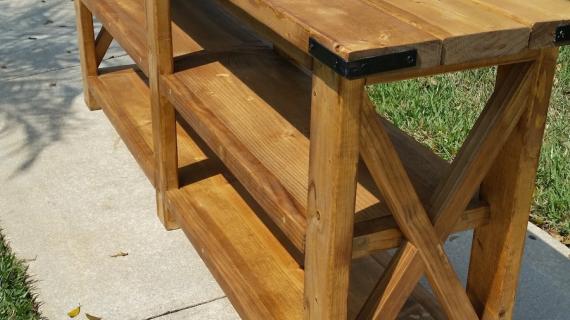
I loved this room, and I especially love the shelving. Of course this is an IKEA Expedit unit, and at $70, a very reasonable price. I am going to give you plans for a similar unit (with trim over the shelves and dividers for extra strength) today, and also show you how to add the molding on the bottom of the shelving unit.

Notice that is THREE shelving units, put together with a solid countertop. I will show you how to adjust the length of the legs in this plan to get this exact look. Love those trees? Go to here for the pattern, from Jeni Wright of Team DIY.

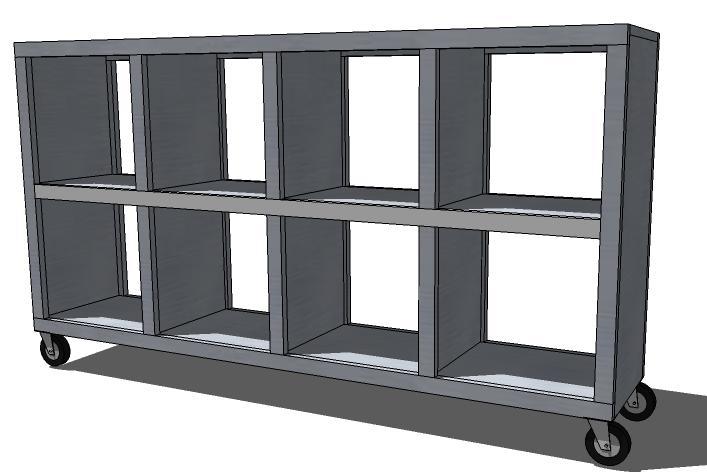
So you might not have room for all three. I just want to give you an idea of how to finish out the tops and bottoms to make the shelving units look like built-ins. Of course, if you like the wheeled version better,

That's the plan we are doing today!
Preparation
4 – 8′ 1×12 Boards (Cut all of the long cuts first, short cuts from the scraps) 8 – 1×2 Boards, 8′ Length
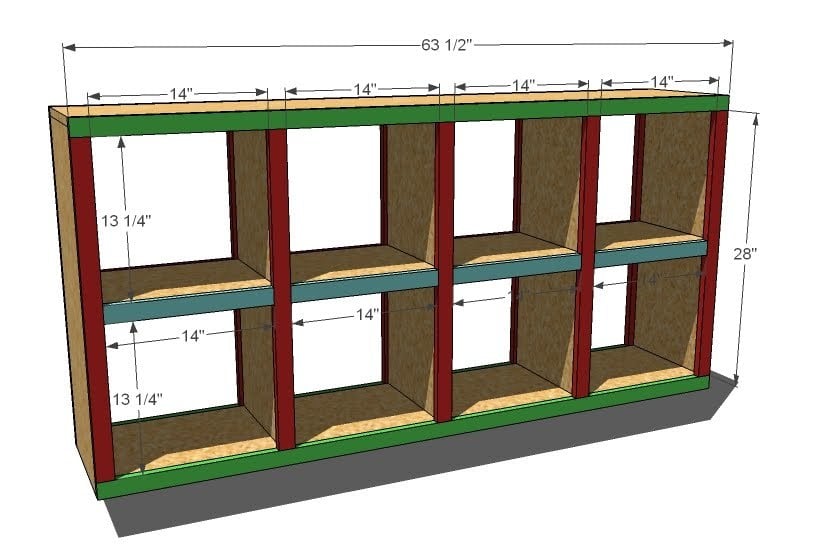
Cut List for the Box 2 – 1×12 @ 30 1/4″ (Sides 1 – 1×12 2 63 1/2″ (Top) 2 – 1×12 @ 62″ (Shelves) 6 – 1×12 @ 14″ (Vertical Dividers) Cut List for the Trim (I recommend cutting your trim to the project specific measurements and using these numbers as a guide) 4 – 1×2 @ 63 1/2″ (Top and Bottom Trim) 10 – 1×2 @ 28″ (Vertical Trim) 8 – 1×2 @ 14″ (Shelf Trim) 3 – 1×2@ 11 1/2″ (Caster Wheel Supports)


Work on a clean level surface. Take a square after each step. Use glue and keep outside edges flush as necessary. Use proper safety equipment and precautions.
Instructions
Step 1
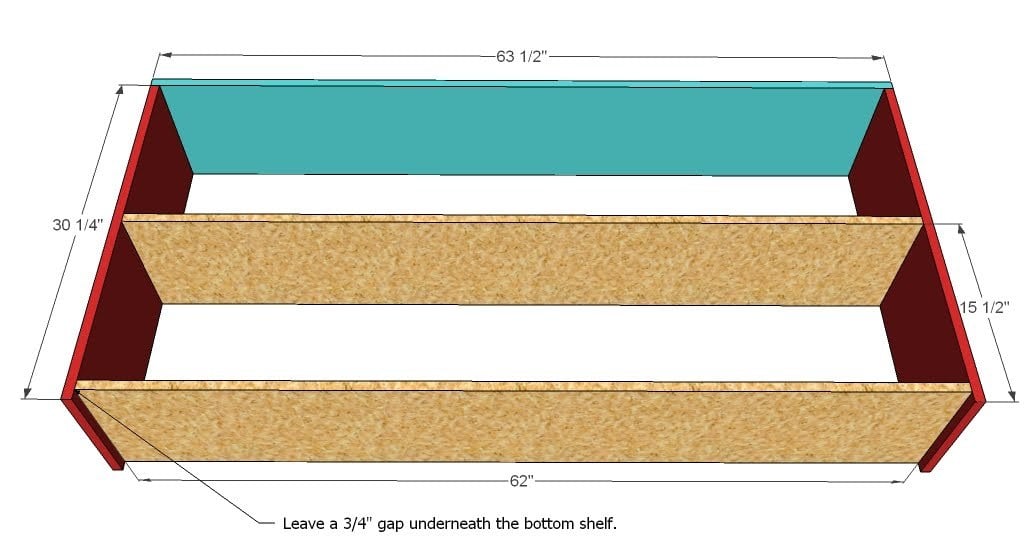
Build the Box. Begin by fastening through the sides with 2″ nails and glue to the shelves. Use the measurements above to guide you. Then fasten the top in place.
Step 2
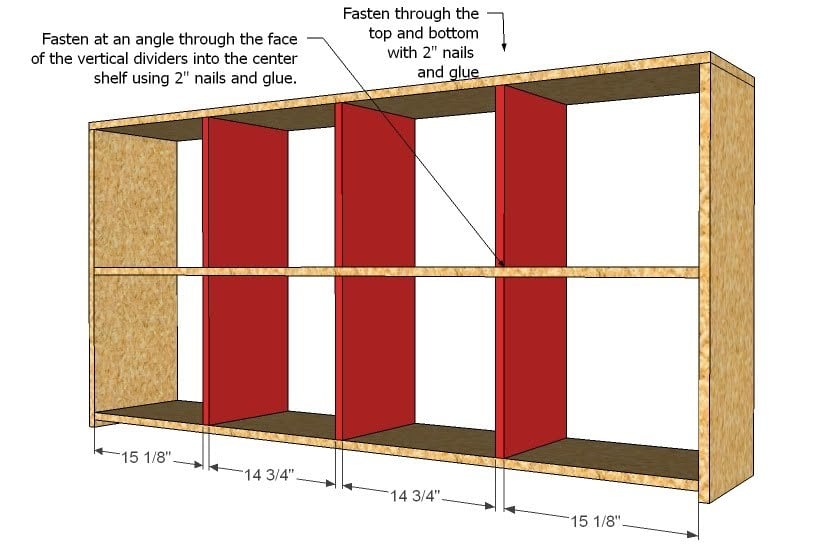
Dividers. First fasten all the bottom dividers in place, fastening through the shelves into the ends of the dividers. Mark out the proper spacing. Then fasten through the top into the top dividers. To fasten the bottom edge of the top divider, nail at an angle through the bottom corner of the divider into the shelf. Use 2″ nails and glue.
Step 3
Trim. Using 2″ nails and glue, fasten the trim in place, measuring to fit. You may wish to mark the top and bottom trim before fastening the vertical trim in place. The shelf trim is flush on the top with the shelves.
Step 4
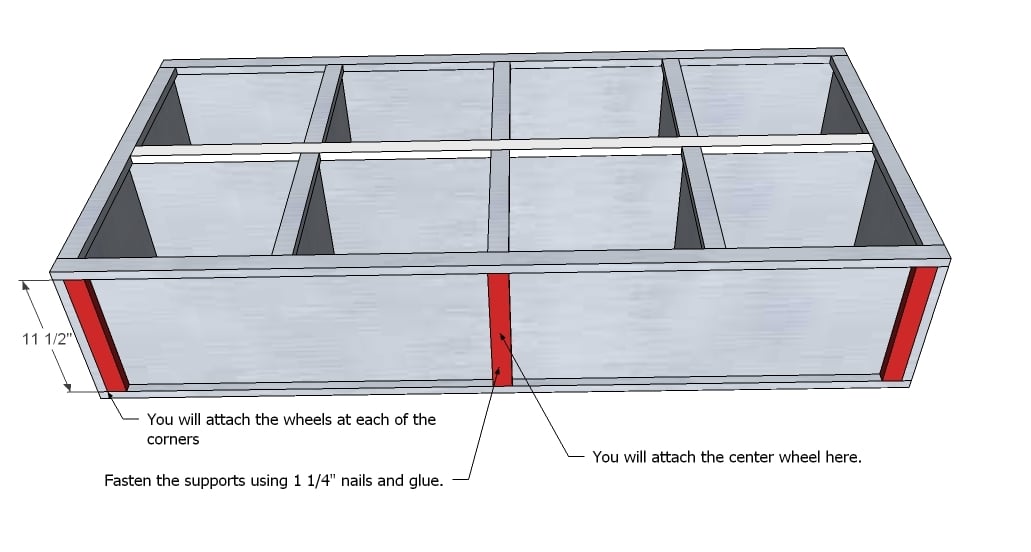
Caster Supports. Using 1 1/4″ nails and glue, fasten the caster supports to the bottom of the piece. Then fasten your casters to these pieces.
Comments
Viola (not verified)
Fri, 03/05/2010 - 09:56
Thank you Ana. This so
Thank you Ana. This so versatile. I can hardly wait to build it this spring.
eas (not verified)
Fri, 03/05/2010 - 09:56
Ana, LOVE your blog! I've
Ana, LOVE your blog!
I've been waiting and waiting for you to put plans up for a bookshelf EXACTLY like this!!!
Will you be doing plans for the 2 level one?!
Katie (not verified)
Fri, 03/05/2010 - 10:44
This is exactly what we are
This is exactly what we are looking to build in our bedroom! We have a half story, with a low wall that I wanted to line with shelves like this! Thank you!!
Kate Bailey (not verified)
Fri, 03/05/2010 - 10:45
I know, I want to make the
I know, I want to make the two level one, too! I could probably figure it out on my own by looking at the cut lists and instructions for this one, I'm just so lazy.... sigh. Anyway, I'm super excited to make this!
Qycone (not verified)
Fri, 03/05/2010 - 15:53
I love love love this! I am
I love love love this! I am so happy you are doing these modern pieces too! My head is swimming with ideas on how I can use this! "Oh! I could use one there! Oh, I could use one over there too!"
I also put in a vote for the two level one when you get a chance. I think the two level one is exactly what I need to make the perfect sofa table in my living room.
Thank you so much, Ana! I am so inspired!
souldose (not verified)
Sat, 03/06/2010 - 02:06
I have to show this blog to
I have to show this blog to my parents maybe they can build house furniture... I personally would love a study desk with big space to fit my wheelchair and something at the back after I'm seated that'll keep my chair from falling over when shaking and fainting spells hit
Alicia (not verified)
Mon, 03/08/2010 - 06:59
Can't wait for the two level
Can't wait for the two level one this will help clean up all the toys in the living room! Thanks!
Jenna (not verified)
Fri, 03/12/2010 - 10:57
Your directions and pictures
Your directions and pictures are so nice! It is easy to see how the project would come together.
Donna (not verified)
Mon, 03/15/2010 - 17:54
This is amazing! I've always
This is amazing! I've always admired these kind of shelves and thought I could possibly make one myself, but I could never quite figure out how to secure the vertical supports inside the shelving. Of course it was the trim...you make it look so easy! :)
Vicky Baker (not verified)
Mon, 03/22/2010 - 06:07
Oh this is absolutely perfect
Oh this is absolutely perfect - my husband and I have been looking for a record album (remember those?) storage solution for MONTHS. Non of the commercially made 'cube' storage had large enough cubes. This is perfect in it's dimensions - I don't even have to change a single cut!
Will post pictures of the two of them when they're done!
P.S. Got any ideas for barrister bookcases that'll fit DVD's ?
~janelle~ (not verified)
Thu, 04/15/2010 - 09:00
Thanks for these plans, Ana!
Thanks for these plans, Ana!
I went to the lumber store last weekend, and bought 5 1x12s, but it wasn't enough for all of the shelfs and dividers. I bought most of the lumber, and am going back this weekend for the rest. I will need 3 more 1x12s to complete the cuts that you outline. Of course, that's assuming a 6' 1x12, which is what was available to me.
I'll post pictures as soon as I'm done!
P.S. This DEFINITELY makes me appreciate the need for a nail gun! Mine doesn't hold 2" nails, I need a bigger one!
aimeewrites (not verified)
Sat, 04/17/2010 - 12:43
Perfect! I've been wanting
Perfect! I've been wanting better storage for my boys' toys, and this will definitely fit the bill. I'm not sure when I'll get it done, but I'm printing the plans today...one step closer!
gakusei (not verified)
Sun, 04/18/2010 - 18:02
So glad I found this! I was
So glad I found this! I was just envying the Expedit shelves, as I prefer cubbies to dresser drawers. This is a great plan for a money-tight college student like me. Thanks!
Kristin (not verified)
Thu, 05/06/2010 - 16:03
Has anyone modified this to
Has anyone modified this to make it 4x4 like the Expedit? I was planning on putting one of those on a living room wall but if I can build a more durable version (for less!) I think I want to try my hand at it but it would be the first big piece of furniture I've built and I'm intimidated. It looks like it would be plenty easy to make it one cubby wider, am I right?
orange sugar (not verified)
Fri, 06/04/2010 - 16:03
Hey Kristin I don't think it
Hey Kristin I don't think it would be difficult at all. I was thinking something similar. This reminds me of the Expedit but you can build it out of something better than particle board.
makingitcheap (not verified)
Wed, 01/26/2011 - 18:24
Ana, I don't know if you have
Ana, I don't know if you have decided what to put in your entryway but I have a similar great room that I love but sometimes I had been looking for some way to "make" one with a piece of furniture. I stumbled onto a picture of a similar cubby system, about 5' tall by 4' or so wide that was "open", allowing the spaciousness that we love about our great rooms but a sort of closed area so that people who just stop by won't see all our mess in the room. The picture had the cubby unit staged with decorative items, and since then I saw an hgtv show that used a similar one to separate a "bedroom" from a living area in a bachelor or loft apt. I am going to try to make this cubby unit you have shown without the wheels to be my "entry." I think it will be fabulous. Thank you for posting the plans. Teri
Lynne (not verified)
Sun, 02/13/2011 - 09:28
Kristen, this is only the
Kristen, this is only the third thing I've ever built in my life and I must say, it's easier than I thought. I was intimidated too, but you definitely can do it. All I have left to do it sand and paint it, and I'll include pictures. You could alter the design easily.
Guest (not verified)
Thu, 04/07/2011 - 12:51
I love love love the trees on
I love love love the trees on top of the shelves in this photo? I see they are the same as the ones in the magazine. Any idea where you can get them?
kdgal
Thu, 04/07/2011 - 13:23
Tree Pattern
It'a DIY project! I saved it because I think they are so cute too. Here's the link- http://www.diyideas.com/howto/WorkWithWood/plywood-tree_1.html
Jessica Kennedy (not verified)
Wed, 06/27/2012 - 10:26
tree pattern
When clicking on the link it doesn't not show the tree pattern. I really would love to have this
Guest (not verified)
Tue, 04/12/2011 - 12:40
Question
Does anyone know where I can get the plans Ana mentions for these shelves with the added countertop and molding to make them look like built-ins? She references these plans, but I only see the ones for the single shelf with wheels. Am I missing something? Thank you!
bhoppy
Tue, 04/12/2011 - 12:59
they must not have migrated
I can't give you the exact dimensions but I do remember the plan used to be much longer..(because I wanted the built-in look too.) basically you build the box the same but extend the vertical face framing down as legs and then trim the bottom with base molding. For the top she added cleats to the corner walls and then another board across the top. I remember Ana saying not to use glue though, otherwise it would be impossible to get off. Does that make sense??
Maybe she will see this and post her original extended plans so you won't have to rely on my poor description and shoddy memory.... I'll look to see if I saved it somewhere though.
Guest (not verified)
Tue, 04/12/2011 - 17:29
Thank you
Bhoppy, thank you so much for the info. I would love the extended plans, if you have them. I appreciate your help!
bhoppy
Wed, 04/13/2011 - 10:30
Found them!!
I found a pdf version of the extended plans on my computer with all of Ana's original coversion to built-in with sketchup details... I don't see a way to upload on here so contact me directly and I will email them to you:-)
Guest (not verified)
Wed, 04/13/2011 - 11:14
How do I contact you?
I am new to this site, so I am not sure how to contact you for the plans. Thank you so much!
bhoppy
Wed, 04/13/2011 - 11:42
Create a profile and join...
It's easy and you can sign in and save plans to your virtual "to do list"..
I first found this site when I was looking for the article that Ana referenced in this plan from the DIY magazine last spring. I haven’t actually built the cubbies because I can't cut straight with a circular saw to save my life (yet) But it's still on my "to do" list. I have one of the 2x4 Ikea Expedit cubbies and I built some gallery shelves for the wall above them from Ana's 10$ ledge plans.
Meghan
Wed, 04/13/2011 - 17:24
Something wrong with site...
Ok, I created an account. But there must be something wrong with the site. When I go to contact you a white pop-up occurs, but does not allow me to write anything :(.
In reply to Something wrong with site... by Meghan
Nuku-chan
Fri, 04/15/2011 - 19:53
I was able to get the contact
I was able to get the contact window to work when I loaded this page with Internet Explorer - I was using Google Chrome before - hopefully you will be able to send a message that way.
bhoppy
Thu, 04/14/2011 - 13:00
I get the same thing:-(
Hopefully the bugs on the new site will get worked out soon!
Nuku-chan
Fri, 04/15/2011 - 19:40
Extended plans to make them look like built-ins
I had the same question as Meghan above. I get the same bug when trying to contact bhoppy for her copy of the plans. I hope Ana sees this soon! Or we can find a way to contact each other :(
Nuku-chan
Fri, 04/15/2011 - 19:52
Try loading this page with Internet Explorer
I was able to get the contact window to work when I loaded this page with Internet Explorer - I was using Google Chrome before
katiedavison
Tue, 07/05/2011 - 07:02
How to finish top
I am planning on making two of these and putting them in a corner, but I do not know how sturdy they will be. Anyone know if the facing helps enough to sturdy these up or if they should have a back?
Kate (not verified)
Tue, 08/09/2011 - 13:34
Built-ins?
Does anyone know if Ana ever posted the extended plans with the built-in instructions?
heavy duty castors (not verified)
Fri, 04/06/2012 - 00:27
castors
This cube shelve is really cool because it has caster wheels that makes it movable. Having wheels will allow you to put it in your preferred place without needing to carry. A simple push and pull will do the job.
Selena Gomez (not verified)
Sun, 09/16/2012 - 14:38
Thank you SO much!
I am totally going to hire someone to make this for me because I don't have enough time between songwriting and acting and I hope this helped everyone else as well!
Marcus (not verified)
Thu, 01/03/2013 - 18:00
Going to build this weekend
Going to build this weekend and I see in the tools list it calls for a kreg jig but does not mention it in the plans. Any advise on when to use or if I should just use the nails like in the plans.
bhoppy
Fri, 01/04/2013 - 19:08
Extended plans link
So I've been getting emailed for years now about the extended plans, lately a lot!! I finally saw tonight where someone suggested I upload it so everyone can download the plans if they are so interested. So here is the link:
http://www.scribd.com/doc/119034030/An-a-Cubby-Plans
I feel a bit guilty since it's not my work but she hasn't updated the blog with plans for almost 2 years so hopefully she won't mind.
rysoftballstar
Tue, 04/09/2013 - 12:27
Screws & Nails
I'm new to this site but want to attempt this project with hubby soon. Looking it over though I see screws and nails are listed under shopping list but I don't see in the plan where the screws are used. Is it just nails all the way around, no screws?
TennesseeMom
Tue, 07/02/2013 - 15:51
Tree Plans
Ana (or anyone else!) did you happen to save the cut out tree plans? Above you gave the link (Love those trees? Go to here for the pattern, from Jeni Wright of Team DIY.) but it directs to a main page and I have spent over an hour looking for the plans----any help? SO MUCH APPRECIATED!!!
ladyj
Thu, 05/22/2014 - 05:30
Decorative trees pattern
I clicked on the link for the free plywood decorative tree wall art but it no longer exists (just goes to the main website). Does anyone have the PDF still by any chance? It's such a nice piece and I'd love to make it for my kids' room. Thanks! I searched for hours on the internet so I'm hoping I will be lucky :)
meghanwb
Sun, 06/08/2014 - 12:11
Tree plan
Ladyj - any luck getting the tree plan? I even tried to order the past issue, and I can only find back issues through Fall 2010.
ladyj
Fri, 06/13/2014 - 10:14
I've had no luck :( It's such
I've had no luck :(
It's such a nice piece too...too bad.
kim.g2002@gmail.com
Tue, 02/16/2016 - 19:27
A Novice Question
Would it work to use 2x12 as the outer box and plywood as the inner shelf and no face framing? You mentioned the face frame provides stability but I don't want extra ledges and corners just a thick outer box and narrow inner dividers. Would there be enough stability just using pocket holes for every conection , offset when needed as to not hit screws coming from the other side or is there something I am missing?