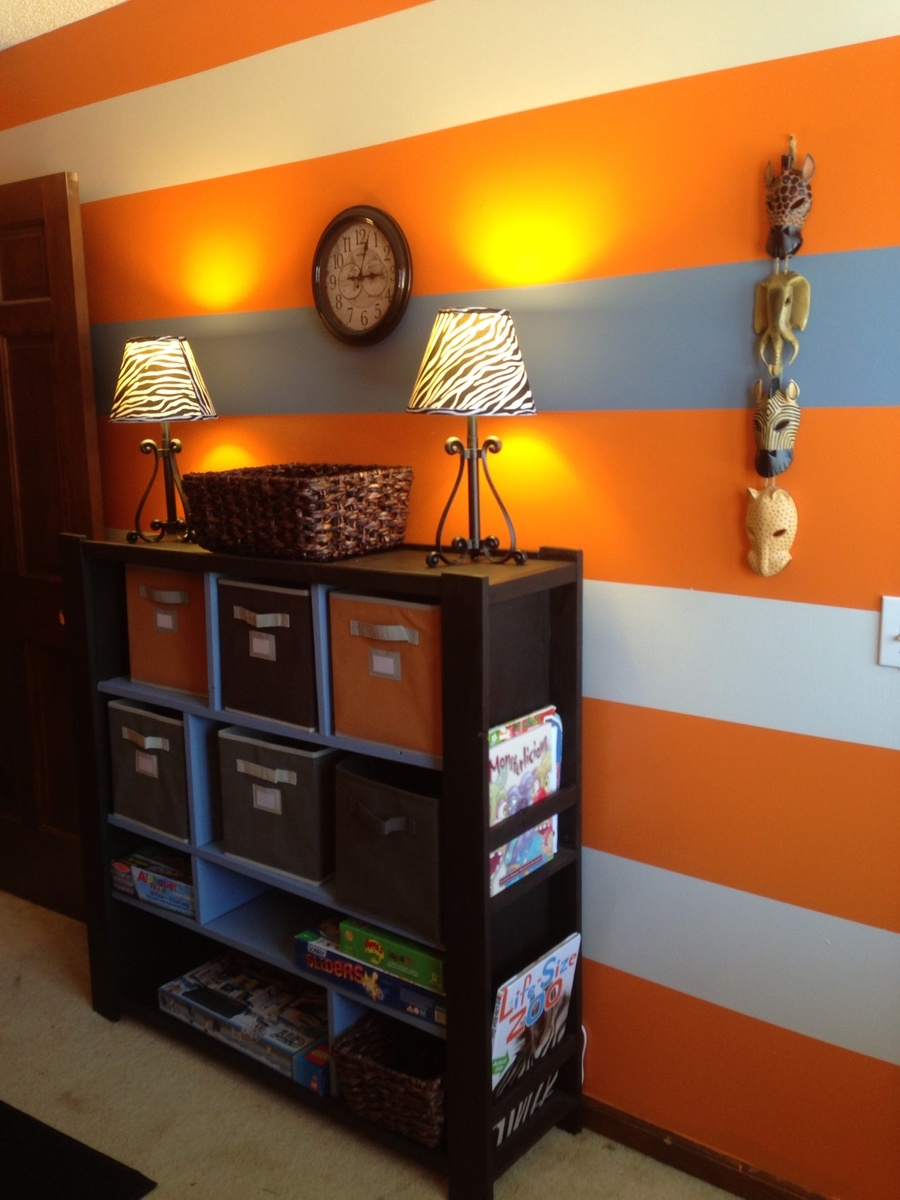
Free plans to build a Land of Nod Compartment Department inspired bookshelf from Ana-White.com
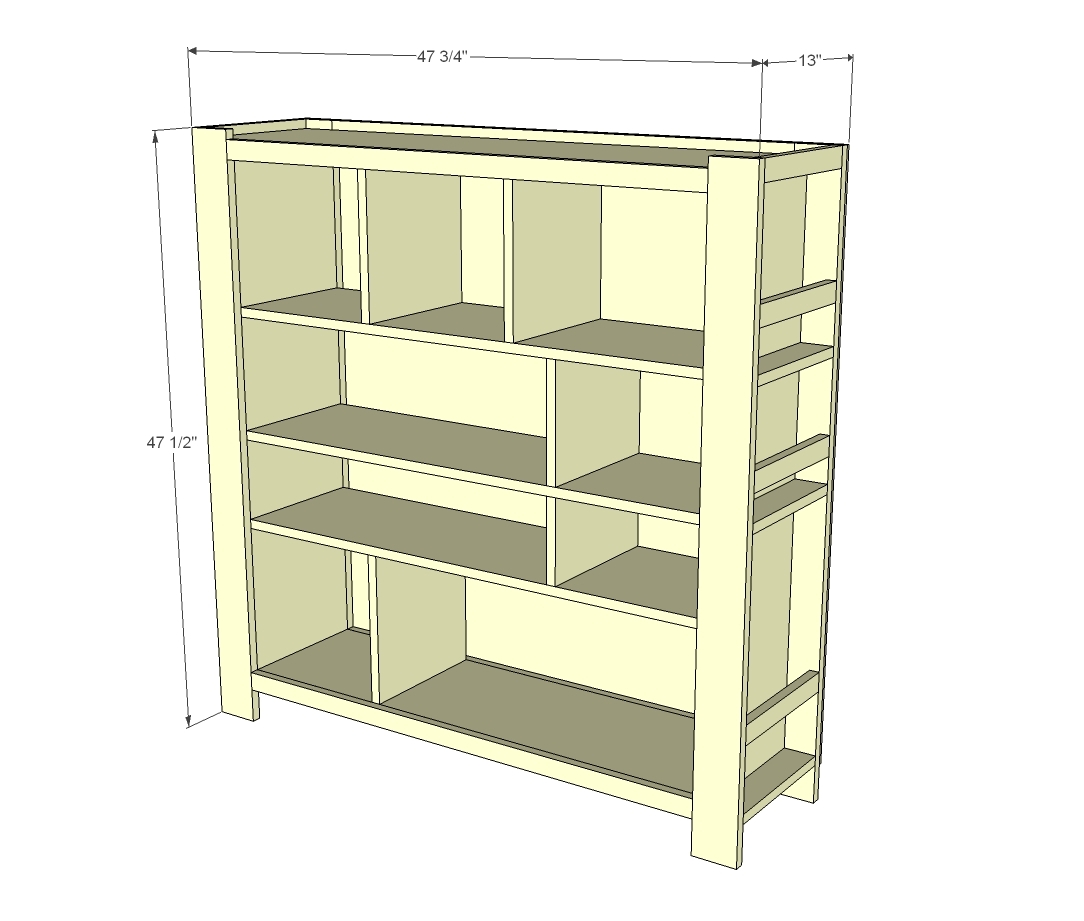
Preparation
4 - 1x12 @ 8 feet long OR 1 sheet of 3/4" plywood ripped into strips 11 1/4" wide (you could actually go up to 11 3/4" wide but will need to adjust side shelves/trim cut widths)
2 - 1x4 @ 8 feet long
1 - 1x3 @ 8 feet long
3 - 1x2 @ 8 feet long *You'll need a couple more if filling in back pieces between back and shelves)
1/2 sheet of backing material (usually 1/4" plywood or other hardboard)
Recommend assembly with 1 1/4" pocket hole screws and 1 1/4" and 2" finish nails
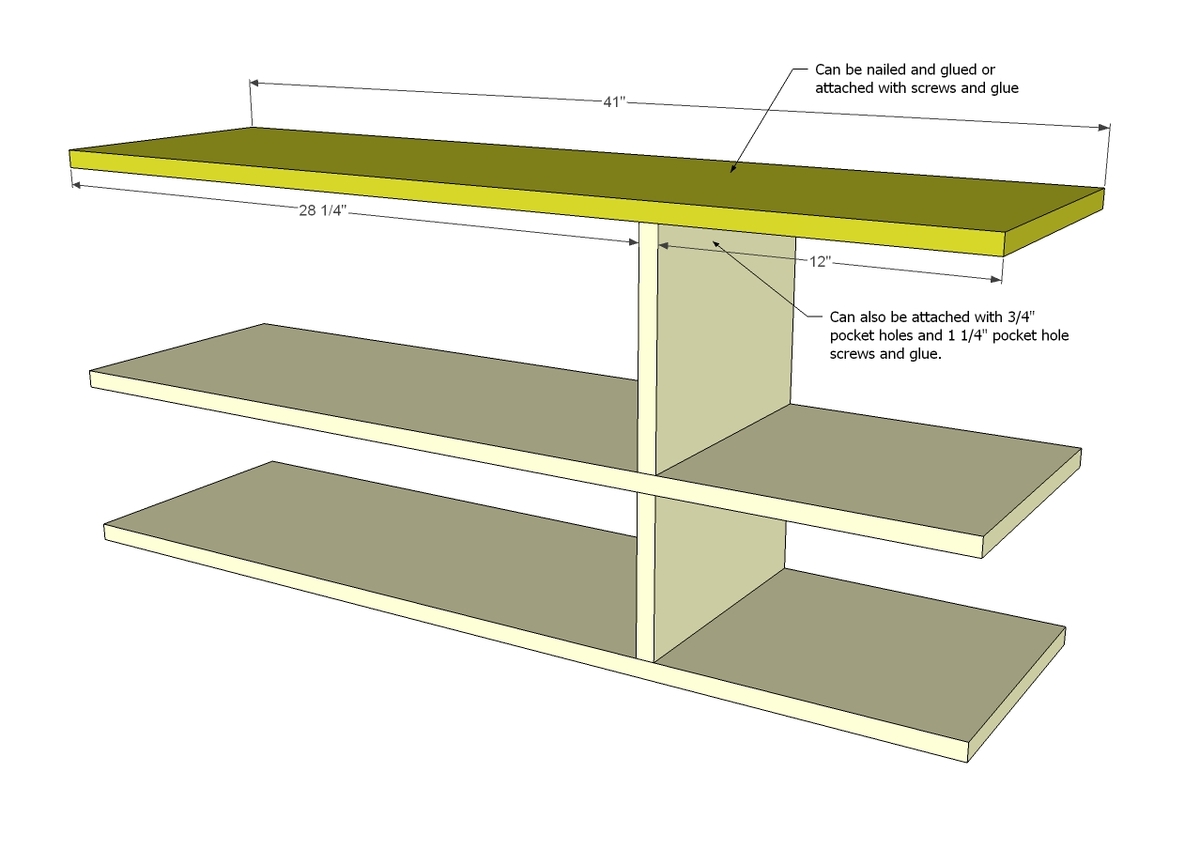
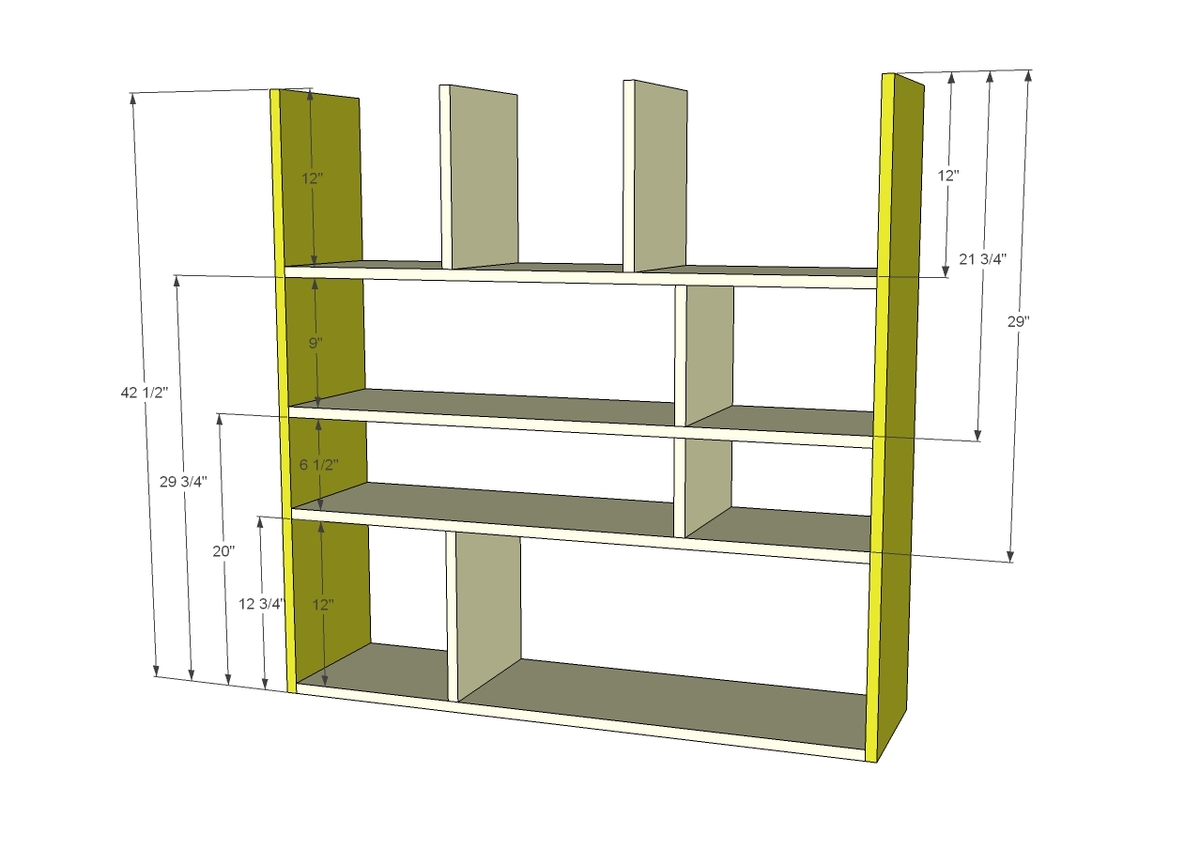
1 - 1x12 @ 6 1/2" (divider)
4 - 1x12 @ 41" (main shelves)
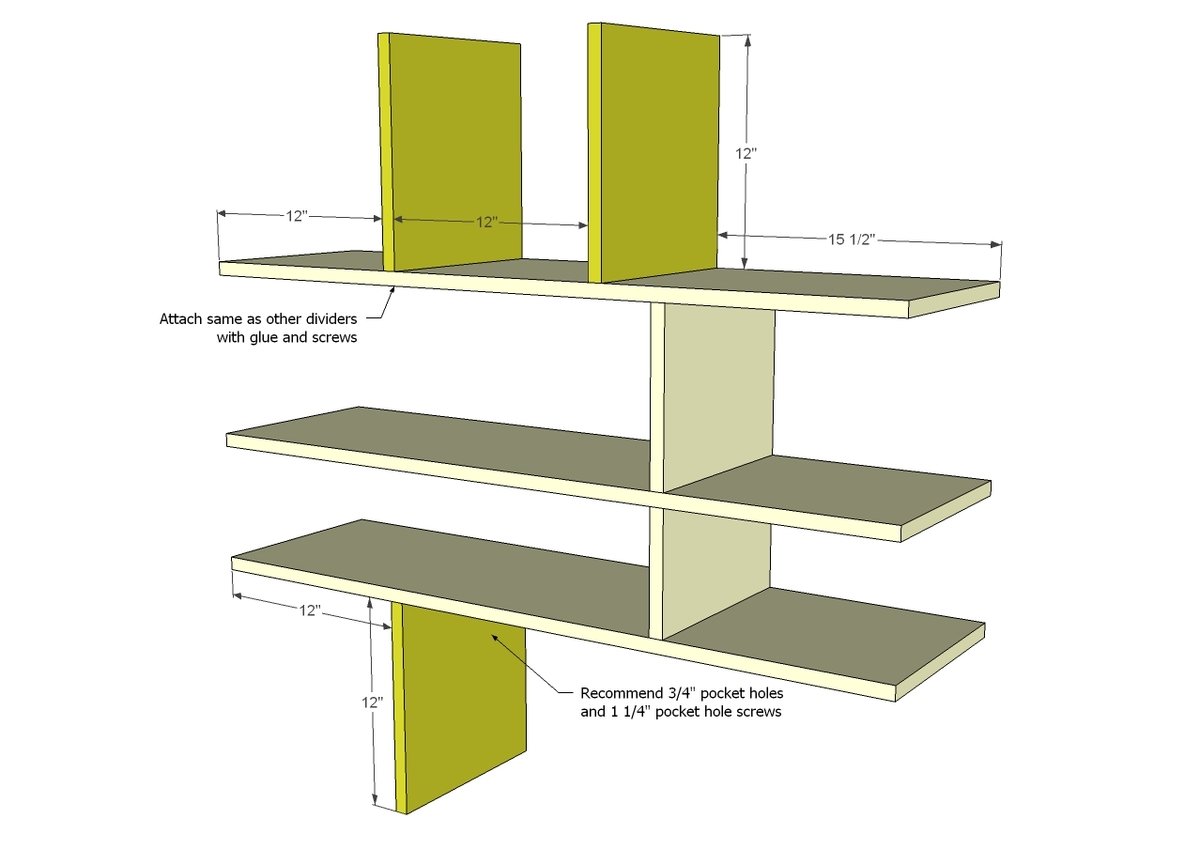
1 - 1x12 @ 9" (divider)
3 - 1x12 @ 12" (divider)
2 - 1x12 @ 42 1/2" (sides)
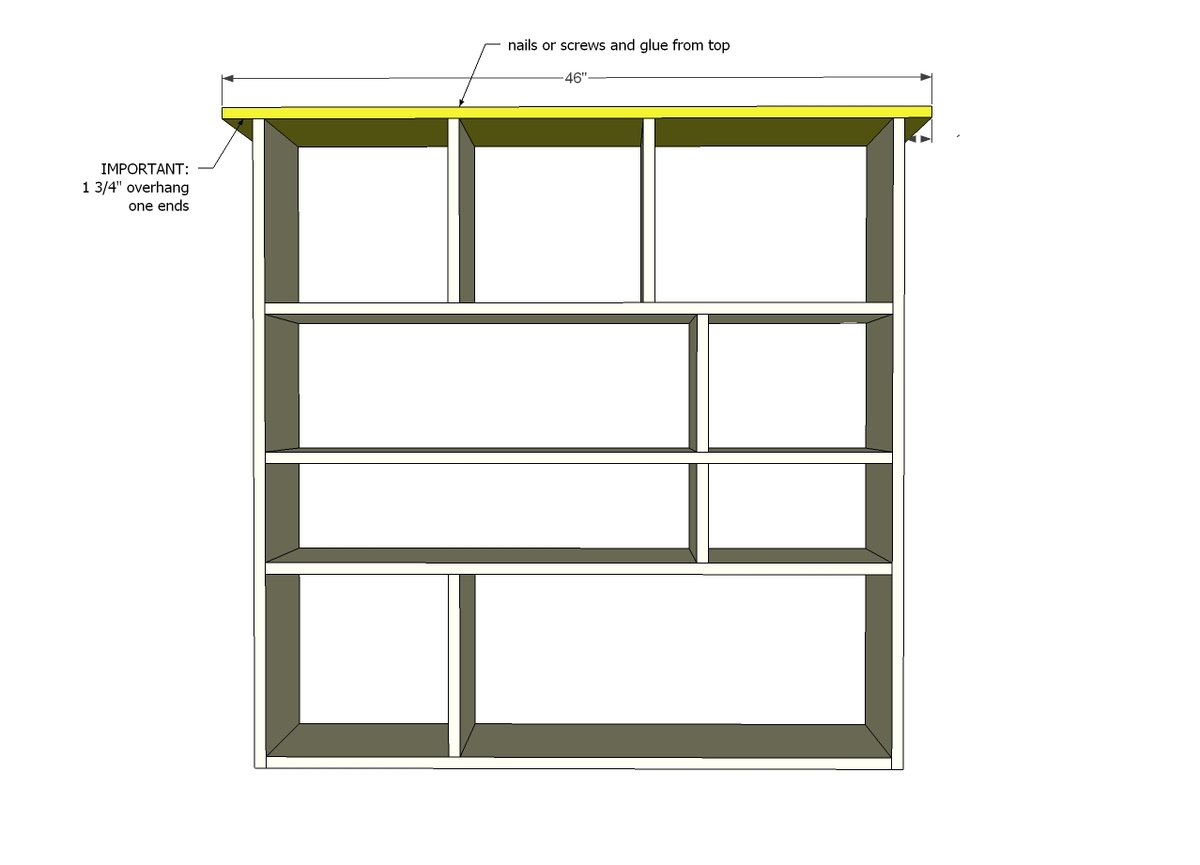
1 - 1x12 @ 46" (top)
4 - 1x4 @ 47 1/2" (legs)
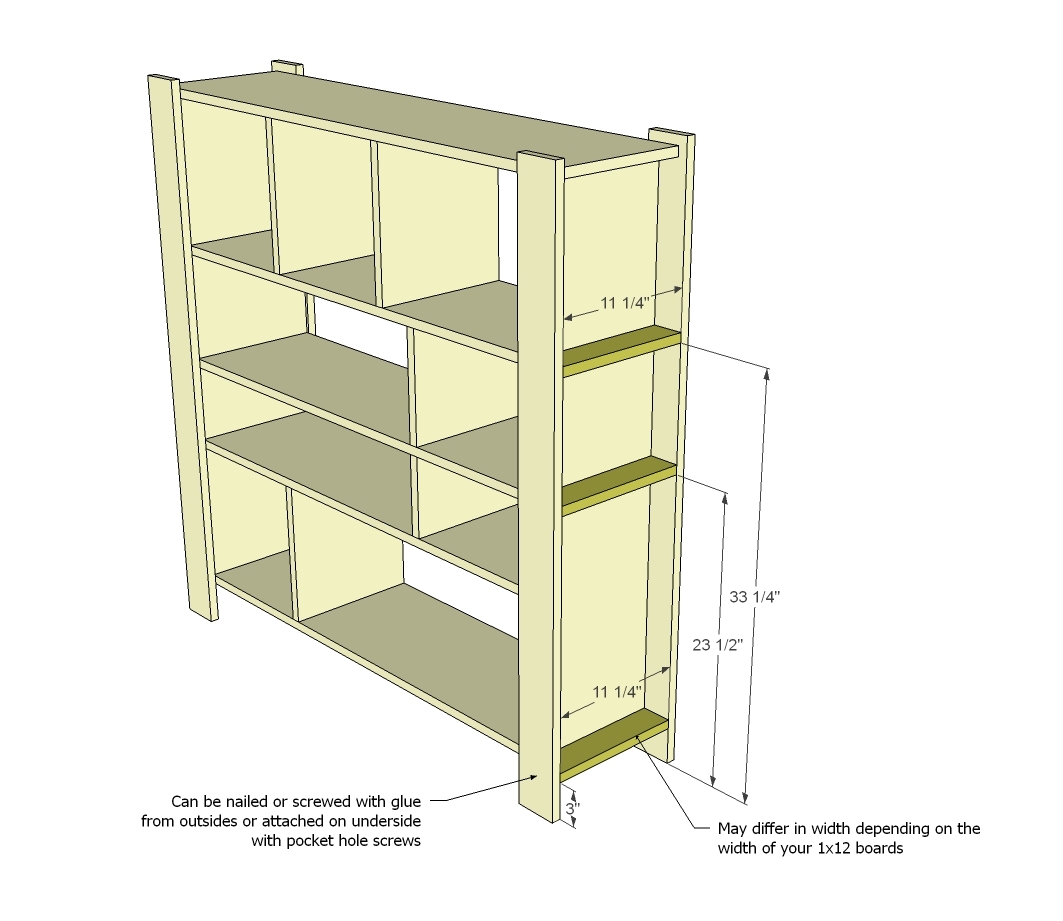
6 - 1x3 @ 11 1/4 - OR width of 1x12 (small shelves)
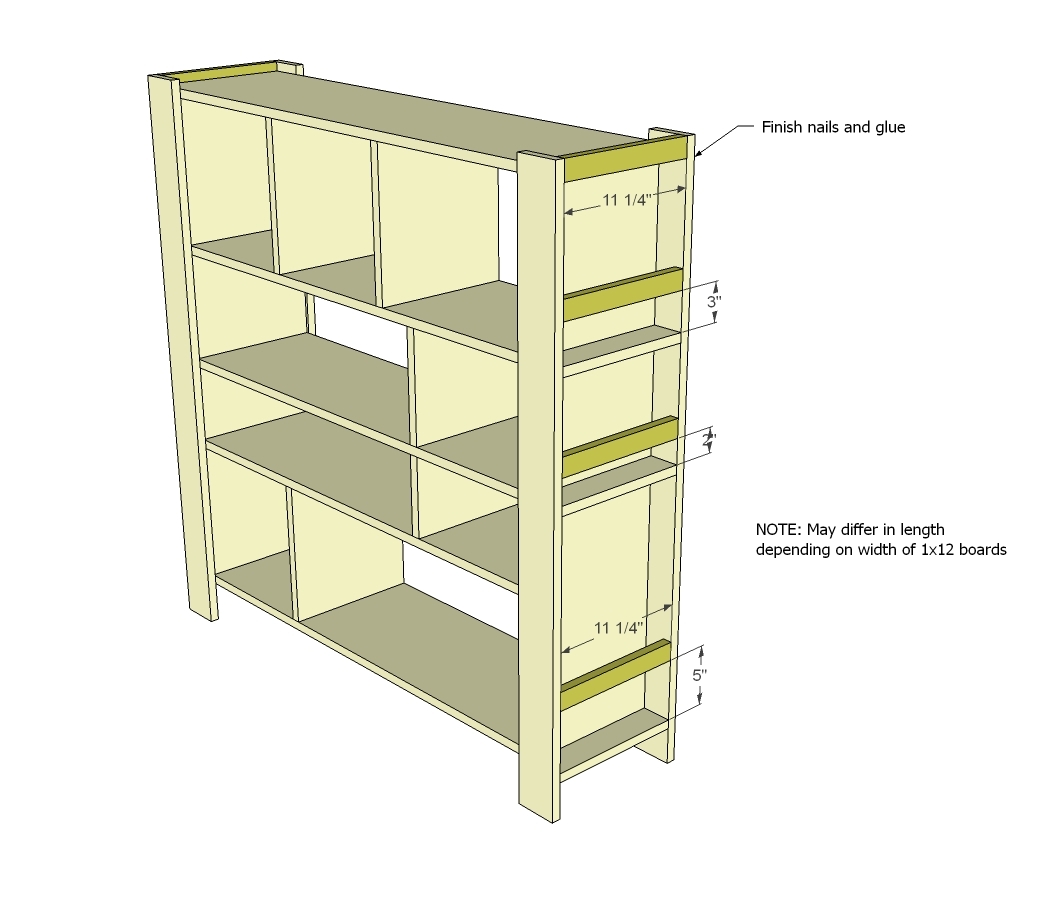
8 - 1x2 @ 11 1/4" - OR width of 1x12 (side rungs/trim)
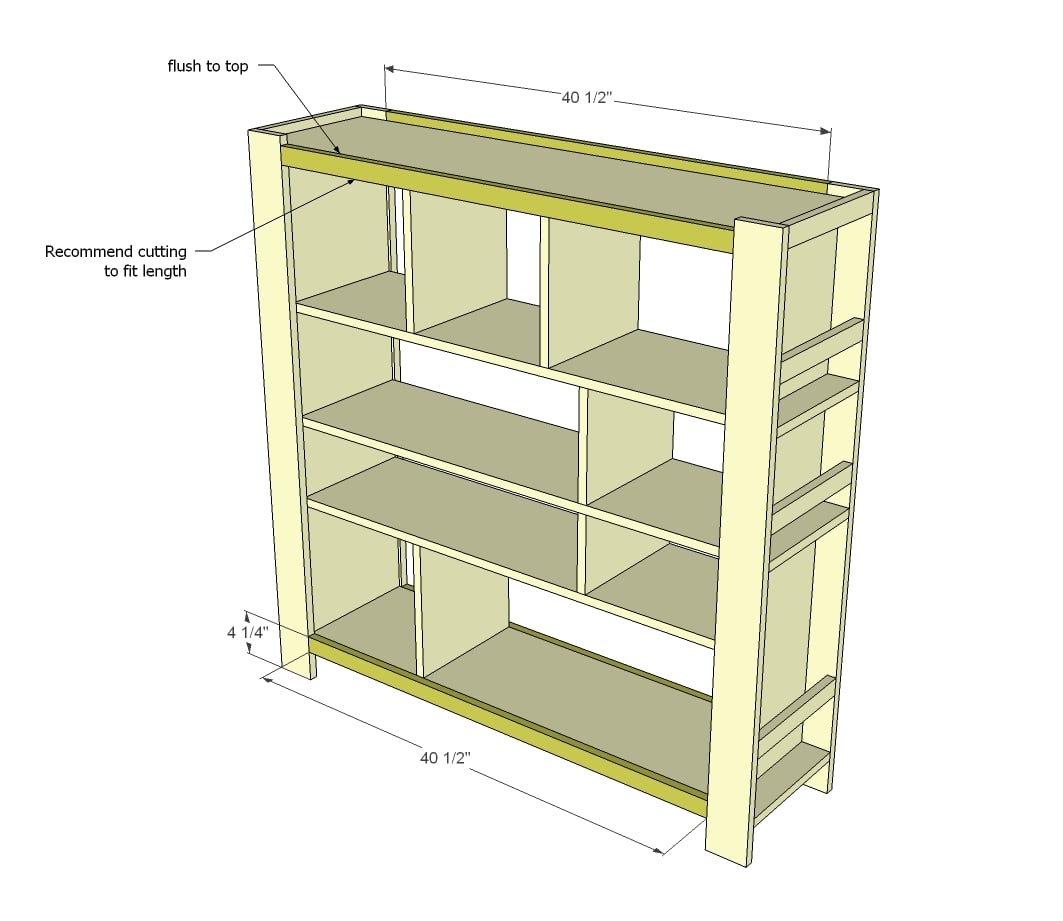
4 - 1x2 @ 40 1/2" - CUT TO FIT (front/back trim)
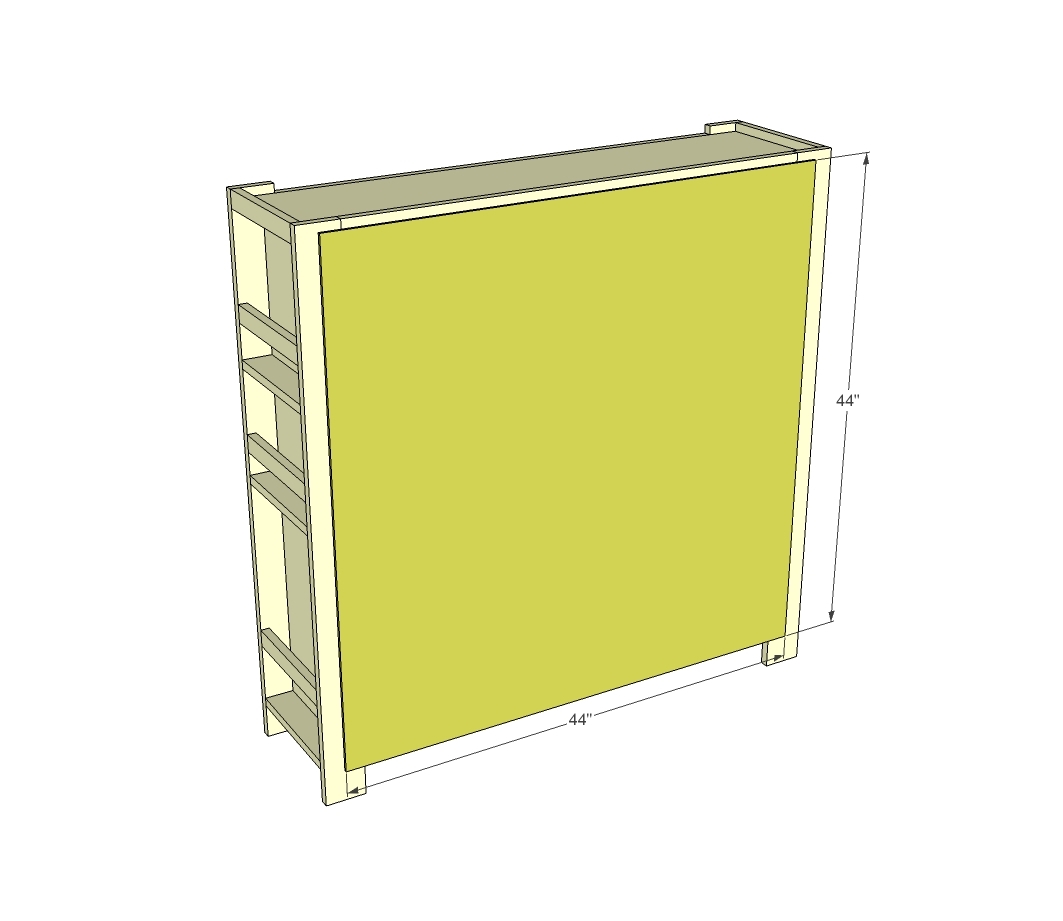
1 - 1/4" plywood @ 44" x 44" (back)
NOTE: you may also wish to fill in back shelves with 1x2 trim to get rid of spacing between shelves and back plywood - it's up to you.
Please read through the entire plan and all comments before beginning this project. It is also advisable to review the Getting Started Section. Take all necessary precautions to build safely and smartly. Work on a clean level surface, free of imperfections or debris. Always use straight boards. Check for square after each step. Always predrill holes before attaching with screws. Use glue with finish nails for a stronger hold. Wipe excess glue off bare wood for stained projects, as dried glue will not take stain. Be safe, have fun, and ask for help if you need it. Good luck!
Instructions
Step 1
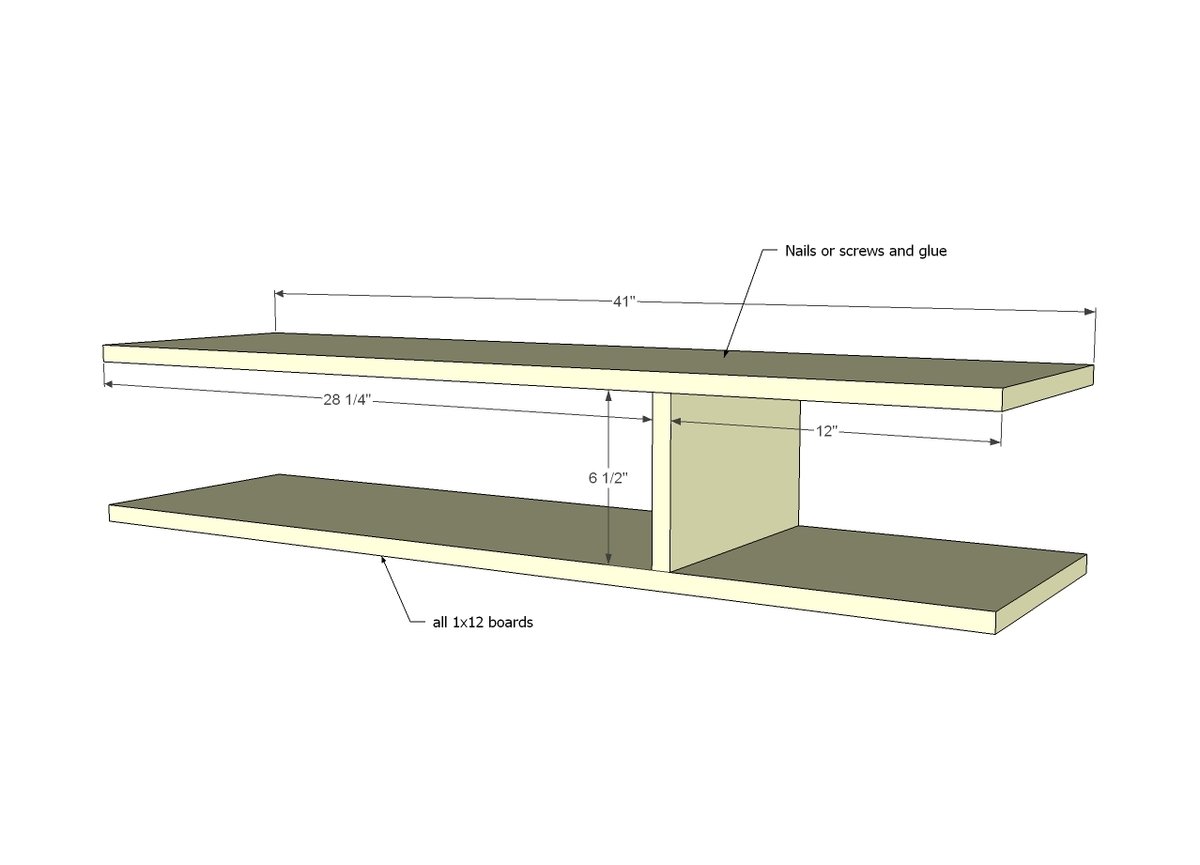
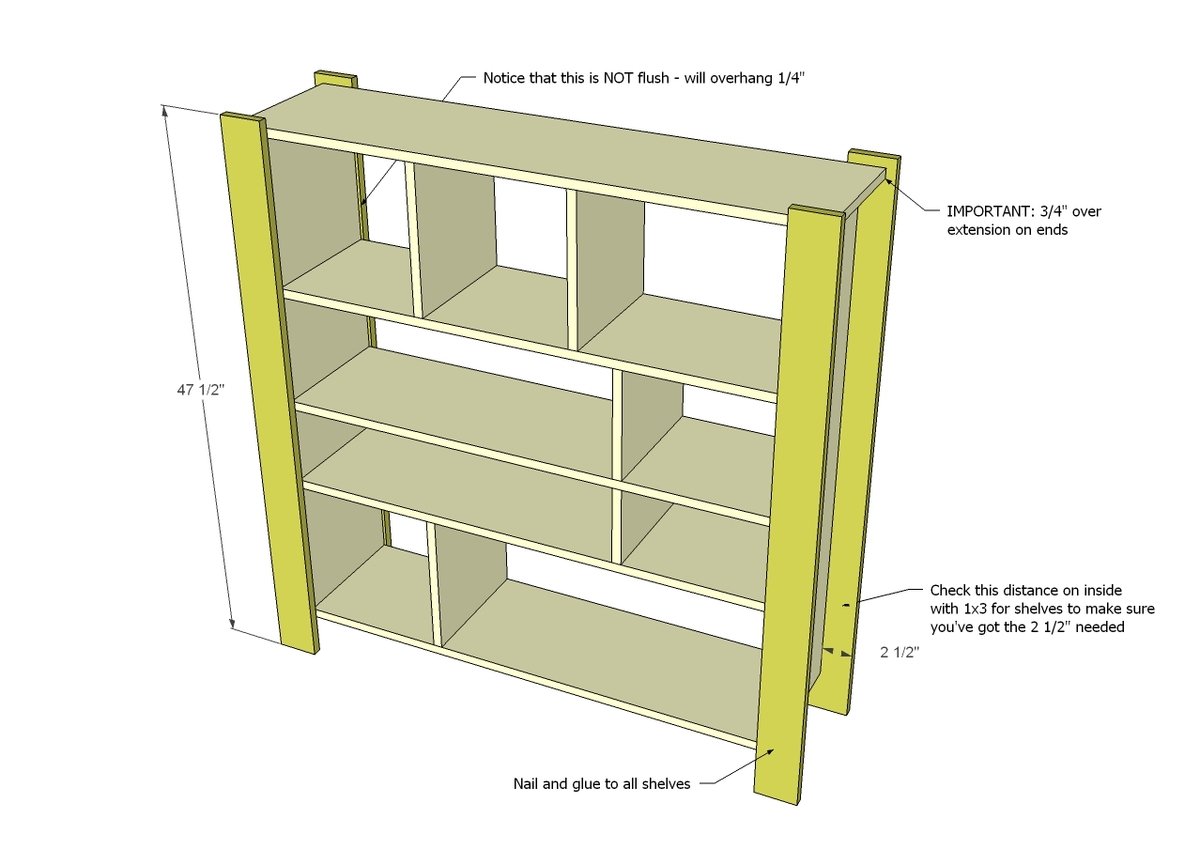
Because you have to think about leaving room for the drill when attaching, start on the inside and work your way outward. Attach divider to two shelves.
NOTE: If you don't have a pocket hole jig, you may wish to attach bottom divider (see step 4) first because there won't be room to get a standard drill in between the shelves later on.
Step 2
Next, attach divider on top. If you don't have a pocket hole jig (recommend getting one, even the tiny one would do the trick here) you could also glue and nail at an angle from both sides to keep in place, or drill holes and secure with wood dowels. There's lots of different options, I just give the easiest.
Step 4
Step 6
Step 8
Step 12
For the back, there's a number of different ways you could do this. You could cut the plyood to fit inside the back frame, you could fill in the back shelves with 1x material, or you could be okay with a 3/4" gap and attach plywood to back as shown here - it's up to you. You could even leave the back open if you want.
It is always recommended to apply a test coat on a hidden area or scrap piece to ensure color evenness and adhesion. Use primer or wood conditioner as needed.







Comments
Rini
Sun, 03/31/2013 - 12:27
Height
I would like to make this twice as tall. Will it be sturdy enough if I just replace the top piece with the bottom shelf from step 5 and make the sides 85 inches tall instead of 42.5?
Huthbert
Mon, 04/01/2013 - 13:33
Fabulous!
This looks fantastic! I think we might make this to put in our nursery!
denogirl
Thu, 08/01/2013 - 21:03
Loft bed
I've been looking for a good bookshelf type thing to be the "legs" to a shorter kids loft bed. The plan is for shelving at the end of the bed, cubbies at the front and use the middle area underneath for hanging clothes (no closet in the kids room.) Would this be sturdy enough to hold the weight of a bed?
therapistthatbuilds
Mon, 01/03/2022 - 07:22
Denogirl, Did you try it?
Denogirl, Did you try it?