

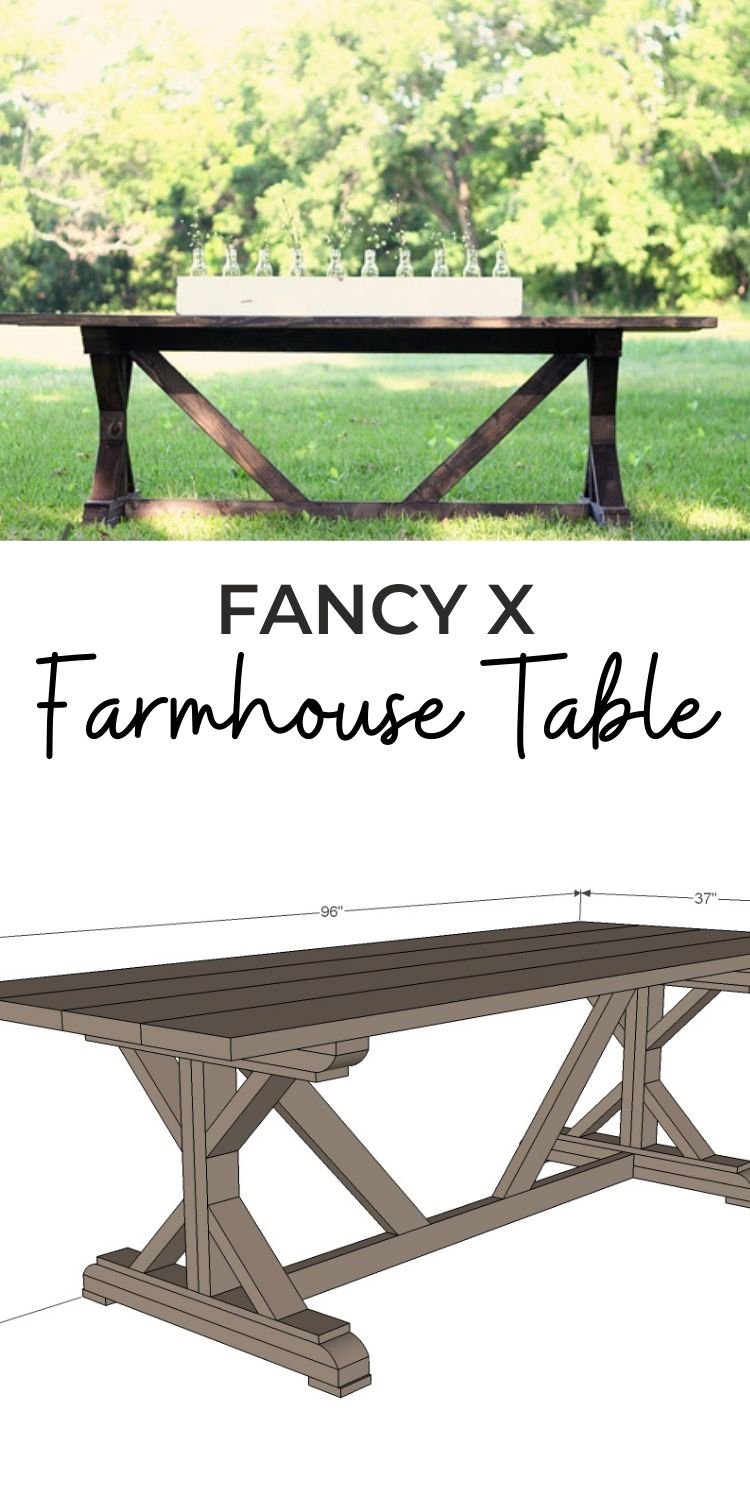
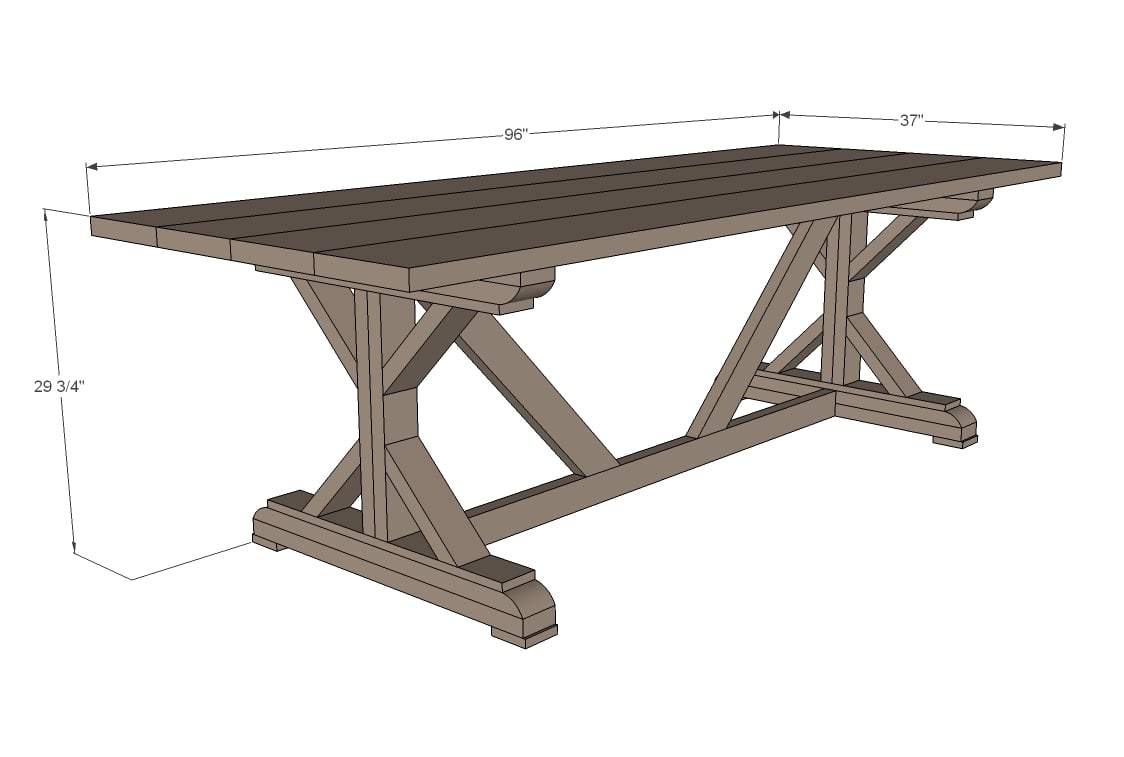
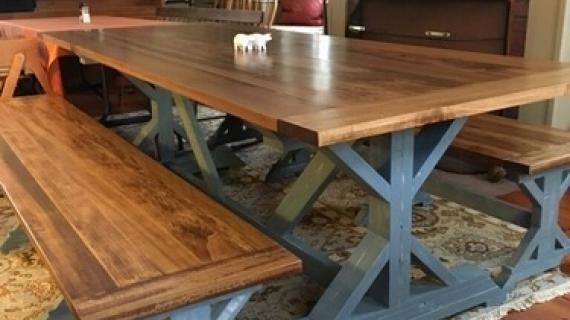
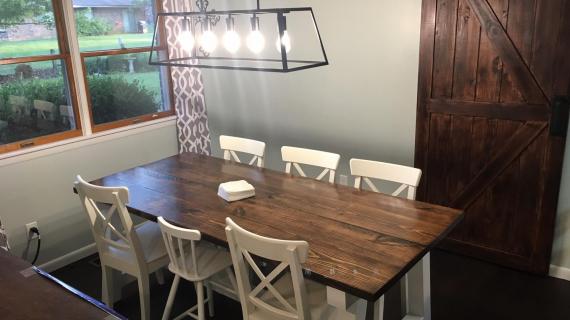
Build the Fancy X Farmhouse Table from 2x4s and lumber for $65. A reader favorite, this table has been built thousands of times!
We also have plans for a matching bench and lots more farmhouse furniture plans.

Video - Watch this Table Being Built!
See More Photos and Build Post
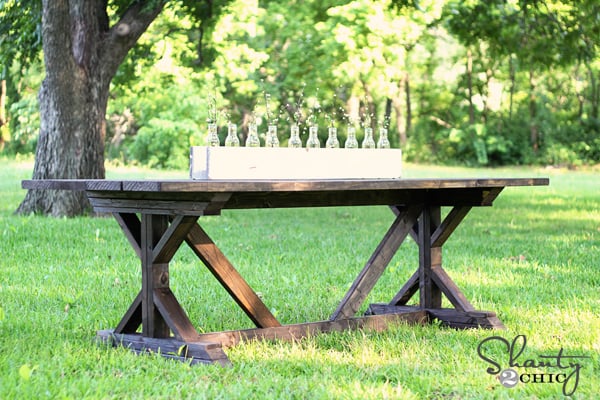
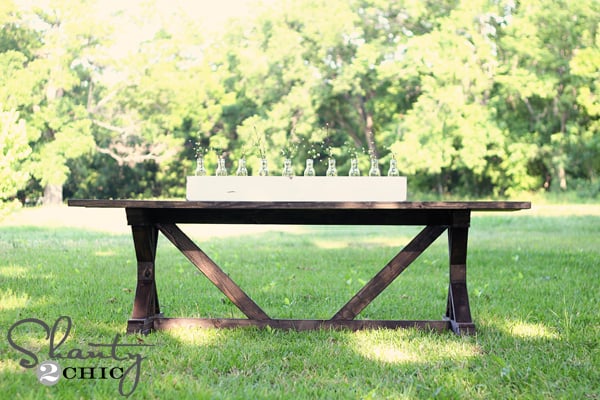
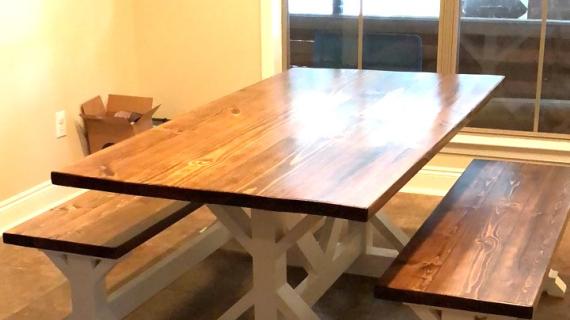
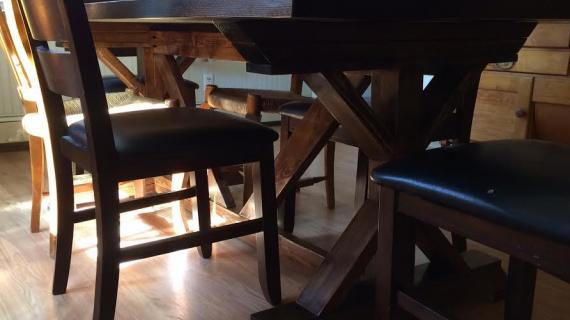
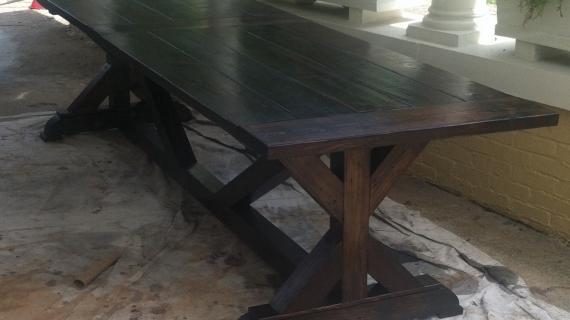
This table was built in collaboration with my friend Whitney from Shanty2Chic. Whitney has a family of seven, and wanted to build a sturdy and strong farmhouse table with a little bit of fancy to it to dine on outdoors this summer.
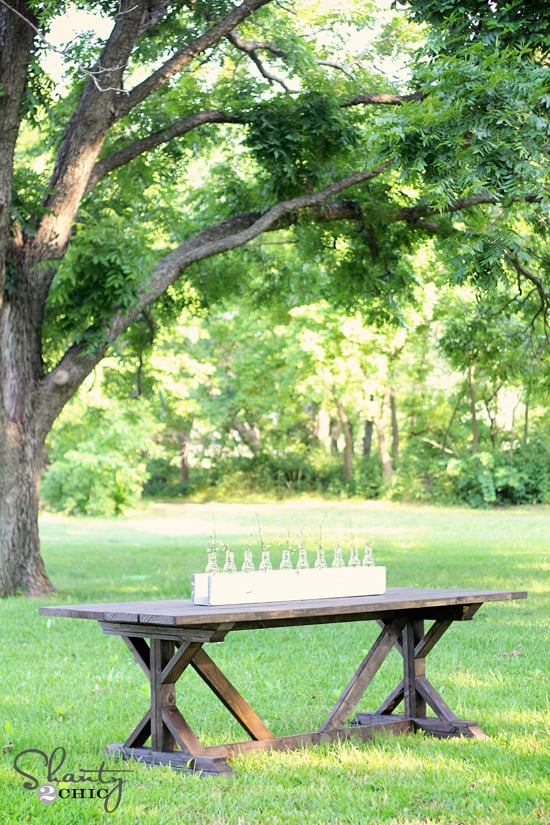
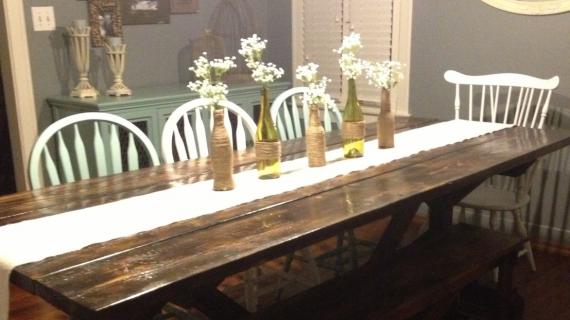
This is my very favorite build yet! I have been in serious need for an outdoor table to seat my family of 7. When we stumbled upon a beautiful, long farmhouse table from Anthropologie, I knew it was love at first sight. Everything was perfect about it... Except that $2,000 price tag... Ouch. That hurts to even write. But... I knew who to call to help me make my own at a very small fraction of that cost! This baby only cost me $65!
Head over to visit Whitney at Shanty2Chic to get all the details, lots more photos, and a peek at her construction process!
Thanks Whitney!!!
Pin For Later!
Preparation
4 – 2x10 @ 8 feet long
7 – 2x4 @ 8 feet long
1 – 1x4 @ 12 feet long
3” self tapping wood screws
2 ½” pocket hole screws
2” finish nails
ENDS
- 8 – 2x4 @ 11 3/8” (ends cut at 45 degrees off square, longest point measurement, NOT parallel)
- 4 – 2x4 @ 20”
- 4 – 1x4 @ 28 3/8” **
- 8 – 2x4 @ 32 5/8” CUT TO FIT **
- 4 – 1x4 @ 3 ½”
MAIN TABLE
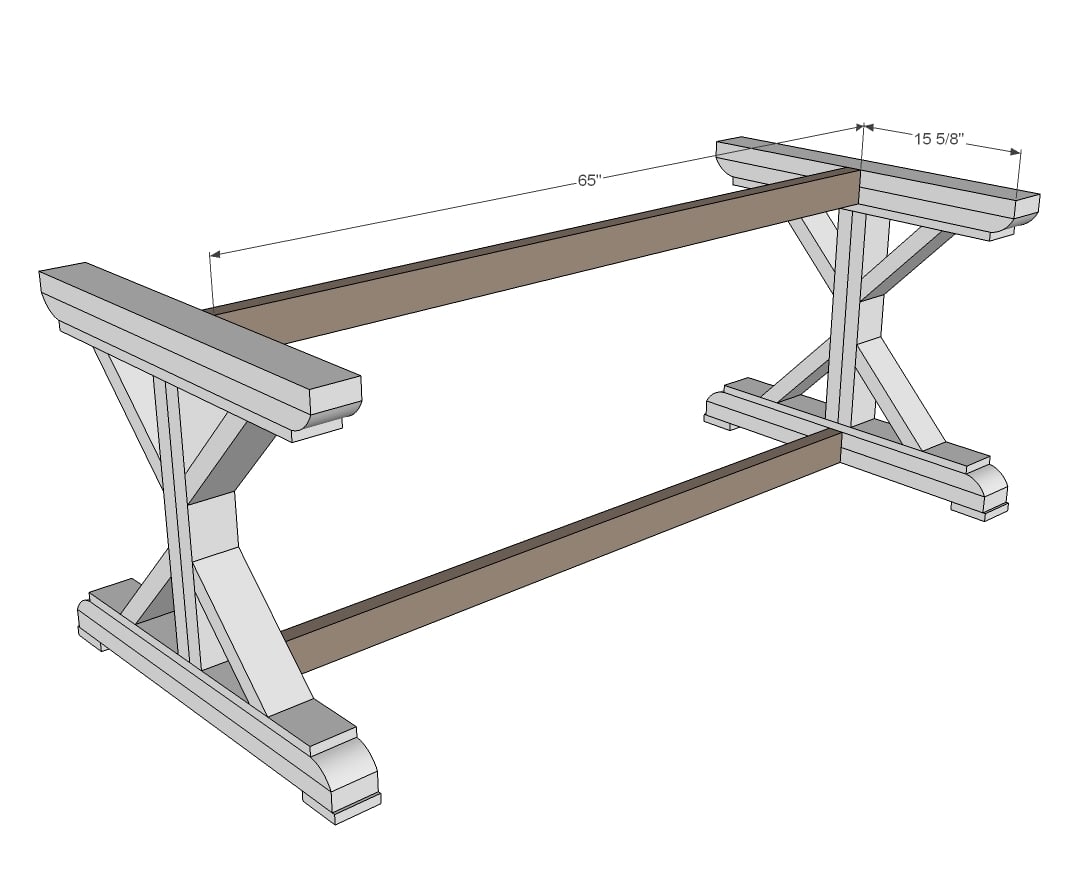
- 2 – 2x4 @ 65”
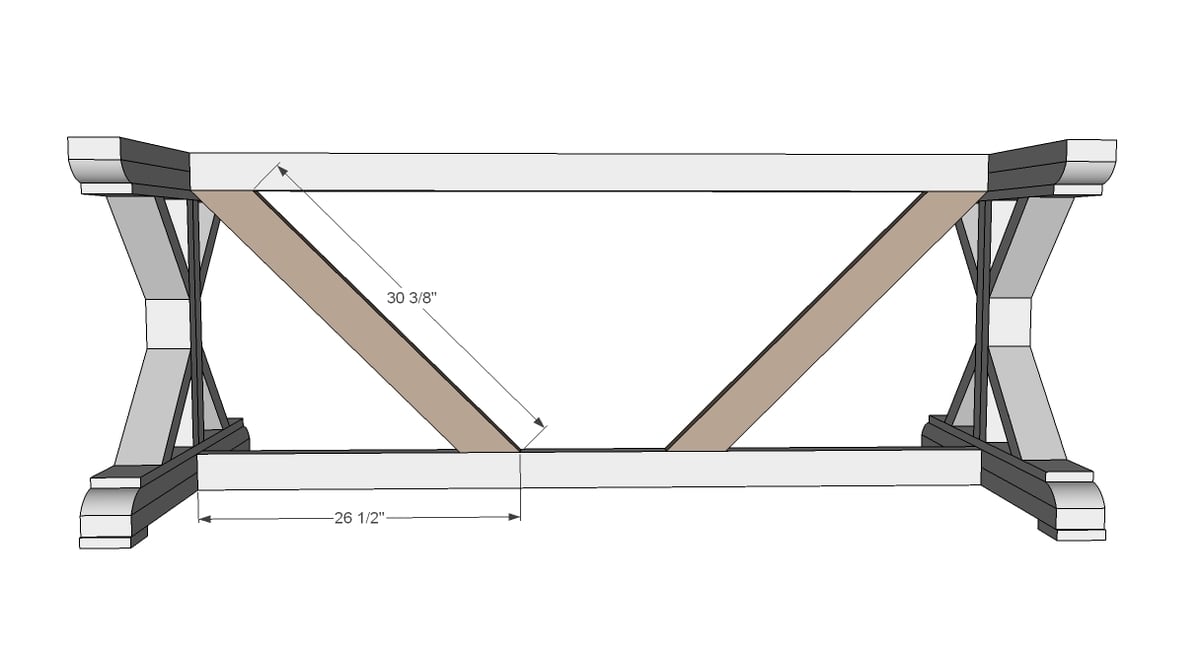
- 2 – 2x4 @ 30 3/8” (both ends cut parallel at 45 degrees off square)
- 4 – 2x10 @ 96”
** For 45 degree cut tops and bottoms (easier) on the legs top and bottom (see steps 3-5 and step 10), replace these cuts with:
- 4 - 2x4 @ 31" (both ends cut at 45 degrees off square NOT parallel long point measurement)
- 4 - 2x4 @ 34" (both ends cut at 45 degrees off square NOT parallel long point measurement)
Please read through the entire plan and all comments before beginning this project. It is also advisable to review the Getting Started Section. Take all necessary precautions to build safely and smartly. Work on a clean level surface, free of imperfections or debris. Always use straight boards. Check for square after each step. Always predrill holes before attaching with screws. Use glue with finish nails for a stronger hold. Wipe excess glue off bare wood for stained projects, as dried glue will not take stain. Be safe, have fun, and ask for help if you need it. Good luck!
Instructions
Step 1
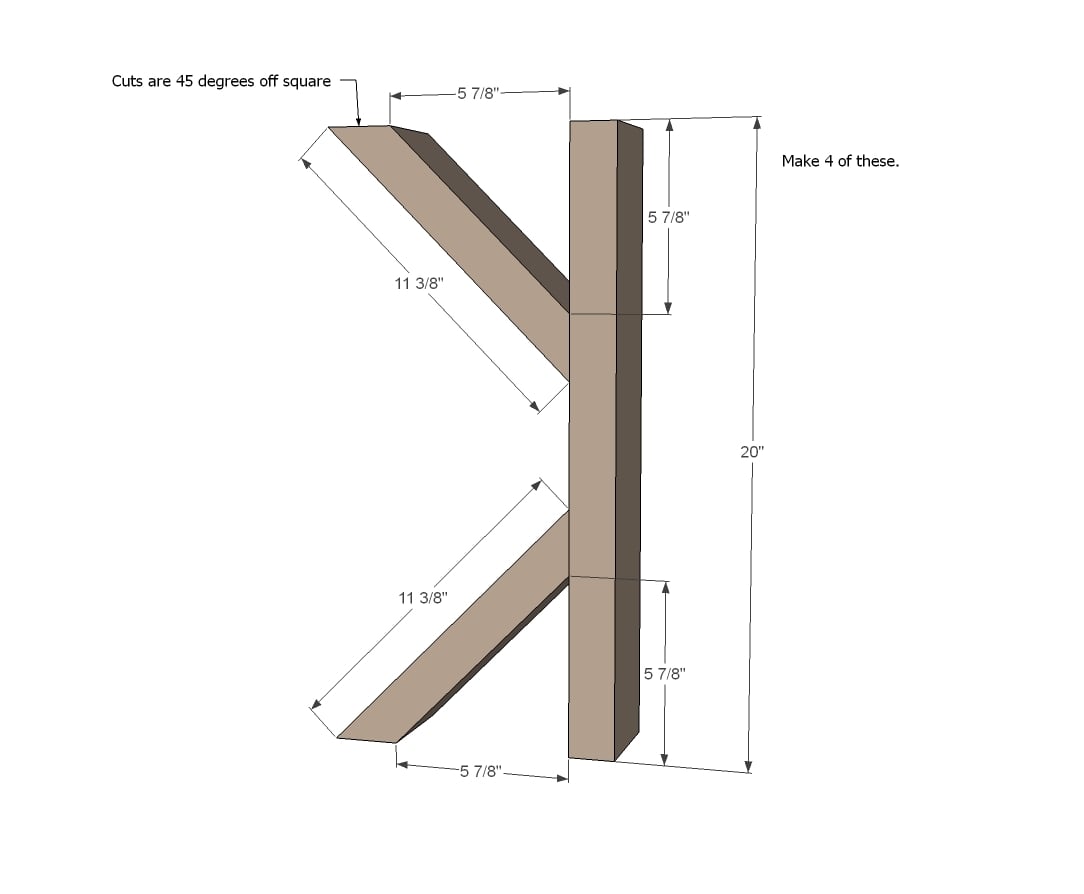
Build four of these. I’d simply countersink screws from the backs into the ends of the cross braces using 2-1/2" self tapping wood screws
Step 2
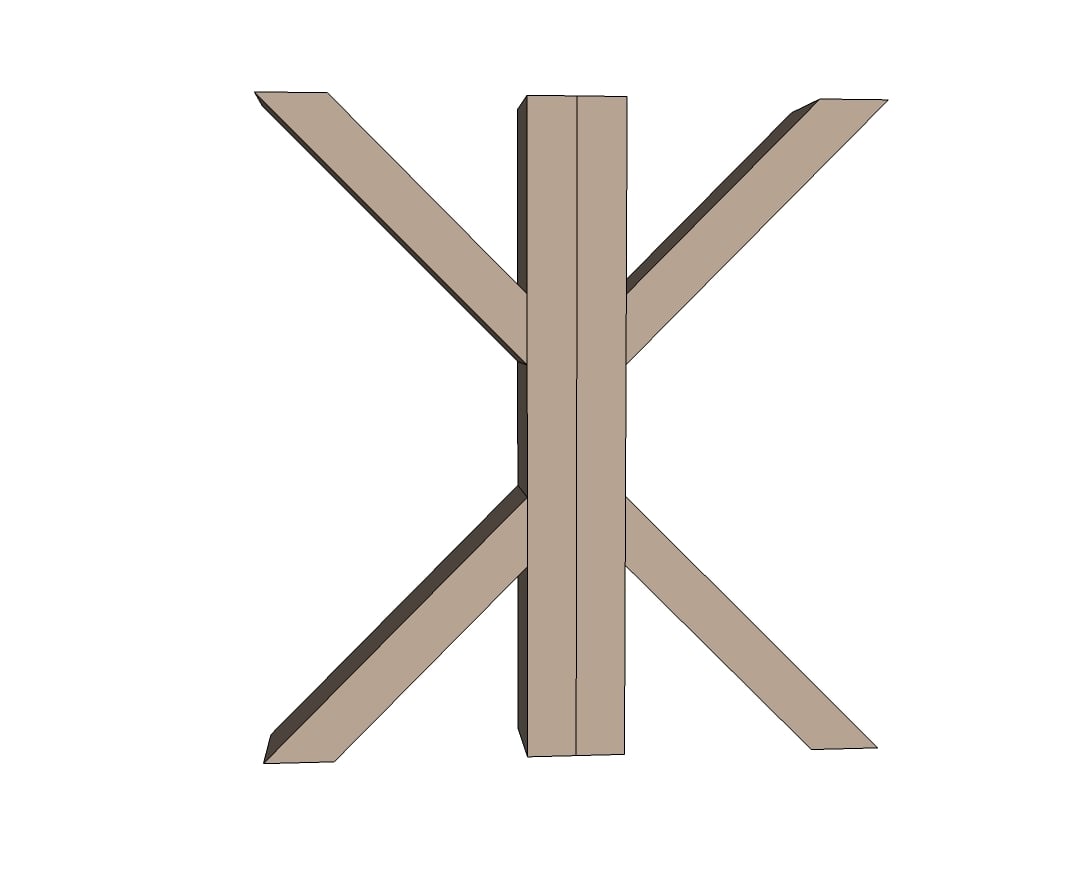
Then just attach two of the leg pieces together with glue and 2” finish nails from each side
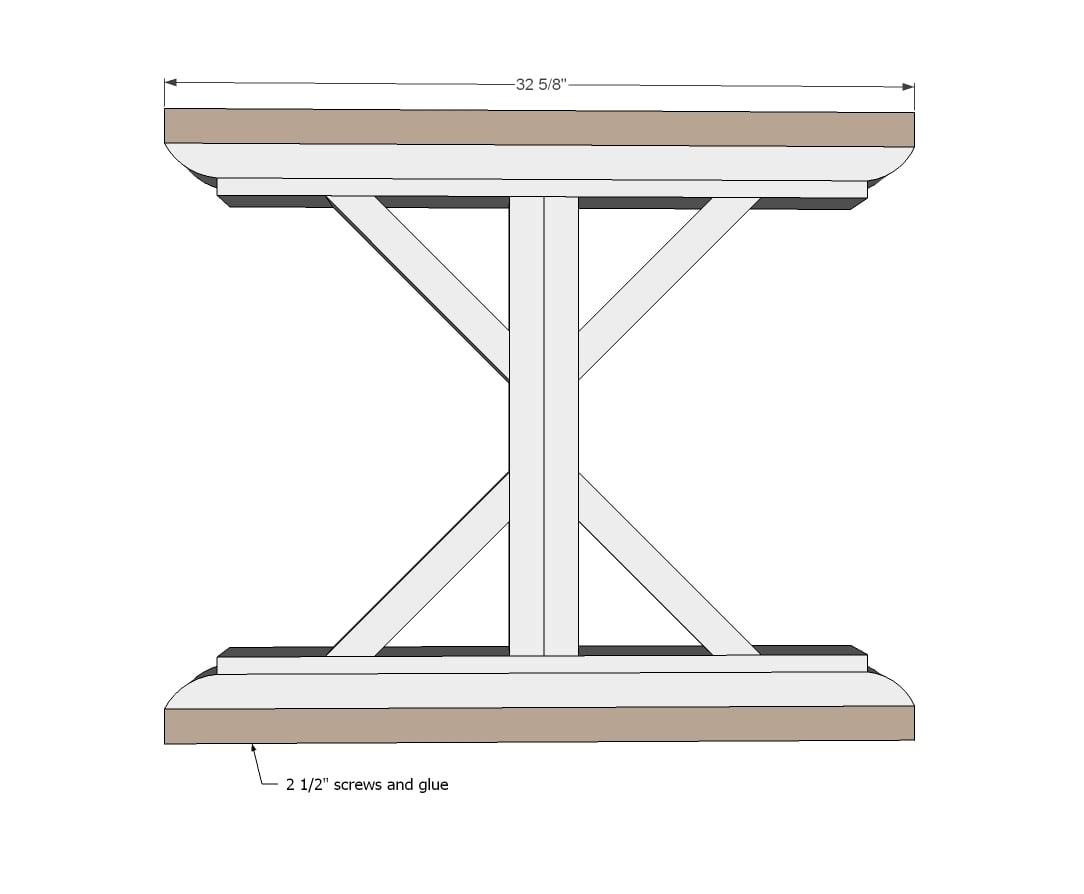
Step 3

And add the top/bottom. You can use 2” screws or nails here and glue.
Step 4

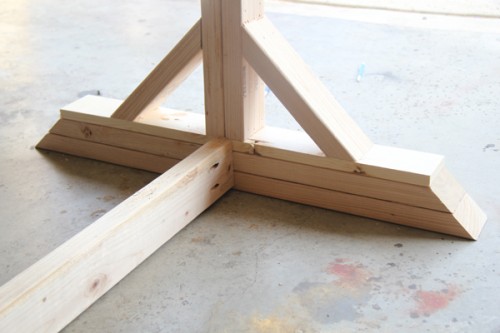
And then add the curved pieces. The ends may be a challenge – what I do is first cut a 2x4 32 5/8” long with both ends cut at 30 degrees off square, ends not parallel. Then make a second cut at 45 (or more if your saw cuts higher degree bevels) degrees off square and cut that same board 28 3/8” short point to short point.
Step 5
Repeat for the next layer of 2xs to build up your leg ends
Step 6

Followed by the little feet ...
Step 7
I'd recommend 1 1/2" PHs and 2 1/2" PH screws here ... hide on top and bottom edges
Step 8
The easiest way to attach cross braces is with pocket holes. But you will have to fill later with wood filler.
An alternative is to glue and screw through the cross brace into the top and bottom 2x4s with longer screws.
Step 9
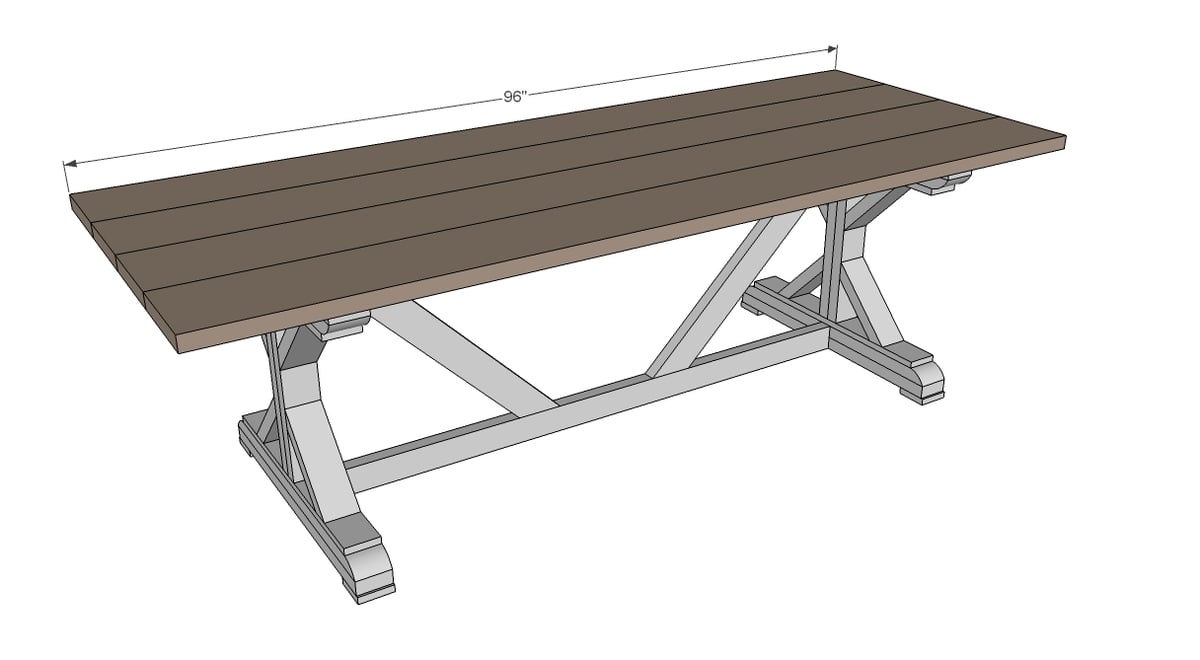
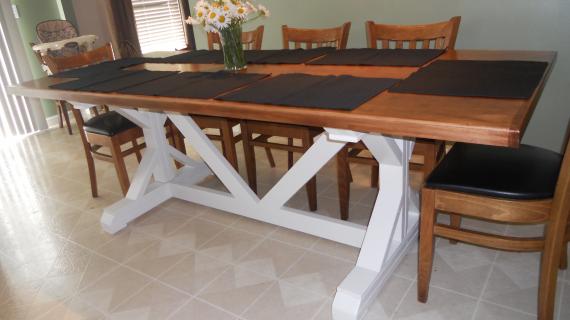
And finally the top! I recommend building the tabletop first with pocket holes and then attaching.
If you are using the table outdoors, leave a little space between the boards for water drainage.
Step 10
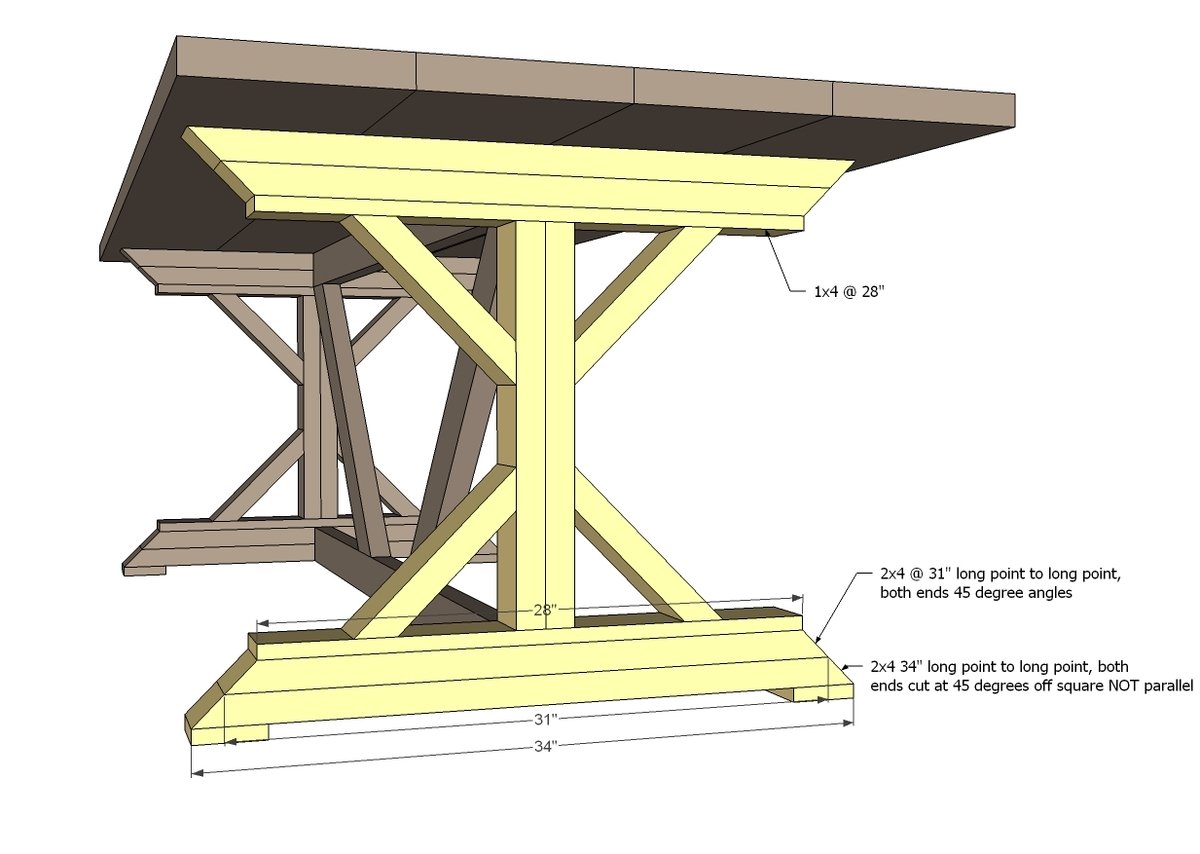
And for the alternate ends like Whitney did - just use 45 degrees off square cuts.
Step 11
For more photos and construction details, please stop over and visit Whitney at Shanty2Chic!
It is always recommended to apply a test coat on a hidden area or scrap piece to ensure color evenness and adhesion. Use primer or wood conditioner as needed.


Comments
Philperrin
Sun, 09/06/2015 - 16:49
Math? Step 4
I think I might be reading something wrong, but I can get the angles in step 4 to add up. A 45 degree cut to make the 28 3/8 short to short entirely cuts off the 30 degree cut for the 32 5/8 long to long side.
Am I missing something?
JimmyC
Tue, 09/15/2015 - 05:53
You're only trying to cut enough to round the corners
Cut once at 30, then another a 45. You want to make the rounded ends on the legs after some serious sanding.
Roccosworld
Fri, 09/11/2015 - 15:11
Tabletop
Does anyone have a recommendation on how to attach the table top? To eliminate gaps, would it be a good idea to attach the 4 2x10's together first, then attach the whole tabletop to the legs? Any thoughts?
JimmyC
Tue, 09/15/2015 - 06:13
Tabletop is what everyone will see - focus on that
After arranging the 2x10 boards on the garage floor to minimize gaps (e.g. trying to match up the board warps between them), I reduced gaps even more by hand planing the edges - ended up with just a few minor gaps (1/32") but nothing too bad. I then clamped 2 of the 2x10's together while standing on top of them to get them even, then attached them with 2 1/2" PH (Kreg) screws - I got the idea from this guy's YouTube vid: https://www.youtube.com/watch?v=2IT89XCa9Vk
Repeated with the other 2 2x10's. I didn't have a 37" clamp (I had 36"!) so ended up using ratcheting tie-downs to cinch the whole tabletop together. It ended up quite flat and with almost zero gaps. I figured it's best to the get the tabletop flat and gap-free since that is what is visible. If necessary, plane/sand down the leg tops to minimze gaps between the tabletop at legs.
trey.hemingway
Tue, 12/08/2015 - 12:31
Table Buildout
I thought one table was childs play, so I built 8... in 56 hours.
"Nver Half Ass Two Things, Whole Ass Eight"
-Ron Swanson
In reply to Table Buildout by trey.hemingway
Ana White
Wed, 12/09/2015 - 17:57
WOW, that's impressive! Go
WOW, that's impressive! Go big or go home, right!
melissafontes
Sat, 01/02/2016 - 07:51
Need help Changing the length
I need to shorten this table a bit to fit my room better - maybe like by 4-6 inches off the length. An obvious fix for the tabletop BUT How does that change the length of the supports (or anything else for that matter) underneath? We are newbies to all this.
Terrilynn08
Thu, 01/07/2016 - 07:40
FINISH COLOR?
So sorry if i missed this information somewhere, what exact color finish did you use? Is it a stain or paint? Absolutely in love and my husband is making this for me this weekend!! AHHHHHH cant wait
Terrilynn08
Thu, 01/07/2016 - 07:40
FINISH COLOR?
So sorry if i missed this information somewhere, what exact color finish did you use? Is it a stain or paint? Absolutely in love and my husband is making this for me this weekend!! AHHHHHH cant wait
Bobsurber
Fri, 02/19/2016 - 15:08
Longer table?
Do you have plans for this as a 12 foot table or what modifications would be needed to make this a 12 foot outdoor table?
Jtgrins
Mon, 02/22/2016 - 17:19
Need help with step 4
I think I might be reading something wrong, but I can get the angles in step 4 to add up. A 45 degree cut to make the 28 3/8 short to short entirely cuts off the 30 degree cut for the 32 5/8 long to long side.
Can someone please explain how u get 28 3/8 short point to short point without cutting off ur 30 degrees cut and turning it into 45?
jesseroche
Wed, 08/31/2016 - 08:22
Im not sure if this will help
Im not sure if this will help you or if you made the same mistake I did but in case you did, I was cutting the 2x4's with the long side flat. I didn't realize that all my angles and measurments didn't add up until recently. I think you just have to flip it up onto the 1.5" side. I'm not sure on doing the rounded edges though. I'm doing mine straight.
Pmeverden
Sun, 04/03/2016 - 12:33
What kind of wood to use for outdoor table.
I want to build this table for outdoors. I plan to cover the top to prevent damage but the legs will still get wet. I don't want to use pressure treated wood for many reasons. Can I use use pine from Home Depot and keep it stained and coated with spar? I live in Pennsylvania and. Have heard that Douglas Fir or Cedar would be good. Also I am concerned about the overall weight of the table. Has anyone used 1 x instead of 2x boards for the top.
pixelthecat
Tue, 05/31/2016 - 10:42
Outdoor Wood
Use something relatively weatherproof.
Redwood is a good choice for softwood, but you'll still need to seal it with polyurethane. Pine (including doug fir) will not stand up to water particularly well and your hard work won't last as long.
If price isn't a question, look at Teak, Cedar, or Eucalyptus, which are far more weatherproof than other woods.
BrittLee2307
Wed, 04/06/2016 - 13:45
How would I adjust the top length?
I would like to be able to make the table top longer, in order to be able to use the ends as additional seating. What adjustments would I need to make, in order to ensure its a solid structrue? I plan on making 2 of the fancy X farmhouse benches and using them as seating, but also want to add a chair to either end of the table, so I'm assuming the top would need to be longer?? LOVE this table and the benches!!! LOVE your style and love this site!!!!!
cdd1204
Thu, 04/28/2016 - 15:57
farm table top
Love love this table!! My husband and I built it but there are not instructions for attaching the top. Can you please let us know how you did it? Thank you!
Amber Lea
Sun, 05/08/2016 - 17:18
4x4 vs 2x4
I am still relatively new to work working. I have been slowly collecting tools to make this table. I love the chunky look of the 4x4 vs. the 2x4. I have been working on this for a few weeks and am really struggling. I am still on step 1 and am having trouble joining the 4x4s. Did anyone else have this problem? Is this a problem when using 2x4s? (I'm assuming with 2x4s clamps can be used?) Thank you for your advice!
sjaustin
Mon, 05/09/2016 - 14:10
You could use clamps with the
You could use clamps with the 4x4s, but I'm not sure that I would. I would just lay the pieces down on my work surface, measure, mark, pre-drill, and screw, holding the smaller angled piece in place with my left hand while screwing from the back of the long straight piece with the right. What exactly are you having trouble with? What in particular seems to be going wrong when you try to join the pieces?
Amber Lea
Tue, 05/10/2016 - 10:20
Joining
I used the Kreg Jig HD to screw holes and when I try to join them I am struggling both to keep both pieces of wood aligned and to screw the PH screws in deep enough that the two pieces stay together. I am having trouble holding them together and pushing the screw deep enough that they stay together.
sjaustin
Tue, 05/10/2016 - 12:37
The Kreg PH system isn't
The Kreg PH system isn't intended to be used for anything thicker than 1.5" (nominal 2") and won't work for 4x4s. I would use deck screws with a minimum length of 4".
Codding58
Thu, 05/12/2016 - 12:34
Quick Question
How are you attaching the table top?
Amber Lea
Thu, 05/12/2016 - 13:29
Thanks
Thank you!
AMMartin
Thu, 06/23/2016 - 21:15
Alternate Tops
Has anyone tried to put a different top on the table- I may have a good lead on some Quartz but not sure how sturdy the table is? I think it would weigh around 270 pounds! Thoughts, suggestions??
Thanks!
AKSully
Tue, 07/12/2016 - 12:01
Wood
What is the best wood for using as a dining room table? Also how long should we let the wood acclimate to our living room climate before building?
Thanks so much
loisknows
Wed, 07/27/2016 - 04:06
Sanding and staining this giant table..
Building this giant table was super easy..and so much fun..sanding and staining it however, was a giant pain. If I built another one I would sand and stain all the pieces first..then assemble it. Just the angles and the overall size if it made it very hard to maneuver the sander..sanding and staining long straight boards would have been much easier. Overall tho, I think it turned out quite nice ..plus I made the benches..the long ones ..now I wish I had made the shorter ones because they are so big..lol..they're very difficult to move ..and finding 8 foot boards that were straight and met up correctly was a chore all by itself. Still a very fun project. And it sure does fill up our new patio.lol
Labuela
Thu, 08/11/2016 - 09:35
Attaching top boards to base?
What are somej approaches / reocmmendations for attatching the top boards to the table base? Pocket hole screws from the inside - I wish i would've drilled those before assembly.
Thanks much.
Joe
melissafontes
Thu, 01/05/2017 - 15:37
attaching top to base
Im getting ready to attach the top to base. Do you have any pictures showing where you put your pocket holes to do that?
sdoc
Tue, 08/16/2016 - 10:30
any changes you would
any changes you would recomend for making it only a 6' table. i cant fit this big of one in my dinning nook. :)
Ztchevy
Sun, 08/28/2016 - 14:45
Attaching Table top
How do you attach the table top without putting screws down through the top of the boards???
jesseroche
Tue, 08/30/2016 - 10:52
Why don't any of the cuts and measurements add up in steps 1-4?
I am considered a beginner but isn't a 45 degree cut of center just a 45 degree cut on a miter saw? I cut the wood at 45 degrees for steps 1-4 as directed and decided to see how it all matches up. To my surprise none of it matches up. I made sure the measurements from long end to long end were correct at 11 3/8 in and made 45 degree cuts (non parallel) at those points. When you connect those to the 20 inch piece in step 1 you dont get the 5 7/8 measurement (the distance away from the post). Likewise with steps 9,10, and 11. I choose to go with the straight 45 degree cuts, 34" long end to long end. When you make 45 degree cuts the short end to short end does not equal 31" for the next 2x4 thats suppose to go on top of that and the 1x4 is definitely not 28". Please someone help me with this.
jesseroche
Wed, 08/31/2016 - 08:15
nevermind
I haven't verified this but Im pretty sure i just need to flip the boards on the side. I was cutting them on the 3.5" side. Boom!
LWags
Sat, 09/03/2016 - 17:17
LOVE
adding this to the list of your tables for my hubby to make!! =)
Recolbert
Mon, 09/12/2016 - 20:19
Table top
How exactly is the top attached. I don't want to see screw holes???
Cami.hales
Sat, 09/17/2016 - 07:39
How is the top attached?
Do you use biscuits on the top of the table, or are you simply screwing it into the base of the table?
Nicoled0425
Sun, 09/25/2016 - 05:08
Bigger table
Any way you can make this into a ten foot table?
Koakley
Sun, 11/06/2016 - 09:16
Does anyone know how many
Does anyone know how many people this table will seat if it is modified to 6tf? Thanks!
joshua.abbie
Tue, 01/03/2017 - 11:10
Newbies
So we are both new to this, but does anyone have modifications to this plan that would involve the "breadboards" at the ends? I think that is what the horizontal boards are called on Farmhouse tables... We love this table, but would like to add the horizontal boards and aren't sure on how to make sure they are secure.
In reply to Newbies by joshua.abbie
Ana White
Thu, 01/05/2017 - 14:30
Check this outhttp://www.ana
Check this out
http://www.ana-white.com/2012/11/plans/farmhouse-table-updated-pocket-h…
Kplum
Wed, 01/10/2018 - 17:44
Cedar??
Has anyone used cedar for this build? Just curious which to use? Cedar? Or Pine?
melbuckner
Sun, 07/07/2019 - 11:32
Yeah. Did pine for the base…
Yeah. Did pine for the base but spent a little extra for cedar 2x10x8 and then put 7 ship n shore to seal it and 7 coats of spar urethane on the table top.
kirstenjohnson1994
Mon, 01/22/2018 - 11:36
Farmhouse tables wood warp
I have plans to build something like this but have read a lot about how sometimes the wood warps overtime. I was just wondering if anyone has experenced this and if so are there ways of preventing it? Any information would be truly appricated!
diy101rookie
Thu, 02/01/2018 - 09:51
Software
What software was used to design this out?
In reply to Software by diy101rookie
Ana White
Fri, 02/02/2018 - 13:00
Google SketchUp
Google SketchUp
KevinMC
Fri, 02/02/2018 - 18:35
Height question
I think I know the answer but I'm a complete novice. If I wanted to build this table at counter height or 40", what adjustments would I need to make the length and/or angles of my base?
k81180
Thu, 02/22/2018 - 17:37
Add planter/cooler??
I am hoping to make a couple of these tables this spring for my deck and wondering if there are any thoughts on how to add support for a couple added features listed below:
- Umbrella hole - what are some recommendations to add support so when I drill a hole for an umbrella the table support is offset and not compromised.
- Center rectangle in-set cooler or planter boxes: again any thoughts on best way to add support for the table as a whole for recessed planter boxes to be used for plants or as coolers for drinks.
I am new to this wood-working world and any designs or tips/tricks for me to try would be appreciated.
Thanks.
Kate
melbuckner
Tue, 06/11/2019 - 16:12
How to attach completed table top to the X frame?
hey all,
Im 70% done with this table - just need to attach the table top to the frame. Curious how to do that - I built the top with pocket holes, but as for laying on the frame - obviously I could drill down through the top but I think that looks tacky and it looks like from pics - people aren't do that.
How are you folks attaching the top to the frame?
thanks -
Mel
peoniespinkandpearls
Tue, 10/15/2019 - 19:16
Did you figure this out? We…
Did you figure this out? We just started tonight.
Kate M.
Thu, 06/13/2019 - 12:01
Altering Dimensions?
Hi Ana,
This is the farmhouse table of my dreams. I'm trying to figure out how to alter the legs to the dimensions of the table we are going to build, which is 46.25x70. Is there a ratio that I can use? We can figure out the length we need if we still subtract the 4.5 inches from either end, but how can I figure out how long the angled pieces need to be?
Thanks so much for your help,
Kate
danielsboyer
Mon, 07/01/2019 - 14:07
Extended Fancy X Farmhouse Table - Additional Leg Required?
Really like this table, but looking to build it at about 10' overall length (v. 8'), possibly 12'. I'm curious if anyone has done that and if they added a 3rd full leg/cross beam support in the middle or made it work with just two? Thanks in advance.