Community Brag Posts


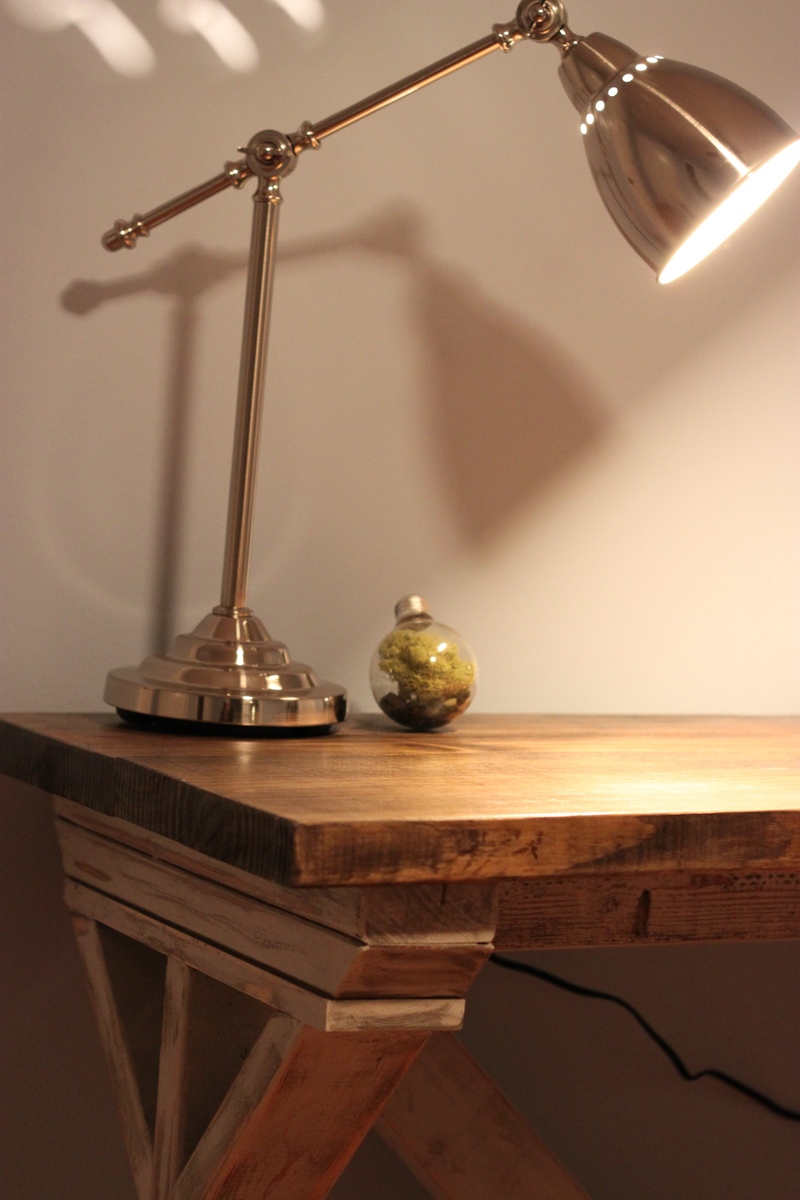
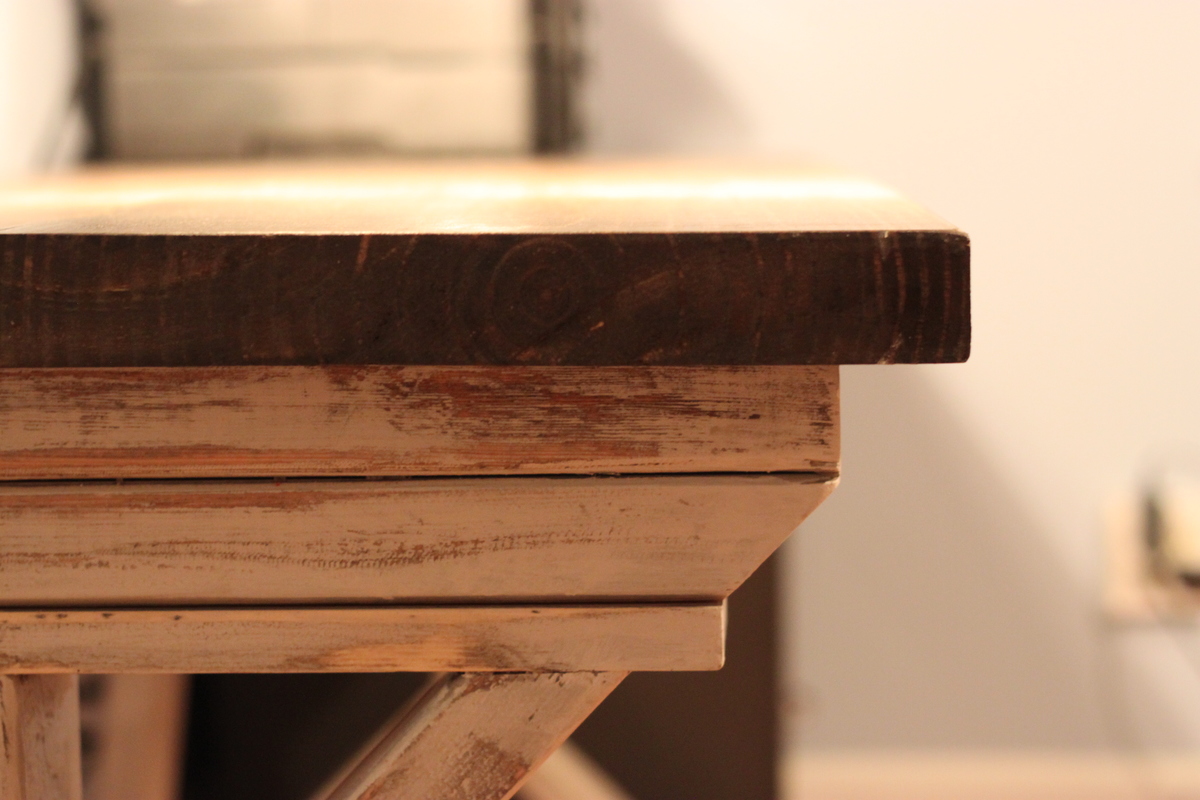
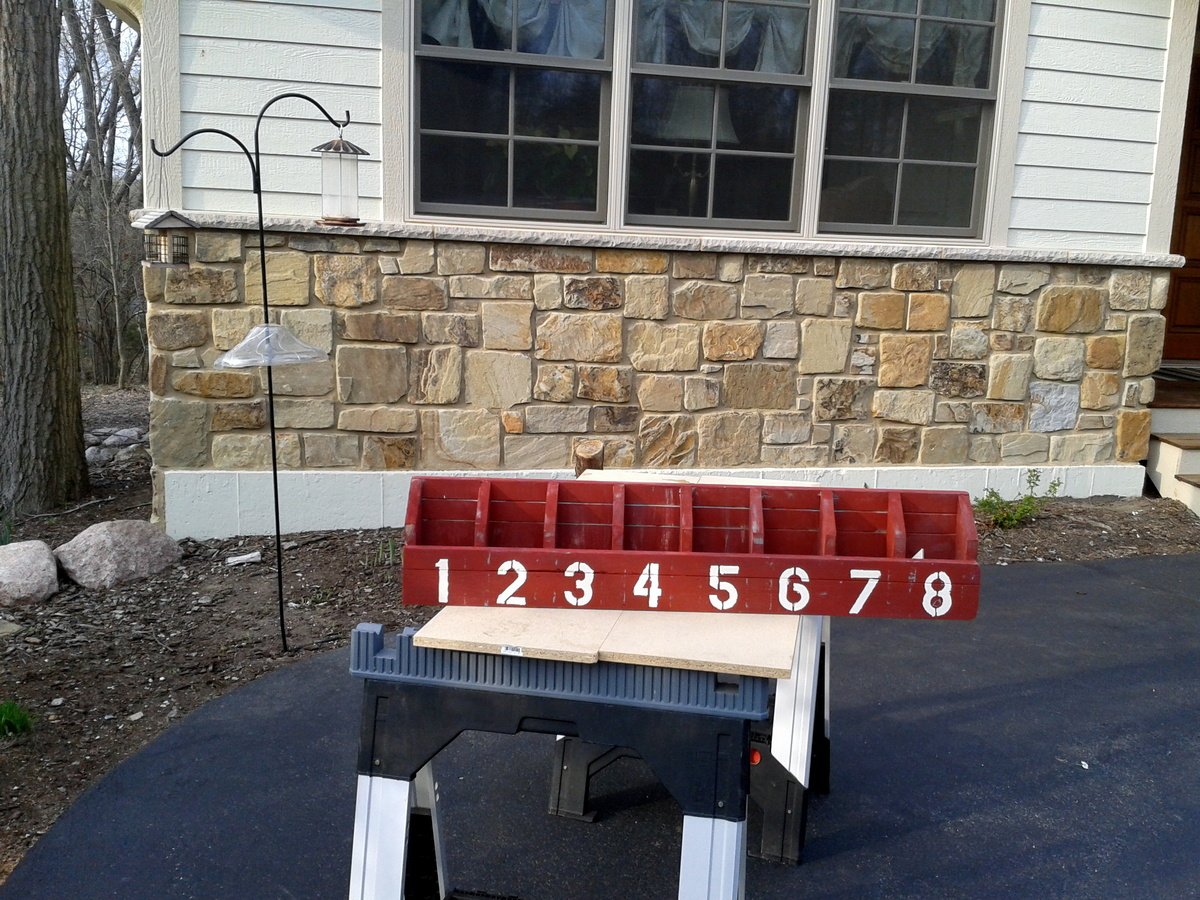
Easy Workbench Build
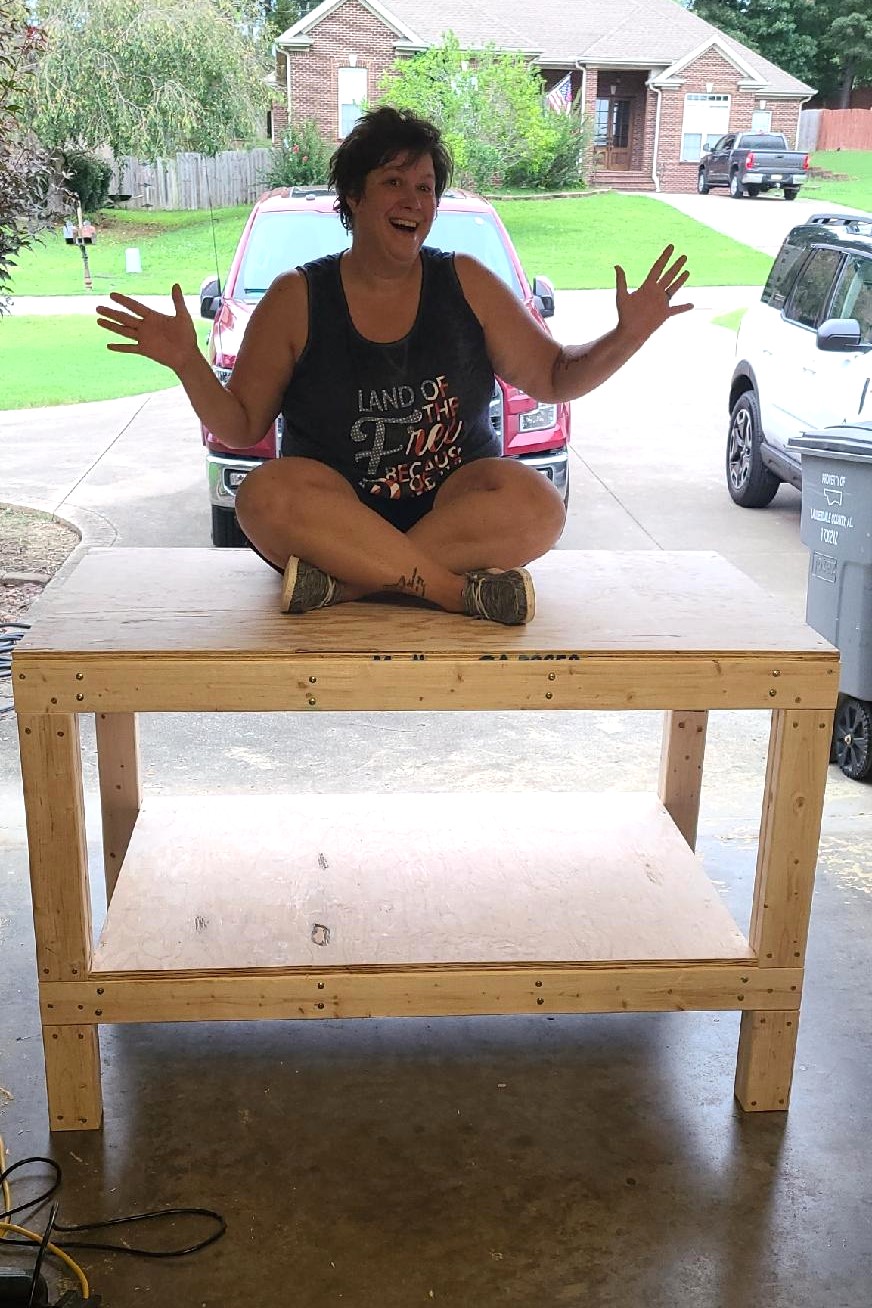
This plan was so easy to follow. I love my new workbench!
Built from Plan(s)
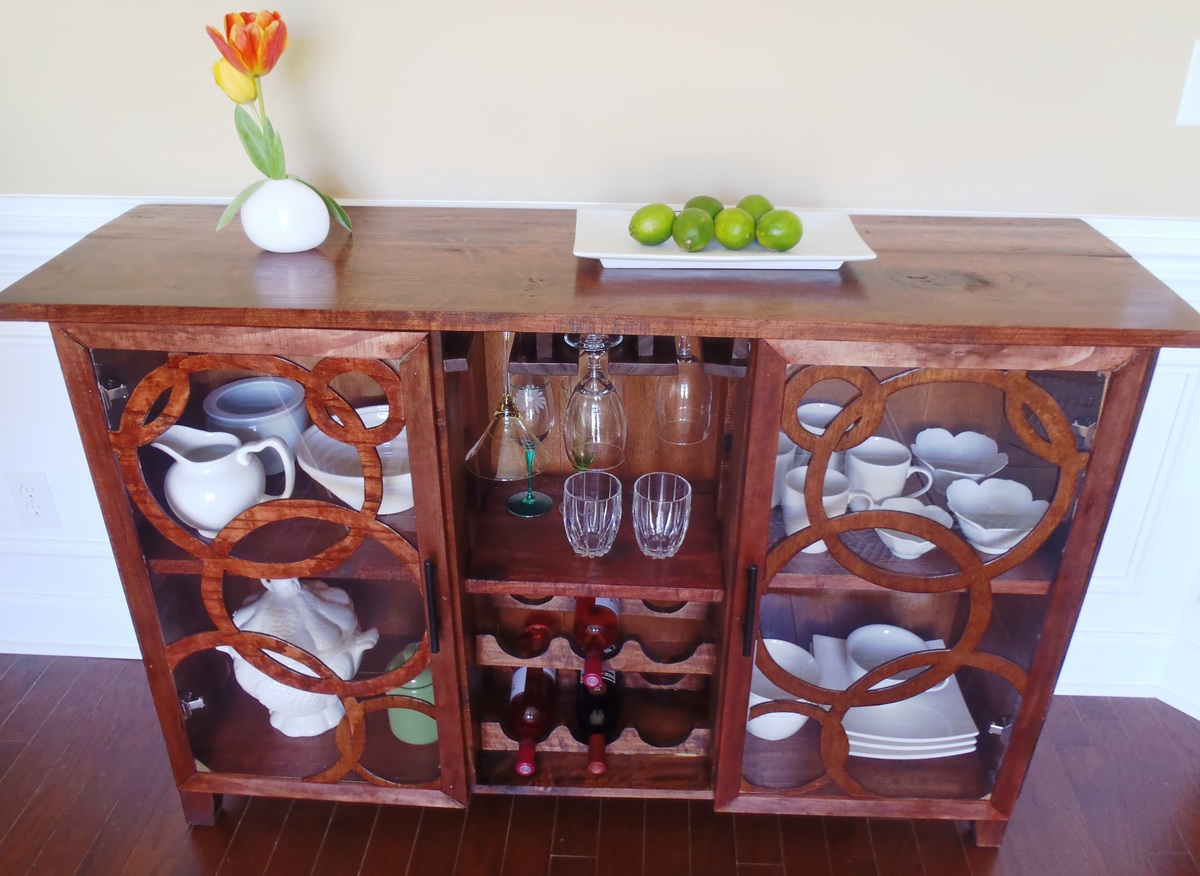
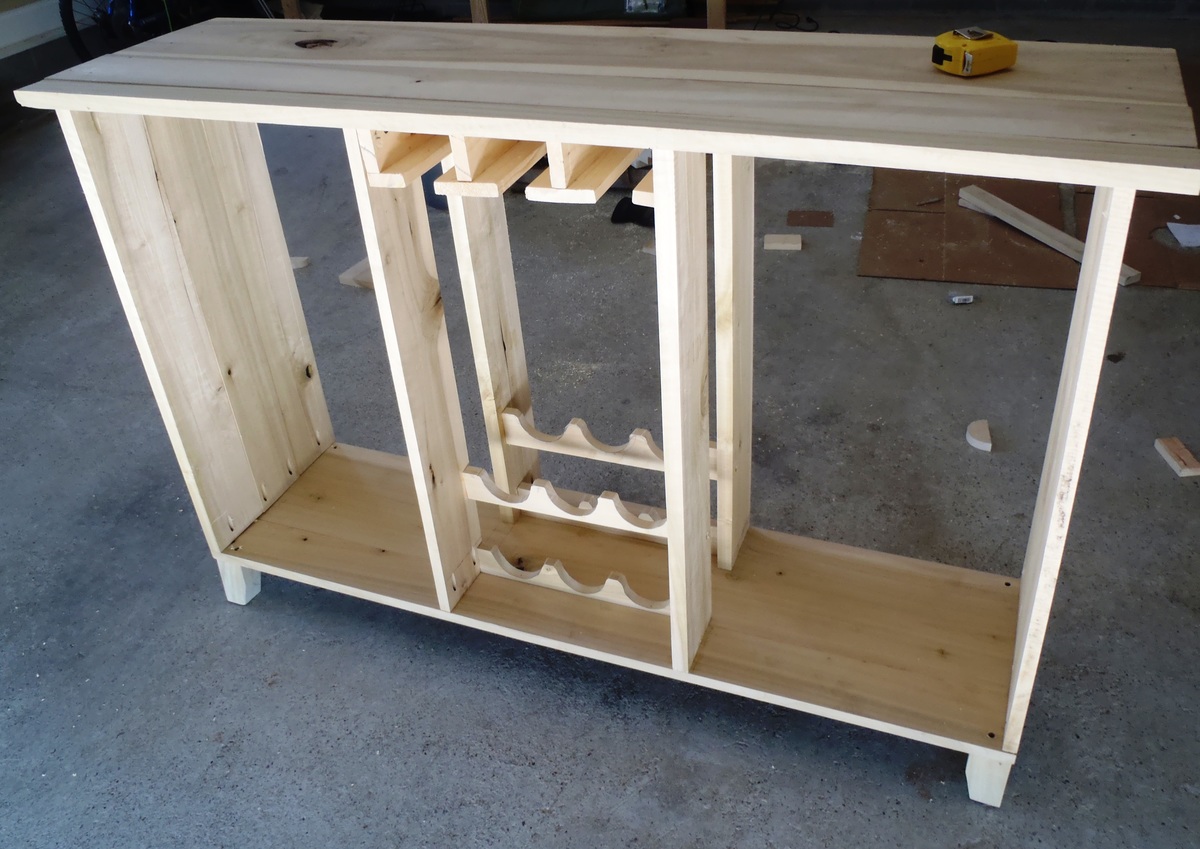
Dining Buffet
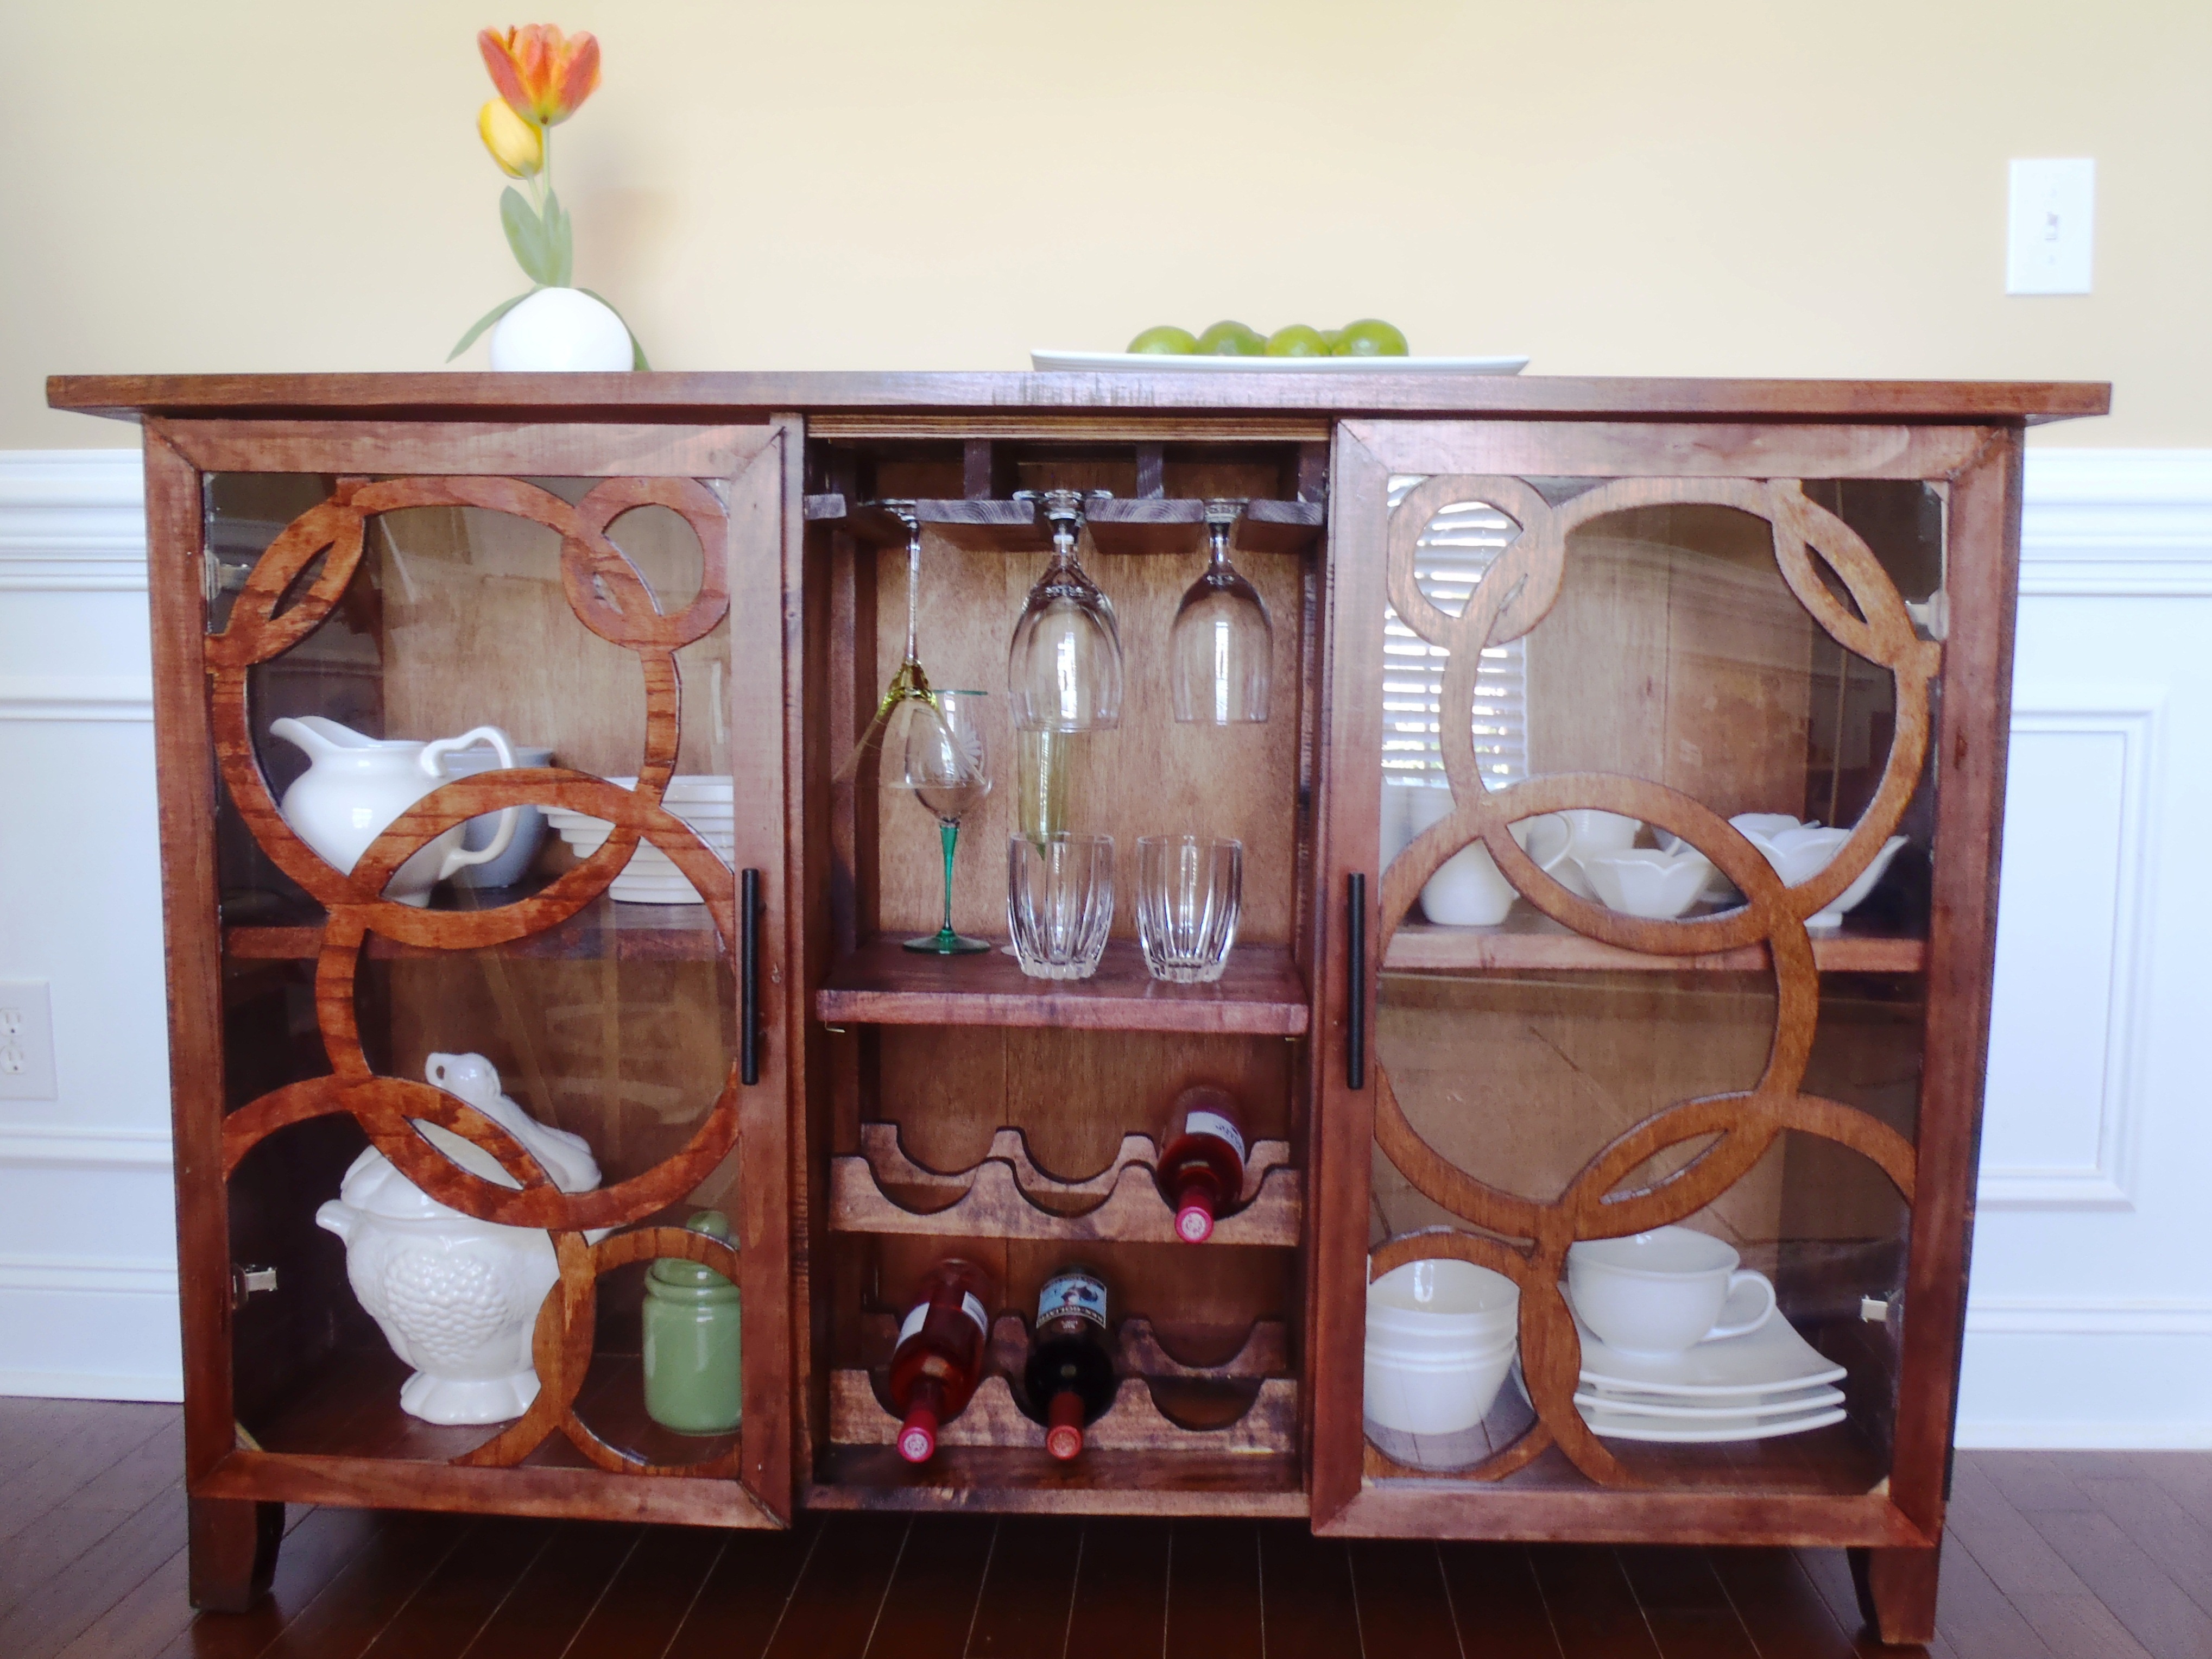
Modified the salsa console by taking the drawer off and stealing some from Patrickhosey's (bragpost). I built it for my dining room. Measures 57-1/2" long X 17" depth X 39" tall.
Built from Plan(s)
Estimated Time Investment
Week Long Project (20 Hours or More)
Finish Used
Minwax red oak and poly
Recommended Skill Level
Intermediate
Comments
Sun, 04/01/2012 - 16:52
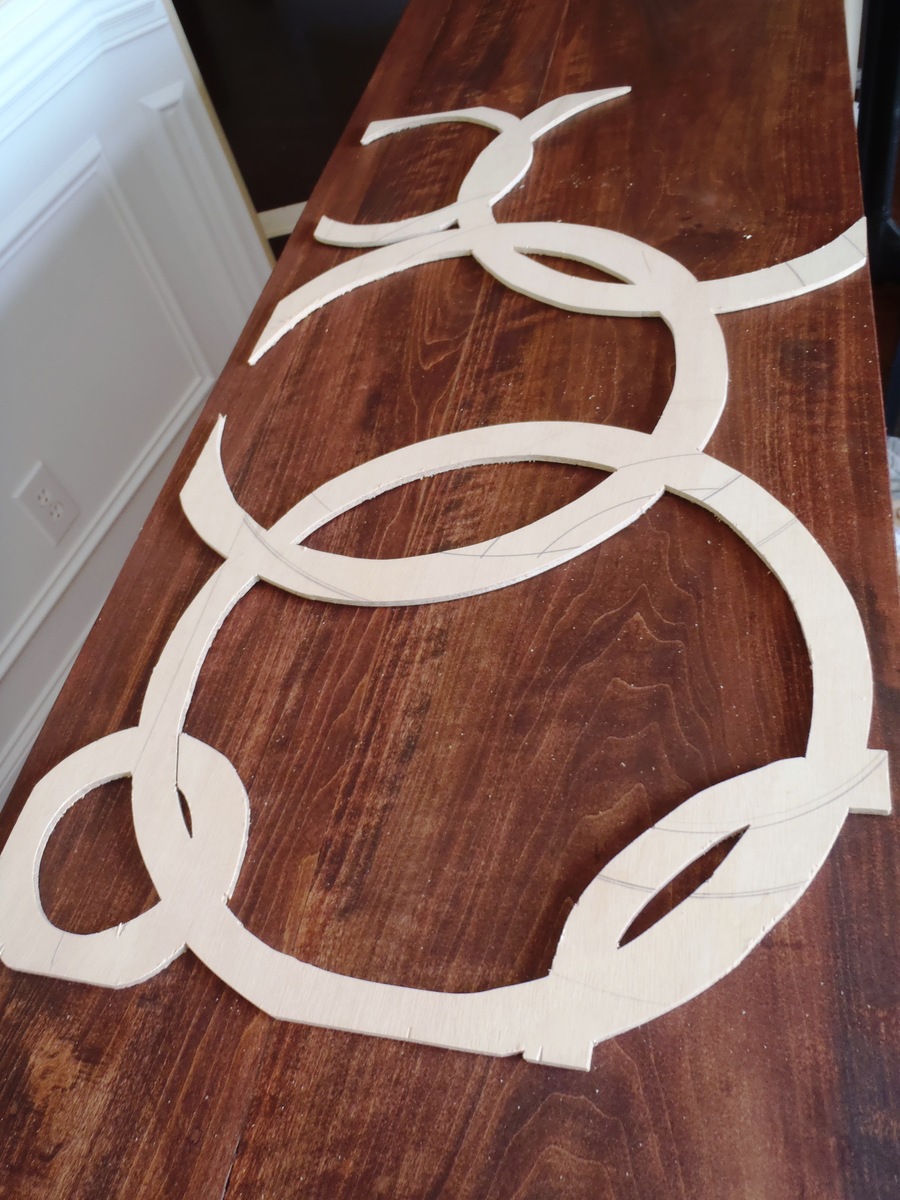
great job! do you have a
great job! do you have a template for your circle pattern?

In reply to great job! do you have a by margjack
Mon, 04/02/2012 - 04:47
Thanks
I don't but it's easy to make, make your door frame first, trace the inside of frame on a plywood sheet and use compass to make all sizes of circles on that sheet. If you don't have compass that's big enough, just use string or thread( like I did on this project), pivot one end, attach the pencil on one end and swing to make circles :)
In reply to That is sooooo cool! by Pam the Goatherd
Mon, 04/30/2012 - 05:24
Thanks
Love your avatar! so cute, I hope that's not mountain dew in there (just kidding:)
Farmhouse Cottage Bed Full Size
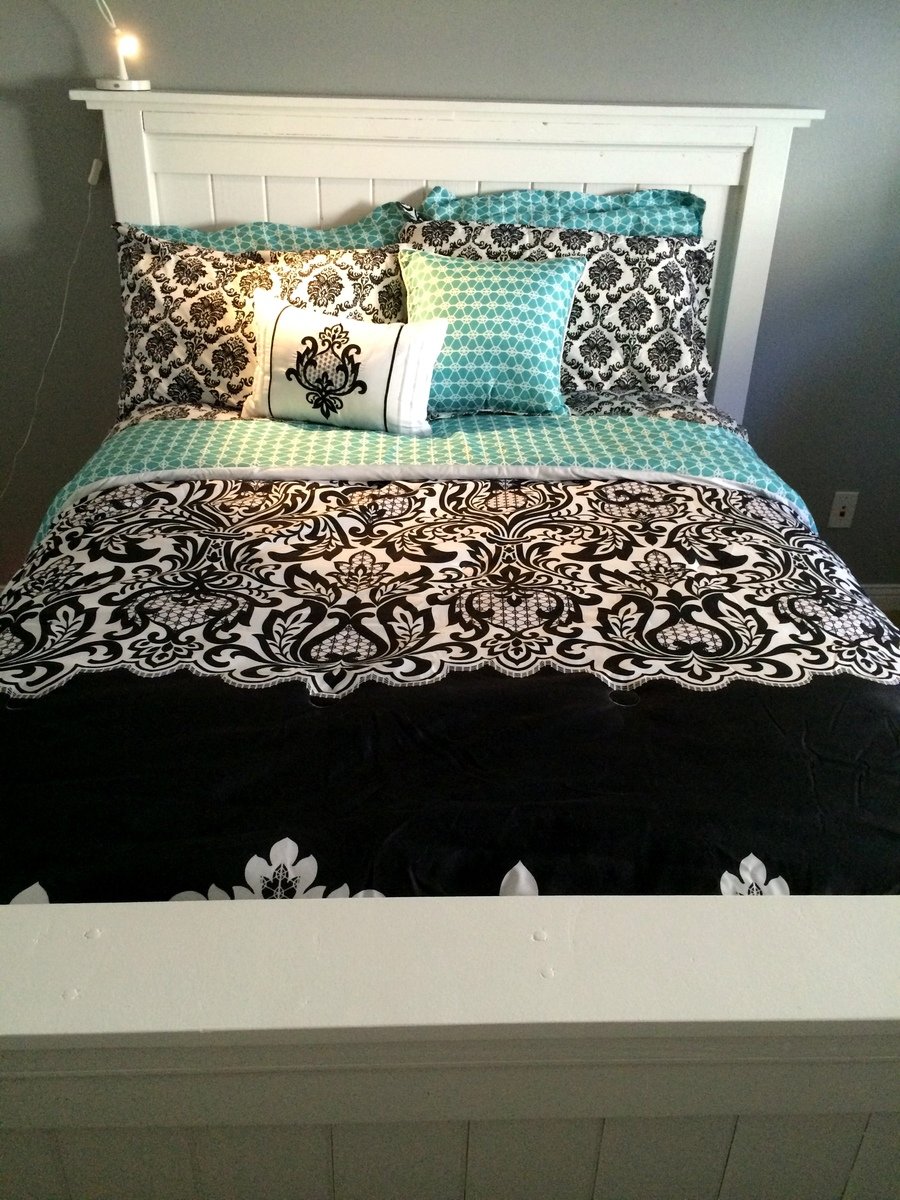
Farmhouse / cottage style bed based on your plans.
Built from Plan(s)
Finish Used
Latex white paint.
Recommended Skill Level
Intermediate
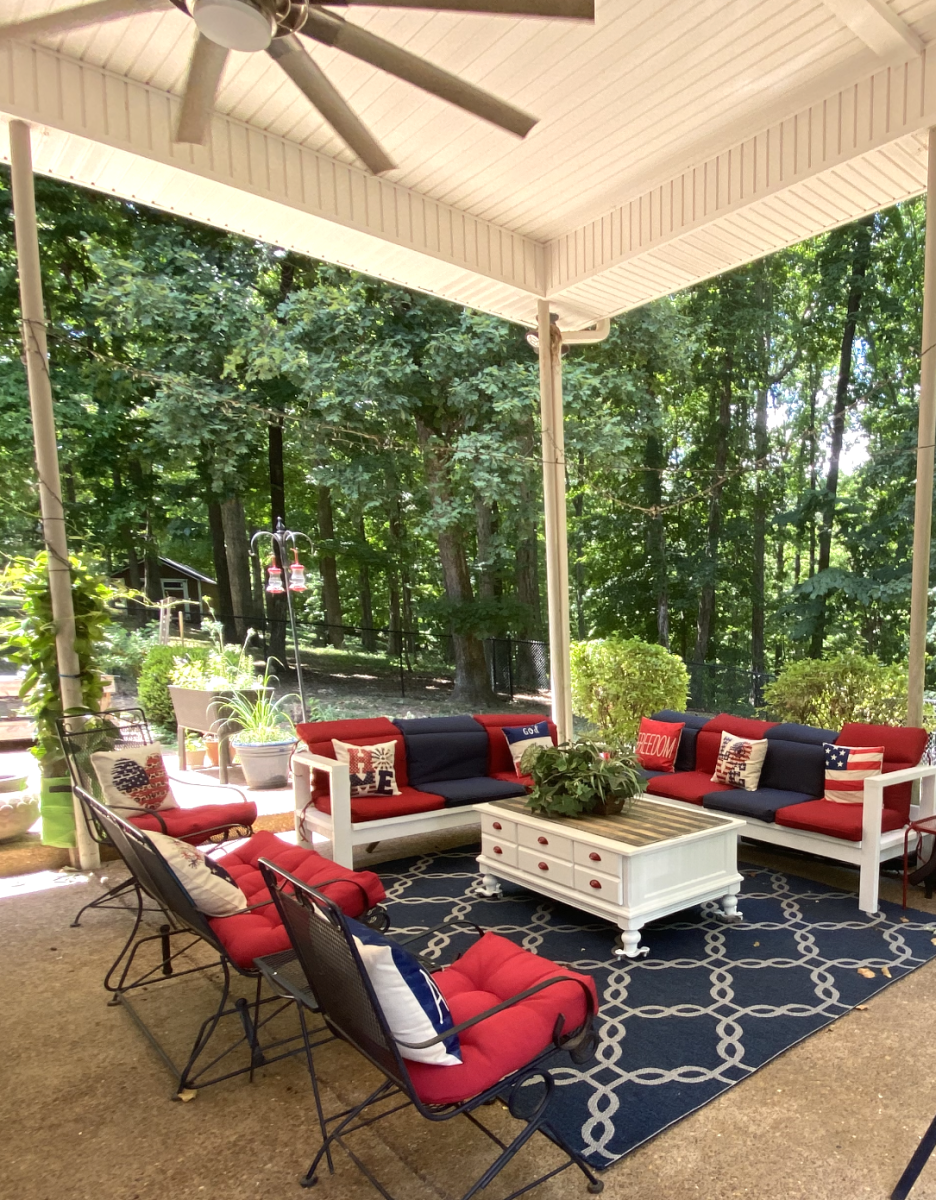
DIY Outdoor Living Room
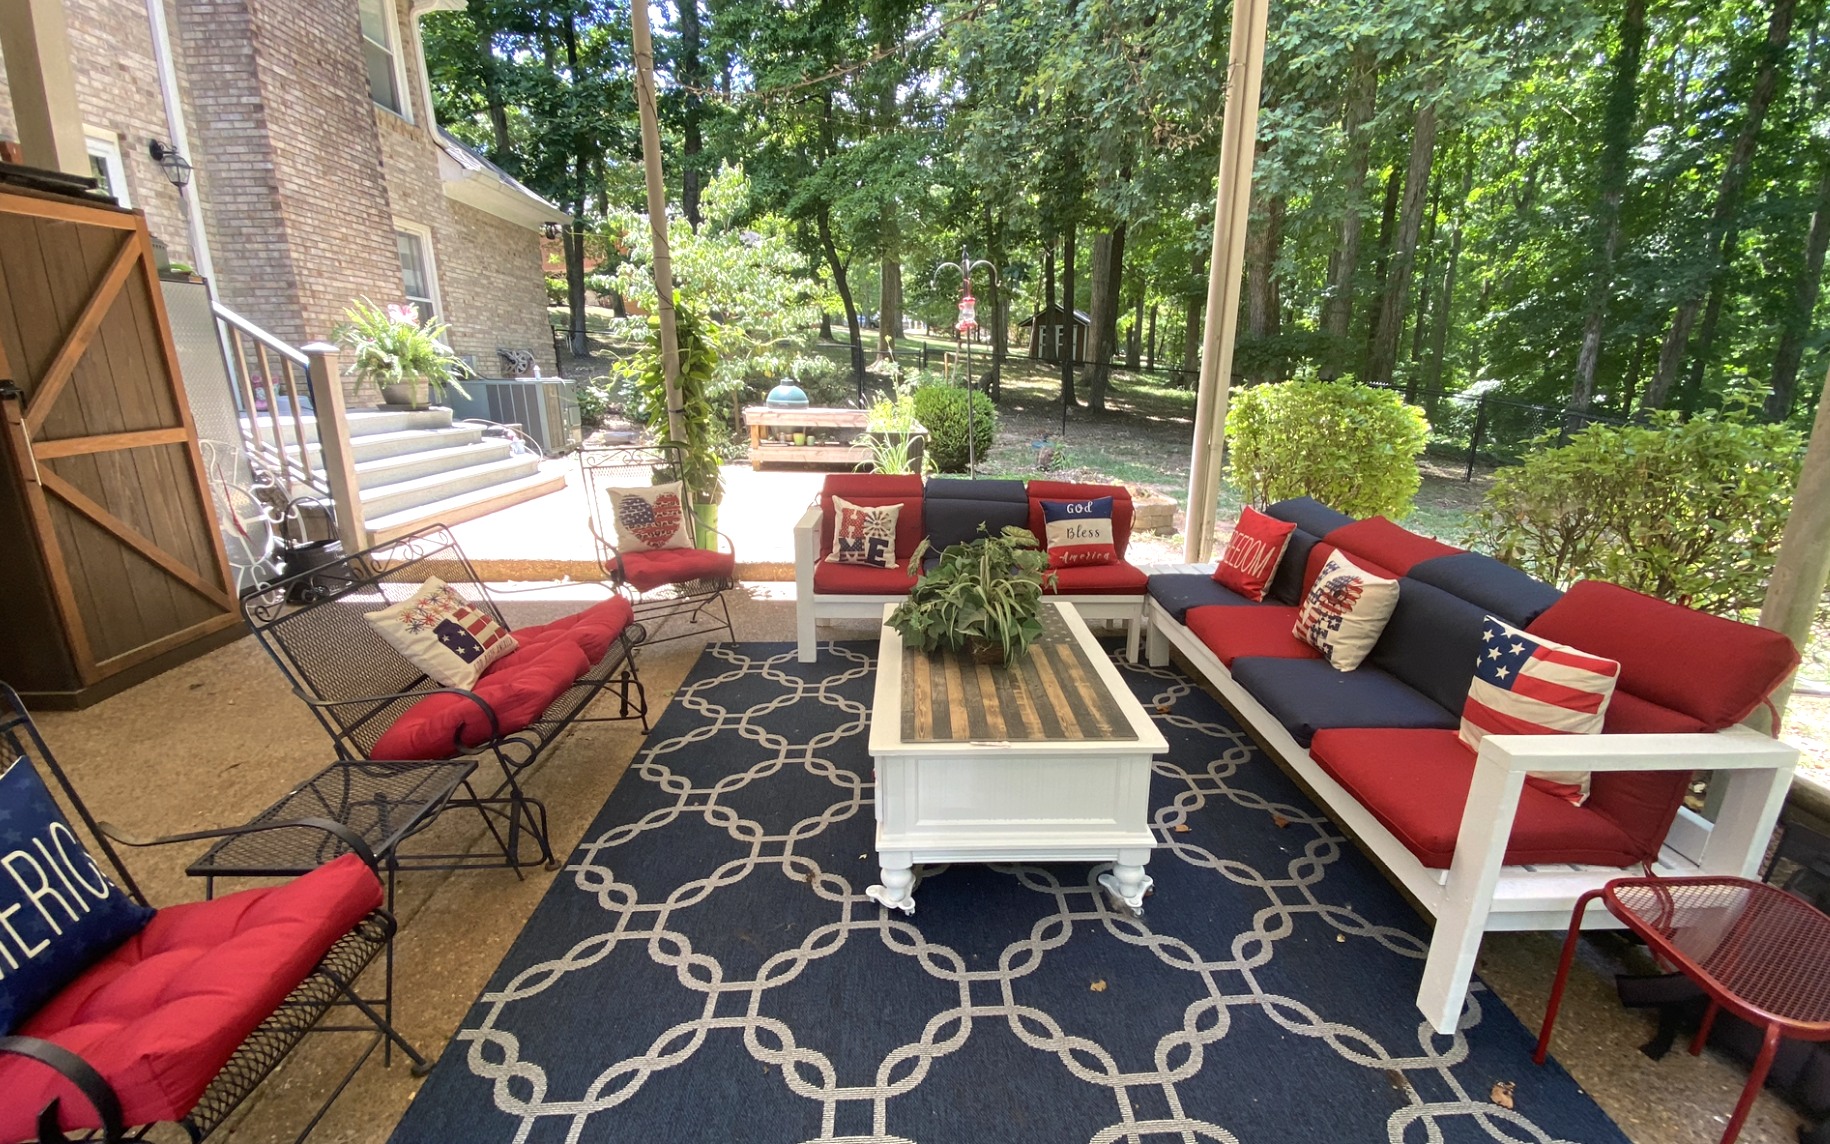
I wanted a bar lounge on my patio so I built it from your plans. We had a July 4th party for the my family. It was so nice.
Everyone was surprised I had done it myself.
I also made a corner table but unfortunately it doesn’t show in pictures.
Thank you! Your plans are amazingly easy.
Donna-Tennessee
Built from Plan(s)
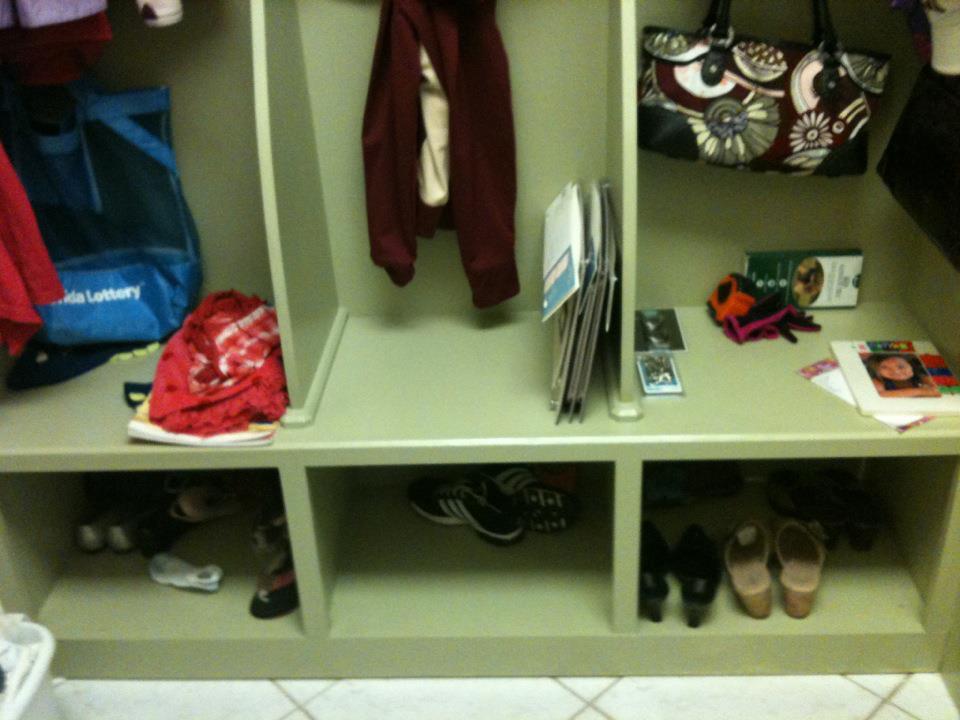
2 projects combined
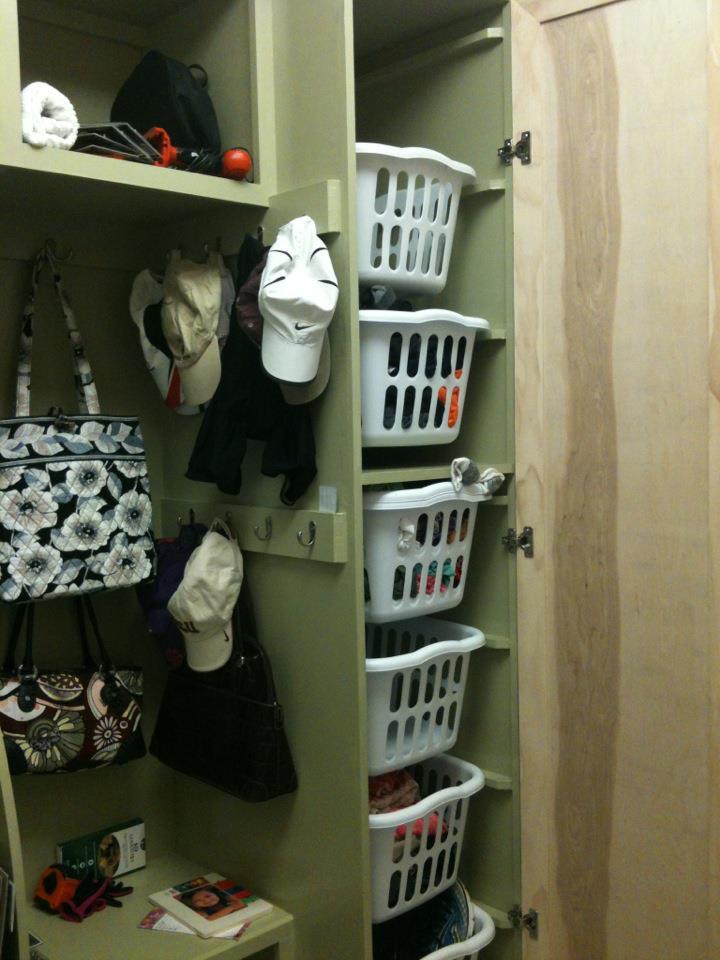
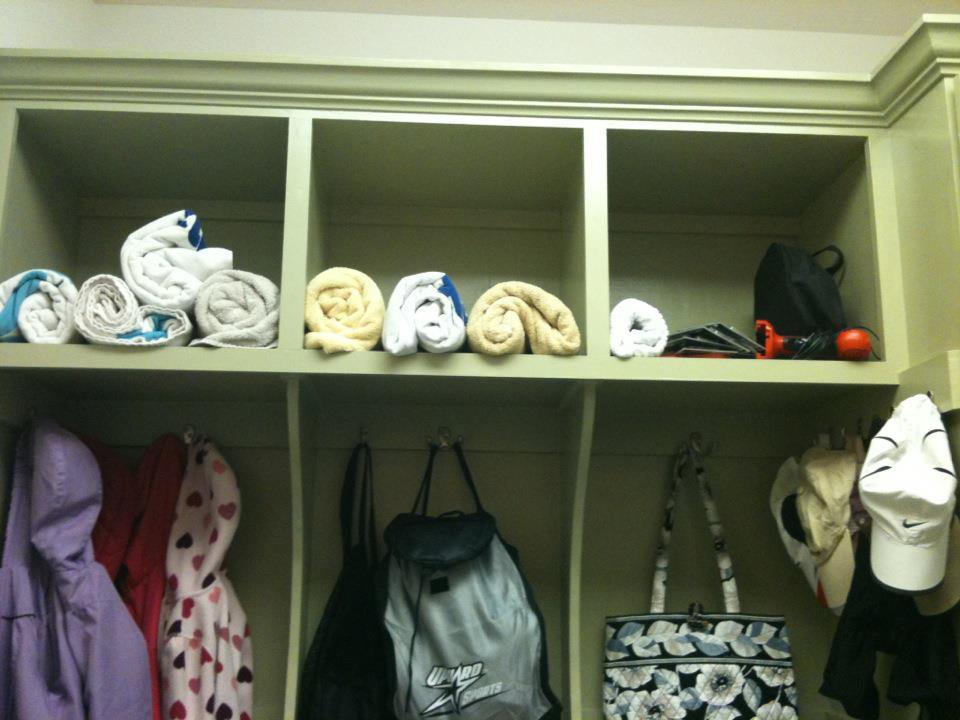
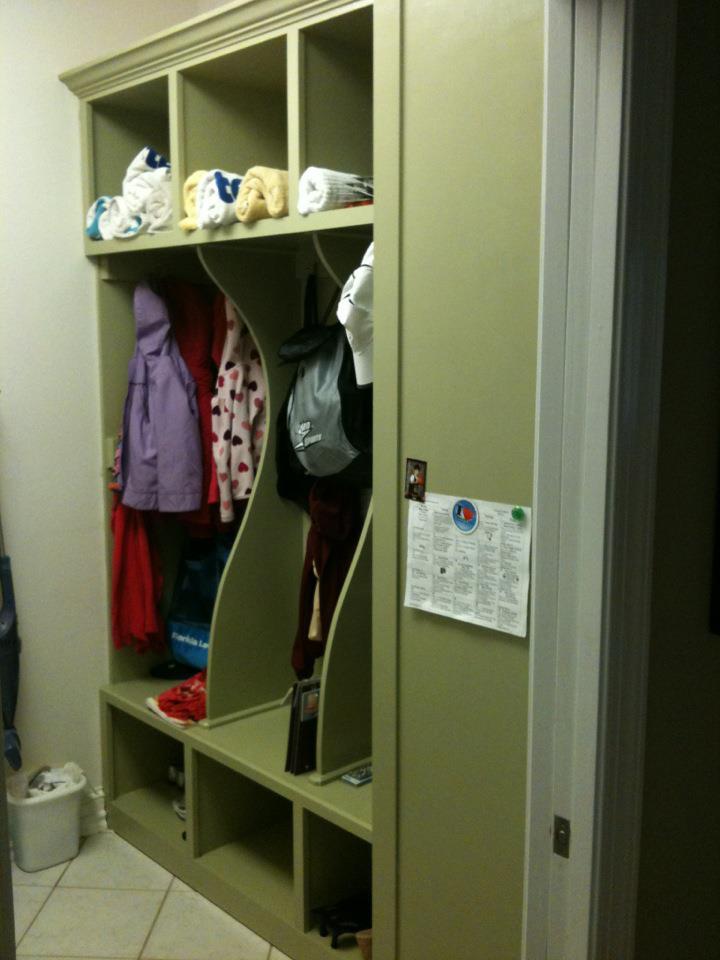
This replaced a huge formica countertop in our laundry room. The counter collected unfolded clothes on the top, and piles of shoes underneath. Also, we had a 4 hook shelf from Target holding all 3 of our kids bags and backpacks. My husband was against this, because "where would we put all the laundry?" Well, this is the solution and we both love it!
I measured this out and drew diagrams and then finally decided this was too big of a project to do for the first time. I did hire someone, but he said the measurements were right on.....he had never built something like this before. The outside of the door is painted with magnetic primer and holds magnets. So much more functional that the counter.
I know I didn't build this myself. I think I could have done it, if I could have a week to do this without interruption, but that was impossible and I needed this YESTERDAY (the 4 hook wall shelf fell out of the wall). But I wanted to share in case anyone else is having a space dilemma! We LOVE it!!!!
Built from Plan(s)
Estimated Cost
$1100 hired/ $200 self
Estimated Time Investment
Week Long Project (20 Hours or More)
Finish Used
paint sherwin williams
Recommended Skill Level
Intermediate
Comments
Thu, 04/05/2012 - 12:10
What a great idea! Very well
What a great idea! Very well planned out! I would love to build something like this in our mudroom.
Tue, 04/10/2012 - 16:33
Just what we need!
Just what we need! Thank you! And I love the door covering the baskets and the magnetic paint - I hadn't thought of those! Thanks so much for sharing! It gives met the confidence to try it myself!
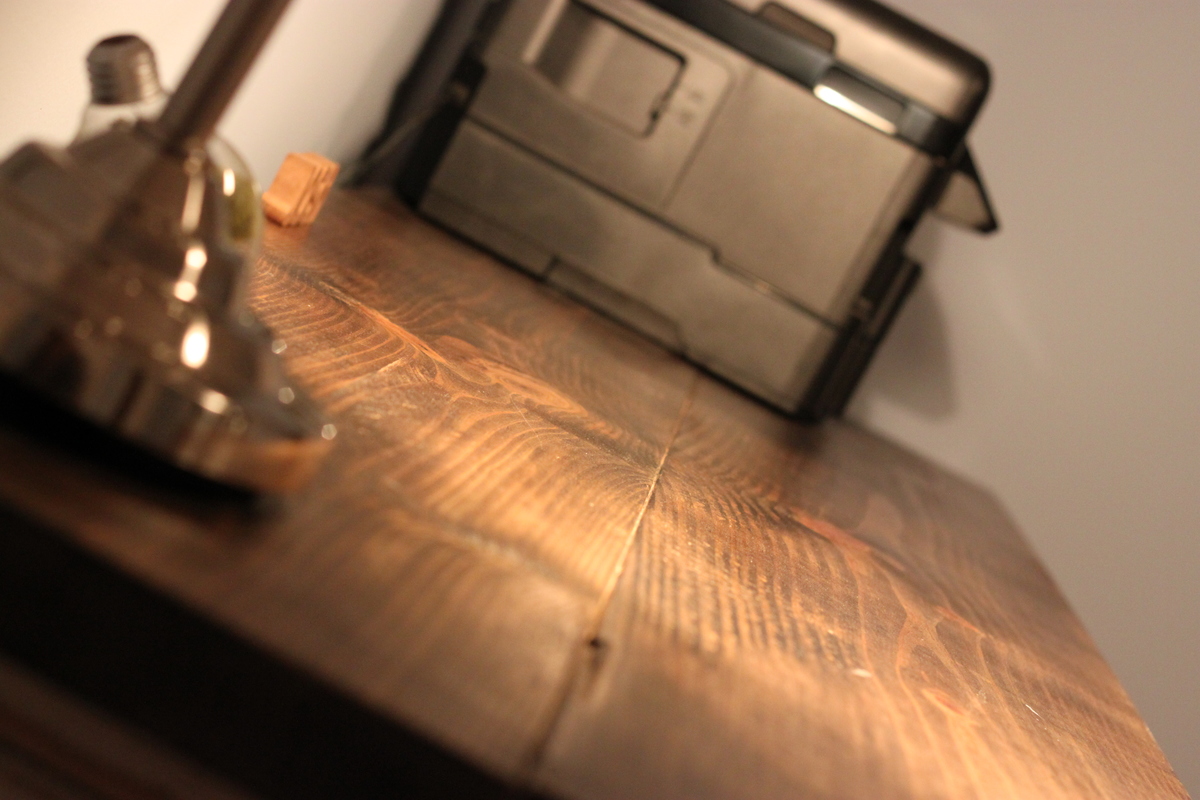
Rustic 'X' Desk
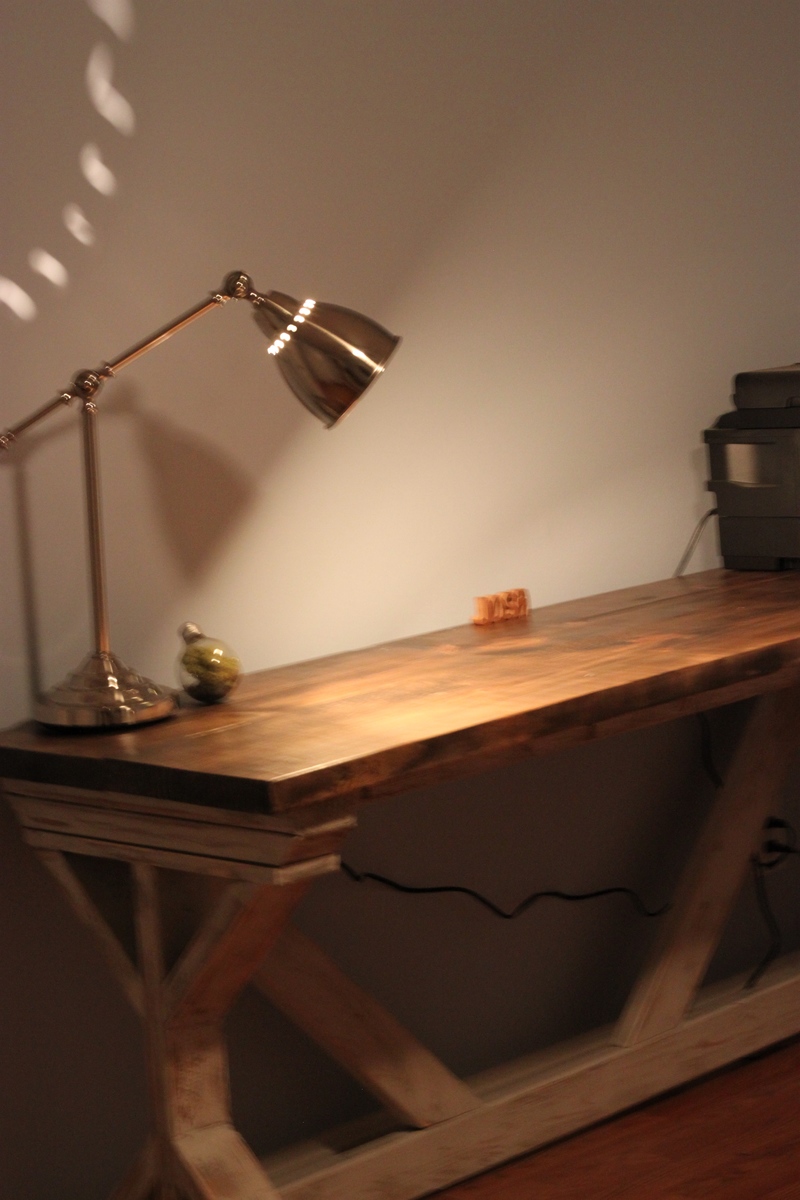
This was a great project. I had some trouble with getting the X's perfectly connected (due to off square boards) and had to use some wood filler here and there. Beyond that, everything came together really well. The longest part was getting the finish just right.
Built from Plan(s)
Estimated Time Investment
Weekend Project (10-20 Hours)
Finish Used
For the base I used Miniwax Jacobian, spray painted in white, and painted in an off-white SW color. Used 80 grit sandpaper to get the look and finish just right. The table top is just jacobian. Everything has 2 coats of polyurethane.
Recommended Skill Level
Beginner
Pallet Reclaim Swing

I work for a large manufacturing company that frequently has 'desirable trash'. Found 3 beautiful, heavy-duty pallets with beautiful wood on them. Took them home, took them apart, and got to work. The wife had been wanting a swing out near our children's playset so she could sit and watch them. Used Kreg pocket holes for everything that I could so as to hide as much hardware as possible.
*Side note regarding why I did the rope the way I did - the original post had mentions of it being a bit tipsy (particularly with little ones!). With this design, there's no flip front or back and the rope only gets tighter the more weight that is applied.
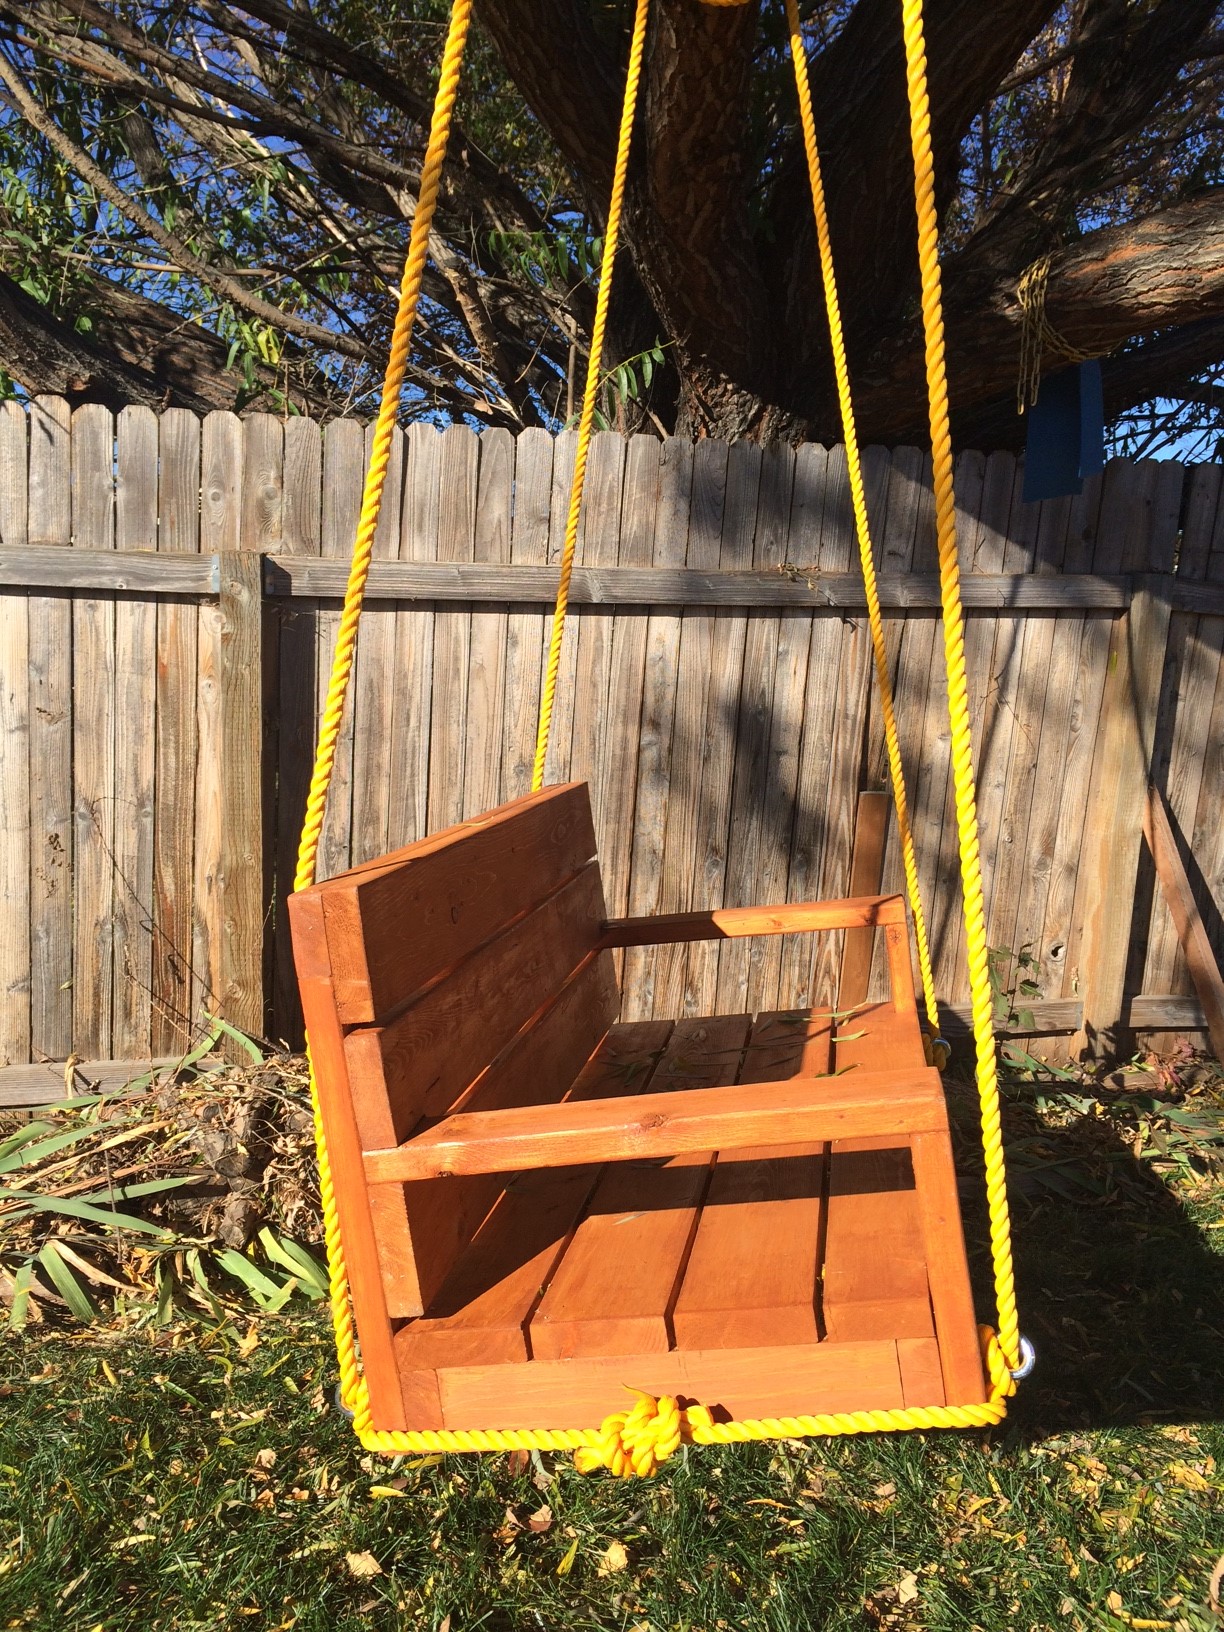
Built from Plan(s)
Estimated Cost
Almost free, only had to pay ~$30 for the rope.
Estimated Time Investment
Afternoon Project (3-6 Hours)
Finish Used
Olympic Cedar Naturaltone Stain, foam brushed on and wiped off with rags.
Recommended Skill Level
Starter Project
Pet feeder
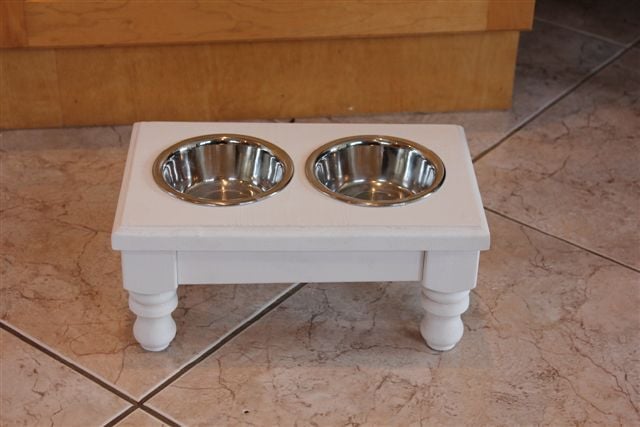
I love my cat, and felt she needed a pretty feeding dish. I stole some old spindles from my sister's garage, cut them down and threw this plan together. It was actually harder than I expected because getting into tight little spaces with my drill to drill in the pocket holes was almost imposible. The wood split, nothing is square and the holes for the dishes are messy...but it doesn't really matter, it looks good from a distance and my cat doesn't judge. Not that I know of, anyway.
Estimated Cost
Free - made from scraps
Estimated Time Investment
An Hour or Two (0-2 Hours)
Finish Used
Flat white paint
Recommended Skill Level
Intermediate
Comments

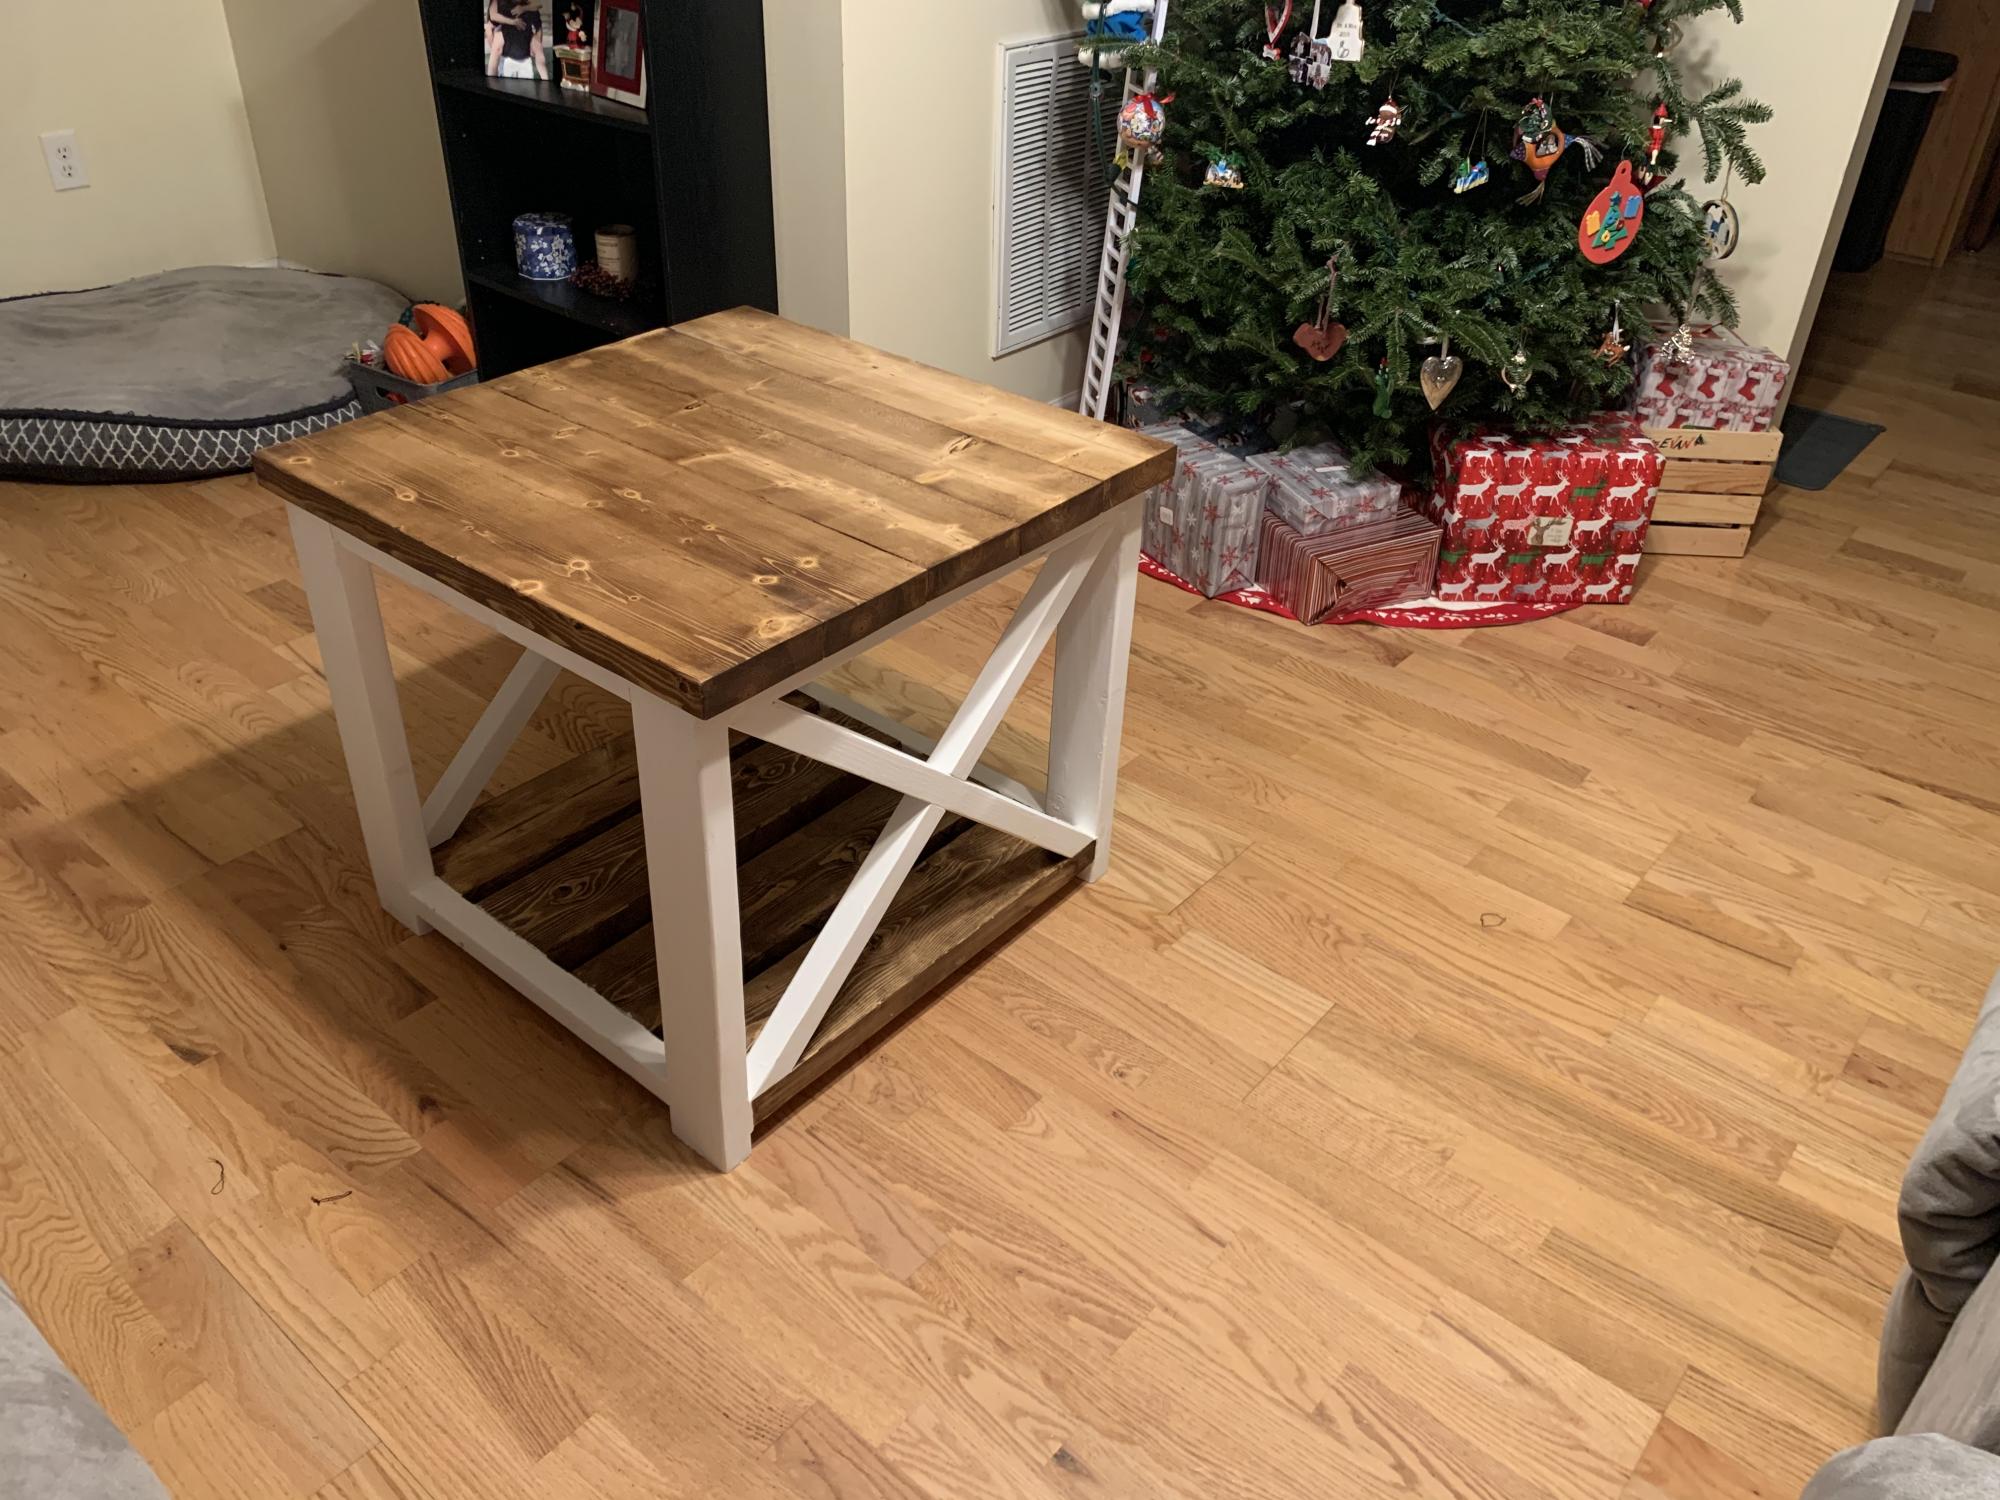
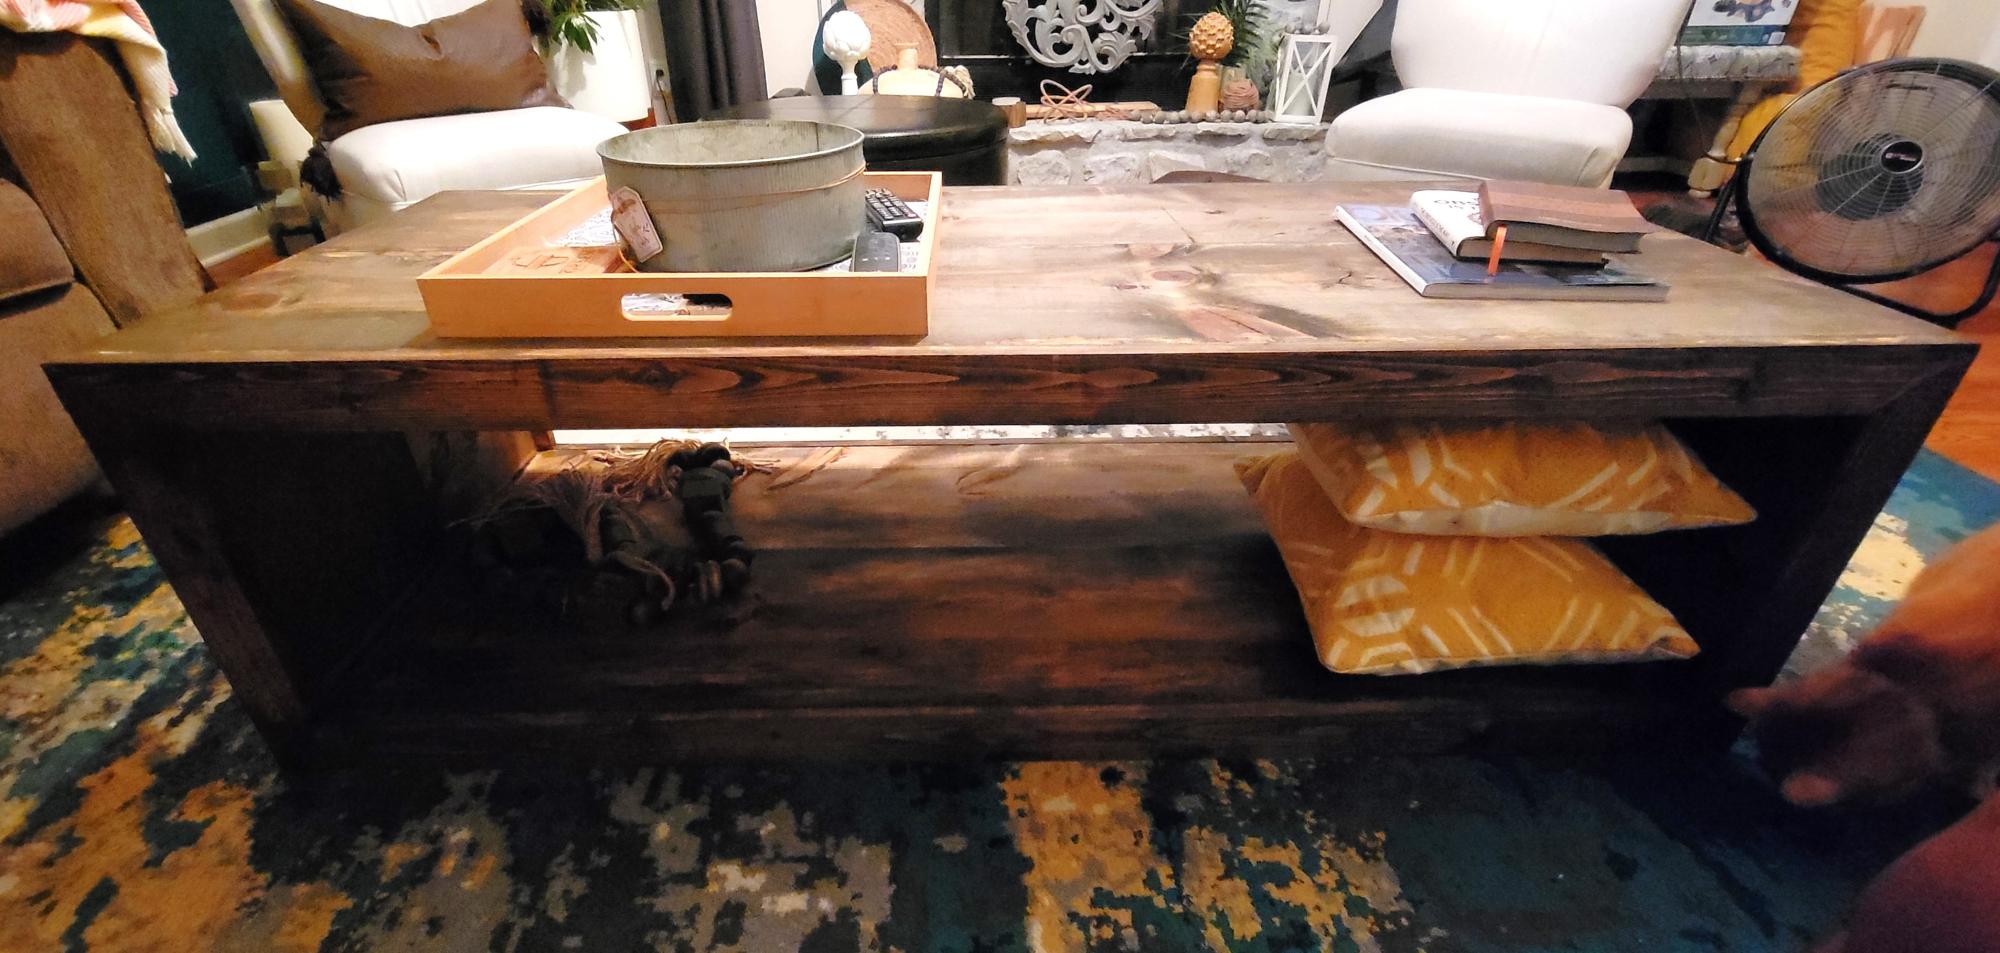
Rustic X Coffee Table

- made directly from the plans
- decorative hardware was spray painted "flat black"
- there are decorative bolts in the legs, they were installed after these pictures were taken.

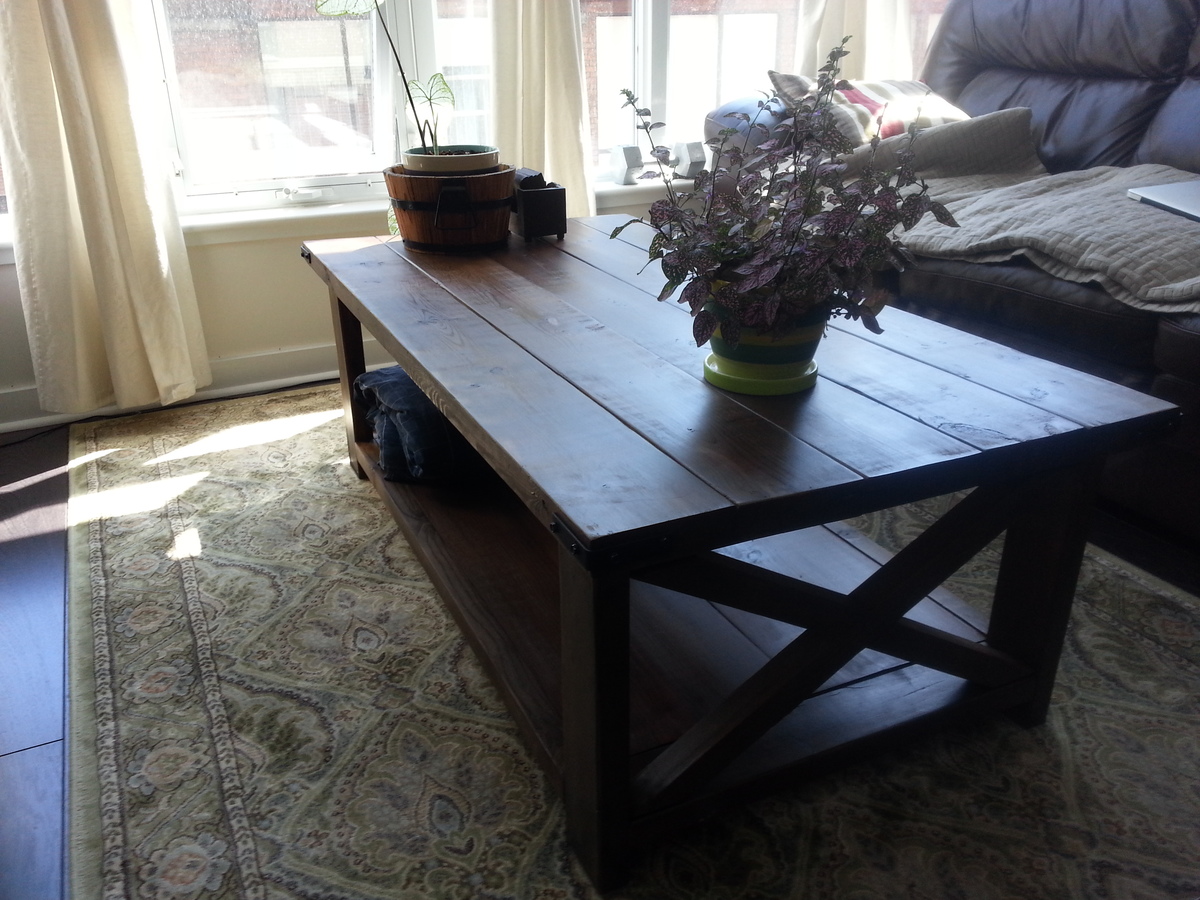
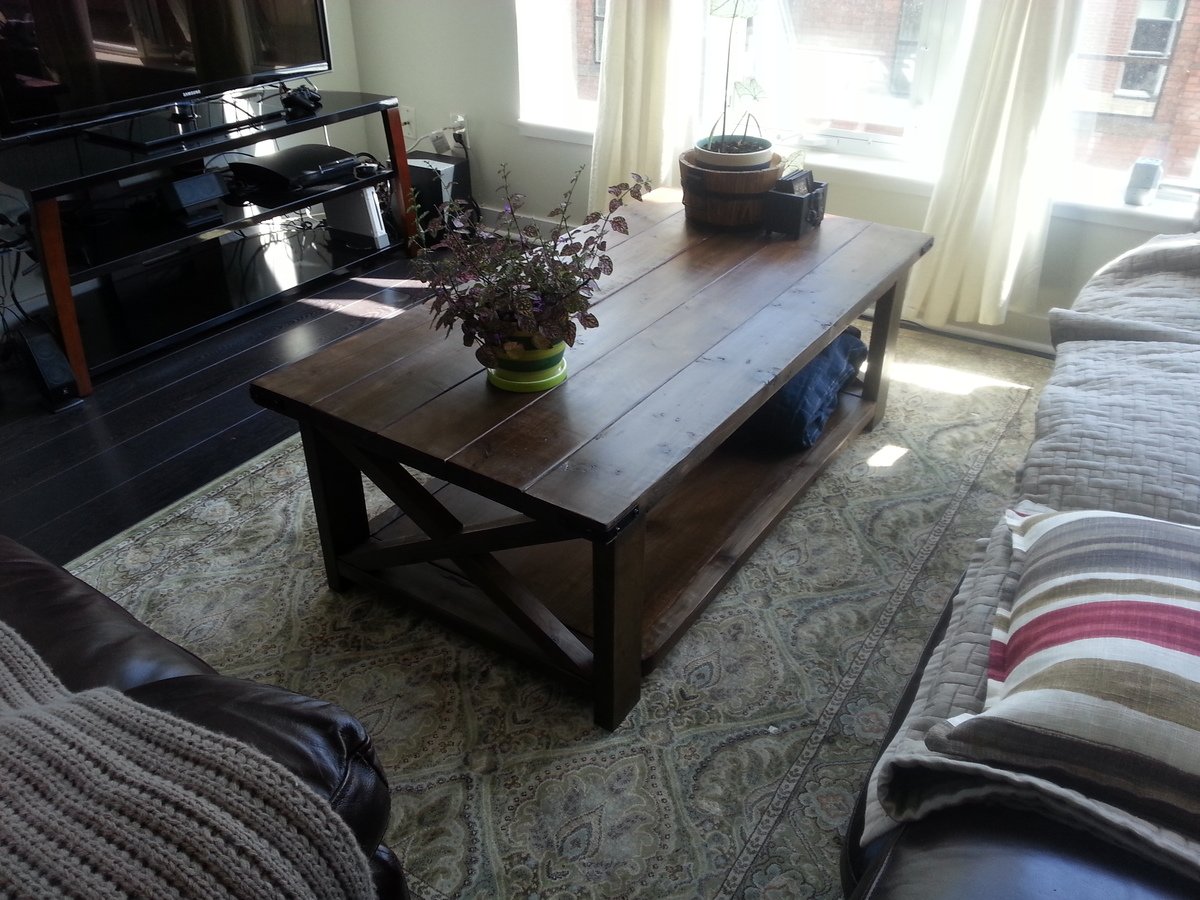
Built from Plan(s)
Estimated Time Investment
Day Project (6-9 Hours)
Finish Used
- Brushed on black tea
- Brushed on solution of vinegar and steel wool that sat for 72 hours
- Vermont Natural Coatings Wipe on PolyWhey
- Brushed on solution of vinegar and steel wool that sat for 72 hours
- Vermont Natural Coatings Wipe on PolyWhey
Recommended Skill Level
Beginner
Large dog table crate
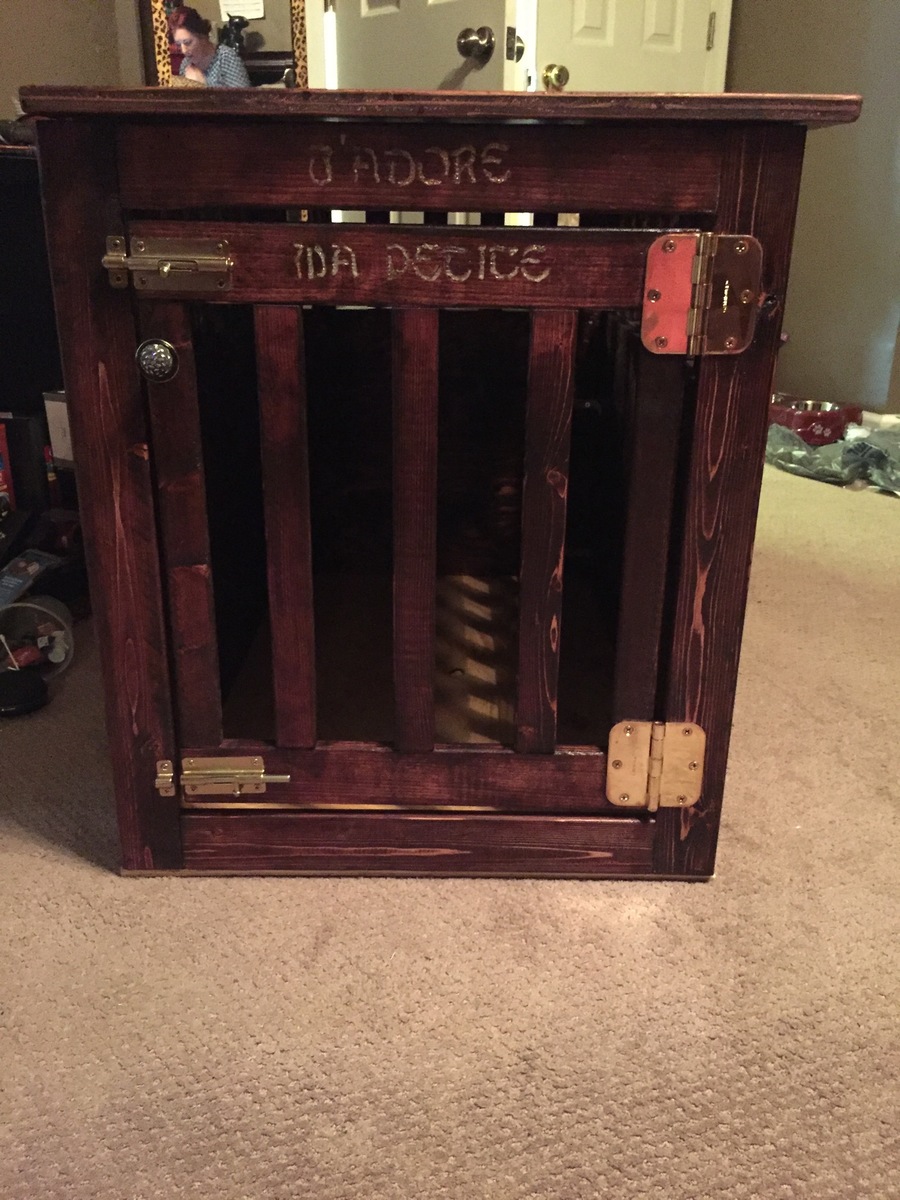
I am so ridiculously proud of myself... This was my first wood building project and now I think I'm addicted !!!! Next project a bookshelf!!
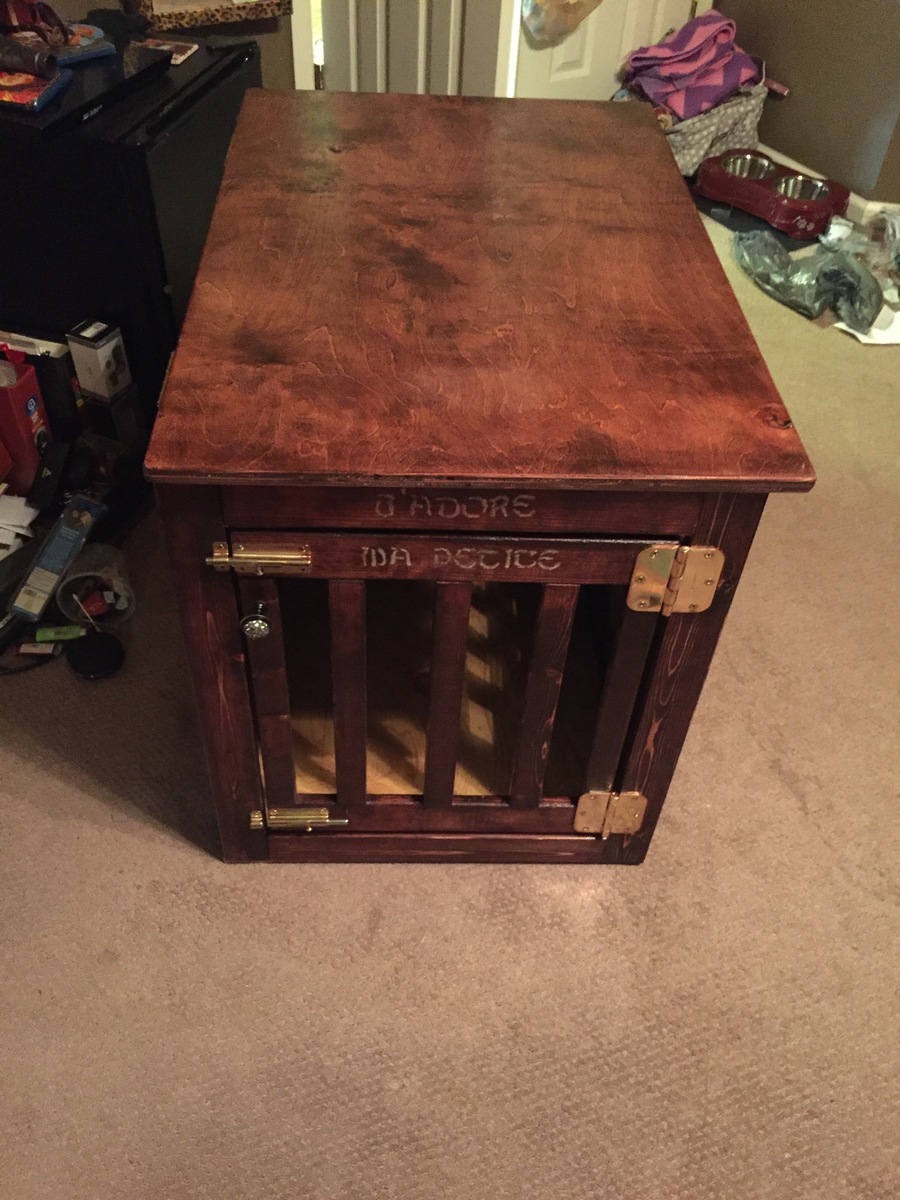

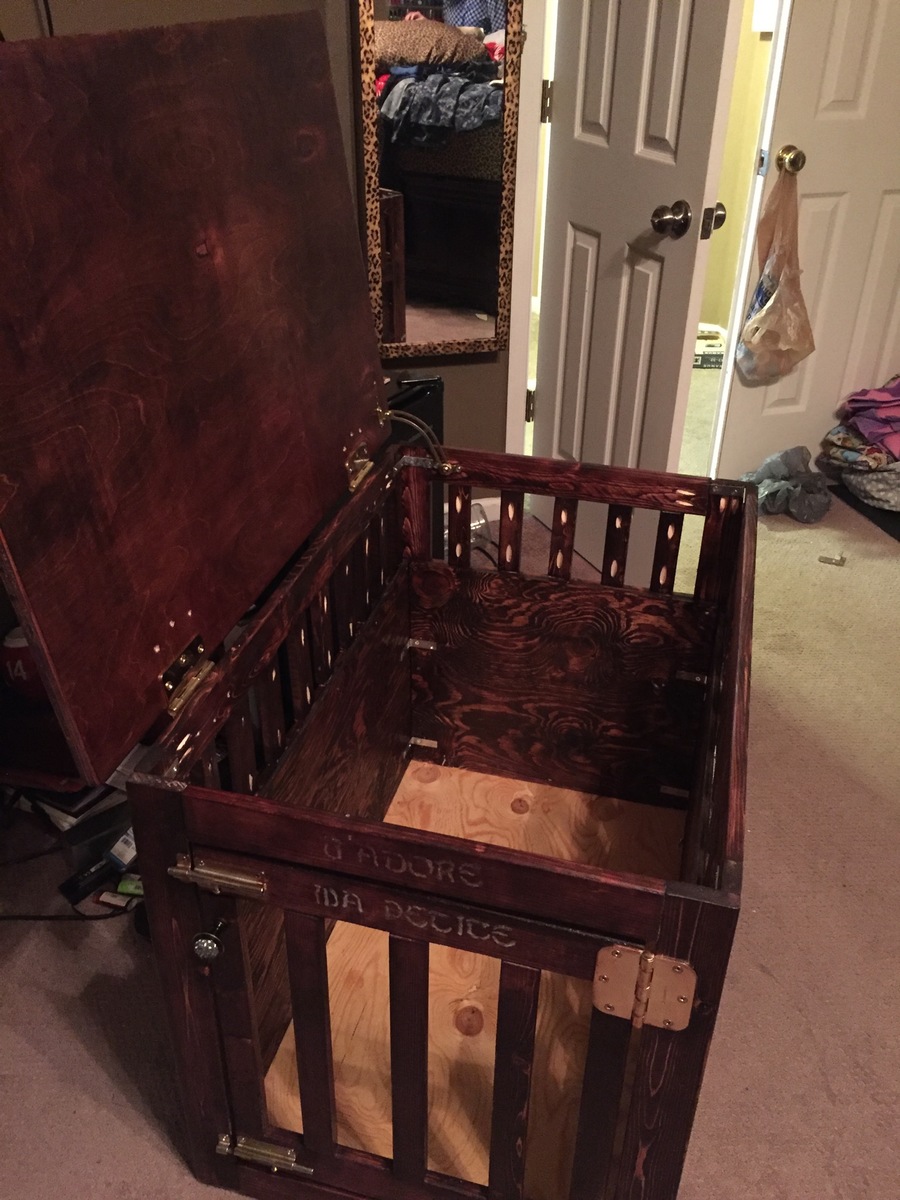
Built from Plan(s)
Estimated Cost
$165
Estimated Time Investment
Weekend Project (10-20 Hours)
Finish Used
Cherry mahogany
Recommended Skill Level
Starter Project
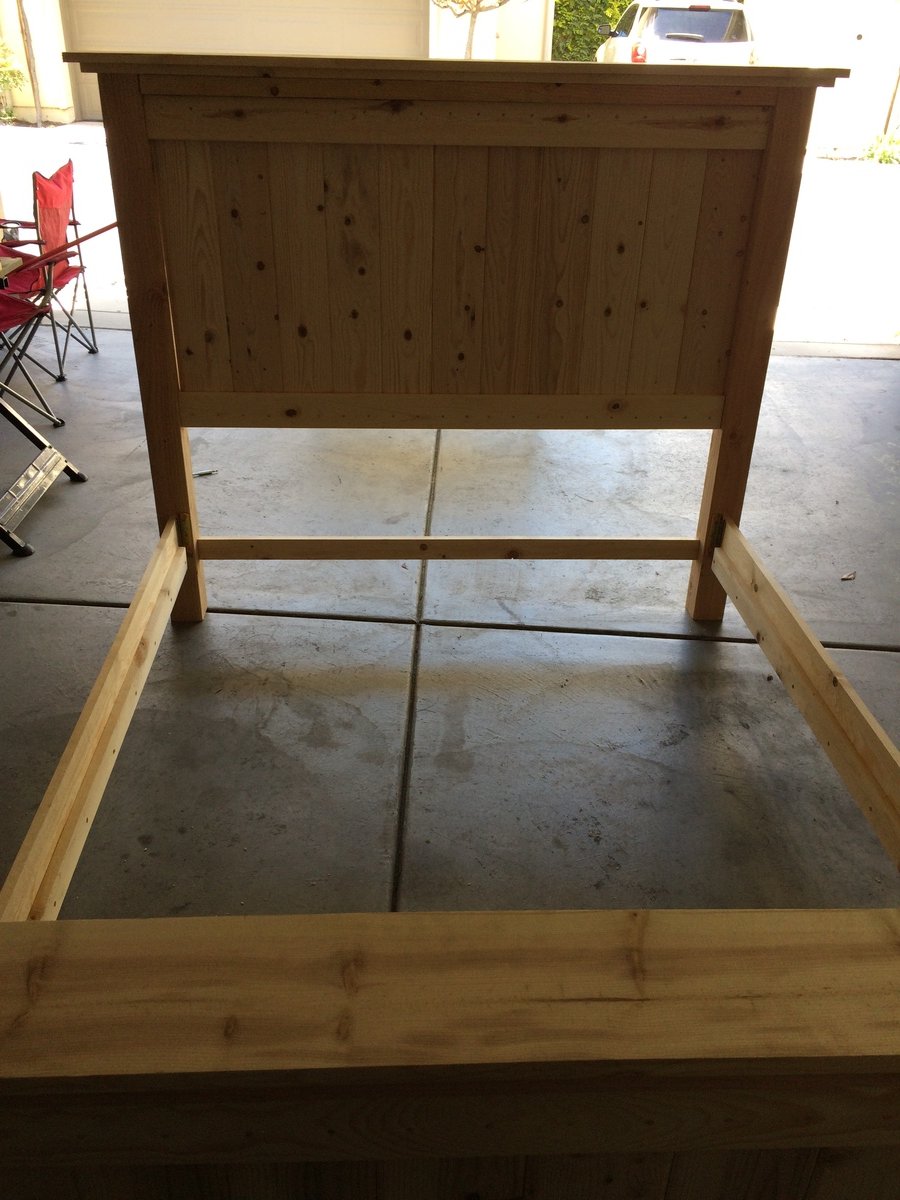
Full-size Farmhouse Bed
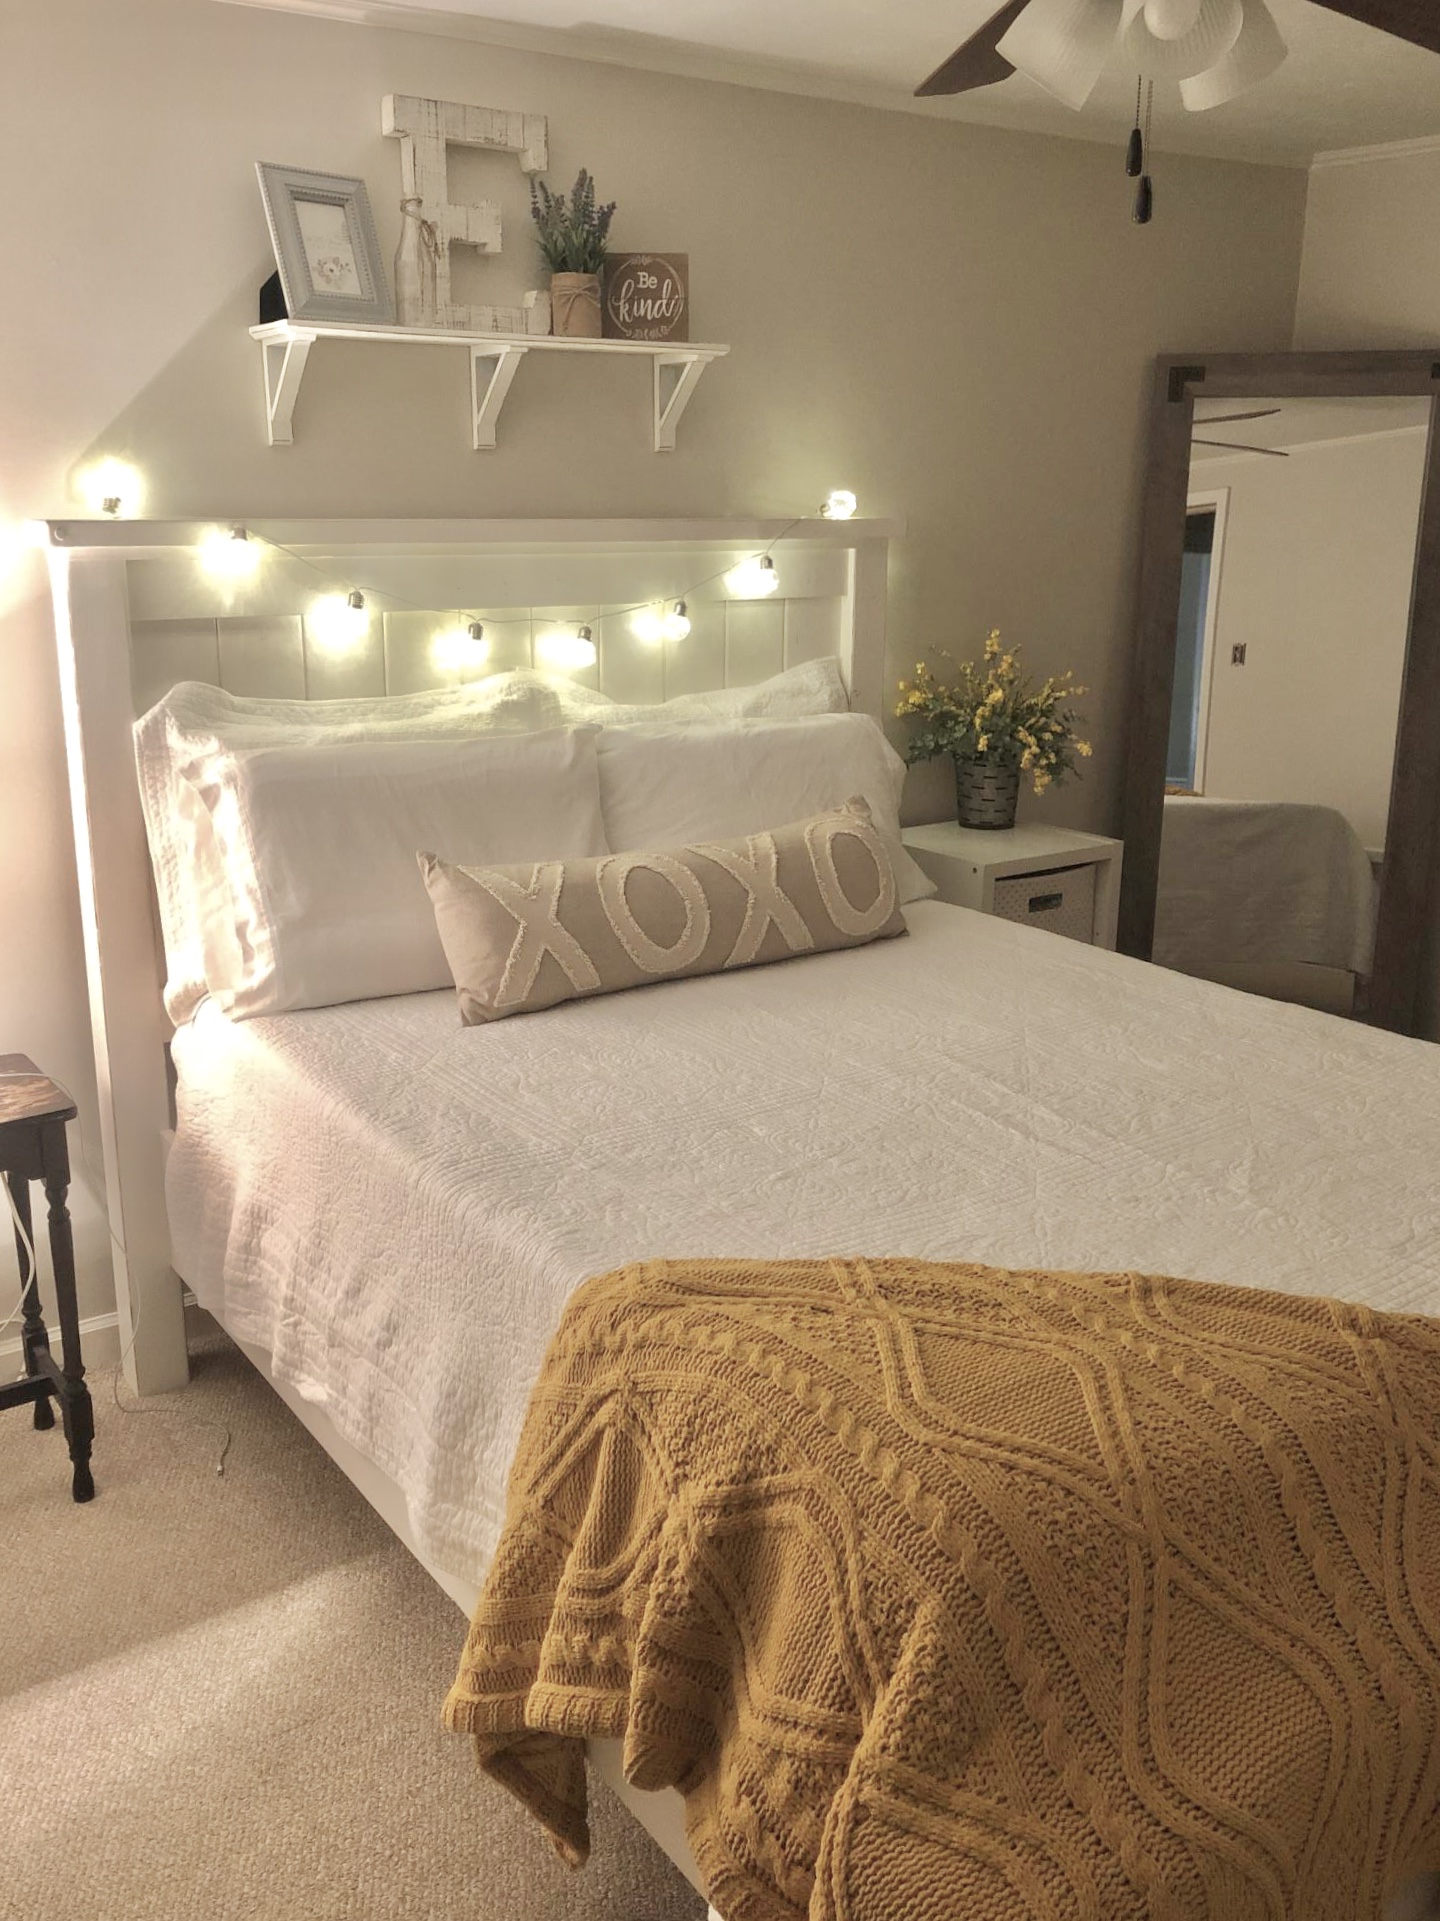
Such a great sturdy bed! Daughter loves it.

Built from Plan(s)
Estimated Cost
208.00 for wood
Finish Used
We primed and painted with BM Alabaster. I then sanded edges and grooves and applied Matte Poly.
Waterfall Coffee Table
Ana White Coffee table.
Vallerie Brown
Built from Plan(s)
Custom Bird Cage Stand
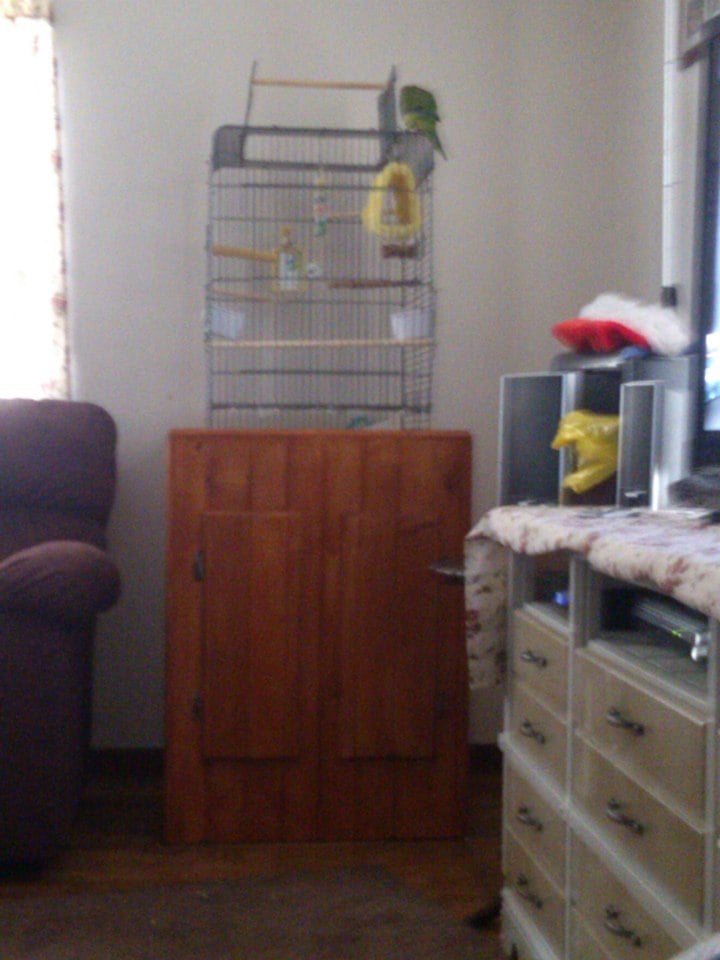
I wanted our bird's cage up higher and on something that the kids wouldn't be able to tip over. So my Husband came up with this. Its car siding. and stained. it has 2 hinged doors and a shelf.

Estimated Time Investment
Weekend Project (10-20 Hours)
Finish Used
I purchased a stain in color of choice and clear coat
Recommended Skill Level
Starter Project
My version kids play grillKids wood play grill
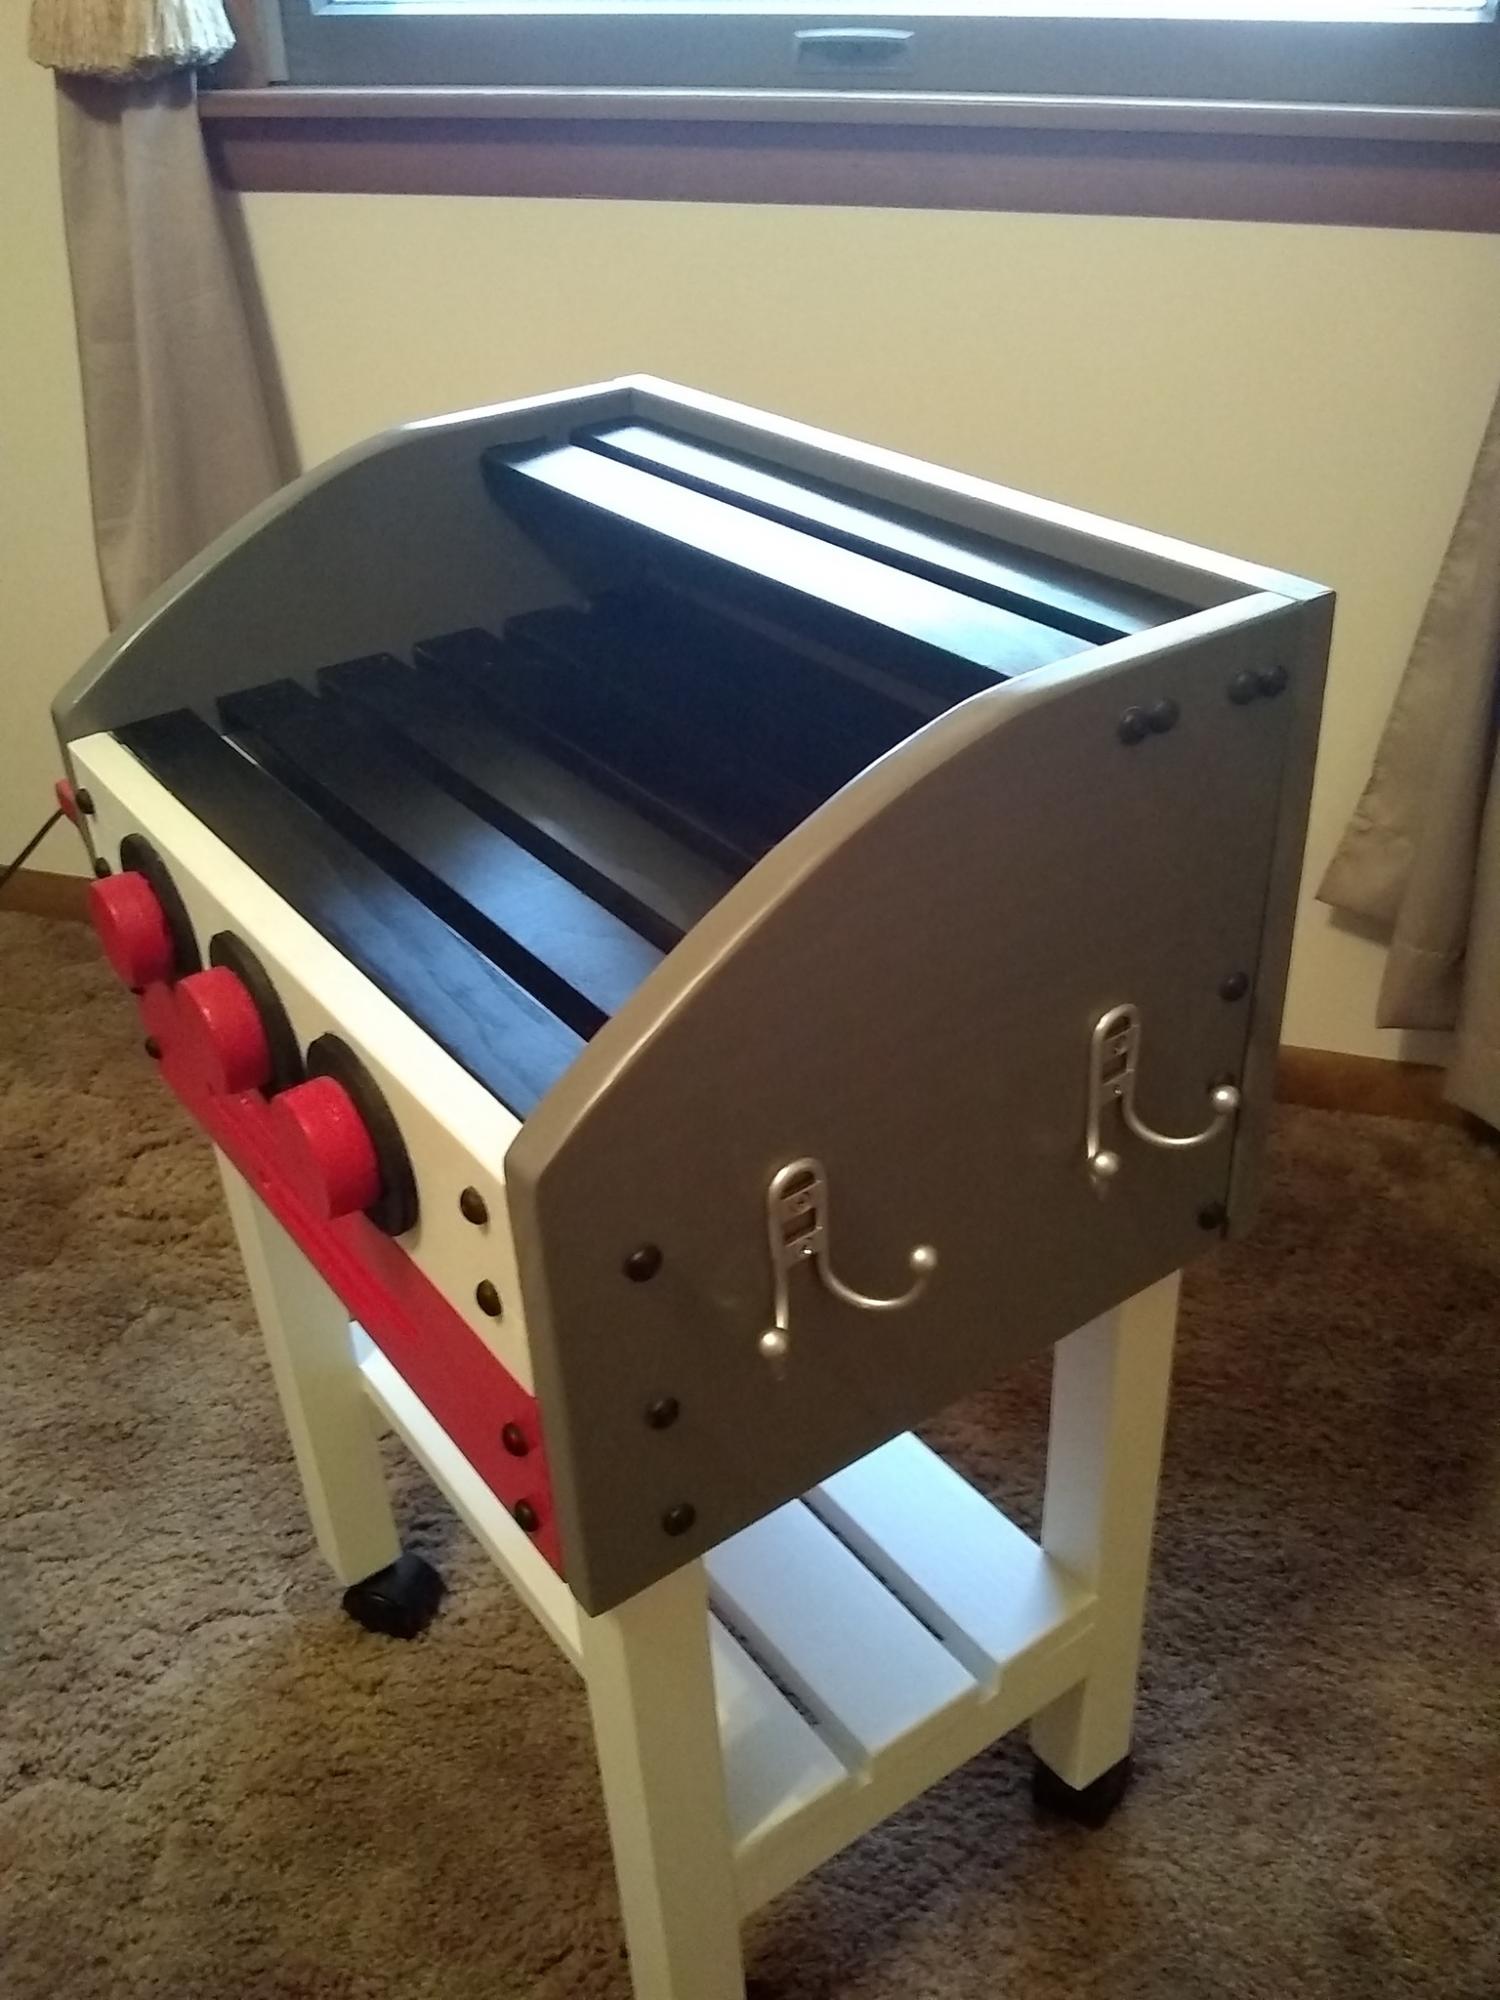
As in a lot of plans I made them to fit my needs. This one was no different. I love Anna and her site. Sometimes things are not always clear. With simple knowledge you can solve most of the problems. I made this version for my 5 year old niece for Christmas. I decided to use 1x12 in place of the plywood . It was easier to work with and made it much stronger With the solid wood I think I lost 1/4 inch in height. I also had extra 1x3 boards I used them for bottom shelf. For the dials I used what I had. I used my hole saw and filled in center with filler. It was cheaper than buying a dowel. I think it is easier to mount the shelf before you put the sides on. Top grill I stayed with 1x2 I thought it looked much vetter that 1x4 board. I finished it off with castors I think that put the icing on the cate and made it even better. She loved it.
Built from Plan(s)
Estimated Cost
$70
Estimated Time Investment
Weekend Project (10-20 Hours)
Finish Used
Satin Spray paint
Recommended Skill Level
Intermediate
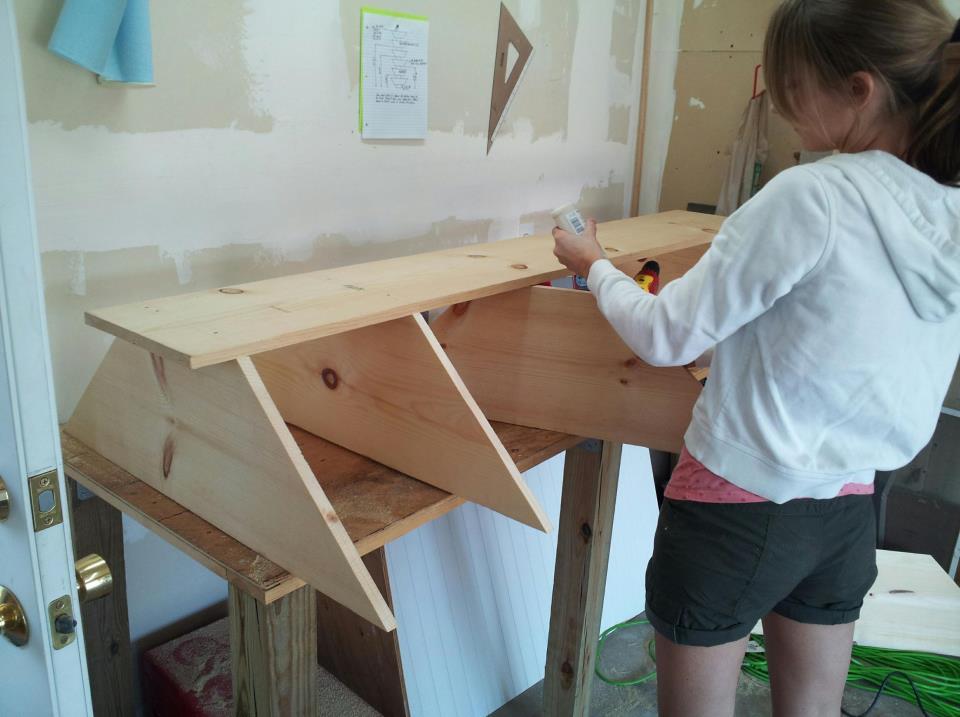
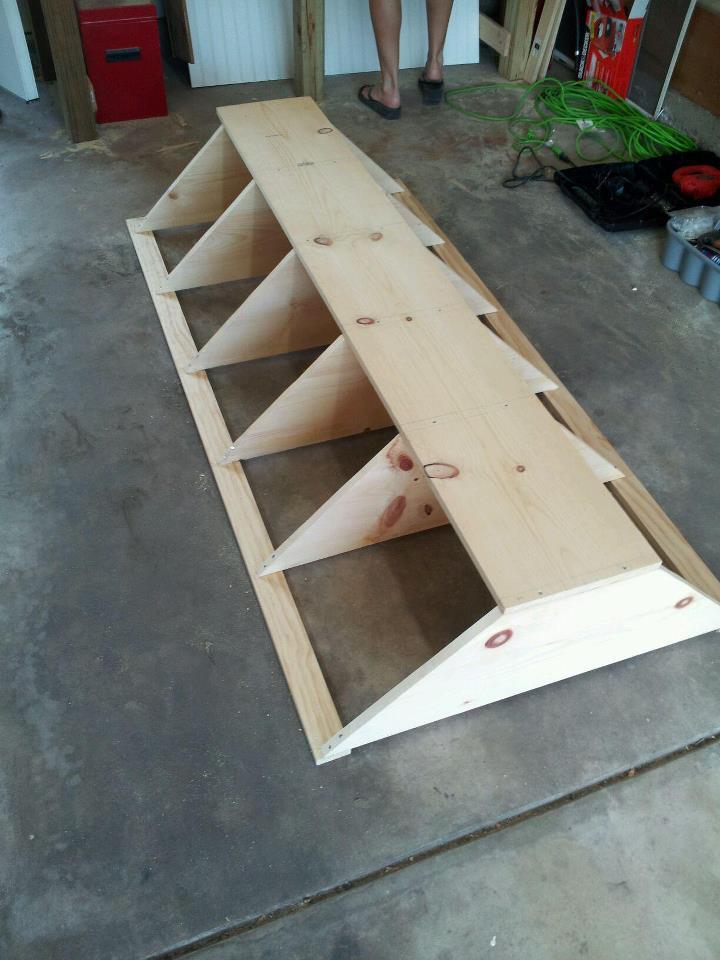
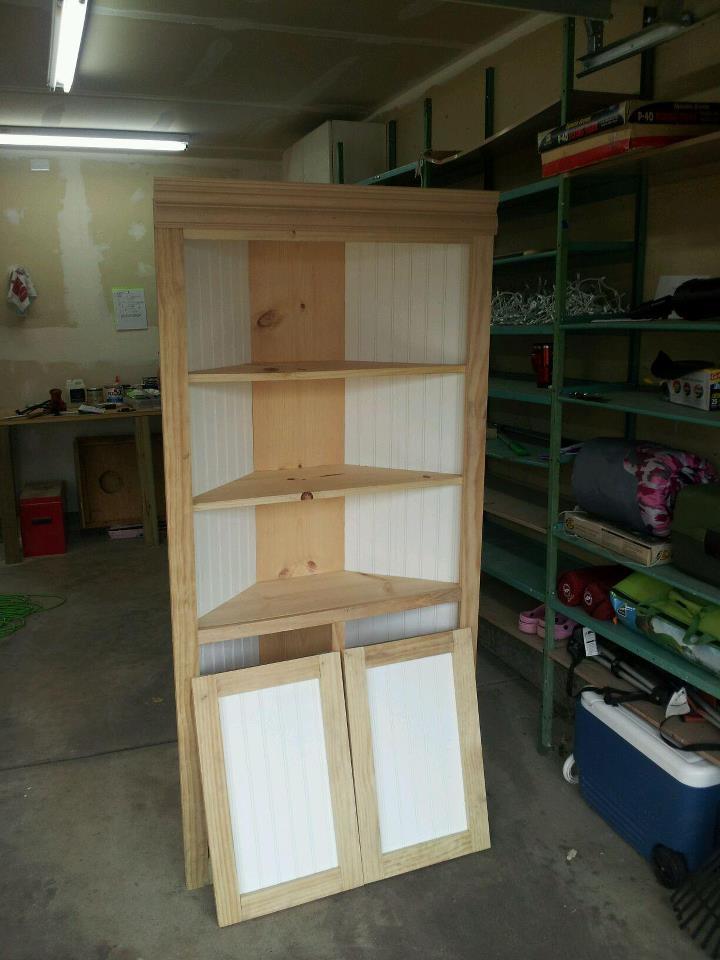
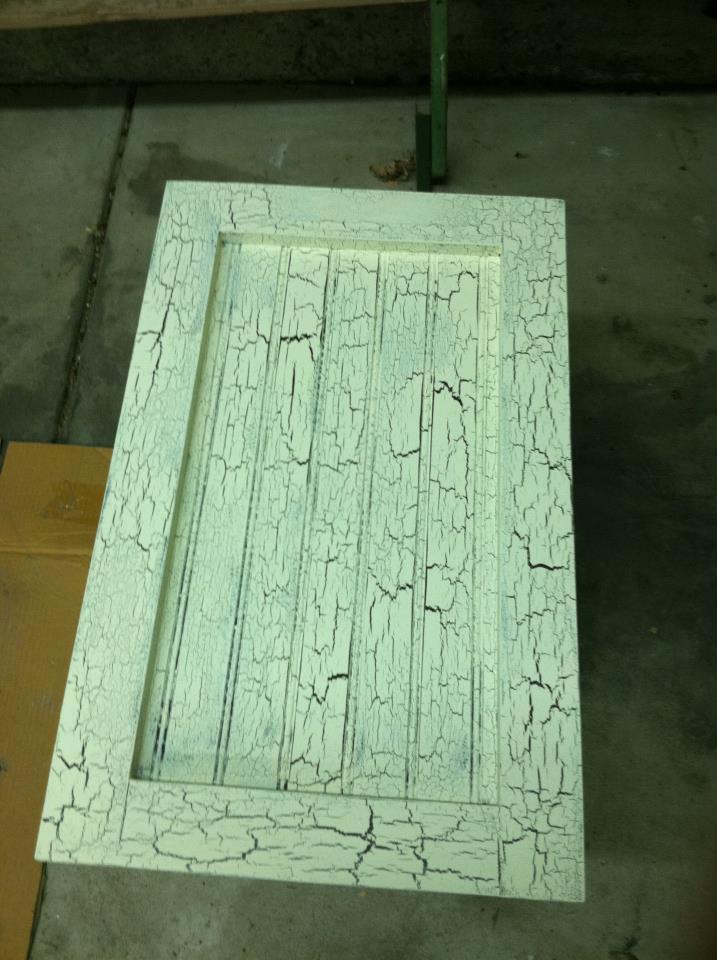
My own weathered corner hutch :)
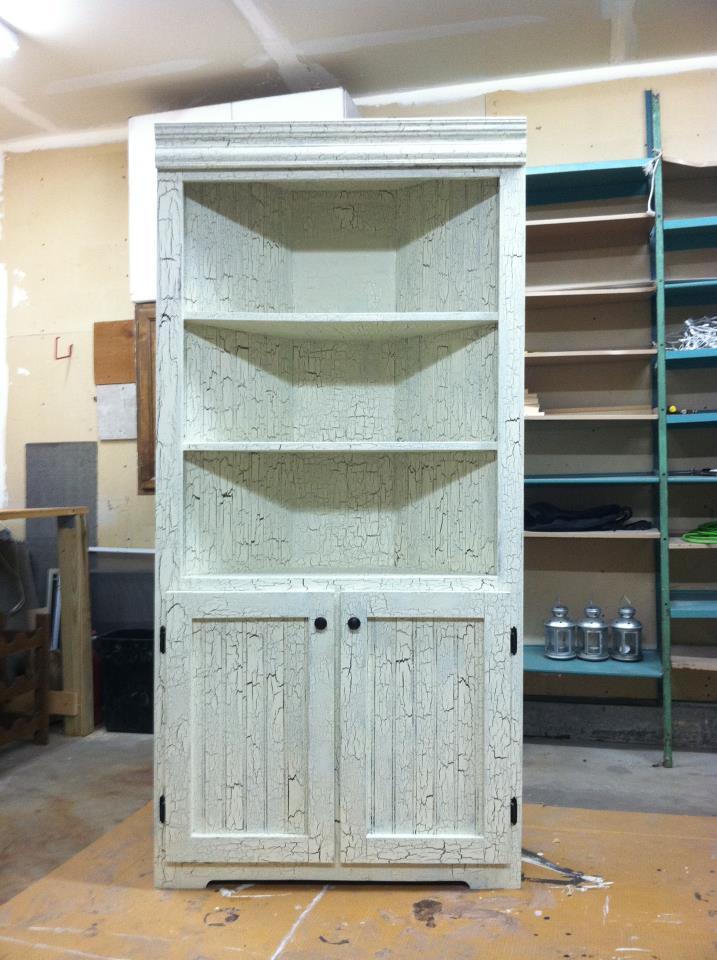
This was my first project. It took me a weekend to build and prime. Since I chose to use a crackle finish, waiting time between coats extended the total time to one full week. My husband and I were supposed to make this hutch together, but I became obsessed and did most of it alone! I adjusted the size a bit to make it larger, so I could fit big pieces on shelves and in cabinets. Thanks for the plan Ana!!
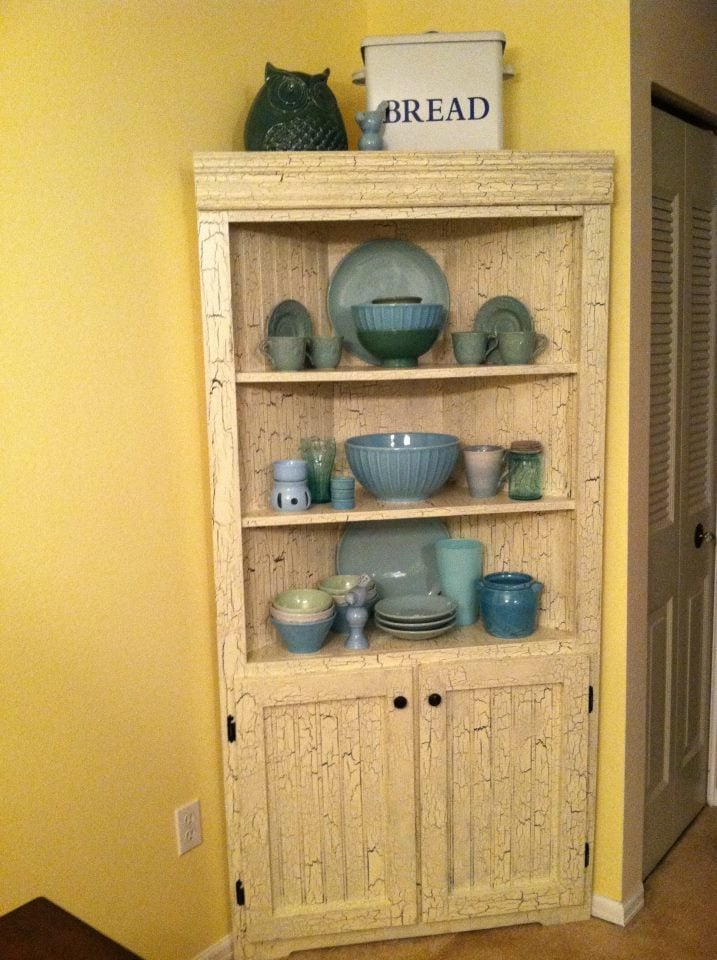
Built from Plan(s)
Estimated Time Investment
Week Long Project (20 Hours or More)
Finish Used
Weathered Crackle Finish done as follows:
1. Killz2 latex primer (highly recommended)
2. Valspar interior satin finish, "Frontier Road" (this is the color that shows in the cracks)
3. Valspar weathered crackle glaze (a suggested substitute that costs less is Elmer's glue)
4. Valspar interior flat finish, "Churchill Hotel Lace" (must be a flat paint, this is the dominant color of your piece)
5. Valspar clear protector (also highly recommended to protect the finish you worked very hard to create, when you paint the same piece of furniture 5 times in one week your sanity will agree!)
Recommended Skill Level
Starter Project
Comments

Fri, 04/13/2012 - 14:47
Beautiful!
Wow, this is sooo beautiful! The finish is just awesome. My Hubby hates to paint, and he saw this multi-step finish and said you must have the patience of a saint! :) Congrats on such a stunning first project!
Mon, 10/01/2012 - 23:33
Very Nice! What did you do
Very Nice! What did you do to make it "bigger"...did you make it deeper or wider? Just curious, because I would like to try and make a bigger version as well. Did you still cut the shelves on each side at a 45 degree angle? Thanks!
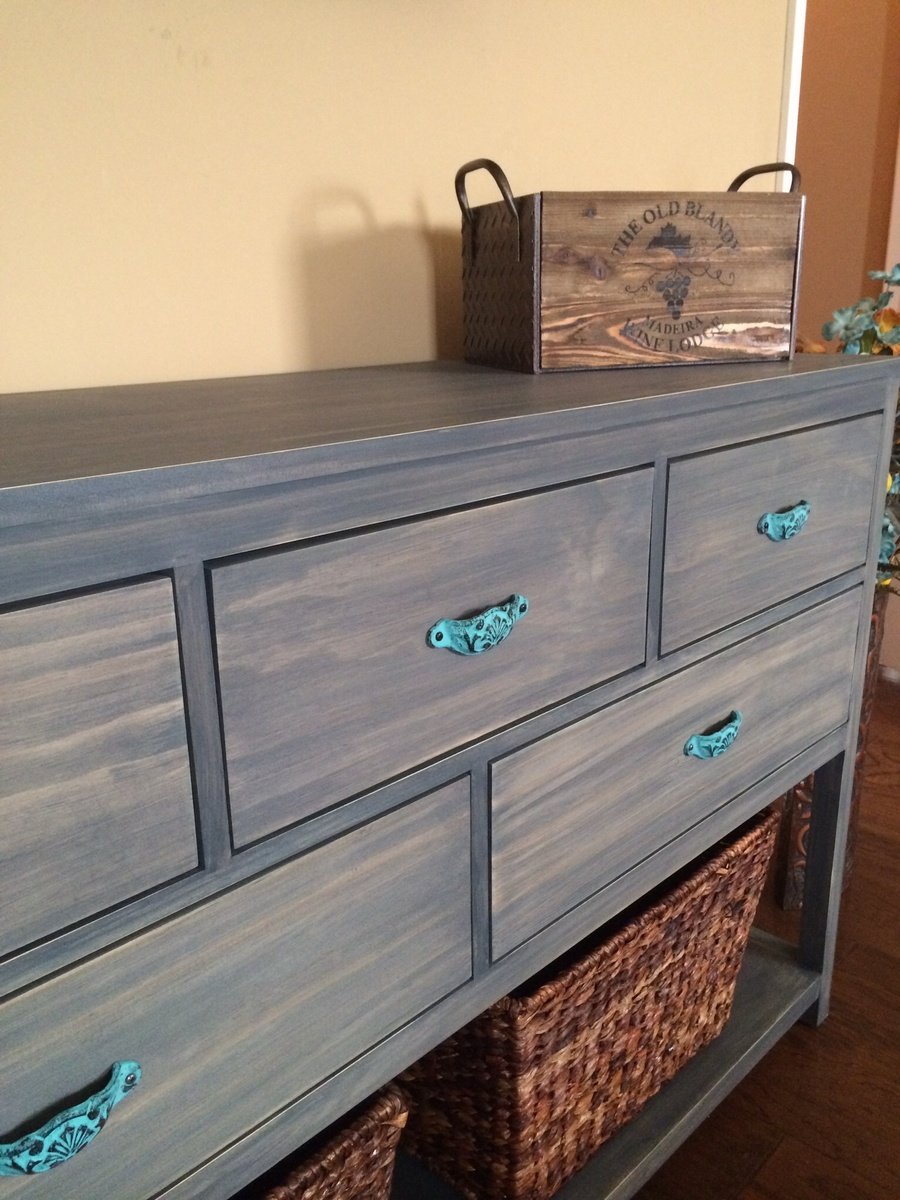
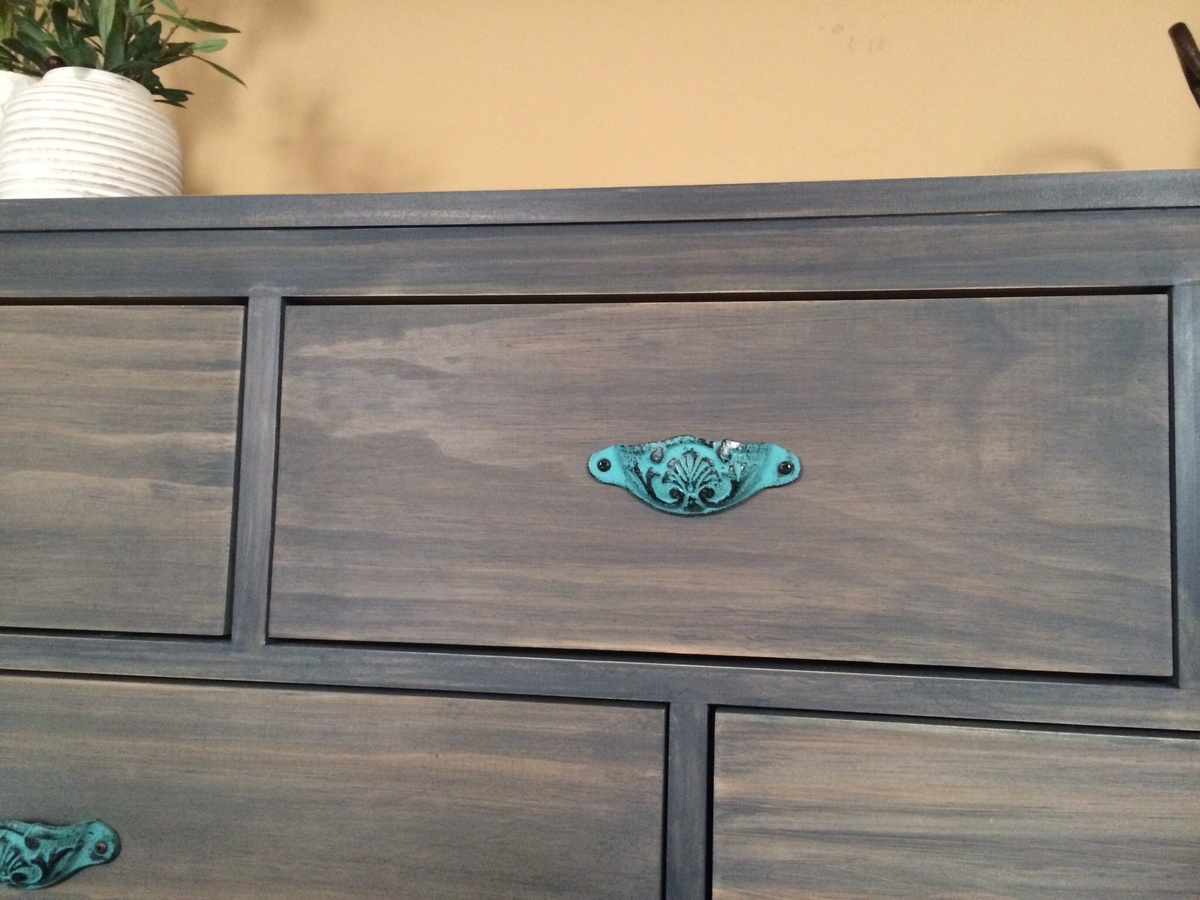
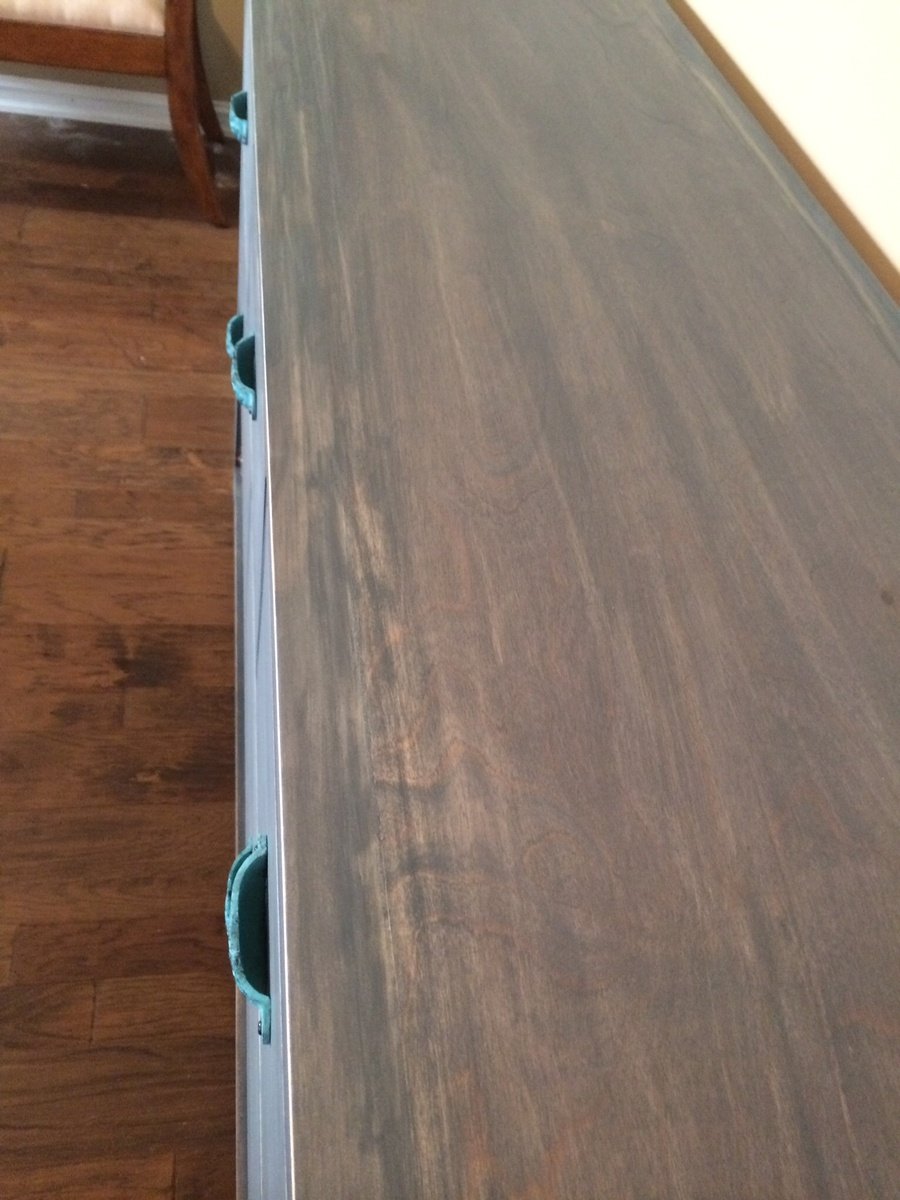
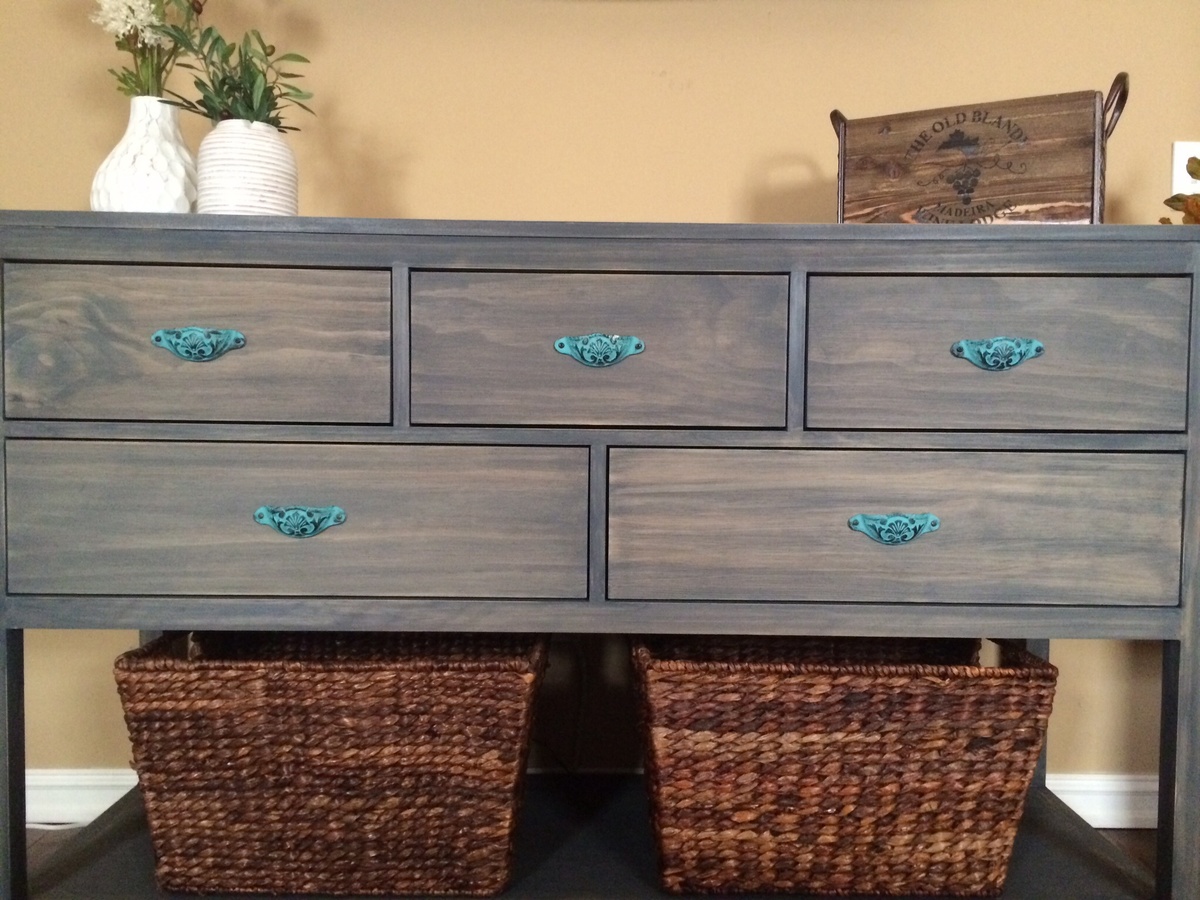
Wide Cabin Dresser
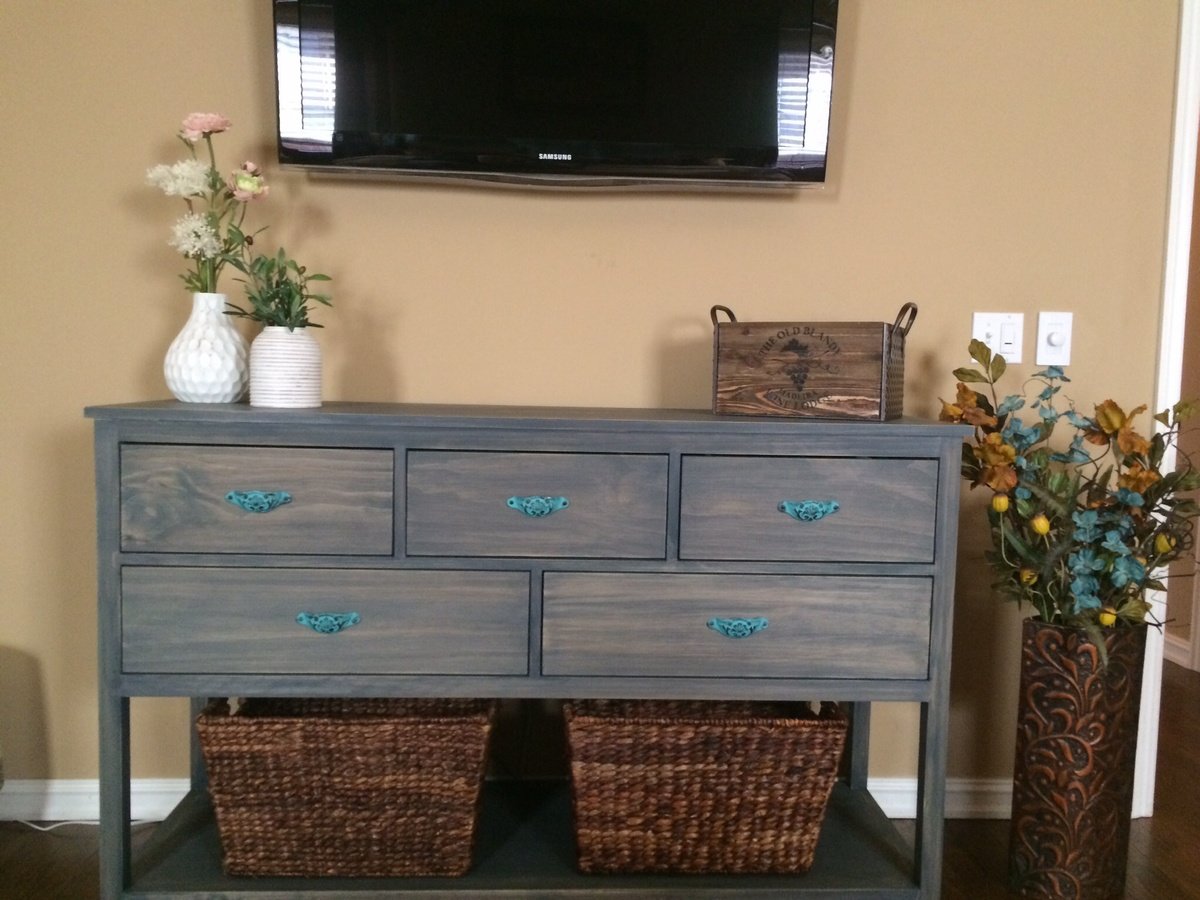
Wide cabin dresser from pine, charcoal grey wood stain, soft-close drawer slides, and turquoise hardware.
Recommended Skill Level
Beginner
Comments

Tue, 01/28/2014 - 08:07
I absolutely love the finish
I absolutely love the finish and the turquoise handles! So pretty!
Ladybug chair
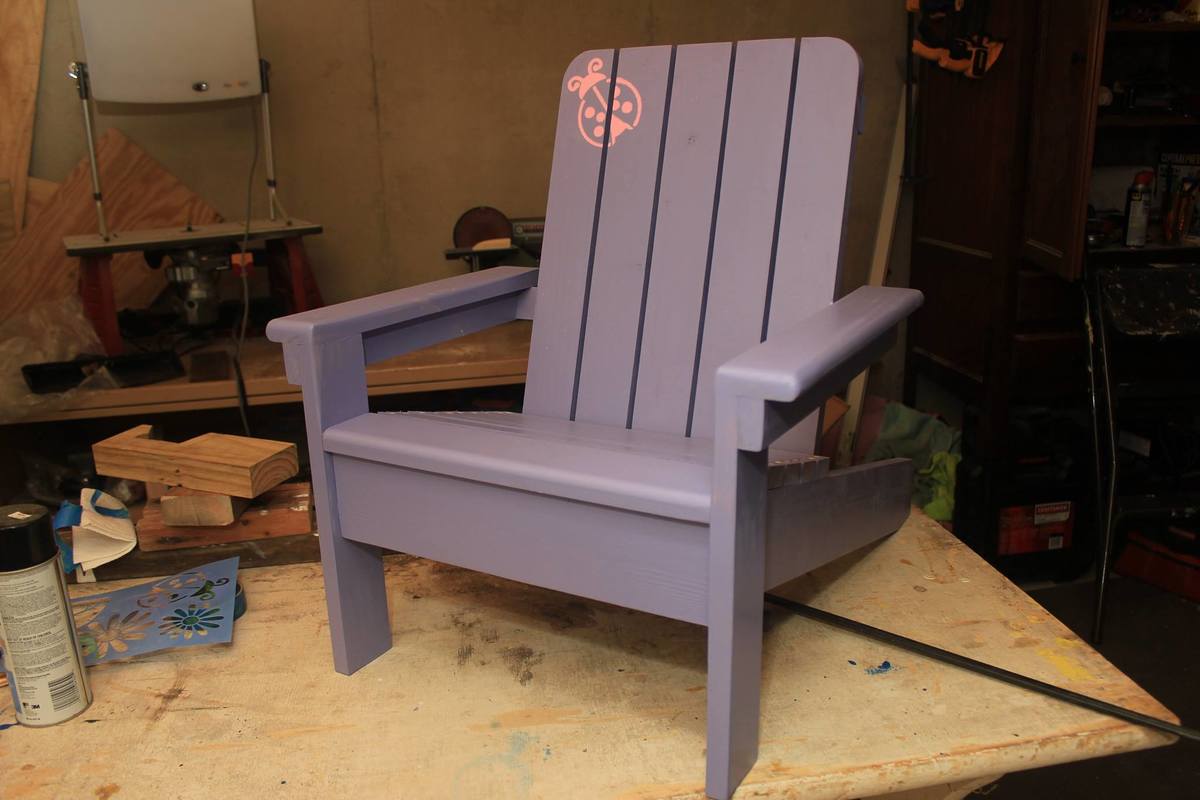
This was a true joy to build. I plan on making at least three to four more of these. Couple tips I learned though: I used pocket hole screw where I could to prevent drilling so many holes that would need to be filled: Ft board, Rear boards, and a couple others. Also I routed the edge of the very front board where the child's legs will be dangling from, as well as the inside/outside edges of the arm rests. Smoother the better I thought with little kids. Lastly, I painted all the boards and then put it together as recommended. However, I would go through the plans and only paint the surfaces that you know will either touch and will be difficult to get to or sides that won't be drilled out; unless you don't plan on filling the holes and painting over them. It will save you paint and time if you plan out what sides of what boards you'll paint first than doing them all at once.
Built from Plan(s)
Estimated Cost
~$35
Estimated Time Investment
Weekend Project (10-20 Hours)
Finish Used
Exterior latex paint
Recommended Skill Level
Intermediate
Small entry table
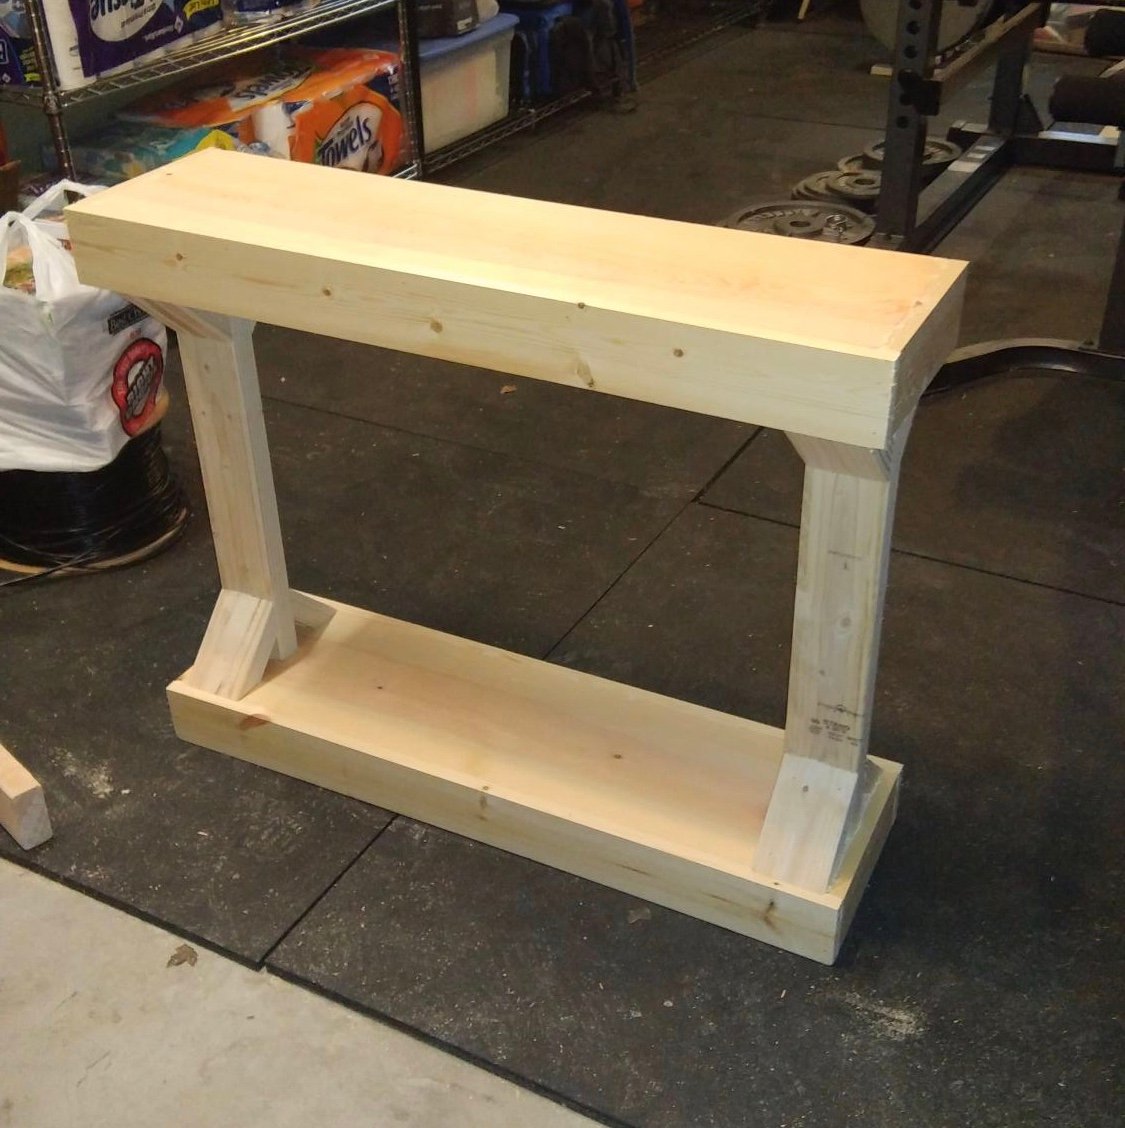
First attempt at trying this.
Built from Plan(s)