


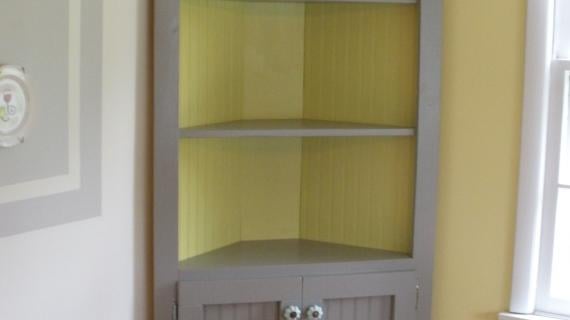
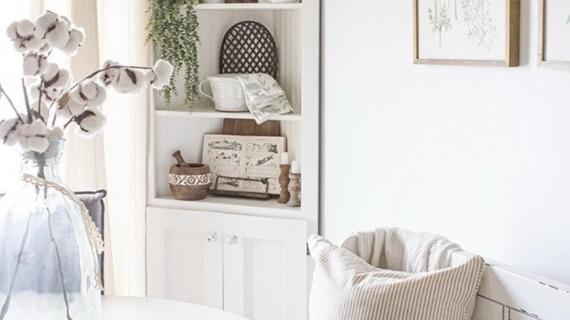
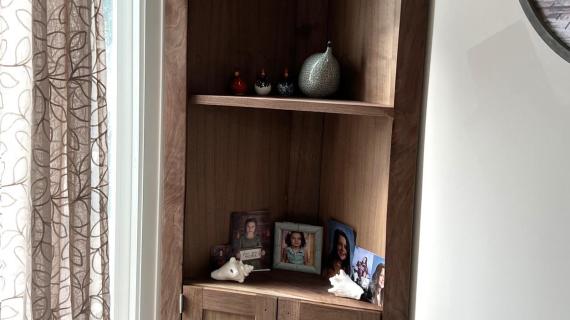
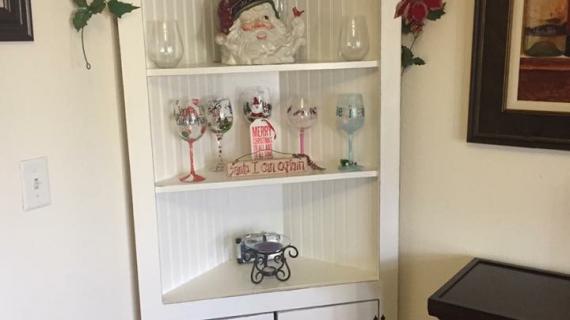
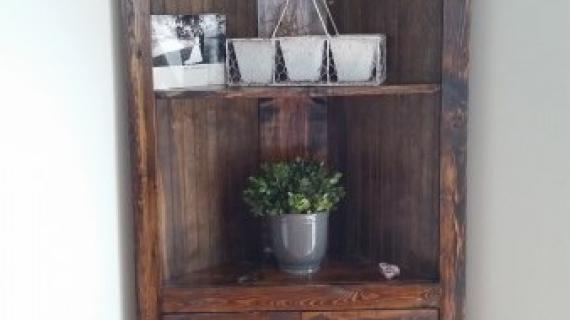
This corner cupboard can turn an empty corner into a storage and display spot. Cleverly designed to minimize board waste and to be easy to build. Special thanks to Tamara for sharing her photos with us.

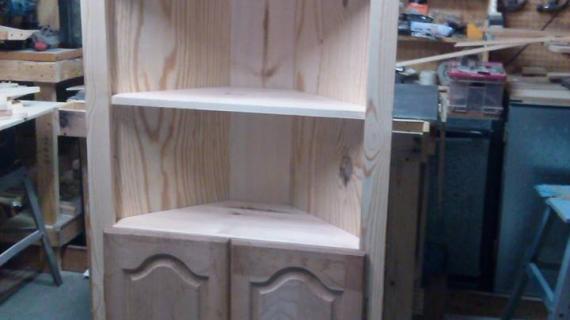
Thank you Mamma_joy for not only requesting this plan, but actually believing that I might have the ability to come up with a simple way to build it. So many of you have requested corner cabinets, and I've been listening. But like Erin says in her project suggestion, how would we build this one without beveling the sides, requiring a table saw? Definitely required some deep thinking, and I'm so proud to publish this plan AND also say, it's pretty simple, totally buildable, and you don't have to have a table saw at your disposal.
I tried to keep the dimensions close to Erin's suggestion for the plan

But it's a no brainer to modify the corner cupboard to be a little wider
 Just use a 1x12 for the back instead of a 1x8 as the plan calls for. For both plans, the shelves are made of 1x12s, so the shelves will only be approximately 11 1/2" deep.
 So go measure your corner. Do you have 21 1/2" of space? Then the question is, do you have some beadboard?
Pin For Later!


Preparation
2 – 1x12s, 6 feet long 1 – 1×8, 6 feet long 1 – 1×4, 6 feet long 1 sheet of beadboard, preferably 1/4″ to 3/8″ thick 3 – 1x3s, 8 feet long 1 – 1×2, 3 feet long 1 – 36″ long crown moulding or other moulding
1 – 1×8 @ 72″ (Back) 6 – 1×12 @ 30 1/2″, both ends cut at 45 degrees off square (see step 1) 2 – 1×3 @ 72″ (Front Side Trim) 2 – Beadboard @ 16 1/4″ x 72″ (Measure for exact fit) 2 – 1×4 @ 26 1/2″ (Top and Bottom Trim, measure for exact fit) 1 – 1×2 @ 26 1/2″ (Tabletop trim, measure for exact fit) top moulding – measure to fit Doors – see step 6.
Instructions
Step 1
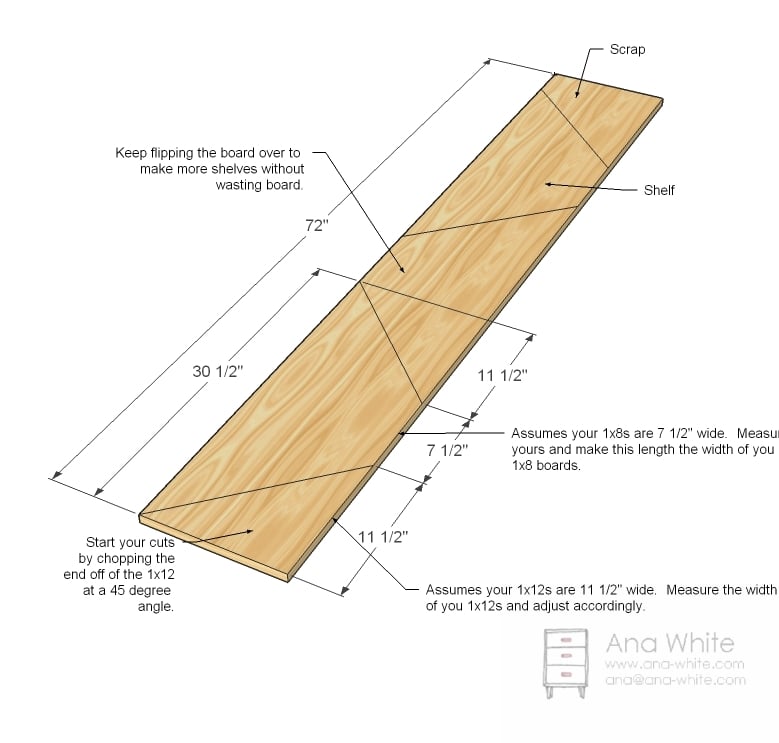
Cut Shelves
This step would be really straight forward if widths of boards didn’t vary so much depending on where you live. So take your 1×8 pine boards and measure how wide they are. Can be anywhere from 7″ to 7 1/2″. Note this then start cutting your shelves by cutting one end of the 1×12 at 45 degrees. Then measure the width of the 1×8 (in the example above that is 7 1/2″) and a 45 degree cut PERPENDICULAR to the first cut. Then continue making cuts to make all your shelves. In this manner you can easily adjust the width of your back to the width of a 1×12 or 1×10. You will need to cut six shelves totally.
Step 2
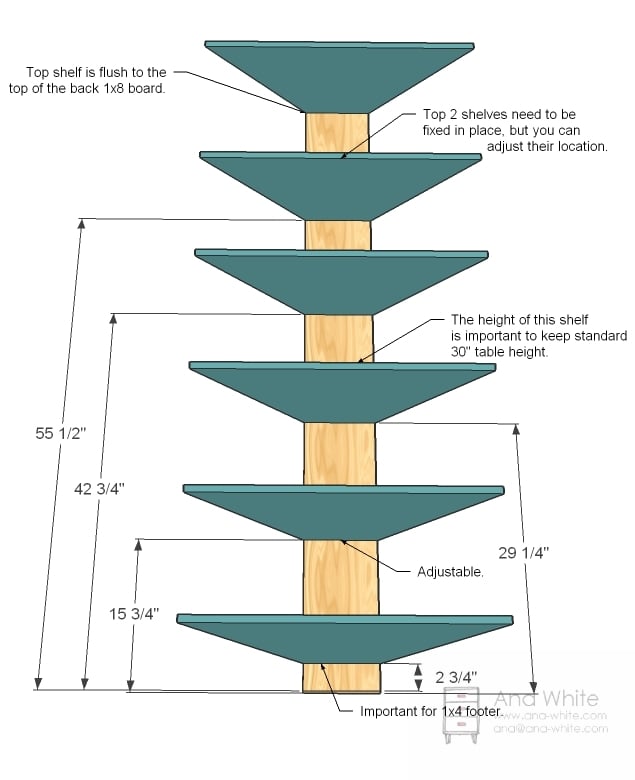
Back
Now mark the back as shown in the diagram above. All shelves need to be fixed. Predrill your holes or pocket holes and apply glue. Attach back to shelves with 2″ screws and glue.
Step 3
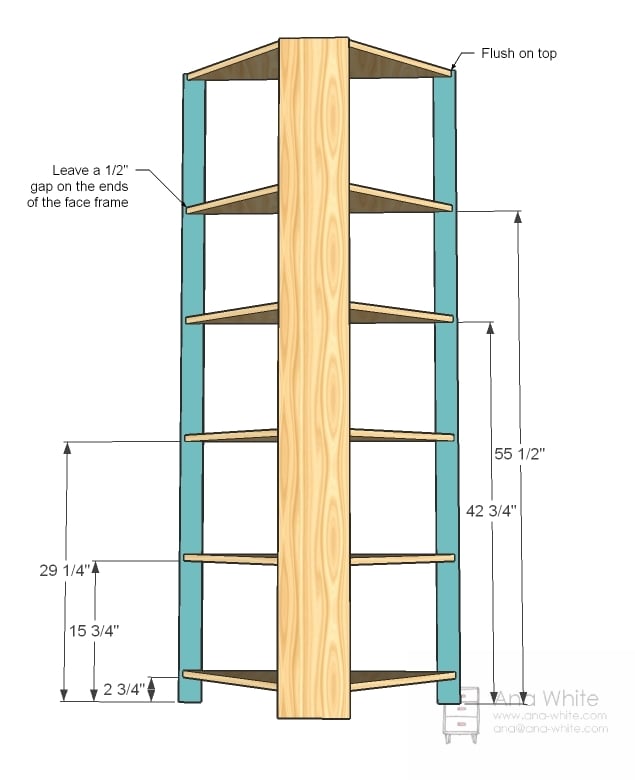
Front Side Trim
Mark the front side trim 1/2″ in all the way down the length of the back side of the side trim. Then mark all shelf locations as indicated in the above diagram. Predrill holes. Consider the depth of your screws and the angled shelf cuts as you place your screws – 2″ screws on the inside and 1 1/4″ screws on the outer edge, 2 screws per shelf. Use glue. Don’t stress this one too much, the sides are going to get beadboard (super strong) over them. The main thing is to get these lined up just right.
Step 4

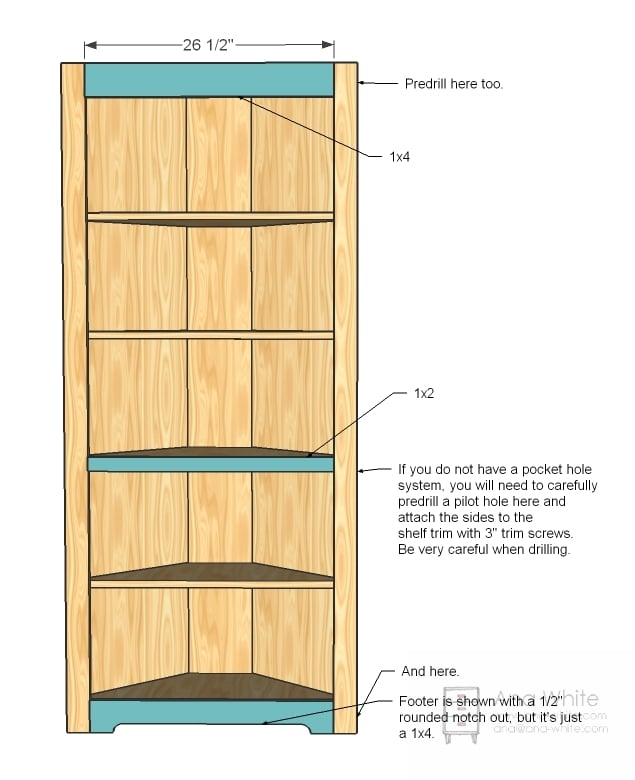
Beadboard
Measure the width of the open spaces on the back sides, and cut your beadboard to fit. Shown above is the perfect dimensions for 1x12s that measure 11 1/2″ wide. Try to get a nice tight fit. Apply glue to the shelf edges that are exposed and use 1 1/4″ screws to attach the beadboard to the shelves. Keep the beadboard first and foremost flush to the back 1×8, as this is the seam that will be most visible. The front seams are hidden behind the front side trim.
Step 5
Step 6

Top Moulding
Measure the top and tack the crown o
Step 7
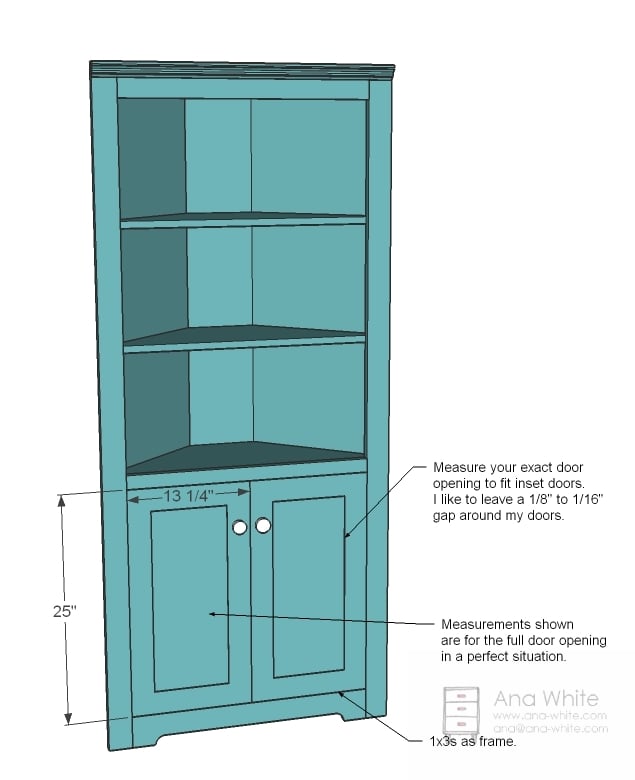
Doors
The doors are the most difficult part because most of us don’t have routers or tablesaws. If you do have a router or table saw, you can build your doors inset as shown above. because of the shelf behind the doors, the doors must be no more than 3/4″ thick, so you will have to inset the panel in the frame of the door. There are other options.
Step 8
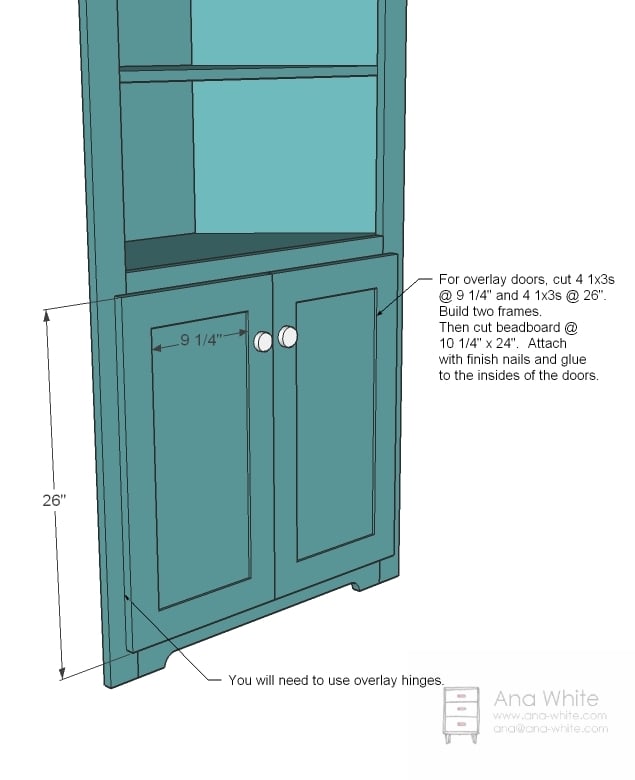
You can build an overlay door. Simply build a frame out of 1x3s, either using a Kreg Jig™ or 3″ fine screws to build the frame. Then tack beadboard to the back, but make sure the beadboard would fit in the opening in the shelf.
Step 9
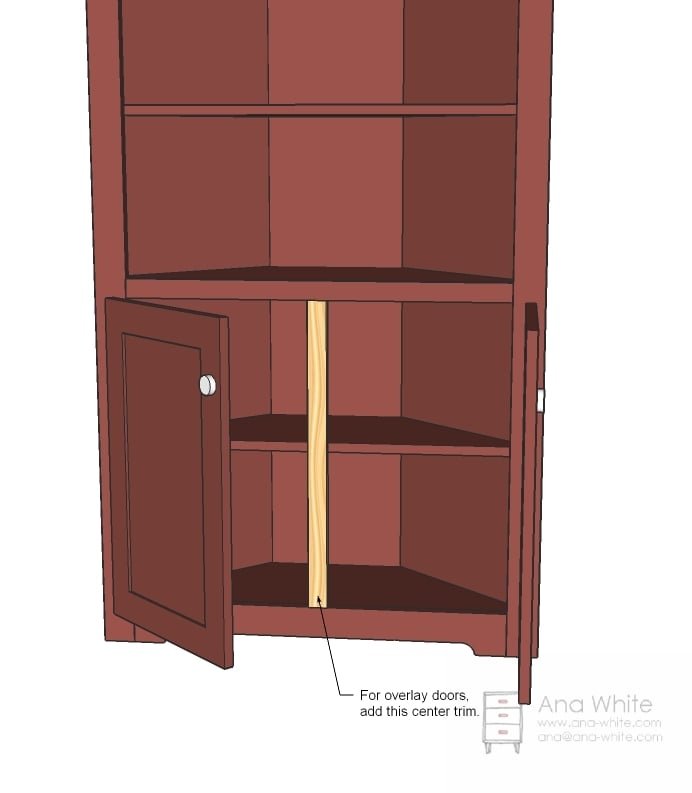
And you would want to add the center post to remove any gaps between the doors.

Comments
Teri (not verified)
Mon, 12/27/2010 - 19:53
Brilliant!!!
Brilliant!!!
michelle minor (not verified)
Mon, 12/27/2010 - 20:08
This is awesome I think you
This is awesome I think you should make it bigger for a corner entertainment center that you can add side cabinets that corresponds like the Pottery Barn Printer Collection
Lisa W (not verified)
Mon, 12/27/2010 - 20:11
Looks exactly like the one I
Looks exactly like the one I had growing up. I ended up selling it a couple of years ago because it was a pain to move and the wood on one side of the back was broken and I didn't know how to fix it. I don't know that I'll make this, but thanks for the memories brought back just by seeing the piece. Have a great night!
mamma_joy (not verified)
Mon, 12/27/2010 - 20:12
You're awesome! I had no
You're awesome! I had no doubt you would be able to do this...and now we all can, too! It looks so fun to build! Thank you for all that you do!!
P.S. I feel like a celebrity being mentioned in your post! <3
Lynn (not verified)
Tue, 12/28/2010 - 02:09
This is great. I agree with
This is great. I agree with Michelle, this would be great modified to be a corner entertainment center. I would definitely make that since I have been trying to figure one out for my home. Hmmm, will have to see if I can modify for the size of my flat screen tv. Thanks, as always for the great stuff.
I got tools and a gift card for lumber as gifts this year (that was all I asked for) so, along with my chop saw, my kreg regular and micro jigs and my drill, I will be all set to get building! The basement is a workshop just for me and I am creating a craft room from one of our bedrooms for my sewing and fabric crafts! You are a gift!
Leroy Barrentine (not verified)
Sat, 02/11/2012 - 12:43
corner entertainment center
A few years back My Wife wanted one that Penny's sold,it was
$495:oo We got to looking around the catalog outlet stores and foud the exect same cabinet.The only thing wrong with it was one of the back panels was busted and was missing a foot on the front.
We got it for $85:00 and went to Lowes and got a sheet of 1/4" luan for the back that matched the other side and they had the same exect same foot.
So if You want to spend some time You might luck up and find a deal as We did.Not takeing anything away from Anna I love Her disigns and have built many of them.
Amy E. (not verified)
Tue, 12/28/2010 - 03:41
this looks AMAZING! the steps
this looks AMAZING! the steps are so easy to follow. i can't wait to convince the hubby that we need to build this! thanks Ana!
beth (not verified)
Tue, 12/28/2010 - 04:47
I love it, Ana! That has me
I love it, Ana! That has me all excited. I think that would look great in the corner in my dining room. Hmmmm.
Hope you had a wonderful Christmas!
Beth.
shelley (not verified)
Tue, 12/28/2010 - 04:55
I'm sorry, I know I should
I'm sorry, I know I should post this on community board but some how am not computer literate enough to do so. Is it safe to use pressure treated lumber for inside projects if it is painted/sealed? I have 4 tiny girls and have heard some about the chemicals in the treated wood being so bad for you. But I didn't know if it was painted if it made any difference? My husband has lots of scraps I would love to steal :) but I wasn't sure if that was ok? Sorry, I'm totally new. I've never built anything before so I don't know anything about wood. Thank you to anyone who is nice enough to answer my question!
Deb W (not verified)
Wed, 03/30/2011 - 19:30
pressure treated (PT) wood
Shelley, PLEASE don't use PT wood for any projects where kids are involved! One tiny little sliver will give the worst infection (personal experience) and little kids are so much more susceptible to any kind of poison... Better safe than sorry, right?
Erika (not verified)
Tue, 12/28/2010 - 04:56
Add this one to my list!
Add this one to my list!
Tiffany (not verified)
Tue, 12/28/2010 - 05:44
Yay! Yay! and
Yay! Yay! and Yay!!!!!!!!!!!!!!!!!!!!!!
Jack (not verified)
Tue, 12/28/2010 - 06:46
I wouldn't use pressure
I wouldn't use pressure treated (PT) for several reasons, the #1 being the chemicals they use.
Other reasons I wouldn't are:
* PT is several times heavier than untreated wood.
* PT is generally harder to cut with regular blades. I'm not saying it can't be done, but you might have a hard time if you don't have a sharp blade.
* PT is usually very wet feeling and needs a while (weeks) to dry, even outside.
I really just don't think its worth trying, but you may have better luck.
Sunny (not verified)
Tue, 12/28/2010 - 07:00
Ana, I just fell in love with
Ana, I just fell in love with you again. I am hopeful that you will have plans for kitchen cabinets up before DH and I start building them ourselves. Of course all a kitchen cabinet is...is a bookshelf with doors.
Jennifer (not verified)
Tue, 12/28/2010 - 07:17
LOVE LOVE LOVE LOVE LOVE
LOVE LOVE LOVE LOVE LOVE this!!! Thank you so much! :)
Tsu Dho Nimh (not verified)
Tue, 12/28/2010 - 07:45
It's low-quality wood, hard
It's low-quality wood, hard to cut, stinky, and doesn't paint or stain worth a darn.
Don't waste your time.
shelley (not verified)
Tue, 12/28/2010 - 08:11
Thanks so much for the info!
Thanks so much for the info! I'll get some new wood for my project! Appreciate the help!
shelley (not verified)
Tue, 12/28/2010 - 08:12
Thank so much for the help!
Thank so much for the help!
Jessica K. (not verified)
Tue, 12/28/2010 - 09:28
This is so awesome! I have
This is so awesome! I have been wanting something similar for my dining room for a long time, and as always, you have something perfect for what I am wanting!
Ana, you are fabulous. Thank you so much! :)
Tara (not verified)
Tue, 12/28/2010 - 09:57
I've been waiting for this
I've been waiting for this one! I think it's great and I will be starting it in the next week or so. Thank you!
CreativeCarol (not verified)
Tue, 12/28/2010 - 10:01
Oh Ana! This is just what I
Oh Ana! This is just what I was wishing for. I've got the perfect corner just waiting.
Ana White (not verified)
Tue, 12/28/2010 - 10:51
Aren't are readers amazing?
Aren't are readers amazing?
Rebecca (not verified)
Tue, 12/28/2010 - 12:29
I've always, always wanted a
I've always, always wanted a pretty corner cabinet! Thanks for the brilliant and so well laid out plans!
Kira (not verified)
Tue, 12/28/2010 - 13:06
I am with Michelle and
I am with Michelle and Lynn...I have been hoping for corner entertainment center plans, and I would love to see this plan modified.
You are wonderful!
Jami (not verified)
Tue, 12/28/2010 - 21:47
So, I looked at this and
So, I looked at this and thought "Wow, Ana, has done it again...Brilliance! But, I don't need this in any corner of my house, bummer. Then someone suggested building it for a TV and I realized this is exactly what I need to modify and tuck my TV away in the corner my bedroom.
Yay for Ana and Ana's awesome friends!
Erin (not verified)
Sat, 01/01/2011 - 18:18
Ana, I love this design!
Ana,
I love this design! Do you have plans for a regular shelf unit with doors on the bottom? I would love to have bookshelves in my living room where I could store things in the bottem (and then baby latch) so my daughter can't get to certain things. Would I need a special design or just add doors to one of your current shelves? Thanks! Keep up the good work- You're awesome!
Nan Tovar (not verified)
Sun, 01/02/2011 - 06:45
Oh, thank you, thank you,
Oh, thank you, thank you, thank you!!!! Ana, you rock!!!
Now all I need is a Kreg jig, supplies and time, and I've got this built :)
Alyssa (not verified)
Wed, 01/05/2011 - 12:51
With a small house that
With a small house that wasn't designed with storage of any kind in mind, I'm always looking for storage ideas. I *love* this. Can't wait for spring so we can set up our wood working tools in the garage!
clarissa kisic (not verified)
Fri, 01/07/2011 - 17:46
I love this cabinet and I
I love this cabinet and I will probably make it in the near future......I was wondering if there is any way to make a corner TV stand out of the bottom of this unit? if anyone has any suggestions I would love to hear them. I am going to study the plans a bit more and see if I can figure out what kind of cuts I would need for just the bottom portion of this unit.
Sue Dally (not verified)
Mon, 01/10/2011 - 07:06
I want to make this wider for
I want to make this wider for a corner media center-just the bottom. Our present tv is 42"-but we might be getting a larger one in the future. How do I make the base wider?
Ana White (not verified)
Mon, 01/10/2011 - 09:31
Sue, the easiest method is to
Sue, the easiest method is to use a wider width board for the back "spine". But if you want to have no dead space behind the cupboard, you will need to cut your shelves from 3/4" plywood or MDF into pentagon or triangle shaped pieces and build in that method. Me personally? I'm okay with more dead space behind the cupboard than dealing with a jigsaw and large plywood pieces :)
christina miller (not verified)
Tue, 01/18/2011 - 05:44
That is exactly what I was
That is exactly what I was thinking- about 38"-40" across the front would be perfect. I have been wanting to build a corner entertainments center for quite some time.
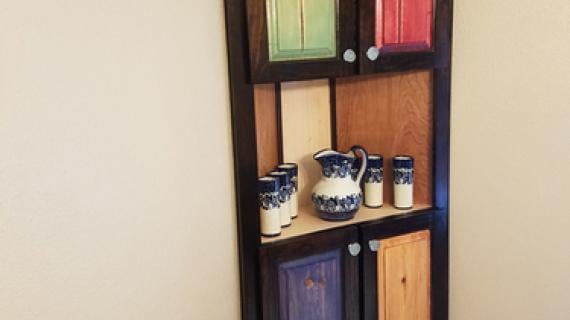
anawhite_ (not verified)
Mon, 01/24/2011 - 16:53
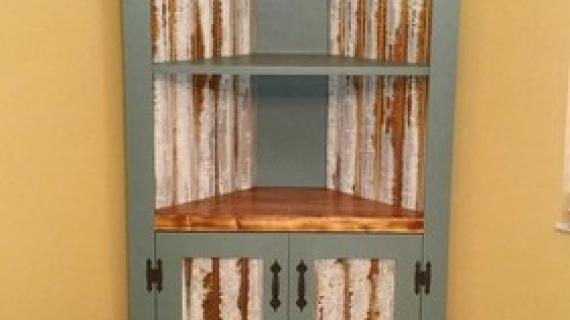
Look what Tamara
Look what Tamara made!

Jen (not verified)
Tue, 03/08/2011 - 09:57
I want to make 2 of these but
I want to make 2 of these but I want to make them taller to look like built-ins. Like 8 feet tall. How would I do this and still make them structurally sound? Also, can plywood or mdf replace the beadboard backing? Or would adjustments need to be made to the measurements since beadboard is thin?
In reply to I want to make 2 of these but by Jen (not verified)
dan-k
Wed, 03/30/2011 - 20:21
It can be done
It should be no problem to increase the height to 8 feet. Just have to add 1-2 more shelves or space them out further.
If you use thicker material in place of the beadboard it may stick out past the sides of the 1x3's. It's hard to say from the plans. The simple answer is to offset the 1x3's more than the 1/2" listed in the directions to hide the edges. This would change the lengths of the shelf trim pieces and the width of the center post between the doors.
Another option is to use 1x4's which will provide even more coverage and might look better on a larger cupboard. Using 1/2" plywood or mdf (heavy) would really stiffen things up.
I would recommend finding the wall studs in the corners where you will be installing the cupboards and drive a few trim head screws through the back panels into the wall for added stability. You could drive them in just under a shelf and they would be hidden.
Leffel
Wed, 03/30/2011 - 19:16
What if I don't want to use beadboard
Can anyone recommend a different material for the back? I'm anxiously awaiting the fundage to tackle this project and have been mulling over what to use. I'm thinking a good grade of plywood. I want to stain the piece in the end, so something stainable is a must.
dan-k
Wed, 03/30/2011 - 19:49
There are lots of things to use instead of beadboard
You could use Lauan plywood, unfinished paneling, hardwood veneered plywood.
Guest (not verified)
Mon, 04/25/2011 - 12:11
Corner media stand anyone?
Did anyone happen to take this plan and turn it into a media stand for a 42" tv or bigger? Basically I just need the bottom half of this unit but bigger...no idea where to start! lol
Joe Makes Things (not verified)
Tue, 06/07/2011 - 12:12
Add a Functional Groove and a Consideration
My house is a hundred plus years old and came with two corner cabinets built into the dining room. The shelves have a feature that I feel adds to the funtionality of the shelves for displaying the "good" dishes. Each of the exposed shelves has a groove routed into the top of the shelf 1.25" from the back. This groove allows you to lean you "good" dishes upright at a slight angle.
One consideration when building these shelves is to decide if you are going to permenantly mount them to you corner. If you would like them to be movable, don't forget to incorporate noches around the bottom trim and install an offset support for the back of the unit so the entire shelf will sit over your baseboards.
You cabinet design is wonderful.
claydowling
Tue, 06/07/2011 - 12:53
Plate rail
A low raised rail works as well. My china cabinet has one, and I love it for displaying all of the dishes I inherited from my grandmother. I've seen this carried to its logical extreme around the outside of a room as well.
martha_aint_me
Mon, 06/13/2011 - 09:41
corner cabinet
space-saving
tinambear
Sun, 08/28/2011 - 14:31
Is the last picture the 31
Is the last picture the 31 1/2 size or the larger 35 1/2?
Guest (not verified)
Wed, 11/30/2011 - 12:27
Screw placement?
I'm having trouble visualizing screw placement in attaching the shelves to the front side trim. Anyone who has built this that could give advice on what worked for you?
Guest (not verified)
Fri, 02/03/2012 - 11:25
Hinges
What hinges do you suggest for the doors?
LenClark (not verified)
Sat, 02/11/2012 - 07:57
Corner Cupboard
I love this and starting the project this weekend. I'm planning on building 2 corner units in my dining room and have a small snag. Both corners have basebord heat and I'm trying to figure out a way to cut away the bottom so the unit will fit snug in the corners. Any ideas?
claydowling
Sat, 02/11/2012 - 08:27
Legs
I have a similar problem with some bookshelves I'm building. I'm putting legs on to the level of the top of the heater, building a top that extends all the way to the wall, and will be fastened to the wall with a cleat.
LenClark (not verified)
Fri, 02/24/2012 - 10:18
Excellent idea about the
Excellent idea about the legs, thanks Clay.
Guest (not verified)
Wed, 02/22/2012 - 12:10
I am going to make it into a bird cage....I think :)
So I have been wanting to build this and place it in my dining room. I need the extra space to store the "good dishes". But then my son wanted a bird(parakeet) well one turned into 3.(I felt bad for the one for being by herself and got her some friends...)
At anyrate I am going to take out the 2 and 3rd shelves from the top.I think I am going to add rails for the support. Then on the shelf above the cabinet doors I was thinking that I would frame out the wire and build it into the cabinet that way. So that I could then be able to open the cabinet doors to clean the cage and have storage under the newspaper section.
For the front of the cabinet I thought I would hang the wire from the inside before the back is put on it.Of course I will have to add trim on the inside to cover the wire. Also I will have a section in the wire to open so we can feed/water them.
Thank you Ana so much for these plans!! I built the Farm-Table of my dreams from your plans!!! :) Bonnie
FredD
Sat, 02/25/2012 - 17:12
I'm going to make two of these
I was just commissioned by someone in my neighborhood to make two opposing corner bookcases. I had my own plan in mind but think I will go with this plan. However, since the customer wants the units painted, I'm going to use cabinet grade plywood in place of the 1x8 pine and the beadboard, for added strength. I'll probably make the units taller and wider and will also probably bevel the back panel to accept the plywood for a nice snug fit. Anyway, I'm so glad I came across these plans. I'm new to this site and I LOVE IT!!
Guest (not verified)
Sun, 03/18/2012 - 18:50
Confused on Steps 3 and 5
Hello, all. To Ana or anyone else having experience building this piece, I am confused on a couple of the steps. I already have the shelves, two front trim pieces and main back piece cut.
Step 3: Says place 2" screws on the inside and 1-1/4" screws on the outer edge, 2 screws per shelf. Wouldn't this be 4 screws per shelf or am I reading into this wrong? I've used some scrap to try this out with the 1/2" overlap and drilling 2 pocket holes into the angled edge of one of the scrap shelves. I used 1-1/4" screws and they actually just came through the front trim piece (there is no way 2” screws would work, the way I am doing this). Furthermore, I am concerned that the joint will not be that strong with the holes so close together and not having much to "bite" into in the angled shelf edge. Should pocket holes be used here to fasten the trim pieces to the shelves, or would finish nails be safer (no splitting)? I have considered using a pneumatic trim nailer with 2” brads, also. Thoughts?
Step 5: Says if you have a Kreg Jig (I do) to build the entire face frame first. Does this essentially take the place of step #3 for me, if I do in fact use a pocket hole system? If I went ahead and built the entire face frame first, what is the best way of attaching it to the rest of the assembly? (Goes back to my above question).
Overall, I am concerned with strength and stability. I intend to house glasses and mugs on the top shelves and I just want to make sure the unit is as rigid as possible. I’ve been mulling over these couple of steps, trying to come up with the best way to attach the side trim to the shelves. Any help (verbal or pictures or other) would be greatly appreciated to keep my project rolling along!
Ana, very cool design, I’m hoping I can do it justice and pull it off! Will post pics if and when I do!
Thanks,
Justin