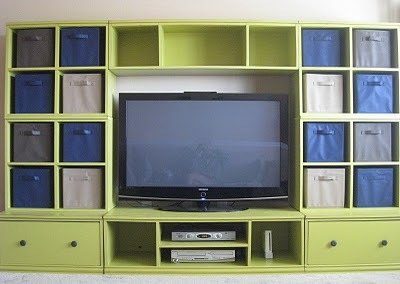


One of the greatest things about DIY is you can get exactly what you need and want. Not only are you free to build a big storage entainment center (special thanks to Shanty2Chic for sharing their photos)and paint it a bold shade of leapfrog, but you are also free to build a bridge to give your TV that custom built in look. Not to mention claiming a little extra storage and solving a common design problem - how to decorate over the TV.
Preparation
1 sheet of 3/4" plywood
1 sheet of 1/4" plywood (back)
A) 4 – 3/4″ Plywood @ 14″ x 12” (Sides, Cubby Dividers)
B) 1 - 3/4″ Plywood @ 14 1/2″ x 52” (Top)
C) 1 - 3/4″ Plywood @ 14″ x 52″ (Bottom)
D) 1 – 1/4″ Plywood @ 13 1/2″ x 52” (Back)
E) 2 – 1×2 @ 13″ (Top, Cubby Trim)
F) 1 – 1×2 @ 23″ (Top Center Trim)
Cut all pieces out from the plywood. Make every effort to make long straight cuts whenever possible. Be aware of the difference your saw blade width makes when cutting.


This bridge must be attached to a stud in the wall for security purposes.
Fasten with 2″ fasteners (scews or nails) unless otherwise directed. Review the fastening instructions in the plans for all of the Cameron Collection. Always use glue. Cut all of your boards first. Work on a clean level surface. Be safe and have fun!
Instructions
Step 1

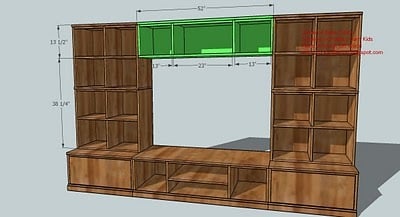
Sides, Top and Bottom. Fasten the top (B, Purple) and bottom (C, Blue) to the sides (A, Green) and cubby dividers (A, Green) as shown above. Use the measurements above to guide you. Keep the back edges flush. The top will overhang the front by 1/2″.
Step 2
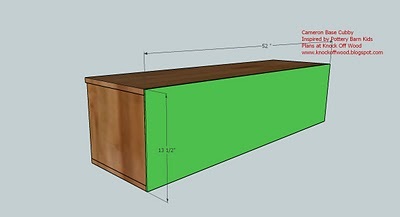
Sides, Top and Bottom. Fasten the top (B, Purple) and bottom (C, Blue) to the sides (A, Green) and cubby dividers (A, Green) as shown above. Use the measurements above to guide you. Keep the back edges flush. The top will overhang the front by 1/2″.
Step 3
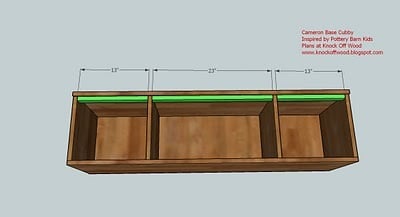
Trim. First attach the cubby top trim, pieces E, to the tops of the cubbies, keeping edges flush with the sides and the cubby divider. The top will overhang 1/2″. Then attach the center trim F, with 1 1/4″ nails, nailing into the underside of the top. Also add a few nails to the cubby top trim, nailing through the face of E into the underside of the top.
Comments
Shanty 2 Chic (not verified)
Wed, 01/13/2010 - 03:13
Hey Ana! Thanks so much for
Hey Ana! Thanks so much for posting the base and the hutch plans! I am going to get started on these this week or next! ~Ashley
Jennifer Guire (not verified)
Wed, 01/13/2010 - 06:43
This is my next project after
This is my next project after I build my benches this weekend! Thanks for the plans. Jennifer
Lorie (not verified)
Wed, 01/13/2010 - 15:53
You are amazing!!
You are amazing!!
The Faveros (not verified)
Wed, 01/13/2010 - 18:03
This is our next project for
This is our next project for my son's room - there are so many plans I want to try!! I can't wait to see how this turns out
Gina (not verified)
Mon, 01/18/2010 - 16:26
Sorry, I am bugging you again
Sorry, I am bugging you again but I am SO excited! :)
Do you have any plans for a cabinet with doors to put a tv in? Or do you have any that could be modified? That would be perfect for us! :)
womanofchase@hotmail.com
Thanks so much!!!
Freezer Mommy (not verified)
Wed, 01/20/2010 - 12:37
I would love some type of
I would love some type of door that could cover up the screen too when not in use. It would have to be the fancy fold up or slide to the side ones. Even a simple hinge would be great. Loving this sight!
Freezer Mommy (not verified)
Wed, 01/20/2010 - 13:07
I'd love the plan on the
I'd love the plan on the "puzzle shelves" where there are three short shelves within a cube.
Aidan and Evan… (not verified)
Sun, 07/04/2010 - 07:45
Hi Ana! I love your plans! I
Hi Ana! I love your plans! I was wondering how many sheets of 3/4" mdf or ply and 1/4" ply I'd need to buy to make this entire unit including the bridge and drawers on the bottom units.
Thanks so much! I have a list of items I want to build a mile long now. I'm hoping to start with the loft bed for my son, although we will be shortening it since he is only 3. Can't wait to see what you come up with next! :)
Monica (not verified)
Wed, 12/29/2010 - 04:49
We have this exact system
We have this exact system from Pottery Barn that we purchased about 4 years ago, I wish I'd knew back then about your website since it would have saved us so much money, but I am so glad I found it!
One thing with the PBK furniture is that the wood is so soft that it gets beat up easily by the kids playing (of course) on the furniture, do you have an advise on how to finish wood furniture with a harder surface so it will resist more the daily dents and scratches?
Thanks!
Ana White (not verified)
Thu, 12/30/2010 - 12:56
Monica, it's all in the wood
Monica, it's all in the wood species. Pottery Barn does a ton of MDF, which just isn't the same as hardwood. For durability, go with hardwood plywood, and paint on layers and layers of thinner paint, so a scratch only scratches one layer. The other good news about DIY? Just keep a little extra touch up paint handy :)
Laura (not verified)
Tue, 01/11/2011 - 14:23
LOVE this:) we are going to
LOVE this:) we are going to add "sliding doors" of sorts to cover the tv when not in use since it will be in kind of a multi purpose room. It's officially a den but its open to the kitchen. This will fit perfectly! Its a big room but rectangular in shape so this will take advantage of a LONG room thats not so wide. Thanks soo much for the inspiration! ps. I told hubby if he builds it he can put as big a tv as he wants in it LOL
Kristen Arland (not verified)
Sun, 06/19/2011 - 19:16
how to connect the bridge to the side pieces?
I'm trying to figure out the best way to connect the bridge to the side hutches. I'm not sure if there are brackets I should use on the backs or them, or if I should somehow screw them together. Any one have any input?
Thanks!
Hyun (not verified)
Fri, 09/28/2012 - 21:41
How to secure the bridge
I'm planning the bridge as my phase 2 of my bookshelf system and I'm wondering what the best way to secure the bridge would be. Totally a beginner at building things and am eager to hear your advice. Your site is truely inspirational! I have been inspired!