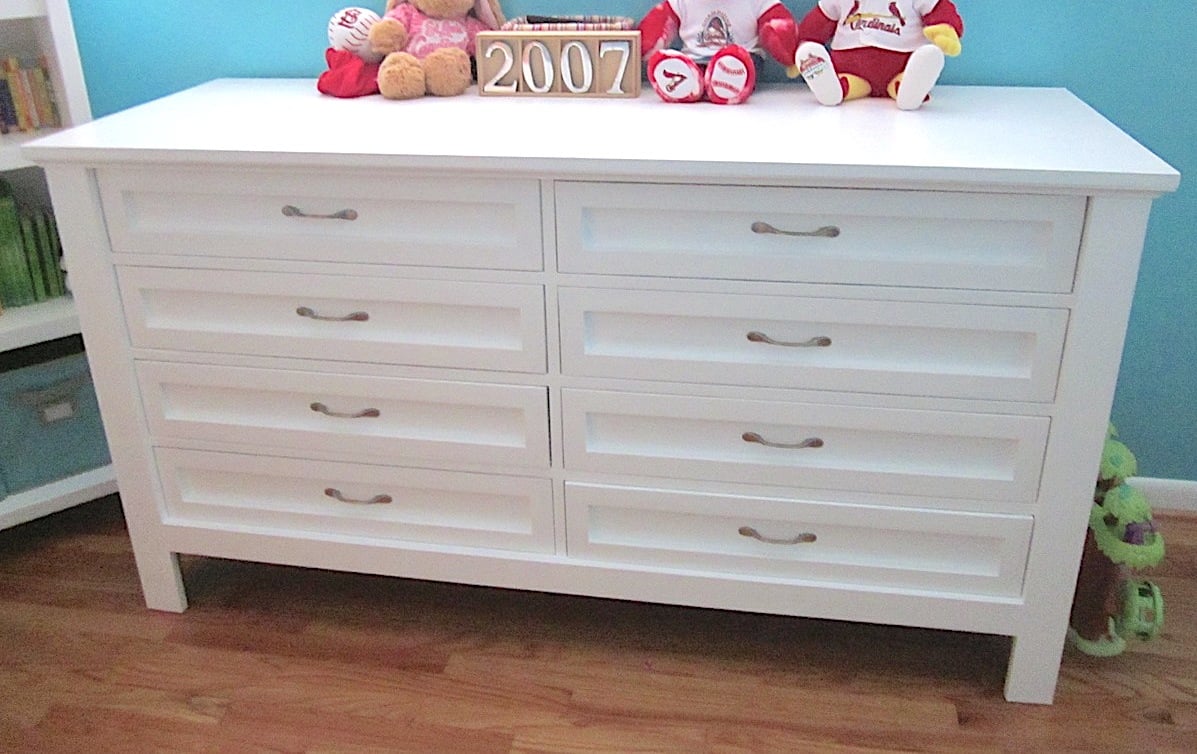
This project is advanced, not only because of the need for careful layout and measurements, but also because of the tools needed. A table saw is just about required to rip a number of parts for the drawers, and a miter saw will make cutting the many 45 degree cuts much easier. Certainly, you could construct this piece without either of these tools, but it will be a test of your sawing prowess.
Requested by bobcatmama
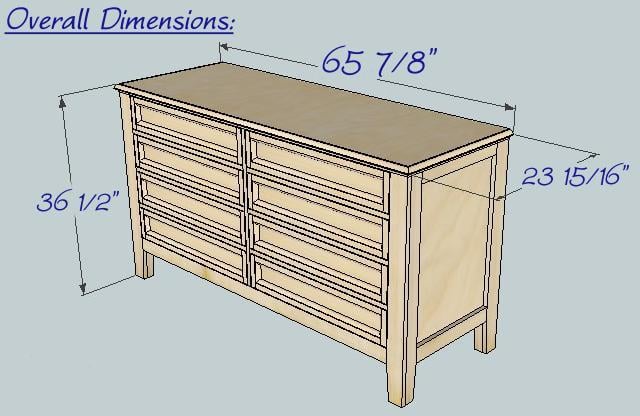
Preparation
- 1 Sheet of ¼” Ply For Drawer Bottoms, Drawer Fronts and End Panels – One good side
- 1 Sheet of ¼” Ply For Back – Not seen
- ½ Sheet (2′ x 8′) of 3/4” Ply For Top – One good side or can use MDF if painting
- 1 Sheet ¾” Ply For Drawer Case – Not seen
- 4 2×2 8′
- 1 2×4 8′
- 2 1×3 8′
- 8 1×4 8′
- 10 1×6 8′
- 1 ¾” Cove molding 10′ “See step 8 for molding profile”
- 7 ¾” Quarter round 8′ or 5 @ 10′
- 8 pair 20” drawer glides
- Knobs or Handles for 8 – 28” wide drawers
- Box of 2” Trim-head Screws and appropriate driver bit
- 1½“ Finish nails
- Wood Glue
- 2” wood screws
- 1 ¼” Pocket hole screws
Drawer Case:
- 2 Case Sides 22 x 26½ ¾” Ply
- 1 Case Top 20½ x 62½ ¾” Ply
- 1 Case Bottom 22 x 60 ¾” Ply
2×2 Frame
- 3 Long Rails 2×2 – 63”
- 2 Front End Rails 2×2 – 27 1/4”
- 2 Back End Rails 2×2 – 26 1/2”
- 2 Bottom Corners 2×2 – 19”
Ends:
- 4 End Rails 1×3 –17¼
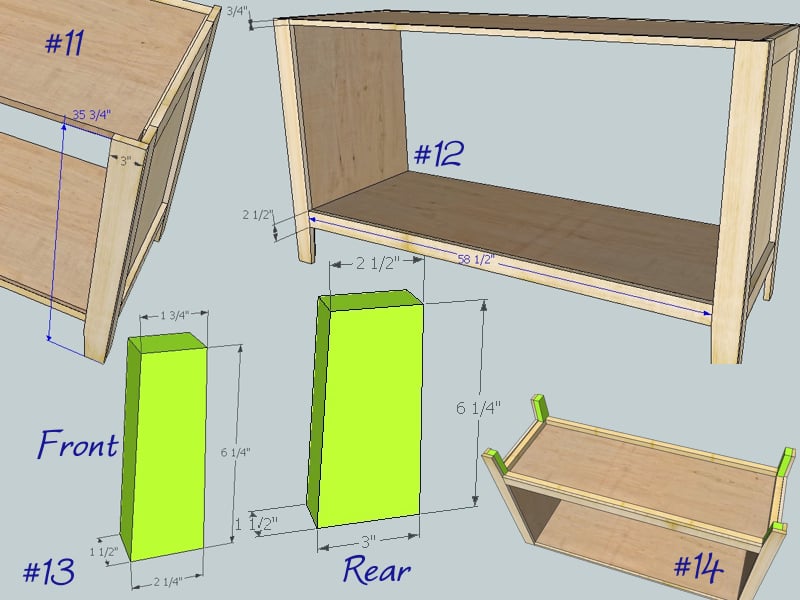
- 2 Front Legs 1×3 – 35¼ (Rip down to 2¼”)
- 2 Back Legs 1×4 – 35¼ (Rip down to 3”)
- 2 End Panels 19 x 28 ¼”
Ply Front:
- 2 Front Legs 1×4 –35¼ (Rip down to 3′)
- 1 Front Top Rail 58 1/2 x ¾
- 1 Front Bottom Rail 1×3 – 58 1/2
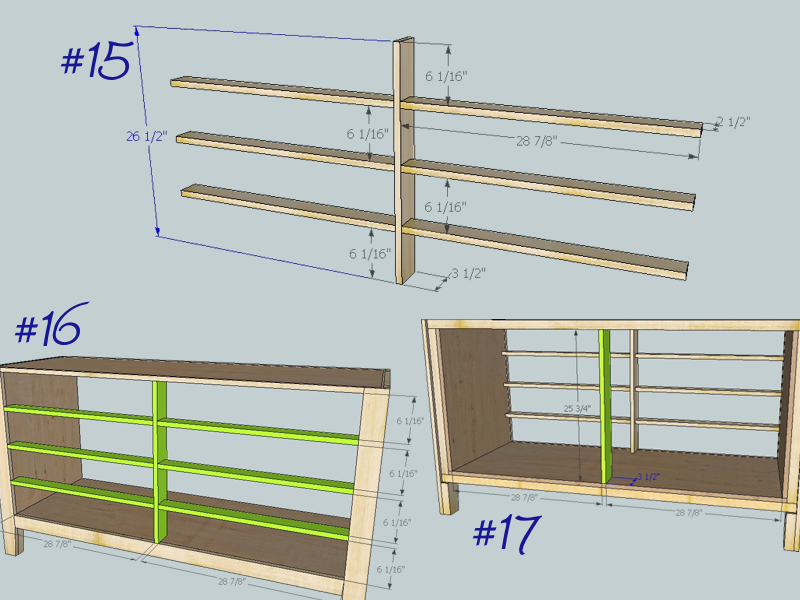
- 1 Center Divider 1×4 – 26½
- 6 Drawer Dividers 1×4 – 28 7/8
- 1 Rear Support 1×4 – 25¾
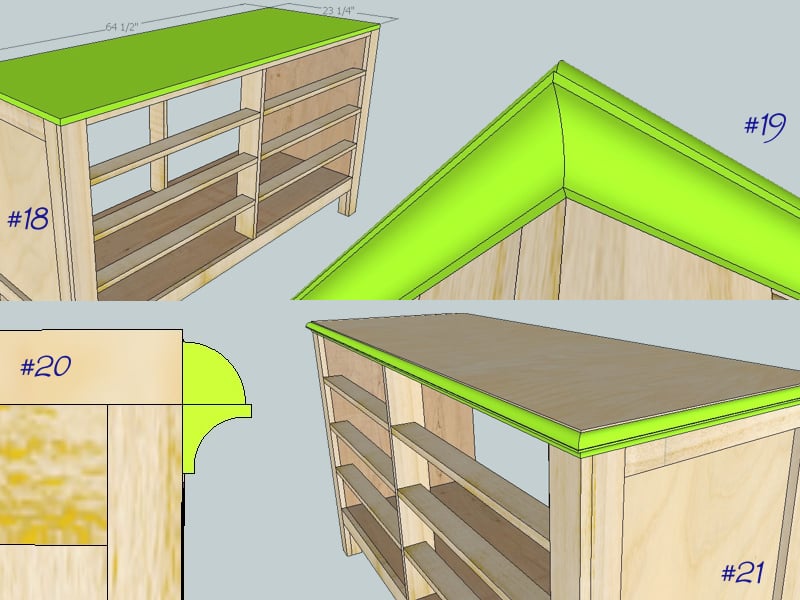
Top: 64½ x 23¼ ¾” Ply or MDF
Drawers:
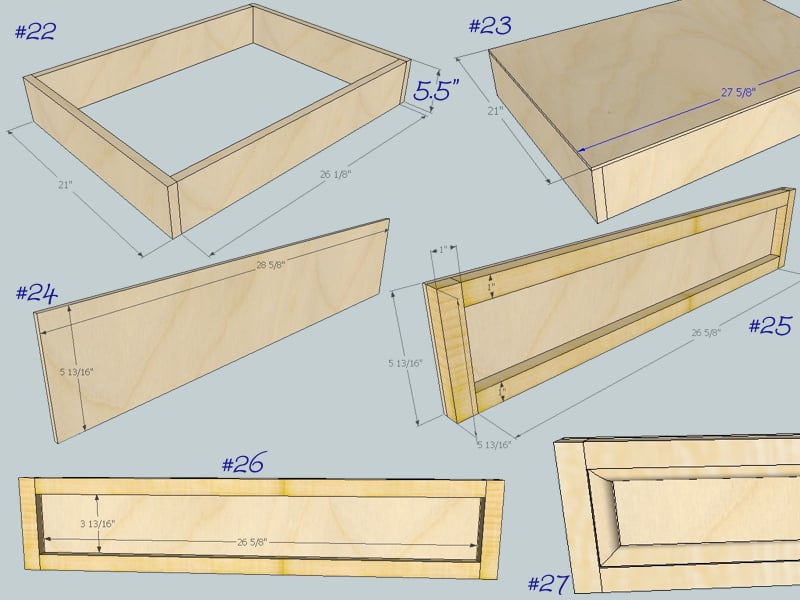
- 8 Drawer Faces – 5 13/16 x 28 5/8 ¼” Ply
- 8 Drawer Bottoms – 21 x 27 5/8 ¼” Ply
- 4 Top Drawer Sides 1×6 – 21 (Rip down to 4 1/2")
- 4 Top Drawer Ends 1×6 – 26 1/8 (Rip down to 4 1/2")
- 12 Lower Drawer Sides 1×6 – 21
- 12 Lower Drawer Ends 1×6 – 26 1/8
- 16 Drawer Face Stiles – 1 x 5 13/16 (Rip out of 1×4)
- 16 Drawer Face Rails – 1 x 26 5/8 (Rip out of 1×4)
Back: 29½ x 63 ¼”
Ply Trim:
- 2 Top Cove Ends – 25” Rough Cut
- 1 Top Cove Front – 68” Rough Cut
- 2 Top 5/8 Quarter Round 25” Rough Cut
- 1 Top 5/8 Quarter Round – 68” Rough Cut
- Remainder of trim measure and cut to fit drawer fronts.
Please read through the entire plan and all comments before beginning this project. It is also advisable to review the Getting Started Section. Take all necessary precautions to build safely and smartly. Work on a clean level surface, free of imperfections or debris. Always use straight boards. Check for square after each step. Always predrill holes before attaching with screws. Use glue with finish nails for a stronger hold. Wipe excess glue off bare wood for stained projects, as dried glue will not take stain. Be safe, have fun, and ask for help if you need it. Good luck!
Instructions
Step 1
Drawer Case
Start by cutting a ¾” by 1½“ notch out of both drawer box side panels as shown in #1. The 60 x 22 piece is the bottom of the drawer case. Attach the side panels using 4 – 2” wood screws per joint. Pocket holes can also be used. The top of the case measures 62½ by 20½. It gets installed flush front and back with an overhang of 1¼” on each side.
Step 2
2×2 Frame
During this section it is important that all of the joints and edges line up flush and even, to avoid troubles later on in the assembly. Begin installing the frame by attaching 2×2 pieces to both ends as shown in #5. These pieces should hang past the top of the case by 1/4”. Drive 2” screws into the 2×2′s from the inside of the case. Flip the unit over for #6 and add the two bottom rails. The 19” pieces are attached by driving screws in from the ends as this piece isn’t up against the case. Predrill to avoid splitting. Or use pocket holes . Flip the unit back upright for #8. This 2×2 sits right in the notches cut earlier.
Step 3
End Panels
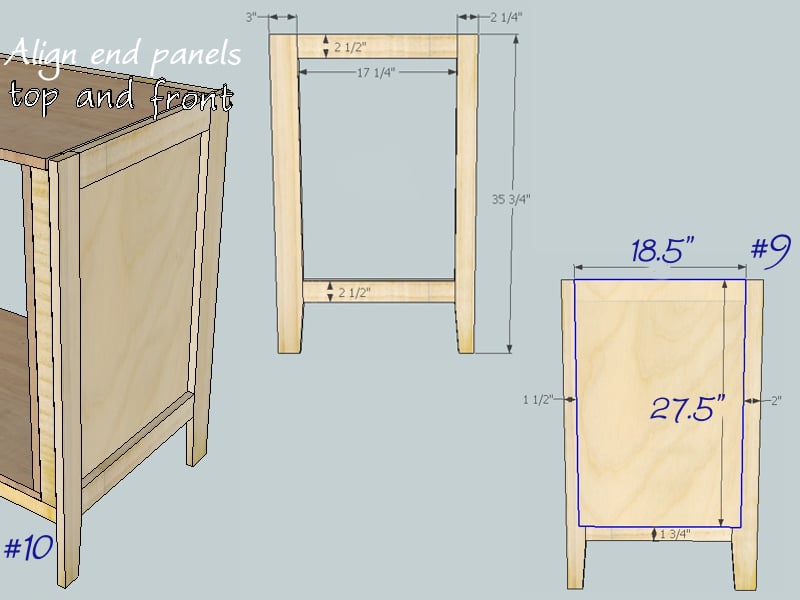
The two ends of the dresser are mirror images of each other. The front and back leg are different sizes, with the back leg being larger. Keep this in mind as you assemble. Drill 2 pocket holes in each end of the 17 ¼” rails, about 1” in from the edges. Screw the panel together keeping the faces flush. Take the 18½ x 27½ piece of 1/4” ply and align it as shown in # 9. The dimensions shown are the minimum distance necessary so stay inside of them by about ¼”. Apply a small bead of glue around the inside edge of the frame and finish nail the plywood to the frame. Take the completed end panels and attach them to the case with 2” finish nails. 2” Trim head screws are another option. The panels are flush with the top and front of the case. Make sure that the larger leg is to the back.
Step 4
Legs and Feet
Attach the fronts of the front legs. #11 Trim head screws into the 2×2 are recommended here.
#12 Next apply the face pieces between the front legs with finish nails. Flip the unit on its top. #13 shows the dimensions of the feet. It is much easier and safer to make the angled cuts first, then cut the pieces to length. Once cut, clamp the feet in position, fastening the feet through the legs with trim head screws. Drive additional screws down into the 2×2 frame.
Step 6
Top and Trim
Lay the 64½ by 23 ¼ plywood on top of the dresser. Align it so the front and side edges are flush with the edges of the case. Attach the top by driving 1 ¼” pocket hole screws up through the top of the drawer case. No need to drill anything, we’re just using the screws. After the top is secure begin adding the trim. #19 Start by mitering one end of the cove molding and aligning it on the side of the case. The top edge of the cove molding should run even with the bottom edge of the plywood. #20 Finish nail it on and carefully saw the excess off using the back of the dresser as a guide. Next cut the corresponding miter on an end and run the piece across the front of the dresser. Use clamps to hold the trim in place, then mark the uncut end where it touches the front corner of the dresser. That line will be the short side of your miter. Cut and attach the front piece of cove. Then cut the third piece, nail it on and cut it off flush. The quarter round goes on in the same process. #21
Step 7
Assemble Drawers
The drawers are a simple box with a plywood bottom nailed on. #22 The top two drawers are an inch shallower than the other six. Pocket holes are drilled on both ends of the 26 1/8” pieces. Once again locate the holes 1” from the outside edges. Begin constructing the drawer boxes, making sure to put the pocket holes to the outside of the drawers. They will be hidden later by the drawer fronts. #23 When all the drawer boxes are assembled attach the plywood bottoms. The plywood should line up flush on all sides to prevent problems fastening the drawer slides. A thin bead of glue and finish nails secure them to the drawers. Allow the glue to dry and begin creating the drawer fronts.
The drawer fronts consist of three components; a ¼” plywood back, an outer frame of ¾x 1” wood, and an inner frame of quarter round. #24 Apply a thin layer of glue to the back of each outer frame piece, align it with the edges of the plywood back and clamp it in position. Finish nail from the back side through the ¼” plywood. Attach one end, then the two center pieces and finally attach the other end. #25 Once all of the outer frames are secure, the quarter round trim can be installed. Ideally the measurements of the panel will match those shown in #26. Measure and cut the shorter end pieces first, then the longer sides. It may be necessary to flex the longer pieces slightly to get them to fit in position. When all four quarter round pieces are in place finish nail them. Angle the nails so they are driven into the outer frame and not just to the plywood.
Layout and drill the holes for the knobs or handles now. It is easier to do this on the flat backside of the drawer face.
Step 8
Install Drawers
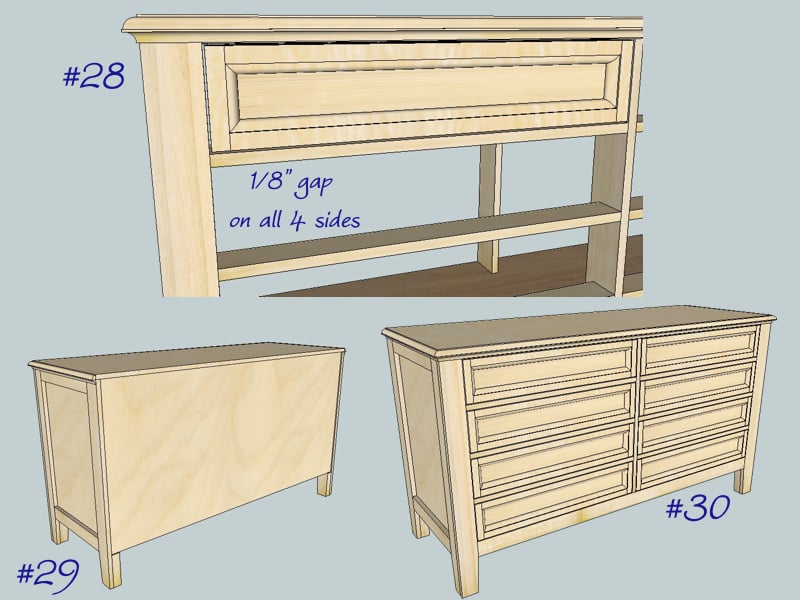
Install the drawer slide hardware on the drawer boxes and into the dresser. Position the drawer glides so the front face of the drawer box is 1” back from the face of the dresser. After all the drawers are in place the drawer faces can go on. Use 1/8” shims to keep the gap around the drawer face even. #28 Drive 2” finish nails through the outer frame of the drawer face into the drawer box. When the drawer faces are secure finish drilling all the holes for knobs/handles. Add the knobs after finishing is complete. #29 The back panel is simply nailed on with finish nails. Drive a finish nail every 6″ along the outside edges.
It is always recommended to apply a test coat on a hidden area or scrap piece to ensure color evenness and adhesion. Use primer or wood conditioner as needed.




Comments
JoyofBaking
Wed, 03/23/2011 - 10:31
Fantastic Job!
This looks amazing!! I cannot wait to try building this! I dont know if you take requests, but if you could plan the six drawer Hudson chest, or even the nightsand, I would be ecstatic! Pretty please, and thank you for this!
honey924 (not verified)
Fri, 04/08/2011 - 11:39
This looks fantastic
I don't even need a dresser and I want to build this! Great job.
fethiye
Sat, 06/04/2011 - 14:16
Pic
Will you be building it any time soon, so we can see how it looks when built, other then sketch?
Stephanie (not verified)
Mon, 06/06/2011 - 18:05
Building this
I purchased all of the supplies today...I have a 3 year-old and a 3 month-old...might take me a while. Will post pics when I'm done :)
Kathy T (not verified)
Wed, 01/25/2012 - 10:21
Did you finish it? I would
Did you finish it? I would love to know of any issues you found and see pics.
Stephanie (not verified)
Wed, 06/08/2011 - 19:26
Cut List
FYI...the cut list is incorrect. It says to cut the drawer pieces to 27 5/8....they need to be cit to 26 1/8. At least I cut them too long instead of them being too short!!
In reply to Cut List by Stephanie (not verified)
dan-k
Fri, 08/05/2011 - 23:53
Thanks
Error noted and corrected.
Any progress or other problems to report?
I'm curious to see how this turns out in reality. Sadly wood is not as straight, flat, or square as it is in Sketchup.
Tim (not verified)
Tue, 09/13/2011 - 21:00
Nightstand
This looks great Dan - thanks for mooing up the dresser. Have you thought about making up plans for the Hudson night stand? I would be very interested if you would.
Kathy T (not verified)
Wed, 01/25/2012 - 07:37
Cut List Question
In the cut list you have "1 Front Top Rail 58 1/2 x ¾". What size board do you cut this from? I would think it would be a 1x3 @ 58 1/2" but not sure what the x 3/4 is for.
In reply to Cut List Question by Kathy T (not verified)
dan-k
Mon, 02/06/2012 - 16:26
Front top rail... and other issues
The front top rail goes behind the trim piece above the top pair of drawers. It measures 58½" in length and ¾" by ¾". You will have cutoffs from the drawer boxes that will work. It is installed in step #12. I cannot edit the plan to correct the mistake(s) for some reason.
The 2x4 is used to create the feet in step #13. Most likely you will have scraps that can be used to make them, but I added it to cover all the bases.
The 1x6's are used in making the drawer boxes.
Kathy T (not verified)
Wed, 01/25/2012 - 10:20
Buy list vs cut list
They don't match, at all. You only need (5) 1x6x8 not 10, (4) 1x4x8 not 8, (3) 1x3x8 not 2. You don't need a 2x4 at all.
Also, on the cut list, you have that strange number for cutting the front top rail but there is not front top rail in the plans. You also have cuts for drawer stiles but they are not in the plan.
We are planning to start building this weekend. I will make notes as I go and pass them back to you.
In reply to Buy list vs cut list by Kathy T (not verified)
dan-k
Mon, 02/06/2012 - 16:39
answers
The drawer stiles are installed in step #25. They are the shorter pieces of wood that are installed vertically on the sides of the drawer face. I've addressed the rest of your concerns in my previous post. Thanks in advance for your help, and I look forward to seeing the real life project come together.
ktrinity
Mon, 02/20/2012 - 15:31
Finished it!
I added a brag post but it has not shown up yet.