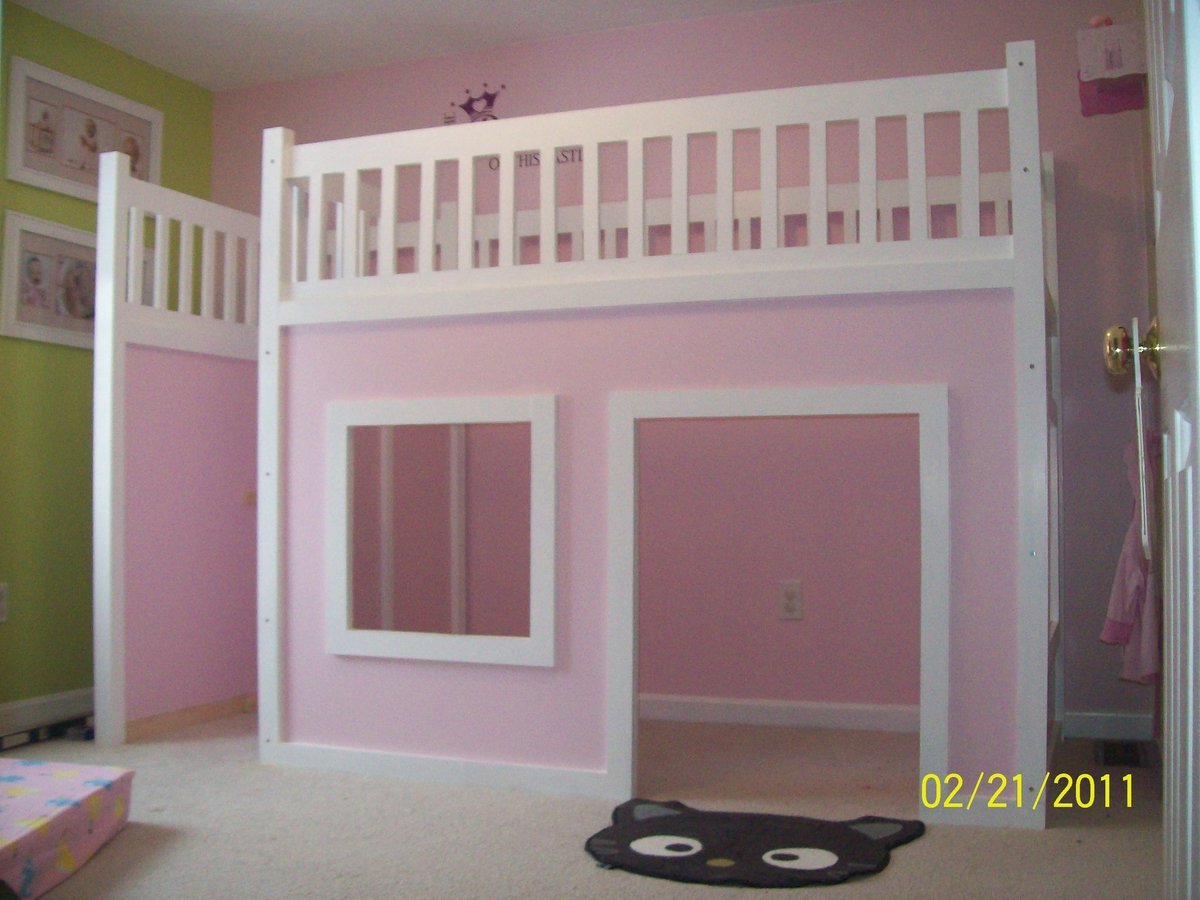


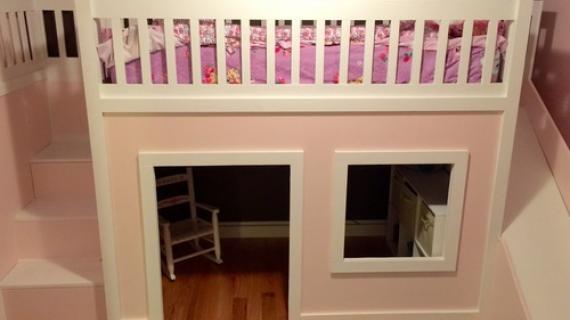
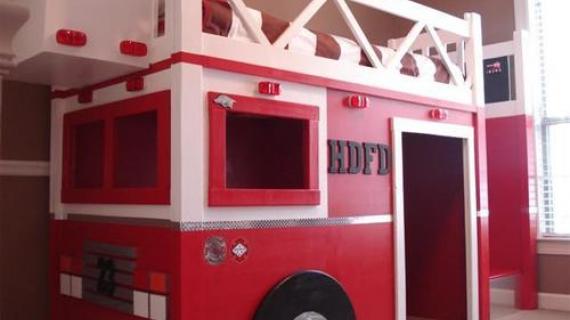
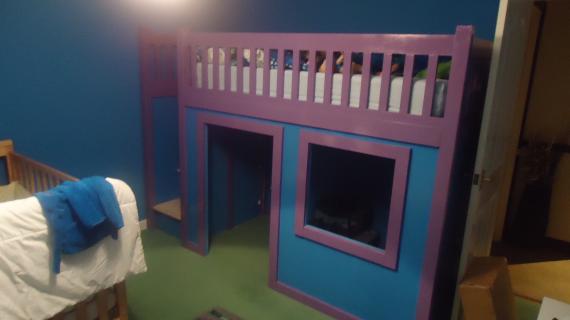
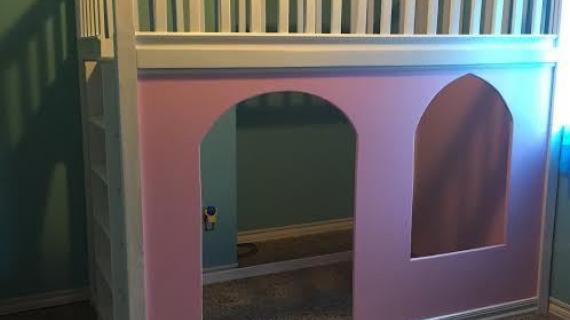
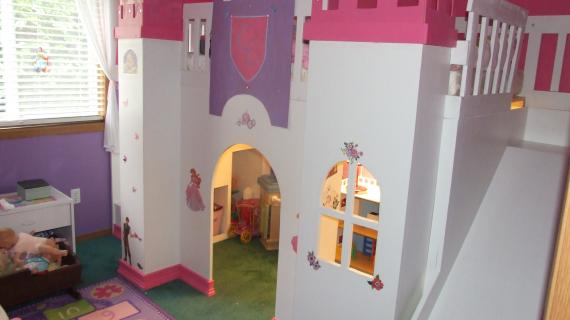
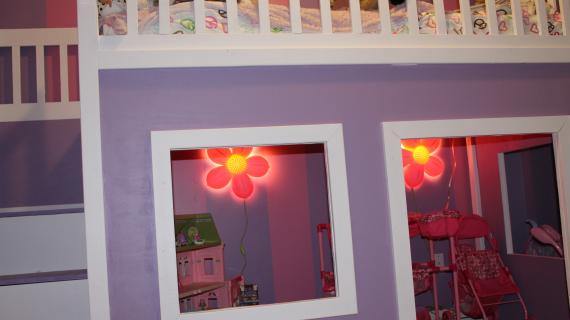
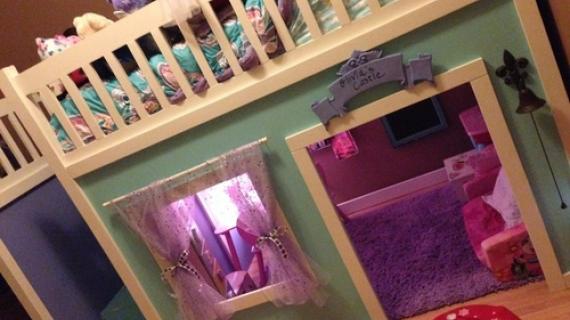
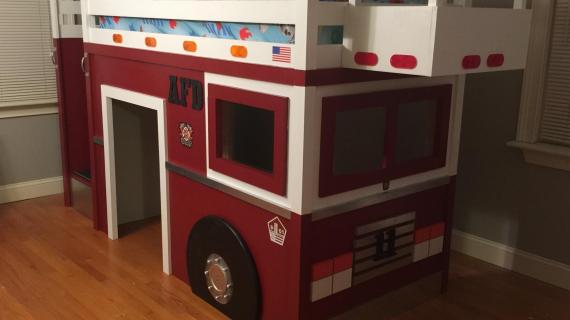
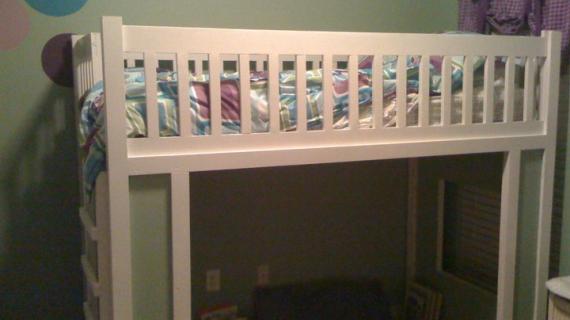
Building a playhouse bed is easier than you think with this straight forward plan. It's a big project, it's going to take patience and persevering, but as so many of our readers have discovered, well worth the hard work! Special thanks to Kimberly for sharing her amazing photos of Princess Katherine's bed.
Preparation
2 sheets of 3/4″ MDF, particle board or plywood (sanded to reduce splinters)
7 – 1x2s, 8′ long
15 – 1x3s, 8′ long (not including 1x3s for mattress slats)
6 – 1x4s, 8′ long
3 – 2×2, 8′ long
1 1/4″ pocket hole screws
2″ self tapping wood screws
1 1/4″ brad nails
2″ brad nails
wood glue
wood filler
Finishing Supplies
53 – 1×2 @ 11 1/2″ (Rails)
4 – 1×4 @ 80″ (Top and Bottoms of Rails)
4 – 1×3 @ 11 1/2″ (End of Rails – Front and Back rails)
1 – 3/4″ Plywood or MDF @ 48″ x 80″ (Front Plywood)
8 – 1×3 @ 68 1/2″ (Legs)
1 – 1×3 @ 75″ (Top Front Trim)
2 – 1×3 @ 36″ (Door Trim)
1 – 1×3 @ 31″ (Door Trim)
1 – 1×3 @ 38″ (Front Trim)
1 – 1×3 @ 6″ (Front Trim)
6 – 1×3 @ 21″ (Window Trim)
2 – 1×3 @ 26″ (Window Trim)
4 – 1×3 @ 2″ (Top Leg Filler Pieces)
2 – 1×3 @ 45 1/2″ (Back Leg Filler Pieces)
1 – 1×3 @ 80″ (Back Base Trim)
2 – 1×4 @ 37 1/2″ (Top and Bottom of Side Rail)
2 – 3/4″ Plywood @ 48″ x 37 1/2″ (Side Plywood)
4 – 1×3 @ 37 1/2″ (End Trim)
2 – 1×3 @ 25 1/2″ (Window Trim)
2 – 1×4 @ 21 3/4″ (Ladder End Rail Top and Bottom)
1 – 1×2 @ 66 1/2″ (Ladder Inside Support)
2 – 1×2 @ 43″ (Ladder Spacer)
2 – 2×2 @ 48″ (Ladder Sides)
5 – 1×2 @ 15 3/4″ (Ladder Rungs)
2 – 1×3 @ 13 1/2″ (Ladder Side Window Trim)
2 – 2×2 @ 75″ (Cleats for the mattress support frame)
1x3s @ 39″ (Mattress Slats, as recommended by the mattress company)


Instructions
Step 1
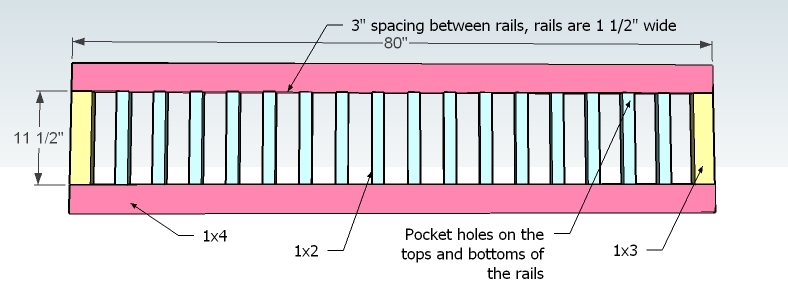
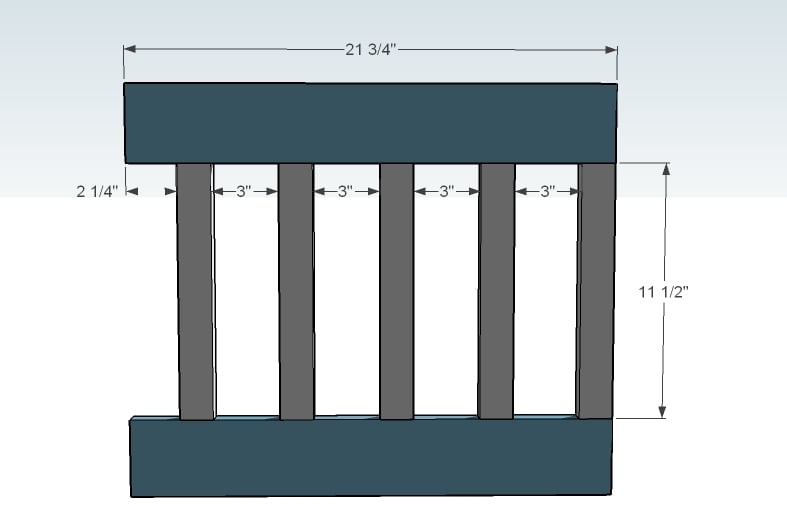
Front and Back Railing
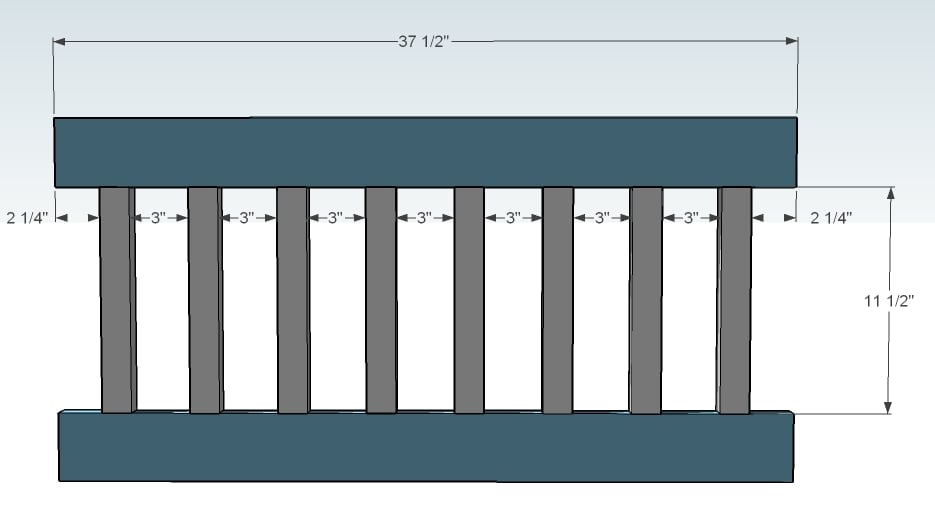
Build two of these – one for the front, and one for the back. Simply drill two pocket holes on both ends of all of the rails (blue) and ends (yellow). Mark the top and bottoms (pink) with 3″ spaces, remembering that a 1×3 is actually 2 1/2″ wide and a 1×2 is actually 1 1/4″ wide. Use glue and 1 1/4″ pocket hole screws to attach the rails to the tops and bottoms, as shown above. Set aside.
Step 2
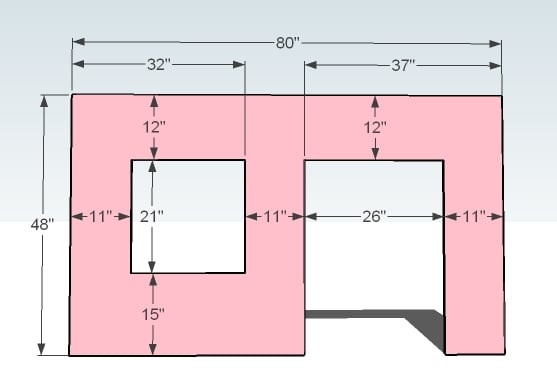
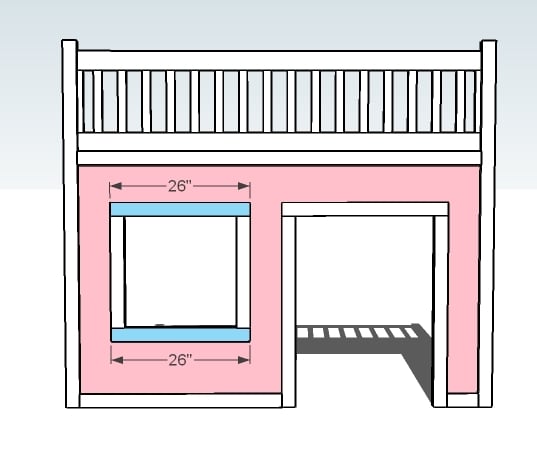
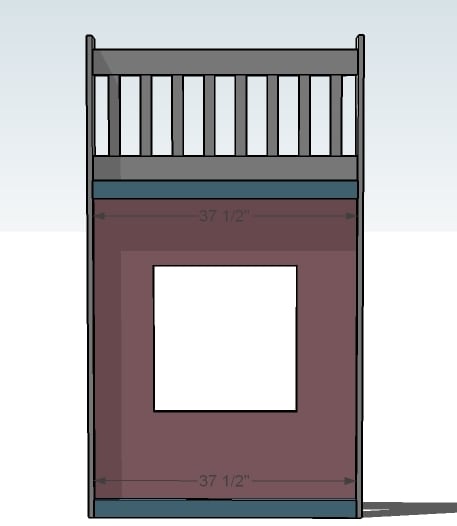
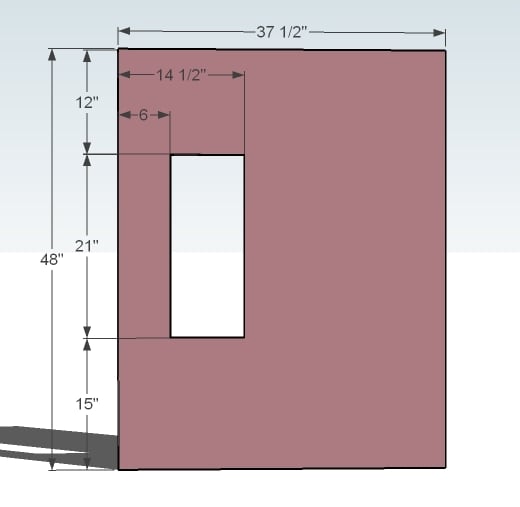
Front Plywood
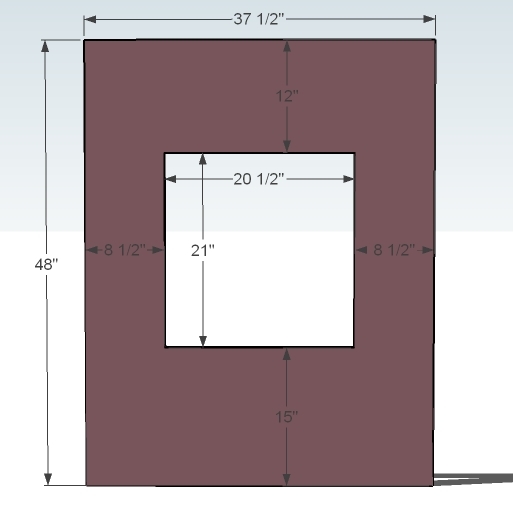
Mark out your front plywood as shown above. Use a jigsaw to carefully cut out the windows and doors.
Step 3
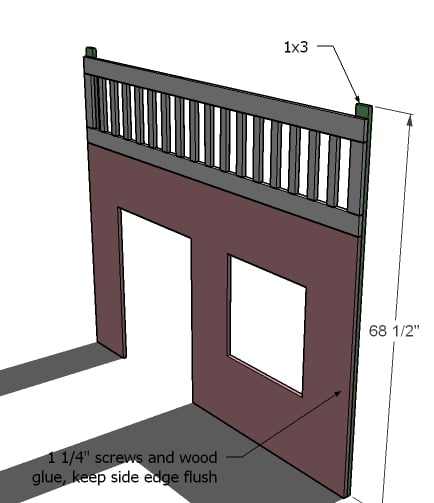
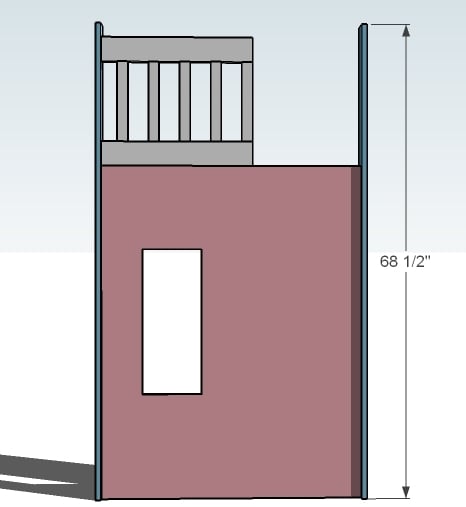
Front Legs
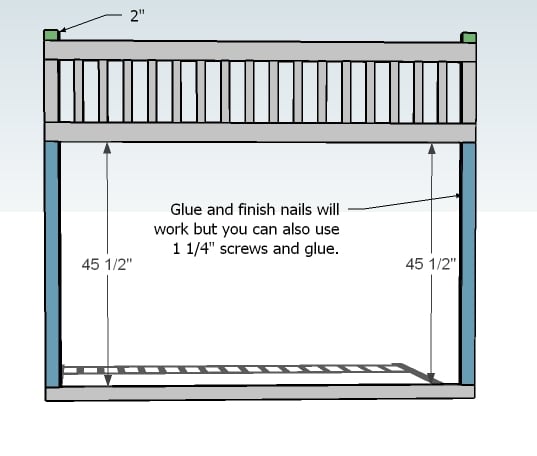
Use 1 1/4″ screws and glue to attach the plywood and the rails to the legs, as shown in the diagram. Keep bottom and outside edge flush.
Step 4
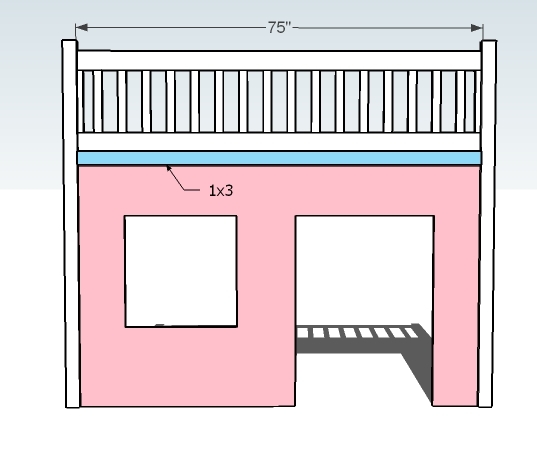
Top Trim
Attach the 1×3 to the front of the bed. Use 1 1/4″ screws and glue,overlapping the rails by 1″, hiding the joint between the railing and the plywood.
Step 5
Step 6
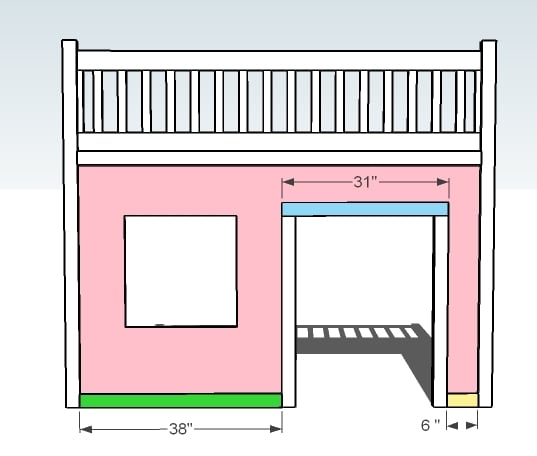
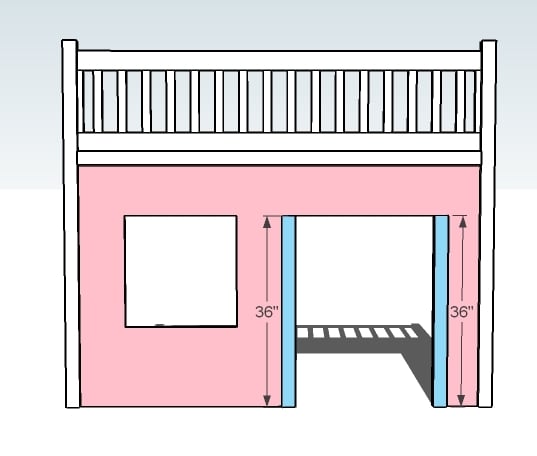
Front Trim
Add the remaining trim, as shown above. Use 1 1/4″ nails and glue.
Step 7

Window Trim
Add the window trim as shown in the diagram. Use 1 1/4″ finish nails or screws and glue.
Step 8
Window Trim
Trim out the window as shown above. You can alternately build your window frame with a Kreg Jig™, and then attach to the plywood front.
Step 9
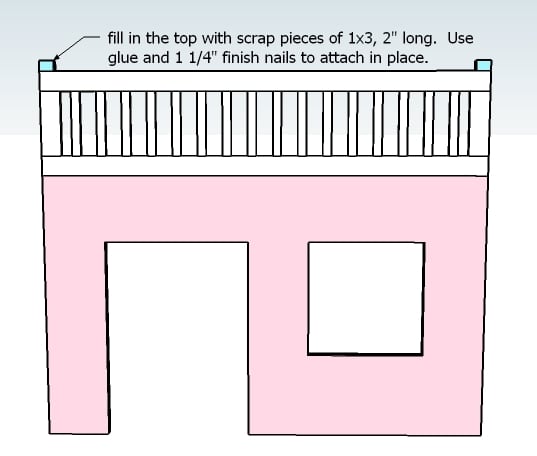
Top Fillers
Add the top pieces to the tops of the legs to fill in the gaps. Avoid overnailing and splitting the wood. Use 1 1/4″ nails and glue.
Click on the page links below for the complete instructions on building the back up next.
Step 10
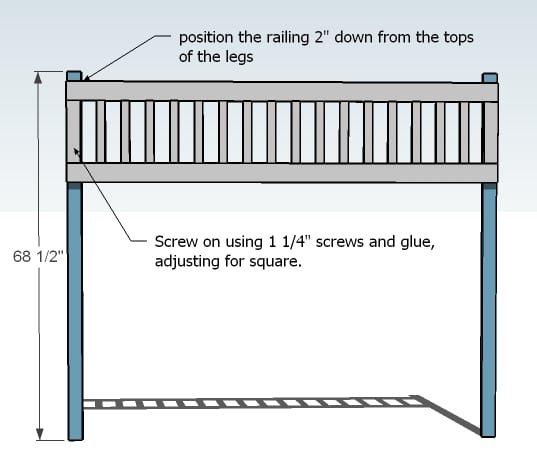
Legs and Railing
Attach two legs to the railing as shown above (on on each side – you should still have four legs left). Use 1 1/4″ screws and glue. Leave 2″ at the top of the legs. Adjust for square.
Step 11
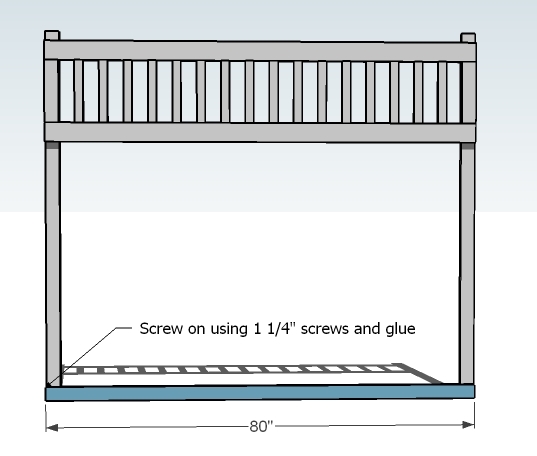
Back Bottom Trim
Attach with 1 1/4″ screws and glue the back bottom piece as shown above.
Step 12
Back Trim
Fill in the exposed gaps with 1×3 trim boards as shown above. Use 1 1/4″ fasteners and glue.
And now we have two of the wall built! Click on the page links below to see how to build the side walls.
Step 13
Build the Side Railing
Step 14
Legs
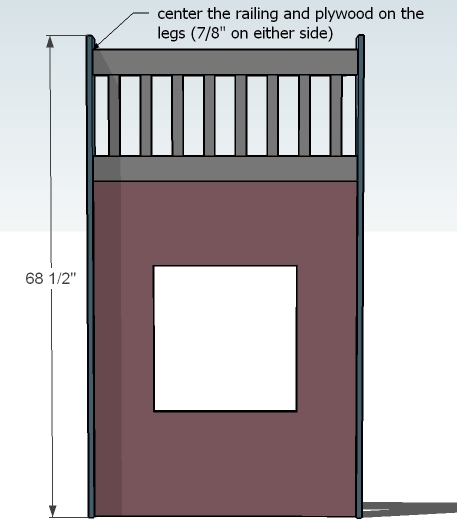
Attach the legs to the sides of the plywood and the railing. Your best bet is to use pocket holes, drilled from the plywood, screwing into the legs (same with the railing). Use 1 1/4″ pocket hole screws and glue. Center the plywood and the railing on the legs.
Step 15
Trim
Attach the trim to both the legs and the plywood,overlapping and attaching to the railing also (as you did the front,overlapping 1″). Use 1 1/4″ screws and glue, 1 1/4″ pocket holes and glue to attach to the legs.
Step 16

Window Trim
The best way to go on window frames is to build them separately with 1 1/4″ pocket hole screws, and then tap on with finish nails and glue. You can alternately attach with 1 1/4″ finish nails and glue.
This completes the end wall without the ladder. Click on NEXT PAGE below to see how to build the ladder end.
Step 17
Ladder End Rail
As you built the other rails, build the ladder end rails as shown above.
Step 18
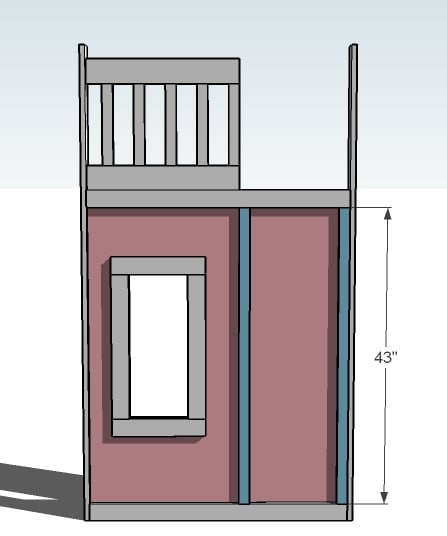
Ladder End Plywood
Cut your ladder end plywood as shown above, carefully cutting out the window.
Step 19
Legs
As you did with the other sides, add the legs to the plywood and railing. Best option is pocket hole screws (1 1/4″ pocket hole screws) or 2″ screws and glue from the outside.
Step 20
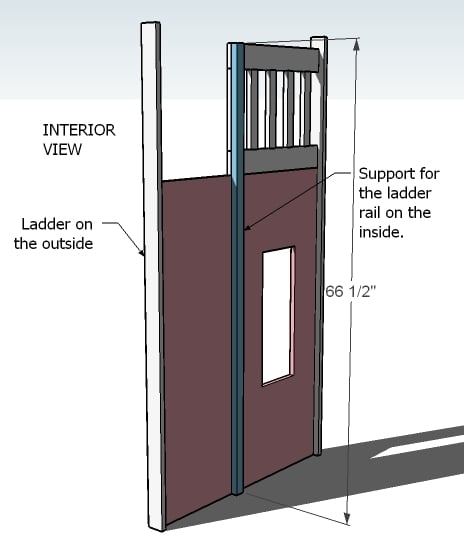
Ladder Railing Support
So I tossed and turned on this one, knowing that little hands are going to be pulling on the top of this railing and knowing it needed to be sturdy. The best bet was to run a support down the entire length of the inside. Use 1 1/4″ screws and glue to attach the 1×2 to the inside as shown above. Notice how it’s flush with the end of the railing?
Step 21

Ladder End Trim
Just like you did the other end, add the trim boards. Use glue and 1 1/4″ screws or nails. Overlap the railing by 1″ to keep the railing in place.
Step 22
Ladder Spacer
You’ll need this as a spot to secure your ladder too. Use 1 1/4″ screws and glue.
Step 23
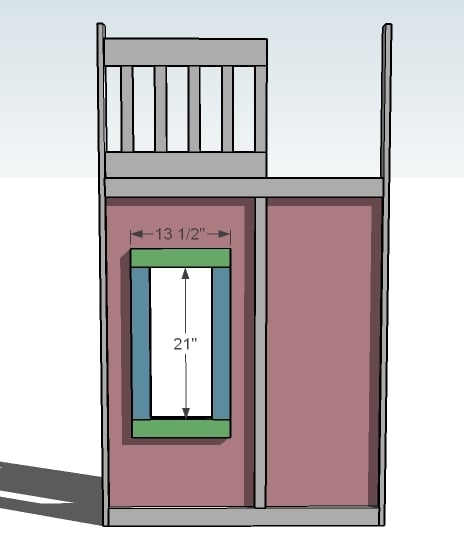
Window Trim
Best bet? Build the window frame separately with a Kreg Jig, and attach the window to the plywood with finish nails and glue. You can also attach each piece separately.
Step 24
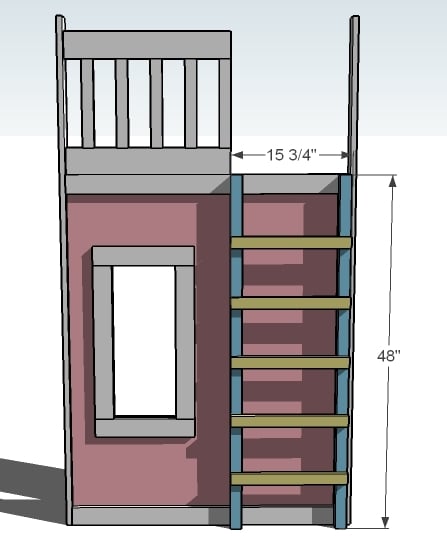
Ladder
Build the ladder with the 2x2s and 1x2s, using 2″ screws and glue. Space the rungs 7″ apart, leaving less room at the top. Screw to the end with 2″ screws and glue.
You have built all four walls! Click on the page links below to see how to assemble the four walls and add the mattress slat
Step 25
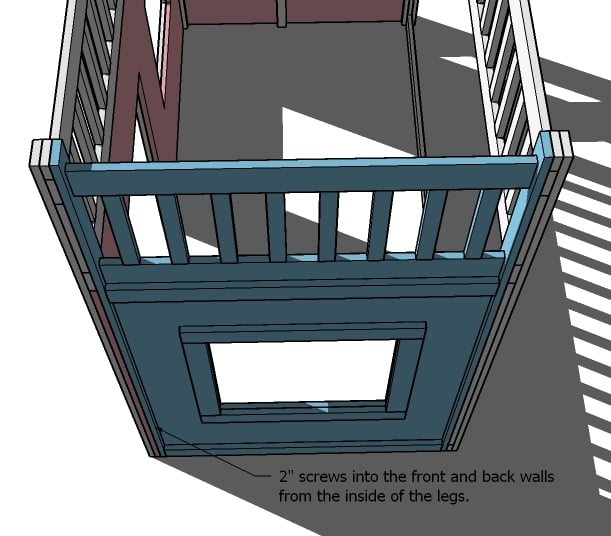
This bed is built in such a manner that you can attach the four walls easily, creating a leg that looks like a solid post. Use 2″ screws from the inside and leave off the glue for easy dis assembly. Adjust the entire playhouse for square.
Step 26
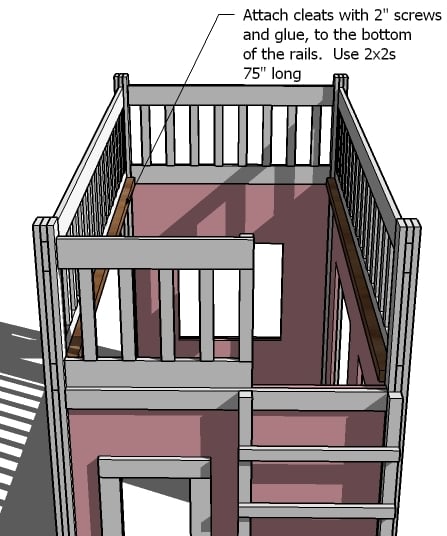
To allow your mattress to “breath” slats are the best way to go. You can purchase metal brackets, or use a 2×2, glued and screwed to the insides of the rails, as shown here.
Step 27
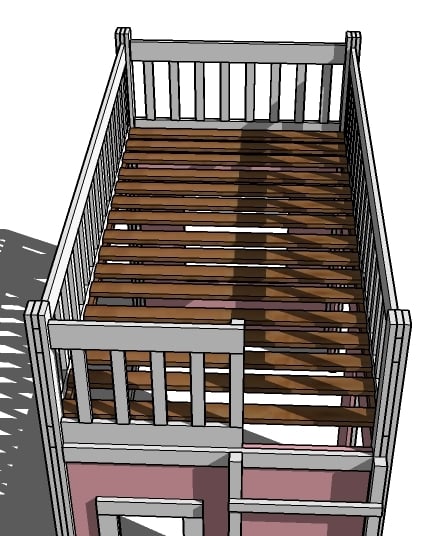
Install slats by laying on the cleat and screwing down. Leave the glue off so you can remove the slats. Place the slats according to your mattress recommendations.
Comments
AAmann (not verified)
Wed, 01/04/2012 - 07:07
Moving?
I LOVE this bed. I have a 2 year old daughter, by the time we're in the states again, she'll be 3. This would be perfect for her! Only issue, is that we're a military family. We'll probably be moving every three years or so for a long time... How hard would this be to take down and reassemble, since I'm assuming it wouldn't just fit through a standard door? lol
In reply to Moving? by AAmann (not verified)
Abzman
Wed, 01/04/2012 - 08:34
Disassembly
It's not too hard but be warned it will be very heavy. The one I built was very heavy and the longest side was very heavy and required at least 2 strong men to move.
If you build a stair case then make sure your design allows for easy disassembly.
I built my staircase as a separate unit which I slid in place. That's not the case for some other stair cases I saw here and online.
Best of luck.
bakwoodj
Sun, 01/22/2012 - 15:33
moving the bed
This bed can easily be taken down and moved. The weight is an issue but since you are in the military I assume your or significant other will be physically fit. I can move the pieces by myself and i'm not in that good of shape. I made mine with plywood not mdf. You will definitely need help to move the pieces made of mdf.
Ms (not verified)
Fri, 01/20/2012 - 10:03
Playhouse loft bed
Can this bed be made without the house at the bottom, and still be stable? I love the look of the loft bed, but would prefer to have it without the house underneath. How could I go about this to modify it?
Ms (not verified)
Fri, 01/20/2012 - 10:04
Playhouse loft bed
Can this bed be made without the house at the bottom, and still be stable? I love the look of the loft bed, but would prefer to have it without the house underneath. How could I go about this to modify it?
In reply to Playhouse loft bed by Ms (not verified)
Abzman
Sun, 01/22/2012 - 15:10
Some design change needed
You would need to make some modifications by providing additional support to distribute the weight to the posts but it can be done.
bakwoodj
Sun, 01/22/2012 - 15:25
Yes, I think it would work.
Yes, I think it would work. Just make the front wall similar to the back wall with only a brace across the bottom.
In reply to Playhouse loft bed by Ms (not verified)
spiceylg
Fri, 11/09/2012 - 06:30
alternate
How about these plans:
http://ana-white.com/2010/05/furniture-plans-loft-bed.html
bakwoodj
Mon, 01/23/2012 - 11:59
Completed!
I finished my bed! My 3 year old daughter loves it! Followed the plans with changes made for full size bed. The plans were clear and well done. I used a .322” bead board and 1/2” plywood glued together for the front. The difference in thickness is not noticeable. I also added a 1x8 to the bottom of the plywood to give my interior height 4’ 7 1/8” instead of 4 feet. It worked great! I should have pocket drilled from the plywood into the 1x8 instead of the other way but the trim and posts shored it up. I also added a 1x3 layed flat under the mattress cross pieces with one screw in each board. It made the mattress frame much more solid across the full size width. You won’t need this for a twin size. I knew that I would have 5 little girls playing on it at a time as soon as it opened for business. I also read to my girls every night and I knew that it would have to support me. I can say that it supports me, and both my daughters for a total weight of 280lbs. I’m sure it could easily hold more. I hung from the back rail before the bed was finished and it didn’t budge! This think is strong! It took me and my uncle approx 35 hours to build and another 10 to paint! This could have been faster but I kept double checking my measurements and the plans. Here is the link to my plans.
https://www.facebook.com/#!/media/set/?set=a.317194951656199.71003.2485…
In reply to Completed! by bakwoodj
Abzman
Wed, 01/25/2012 - 19:59
Great job
Great work, looks great and a job well done.
Yes it's certainly time consuming unless you've done them before. Mine took a very long time because I was alone and was coming up with the plans as I worked and double checking myself plus it was my first such job.
I like the added height idea.
Guest (not verified)
Sat, 01/28/2012 - 23:34
how do you make the stairs. i
how do you make the stairs. i want to make this for by daughter she is 2 1/2 years old and she dose not know how to go up ladder yet
bakwoodj
Tue, 01/31/2012 - 20:59
stair plan
The stairs are under the title stairs for loft bed
Here is the link
http://ana-white.com/2010/09/easy-playhouse-loft-bed-with-storage-stairs
Good luck!
Crystal B (not verified)
Mon, 01/30/2012 - 13:09
Cost???
So, can this, with the added storage stairs and alterations to a larger bed size (king or two twins), be made for under $300? I've seen other estimations of cost. I'm just wondering how much costs would increase for larger capacity alterations. My idea is basically two twins up top for my two boys with the entire bottom for play. I would put in a partial wall divider in the bottom center (where the twin mattresses would meet in the middle up top) so it would be like two of them together with a shared partial interior wall. Or in the L-shape for a corner wall as someone mentioned already. Would this work? Does anyone know how much it might cost?
I want to build one for my two boys and another for my two girls in the fall. Any thoughts or suggestions are appreciated. :O)
bakwoodj
Tue, 01/31/2012 - 21:05
Cost
The lumber, screws and paint cost about $650. I used "choice" 1x's from Lowes for everything. I skimped on the plywood grade and would not do that on the next one. I bought CD plywood instead of AC. The partial wall may make it a bit tight inside but that is your call. I think the corner idea would work great. If you have the room put the twin beds on opposite walls and build a bridge! If you put them in the corner, the corner area could be open to the beds so that would make the underside seem huge!
In reply to Cost??? by Crystal B (not verified)
Abzman
Tue, 01/31/2012 - 21:26
Cost...
I agree with BakwoodJ. Mine cost over $1000 which includes 2 mattresses and the drawers. I too skimped on the walls but would never do that again. I think actual costs should be even higher than initial.
Note that standard wood boards are 4x8 so if you make the width wider than 4 feet like myself then your design will become a bit more complex so you'll need to spend time re-designing.
Now, if you plan to make the bed as wide as you say then you're up for many challenges. Having an inside divider wall would help solve your load issue.
My stairs were a separate unit that I slid in place. The benefit of that is: No load on walls - load is vertical and can pretty much handle more than 300 lbs. Also, no squeaking noise. Helpful for me as I wake my daughter up on top for school while the other stays asleep.
Finally, assembly & disassembly is much easier.
Costs add up with such a piece of furniture but it's worth it at the end.
Skip (not verified)
Wed, 02/01/2012 - 17:16
Full
I want to do this for a full bed and see that it was talked about above but I do not see the dimentions and materials list. Anyone have this?
In reply to Full by Skip (not verified)
Abzman
Thu, 02/02/2012 - 07:00
Full size
Use the dimensions above in this site for the single size bed and look at mine (Full). I have some dimensions marked on my pictures but no plans.
https://picasaweb.google.com/103590147643813514240/PlayhouseBunkbedSurp…
Hope this helps.
Guest (not verified)
Wed, 02/01/2012 - 19:51
Loft bed does it need to be secured to a wall?
Ana this bed with steps should it be attached to wall threw slat cleats? My granddaughter now 3 likely to young but when 4-5 l would like to build take a[part move from ontario to nova scotia for my grandaughter she would love it.
jim ontario
Bunnie1978
Mon, 02/27/2012 - 17:44
Still in process of this... queen size loft bed
I don't want to post a brag until I'm complete... still a few shelves to build and I think I'm going to modify the rail. Then I can paint. I have to say, MDF is heavy. Queen beds are heavy, and you are going to be blown away when you see how awesome this bed it! It has stairs and a slide and hide-away storage under both!
Guest (not verified)
Tue, 03/20/2012 - 10:36
loft bed
Are the dimensions shown for a twin size mattress?
Jackie Callahan (not verified)
Sun, 07/01/2012 - 17:29
Step 26 question - what screws to use to support weight?
Hi, everyone. We are about to finish our loft bed. We are on step 26 where you attach the cleats to the bottom of the rails and then put the slats on. The instructions say to use 2" screws to attach the cleat. I have been using #8 wood screws for the other parts of the project. Is a #8 2" screw going to be sufficient to hold the weight? And how far should we space them?
One note - we have modified the plans slightly. Instead of a "bed" this is a reading loft. So we are not using a mattress. Instead we are using a piece of 5/8" plywood. Our kids are young - 6 & 8 - and we expect them to both be up there at the same time.
Should we do anything else to make this modified loft support that kind of weight?
In reply to Step 26 question - what screws to use to support weight? by Jackie Callahan (not verified)
Abzman
Mon, 07/02/2012 - 16:14
Screws & support
I personally think that should suffice. I also glued the cleats. I'm over 200lbs and I laid down on the top bunk (Mine is a Full size) along with my 2 kids! Should be more than enough for your purpose.
My spacing was about 4" but I did that since the distance is larger due to the larger mattress size.
Jackie Callahan (not verified)
Tue, 07/03/2012 - 08:48
Thanks to Abzman
Thanks Abzman, for your reply. I did some further research and think I'm going to make sure I use Gorilla glue when I glue the cleats on for added strength because I already primed and painted the cleats.
I also do not have plywood on the one long wall -- I believe you added plywood to the wall where Ana's project plans have the space open. I think I'm going to add 2 additional 1x3s spaced eventing to support the railing there just in case. I'm going to take your advice about the 4" spacing of the screws.
And lastly, I think I'm going to run down to the hardware store and check out what they have for various brackets or braces that I could use underneath those cleats.
Everyone says how sturdy the structure is, but I guess I'm paranoid and worried about the fact that I'm a beginner with woodworking. I worry that maybe I made some other structural error somewhere else that might cause a problem. Anyway, I'm going to take a few more steps to shore it up and make it as sturdy as possible.
Thanks!
In reply to Thanks to Abzman by Jackie Callahan (not verified)
Abzman
Tue, 07/03/2012 - 12:06
Yes, better safe than not
Hi Jackie,
I agree with being extra safe. I wouldn't add L brackets to all cleats but I would focus mostly on the center so as to help provide more stability and hold the center together.
I've actually screwed in some of the cleats.
Good luck and be sure to share pictures.
Dave Lively (not verified)
Sun, 07/29/2012 - 11:25
Incorrect material list
The cut list calls for 840.75" of 1x2, or 8.75 8' boards. Even without accounting for cut/blade width and scrap, this is more than the 7 1x2's called for in the material list.
Dave Lively (not verified)
Sun, 07/29/2012 - 11:29
lncorrect material list
The 1x2 cuts listed total 840.75" (8.75 1x2s @ 8'), not including cut/blade width and scrap. The material list calls for 7 1x2s, or 672". I'd recommend getting 9 or 10 1x2s.
Elise M (not verified)
Tue, 08/28/2012 - 21:50
Hi, I'm in Australia and am
Hi, I'm in Australia and am seriously thinking about getting this built for my youngest daughter's birthday.
I need the measurements in metric though. Can anybody help with this? Can someone also point me in the direction of the plans for the add on stairs? (as I prefer those to a ladder)
Thanks
Chrissie (not verified)
Wed, 09/05/2012 - 07:18
2 beds in 1 room??
I have a 12X13 room that I would love to put two of these in, with at least 1 of them having stairs...I'm having a tough time configuring them though...I figure I could do 1 without stairs and have 1 with and they they both share the stairs...but my brain can't figure it out...HELP?!?!
In reply to 2 beds in 1 room?? by Chrissie (not verified)
Abzman
Wed, 09/05/2012 - 08:35
Configuration
Do you plan to have them back to back or end to end or farther apart? If I had room I'd also build a bridge between the two to make the set up look like a castle.
If side by side you could build center stairs with a common landing.
Chrissie (not verified)
Thu, 09/06/2012 - 11:55
Oooh I think that the common
Oooh I think that the common stairs would work...I was going with an "L" shape thought in my head...the one wall at 144(12ft) would be hard since the beds in an L shape would be 144.5" but with a common landing in the middle it would work. thanks!!
Angela Bunch (not verified)
Thu, 10/04/2012 - 18:16
Playhouse Bed
Approximately how much would this cost? I love this and I want to fix this in my granddaughters bed room. Please reply as soon as possible so I can get started. Also will Lowe's have everything that I need to finish the project? Thank you
Samantha Caldwell (not verified)
Mon, 10/15/2012 - 20:04
What size bed are the directions made for?
I am wanting to make this bed for my daughter and I wanted to know if the directions are for what size bed? If someone would help me please. Thank you
Kevin1982 (not verified)
Fri, 11/09/2012 - 03:31
Loft Bed
I am in the process of making this loft using metric wood dimensions and to suit a UK size single bed. I am building with Redwood and 25mm thick MDF, which I purchased for 230 GBP from a local timber supplier in England. I have also purchased the Kreg jig set and screws. Including paint (Plasti-Kote spray paint) I am expecting the job to cost around 300 GBP. I will post pictures once (if) completed.
Autumn Tisdale (not verified)
Sun, 12/16/2012 - 08:12
Do you need to put a twin box
Do you need to put a twin box spring mattress or just the mattress? My husband is working on this today and I am trying to see what all I need to buy. Thanks.
In reply to Do you need to put a twin box by Autumn Tisdale (not verified)
Abzman
Sun, 12/16/2012 - 09:50
Box Spring
No Box spring needed.
Krissi (not verified)
Fri, 12/28/2012 - 08:02
Can someone send me plans for this modified for full mattress?
Can someone post link for plans for this bed for a full size mattress?
ShaneKnutson (not verified)
Thu, 01/10/2013 - 14:28
Full Size Plans
The difference between a TWIN mattress and a FULL matress is only its width. it comes out to be 15"
When building this add 15" to the side measurements as well as the railing depth.
Rich C (not verified)
Tue, 01/22/2013 - 08:19
How to hide Pocket holes
Just curious on how everyone hid all of their pocket holes, especially for the all of the railings along the top. Are all of the pocket holes facing towards the inside of the mattress so you don't see them when you're standing in front of the loft playhouse bed?
I know Kreg sells plugs to plug up the holes made by the pocket screws, did anyone use them or did you just leave the holes?
Rich C (not verified)
Tue, 01/22/2013 - 08:21
How to hide Pocket holes
Just curious on how everyone hid all of their pocket holes, especially for the all of the railings along the top. Are all of the pocket holes facing towards the inside of the mattress so you don't see them when you're standing in front of the loft playhouse bed?
I know Kreg sells plugs to plug up the holes made by the pocket screws, did anyone use them or did you just leave the holes?
Rich C (not verified)
Tue, 01/22/2013 - 08:23
How to hide Pocket holes
Just curious on how everyone hid all of their pocket holes, especially for the all of the railings along the top. Are all of the pocket holes facing towards the inside of the mattress so you don't see them when you're standing in front of the loft playhouse bed?
I know Kreg sells plugs to plug up the holes made by the pocket screws, did anyone use them or did you just leave the holes?
In reply to How to hide Pocket holes by Rich C (not verified)
Abzman
Tue, 01/22/2013 - 09:39
Pocket Holes
I left them uncovered. They don't look bad. I was concerned I may need to re-tighten over time so left them uncovered. However, I think covering them would look better.
Rich C (not verified)
Tue, 01/22/2013 - 11:27
Step 14
Is there a simple way of joining all 3 pieces in step 14? Would it be easier to join the railing with the plywood using pocket screws, THEN screwing the leg into them? How did you guys attach?
Rich C (not verified)
Tue, 01/22/2013 - 11:32
Adding plywood to back wall
Abzman,
I noticed in your pics you added plywood to your back wall instead of leaving it open like in the original plans. I was thinking of doing the same thing, did you do this to increase stability of the entire structure?
Also, did you remove the molding in the room so the entire structure would fit flush up against the wall?
Did you screw the structure into the wall or is it just freestanding?
In reply to Adding plywood to back wall by Rich C (not verified)
Abzman
Tue, 01/22/2013 - 12:13
Back wall
Hi Rich,
I put a back wall because of the bed I put inside for support and to prevent my kids from falling out. I don't think the extra support is needed but wanted it fully enclosed to give a playhouse feel. However, my 5yr old doesn't like sleeping inside and prefers to sleep on top. So now we alternate every day. The 5yr old imagines the wood knots and other imperfections as spiders and insects! So we now cover the cleats with a sheet!! Maybe she'll grow out of it. I actually tried sleeping in the bottom bunk and like it as it muffles sound so it's extra quiet there and very sturdy. I weigh about 200lbs.
No need to secure to wall as this thing is a monster and is super stable. However, it is super heavy and make sure you install it exactly where you want it to permanently reside. You don't want to try to move it afterwards as you may crack joints and weaken it.
tinkerjeannette
Mon, 01/28/2013 - 11:57
Pirate Loft Bed
I love This playhouse Loft ! would anyone know how to convert this plans for a pirate playhouse loft bed ???
tinkerjeannette
Mon, 01/28/2013 - 11:57
Pirate Loft Bed
I love This playhouse Loft ! would anyone know how to convert this plans for a pirate playhouse loft bed ???
Atenney
Tue, 02/19/2013 - 13:56
Turn this into an L shape for my two girls...
Can I have help making a double version of this in an L- shape? Not sure if its easier to just make two of them and put the in an L shape and modify the bottoms so they can walk straight through them both when playing underneath or if someone handy can help me make plans.
dgwheeler
Sun, 04/07/2013 - 09:08
Mattress
So does this only use the 1 mattress? Or do I still need to add in a box spring?
Katieparker
Wed, 07/24/2013 - 15:33
Playhouse Loft bed
Love this! Are there plans for making it a full bed? Please send if possible. Thanks!
Katie