


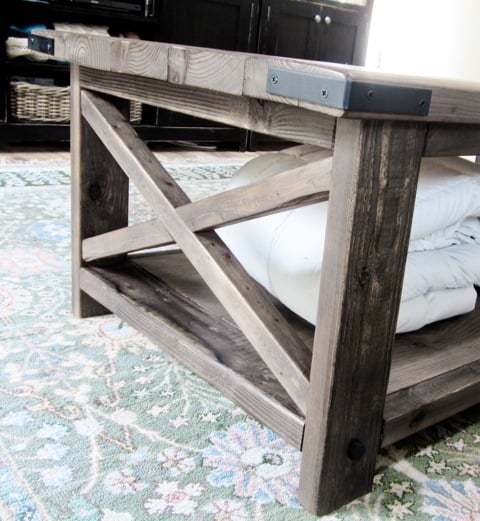
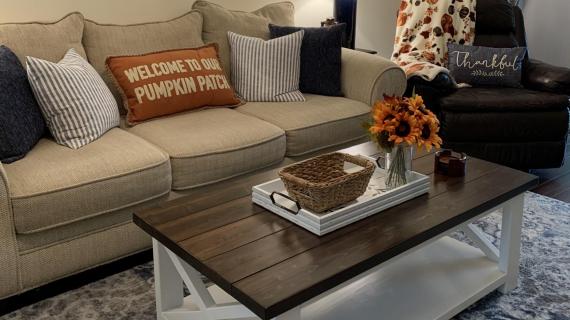
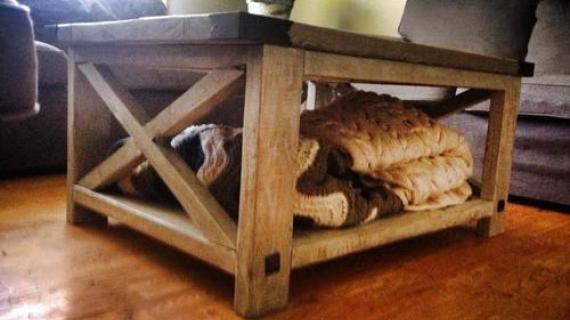
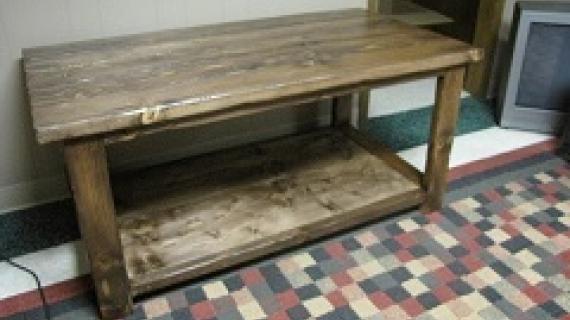
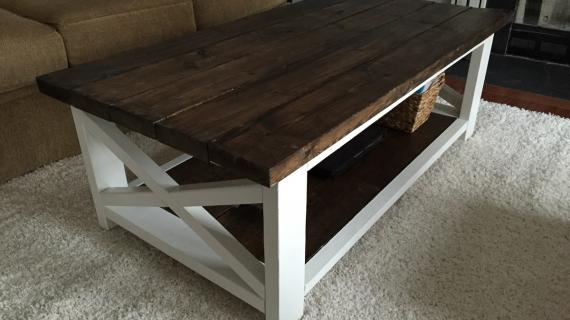
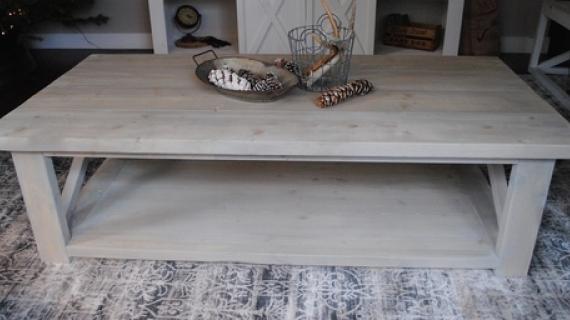
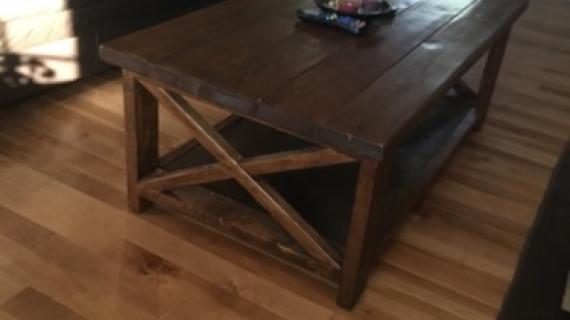
You can build a beautiful coffee table out of lumber! For about $50 in materials, this solid wood coffee table with it's X detailing could be yours. Our free plans include step by step diagrams, shopping lists and cut list - everything you need to get started.
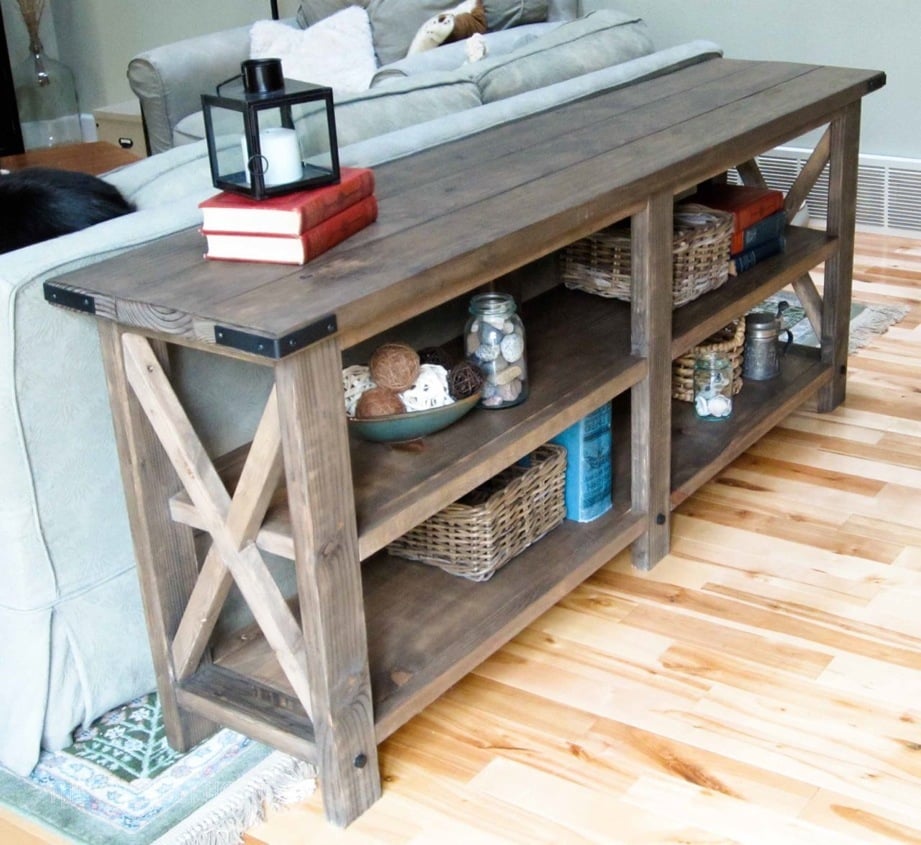
Also in this collection: Rustic X Console Table, Rustic X End Table, and Rustic X Bench Plans


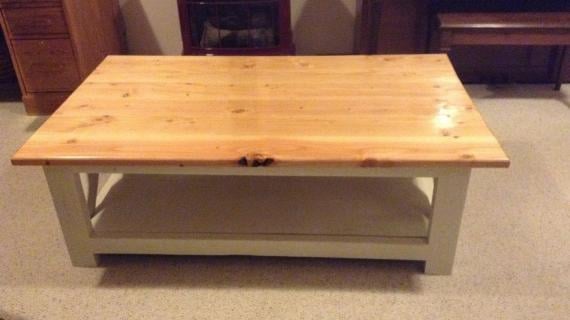
Beginner Friendly Option
With the popularity of this plan, we have created a Beginner Friendly plan that is very similar. It uses less tools and the overall cost is under $40.

The beginner plan is slightly smaller and has a slatted bottom shelf. You can find the plans here.
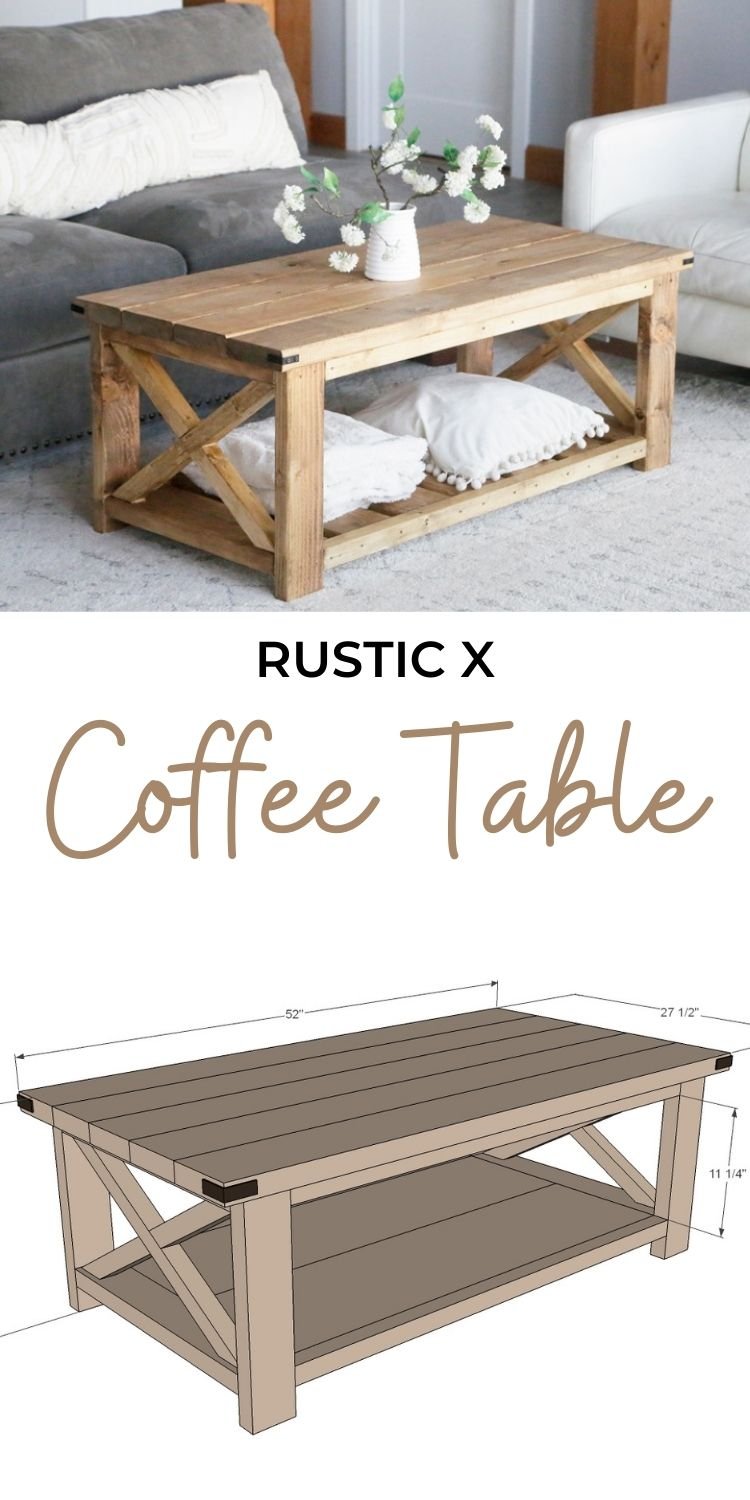
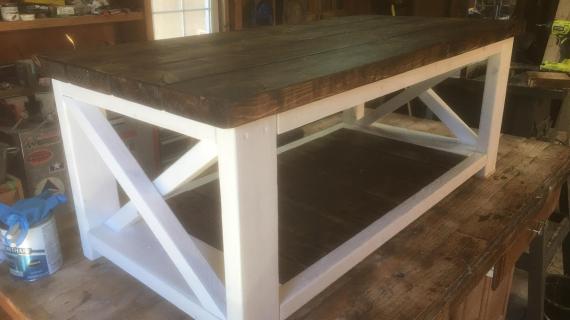
Rustic X Coffee Table Plans
Remember a bit back when Hillary from The Friendly Home built this amazing Rustic X Console Table from 2x4s?
We've had so much interest from readers, we thought we'd add a coffee table plan to the collection.
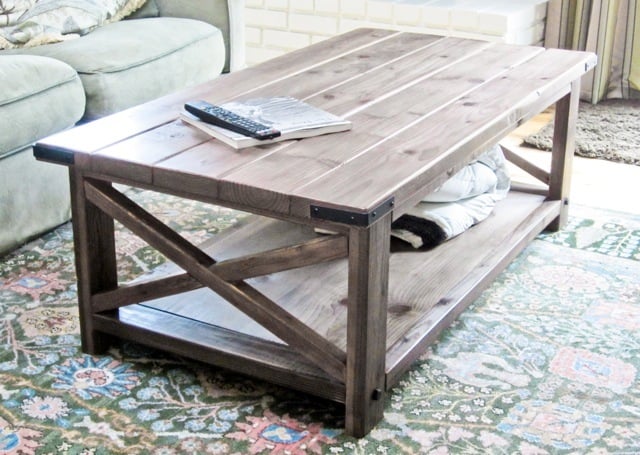
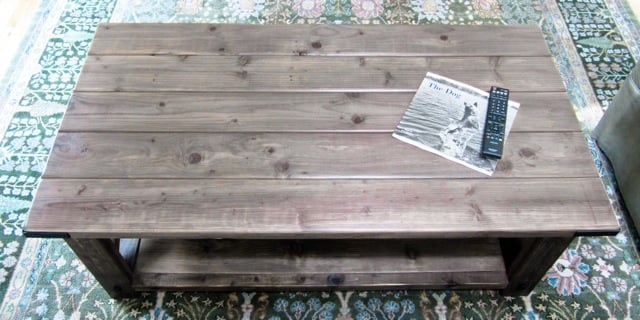
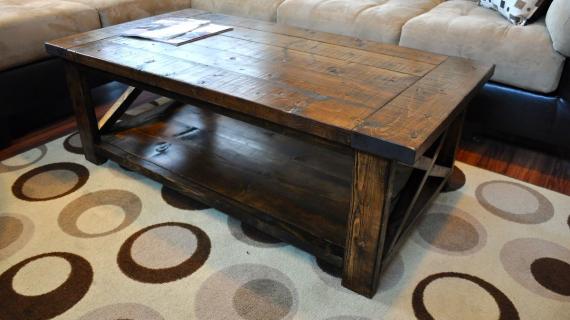
This coffee table is so gorgeous, it's hard to believe it's made from standard off the shelf lumber!

I ENCOURAGE you to stop over and visit Hillary and read about how she battled a wild fire to build this coffee table!
PS - Hillary is also sharing her finishing tutorial.
Pin For Later!

Preparation
- 2 – 2x4 – 8 feet or stud length
- 4 – 2x2 – 8 feet
- 1 – 1x12 – 8 feet long
- 5 – 2x6 – stud length
- 1 ¼” and 2 ½” Pocket Hole screws
- 4 – 2x4 @ 16 ½” (legs)
- 4 – 2x2 @ 41” (side trim)
- 4 – 2x4 @ 22 ½” (end trim)
- 2 – 1x12 @ 41” (bottom shelf)
- 2 – 2x2 @ 22 ½” (both ends cut at 60 degrees off square, long point to short point, ends are parallel)
- 4 – 2x2 @ 11 ¼” (long point to short point, one end cut at 60 degrees off square, other end cut at 30 degrees off square, ends are not parallel but are cut in same direction)
- 5 – 2x6 @ 52” (tabletop boards)


Please read through the entire plan and all comments before beginning this project. It is also advisable to review the Getting Started Section. Take all necessary precautions to build safely and smartly. Work on a clean level surface, free of imperfections or debris. Always use straight boards. Check for square after each step. Always predrill holes before attaching with screws. Use glue with finish nails for a stronger hold. Wipe excess glue off bare wood for stained projects, as dried glue will not take stain. Be safe, have fun, and ask for help if you need it. Good luck!
Instructions
Step 1
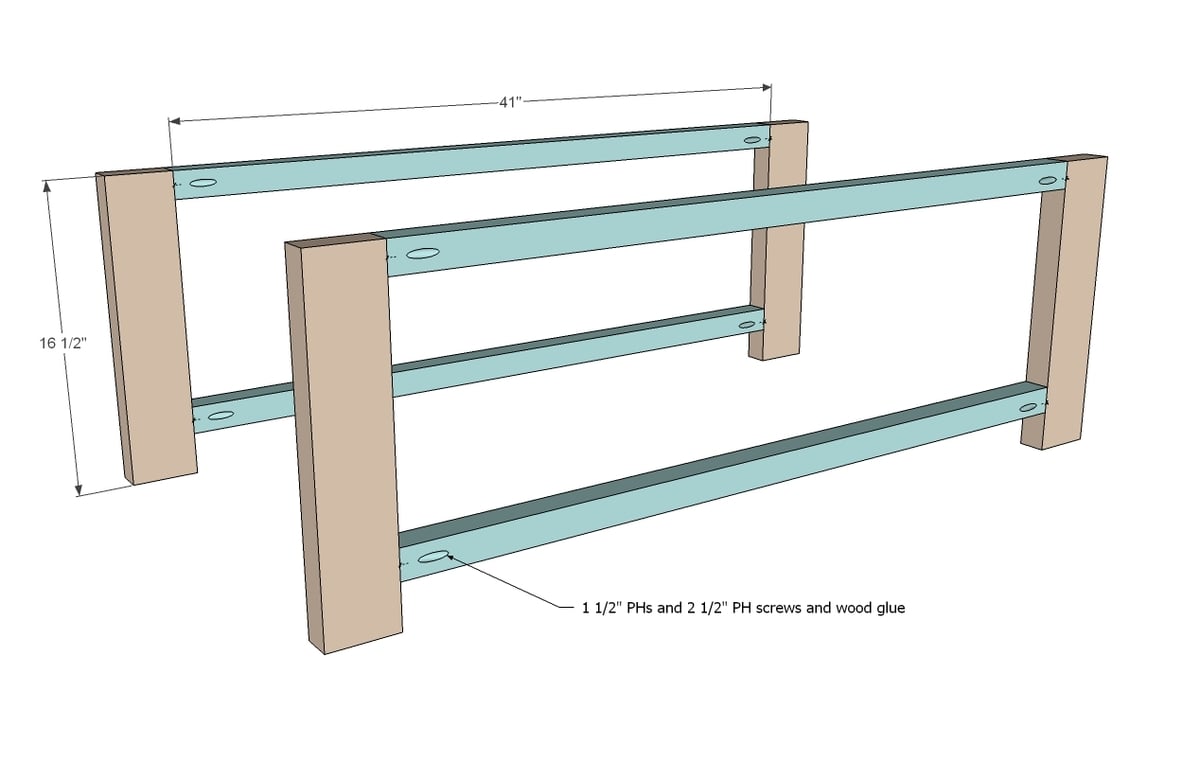
First build the two side trim pieces.
Step 2

Then connect together. Hide top pocket holes on top, bottom pocket holes on bottom. NOTE: This plan is sized for 1x12 boards measuring 11 1/4" wide - measure your 1x12 boards, double that number, and cut your side trim to fit - see next step.
Step 3
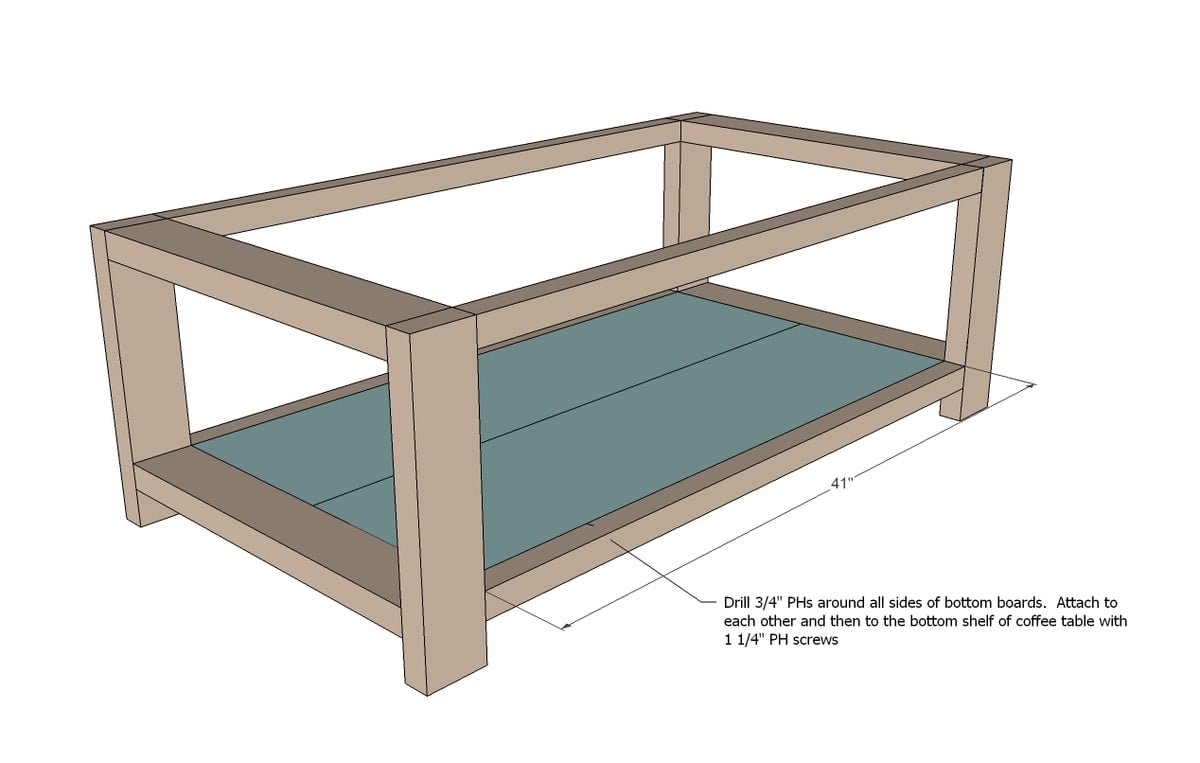
Build your bottom shelf with 3/4" PHs/1 1/4" PH screws down center. Then drill 3/4" PHs around all outside edges and attach to the bottom shelf.
Step 4
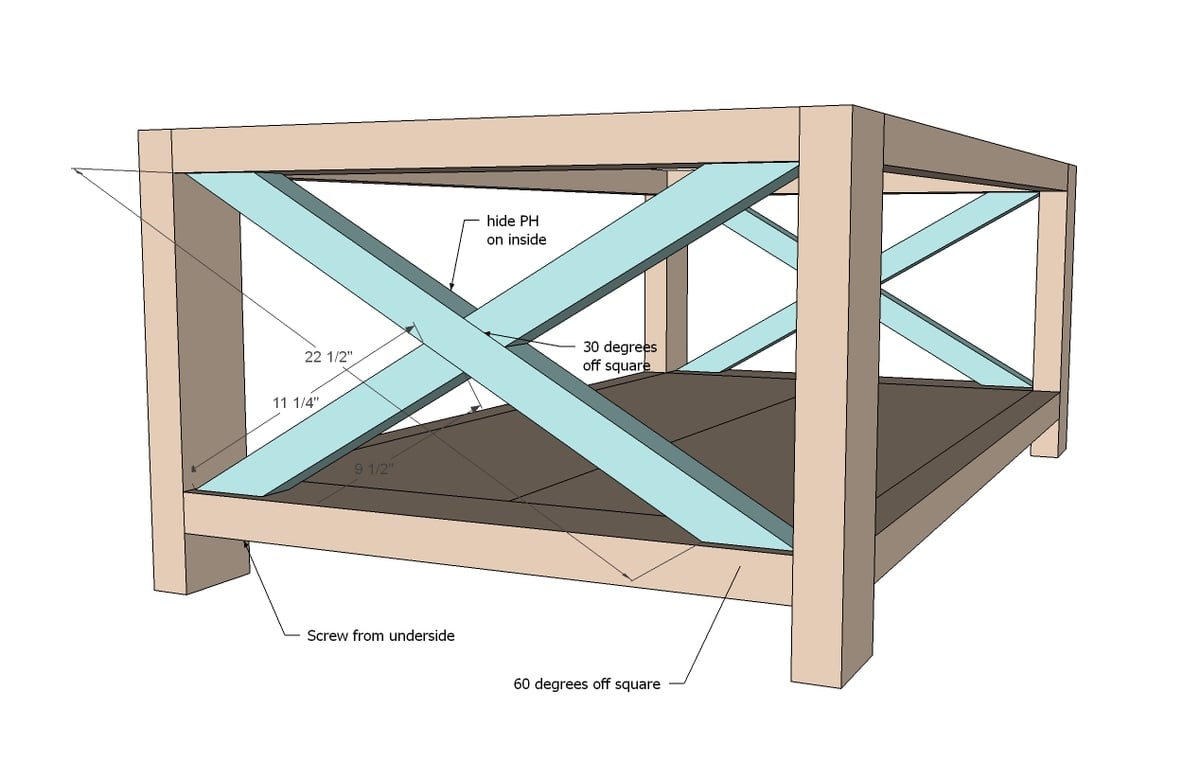
Now attach cut and build the X braces. Attach in place. These are mostly decorative, so don't stress about getting them super screwed in place. Some good glue and screws will do the trick.
Step 5
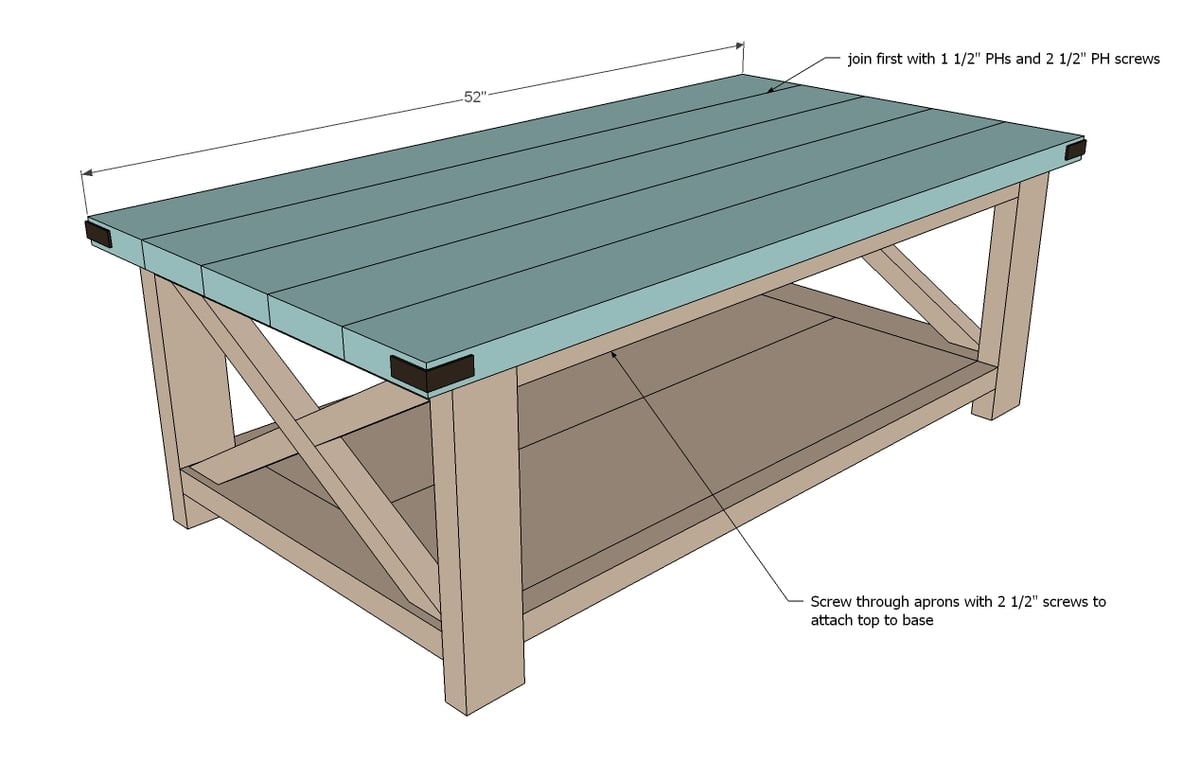
For the top, we recommend building the entire top with 1-1/2" pocket holes and 2-1/2" pocket hole screws on a flat level surface.
Then attached the completed top to the base.
It is always recommended to apply a test coat on a hidden area or scrap piece to ensure color evenness and adhesion. Use primer or wood conditioner as needed.
Comments
Ana White Admin
Sat, 10/10/2015 - 10:24
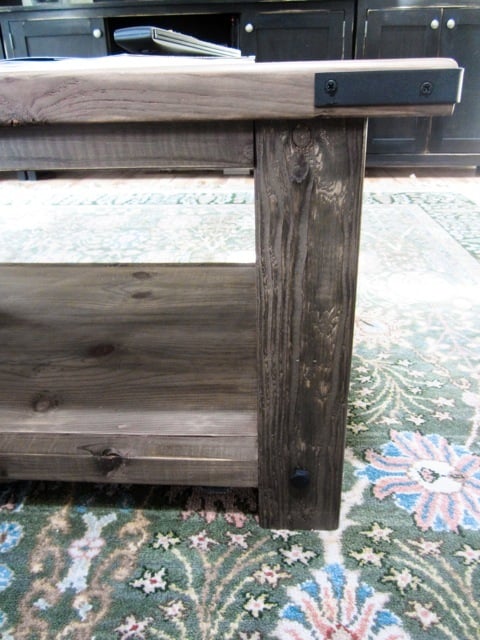
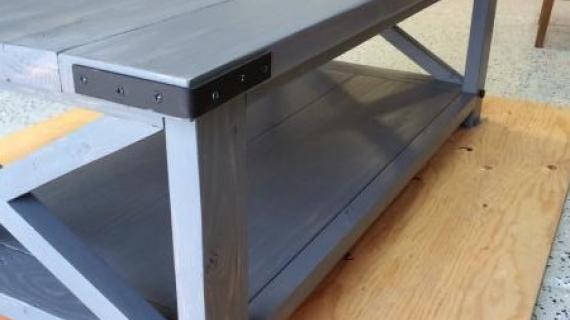
Brackets
Those are just regular L brackets and hex bolts, spray painted black. Hope this helps!
Bluedke
Fri, 10/23/2015 - 07:56
Decorative hardwareiI havr
I have looked at least 10 different places. Where did you get the decorative corner pieces. I'm finished with my table except for those but can't find them anywhere
Ana White Admin
Fri, 10/23/2015 - 12:58
Hardware
Those are just regular L brackets and Hex Bolts spray painted black.
Sonyah27
Sat, 10/31/2015 - 14:25
thank you!
thank you!
Sonyah27
Mon, 10/26/2015 - 10:58
Finishing brackets
Hey all, I'm having trouble finding the finishing corner brackets and stud things on the lower legs. I live in Canada. Any suggestions? Thanks!
Lkarty
Fri, 11/20/2015 - 20:44
Stain?
I'm curious what strain was used for the code table? Is it one I can find at a hardware store or is it vinegar/steel wool or black tea?
Rolexosborne
Sun, 11/22/2015 - 12:08
Warping
Just wondering if anyone has experienced warping after building this by attaching the top with pocket screws. . Worried that it won't allow for proper wood expansion tangent to the grain. Would table fasteners be better?
Connor Latona
Mon, 12/28/2015 - 15:28
What Wood and What Finish?
What wood did you use for this project? How did you get it to look rustic? Also what kind of finish did you use to make it look so nice, and does that prevent scratches?
bradsims
Mon, 12/28/2015 - 17:25
Stain/ Finish
I think the stain / finish used for this was a steel wool Vinegar mixture. http://www.diypete.com/how-to-make-steel-wool-and-vinegar-stain/
Connor Latona
Mon, 12/28/2015 - 19:06
Ana What Did You Exactly Use?
Ana is would be great if you could personally respond to this because I really would like to know all the exact materials you used so I can make it to look like yours. Thanks.
Connor Latona
Mon, 12/28/2015 - 19:06
Ana What Did You Exactly Use?
Ana is would be great if you could personally respond to this because I really would like to know all the exact materials you used so I can make it to look like yours. Thanks.
Connor Latona
Mon, 12/28/2015 - 19:07
Ana What Did You Exactly Use?
Ana is would be great if you could personally respond to this because I really would like to know all the exact materials you used so I can make it to look like yours. Thanks.
In reply to What Wood and What Finish? by Connor Latona
Ana White
Tue, 12/29/2015 - 17:00
Have a lookhttp://www
Have a look
http://www.friendly-home.net/2012/07/finishing-how-to-oxidize-wood.html
horseminded
Mon, 12/28/2015 - 18:36
decorative hardware
Decided not to use hex bolts and instead drilled 3/4 inch hole in botton portion of legs and inserted wooden buttons that I had spray painted black.
mmonteleone
Sun, 01/17/2016 - 05:50
Braces
I LOVE this coffee table. I am almost done building it, but I can't find the black braces. Where can I buy them?
ChillyBaker
Sun, 01/17/2016 - 12:21
I believe you are to spray
I believe you are to spray paint them black.
ChillyBaker
Sun, 01/17/2016 - 12:26
http://www.friendly-home.net
http://www.friendly-home.net/2012/07/oxidized-x-coffee-table.html Ahh. Found it. She states on her page (see link) that she spray painted the hex bolts and L brackets. HTH!
firfitr113
Sun, 01/17/2016 - 09:22
Staining
So I tried the vinigar stain using black tea and wood turned brown not grey. Has any had this problem?
firfitr113
Sun, 01/17/2016 - 09:22
Staining
So I tried the vinigar stain using black tea and wood turned brown not grey. Has any had this problem?
ChillyBaker
Sun, 01/17/2016 - 12:43
Re: Staining
From my experience, it matters the type of wood that you use (i.e. the amount of tannins in the choice of wood), but just as importantly, the type of vinegar. If you use white vinegar, it turns the wood a warmer brown color. If you use apple cider vinegar for your vinegar/steel wool mixture, it brings out a much more grey tone.
kendalldanielle
Fri, 01/22/2016 - 18:12
Stain Color?
LOVE LOVE LOVE THIS! Want to get started asap :) what is the make and color of the stain used on the coffee table?
kendalldanielle
Fri, 01/22/2016 - 18:21
Nevermind :)
I found the oxidize website :)
akelsheimer
Sun, 01/31/2016 - 18:28
Coffee table for house.
Coffee table for house.
Sonyah27
Mon, 02/22/2016 - 05:51
Candle wax stain
Hey there, I made this table and it turned out great. I followed the link to finish the table with the steel wool/vinegar oxidized look and sealed with paste wax. I accidentally left a candle burning on the table and some of the wax left an oily stain. I've tried baking soda and water and dish soap and water with no luck. In thinking I may have to touch up with the oxidizing solution and put more paste wax. Any suggestions?
aum152
Wed, 03/02/2016 - 08:12
Where can I find the brackets?
My boyfriend made this table and we love it! We are having trouble finding the corner brackets that go on the outside. Anywhere I can buy online or tips on what to search? Thanks!
In reply to Where can I find the brackets? by aum152
Ana White
Wed, 03/02/2016 - 20:00
They are just regular L
They are just regular L Brackets and Hex Bolts spray painted black.
Drewdat
Wed, 03/09/2016 - 08:10
Ripping 2x6s?
I have a quesiton: I'm curious about ripping the 2x6s on my table saw, to remove the rounded edge, and therefore make a flatter table top. Any recommendations or suggestions?
NickInHB
Sun, 04/24/2016 - 18:06
Fun Project
I tackled this table this weekend and it was fun. I chose not to do the X on the side and instead of the bottom shelf I used 2x2 spaced out about 4 inches a piece. Took me about 4 hours to complete. Still need to stain though
sao22
Sun, 05/22/2016 - 12:54
Top Lift Table?
Is there a way to make this a top lift table? Any plans that we could use to modify it?
hmmattas
Fri, 05/27/2016 - 19:04
Stain color? Links not opening
Going to attempt to build the end tables would love to know what stain and wood was used so I can achieve the same look! Tried opening links but none ate working :(
In reply to Stain color? Links not opening by hmmattas
Ana White
Sat, 05/28/2016 - 12:00
http://www.friendly-home.net
http://www.friendly-home.net/2012/07/finishing-how-to-oxidize-wood.html
Thetyguy
Tue, 05/31/2016 - 11:52
Wax finish
First project I have done and it turned out great, other than the wax. I applying it a little too thick and have some milky spots on the surface. Any suggestions on how to remove the wax without affecting the stain?!
Thanks!!
roberta12345
Wed, 06/01/2016 - 09:38
making table top
hi there, i am very beginner!
just wondering about the table top. am i attaching each 2x6 to the next 2x6? so all 5 2x6's are joined together by pocket hole screws before attaching the already put together table top to the side aprons?
Woody1
Sat, 06/04/2016 - 09:46
coffee table
rustic
Brett94
Sat, 06/04/2016 - 13:56
I built a rustic X coffee table
Thank you for posting the plan for this coffee table online. I had fun building this table and saved a lot of money.
I plan on on buiding the behind the couch table next.
tktpower
Thu, 06/16/2016 - 05:09
X Coffee Table
did anyone find that when they went to attach the top that the boards made the frame go out of square and made it wobble ?
Bryan O
Mon, 06/20/2016 - 09:03
Flaws in the plan
I built this table back in October. Now due to seasonal expansion in the wood, the table top is pulling apart. The plan calls for using construction grade material and pocket screws. The plan also says to screw together the 2x6's and and then screw the top directly to the table aprons. Doing this prevents seasonal wood movement in the wood and will eventually cause the top split apart from expansion or contraction of the wood. I do not recommend screwing this directly to the table aprons, use desktop figure 8 fasteners which would allow for the seasonal wood movement instead.
amandalowey15
Tue, 06/21/2016 - 14:02
Kreg Jig
Can you use a Kreg Jig Mini to do the pocket holes if you get a clamp? Os there a specific kreg jig that works best?
bobpayne1961
Sun, 06/26/2016 - 05:14
Rustic X coffee table project
I'm a little confused. Step 1 says "First buld the two side trim pieces" and says to use 1 1/2 and 2 1/2 PHs. Why use two different sized PH screws?
In reply to Rustic X coffee table project by bobpayne1961
Ana White
Mon, 06/27/2016 - 10:00
It's 1 1/2" pocket holes
It's 1 1/2" pocket holes(which is set on the jig for 2x material) with 2
1/2" screws placed in them
Amhanford
Sun, 08/07/2016 - 17:11
The x
I'm having problems with getting the x the right cut any help will be helpfull
jhorsefield
Tue, 09/20/2016 - 08:48
Smaller version of this table?
Hi Ana,
I love your designs. In the past I've built a desk for my home office from one of your plans, and I'm currently working on the rustic X console and this matching coffee table. I was wondering if you could help me figure out dimensions for a table that would be about 20% to 25% smaller (in order to fit my space). I'm having a hard time finding appropriate dimensions that would allow four 2x6s on the table top (instead of five), since that affects the type of boards that can be used on the bottom shelf and still obtain a 1" overhang for the top. Ideas? Thanks!
In reply to Smaller version of this table? by jhorsefield
jhorsefield
Tue, 09/20/2016 - 09:32
I should clarify that I'm
I should clarify that I'm happy with the height, just trying to decrease the width and length. The closest I can get is to use three 2x8s for the top and three 1x6s for the bottom shelf. But if you have a better suggestion, please let me know!
Randycw2
Tue, 10/11/2016 - 06:30
X Coffee Table Question
Where did you use the brad nailer? Also, did you use regular untreated lumber or did you buy a special species like oak or pine?
jjjbluray
Tue, 10/11/2016 - 07:48
Brad nailer
I use the nailer on the X's. I hlue the ends and then put a nail through each end and also where the pieces meet in the middle. Tap them in and fill with wood filler. The nails hold it all together while the glue dries.
tierneystephanie
Tue, 10/18/2016 - 02:08
Love your writtings
Nice post Anna, keep up the good work!
Cherithb2000
Sun, 11/06/2016 - 05:58
Decorative pieces
where did you find the metal decorative pieces on the rustic coffee table?
Stephiehutchinson
Sun, 11/27/2016 - 13:14
Stain
What stain is this?! :)
In reply to Stain by Stephiehutchinson
Ana White
Mon, 11/28/2016 - 14:30
http://www.friendly-home.net
http://www.friendly-home.net/2012/07/finishing-how-to-oxidize-wood.html
LIttleTeacher84
Wed, 12/14/2016 - 18:25
Drawers Addable?
Would it make sense if I changed the top trim to 2x6s and move the top 2x2 in the front down 41/4" and insert 4" drawers that just slide in? I am trying to attach an image of a rough change idea to the plan. I don't have a plan maker so it is very rough any help would be great.
[IMG]http://i68.tinypic.com/2gvlmhg.jpg[/IMG]