


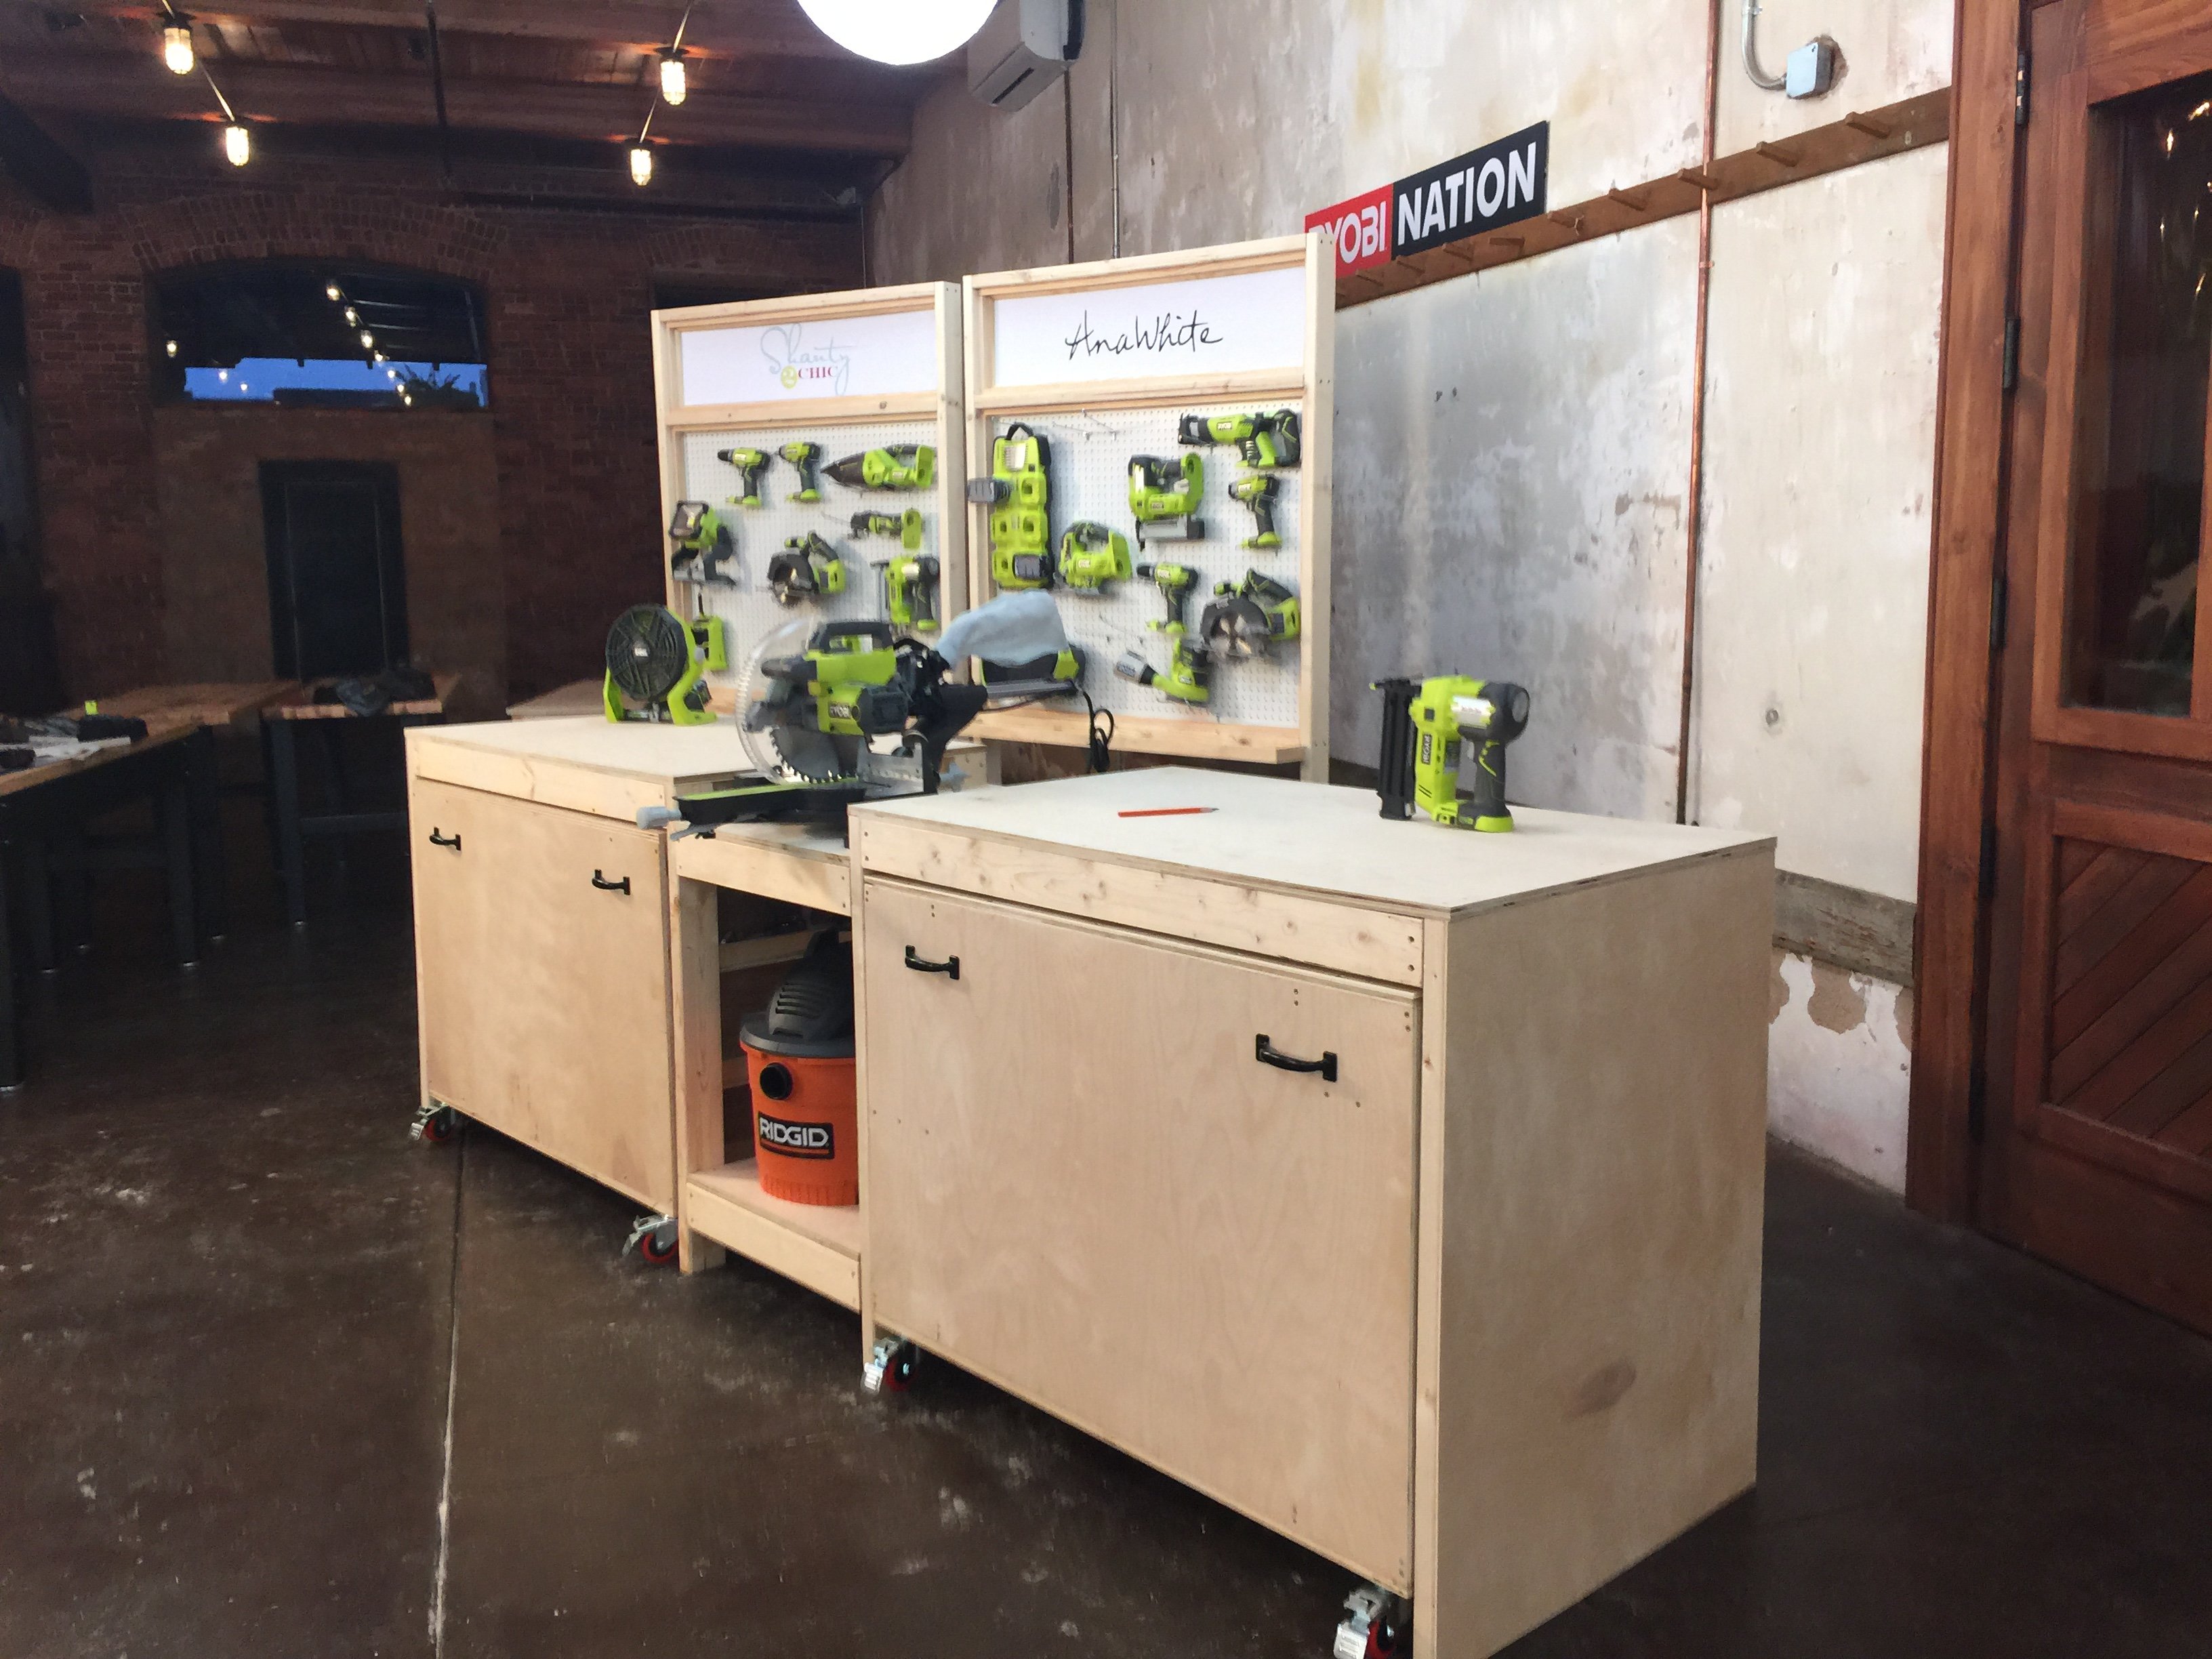
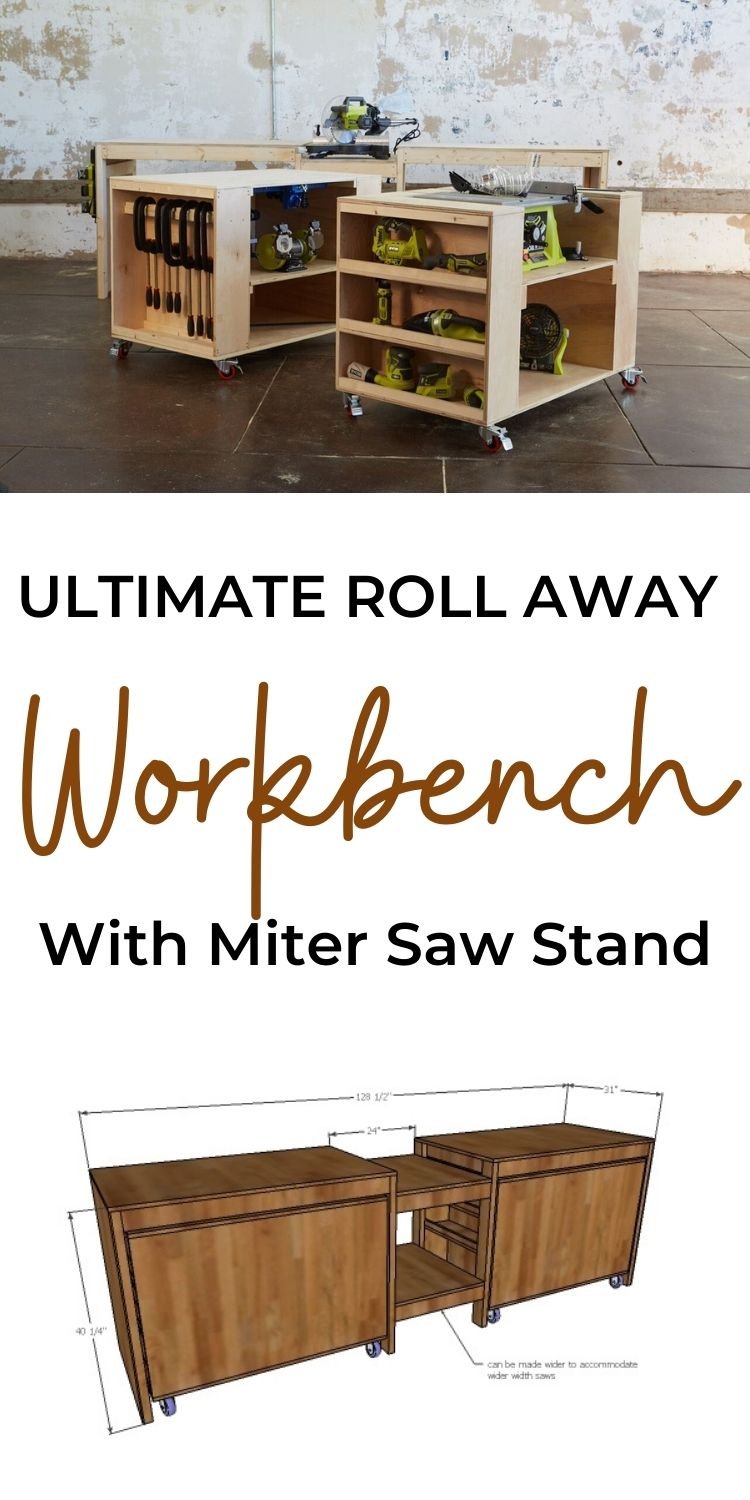
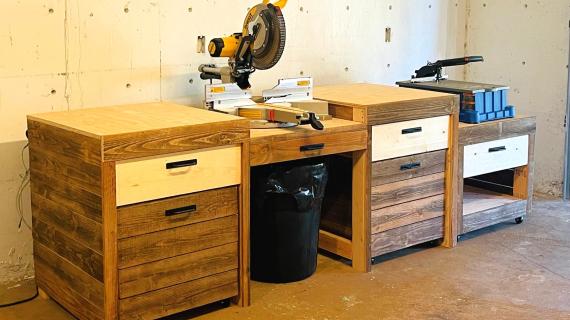
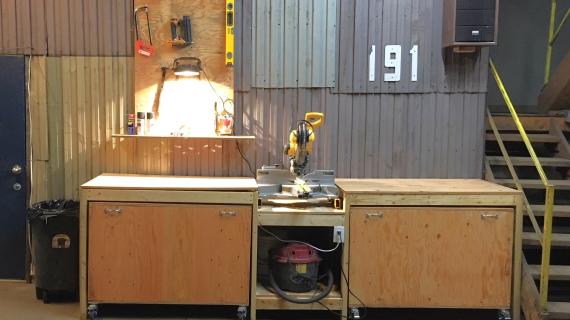
The best workbench you can build! This workbench features a miter saw stand, with roll away carts to hold all your tools and create work spaces. It's easy to customize, and the best part, it all rolls away when done!
Free step by step plans from Ana-White.com

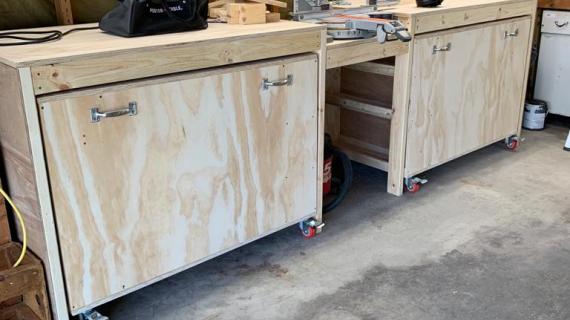
This is one of my most favorite workbenches I've ever designed and built!
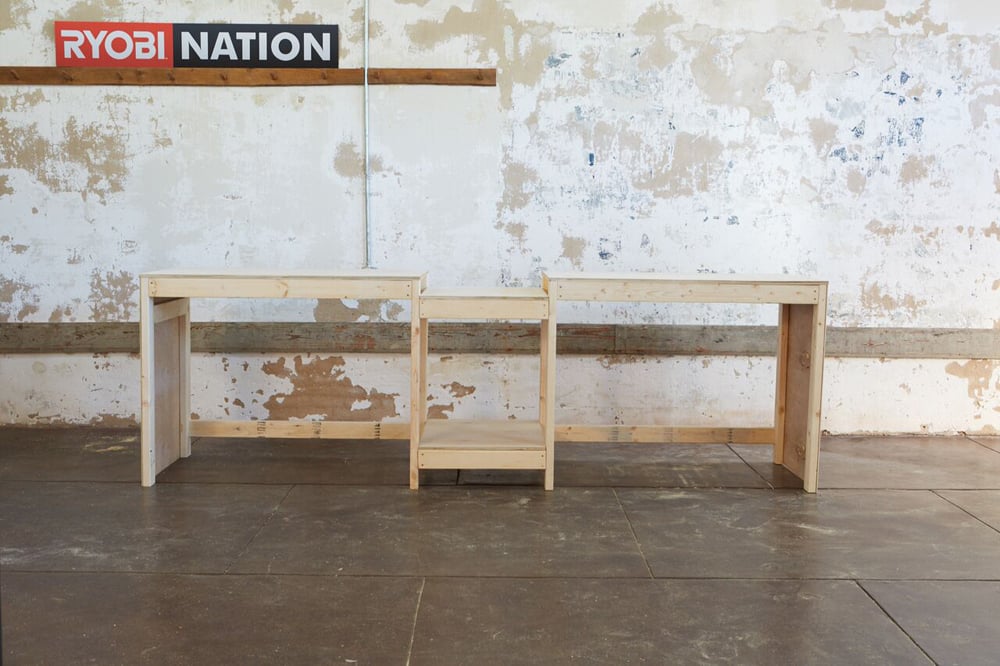
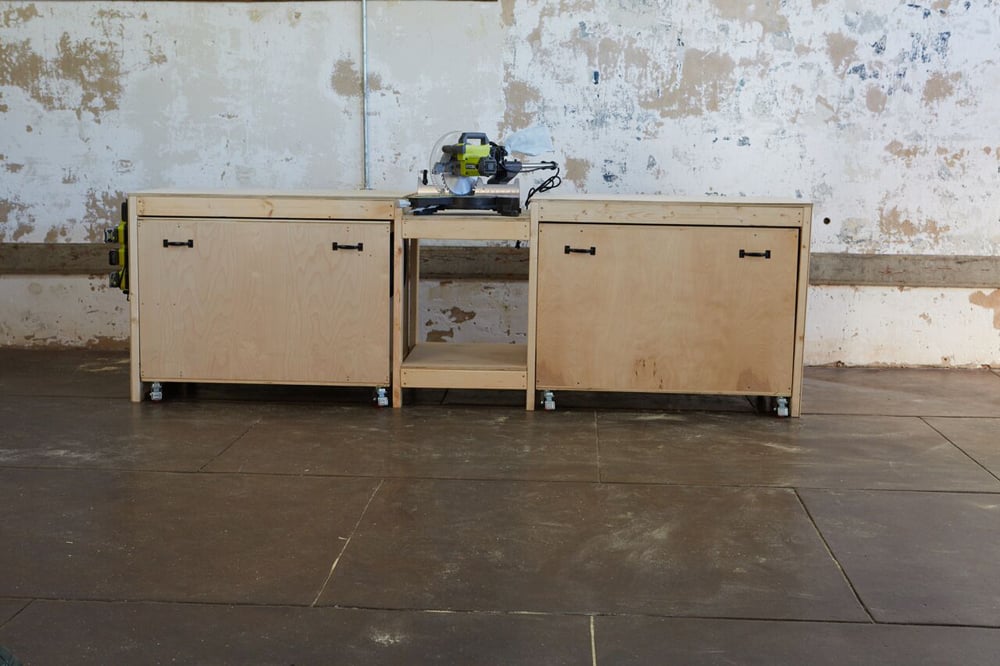
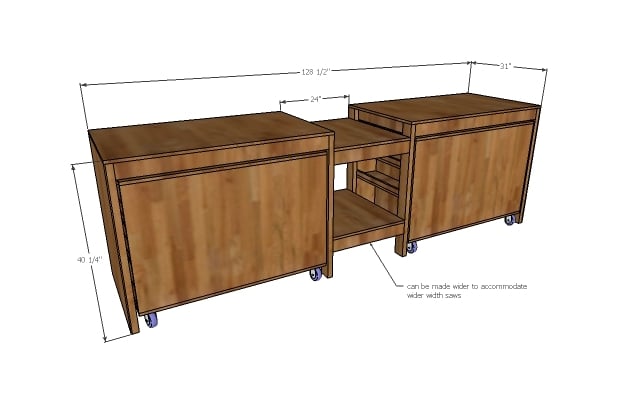
Miter Saw Stand
The base of this workbench is a miter saw stand -

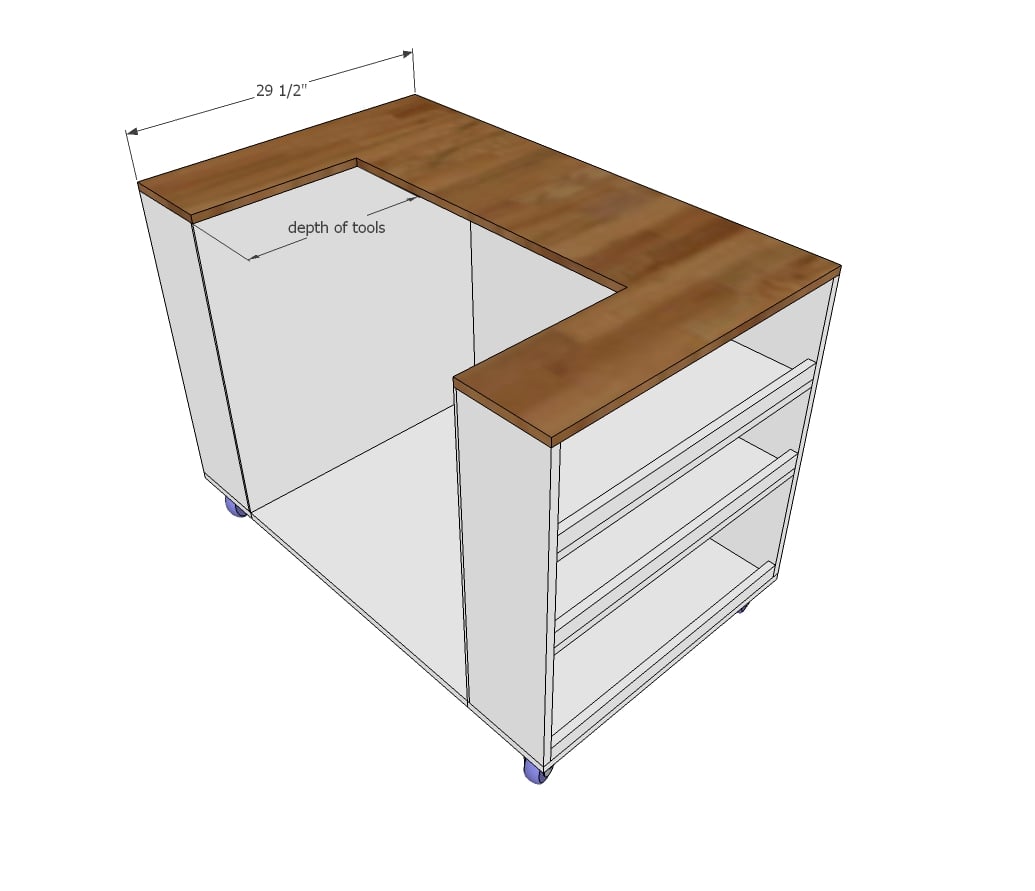
But here's the big problem with a sliding miter saw: It needs 32" (or more depending on your saw) depth-wise to slide.
So what to do with the space under the workbenches, that need to be 32" deep? I knew 32" deep shelving would be a terrible idea, as stuff would just get lost back there (kitchen cabinets are 24" deep and that's about as deep as you want to go).
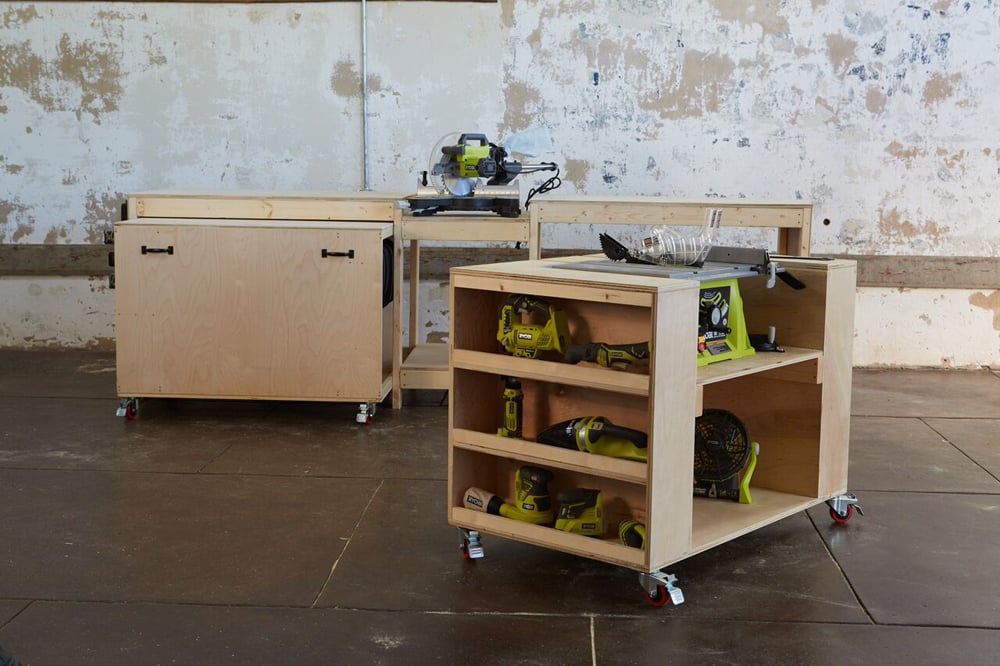
So instead of 32" deep shelving where stuff goes to die, I decided to put roll out carts that function as both storage and work surfaces.
And then when you are done working, they carts neatly tuck under the workbench, saving space in the garage and putting everything away

After designing, tweaking, redesiging, stressing over how to optimize materials to help you save money when building, and then more tweaking .... we built this!
It may look complicated, but I promise, this one is easy. It is big, but it is not difficult to build, and you'll be amazed at how fast it comes together.
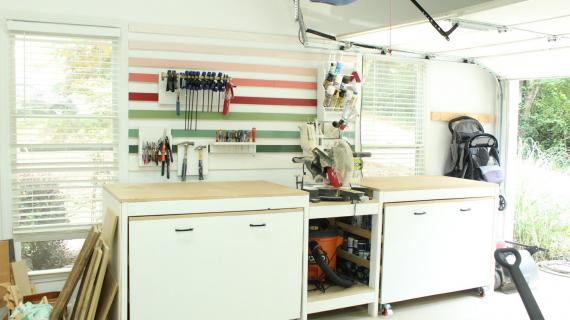
Customizing Tool Storage and the Carts
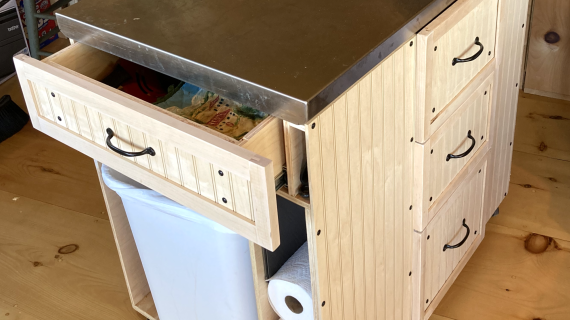
Once you have that perfect workbench built, it's time to start customizing it for your needs. There's a spot for a vacuum under the circular saw, so you can manage your sawdust easier.
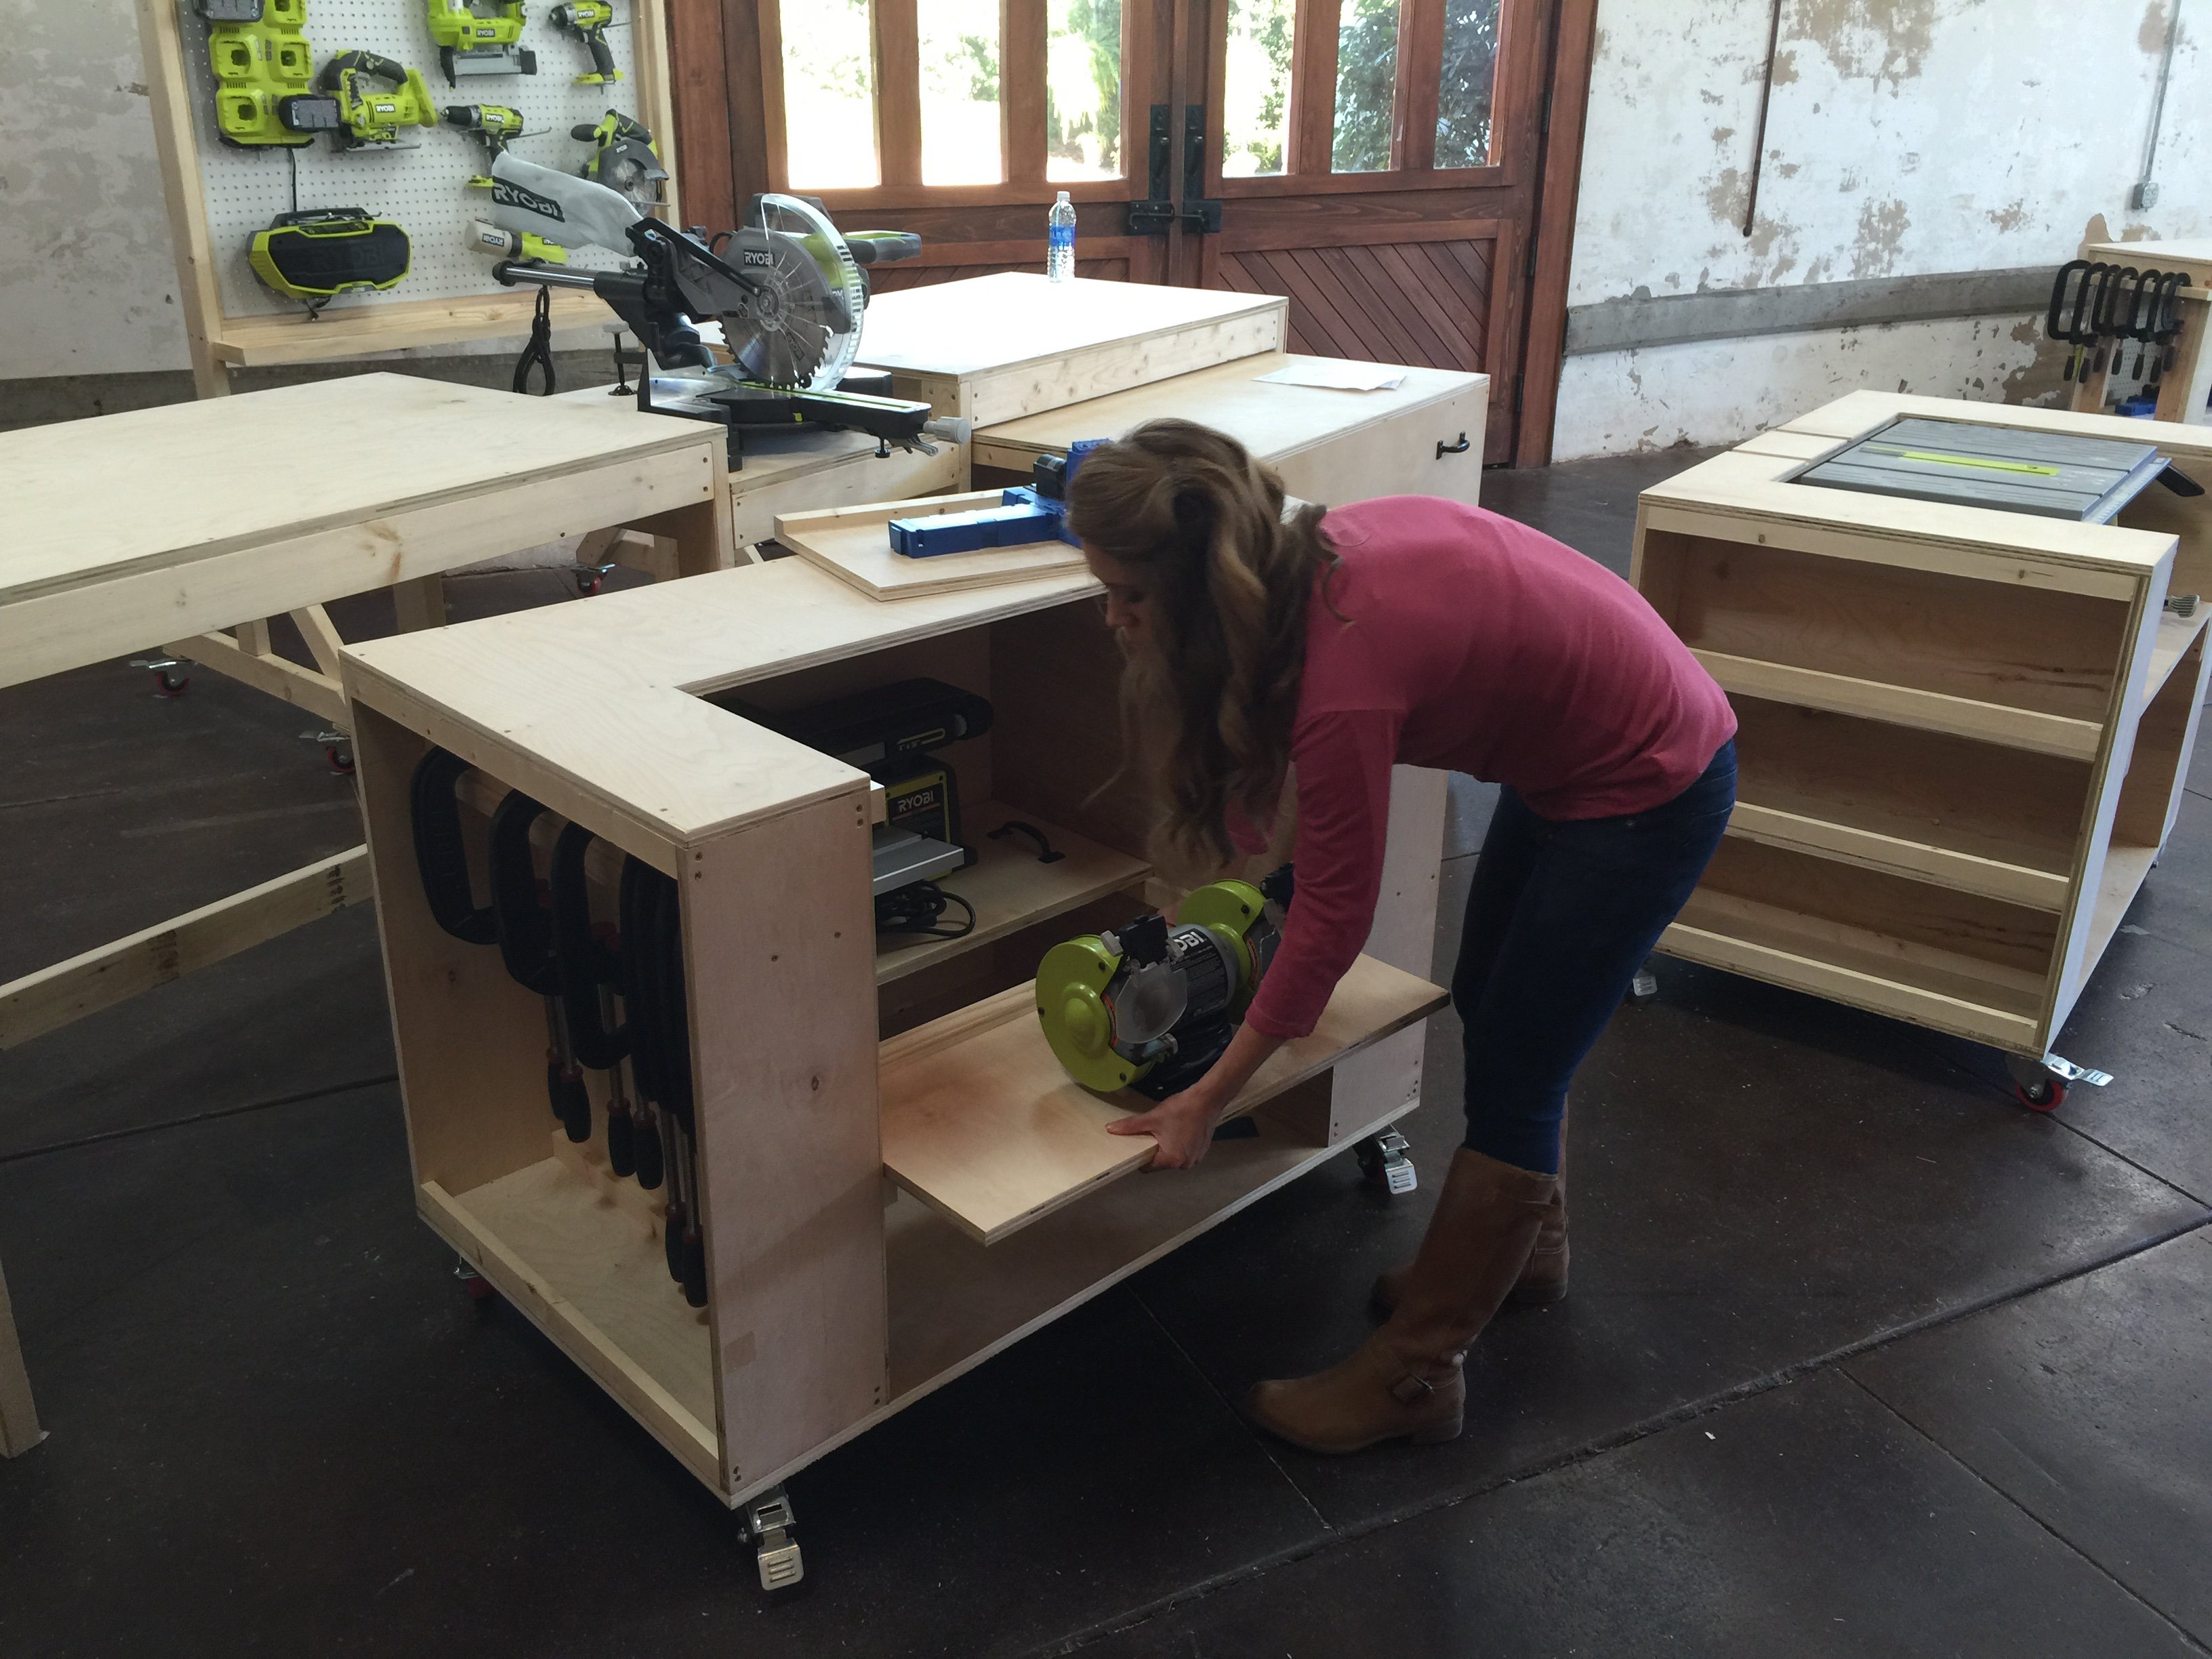
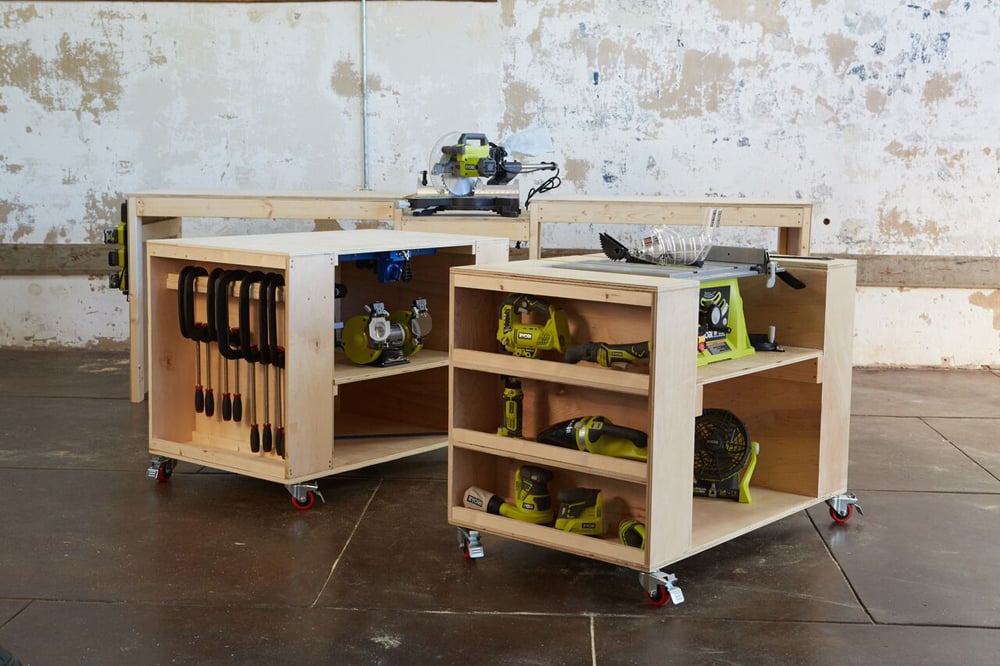
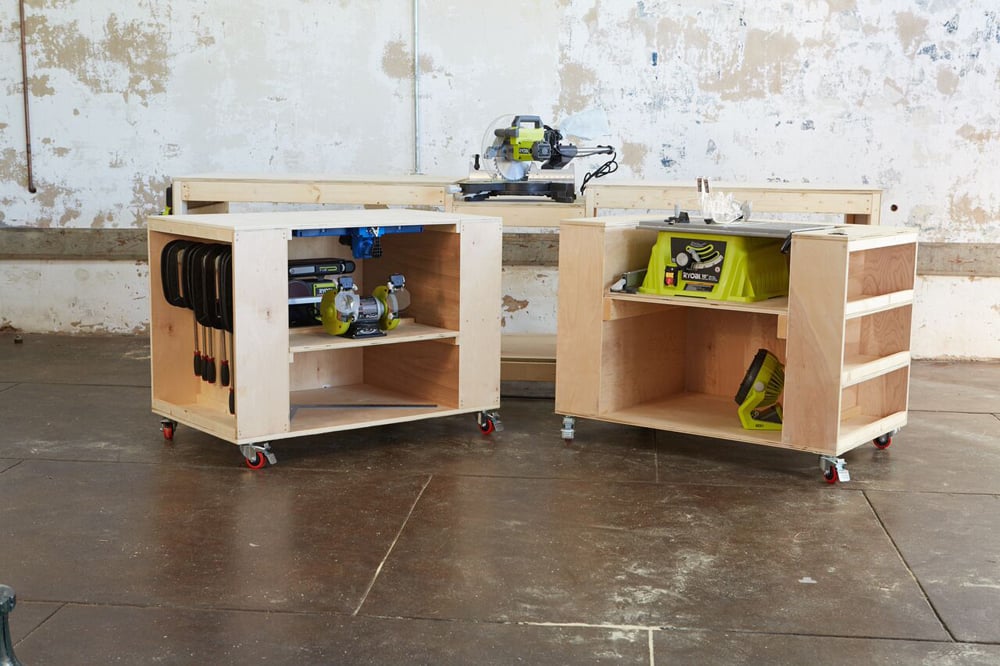
Then on one of the carts we cut out part of the top and attached a bench tool to this. We did this for all the bench tools that needed a home.
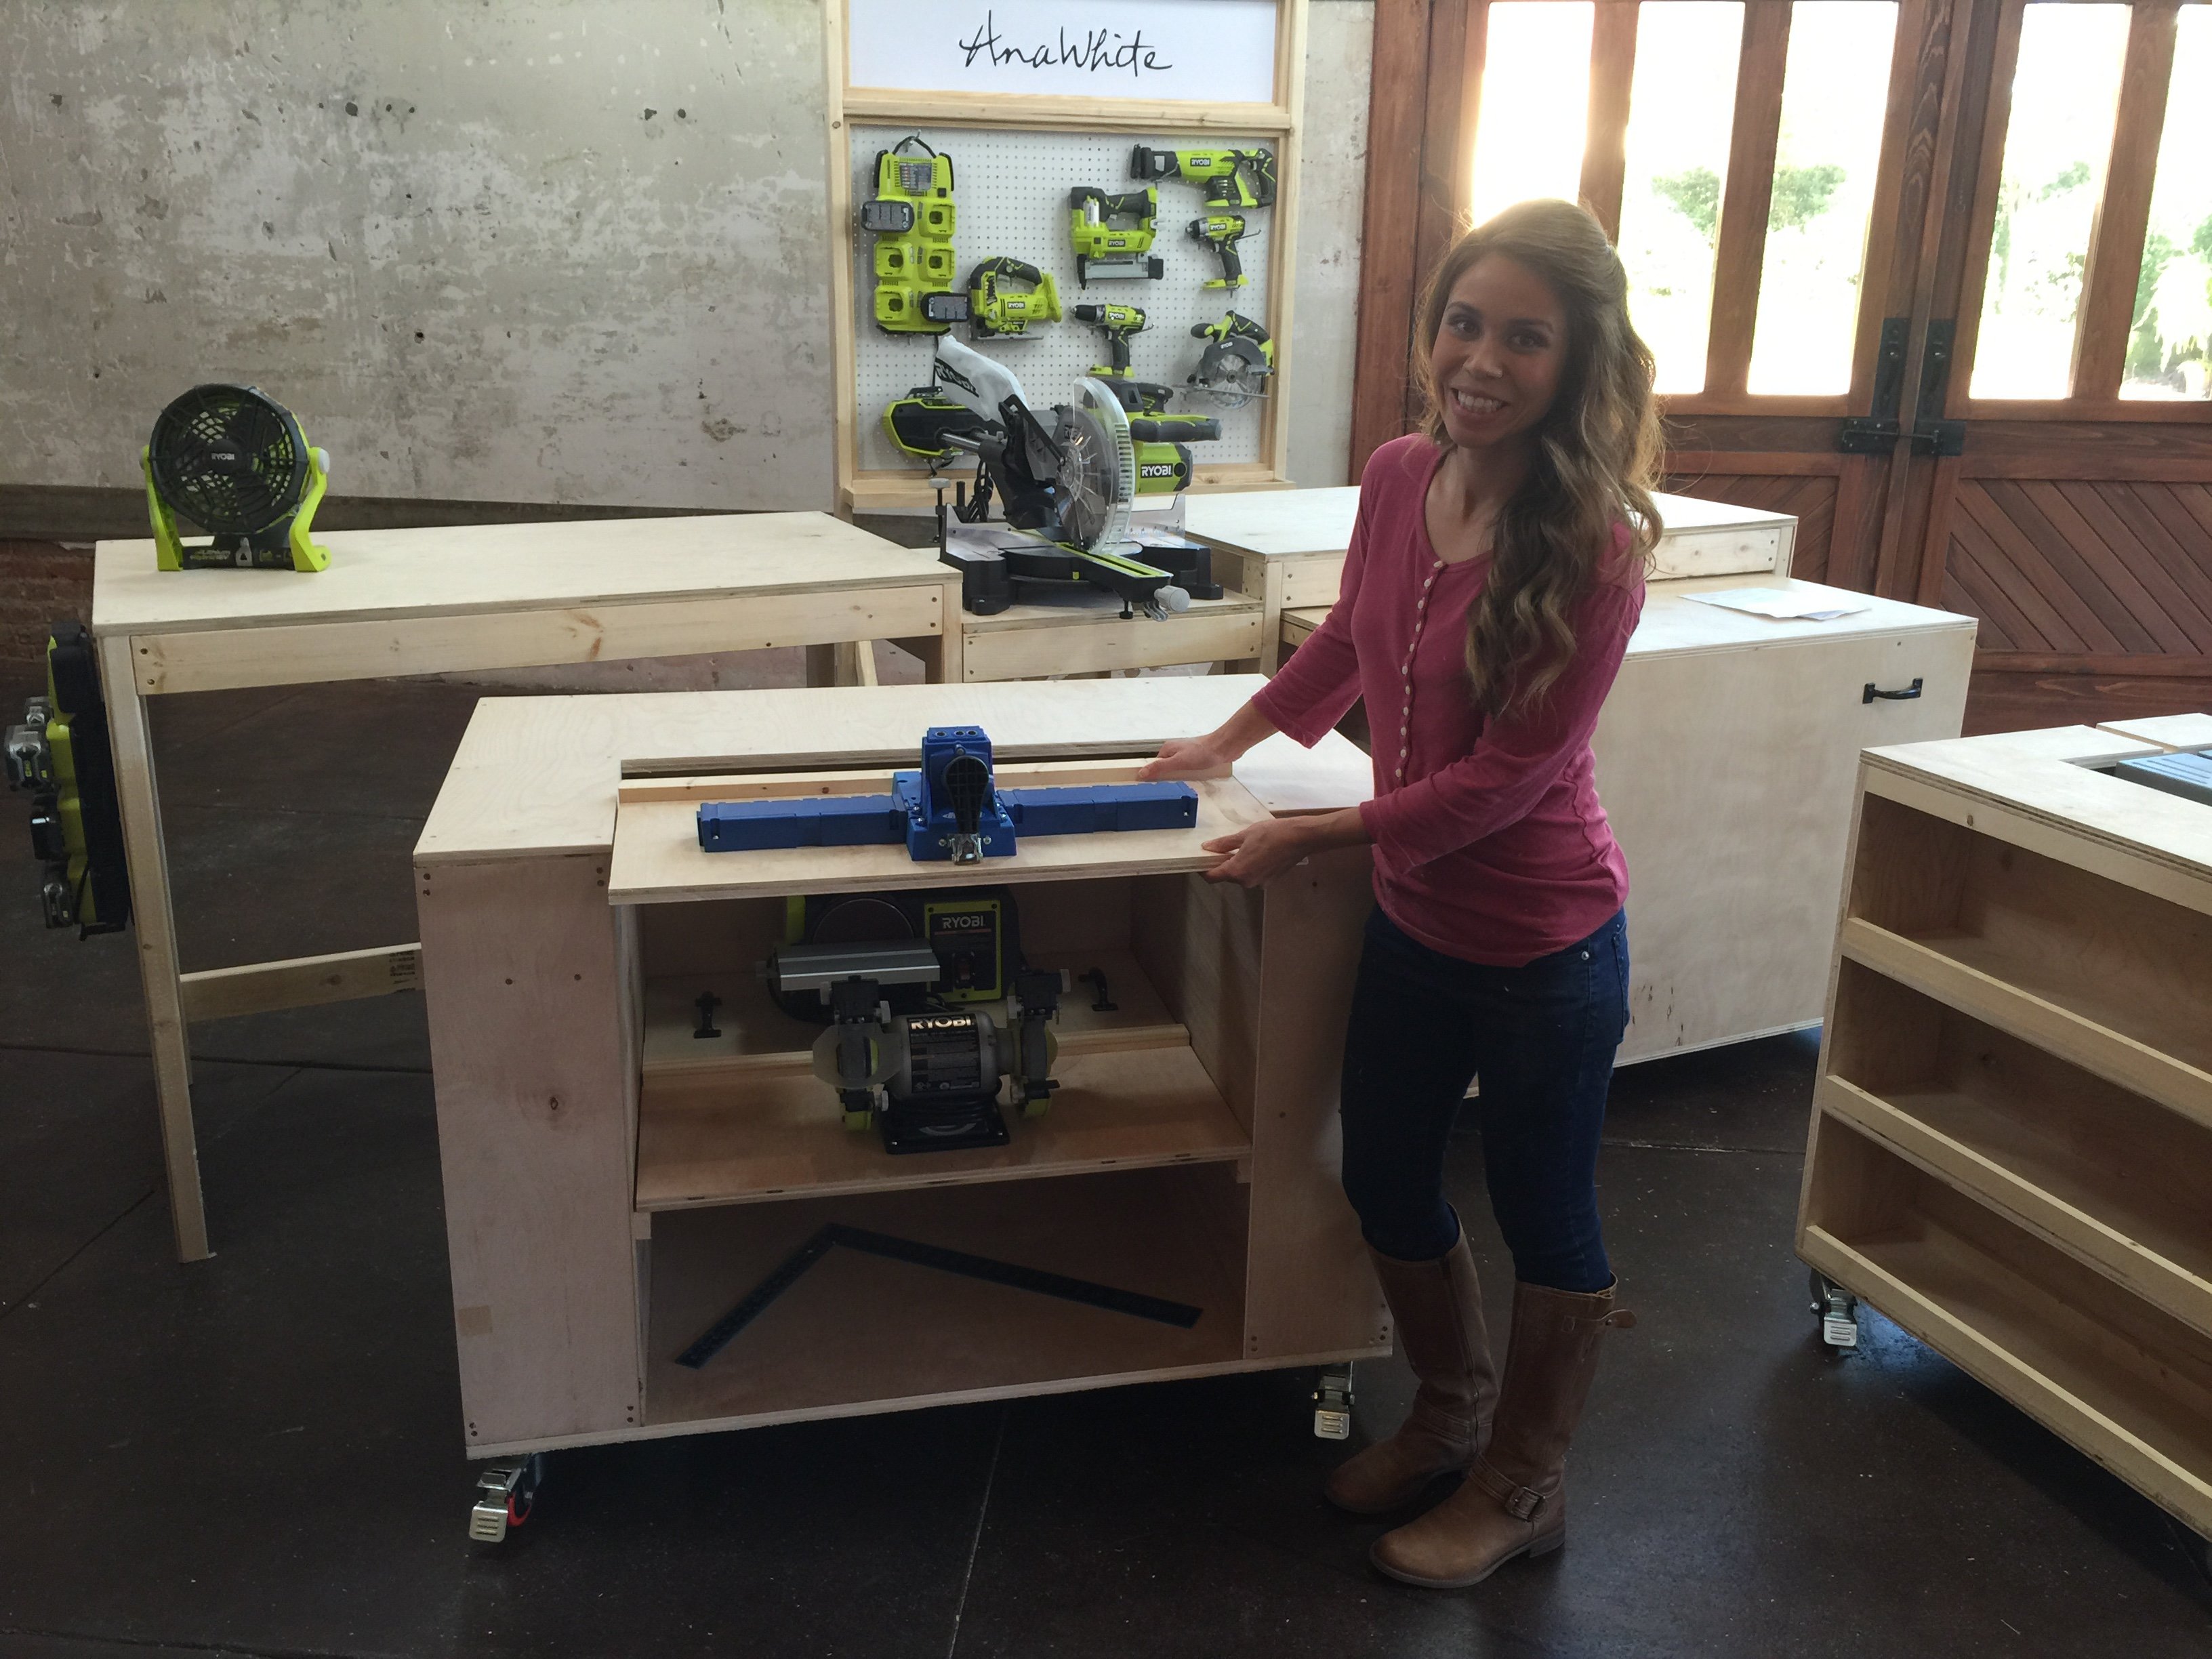
So when you need a bench tool - like this Kreg Jig - all you have to do is slide it into the cut out, use it, and then store it. The Kreg Jig piece is lightweight, so it stores upside down in the space.
How cool is that?
On the side of that cart, we added a clamp bar, so clamps are within easy reach, but always have a home to go back to.
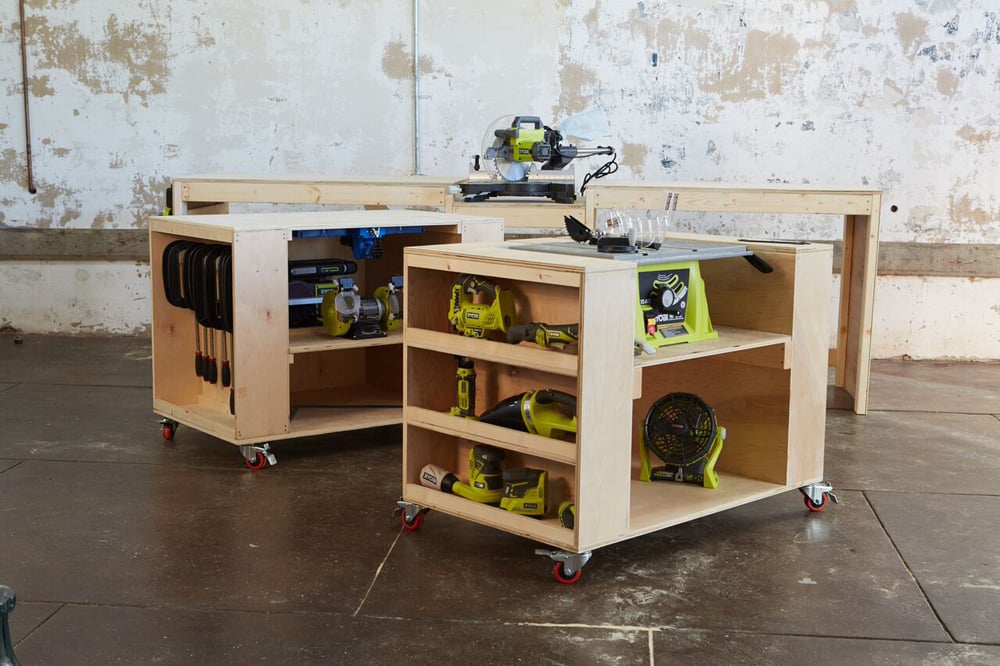
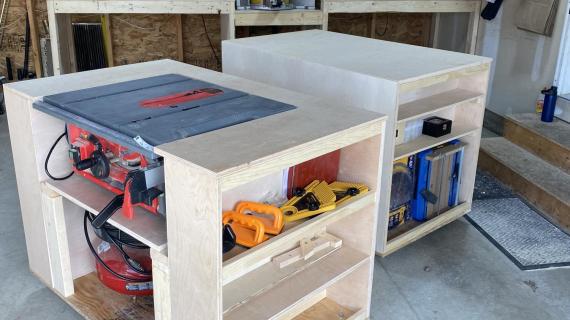
On the second cart, we customized it to hold a table saw. When not in use, it just is a flat surface, but when in use, the tablesaw deck is significantly larger and easier to work with. The cut out area helps to contain the sawdust, and you have a nice place to store your table saw.
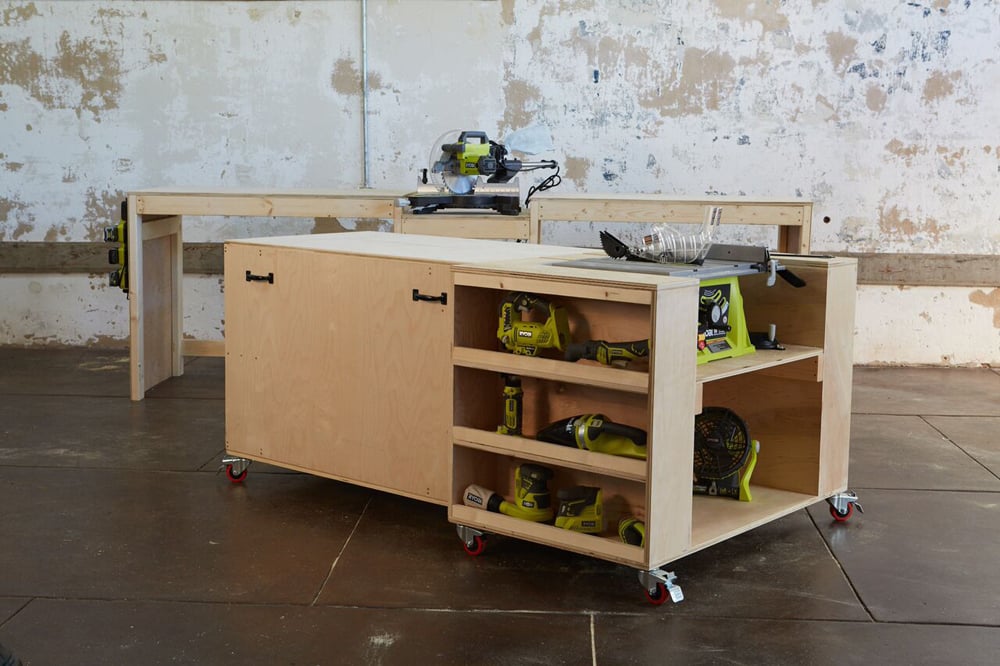
The second cart also functions as an outfeed table for your tablesaw. This is especially handy when using the tablesaw by yourself.

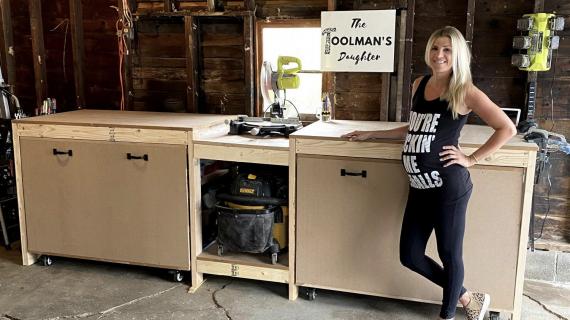
We are so very proud of how this workbench turned out. It is the result of many hours of consideration of how a home woodworking workshop is used, balanced with trying to minimize complexity and materials cost. I wanted this project to be accessible to a new woodworker, but not be something they would outgrow as their skills increased.
We hope you love it as much as we do.
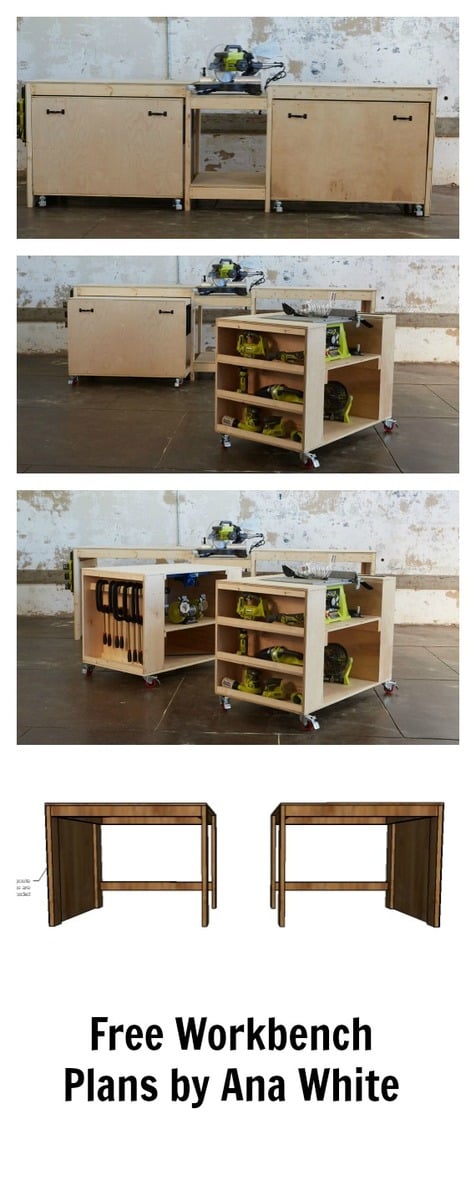
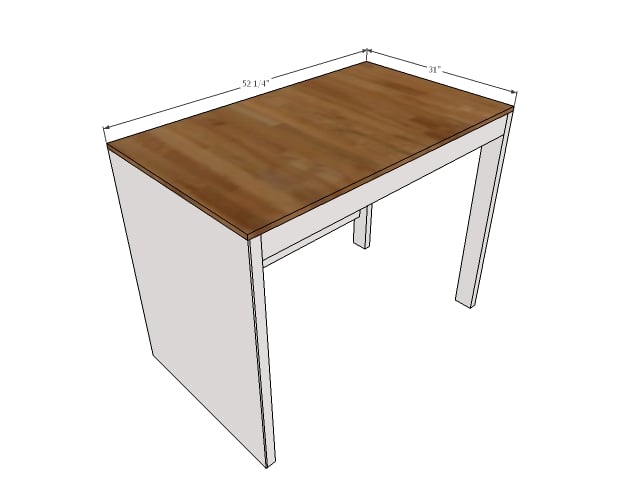
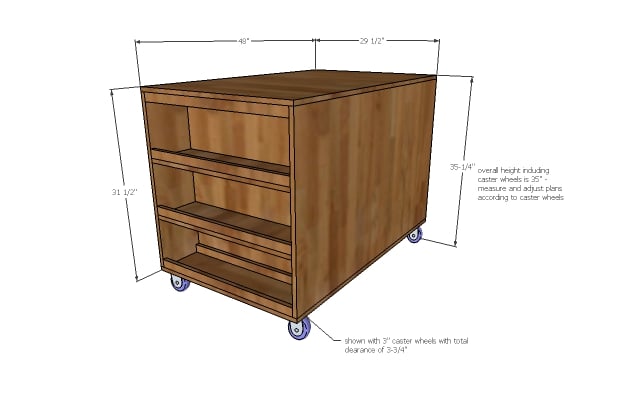
Workbench with Roll Away Carts and Miter Saw Stand Plans
Pin For Later!
Preparation
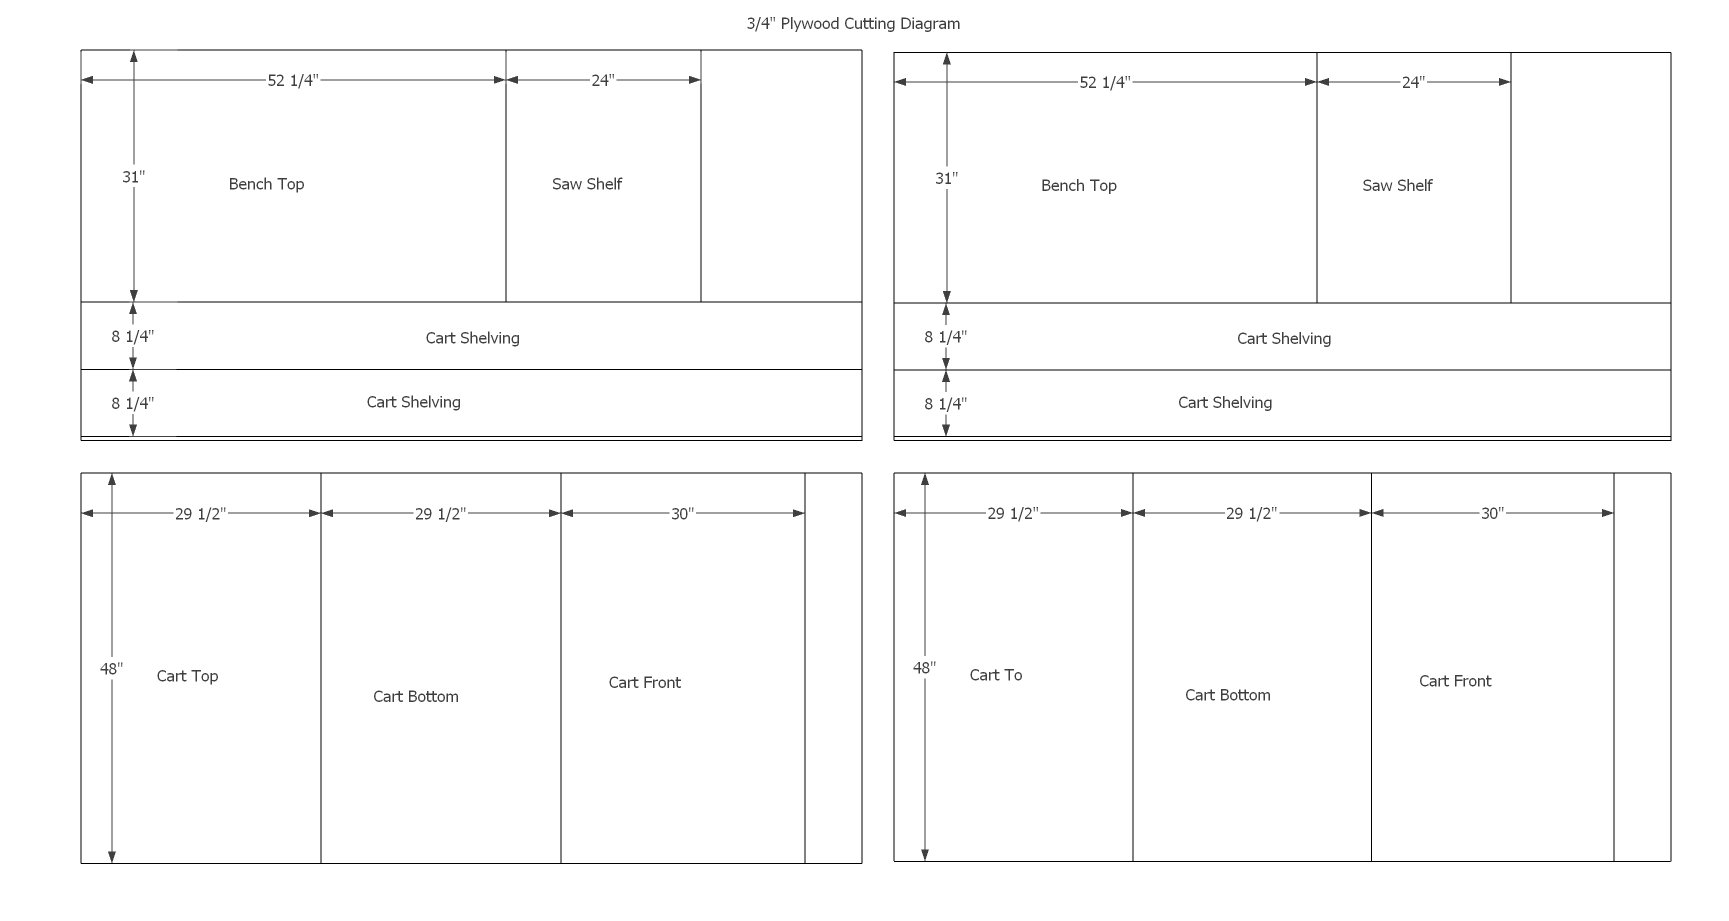
• 4 Sheets of 3/4” plywood
• 2 sheets of 1/4" plywood
• 8 – 3” casters with brakes
• 3/4” screws for attaching caster wheels
• 11 – 2x4 @ 8 feet long
• 8 – 1x2 @ 8 feet long
• 3” self tapping wood screws
• 2” and 1-1/4” 18 gauge staples
• 4 handles for carts
Workbench Cut List
• 6 – 2x4 @ 49”
• 4 – 2x4 @ 28”
• 8 – 2x4 @ 39-1/2”
• 2 – 1/4” plywood @ 39-1/2” x 31” (see plywood cutting diagrams)
• 2 – 3/4” plywood @ 52-1/4” x 31” (see plywood cutting diagrams)
• 4 – 2x4 @ 29-1/2”
• 2 – 2x4 @ width of saw (shown at 24”)
• 2 – 3/4” plywood @ width of saw x 31” (shown at 24”)
Cart Cut List
• 2 –3/4” plywood @ 48” x 30” (see plywood cutting diagrams)
• 4 – 3/4” plywood @ 8-1/4” x 30” (cut from scraps, see plywood cutting diagrams)
• 24 – 1x2 @ 28”
• 8 – 3/4” plywood @ 8-1/4” x 28” (cut from scraps, see plywood cutting diagrams)
• 4 – 1/4” plywood @ 30” x 28-3/4”
• 4 – 3/4” plywood @ 48” x 29-1/2” (see plywood cutting diagrams)
Suggested Plywood Layouts for the Cuts


Instructions
Step 1
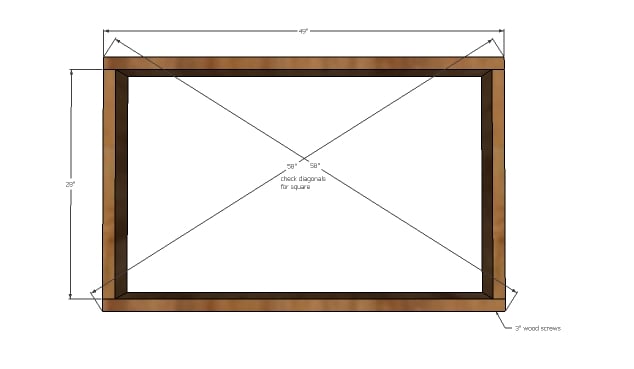
Workbench Step 1: Build Workbench Frames
Attach using 3” wood screws and glue at corners. Check for square and adjust as needed.
Step 2

Workbench Step 2: Legs
Attach legs to frame with four 3” screws and glue. Check to make sure legs are installed square with the frame.
Step 3

Workbench Step 3: Bottom Support
Attach bottom support to back legs of bench, 4” from bottom of legs. Use 3” wood screws and glue.
Step 4
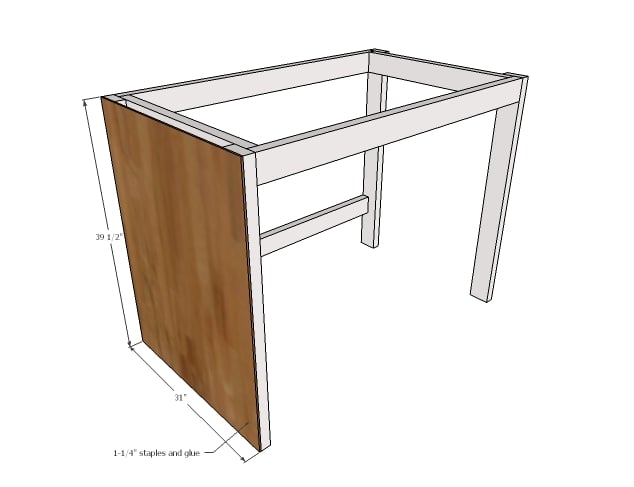
Workbench Step 4: Plywood Side
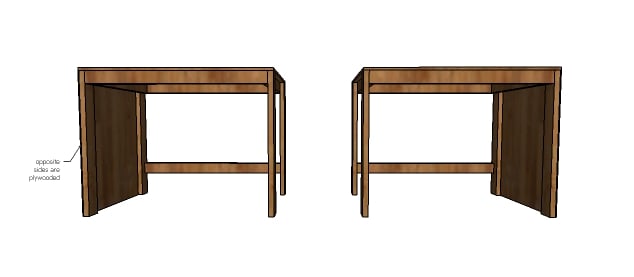
Use glue and 1-1/4” staples to attach ¼” plywood to side of workbench. Remember to plywood the outsides of the bench as shown in below diagram:
Step 5
Workbench Step 5: Workbench Top
Attach workbench top to frame with 2” staples and wood glue.
Step 6
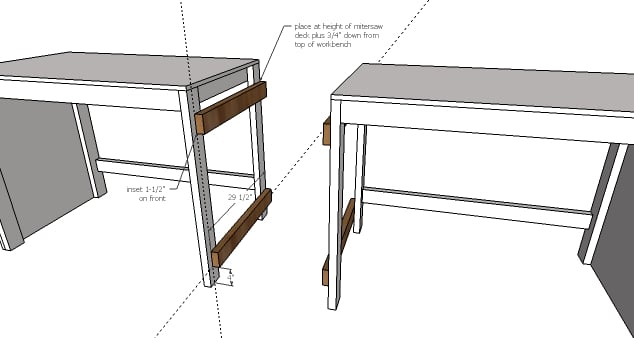
Miter Saw Shelf Step 1: Cleats
Measure the height of your miter saw deck. Add 3/4” to this measurement. Attach top cleats to sides of workbenches this measurement down from top of workbench. Cleats are flush to back, 1-1/2” less on front side. Use 3” screws.
Attach bottom shelf cleats with 4” space underneath.
Step 7
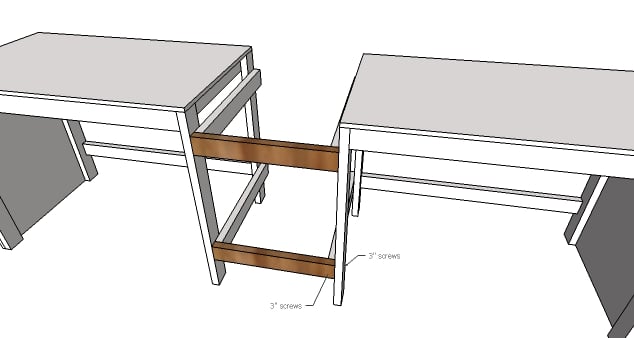
Miter Saw Shelf Step 2: Front Trim
Attach front trim to workbench legs and cleats with 3” screws.
Step 8

Miter Saw Shelf Step 3: Shelving
Place plywood shelving on cleats and attach with 1-1/4” staples and glue
Step 9
Cart Step 1: Caster Wheel Height
Measure the overall height of your caster wheels. Maximum clearance under workbench is 36” but some space should be left to allow cart to slide in. Cut list as shown is for casters with 3-3/4” clearance – adjust your cuts if your caster wheels are different heights.
Also double check the final location of your workbench for sloping garage floors and give extra room if in doubt.
Step 10

Cart Step 2: Cart Frame
Use 2” screws to attach cart front to cart shelf end with 1x2s. Build two of the cart frames.
Step 11
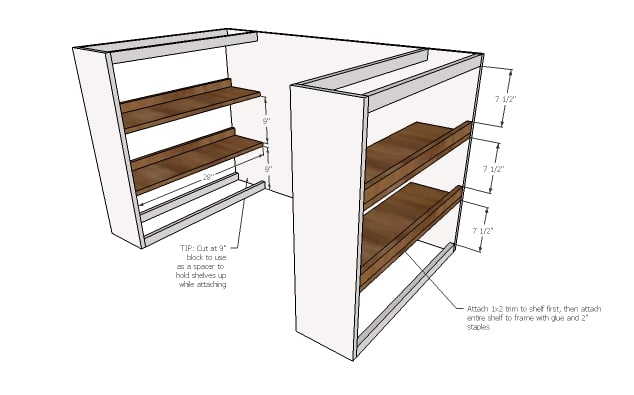
Cart Step 3: Shelves
Attach remaining 1x2s to shelves with 1-1/4” staples from underside. Then attach shelves inside cart frames with 2” screws or staples and glue.
TIP: Cut two 9” blocks of wood and use as spacers when placing shelves.
NOTE: Shelves can be placed at any height – customize to fit your needs and toolset.
Step 12

Cart Step 4: Shelf Backs
Attach backs to shelves with 1-1/4” staples and glue.
Step 13
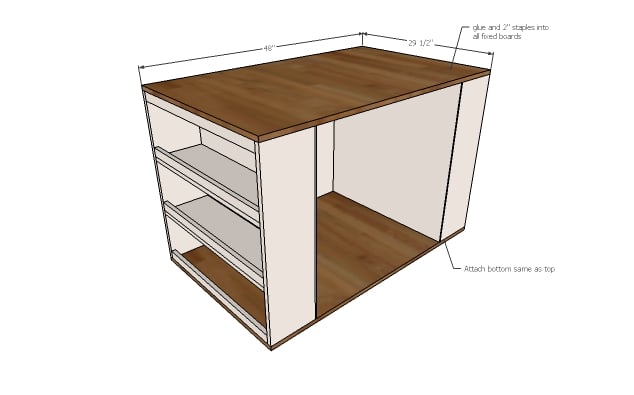
Cart Step 5: Top and Bottom
Attach top and bottom to cart frame with 2” staples and glue
Step 14
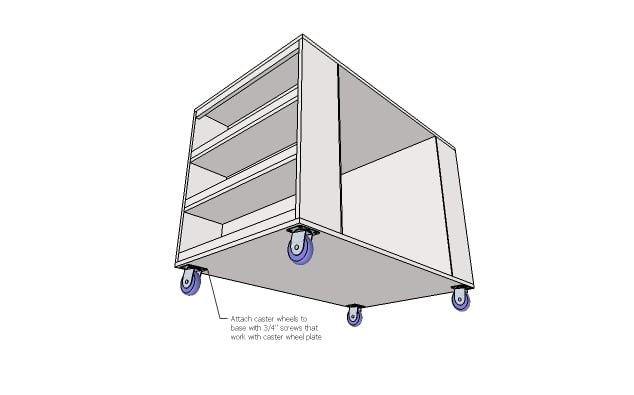
Cart Step 6: Caster Wheels
Install caster wheels on bottom of carts with ¾” screws.
Step 15
Step 1: Benchtop Cutout
Use a circular saw or jigsaw to carefully cut out the top of the workbench cart, following back of shelves and cutting to depth needed for your bench top tools. Make sure you leave about 2” extra for adding the cleat in step 3.
Step 16
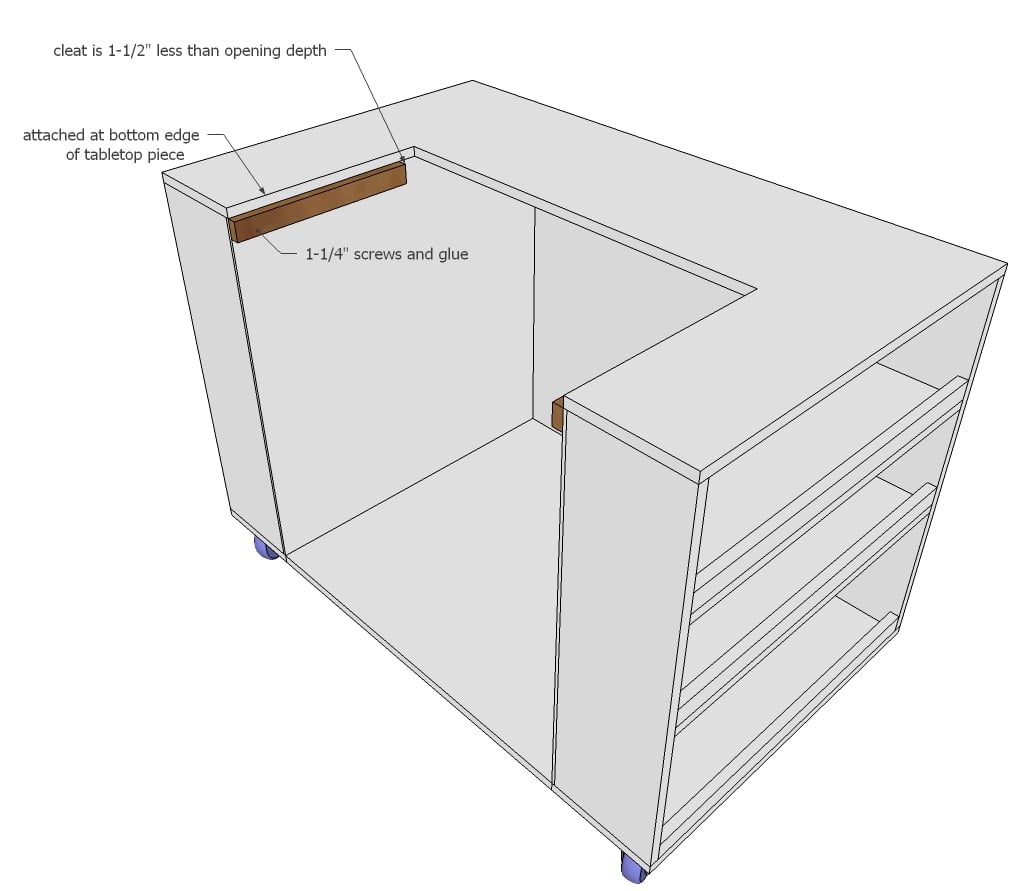
Step 2: Bench Top Cleats
Cut 1x2 cleats 1-1/2” less than the opening depth. Screw to the insides of the workbench cart, so the 1x2 top is flush with the bottom edge of the plywood workbench top.
Step 17
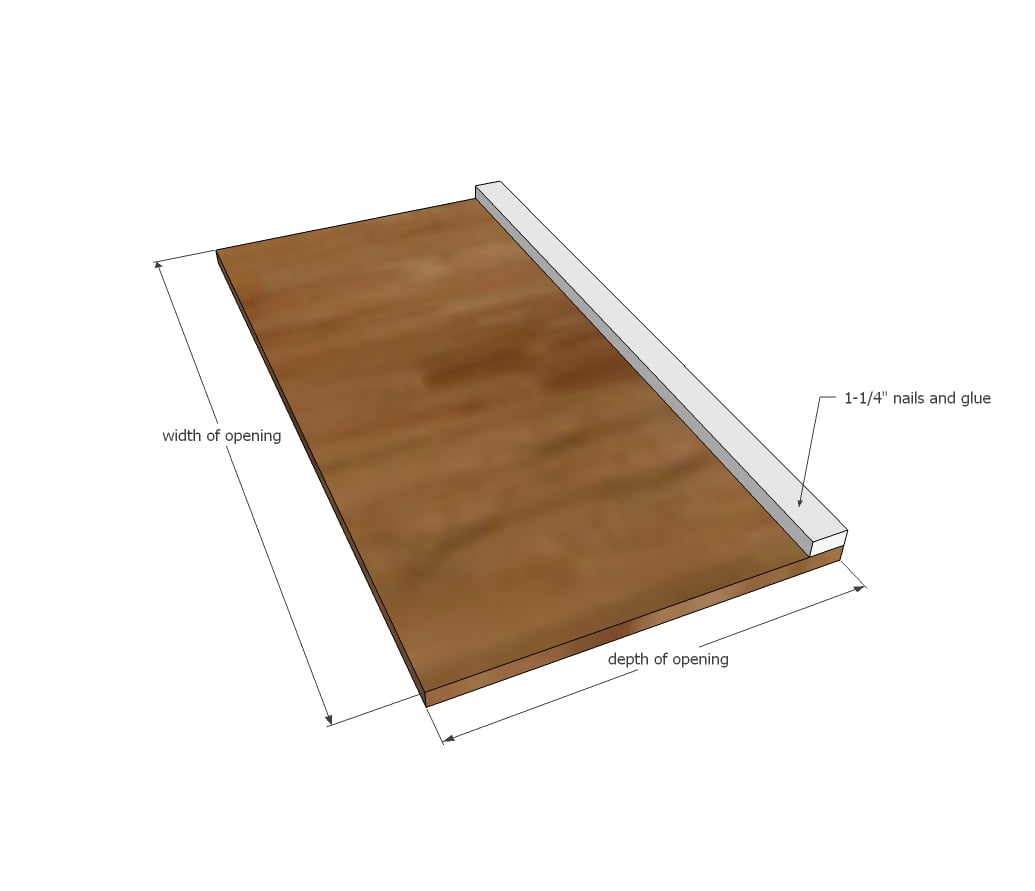
Step 3: Benchtop Tool Shelf
Attach a 1x2 cleat flat to 3/4” thick plywood cut to match the opening of the benchtop. Test fit and adjust if necessary.
Step 18
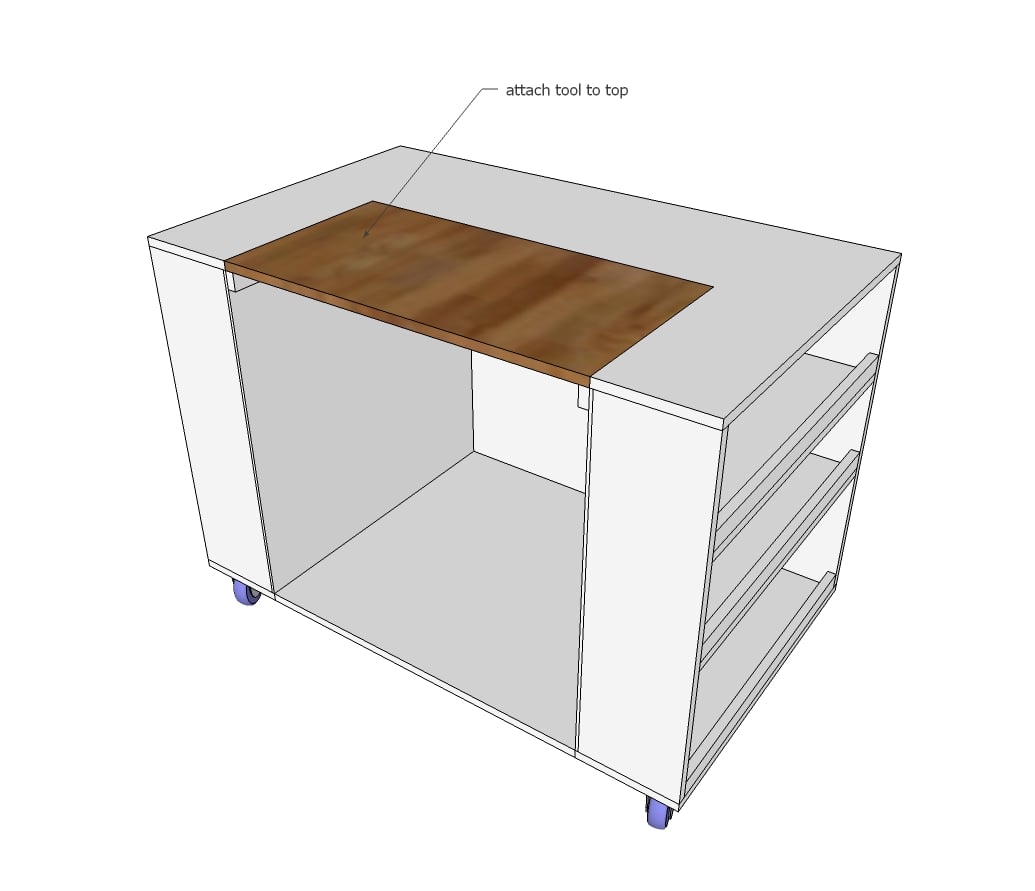
Step 4: Bench Top Tool
Attach Bench top tool to the removeable tabletop piece as recommended by the tool’s guide. Only lighter tools should be hung upside down. Additional cleats can be added inside cart for storing more benchtop tools.
Step 19
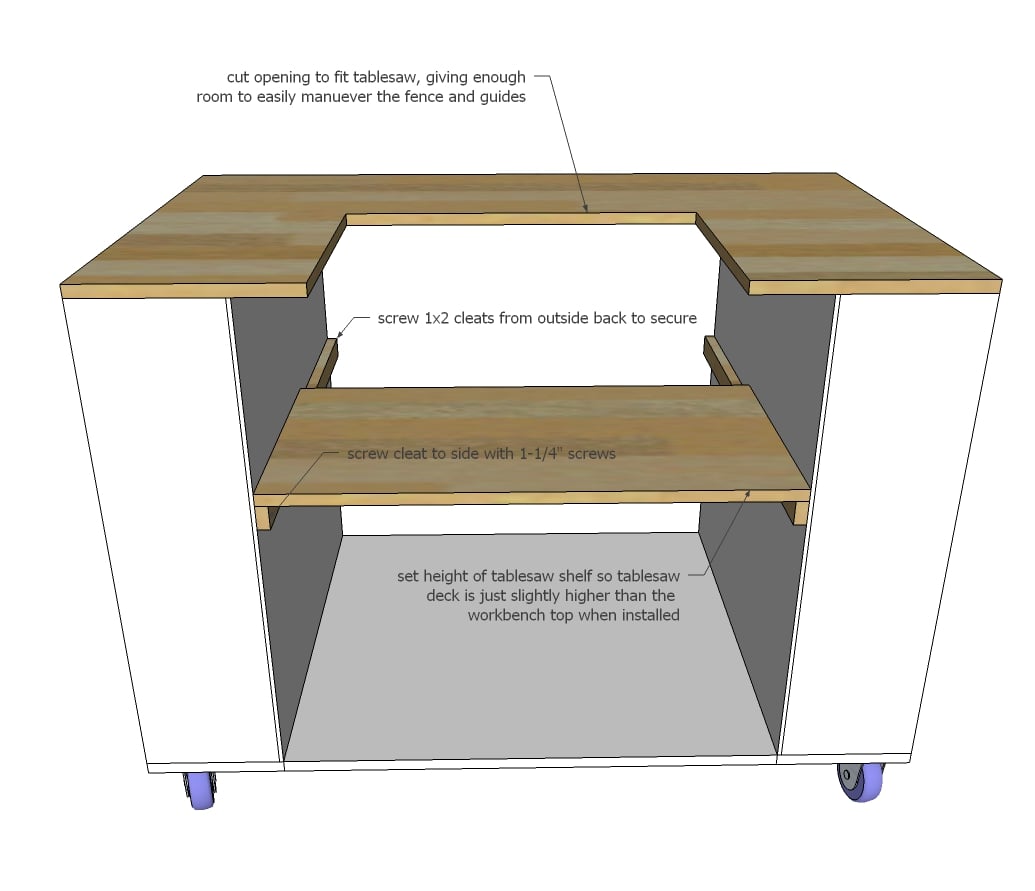
Step 5: Tablesaw Modification
Repeat steps as directed for benchtop tools, except custom cut tabletop out to fit your tablesaw, leaving enough room for the tablesaw fence, guides and accessories to freely move. Use cleats and ¾” plywood to create a shelf for the tablesaw. When installation is complete, the tablesaw deck should be slightly higher than the tabletop itself. Secure tabletop to shelf.


Comments
brickton
Wed, 02/17/2016 - 16:19
Amazing!
I'm in the midst of trying to figure out what I want to do with my sliding miter saw and this looks amazing. I love the utility of having the outfeed section for the tablesaw. This is so great!
In reply to Amazing! by brickton
Ana White
Thu, 02/18/2016 - 09:51
Thank you so much! Glad you
Thank you so much! Glad you liked it. It is so nice to have a sliding miter saw built into the bench. So hard to use a small tablesaw without an outfeed table by yourself too. Share if you build, would love to see how you mod yours out!
chadk
Thu, 02/18/2016 - 15:49
Super Cool!
What's the estimated cost on this one?
chadk
Thu, 02/18/2016 - 15:50
Super Cool!
What's the estimated cost on this one?
Ana White Admin
Thu, 02/18/2016 - 17:24
cost
$250 to $400
Heather Theis
Fri, 02/19/2016 - 08:42
this project!!!
I almost voted for the shanty girls the other day- SO GLAD the Ryobi site hates me!!! lol! Figured it out for you though! This is exacty what I've been looking for! I've been using an unfinished island ( x sides of courst), an old dresser I found on a facebook garage sale site and the two drawer sides to an old desk to do exactly what you did here. It and it doesn't work so hot. Looks like I'm going to be flipping my current pieces to pay for this! lol.
boice12
Wed, 03/02/2016 - 06:57
Plywood type
This may seem like a silly question. But I am just diving in to the world of wood working and just had a question regarding the type of plywood you typically use? What type should I get for this project and where would you recommend getting it. I grew up in North Pole and Eagle River down by Anchorage....so fellow Alaskan here. :-)
vaddr3
Tue, 06/23/2020 - 06:57
I would also like to know. …
I would also like to know. Thank you
exit2studios
Thu, 03/17/2016 - 14:38
If I'm reading the plans
If I'm reading the plans correctly, there is 3/4" clearance for the carts with the casters you used? I ask because my casters are slightly larger (4-1/8" clearance) and I would prefer to have less gap so hoping I can leave the measurements as stated. The pictures don't look like there is that much leeway :-)
Great design, btw. I signed up just so I could vote for you!
exit2studios
Thu, 03/17/2016 - 14:39
Very Cool!
If I'm reading the plans correctly, there is 3/4" clearance for the carts with the casters you used? I ask because my casters are slightly larger (4-1/8" clearance) and I would prefer to have less gap so hoping I can leave the measurements as stated. The pictures don't look like there is that much leeway :-)
Great design, btw. I signed up just so I could vote for you!
Halld03
Wed, 08/31/2016 - 01:08
Plans
The link to the plans no longer work. Any chance I can still download them?
cnewolf
Wed, 02/07/2018 - 19:08
Plans
I feel your pain. I too am trying unsuccessfully to find the plans.
Drustew
Mon, 10/31/2016 - 06:25
Shop Bench: Just What I Needed!!
Ana,
Great idea to build a lot of workspace & storage into a relatively compact area. This is exactly what I was looking for in our shop. Like so many others, our shop is used for about 300 different things and as we acquire more 4-wheelers, mowers, saddles, and random kid's stuff, my workspace seems to shrink and shrink. Your solution is perfect. I spent $400 on lumber, casters, and freshened up some old tools. Super easy to build and plans were extremely simple to follow. Anyone can do this project. I have spent just a couple hours and the large bench is done and the carts will be tonight. Thanks again for all of your great projects and blog!
Dru Stewart
CTCwwC2216
Fri, 12/30/2016 - 13:19
I love this design!
Just as another person said, I signed up for this just to vote for you. I LOVE THESE PLANS!! I can't wait to get started. It saves me so much room for builds, wood, a couch when I want to be lazy (ummm just kidding? :) It really is the perfect design for my space.
hazelsmrf
Tue, 01/03/2017 - 20:40
2 inch staples
Hi Ana, I'm confused about the staple length, since this was for a Ryobi event I was assuming that you were using the Ryobi airstrike stapler, but that one only goes up to 1.5 inches and your plan requires 2 inches. Which stapler are you using? If I only have access to the Airstrike one, I'm assuming using screws would be OK instead of the staples for those parts?
martha.handmade
Thu, 06/11/2020 - 08:22
2 inch staples
This might be a shot in the dark, but did you find a solution to the 2 inch staples? I'm on the same boat as you! And Ana doesn't seem to answer the questions the readers have :(
sanda73
Sat, 06/13/2020 - 05:09
Hi Martha. In her list of…
Hi Martha. In her list of tools needed, you’ll see that she uses a brad nailer. So My guess is that she uses 2”Brad nails. Not staples...even though she says staples...error on her part maybe?
Good luck!
AhmaNaz
Wed, 08/12/2020 - 19:04
I was abt to tear HD apart…
I was abt to tear HD apart searching for the staples, then realized I have a brad nailer so I just ordered the nails from Amazon and they were much cheaper than HD had at same qty.
hitthetwit
Sun, 01/08/2017 - 17:24
Router Table
Has anyone incorporated a router table into one of the roll aways? Perhaps as a switchable benchtop fixture siimilar to the kreg jig or bench grinder?
hitthetwit
Sun, 01/08/2017 - 17:48
Also, I'm wondering how
Also, I'm wondering how sturdy the main, stationary, bench is. Is there any wobble when doing work on either side of the mitre saw?
Indiri
Thu, 10/15/2020 - 21:29
I don't have any wobble at…
I don't have any wobble at all. I finished the main bench a few weeks ago and I'm working on the rollaways now.
danicarby
Sat, 04/29/2017 - 22:48
Love this!
Thank you Ana for these great plans! It's ingenious, really! I was so excited when I discovered it as I was thinking about how to clean-up my garage. I made this system and just finished it yesterday! I'm SO surprised your project didn't win the challenge!
Dream Design DIY
Sun, 04/29/2018 - 21:04
Workbench
Oh my gosh love this! You have thought of everything. I created my own garage workbench recently, but when I am ready to upgrade your plans are next.
CaptainCraftastic
Fri, 11/22/2019 - 15:30
Telescoping Table Saw in the workbench/cart !?!?!
I am IN LOVE with this workbench! I have a small garage, small existing workbench, but WAY too much stuff and this answers A LOT of my issues. Question---I see you have a 'portable' table saw in one of the rolling bench/carts---how do you use the telescoping fence? Or do you? I saw another DIY workbench with an inset table saw and they cut out 'rabbets' for the telescoping part but it doesn't look like yours does.
Any suggestions?
KGill88
Wed, 01/01/2020 - 15:26
Download plans?
I love this project! Is it possible to add pdf plans to download? I’m not finding them. Thank you;)
ChrisoJ
Sun, 02/16/2020 - 21:27
Types of ply??
Hi Ana
Thanks so much for the plans. They look amazing. I'll be doing a bit of a rework on the calculations as I will need to convert it to metric and the standard size of timber sold here in Australia. I'm just wondering if the ply you use (especially the 3/4 inch) - is it structural?
Loved your drawers (from another post) - I've built 7 of them now for my pantry!! Super helpful and cost-effective.
ChrisoJ
Indiri
Thu, 10/15/2020 - 21:31
I would stick to the thicker…
I would stick to the thicker ply as in the plans. For the tops they make a sturdy work surface. For the shelves that hold (sometimes heavy) tools it will help prevent warping of the wood over time.
Tandi43
Tue, 02/18/2020 - 13:44
clamp bar specifics
Would like to know more about the clamp bar. Would love to add this - but what are the specifics?
gmcnally
Mon, 02/24/2020 - 09:51
I have just finished this…
I have just finished this project and have to say it has transformed my workshop and give me much more space to work.Thanks for the plans!
gmcnally
Mon, 02/24/2020 - 09:51
I have just finished this…
I have just finished this project and have to say it has transformed my workshop and give me much more space to work.Thanks for the plans!
Alienz17
Tue, 03/10/2020 - 23:45
How hard was it? Also did…
How hard was it? Also did you do the side where the clamps hang? I ddint really see that part in the plans but going to thoroughly go over them again.
gmcnally
Wed, 04/01/2020 - 02:07
Hi sorry for the delayed…
Hi sorry for the delayed response. It wasn't too bad to build. I modified the design slightly and built it onto my walls and I have also used some mdf instead of plywood in places as I had some already. Currently doing a fench cleat wall so I will post a brag post in a few weeks. I didn't bother with the clamp side. I just made it 2 shelves there for tools as I plan to put the clamps on the French cleat wall.
Alienz17
Tue, 03/10/2020 - 23:44
Clamp depth.
Hi. I plan on making this workbench as it seems to have everything I need. I was wondering about the side where the clamps hang. Didn't really see it in the plans. I wanted to know the depth of it and possibly turn it into hanging drills instead. Can you tell me how deep it is to see if it would work? Thanks.
CarlySolberg
Sun, 04/26/2020 - 11:03
Leveling
Ana,
You have so many excellent free plans, thank you so much for sharing! My husband and I are currently working on the workbench with the two roll away storage carts. It’s coming together really nicely. Our only issue we have run into is that our garage floor slopes about 2” over the course of the 12ft workbench and we are trying to figure out the best form of levelers to use for it. Shims, leveling legs...? Have any of your others followers run into this issue? What would you recommend for the best stability?
martha.handmade
Sat, 05/16/2020 - 09:00
Table Saw
Hi, I'd like to know what size table saw you have on the pic. I'm shopping for one but I'm a newbie so not sure which one I should get.
Many thanks 😁
mdp1989
Fri, 05/22/2020 - 19:29
Thank you
Thank you so much for putting stuff like this up. Really helps me get in the mood and feel like I can build something cool. Without this, my bench would be 1 square box lol.
ianr
Sun, 06/14/2020 - 02:27
Staples or brads?
The instructions for the project say to use staples to attach the plywood but the tool list for the project lists a brad nailer that doesn't take staples. Any suggestions?
rjcarr1911
Sun, 07/19/2020 - 16:55
I used brad nails instead of…
I used brad nails instead of staples
christie_co
Sun, 07/05/2020 - 22:05
Great plans!! A few questions/thoughts
Such great plans! This literally met every criteria I was looking to check - the miter saw table plus a table saw cart plus out-feed space for the table saw and maybe an area for my planer or router table. I am mid-way through construction and have a few observations and questions. Observations first: 1) instructions are very vague so it wasn't clear how many screws to use to attach bench top to the bench frame. I did a screw every 2" on the first bench and then every 4" on the second bench but am curious, what did everyone else do? 2) attaching the plywood side to the bench - this seemed unnecessary so I did not add this to the first bench but did on the second. Adding this pretty much removes any clamp space on the end of the bench so while it looks nice, if you want clamp space on either end of the bench then I recommend that you skip it (saves time and materials). Then there is the question of the staples - I had no 2" stapler so I used my brad nailer. A 2" plus brad nailer would have been longer than the leg depth as it's a 2X4 and you're nailing through through the 2"x side which is really 1.5". So I used 1" brad nails. This plywood side really seems cosmetic so not sure how well it will last but it does help the legs on the outer side of the bench stay in place. If you want to save time and materials and retain a clamp edge, then I would recommend skipping the plywood bench sides. 3) Bench height - this is really tall. I am 5'7" and it seems too tall. I think I will need to cut a few inches off all the legs to make it more usable. Yes I get this means the carts become shorter but you're making this massive workbench space that should be functional and if it's too tall to use, then I would rather make that a more functional height and have the carts a little shorter. 4) Attaching the miter saw - the plans say to add ¾" to the depth of your saw - just wondering why?? Wouldn't this make your saw cutting surface lower than the bench surface? 5) Rather than sanded ¾" plywood for tops you could use OSB. The sanded plywood is going to get scraped, scratched, and dented so maybe save some money and get OSB instead. 6) The carts - I haven't made these yet but am wondering how structural they are with no 2X4 support. Can anyone comment on this? Seems to just be plywood construction with the 1X2 to support shelving, so am curious how well this holds up and how well it supports a table saw or something heavy like planer?
rjcarr1911
Sun, 07/19/2020 - 17:12
1 - I used brad nails to…
1 - I used brad nails to secure the bench tops to the bench frame. I believe I used about (5) 1 3/4 brad nails on each side of each bench top.
2 - I didn't attach plywood to the sides either, and I don't believe I will.
4 - you add 3/4 of an inch to your miter saw height so the miter saw will sit flush with your bench tops (since your bench tops are 3/4 of an inch). if you don't add 3/4 of an inch to this measurement, then your miter saw will be 3/4 of an inch higher than your bench top. this is a good baseline, but I had to do LOTS of tweaking to get everything flush & level. a huge pain really. just make sure your benches are level by themselves first. and then make sure they are level with one another. and then try to make your miter saw flush / level with the bench tops. but then again maybe I did more work than was necessary. wouldn't be the first time.
5 - I prefer plywood. the scratches and what not will drive me nuts a little at first, but I will eventually get over it. I do however plan on finishing with teak oil and polyurethane to manage some surface damage. and now that I think of it, hopefully that won't mess up all of my attempts of trying to get everything flush / level.
6 - structurally, the seem pretty sound. I've only made one so far. I did notice however that the plans call for 1x2 to support a table saw, which sounds insane. but if you look at the pics, it looks like the table saw is supported by 2x4. so I would love some clarification there.
Bgstewar
Sat, 08/01/2020 - 12:35
Would a 12" sliding Dewalt…
Would a 12" sliding Dewalt miter saw fit this table if the cutout was made bigger? It needs a lot of room for the sliding rails.
rjcarr1911
Tue, 08/04/2020 - 06:54
yes, that's the saw I have. …
yes, that's the saw I have. especially if you follow the dimensions in the plans. the workbenches are deep enough to allow full range of motion of the slide. also, your shelf will have to be wider than the plans call for in order to fit that saw. maybe even a little bit wider to allow full range of motion of the miter angles. the saw will have to sit just about all the way forward on the shelf to prevent it from hitting the workbenches when making 45 degree miter cuts. I haven't even attempted bevel cuts, but I don't believe there should be any interference there.
jkjackson
Sun, 09/06/2020 - 18:59
Brilliant use of space! I’m so excited...and have a question. :)
I’m so excited to find this plan! It is such an answered prayer for our needs. Thank you for sharing! I’ve already started it and am curious about the staples. I can’t find any staples that are 2”. What do you recommend as a substitute? A shorter (1 1/2” staple) or a 2” brad nail? Thanks again!
In reply to Brilliant use of space! I’m so excited...and have a question. :) by jkjackson
mvgreen3
Wed, 09/23/2020 - 22:17
They provide minimal…
They provide minimal structural support, and I mean minimal, so either would suffice.
joshua.b.harper7
Wed, 10/14/2020 - 09:40
Question before I build
Hey Ana, I want to build this bench. I, however have a Dewalt 744 table saw with a rack and pinion style gate. I wanted to try to get your opinion on what I should do about building it into the cart still. I was thinking I would just turn it sideways and build the shelving differently on one of the carts to sit on. Maybe rabbet on the underside of the top of the board for the rack to slide. What do you think?
htse
Thu, 12/17/2020 - 21:31
Share CAD model file?
Are you able to share the CAD model file? I love the design, but would need to make a few modifications to fit my space.
Shaila
Mon, 03/08/2021 - 09:17
Modify to make this less deep? Worth it?
I love the idea of this but my basement footprint for my shop is pretty small. I am fine with a wall being used to put a workbench on, but it sticks out so far. Pulling out the sub benches would be very helpful but when both are out with the deep stationary bench, it would be super tight.
Would it be crazy to consider putting the miter saw on a sliding base and use heavy duty drawer slides to pull it out a bit to fully use the sliding function? I think the center of gravity will still be generally over the bench, just sliding out enough while in use and when not in use, I can turn the miter sideways and slide it back in place to be flush with the rest of the benches.
eeegah
Sat, 04/03/2021 - 10:46
Hi! I am planning on…
Hi! I am planning on building this workbench this summer. Thank you so much for sharing the plans! I have about 8-10 inches longer of space to cover... if i keep the carts the same size, can i just cut one of the bench tops to 62 1/2” length?
pberoberts
Sat, 11/13/2021 - 16:25
Screws?
What "number" 3 inch screws should you use? (#8, #9 or #10)