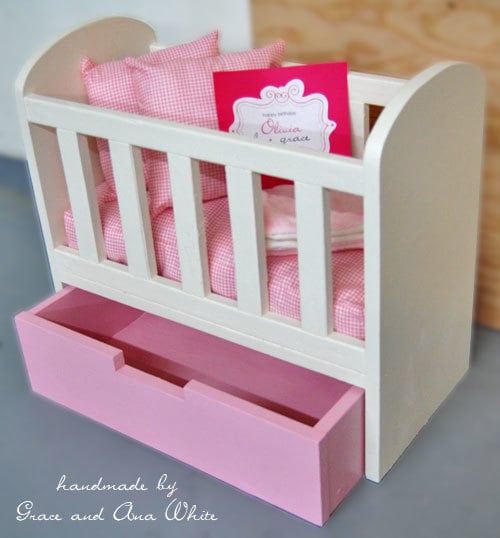
A doll crib designed for 18" dolls. Features a bottom drawer.
I've been making quite a few gifts (with of course the help of my daughter Grace) of late - you'll be seeing a lot of giftable projects, and yes, more projects fit for boys too in the next few weeks - and sometimes, Grace does ask, can I have this?
This particular gift is for Olivia, Grace's friend that she has known from birth. And while we were building this doll crib for Olivia, Grace mischievously whispered, "Mom, let's give Olivia the doll bed and I can have the crib."
So Grace and I had a conversation about how it's better to give then to receive, and how gifts aren't about giving away what you don't want, but about giving something that you hope your friends will love. And it's especially nice to give your time and creativity, in the form of something you made with your hands.
I'm not sure how much actually registered in the mind of a three year old.
It's Alaska. Princess dresses go better with Uggs, over top of your clothes. Does she seem thrilled to give away this present? Especially after we built it together, painted it together, and sewed all the bedding and mattresses, it seemed Grace was rather reluctant to part with this doll crib. I was a bit worried when we went to the party.
When Grace and I arrived at the birthday party, we left our gift in the entryway because (shame on me) some of the paint wasn't quite dry. While Olivia was unwrapping her gifts, I was so impressed with all of the children there, genuinely happy for the birthday girl, never showing any signs of resentment or jealously. But about half way through the gifts, Grace jumped up and ran over to me and whispered in my ear, "Mom, where is our gift for Olivia? Can I give it to her now?" And she hauled it over to the pile of presents, proudly saying, "Olivia, this is my present for you, and I made it for you."
I guess I'm still three years old at heart too, because I felt great joy in seeing Olivia's delight over the gift, but especially great joy in seeing my daughter joyously give a handmade gift.
On the car ride home, Grace was quiet. As we pulled into the yard, she said, "Mom, let's make presents for everyone this Christmas!"
Is it true that it is better to give then to receive? I've often wondered, waiting long hours in lines at stores over the holidays, being run over by shopping carts, or seeing kids get piles of presents, over stimulated by beeping and flashing toys, or upset over not getting what they wanted. My Gracie included.
But this experience was so joyful and fulfilling. It IS better to give, especially when you can give from the heart. I challenge you this Christmas to give at least one gift that you put your heart and time into, to handmake just one gift. And over the next few weeks, I will be blogging all the gifts that I handmake, for both little girls and little boys, to teens, and adults as well.
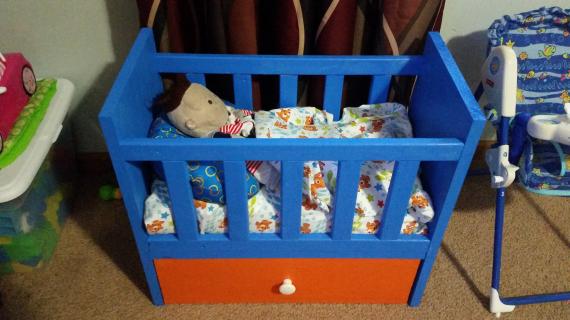
Today's plan is for Olivia's doll crib. This crib is so many times cuter in person than in the pictures. I only had about five minutes to snap photos in the garage. I'm most regretting not getting a photo of Grace sitting inside the crib, pretending to be a baby. This crib is strong and big.
And if you would like to handmake the gift tag, you can go here to print this graphic out and add your text. I pasted mine on scrapbooking paper.
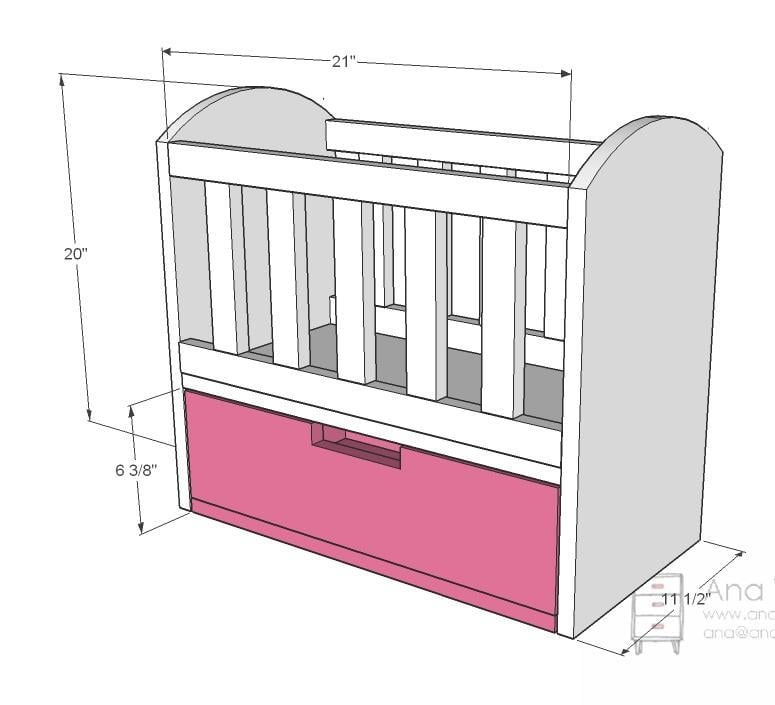
Preparation
1 – 1×12, 8 feet long
1 – 1×6, 6 feet long
2 – 1×2, 8 feet long
wood filler, glue, and finishing supplies
1 1/4″ pocket hole screws or 2″ trim screws
2″ wood screws (can use the 2″ trim screws)
sand paper
2 – 1×12 @ 20″ (Round tops as shown in step 2)
1 – 1×12 @ 21″ (Crib Bottom)
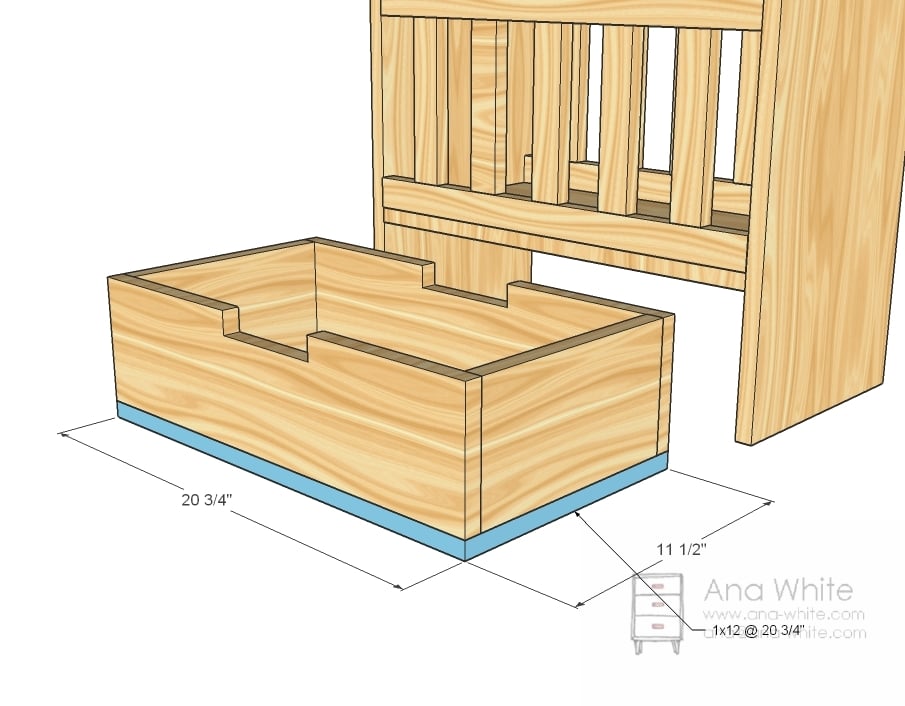
1 – 1×12 @ 20 3/4″ (Drawer Bottom)
2 – 1×6 @ 20 3/4″ (Drawer Front and Back)
2 – 1×6 @ 10″ (Sides of Drawer)
4 – 1×2 @ 21″ (Tops and Bottoms of Crib Rails)
10 – 1×2 @ 7 3/4″ (Crib Rails)
Instructions
Step 1
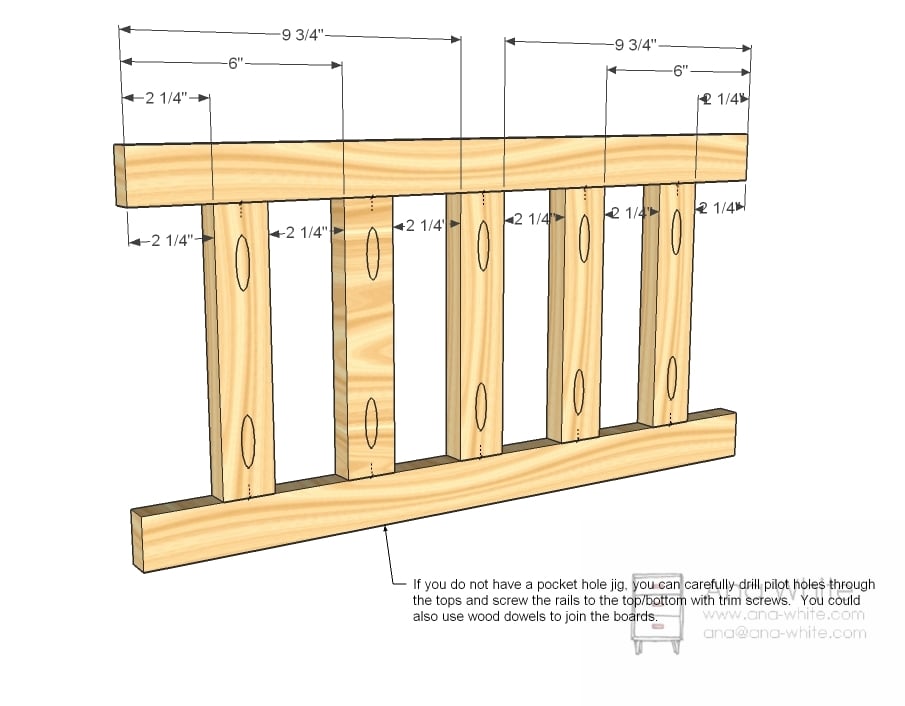
Rails
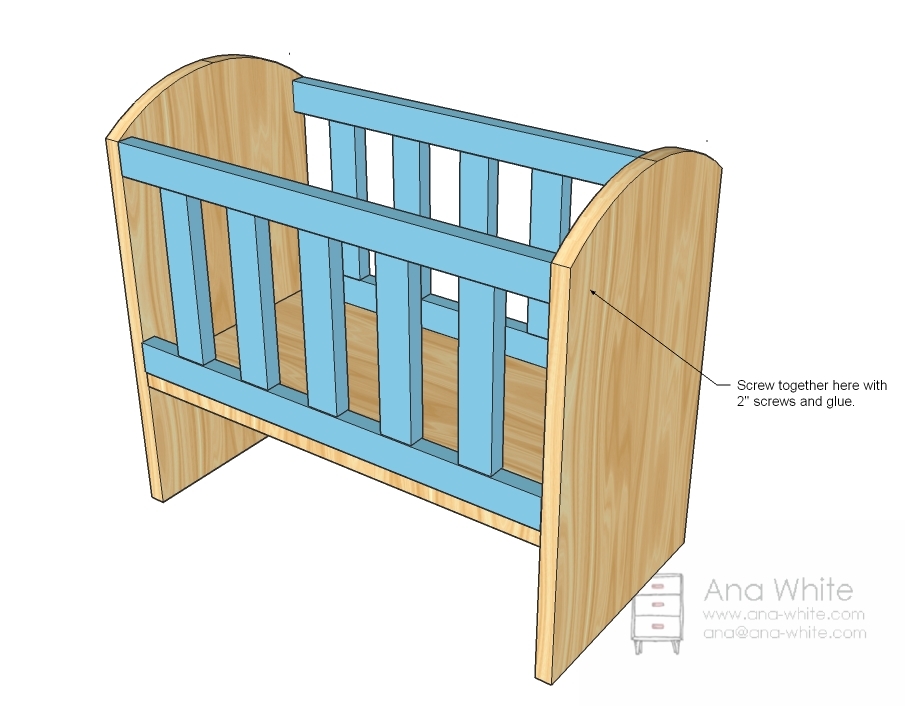
Mark all of the 1x2s @ 21″ long as shown above. Drill either pocket holes in all the rails or in the tops/bottoms of rails and attach the rails to the tops/bottoms with screws. Use 1 1/4″ screws for pocket holes. or 2″ trim screws if you choose to drill through the tops and bottoms. Use glue. One screw will do for each rail if you use glue.
Step 2
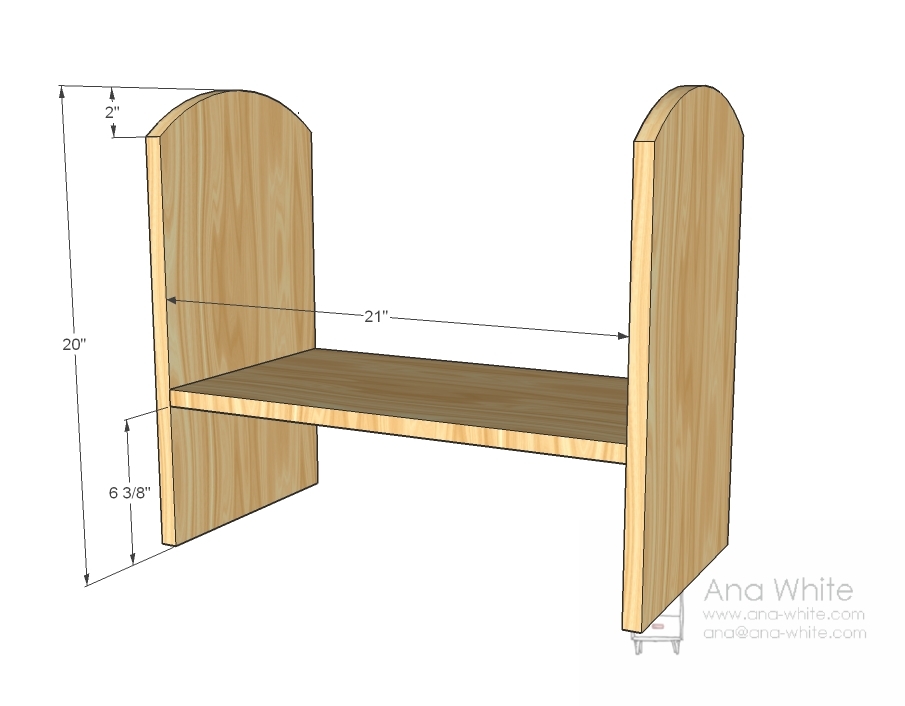
Box
The most difficult part of this entire project was cutting the tops of the ends the same rounded curve. I actually thought about just making the tops straight (would have been much easier and given the crib a cool modern feel) but decided to stick out the curve. Lots of sanding later, and the tops look great. After cutting with a jigsaw, I clamped the two ends together and sanded, sanded, sanded, until the ends matched. Then I built the box as shown above. Use 2″ screws through predrilled holes or 1 1/4″ pocket hole screws and glue.



Comments
AmyLynn (not verified)
Mon, 11/29/2010 - 08:00
What a great t-shirt idea:
What a great t-shirt idea: It's going to be an (Ana) White Christmas!
Jaime (not verified)
Sun, 12/05/2010 - 17:32
Ana your crib doubles as a
Ana your crib doubles as a bench - truly genius!! I made it and flipped it over to paint it and there was a bench! Thanks again for your plans and I'm eagerly awaiting the doll high chair???
Jaime
http://thatsmyletter.blogspot.com/2010/12/c-is-for-crib.html
Jenny V (not verified)
Sun, 12/05/2010 - 17:51
Made the crib today for my
Made the crib today for my niece's 3rd birthday on Saturday. First time building something from this blog...first time building anything really. The plans were perfect. The whole family pitched in, including my husband who helped with some of the larger cuts, my 13 year old son who helped sand and hold wood while it was cut, my 7 year old daughter who helped sand and came to the store with me to buy the wood, and even my 17 month old who got in the crib and tested it!! I plan to paint the graphic for the gift tag on the side of the crib and put my niece's initials inside. Can't wait to see her face when I give it to her! Thank you, Ana!
Ana White (not verified)
Sun, 12/05/2010 - 20:11
Jenny, thanks for taking your
Jenny, thanks for taking your time to come back and share your experience! Really appreciate it, thank you! Ana
Christy (not verified)
Thu, 12/09/2010 - 17:11
This is the sweetest thing! I
This is the sweetest thing! I have 2 year olds and a 5 year old. All girls and they would love this! My 3 year olds are getting this crib for Christmas. I even have that fabric! My 5 year old is getting the farmhouse doll bed. I love that you share this with the world. You are such a blessing to mommies like me:) Thank you Ana!
Christy (not verified)
Thu, 12/09/2010 - 17:12
I meant to say that I have 2
I meant to say that I have 2 3 year olds.
E Krause (not verified)
Mon, 12/13/2010 - 10:08
What type of wood do you use
What type of wood do you use for the crib?
Ana White (not verified)
Mon, 12/13/2010 - 11:20
pine or whitewood furring
pine or whitewood furring strips :) lots of sanding. Good luck!
Heather (not verified)
Mon, 12/13/2010 - 22:53
Discovery Kids makes a kid
Discovery Kids makes a kid tough real mp3 player, with speakers & not headphones/earbuds to tangle up or break. We bought it for our little girl's 3rd birthday last spring, and it is the bomb! We also have a 2 year-old little boy, so I can definitely vouch for it's kid toughness. It's easy to load songs onto--no special software or anything, easy for the kids to operate, comes pre-loaded with 20 songs that don't suck, and you just add whatever else you want to. Has 512MB of memory. Hubs strips songs down to mono (it has 2 speakers, but it's still mono), and makes the files small, and they probably have 50 songs on it, with room for lots more. It does mean, though, that when the 2 year-old is going through a phase, you get to play "Barbara Ann" sixty-eleven times a day for a couple of weeks! :-D
Dee (not verified)
Wed, 12/15/2010 - 09:41
I love this crib. I was
I love this crib. I was wondering if you have the bedding & mattress tutorial yet? I would love it.
Laurie (not verified)
Wed, 12/29/2010 - 18:28
Thank you Ana for the darling
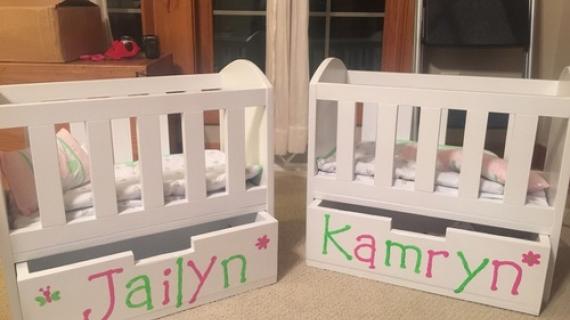
Thank you Ana for the darling crib/w drawer pattern. My husband and I made three of them complete with mattresses and pieced quilts. It was a big, but fun project and our four grandaughters (and parents) loved them. But... after we got them all funished and painted, we brought them all out on the carpeted floor. The drawer no longer fits underneath. The drawer should be 3/8 " shorter to slide underneath the crib. As it is now the sides of the crib sink into the carpet a little and don't allow the drawer to slide underneath. We will have to cut off the top of each drawer and re paint. Or you could add a piece of something to the bottom sides of the crib to raise it up to allow the drawer to slide under neath.
Ana White (not verified)
Thu, 12/30/2010 - 13:00
Laurie, what you could do is
Laurie, what you could do is just buy some cork feet and place it under the crib sides. It'll protect your floor and raise the crib up. Or put a bottom on the crib with a 1x12 the entire length of the crib. Should be an easy fix.
krm123
Sun, 03/20/2011 - 11:25
Easy way to get the tops round
To get both the ends rounded tape the 2 boards together and draw out the curve on the outside board. Then use the jigsaw to cut out the curves and both pieces will match! Hope that helps and makes sense!
Joaleen
Sat, 09/03/2011 - 18:49
This will be my first project
Right now I am planning this project as a gift for my daughter for Christmas. It will be my first project, so fingers cross it will turn out alright.
kyliandkatelinsmama
Mon, 10/17/2011 - 04:55
THANK YOOOOOOOOOOOOU !
This is wonderful ! You have saved Christmas for BOTH of my girls now. We made the bunkbeds saturday and this yesterday . I commented on the sewing tutorial for the bunkbeds and told you how you had saved Christmas. You literally made the things my girls wanted for christmas obtainable and they weren't before. Thank you and God Bless :)
JkH (not verified)
Fri, 10/26/2012 - 11:43
Make into a bunk bed?
Love this doll bed and was wondering if it could be modified to be a bunk bed? Thanks!
danisjohn
Sun, 11/17/2013 - 23:42
Nice! Invention
This is really cute one with the features a bottom drawer, Idea is new but It should be ventilated from round side instead of two.
danisjohn
Tue, 11/26/2013 - 02:54
Best described
As concern you all steps that is really helpful and this is such a nice baby doll crib you just best described keep sharing.
Regards,
http://www.keepingintheloop.com/pink-black-crib-bedding.html
machmanstan
Mon, 01/25/2016 - 18:40
Making this for a real baby
Hi, has anyone made this for a real baby? What about standard sizes? Anyone have plans that will allow the use of standard crib matress, etc?
Thanks,
Stan
machmanstan
Mon, 01/25/2016 - 21:03
Making this for a real baby
Hi, has anyone made this for a real baby? What about standard sizes? Anyone have plans that will allow the use of standard crib matress, etc?
Thanks,
Stan