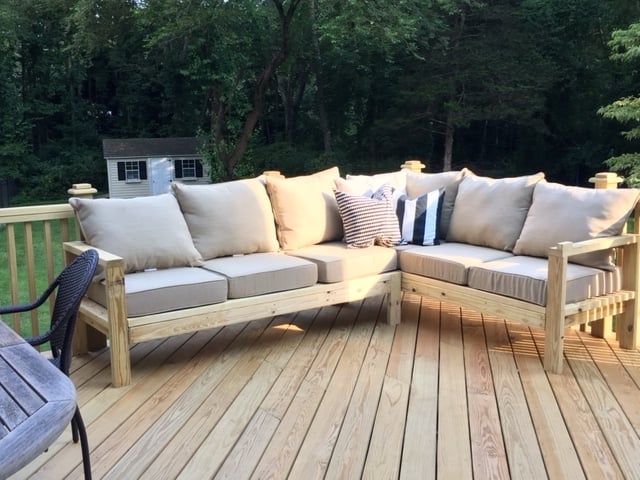


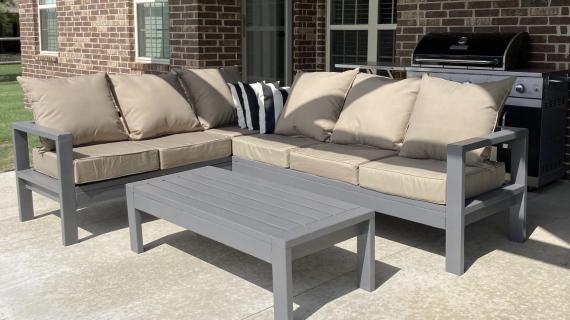
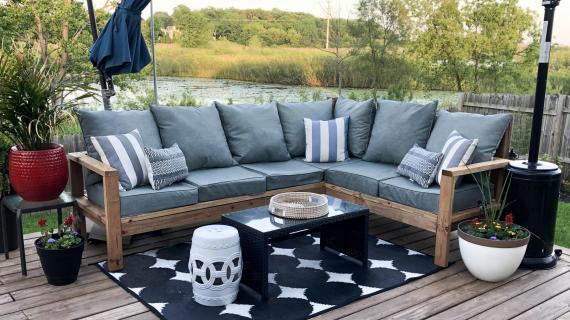
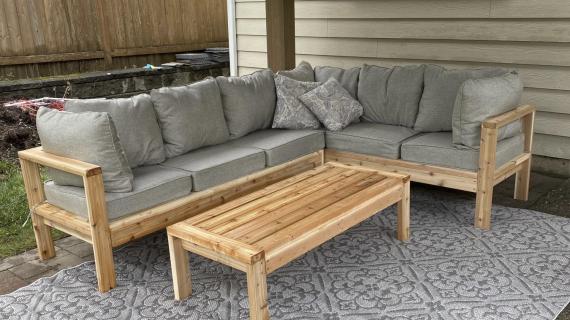
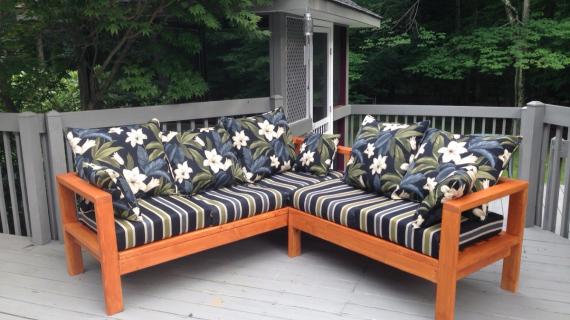
Build your own outdoor sectional out of 2x4s! This plan is for the One Arm Sofa.
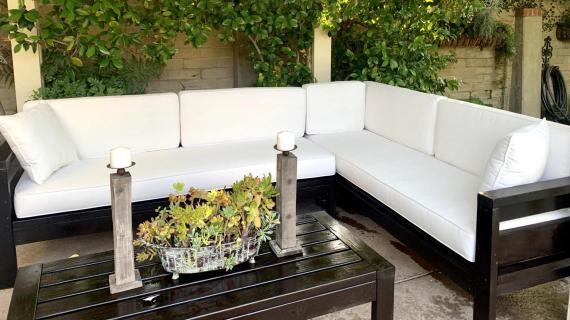
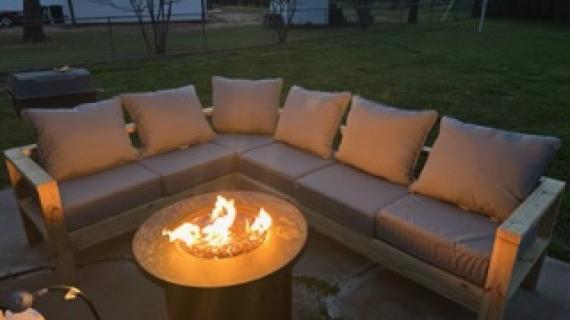
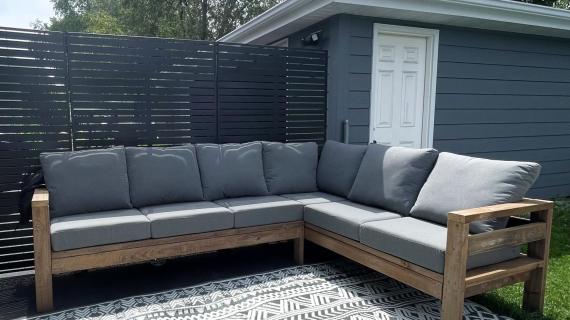
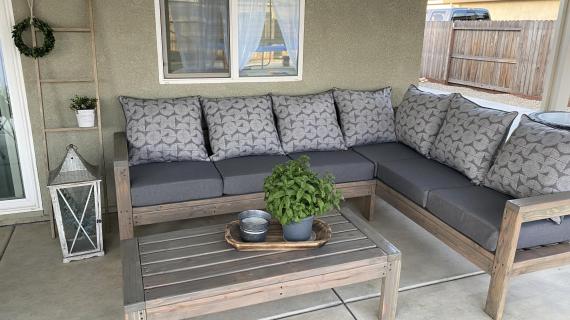
One of my favorite projects I did last year was this 2x4 outdoor sofa
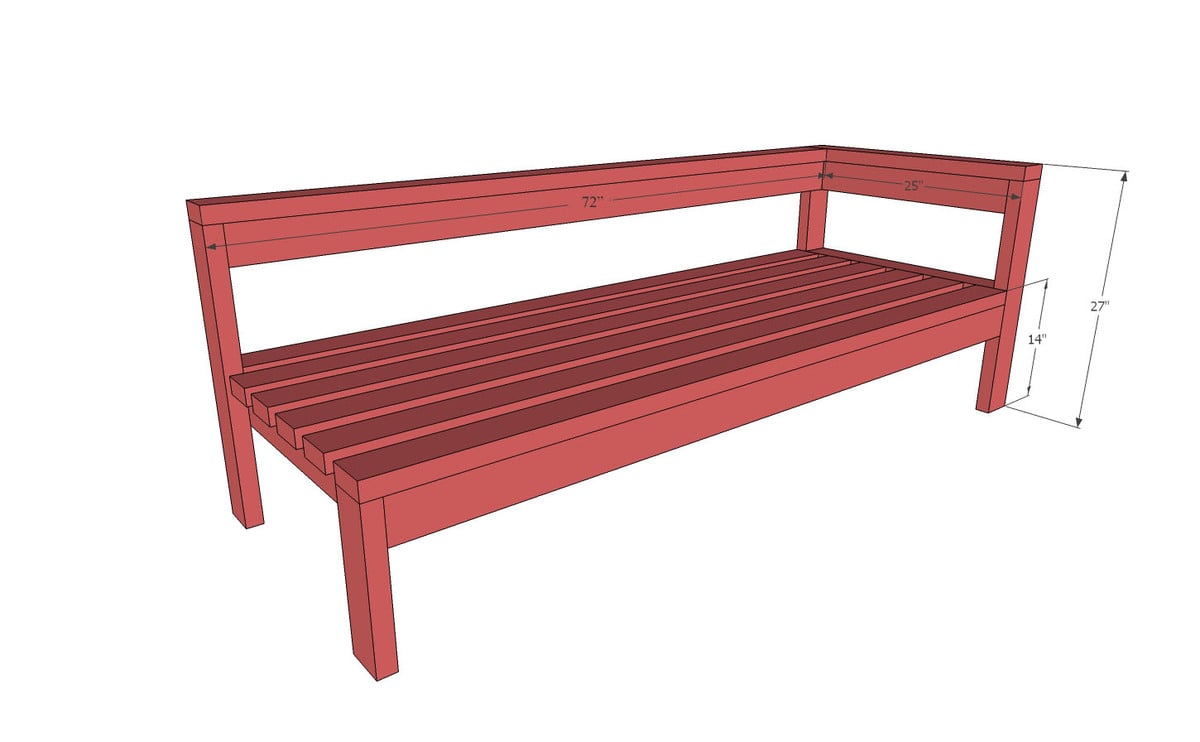
After so many requests, we've added a One Arm Sofa Plan (below) so you can turn your Outdoor sofa into a sectional!
For your convenience, here's the plans in this collection
- 2x4 Outdoor Sofa
- Armless 2x4 Outdoor Sofa
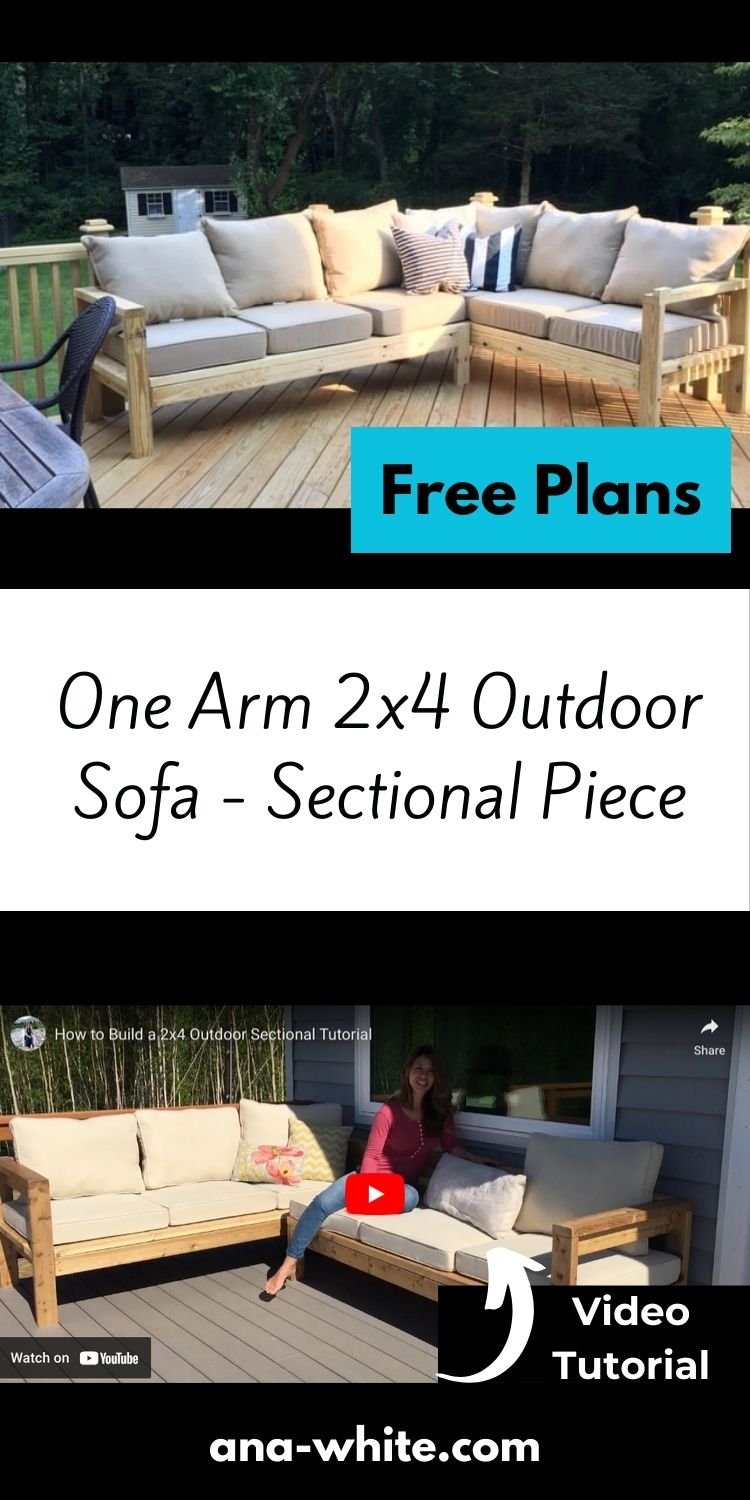
- One Arm 2x4 Outdoor Sofa (plans below)
- Outdoor Coffee Table
Here's Some Tips to Build Better Outdoor Furniture
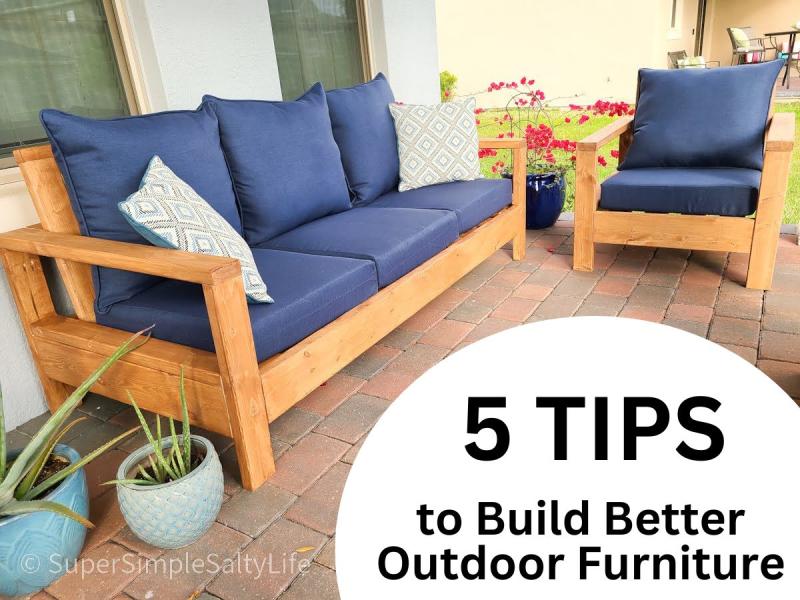
Want to build better outdoor furniture? Over the twenty years I've been building, maintaining, and enjoying my own outdoor furniture, I've learned a few tips that can help build longer lasting furniture.
Pin For Later!
Preparation
- (5) 2X4 @ 12 FEET LONG - CUT THE 70-1/2" AND 72" LONG PIECES FROM THESE BOARDS
- (4) 2X4 @ 8 FEET LONG - CUT THE REST OF THE BOARDS FROM THESE BOARDS
- 2-3/4" SELF TAPPING EXTERIOR DECK SCREWS
- EXTERIOR GRADE GLUE
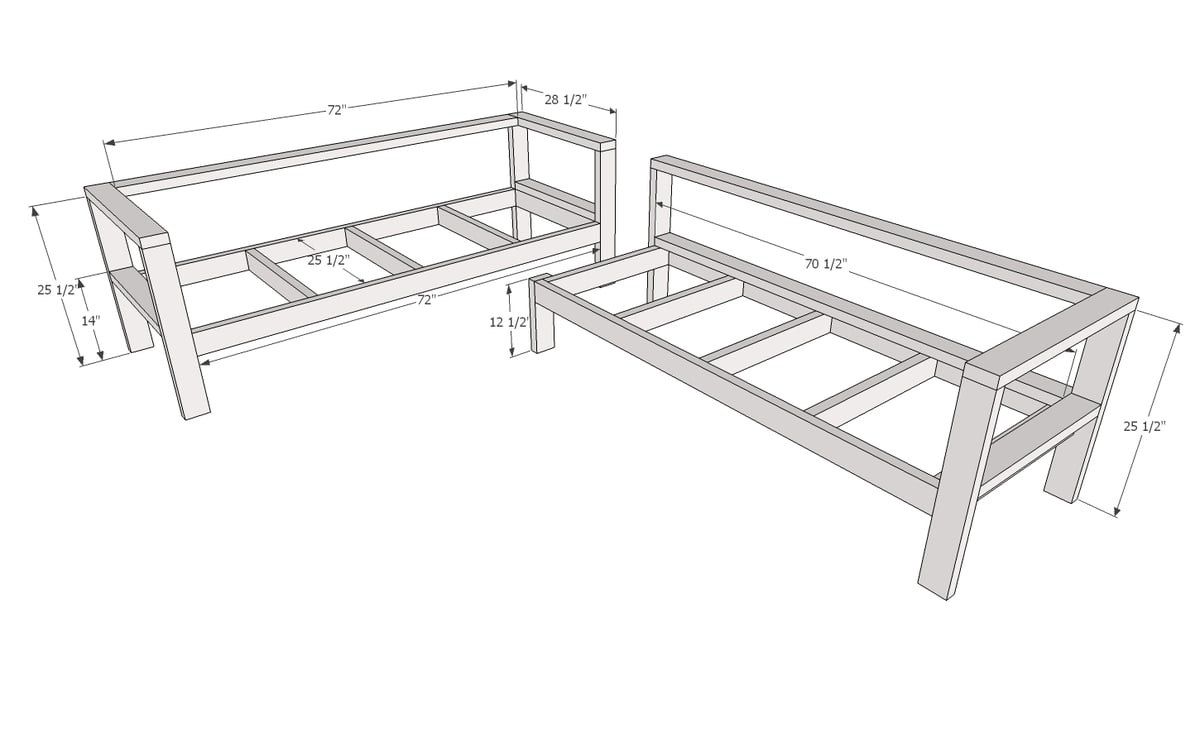
- (3) 2x4 @ 70-1/2"
- (10) 2x4 @ 25-1/2" (includes back support)
- (1) 2x4 @ 12-1/2"
- (6) 2x4 @ 72"
- (1) 2x4 @ 70-3/4" (back support--cut to fit)
- (1) 2x4 @ 28-1/2" (top arm piece)
Use glue at all joints.
Instructions
Step 1
Cut boards using a compound miter saw (preferred) but you can also use a circular saw.
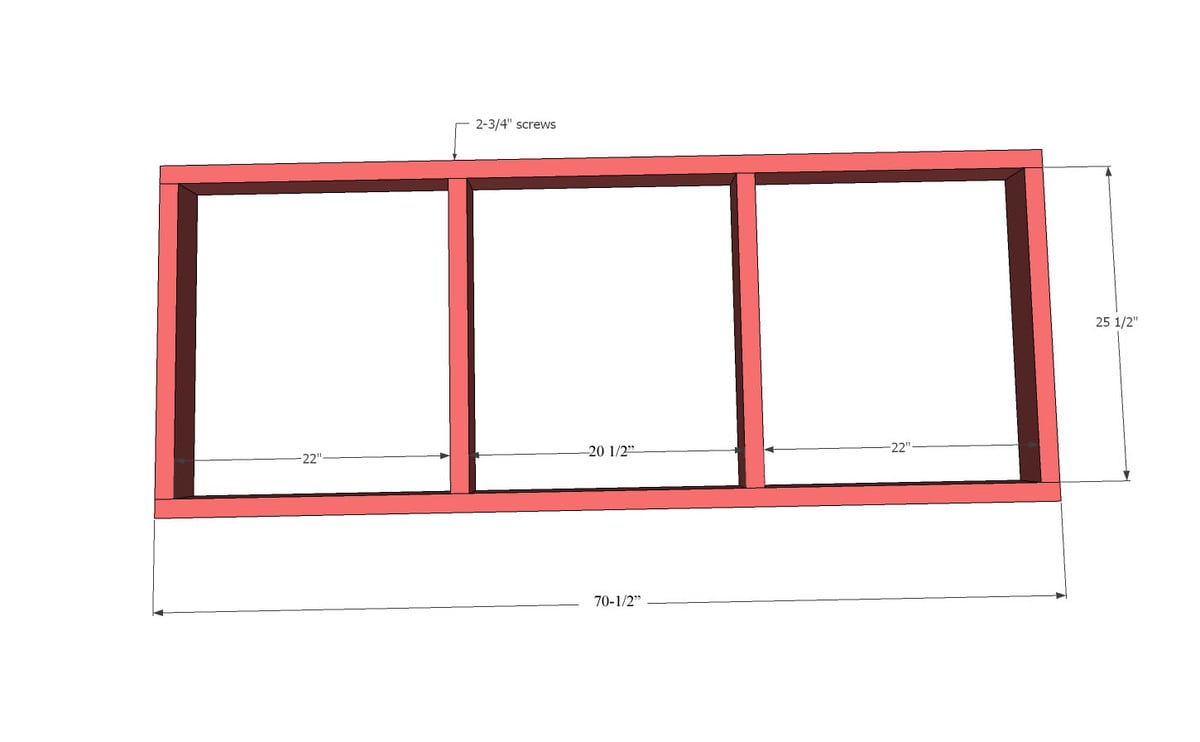
Build the seat frame using the self tapping screws.
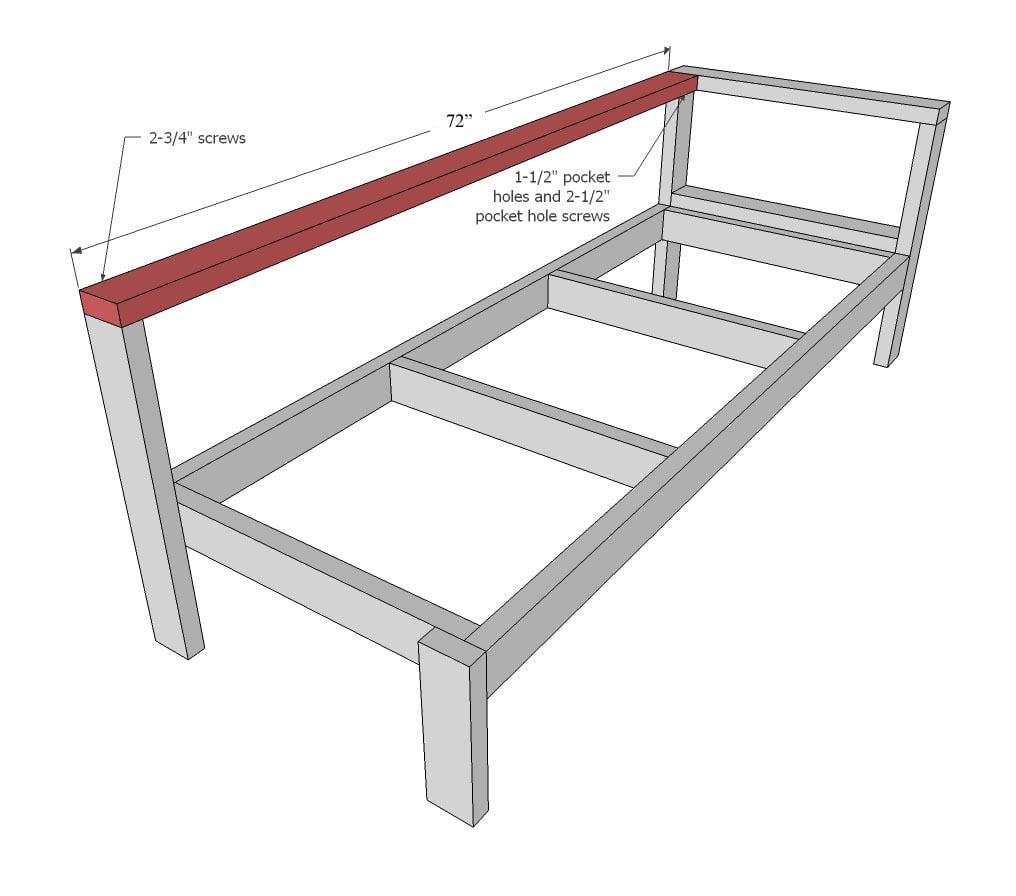
Step 2
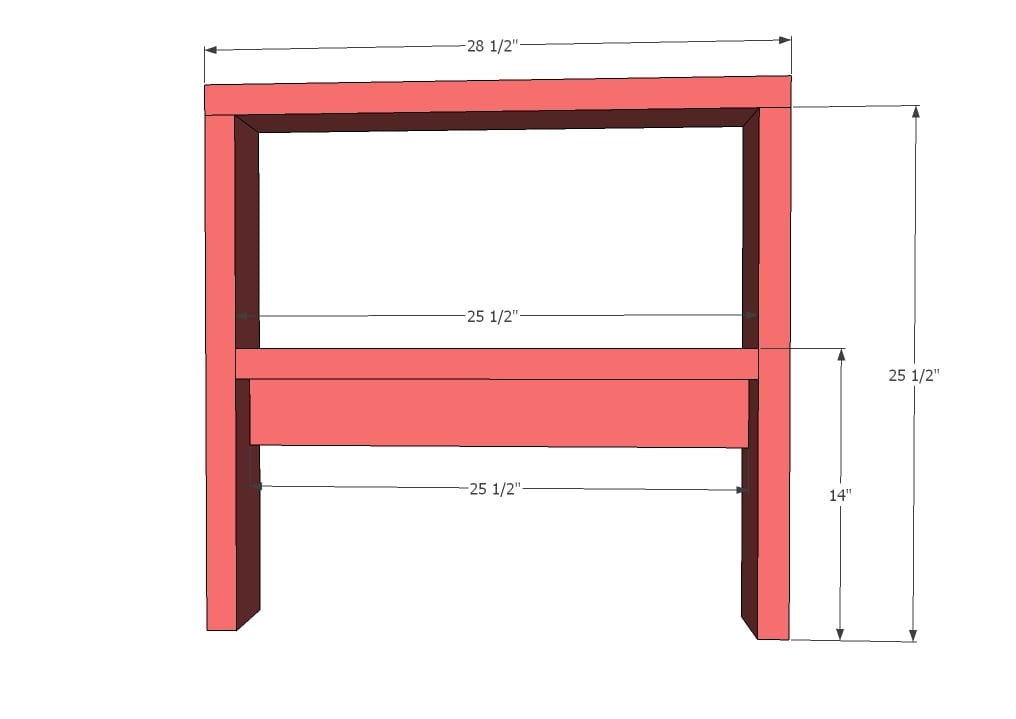
Build one of the arms with the screws.
Step 3

Attach seat frame to the arm with screws. Recommend screwing at an angle into the legs if possible for maximum strength.
Step 4
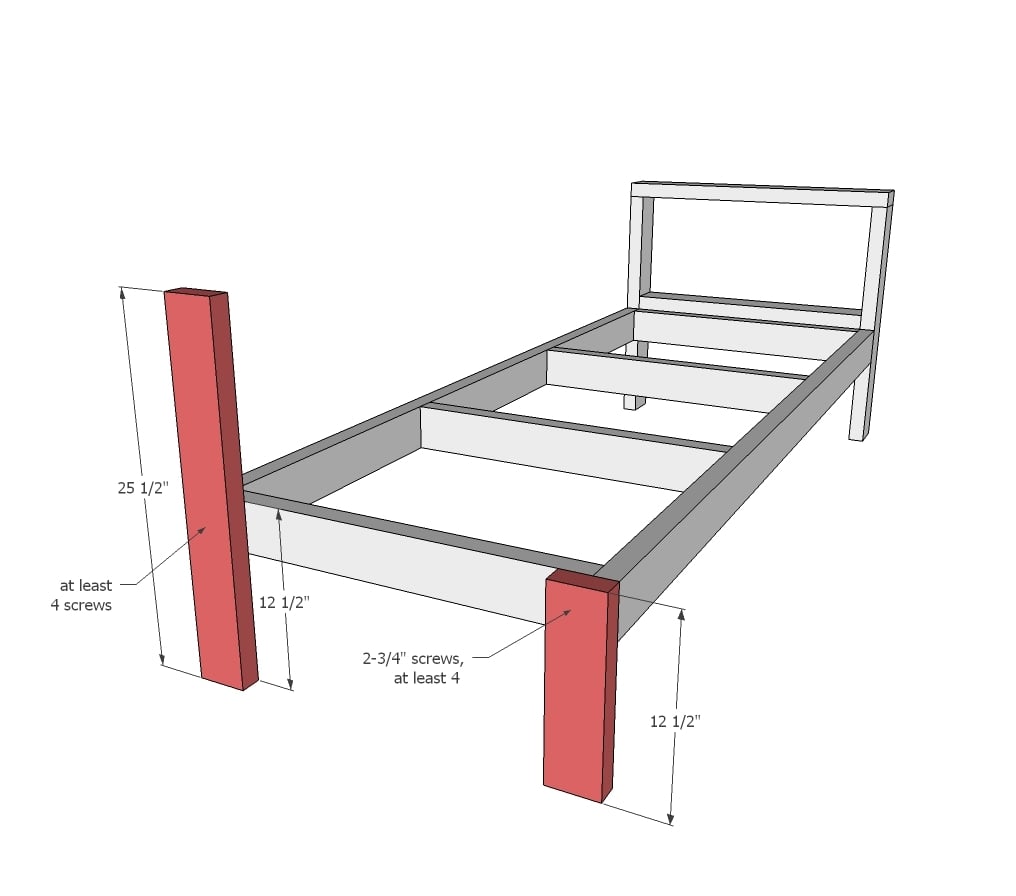
Attach legs to armless ends with screws.
Step 5
Step 6

Place decking on top, evenly spacing, and screw down, two screws per joint (recommended).
Step 7

Optional: Additional back support can be added as shown.
Step 8
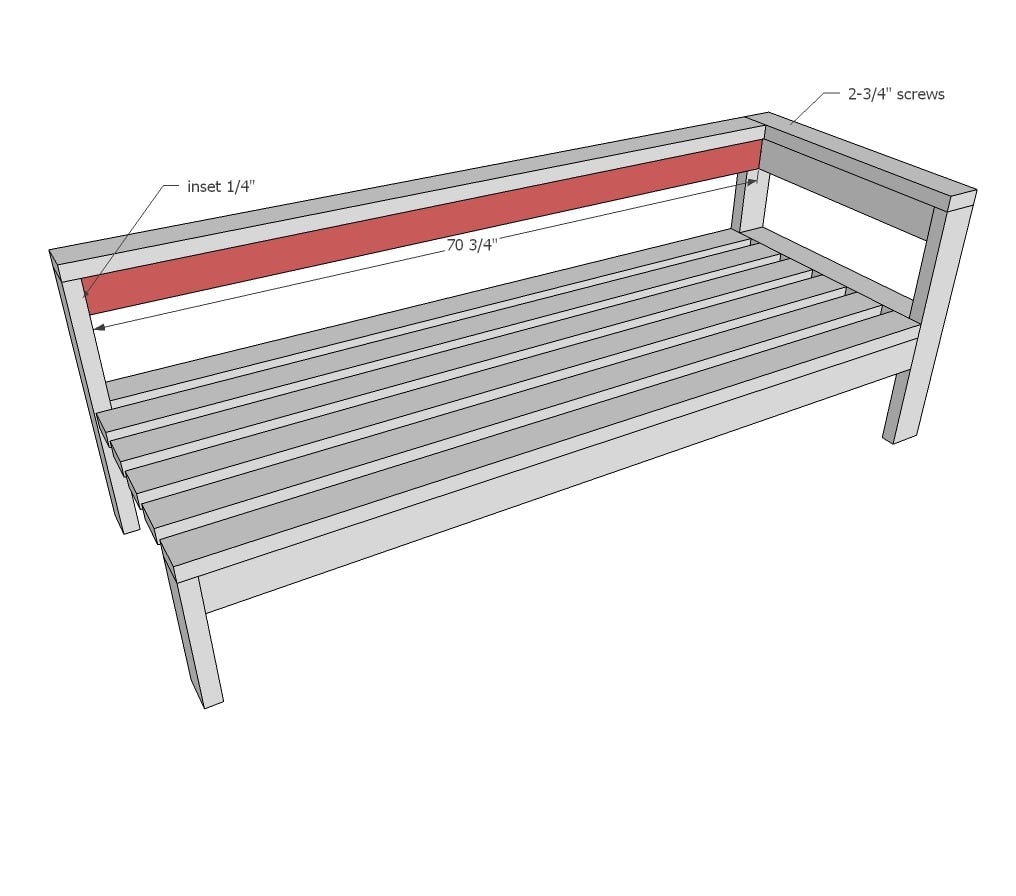
Optional: Additional back support can be added as shown.
It is always recommended to apply a test coat on a hidden area or scrap piece to ensure color evenness and adhesion. Use primer or wood conditioner as needed.


Comments
AndyH
Wed, 06/03/2015 - 05:01
Looks great
Looks great Ana might have to build this :-)
Jose Juan
Wed, 06/03/2015 - 20:35
Medidas del proyecto...
Hola Ana, hey tienes las medidas de este proyecto?... Espero que si ;)!
Saludos desde el Golfo de Mexico =)!
Michelle-Chaos…
Mon, 06/15/2015 - 12:09
Cushion Option
I keep looking at this and thinking how awesome it would be to have an affordable way to add seat cushions. I don't think the dimensions are exactly right, but it occurred to me that it is close enough to adapt to the size of a baby crib mattress. The benefit to that would be that most baby crib mattress come with a plastic or water repellant cover which would be lovely for patio use. I may try to adapt these plans to fit a crib mattress and report on the results.
In reply to Cushion Option by Michelle-Chaos…
Savannahsdad2016
Sun, 04/05/2020 - 16:51
Crib mattress
I tried the crib mattress it is too small
jamesbrown0304
Wed, 06/24/2020 - 04:14
Cot mattresses come in all…
Cot mattresses come in all sorts of different sizes, i've used one thats 140 x 70 x 10cm and modified the dimensions of the build to fit
jamesbrown0304
Wed, 06/24/2020 - 04:15
Yeah it's a great idea i've…
Yeah it's a great idea i've used 2 cot mattresses 140x70x10cm and modified the dimensions of the build to match
SuPrPhAtS
Wed, 03/09/2016 - 12:37
Instructions Missing :(
Sad day!
Ana White Admin
Wed, 03/09/2016 - 14:10
Plans
Sorry about that, they're over at Ryobi. https://www.ryobitools.com/nation/projects/4499
ZenithWoodWorking
Sat, 08/20/2016 - 18:13
Great Job!
I made on but changed it up just a little, but the basic plans didn't change much. I'll post on the brag wall.
Mikebogg
Sun, 02/25/2018 - 18:35
Downloaded Plans
Hi everyone! I know this is an old thread but the Ryobi pages arent working and I would love to get my hands on the plans and cut list for this project!! Anyone have any of these downloaded which you wouldnt mind sharing? Let me know!! Thanks!
terribilis19
Sun, 02/25/2018 - 19:37
plans missing
same!
thanks!
DovetailsandSash
Wed, 02/19/2020 - 15:27
Where is the 28 1/2” Piece?
Is the cut list suppose to have the one 2x4 @ 28 1/2” for the top of the single arm rest? I see it in the plans but not the cut list so I’m wondering if the material list is accurate? Thank you.
wolsen1031
Fri, 10/09/2020 - 09:53
I just had this issue... I…
I just had this issue... I now have an extra 25 1/2 and am short a 28 1/2" board..
MikeyMel
Sun, 04/12/2020 - 11:32
Love the sofa!
Great looking sofa, made one for my back deck <3
I noticed there is a 28 1/2" piece needed for the arm, but the cut list does not have this length listed, just a heads up!
amber.c.hammock
Wed, 04/22/2020 - 16:26
Cushions
I’m so curious where you got your cushions? I’m having a hard time finding the correct sizes
KCinKansas
Wed, 05/13/2020 - 18:47
I'm in the process of…
I'm in the process of getting all my supplies and plan on getting my cushions at this site: https://www.thefoamfactory.com/opencellfoam/HD36-R.html
and covering with an outdoor fabric
ethans
Sun, 04/26/2020 - 09:31
CUT LIST ADDITION
NOTE: be sure to cut a 28.5” board for the arm. It is not currently listed in the cut list.
DaveO
Mon, 04/27/2020 - 07:56
Awesome plans.
I completed one side this pas weekend. Super simple and all worked well. You only missed one item on the cut list and that’s the 28.5” cut for the arm rest. I can’t wait to finish it up this weekend.
ackerman521
Fri, 05/29/2020 - 08:34
Is there a way to modify…
Is there a way to modify this plan to match the Modern Outdoor Chair from 2x4s and 2x6s?
COSparky
Mon, 06/29/2020 - 09:12
Step 1 Dimensions off
Aside from the missing 28.5" piece from the cut list, I'm surprised no one has mentioned the dimensions in Step 1 are off by one inch. 22" + 20.5" + 22" + 1.75" + 1.75" = 68". The distance between the inside of the boards is 67". So I went with 22" from the outside boards and hoping it works out okay.
georgelza
Fri, 09/04/2020 - 02:00
Design program
Can I ask, what program you use to do these diagrams, I'd like to modify the design a bit to fit my requirements, Love the diagrams etc.
G
redmonsurf
Mon, 09/21/2020 - 19:35
Most likely SketchUp for…
Most likely SketchUp for wood workers.
wolsen1031
Fri, 10/09/2020 - 09:52
Incorrect Cut list
I really wish you listed the 28 1/2 board in your cut list.... I now have an extra 25 1/2 and am short a 28 1/2 cut....
twinmom
Sun, 11/15/2020 - 18:15
Would this be any more…
Would this be any more sturdy with pocket holes? Or same regardless. I’m new to this and haven’t used my kreg jig yet so not sure what the difference is. Also would it be good to add a support in the middle or no need? Thanks for all the amazing plans! I made the mud kitchen (second project ever) over the weekend and you make it so easy to follow! I’m addicted now!
angace44
Tue, 11/24/2020 - 11:10
Self Tapping Deck Screws
Cant find self-tapping exterior deck screws but says wood to metal, not wood to wood.
Anyone have a link to these type of screws needed?
angace44
Tue, 11/24/2020 - 11:15
Cant find self-tapping…
Cant find self-tapping exterior deck screws, the ones i did find say wood to metal, not wood to wood.
David Polston
Thu, 12/24/2020 - 05:49
Missing materials list parts
Ana, My daughter loves your site and to date, I have built 3 sets of your plans. I am by trade a professional carpenter and I will please ask you to recheck your drawings materials and cut list. I have had to develop my own plans because yours do not include everything or the cut list to materials bought are insufficient or wasteful.
In this plan you ask to buy 5- 12' and 4- 8' 2x4's. This did not account for the one board that is critical of 28.5" long for the chair arm and no mention of it on the cut or material list. I bought 7- 12' and 1- 8' 2x4 and had less waste wood and all of the parts.
Also consider a back for these benches. After the first set of plans I built (patio furniture) I designed and made backs for them as they were terribly uncomfortable.
Just a little constructive criticism.
astewart
Thu, 01/21/2021 - 12:25
OUTDOOR SECTIONAL MODIFICATION QUESTION
I love this outdoor sectional. I would love to build it and put it in our outdoor gazebo. I would need to make it more comfortable because we would sit on it for hours playing games. I have a bad back. Would it be possible to use an old trampoline mat for the bottom seating areas instead of decking and how could that be supported? Also, it would need to be chair height because my husband has bad knees. He's already had one replaced.
mmckinney3421
Sat, 03/06/2021 - 07:21
Cushions
What is the best cushion size for each “couch”?
cli2550
Sat, 04/24/2021 - 14:55
Cedar
I can’t find 2x4 cedar boards anywhere. I can find 1x4 cedar boards. Will that work? Or another kind of wood.
Thanks much!
RMarvin
Mon, 05/03/2021 - 16:35
I really like this sectional…
I really like this sectional. It looks great and is comfortable. My only wish is for a board to keep the seat cushions from sliding back. I might add a 2x4 toward the bottom/back to keep them in place. Otherwise, this was fun to make and easy with the plans. The hubby wanted me to use recycled 4x4's so I changed up the arms a bit, but they fit with the rest.