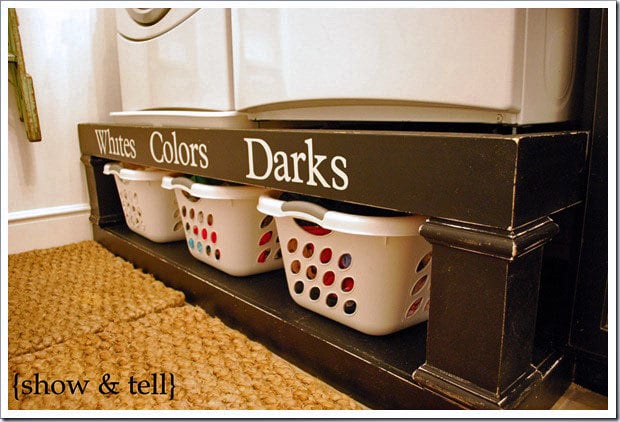


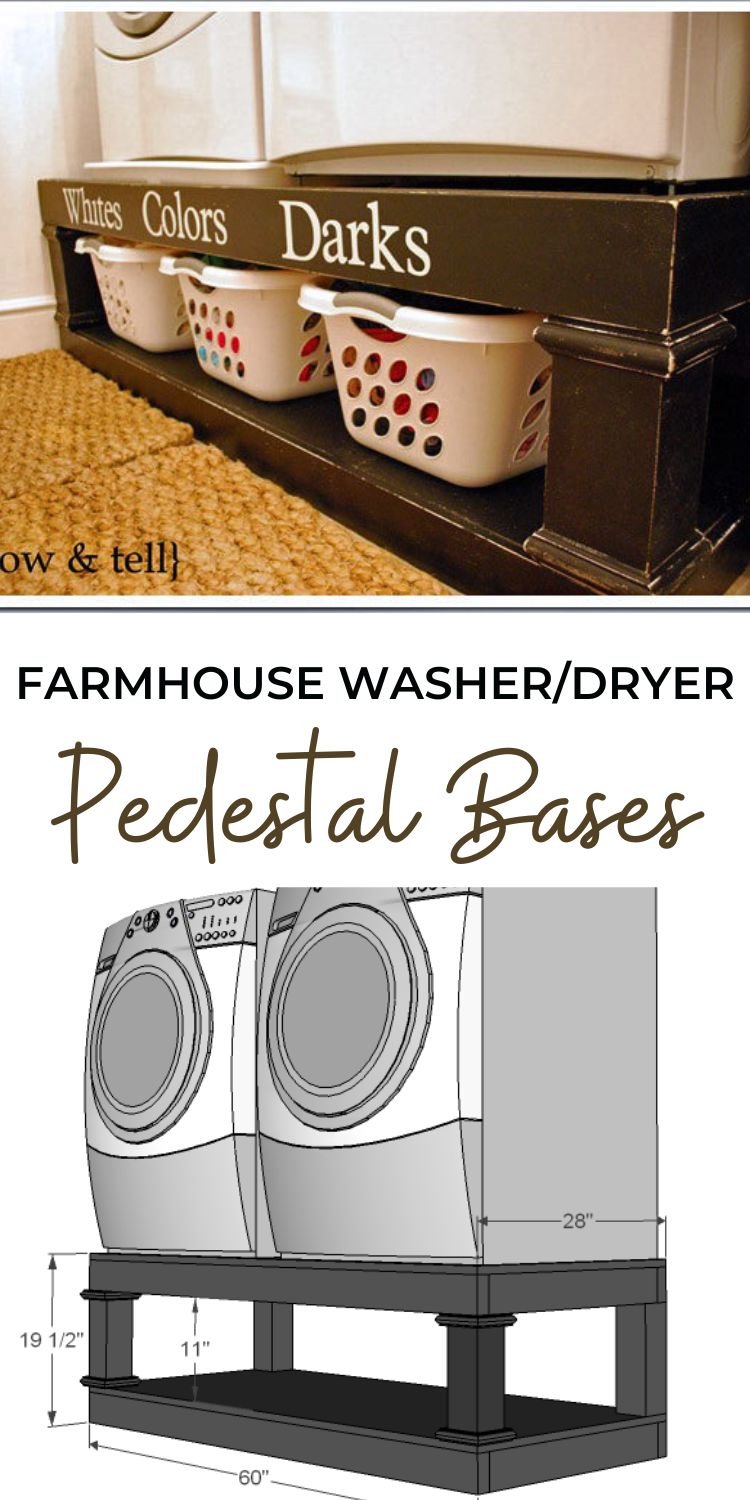
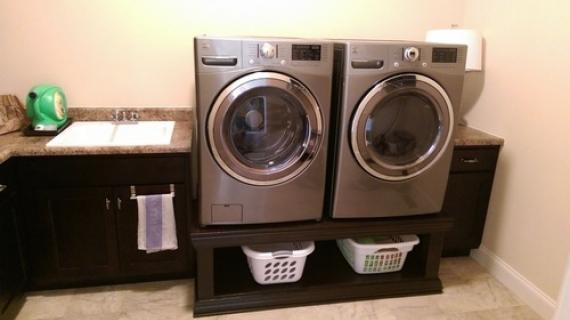
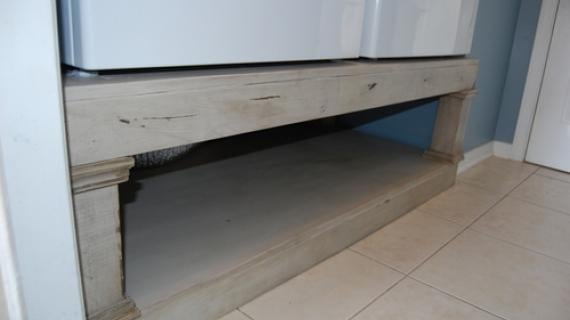
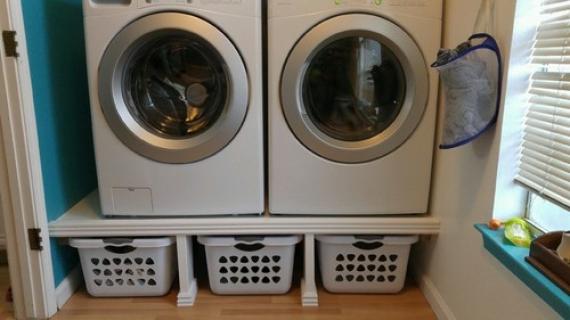
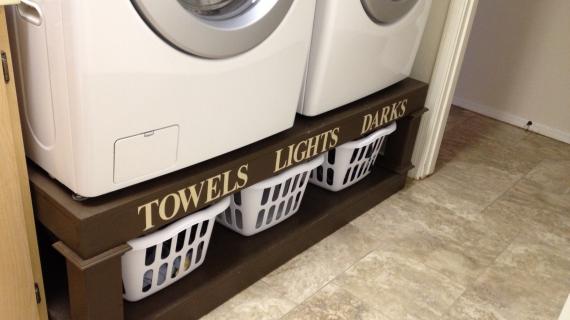
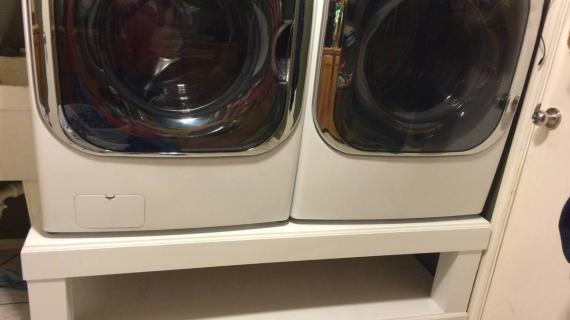
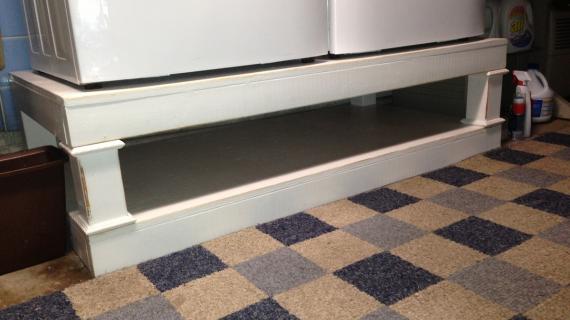
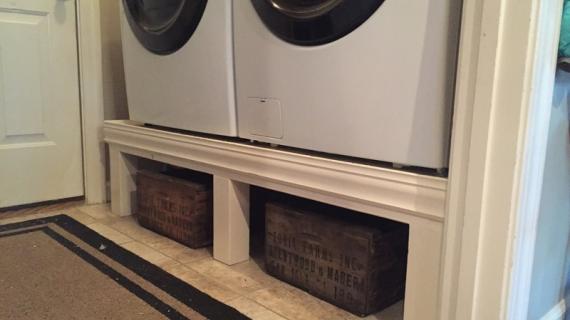
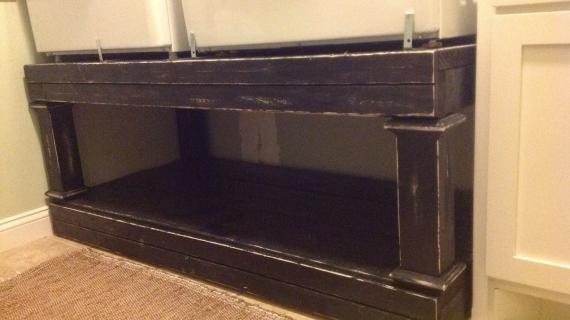
Build your own washer and dryer pedestal bases to bring your laundry up in height. Also includes storage for baskets. You'll love the step by step diagrams and cut list.
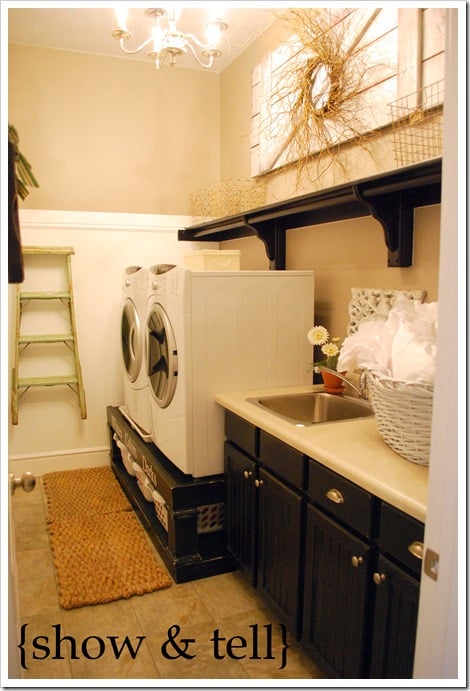
Special thanks to Sausha for letting us create this tutorial from her laundry room bases.

Pin For Later!
Preparation
- 2 – sheet of 3/4″ MDF or Plywood
- 5 – 2×4 @ 8 feet long
- 1 – 4×4 post @ 4 feet long (you can also use 2x4s laminated together – just add another 2×4 to your list)
- 1 – stick of base cap moulding like this @ 6 feet long and 1" brad nails for attaching
- 4 – Angle Brackets (like these)
- 3″ self tapping wood screws
- 2″ self tapping wood screws
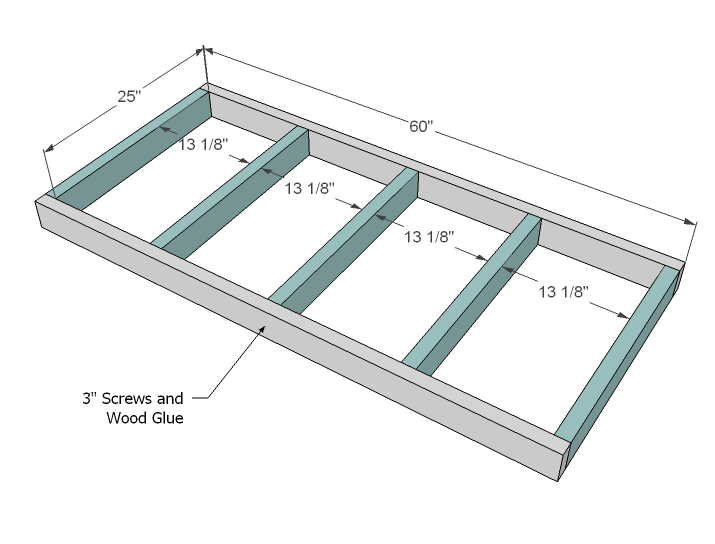
- 10 – 2×4 @ 25″ (Joists)
- 4 – 2×4 @ 60″ (Sides of Floor)
- 2 – 3/4″ Plywood or MDF @ 28″ x 60″ (Decking)
- 4 – 4×4 Posts (or 8 2x4s) @ 11″ (Posts)
- Moulding cut to fit


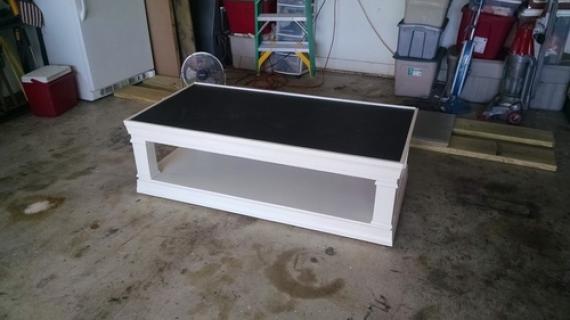
Instructions
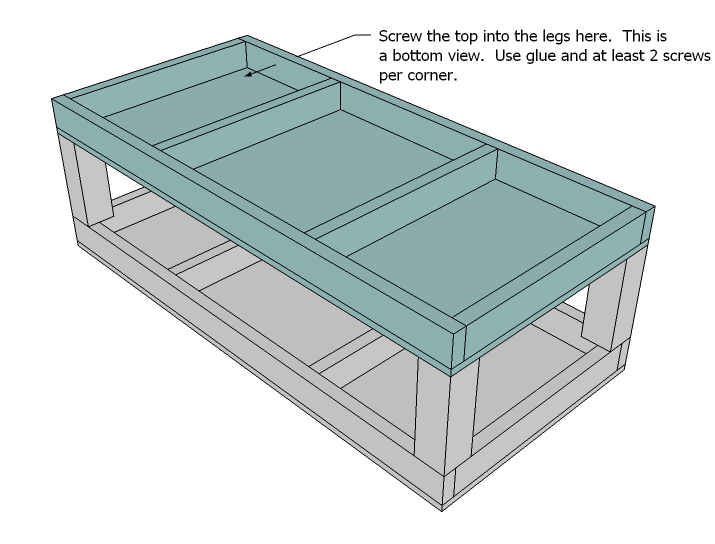
Step 1
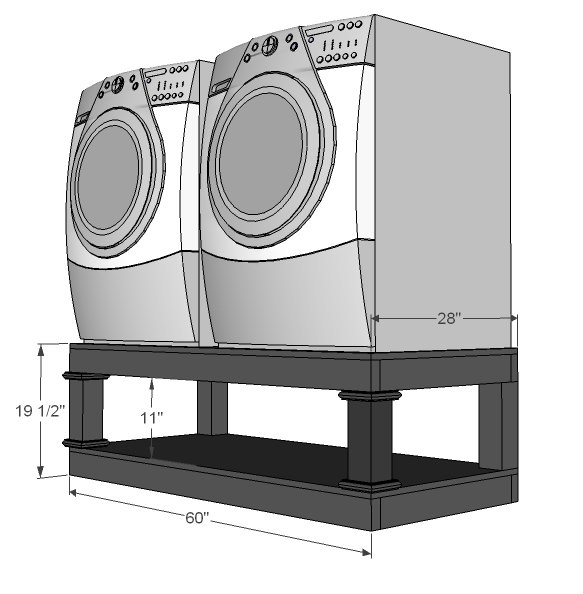
Floors
You are basically going to build two mini floors for this project. The top floor need to be built as shown above.
The bottom floor you can skip the center joists (minimal weight on bottom shelf)
Use glue and 3″ self tapping screws to build the framing. You can also use pocket holes if you have a Kreg Jig, on the 1-1/2" setting with 2-1/2" pocket hole screws.
Step 2
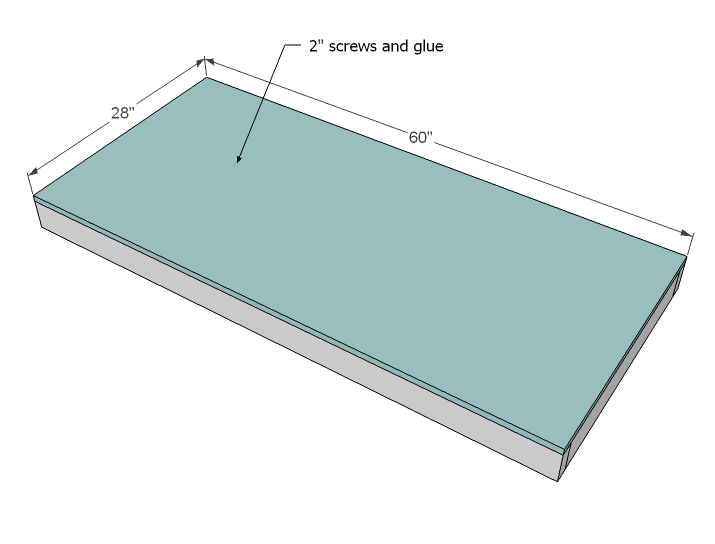
Decking
Screw the plywood to the top of the 2x4s with glue.
Step 3
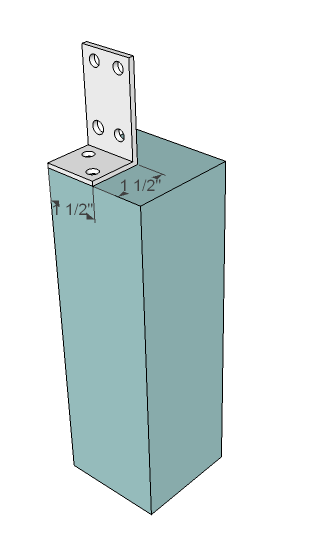
Corner Angles
This step is just because I have an old school washer and dryer that stomps out of the laundry room whenever I overloaded it. But the angles are cheap and will make your life easier. Screw down with 2″ screws.
Step 4
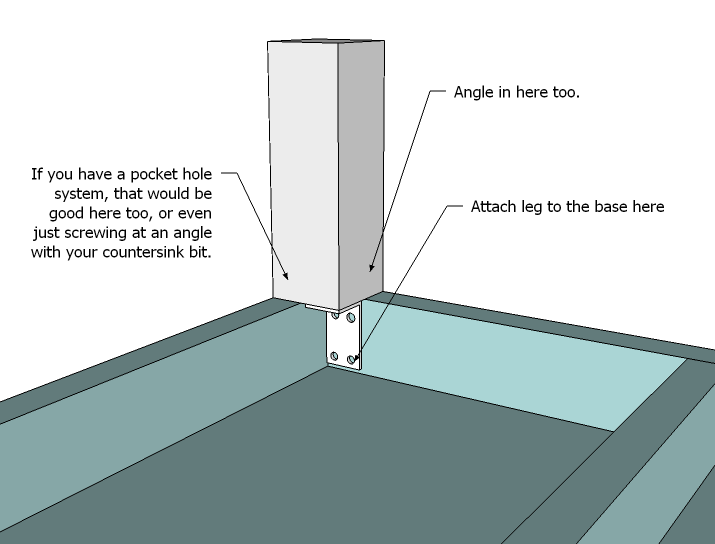
Attach Legs
Attach the legs to the top (the floor with the center supports) and screw down. If you can, add a few screws at an angle in as well.
Step 5
Place the second "floor" on the 4x4s and screw through the 3/4" plywood into the undersides of the 4x4 legs. At least three screws per leg is recommended.
Step 6
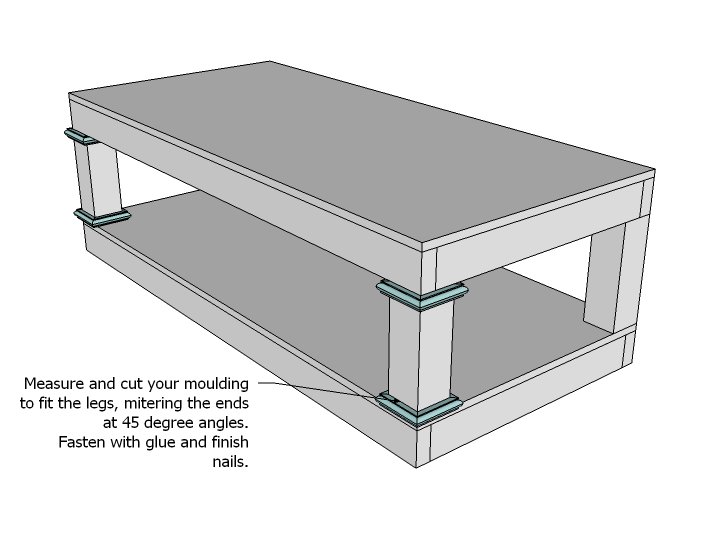
Trim
Cut trim to fit and attach around legs to fancy up the base (optional)
Step 7
Additional Bracing
If you find your base needs more support here are a few quick fixes -
- Cover the entire back in 3/4" plywood or MDF scraps from the build, glue and screw every 4" approximately to the 4x4 legs and the 2x4 framing with 3" self tapping screws.
- Attach the 2x4s framing to studs in the walls
Thanks Sausha!

Comments
Edie (not verified)
Sun, 01/30/2011 - 16:48
Like Tiffany, I am curious
Like Tiffany, I am curious for those who have built this (Sausha, etc) where their machines are located in the house. Our first house they were in the basement on the cement slab and they were SO quiet! Perfect! Now they are on our first floor on a tile floor and a vibrating loud mess. I LOVE these but am worried it would get worse.
Rebecca (not verified)
Sun, 01/30/2011 - 21:03
I have had my front load
I have had my front load washer/dryer combo for years. Even have the pedestals which are basically a waste of space except to raise the machines up to make them more accessible. Ugh!! (My pedestals aren't as deep as the current ones so can't hold liquid detergent) Anyway.... on the pedestal there is a slot for attaching the machine to the pedestal. This prevents the machine from wobbling off and if you have to scoot the machine around to get behind it the pedestal moves also. I imagine it shouldn't be too difficult to find a way to attach the machine to this pedestal also.
Sausha @ {show… (not verified)
Wed, 02/02/2011 - 13:57
My washer/dryer are located
My washer/dryer are located on a 2nd floor (not on a concrete slab) and everything is just fine. As long as you make sure your washer is level you arent going to get vibrations - wether your on a slab or not. The bottom of the washer has little feet that raise up and down - just use those to adjust and you should get very little vibration.
I did this is my laundry room almost 2 years ago now and everything is just fine.
Sausha @ {show… (not verified)
Wed, 02/02/2011 - 14:00
mine is all attached to the
mine is all attached to the wall, and i have cross supports as well so the thing is not going anywhere!! I have crawled up on top of that thing so many times to paint the walls and the thing doesnt even budge! If you are worried, you could always add center supports - maybe just push it towards the back so you couldnt see it??
Sausha @ {show… (not verified)
Wed, 02/02/2011 - 14:01
as long as your washer/dryer
as long as your washer/dryer are level you shouldnt have any problems. The bottom of your machines have little feet on them that you can adjust if you are getting vibrations.
Priscilla-The … (not verified)
Fri, 02/04/2011 - 06:27
These are definitely in our
These are definitely in our plans :)
We were going to just build up and tile the floor but storage pedestals are so much more clever :)
Amanda (not verified)
Thu, 02/10/2011 - 05:34
Beautiful! This will
Beautiful! This will definitely have to go into the mental filing cabinet for later! :-)
Derelique (not verified)
Mon, 02/14/2011 - 14:36
These are excellent
These are excellent instructions! Very well designed and made. For those looking for a platform that also includes drawers, I just finished making a platform for my front loader (LG) washer & dryer and have included a link to my DIY instructions and pics below. The drawers are deep and wide and come in handy for supplies or just dumping the clothes into when there's no laundry basket nearby. My laundry room is on the 1st floor entry way to the garage so I'm not sure about vibrations if it were on the 2nd floor. We installed it a few weeks ago and haven't had a single squeak, rattle, or vibration from the platform. So if you decide to make one yourself you can certainly re-enforce it as strong as you need (braces, long wood screws, thicker wood, etc.).
Thanks for posting, yours are awesome plans!
https://docs.google.com/viewer?a=v&pid=explorer&chrome=true&srcid=0B4HS…
Michelle (not verified)
Thu, 02/17/2011 - 16:34
I love this look, and my
I love this look, and my husband made this for me for Valentines Day! Love it. However there is a pretty big design flaw. My washing machine almost rattled the platform apart. (and we did have a repairman come out to make sure it was not the machine) We have had to add extra stabilizers to keep the washer from moving around. A few extra legs and something to keep the entire platform from moving from side to side. Still Love It! But I would suggest you add a little something more to keep everything stable...
Mickey (not verified)
Tue, 03/01/2011 - 20:22
This was my first project and
This was my first project and it came out great! Thank you for the instructions!
Nicole (not verified)
Thu, 03/03/2011 - 09:42
Where have you been my whole
Where have you been my whole life??? Someone just shared your blog with me and I LOVE it. This is my favorite now!!! Thanks for all you do!!
Lisette
Thu, 03/24/2011 - 08:44
4x4???
Is it ok to use pressure treated 4x4's or should I buy 4x4 cedar???
aliciad
Sat, 03/26/2011 - 13:26
(No subject)
Pookie's Mama (not verified)
Sun, 03/27/2011 - 16:31
Front Loader Vibration
Sadly, I already have pedestals, otherwise I'd build these in a heartbeat. LOVE them. We had to put in extra supports for our hard wood floors on our main floor laundry room when we installed our front loads. Felt like we had earthquakes happening on our 24" center joists. Since our basement ceiling was a drop ceiling that was ok. Also, just ordered and received: Silent Feet. After doing some research and reading some reviews, from VibrationSolutions.com. I'm not affiliated with them, but my husband manages a machine shop and recommended these to absorb the vibration. Since they'll raise the height of the washer, and that would tweek out my anal tendencies, I got a set for the dryer too. Shipped quickly, both sets and shipping were around $75. If it saves my glassware and stemware from chipping from jingling together and my teeth from bouncy around, I'd think it's a great solution.
Tiffany: A single board while it is the same thickness as plywood is not necessarily as strong as plywood since the plywood is glued together and typically is stronger for the same thickness as a piece of soft wood like pine, If you used oak that could be cool, but REALLY expensive. If you found used tongue and groove flooring that would be stronger.
Melissa Gossage
Wed, 04/06/2011 - 11:31
CANNOT WAIT TO BUILD THIS!!!!
I absolutely cannot wait to tackle this project. I am a complete NEWBIE and this will be my first project. Luckily i will have GREAT HELP. I am just a little worried about getting it perfectly level because my washer shakes enough as it is right now but we will make it work! :)
Thank you so much Ana, i was just introduced to your blog and i am so HOOKED!
Sharon L (not verified)
Tue, 04/12/2011 - 16:00
I have had my front load set
I have had my front load set up on pedestals for ten years with never a problem. Mine are just plain plywood, but since we are thinking of downsizing i would LOVE to build this! Also Ana, you could fix a front loader no problem, I have changed a pump and a belt in mine easy peazy, so don't shy from them for that.
Sniks (not verified)
Wed, 04/27/2011 - 10:14
Question on the color
What color is this? Is it a brown paint or a solid stain? I absolutely love this and am going to build this on Saturday! Thanks for sharing!!!!!
Guest (not verified)
Thu, 05/19/2011 - 16:19
possibly too tall?
I adore this pedestal and am dying to build it, but I already have the pedestal underneath the front loaders. After measuring, the top of the washing machine/dryer will be 75 1/2" tall. I really need storage for my laudry baskets!!! My ceilings are vaulted, so I was wondering if it would be better to build something like this to go over the front loaders? Any ideas? I know we can think of something brilliant...
brandi_leigh
Sun, 05/29/2011 - 11:16
Beautiful! This is perfect
Beautiful! This is perfect for our new, tiny-no room for a basket-laundry room. Can't wait to get started!
nikohb
Wed, 06/01/2011 - 13:52
Shorter pedastal legs???
I only have a little over 15 inches of space to work with in my laudry room because I have cabinets above my washer and dryer. My plan was to shorten the legs, the 4x4 support beams to 6.5 to accommodate for the height difference, then fill the space with those under the bed tote boxes that store blankets, decor, etc. Not sure if this will create issues with support or not. Would it be more viable and/or still work with 2x2s instead of 2x4s to get extra space for the supports? Not sure which is better,
Shorter legs, different dimension of wood...
Any thoughts?
Any help is appreciated!
luann (not verified)
Thu, 06/30/2011 - 09:50
pedestals
I am in the final stages of building the pedestals and I was wondering if you could tell me how these were painted. If it is paint what kind-gloss,flat,satin?
John Yeh (not verified)
Sat, 07/02/2011 - 08:09
What can you do when you
What can you do when you currently have a drain pan under your washer. How will the pedestal work in that scenario?
Guest (not verified)
Sun, 07/17/2011 - 20:14
laundry room pedestals
Thanks for this post. These have inspired me to change up my laundry room. It's TINY and doubles as the shop, as I bought a house without a basement or a garage in order to afford it in the area of town I wanted to move into. So, I will put the dryer on one of these pedestals to get more storage space. Right now it's on a wooden box - poor use of the space. And I'll also change the storage cabinet so that it's a pedestal with two levels. The bottom will be laundry storage. The middle shelf will have cupboard doors which I will retrofit from the cabinet that's in the space now. The top will be my work surface - again, I'll try to use a piece of the formica that covers the current storage cabinet. I'll send pics when all is done. So glad I discovered this site. I've wanted to do many of these projects for a couple years but have been afraid. These projects are helping me get "unstuck."
Guest (not verified)
Mon, 08/08/2011 - 07:15
Appliances Sales Trainer
Just a note. Please make sure that your Peds are solid. Front loaders spin up to 1400 RPMs. If the Peds are not solid w/out give, your front loader could walk right off a handmade ped. and you would have a very expensive bill on your hands.
Also note. Someone mentioned to make sure your washer is level. Please follow their advice...lol Walking happens when the washer is not properly levelled and does not have a solid floor/ped to support it.
Happy Washing! Sausha...you're laundry room is a dream! ;)
OH PS! Check your washer's manual...non-manufactured peds void the warrenty on SOME models.
Guest (not verified)
Mon, 08/08/2011 - 07:16
Appliances Sales Trainer
Just a note. Please make sure that your Peds are solid. Front loaders spin up to 1400 RPMs. If the Peds are not solid w/out give, your front loader could walk right off a handmade ped. and you would have a very expensive bill on your hands.
Also note. Someone mentioned to make sure your washer is level. Please follow their advice...lol Walking happens when the washer is not properly levelled and does not have a solid floor/ped to support it.
Happy Washing! Sausha...you're laundry room is a dream! ;)
OH PS! Check your washer's manual...non-manufactured peds void the warrenty on SOME models.
kboarderchick85
Thu, 08/18/2011 - 13:33
Stacking units?
We have the sport model so they are stacked, but we have very high ceilings, can you use this with them stacked or would it be unsafe? i know I could modify it to be shorter so the weight would be supported under each side but it would make them pretty tall. I love Sausha's laundry room, ours is not that big but I can imagine ours looking as beautiful!
Janean (not verified)
Mon, 09/05/2011 - 19:17
Love this idea...wish I had
Love this idea...wish I had seen it before we shelled out all the money for the drawer ones that we NEVER use! but I needed the height!
Ok...this may sound very cheesy, but I wanted to mention how appreciative I am that in your list of necessary items, you include HEARING PROTECTION! As an audiologist who also likes to build and use power tools, I can't stress enough the importance of protecting the hearing! Thanks so much! Maybe one less person who will have to wear hearing aids :)
Craftycraftswoman
Tue, 09/20/2011 - 16:18
I heart this build!
I made this about a few weeks ago. It is almost too pretty for my laundry room!
Thank you so so much for sharing!
Lynne H (not verified)
Sun, 10/16/2011 - 13:38
Made vibrating worse!
I love the pedestal, but we are unfortunately having to pull the machines off of them. My husband built it exactly as outlined. Our laundry is on the first floor, over a basement, so we are on joists. The washer has been leveled multiple times, and does NOT walk at all. We have an LG front-loader. In the old house, on basement slab, no vibrations, no noise, no problems. In this house, even before the pedestal, we had some minor vibrations. The machine doesn't walk, it just vibrates. We even put it on vibration dampening mode, which helped a little. But once we made the pedestal and placed the washer and dryer on top, the vibration became significantly worse. We tried putting a car jack under the center of the pedestal for added support, and that helped a little, but not enough. I've been monitoring for the last few weeks, but today, the vibrations were even worse. We've checked and the machine is level from all directions. It hasn't moved, it hasn't walked. But the shaking is so bad that we fear it may be damaging the machine. I'm glad that so many others have made this without any problems, but wanted to add our expeirence that you may indeed run into vibration issues. If you had any vibration issues before (or shaking), adding the pedestal MAY make it worse. Wish we could find a way to solve this, as the pedestal is beautiful and we hate to get rid of it!
matt.deutsch01
Tue, 11/08/2011 - 05:39
VIBRATION ISSUE
This was the first thing I built for our new house, and we were very excited to gain some additional space in our second floor laundry. However, as many have noted, the vibration issues are very concerning. Has anyone been successful with additional bracing/support to remedy this issue?
Thanks
Woodburnd (not verified)
Thu, 12/08/2011 - 17:58
This is SO cool! For your
This is SO cool! For your guys' vibrating issues, we had the same with our washer when we moved into our new house only a couple months ago. We just reset all of the adjusters on the feet of the washer, then leveled it from there. For some reason, it worked - it's only a minor suggestion but it's worth a shot!
Jaci (not verified)
Tue, 12/20/2011 - 07:51
My only question would be how
My only question would be how to modify it as my dryer vent is on the floor. So I couldn't push this all the way to the wall. Is your measurements all the way to the wall or should I just adjust for that???
Jason_of_Austin
Tue, 12/20/2011 - 10:47
To above
The dryer vent tubing should be able to stretch if you need more length, if not you can always purchase another tube at local store, they run 5-8 bucks depending where you get them from. Also you could aways notch cut a square to let dryer vent tubing go down. Hope that helps.
Guest (not verified)
Wed, 12/28/2011 - 19:23
Attached to wall?
We are in the process of making this so I checked the original post and it sounds like she attached it to the wall for more support. How exactly did she do that?
Guest (not verified)
Fri, 01/06/2012 - 18:56
Cost?
How much are all these supplies?
$$$??
Guest (not verified)
Sun, 01/15/2012 - 07:54
Material costs and wall attachment
I've noticed a few people asking about the cost to build this. I'm a contractor by trade. I'm also 5 month pregnant and needed to put my front loaders up on a pedestal. I started drawing up some plans for building a pedestal and stumbled across this design. I must say that I truly love this Ana!
The estimated material costs for this project should be around $125.00 from your local Lowe's, Home Depot, etc. If you have a local lumber supplier that has better prices, you can get it accomplished a little cheaper.
Some people have also asked about securing it to the wall. I don't know how Sausha did it, but it's not a big task if you have just a little patience. You can do this a couple of different ways. But the first thing you need to do is locate the studs in the wall that you will be anchoring to. You can do this with an electronic stud finder, or you can use a pin nail and nail it into the wall until you hit a solid stud. Once you find one, you should be able to measure every 16" from there and find another one. From there, you can use some really long screws and drill through the 2x4 brace in the back side of the upper platform into the stud in the wall. Just make sure your screws are long enough. If you don't mind having some visible hardware behind your washer/dryer, you can use angle brackets. Just screw one side of the brackets into the top of the pedestal and the other side into the wall studs. Just make sure you don't miss those studs because drywall won't hold it.
It's also important to note that if you have any trim or base molding at the bottom of your wall, this won't work perfectly. You will need to either remove the trim so that the back of the pedestal is tight against the wall, or you can attach a 1x4 to the back of the top platform of the pedestal (or directly to the wall if you already know exactly where you are putting it) to close the gap.
Guest (not verified)
Mon, 01/30/2012 - 07:46
shopping list vs. cut list
I built this yesterday, and the design seems very sturdy. I did want to point out one minor inconsistency in the plans, however. The shopping list specifies 5 2x4s @ 8' each. The cut list says you will end up with 4 60" lengths plus 10 25" joists. The shopping list assumes you will leave the joists out of the lower floor, whereas the cut list assumes you put them in. This can cause confusion at the local lumber store as you start counting your cut boards (don't ask).
I haven't built much with a saw in over 25 years, so the fact that I completed the assembly in a day is a testament to the well thought-out build. I think the hardest part was getting the legs to stay square (the end grain on the 4x4s seems to want to push the screws around and misalign everything). Other than that, assembly was very smooth. Kudos!
Guest (not verified)
Wed, 02/01/2012 - 14:54
Photo vs Diagram
Sausha's photos look like it's built with the 2x4s doubled everywhere, making them 4x4s but the diagram/ plans don't specify for it to be done that way so I'm just a bit confused as to how it should be. I want to build this this weekend but I want to be sure to do it right so that it's nice and sturdy.
rstocks
Fri, 02/03/2012 - 20:26
A Suggestion
For those of us who have a laundry room located on the second floor, we are familiar with the quite necessary tray that sits under the washer machine in case of overflow. I saw a question earlier in the post about using the tray with the pedestal. I was able to put the tray on top of the pedestal (I used a small amount of adhesive to discourage slipping since you obviously wouldn't want to drill bolts through the tray).
Also, I had wanted the new pedestal as a place to store the laundry baskets. We already had the manufacturers pedestals. In order to use the manufacturers pedestal with the tray, we simply bought the anti-vibration pads from Home Depot ($30). It raised the washer exactly how much we needed in order for the door to clear the tray lip and it did seem to help with vibrations, though that's never been much of a problem. One positive of using the manufacturers pedestals in conjunction with this pedestal was that we were able to run a strap over the manufacturers pedestal (before attaching w/d) and used the strap to secure the appliances to the pedestal.
Guest (not verified)
Sun, 02/05/2012 - 18:25
How do you get the washing
How do you get the washing machine up there?
Milca (not verified)
Mon, 02/06/2012 - 19:34
Build these in the Fall
And they are very handy! Renovating an older house and wanted to bring the laundry to the main floor. Unfortunately, our plan worked well on paper, but come installation... the toilet seat and the dryer door didn't like each other :) So, build the pedestal and now the layout works great with the space that we have. Only recommendation, if you like to fill your baskets pretty fully, make sure you give yourself enough room between the top of the basket and the second 'shelf'. Didn't give myself enough allowance, baskets fit only if they are not full. Bottom shelf now serves as storage for toilet paper and laundry supplies. Still very handy, but just something to keep in mind. 1/2" clearance wasn't enough for me (I lowered the 4x4 posts thinking it was a good idea). Other than that, the plan is fantastic!!
Guest (not verified)
Tue, 02/07/2012 - 04:51
How did you get your washing
How did you get your washing machine on top of the pedistal? Isn't it too heavy for 2 people to pick up?
Tammy Petz (not verified)
Wed, 02/08/2012 - 17:44
Would love to know the color
Would love to know the color you used. Is it brown or black or stain??? Writting out my list so my husband can get to work on it this weekend ;) Thanks a bunch!!
Amanda Hughes (not verified)
Tue, 02/21/2012 - 10:36
Just finished this project...
Just finished this project... So happy with the results! Just measure your space first lol! This was my first diy project ever and I forgot to measure my laundry room space so after building the whole thing we had to sand about a half an inch off each side to make it fit. I love love love it though! Saved us $600 on the metal drawer pedestals they tried to sell us with our new washer and dryer! Thanks!!
Gordon_Shumway
Sun, 03/04/2012 - 22:46
Height of Cabinets
I was so excited to have this as my first project as my wife gave me a Kreg Jig for Christmas.
My dryer and washer have a sink in between them, so after I measured "Everything" to fit for my dryer as that is the one I was going to make first, I didn't measure the bottom of the cabinets to how high the the top of dryer would be.
On the dryer I can only raise it 13" before the top is touching the bottom of the cabinets. It is a Neptune with the buttons on a arched top part.
For the washer I can go up 16 1/2" as it is a Samsung with the buttons on the front and not the top.
Now that I had everything almost together I have figured out that 19 1/2" is way to tall.
I am thinking of turning the 2x4s on their sides and using the skinny sides to attach the decking to.
Is this going to be strong enough to hold the weight with the boards like that?
Thanks
Mike
SteveD (not verified)
Mon, 03/12/2012 - 15:36
I am fixin to build one of
I am fixin to build one of these. I already got the wood (some poor soul at the local big hardware store had to cut up a small pile of 2x4s).
My thought was that the design as is might be a little wobbly, with the only thing keeping it upright being the screws from the 4x4 posts into the bottom platform. So, I was going to use a modified design where the posts rest inside the 2x4's. But now I'm wondering if the corresponding reduction in vertical strength would be worse! (since now the only thing holding up the upper platform is the plywood/MDF and however many screws and brackets I use to attach 2x4s to the sides of the posts).
SteveD (not verified)
Tue, 03/20/2012 - 08:36
I posted my thoughts to
I posted my thoughts to another forum and somebody suggested using Simpson Strong-Tie brackets. So I got a half dozen of those for four bits apiece (a.k.a. three bucks total) which should provide the additional vertical strength I desire. Furthermore, I got additional posts for the middle of the platform (though that means I can only fit two laundry baskets), so the feet of the machines will hopefully be resting right on top of the posts.
Robyn (not verified)
Wed, 03/14/2012 - 14:07
Hubby is a carpenter, n=but
Hubby is a carpenter, n=but like the shoemaker's children, I often get put on the bottom of the list, but this is definitely going on the frig to spur him on. Since we have a laundry closet I think we will dispense with the bottom shelf and just make one shelf from wall to wall about 18" up!
Guest (not verified)
Fri, 03/16/2012 - 10:54
Laundry room
What a great idea for the pedestals - this is a beautiful laundry room!
Denver Interio… (not verified)
Tue, 03/20/2012 - 20:25
Why Didnt I think of This
This is just incredible. I've seen things built to lift up the washer and dryer higher off the ground so you dont have to bend over, but to actually store something in there... what a great idea.