Community Brag Posts

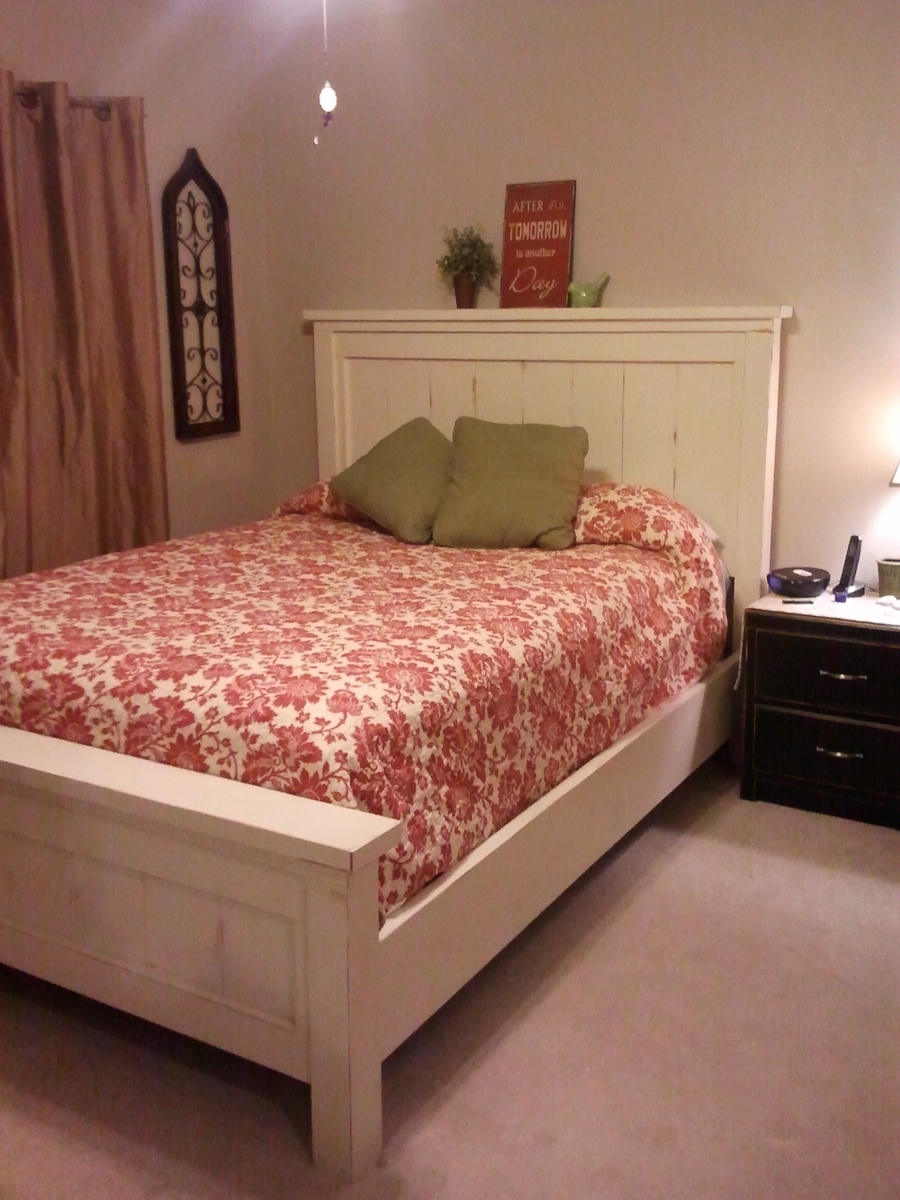
Queen Farmhouse Bed made for a Box Springs
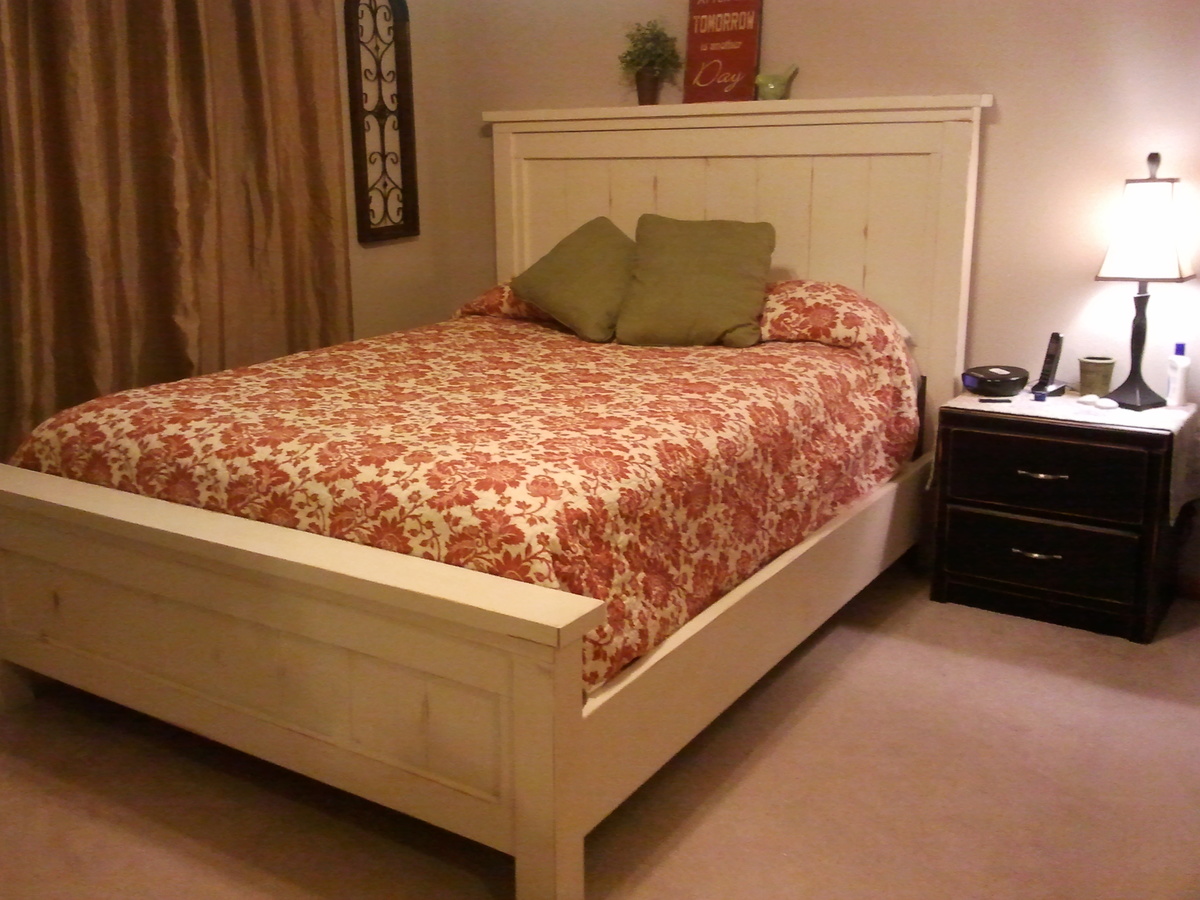
This Farmhouse Queen Bed for use with a box springs is the first woodworking project I have done in almost 30 years (high school shop class). It was so much fun.
I did buy the No-Mortise Bed Rail Fittings from Amazon to hook the head board and foot board to the side boards. I also bought the Mantua Steel Bed Frame System at Overstock.com for $64 after a discount I found online.
To support the rails I screwed and glued 2 X 2's at the very lowest part of my side rails. It seemed to work well and I didn't have to worry about having a good sturdy support system for my new mattress and box springs. This rail system has three rails and each rail has a center support that extends to the floor.
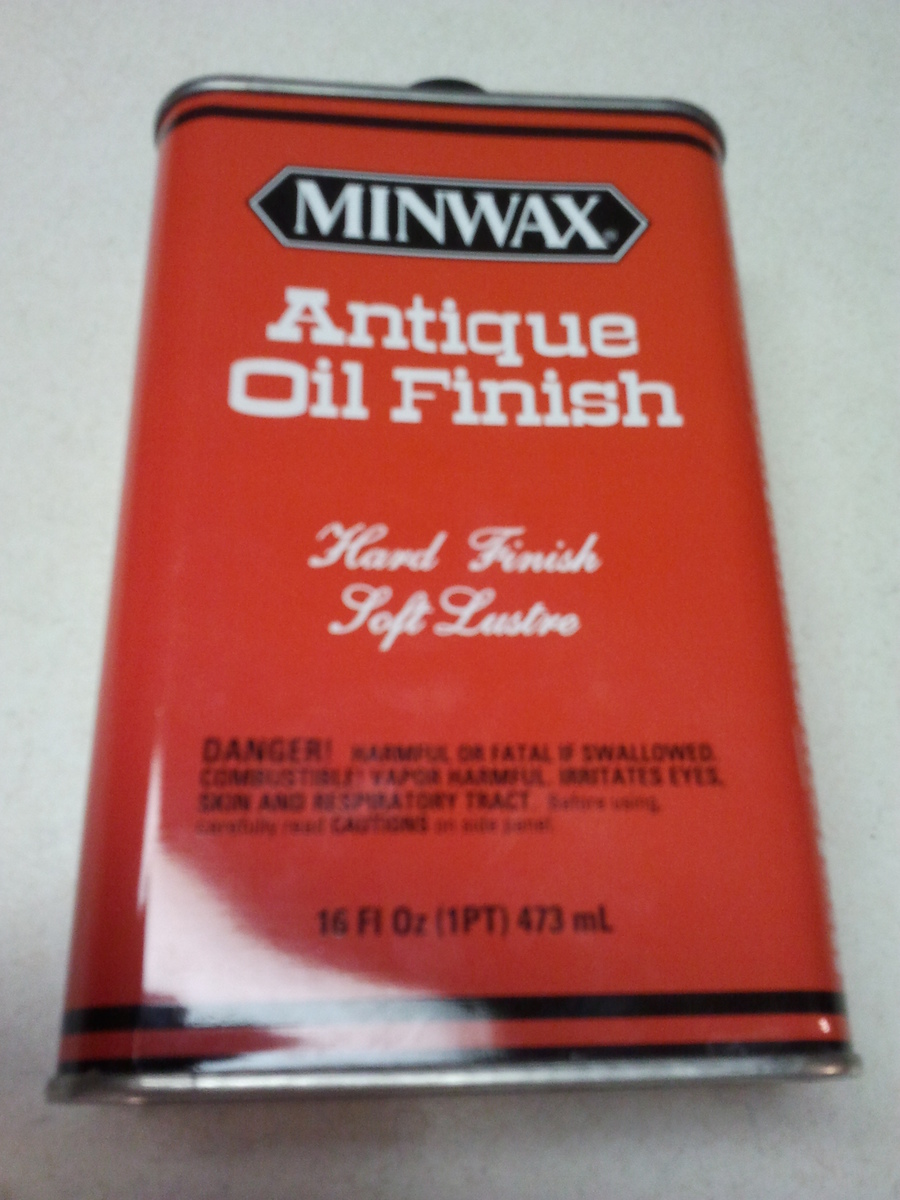
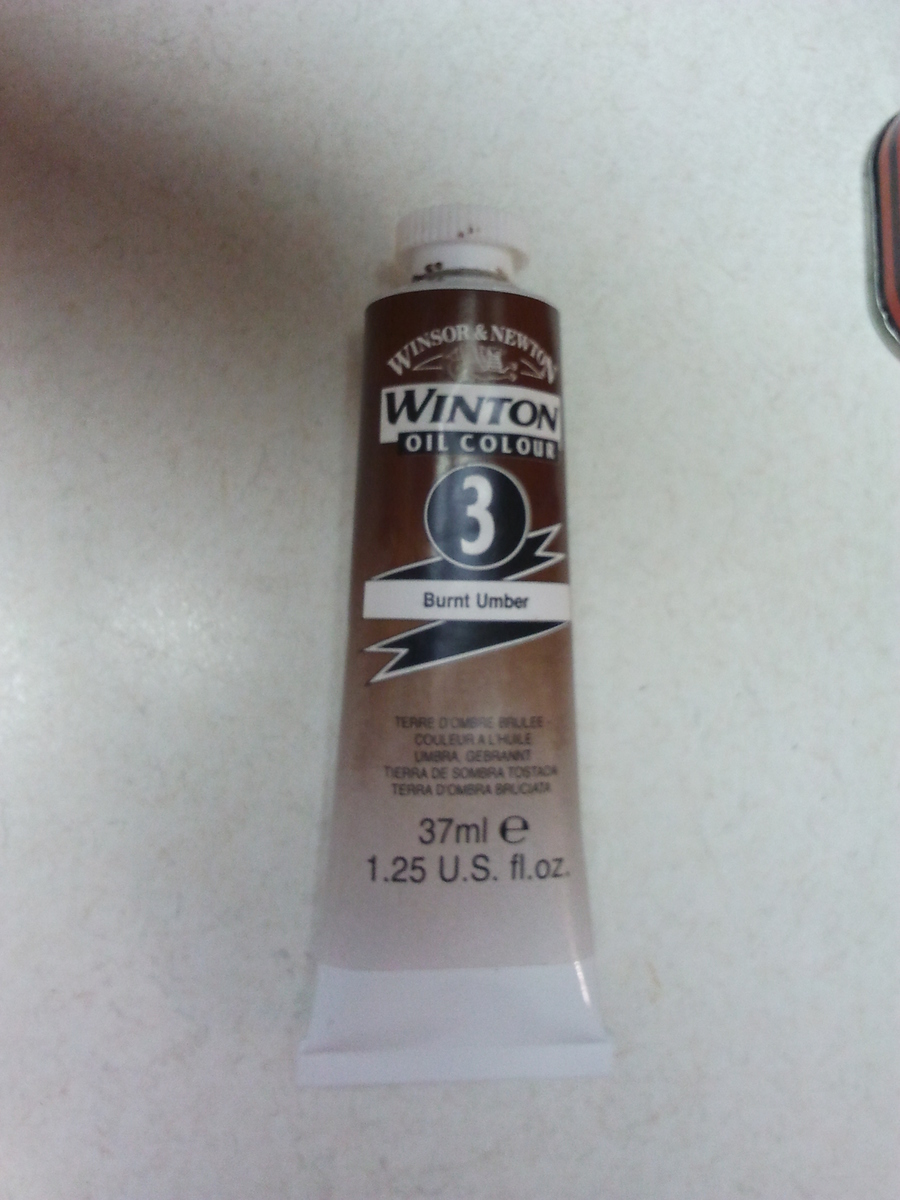
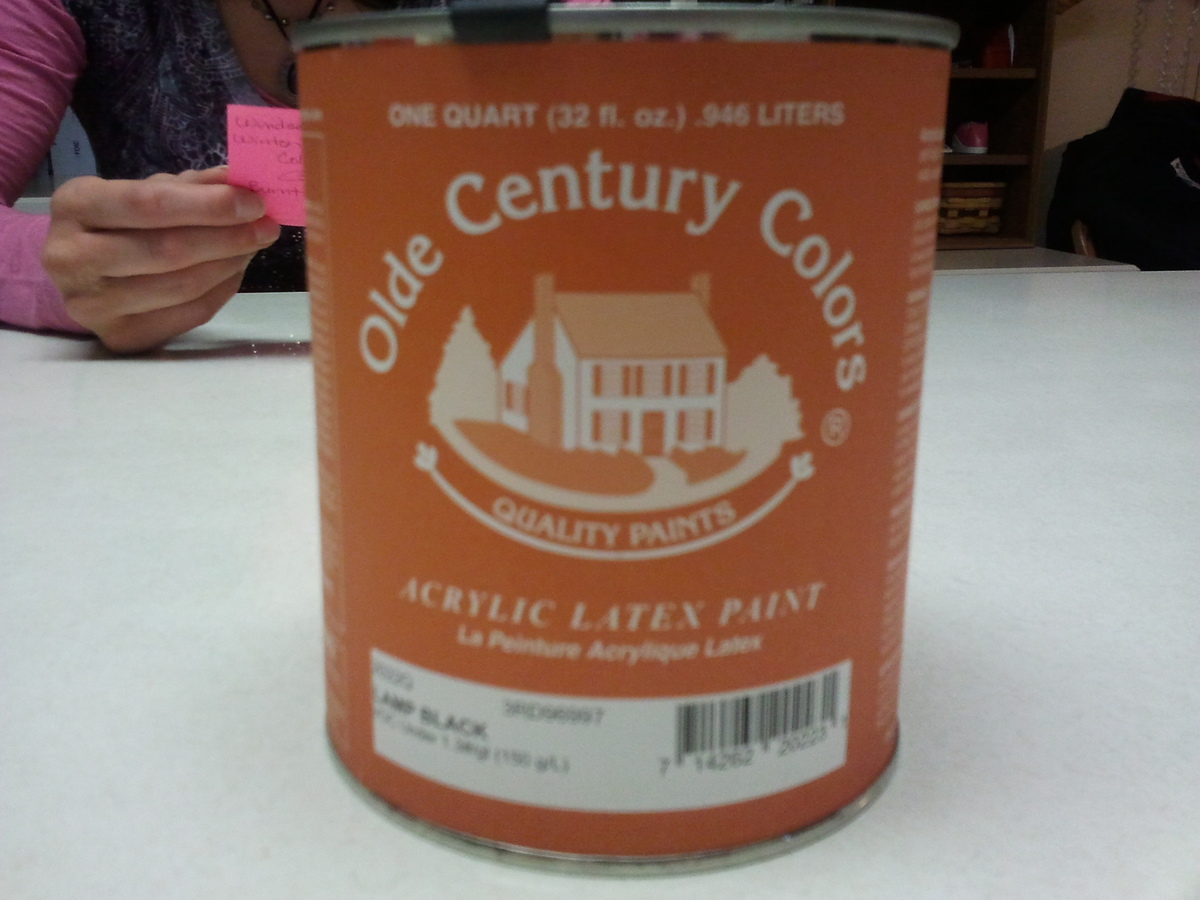
I finished the bed with a good latex paint then sanded where I wanted the aging and then topped the paint off with some Winton Burnt Umber on the sanded areas and rubbed Minwax Antique Oil Finish over the entire piece. See pictures for exact products. I've used these same products in the past to paint furniture I have repainted and aged. I like the finish it gives.
My total price was around $225 but that includes the bed rail system and the brackets.
Enjoy!
Built from Plan(s)
Estimated Cost
$200
Estimated Time Investment
Week Long Project (20 Hours or More)
Finish Used
See description
Recommended Skill Level
Starter Project
Comments
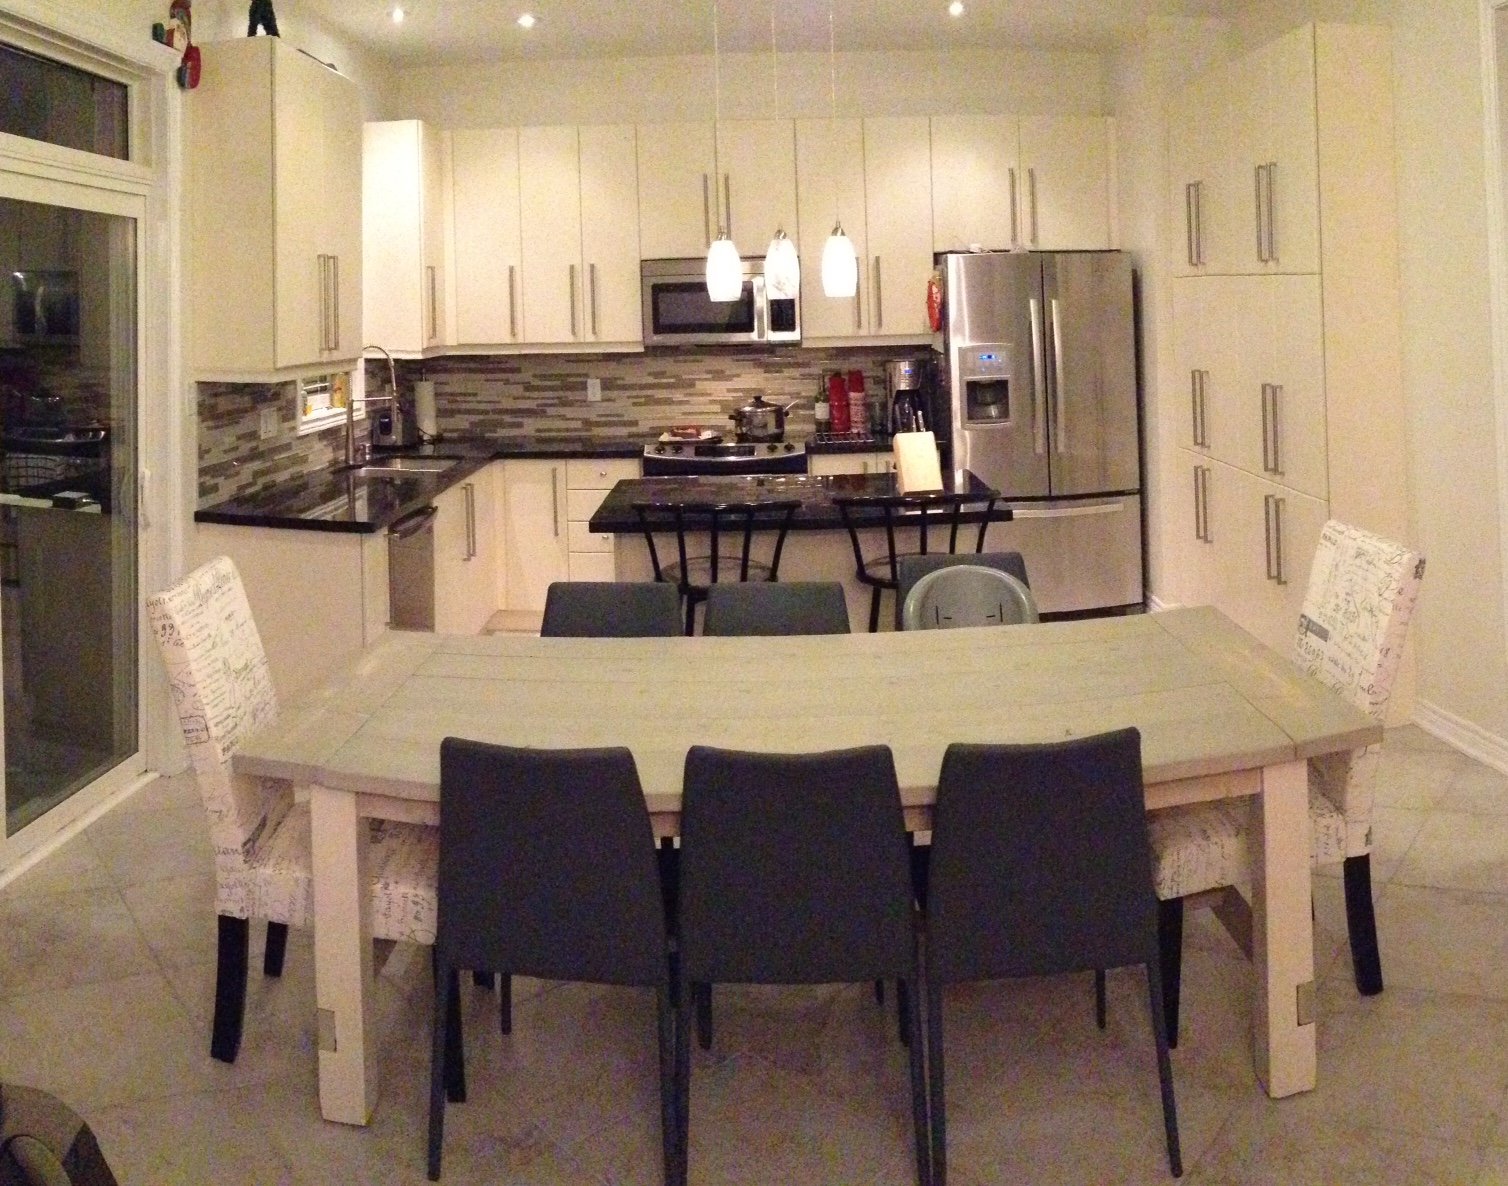
Benchright Knockoff
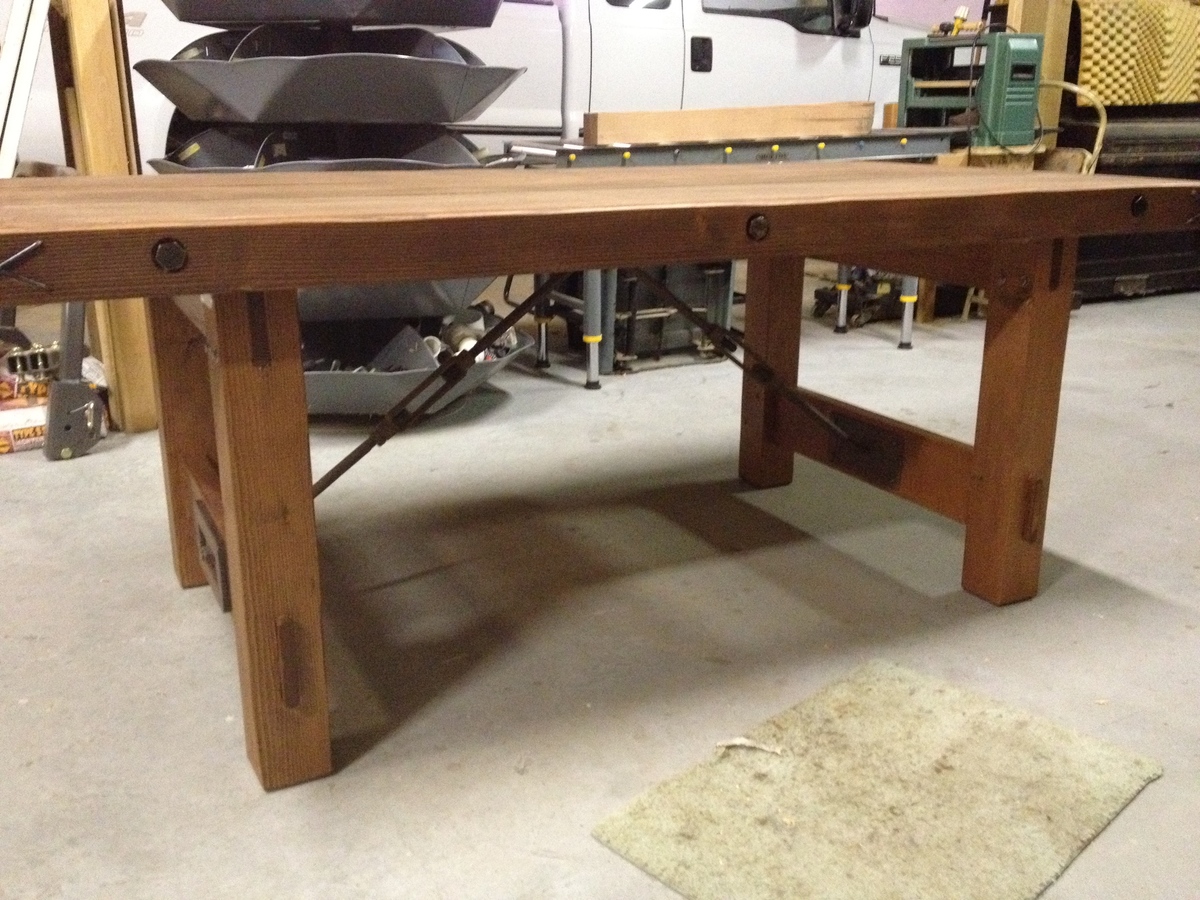
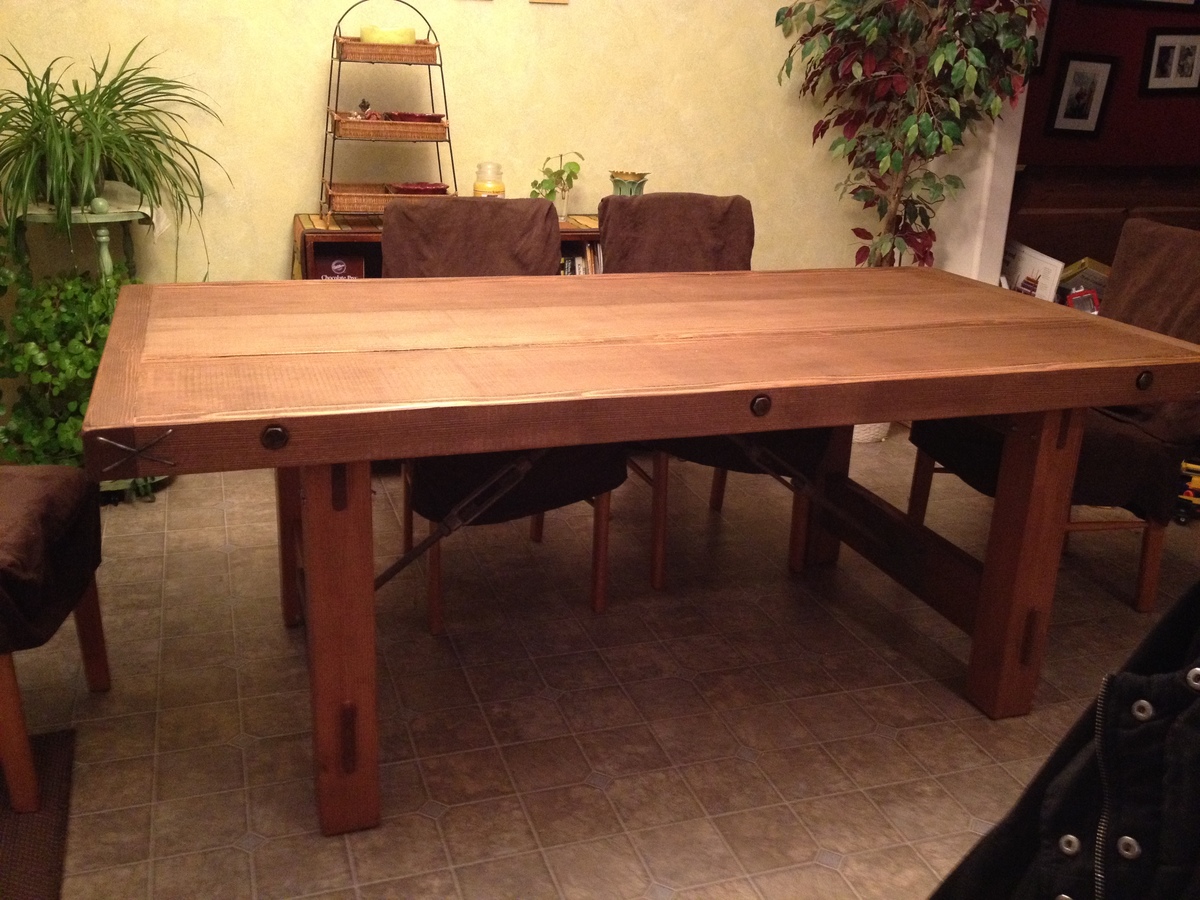
My dad actually built this. I had been drooling over the table at Pottery Barn for two years but couldn't afford the $3000 price. Found the plans here and gave it to him with adjustments on the turnbuckles underneath. I wanted the V shape instead of straight across. The tabletop was obtained from an old wood bridge in Eastern WA. I love, love, love this table. The materials cost was $250. The labor was my birthday present. ![]()

Built from Plan(s)
Estimated Cost
$300
Estimated Time Investment
Week Long Project (20 Hours or More)
Finish Used
Min wax Special Walnut stain, water-based Poly to seal
Recommended Skill Level
Intermediate
Pub Height table shortened
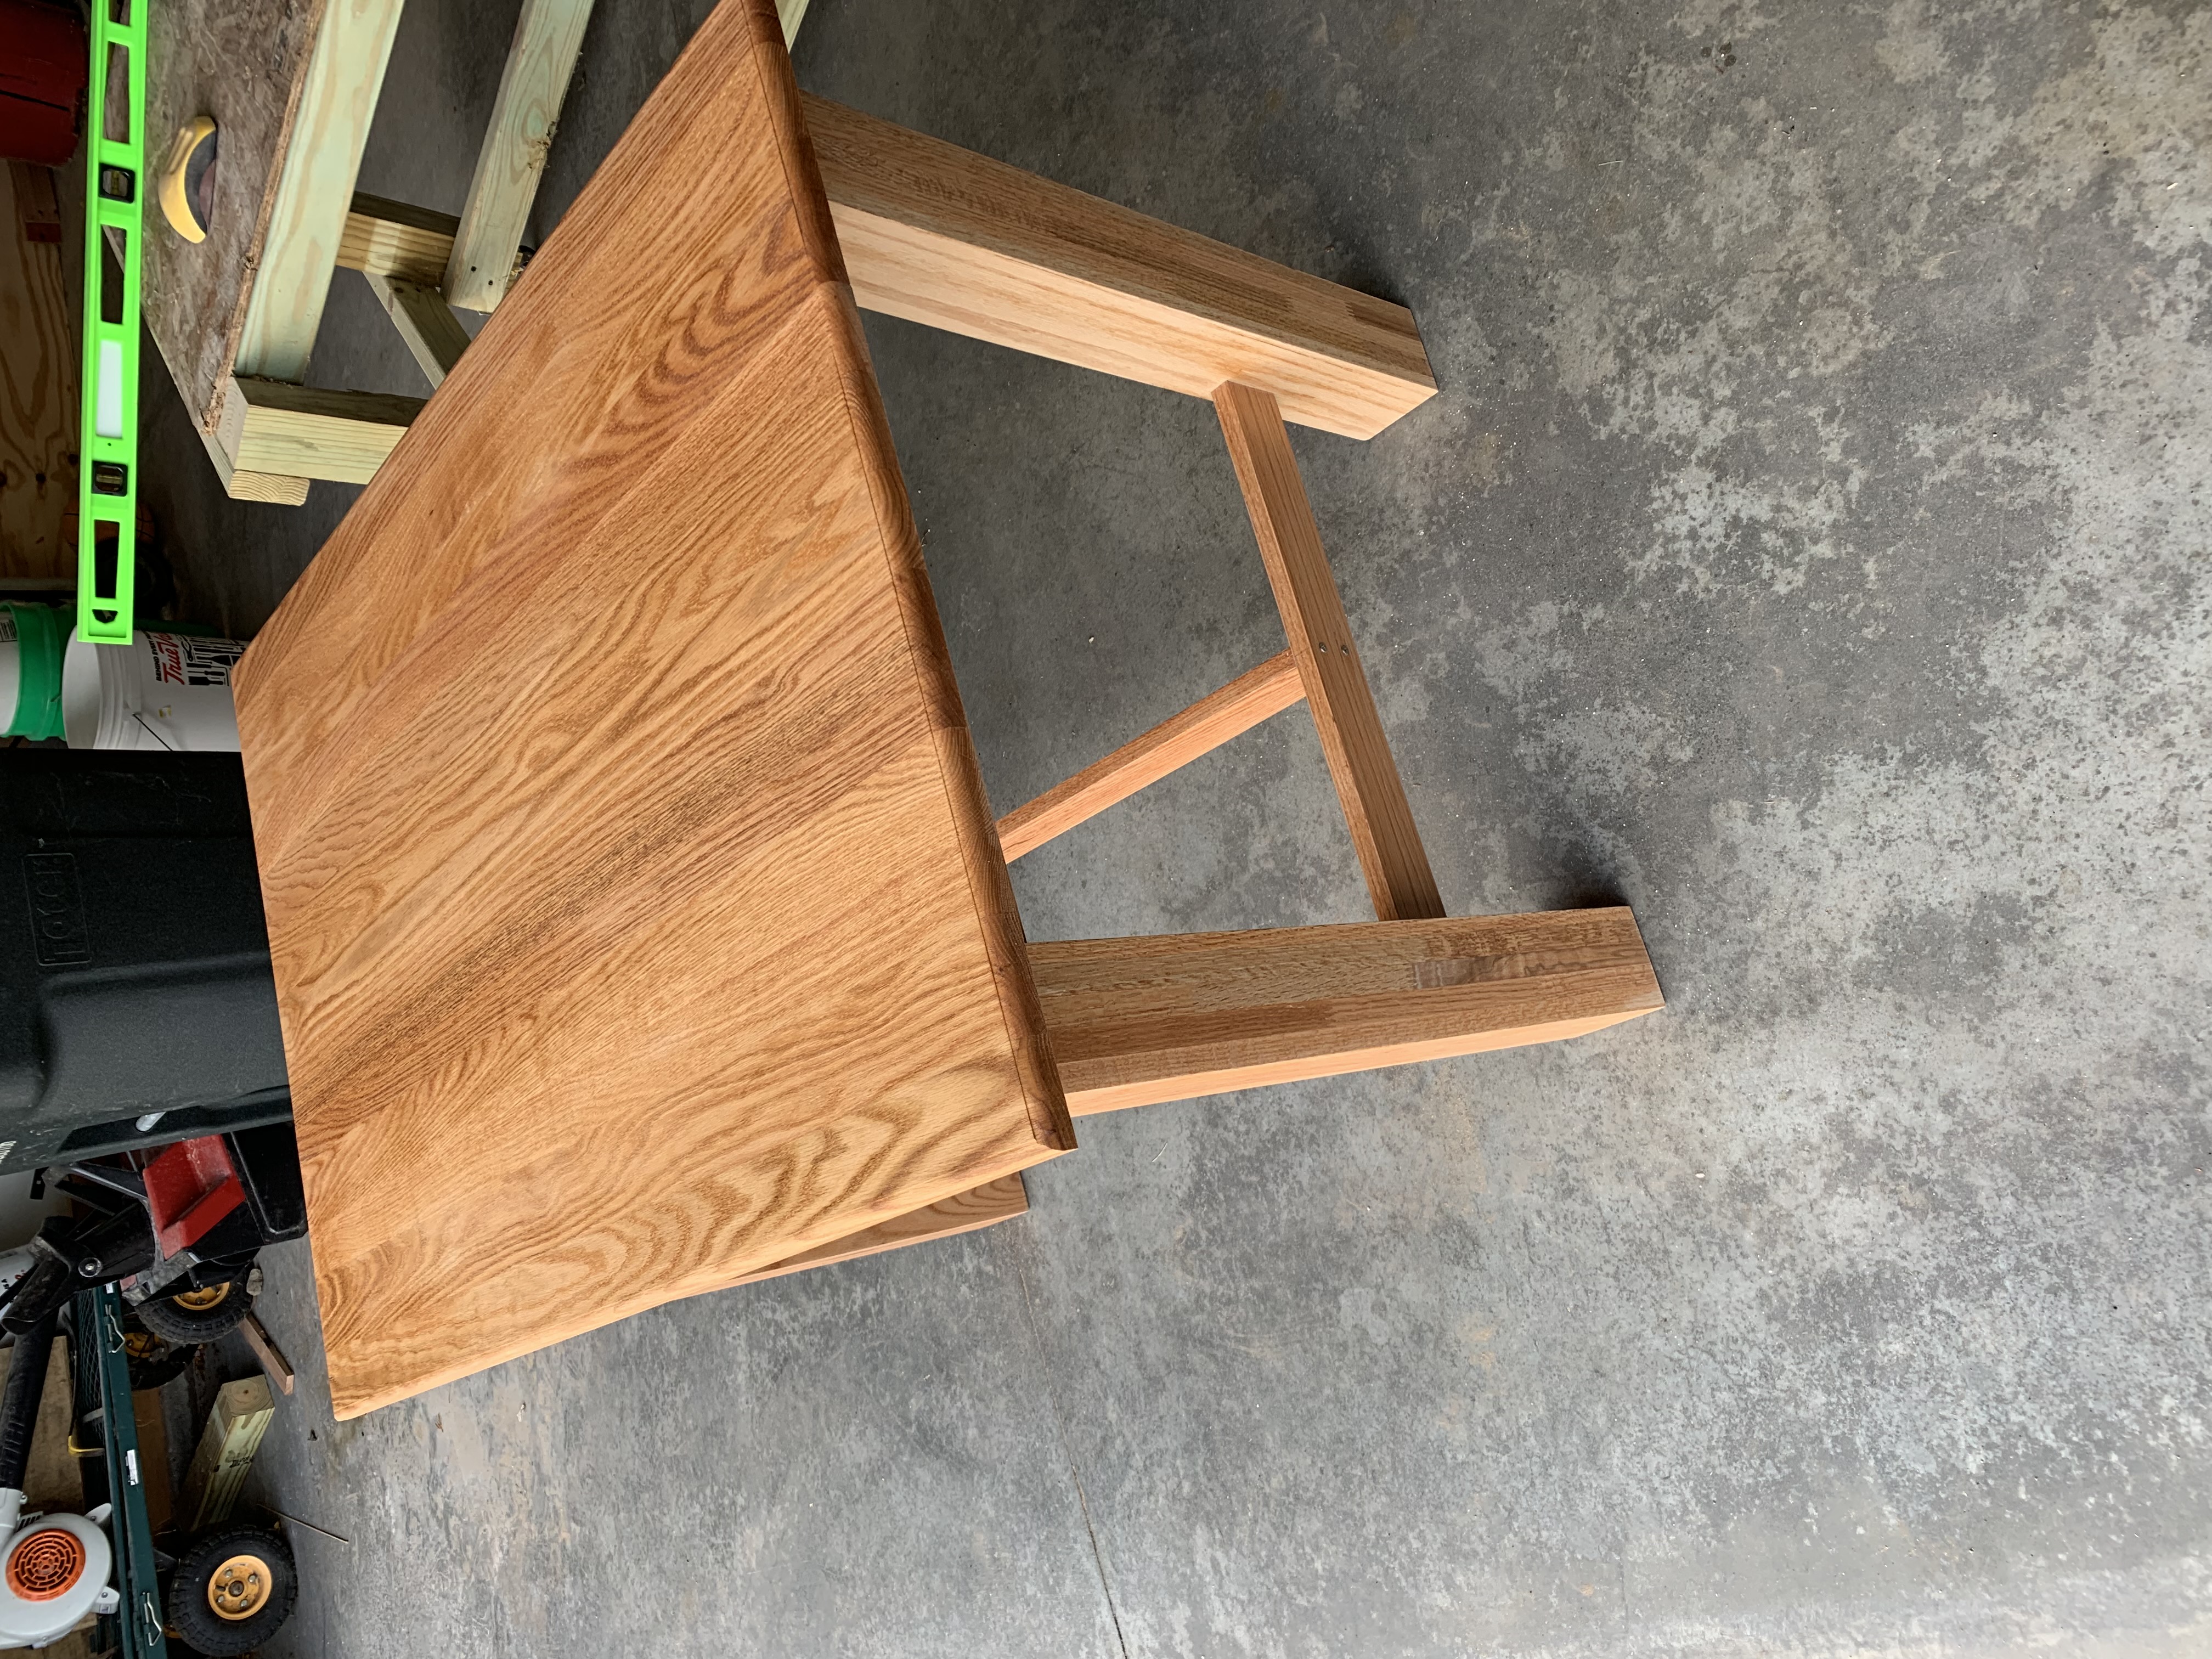
I was asked by my Mother in Law(and when you are asked of anything from your Mother in Law, you do it!) to build a dining room table for my brother in law. She bought all the wood(all Oak), and all I had to do is design and build it. I used your Pub Height table plans and tweeked it a bit. My Single Brother in Law bought a house, and needed a dining room table. It was my first Dining room table build, and learned a lot. Had some trouble with the boards twisting when I screwed them together, but nothing a little sanding took care of. Overall, I am pretty proud of it, and my BIL loves it.
Built from Plan(s)
Estimated Time Investment
Day Project (6-9 Hours)
Finish Used
Min-wax Colonial Maple
Recommended Skill Level
Intermediate
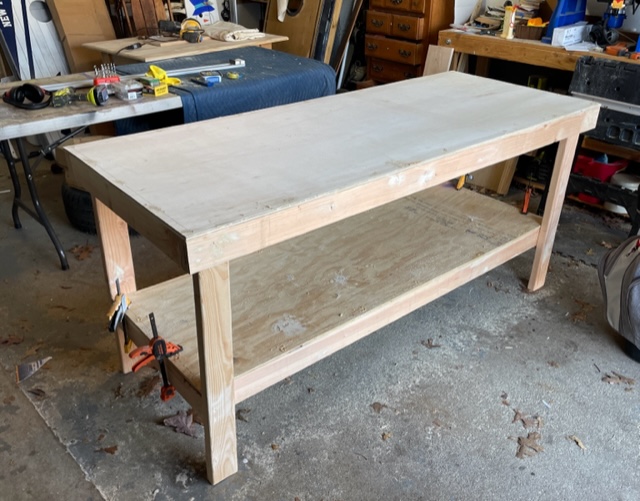
Guitar Workbench
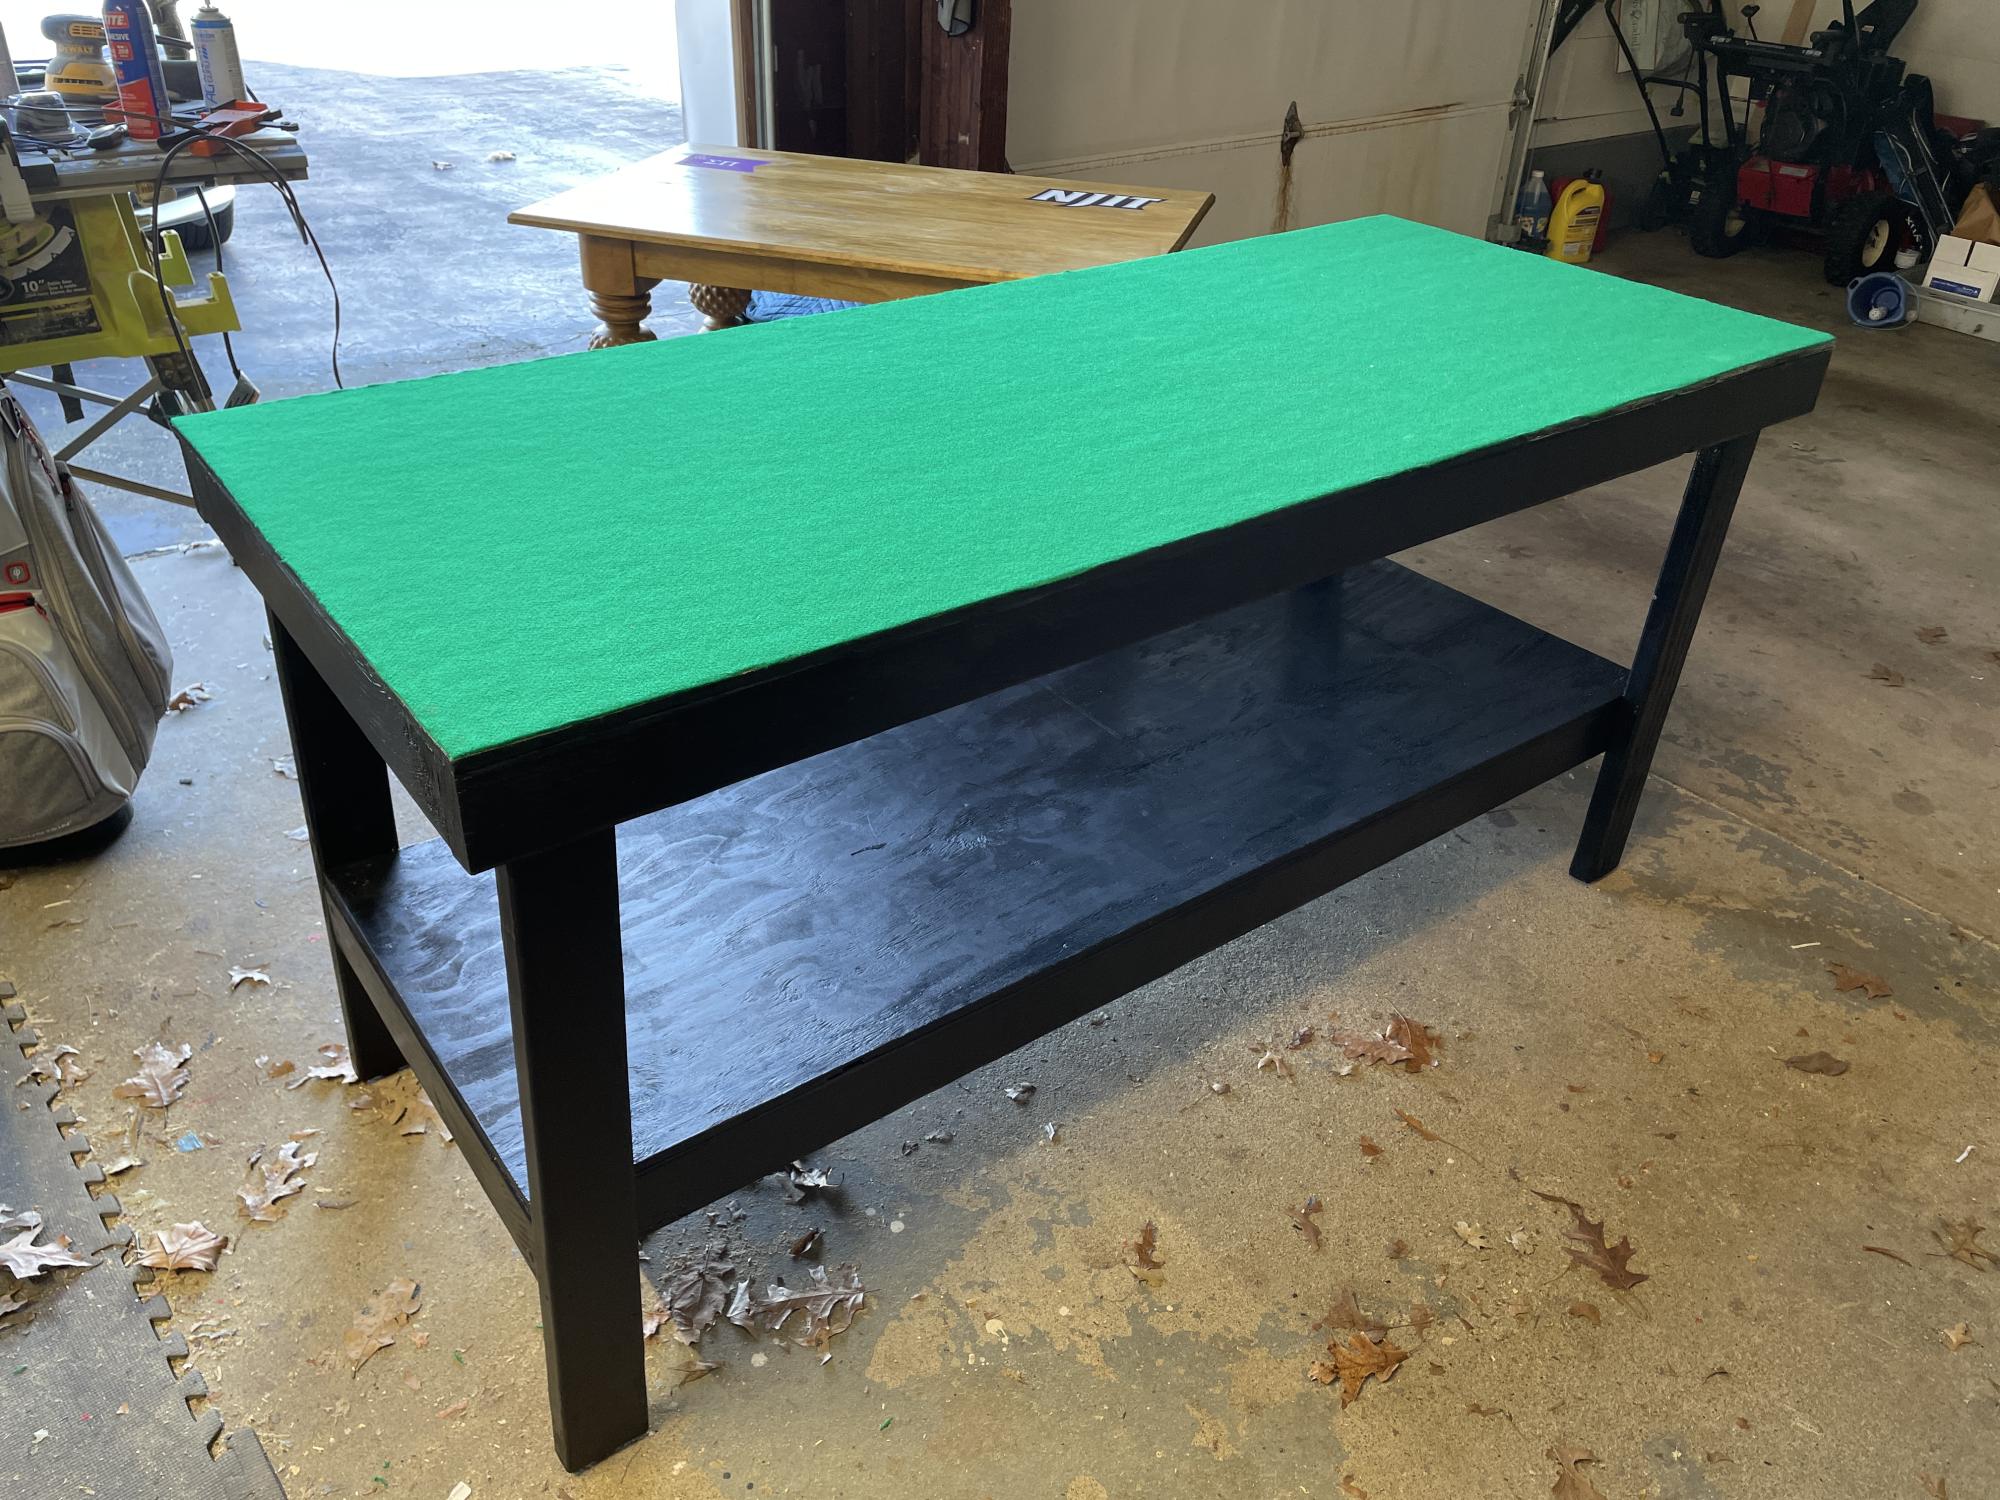
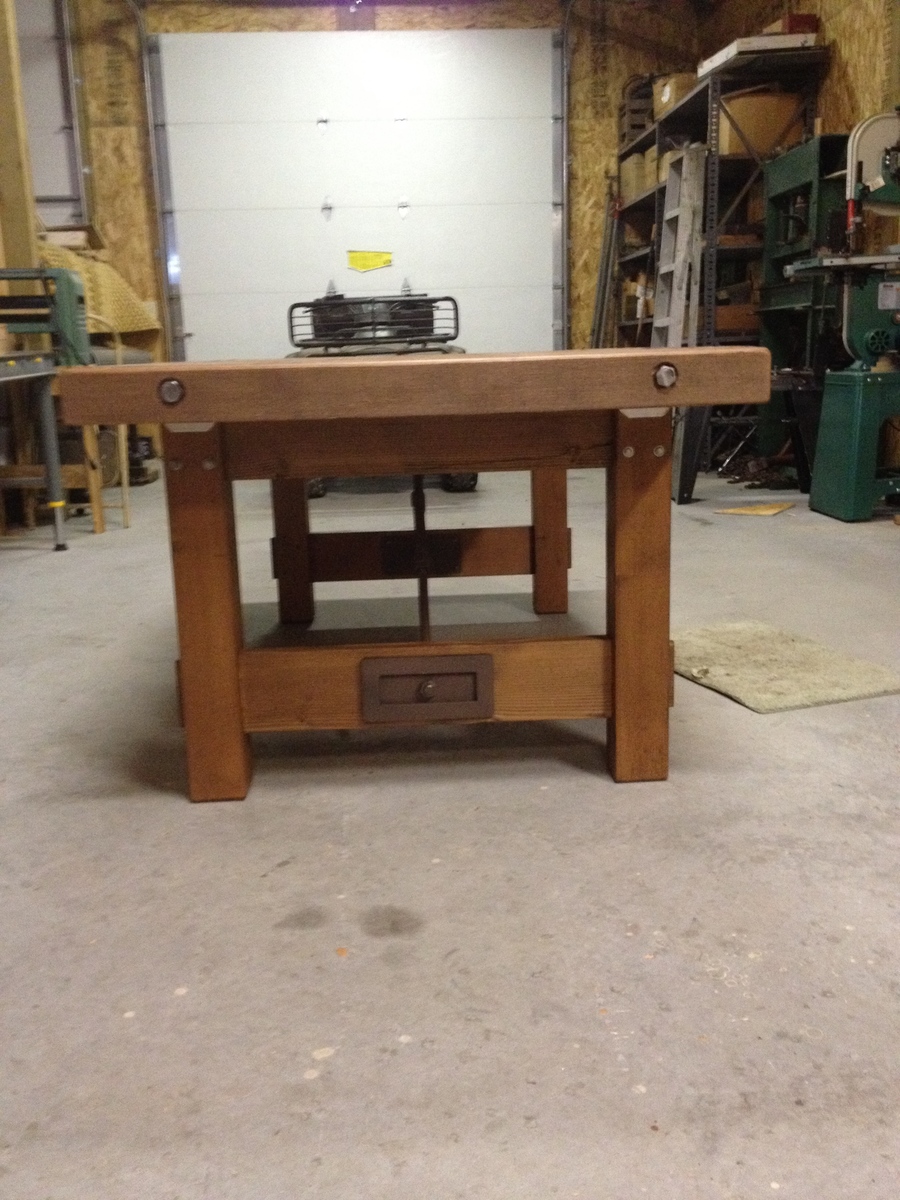
I built this 6' workbench for your garage or workshop but converted it to a guitar workbench for a local music store. I added a felt fabric top so his technician could repair guitars without scratching or damaging his instruments. Painted it black to give it some flair. Check out my other work at www.customwoodcreations48.com
Built from Plan(s)
Comments
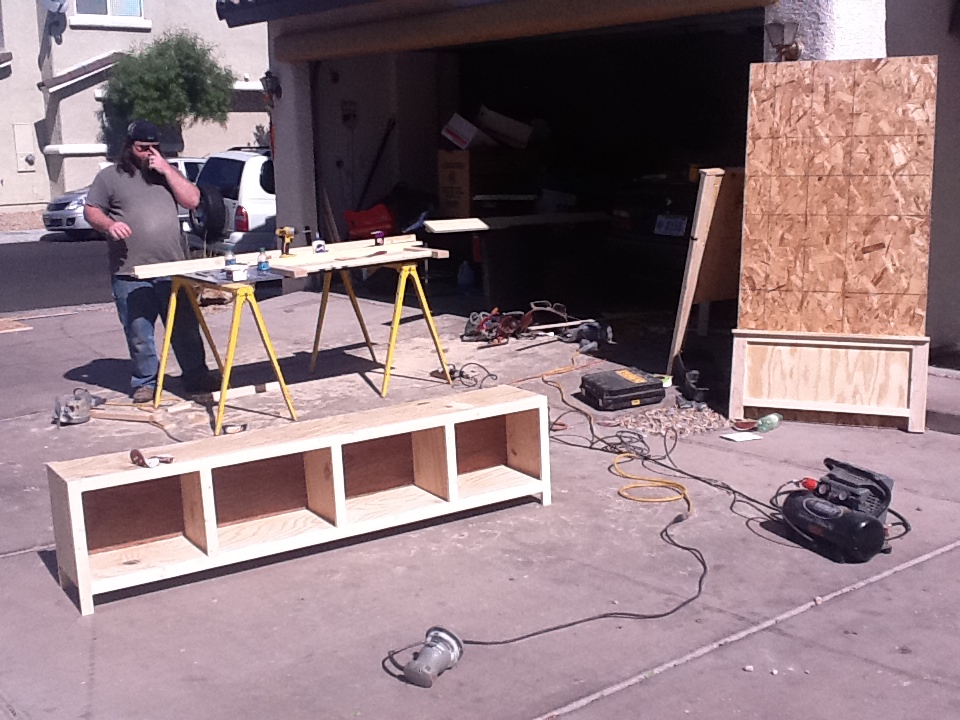
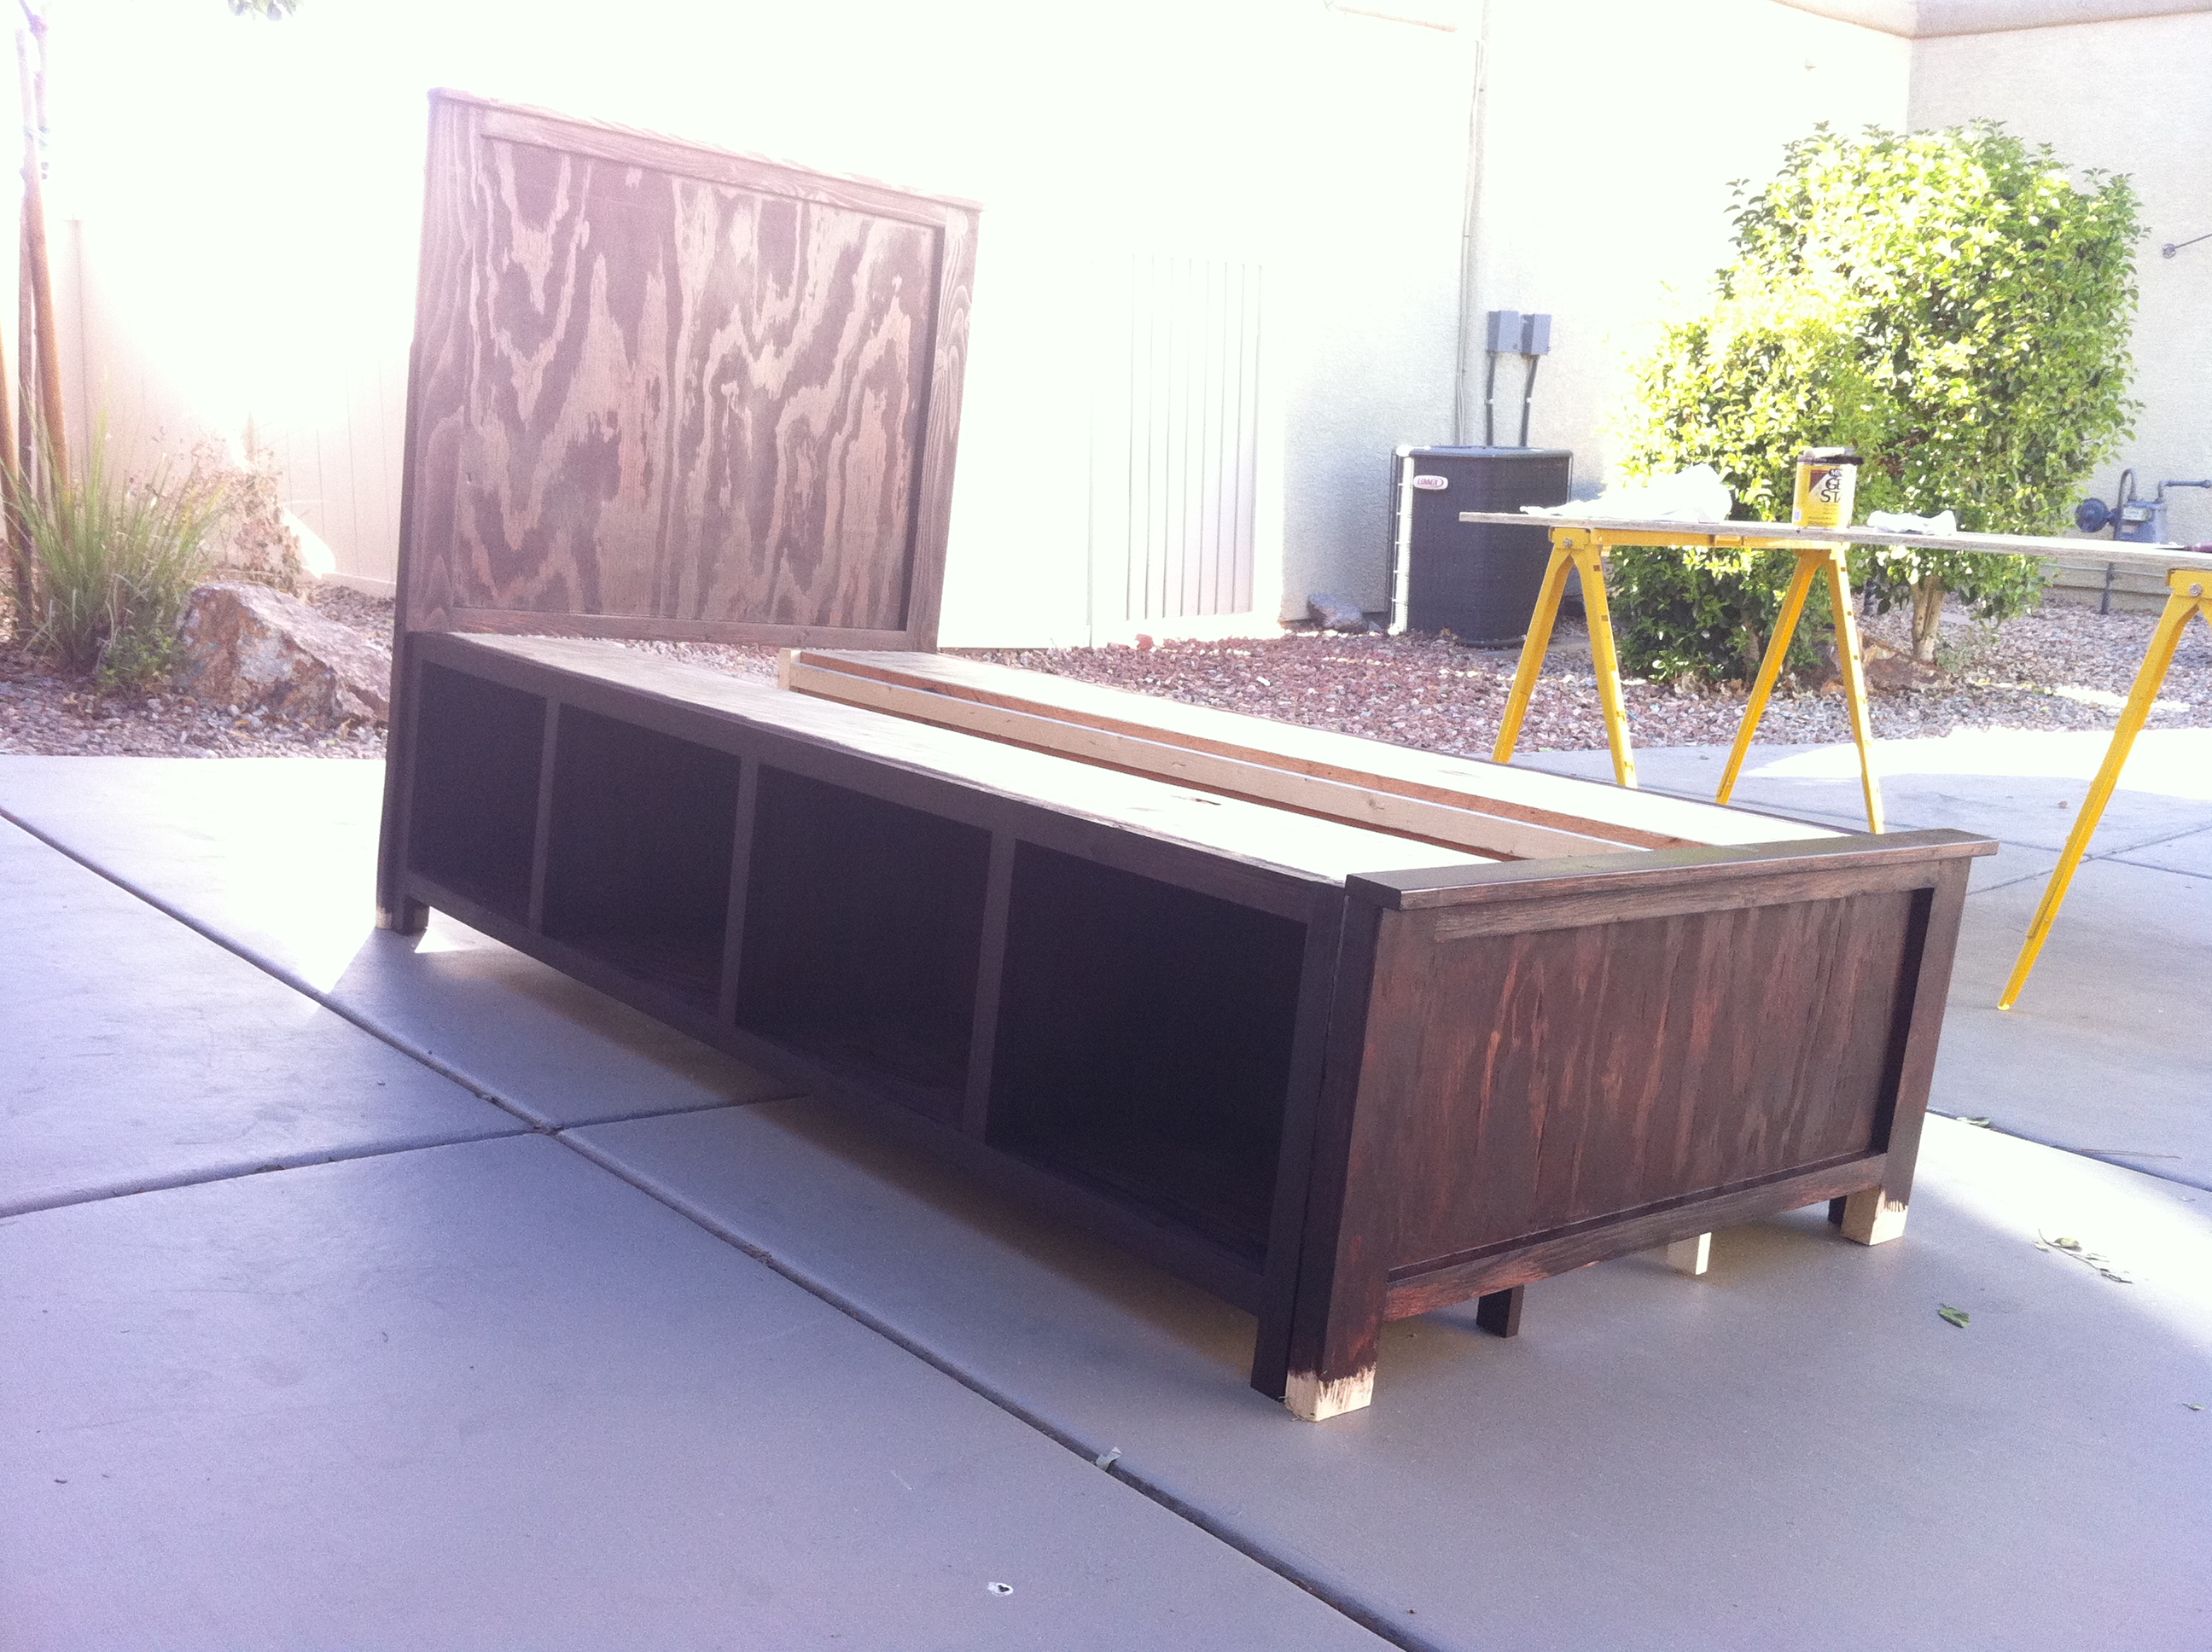
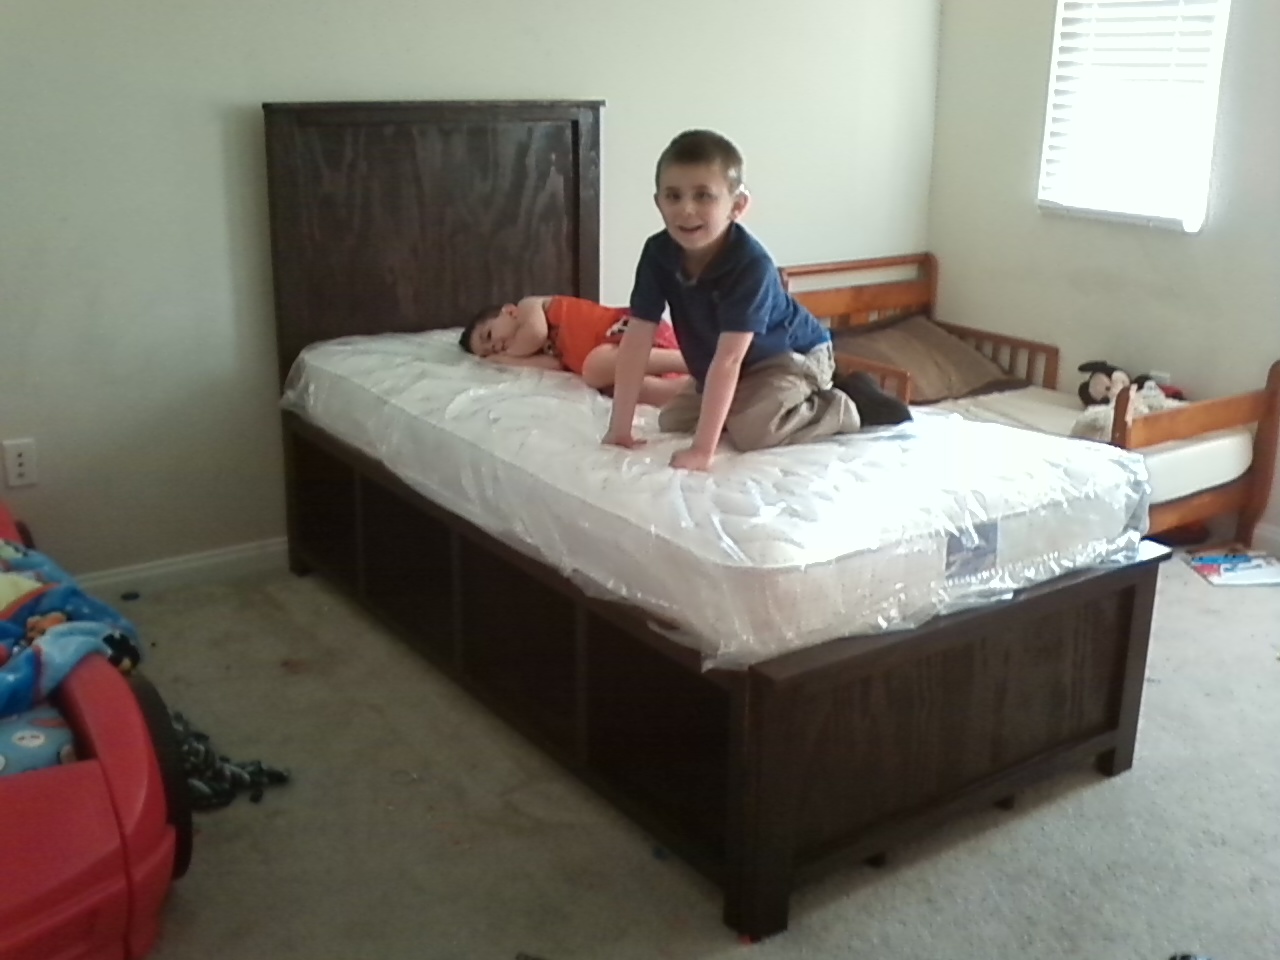
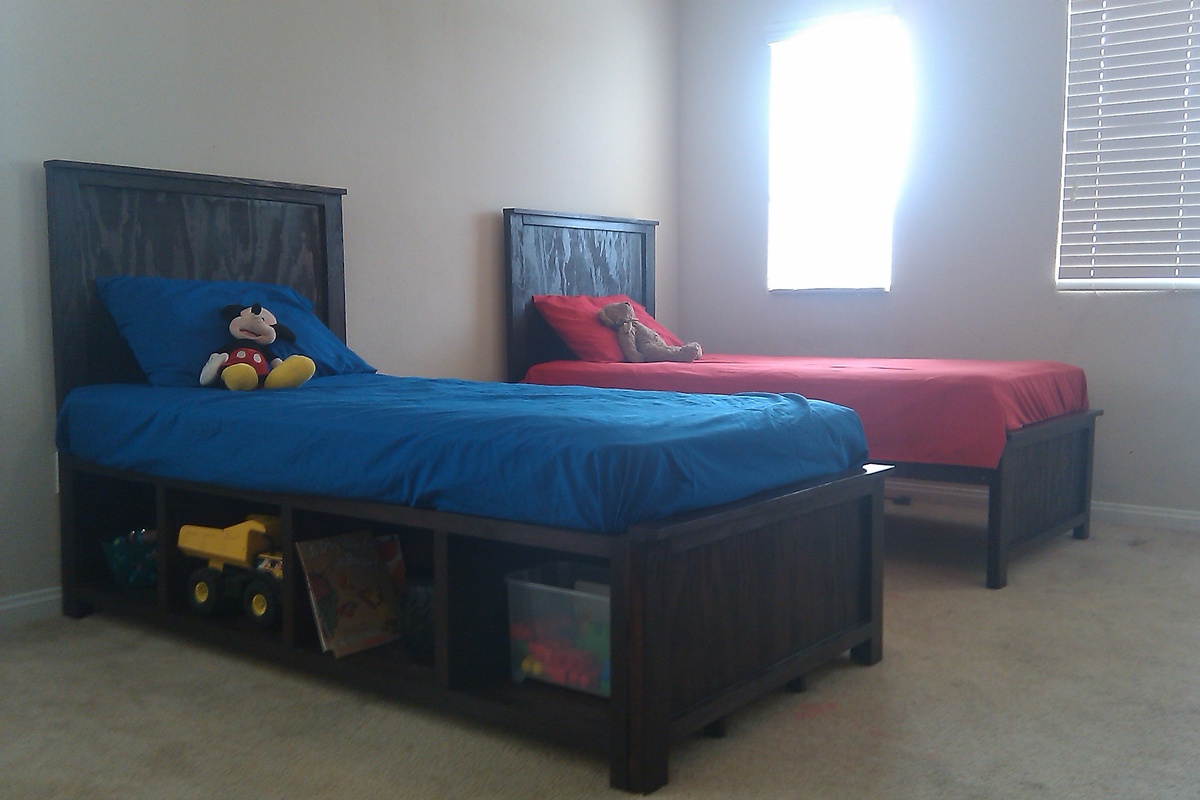
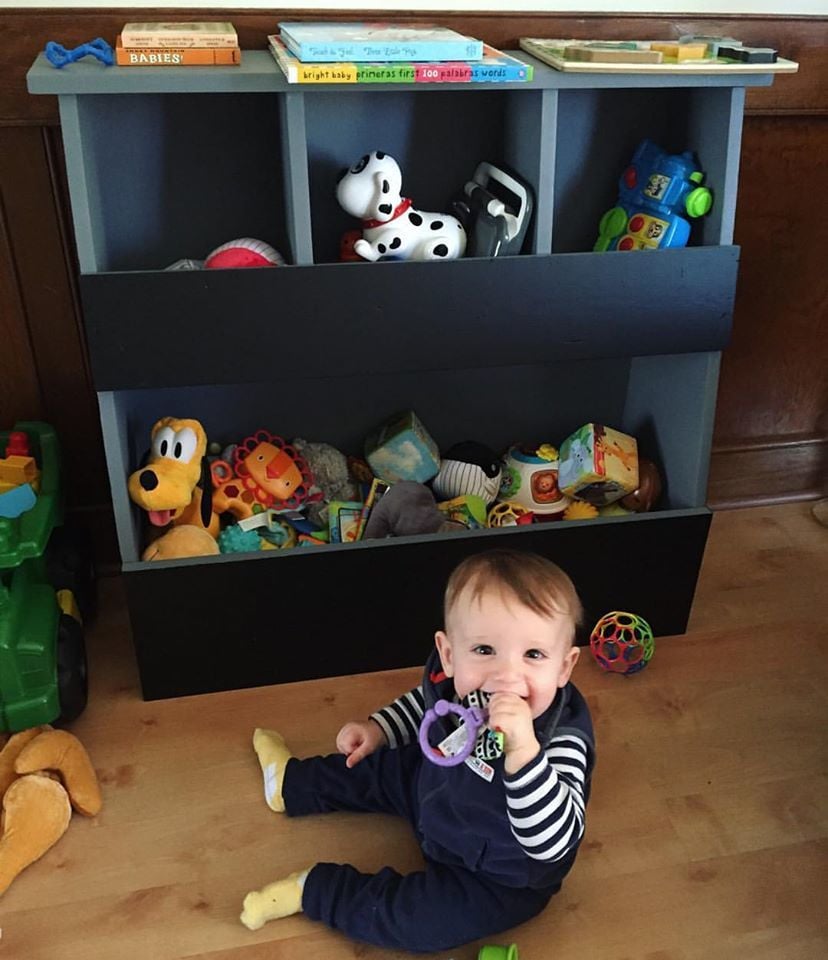
Stained Hailey Storage Bed x 2 (kinda)
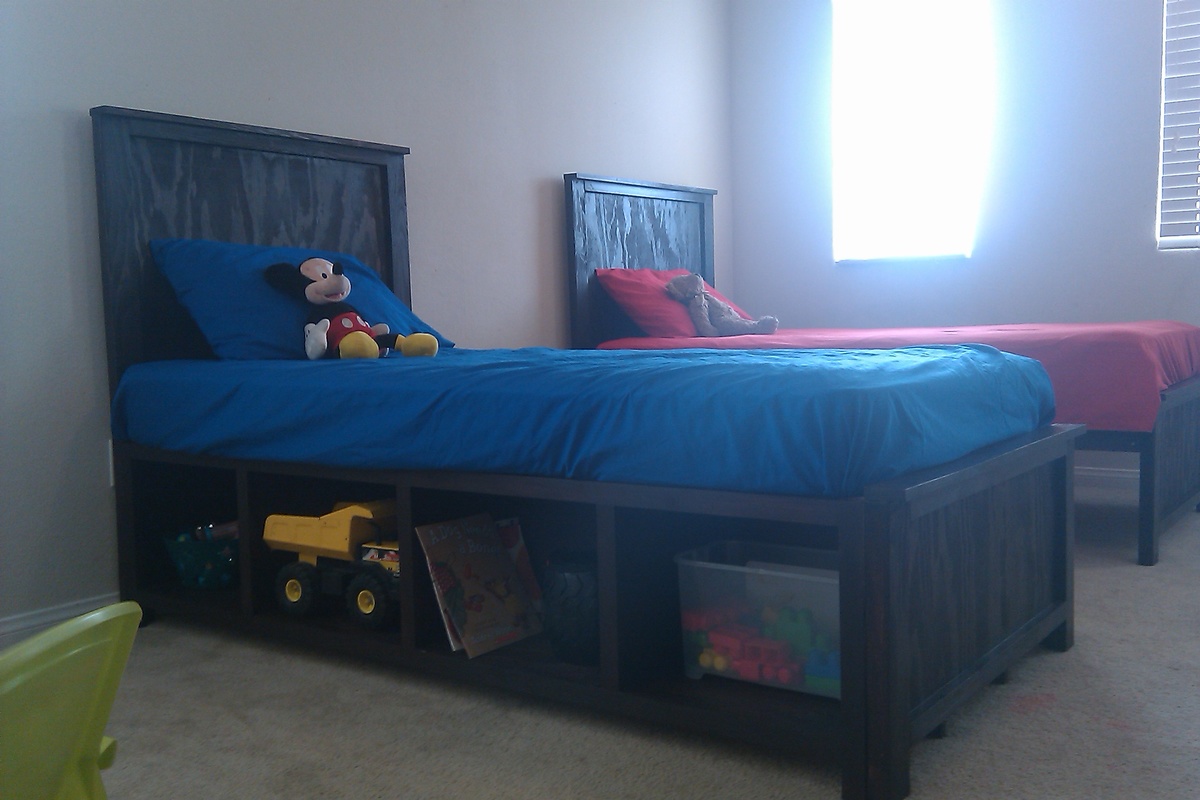
I think that the names of beds shouldn't be gender decided!! Just sayin' :-p
My sister wanted a Hailey storage bed for her son, but she really questioned if it would be too girly. Since I have girls, I hadn't really thought about it... but after looking at it for a few (VERY open mindedly, since all of the ones that have been built have been painted white, and made for girls), I decided that it wasn't a girly bed at all. Then I worked on convincing HER of that. I don't think she was convinced until she saw the pieces built...
My step-dad (a VERY skilled carpenter) and I put together the storage bed with a few modifications. We used 1/2" ply instead of 3/4" (the price difference in Vegas was insane for the same grade ply). We also bought an additional sheet of ply for the head and foot boards, since my sister wanted it stained. After the first bed was finished, she asked us to do an identical head and foot board for another bed, but to put side rails instead of the cubbies. This turned out perfectly, since the additional sheet of ply had enough scraps for another full head/footboard AND to make up for the dividers that weren't accounted for in the plan.
We also bought an additional 1x2 to trim out the middle dividers, which was my own preference. I think it looks stupid without it. Not sure if my sister would have cared... AND... the last mod we made was to use 1/8" ply for the backs. It was super cost-effective, and does the job just as well as 1/4".
All in all, this was a wonderful experience for me. It felt REALLY great to be able to do this with my step-dad... intimidating as it was... And there were points where all 3 of us were outside working (my sister, step-dad and myself) while all the kids played in the driveway with us. I can't tell you how awesome that felt :-)
Estimated Cost
$110-$130 for both beds
Estimated Time Investment
Weekend Project (10-20 Hours)
Finish Used
Minwax Gel Stain (It was either Aged Oak or Red Elm - I remember we debated those two, but can't remember which we decided on!). Top-coated with Minwax wipe-on poly.
Recommended Skill Level
Intermediate
Comments
Sun, 12/25/2011 - 11:56
These look great for boys!
We are planning to build a version of this bed for our son's room. I was so glad to find your brag and have a boy version to show him. He was not too excited after looking at the pink, purple and white rooms. Your modifications look great! I love the even spacing on the cubbies. You all did a terrific job!

In reply to These look great for boys! by mommy can make that
Tue, 12/27/2011 - 17:13
I'm glad this convinced him!
I wanted to post these (even though they're crummy cell phone pics) because I wanted other's to see that it looks GREAT stained and would totally work for boys! Which... explains my first sentence in this post :-p I'm SO GLAD this helped you convince your son :-) :-) :-)
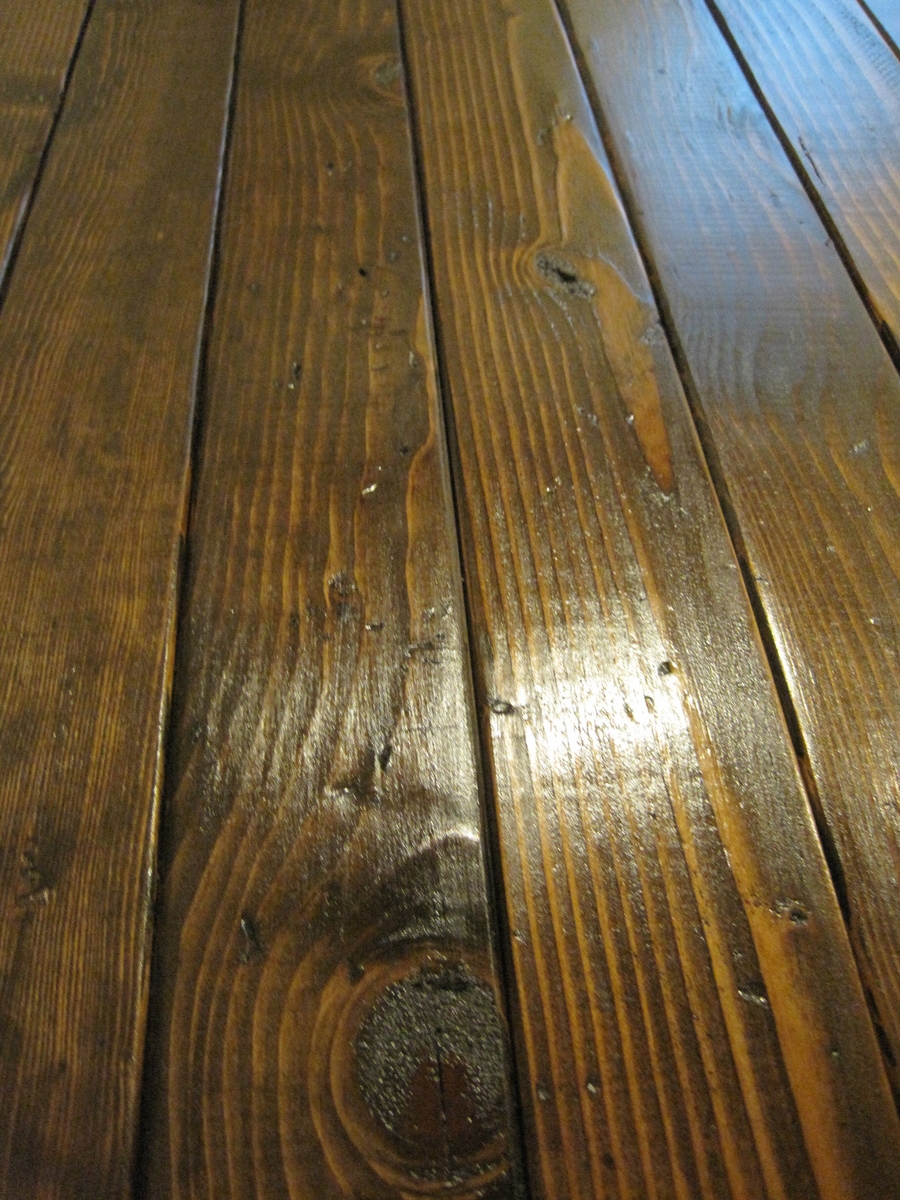
First build! Updated Tryde coffee table
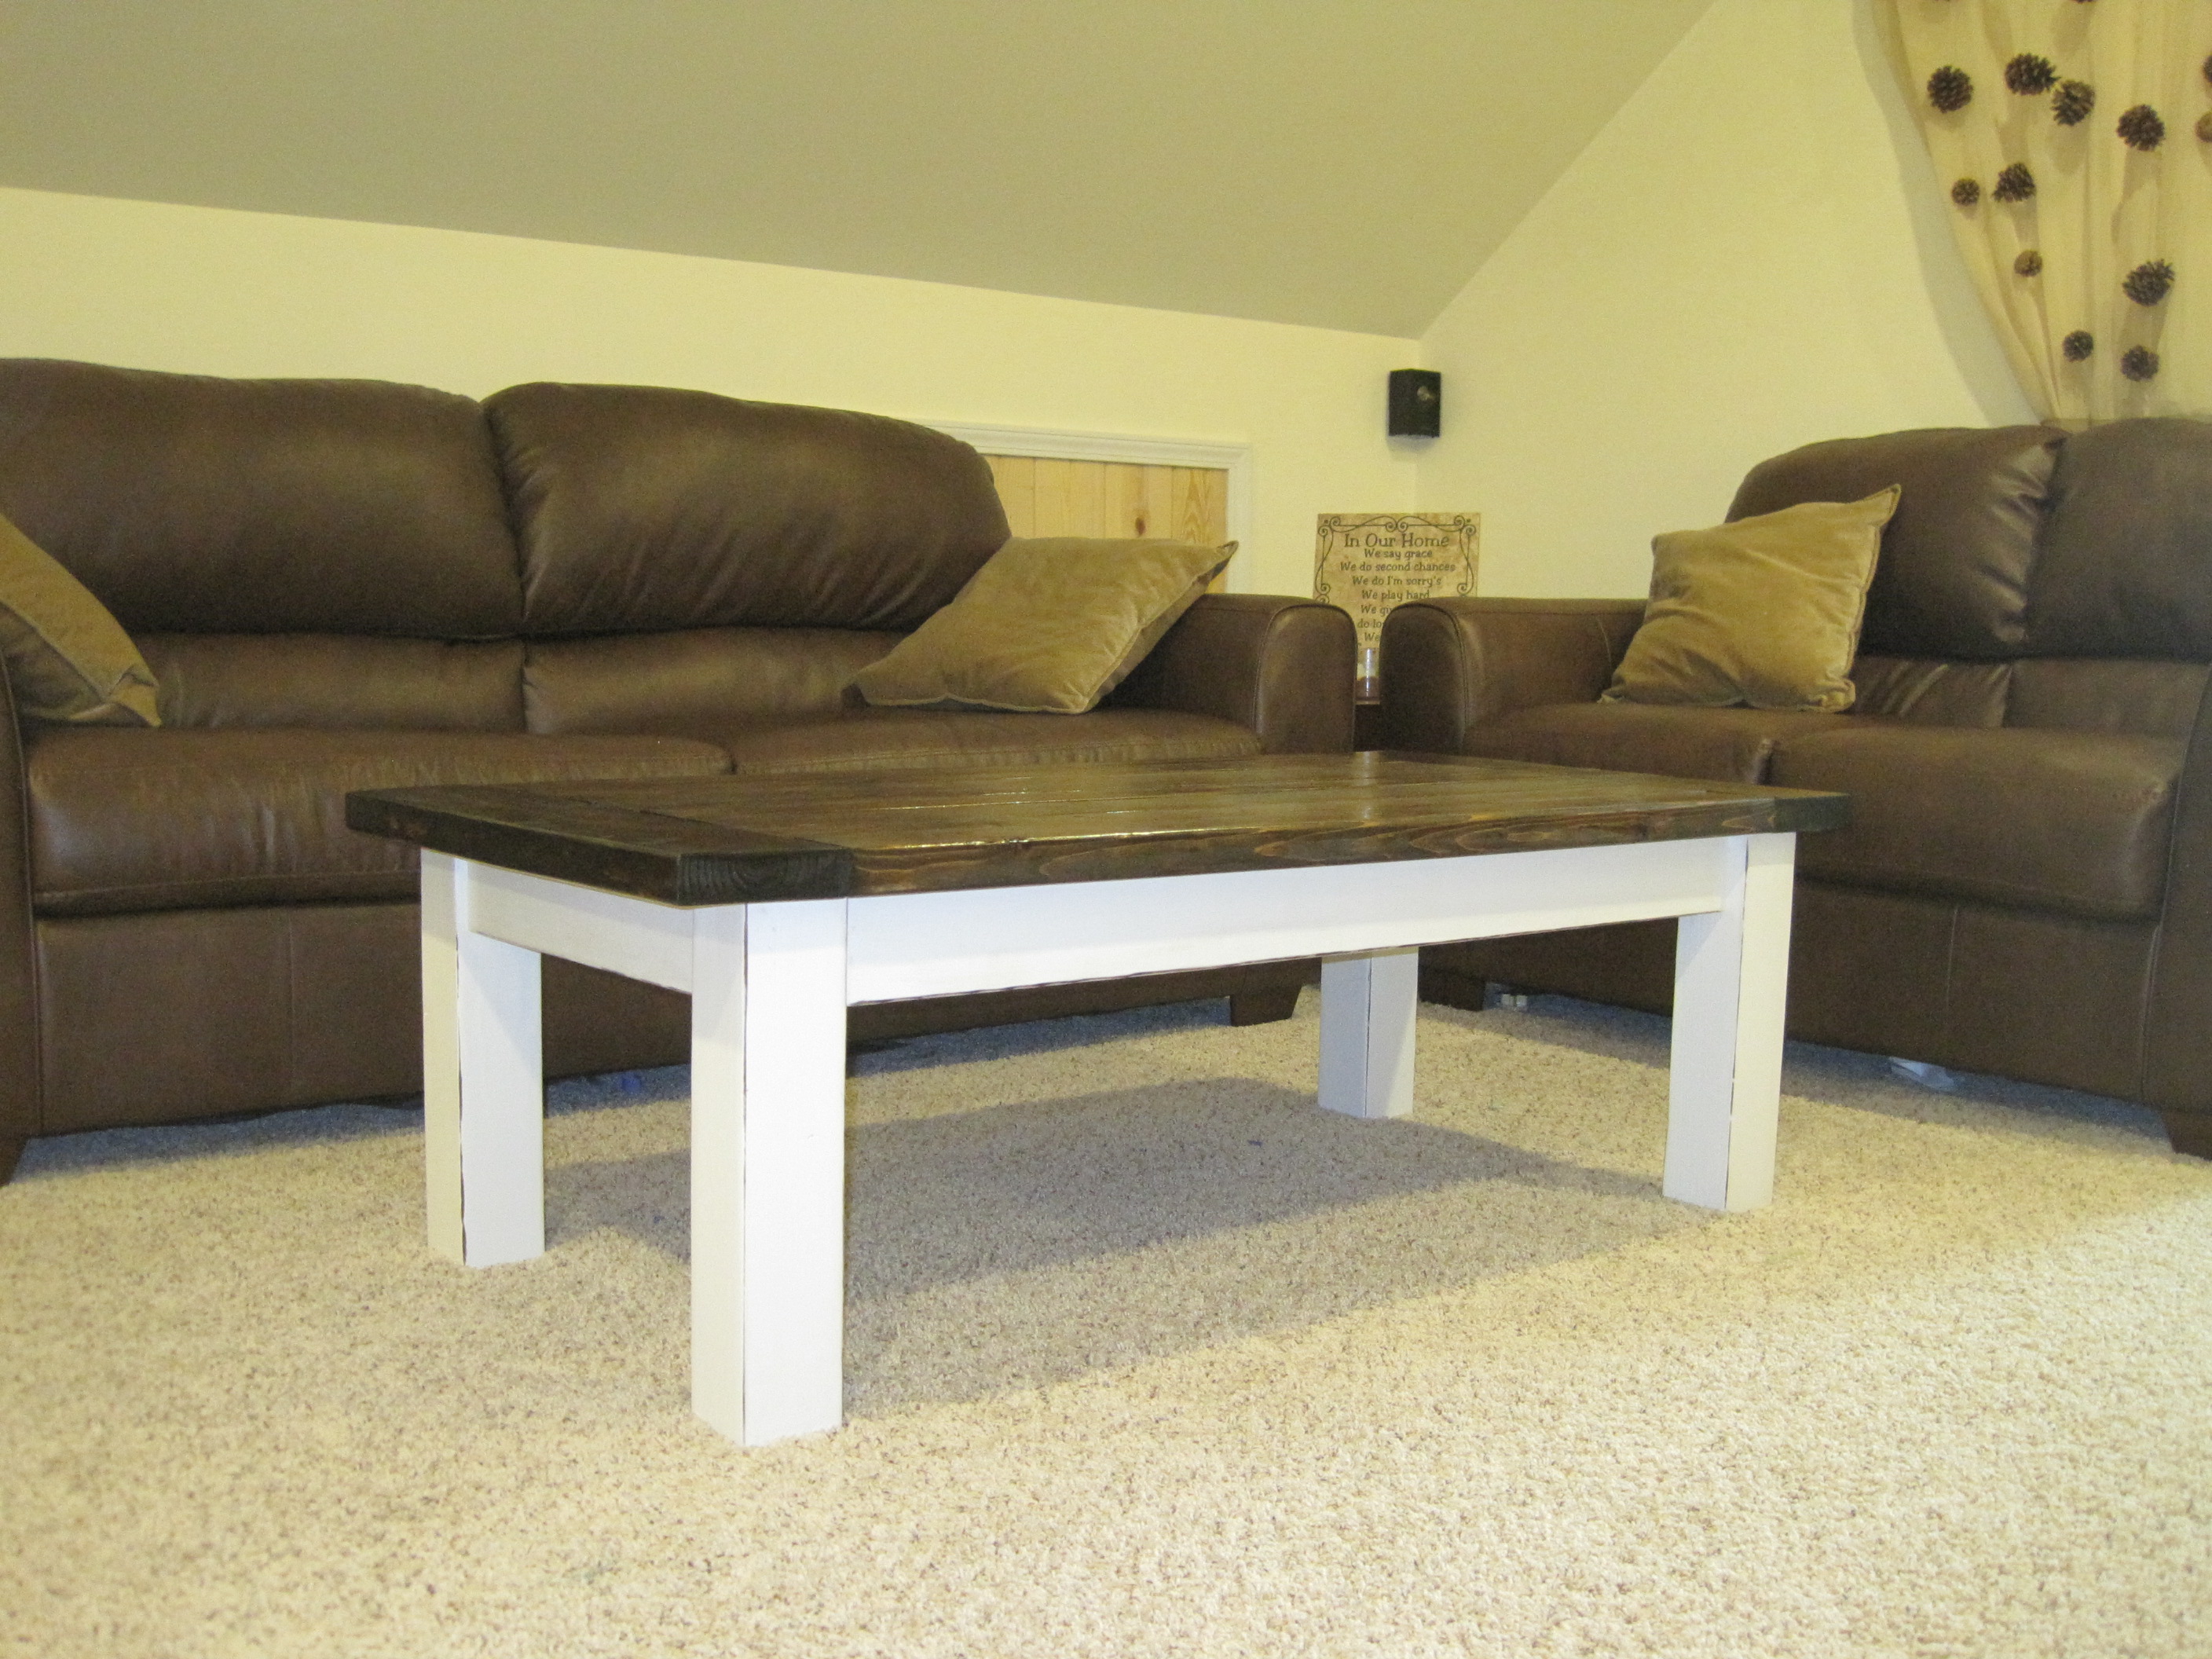
First time builder with a brand new kreg jig! (My husband surprised me with the jig! I am such a lucky gal!) I used minwax dark walnut stain and glidden paint (plain ol' white) with a bit of distressing. I shortened the 2x4s on the top so I could have 2x6 breadboards at the ends. I loved the look from the original tryde table! Really enjoyed the process of building this coffee table! Plan to make matching side tables to complete my "Tryde collection!" Thanks Ana! LOVE THIS SITE!
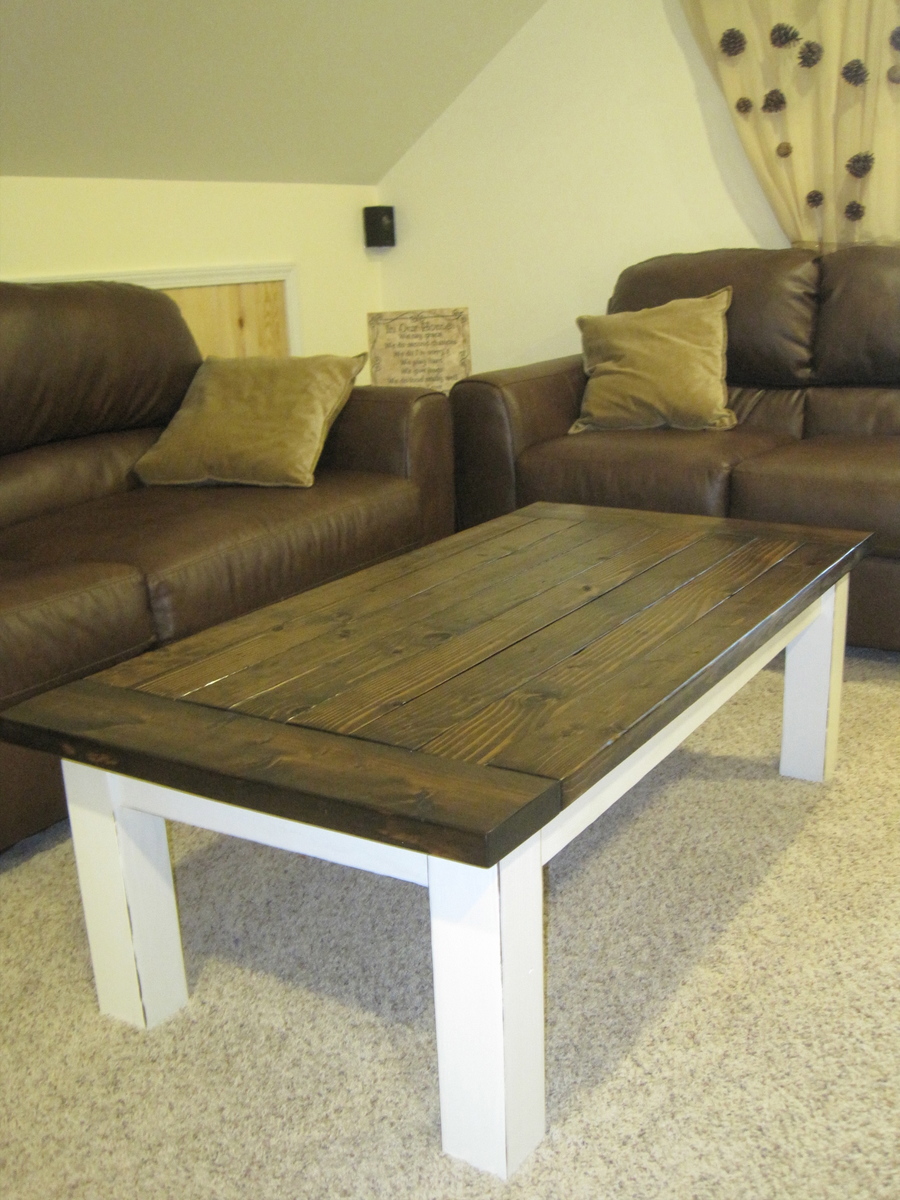
Built from Plan(s)
Estimated Cost
$40 (was given a huge pile of kiln dried 2x4s from my dad to kick start my projects!)
Estimated Time Investment
Weekend Project (10-20 Hours)
Finish Used
Minwax dark walnut stain(2 coats) and 3 coats of minwax polyrylic (sanded between coats gently!) for the table top and dark walnut stain/glidden white paint for the base (painted 2 coats, then sanded edges, used the same dark walnut stain as my table top on the sanded edges, then quickly wiped off with rag and followed it with a clean, damp rag to keep stain off of the paint.), then 2 coats of polyrylic (sanded between coats too)
Recommended Skill Level
Starter Project
rustic baby crib
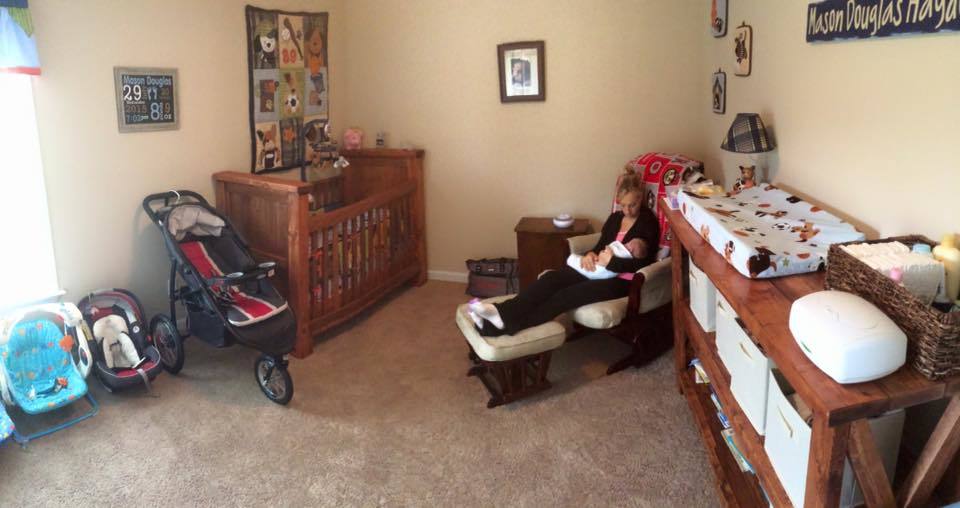
my wife and I had our first son, Mason, over the summer and I was in love with the idea of building his crib. It was a lot more work than I had anticipated but it was well worth the hard work. it came out beautifully. I made a 2X4 spacer that we can remove as he gets older to lower the mattress height. i used all pine lumber for the crib.
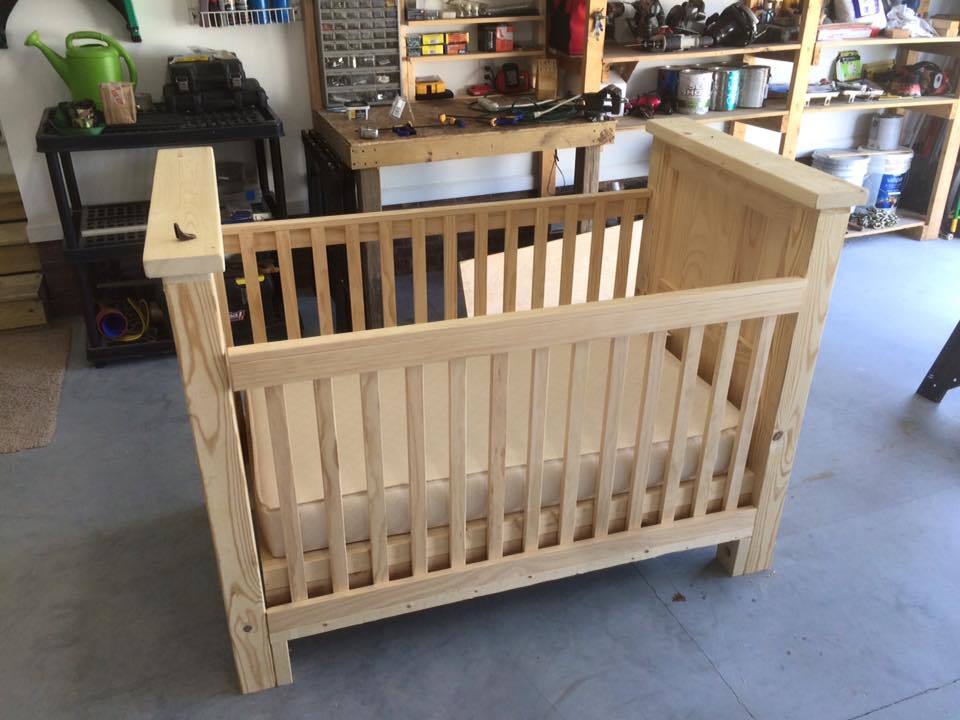
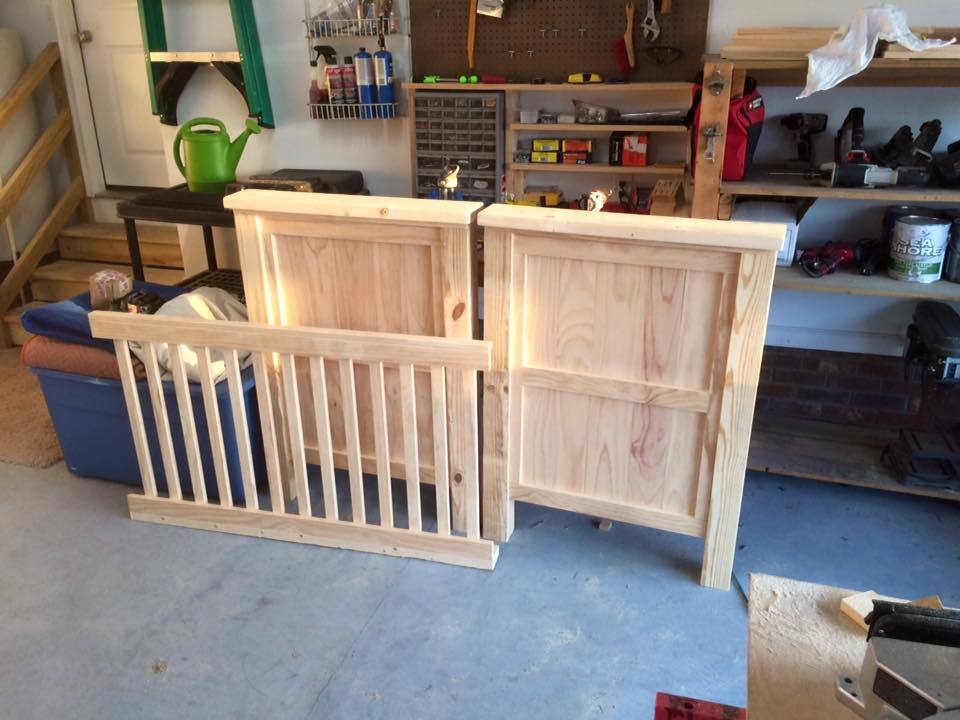

Built from Plan(s)
Estimated Cost
$250
Estimated Time Investment
Week Long Project (20 Hours or More)
Finish Used
rustoleum American walnut
Recommended Skill Level
Intermediate

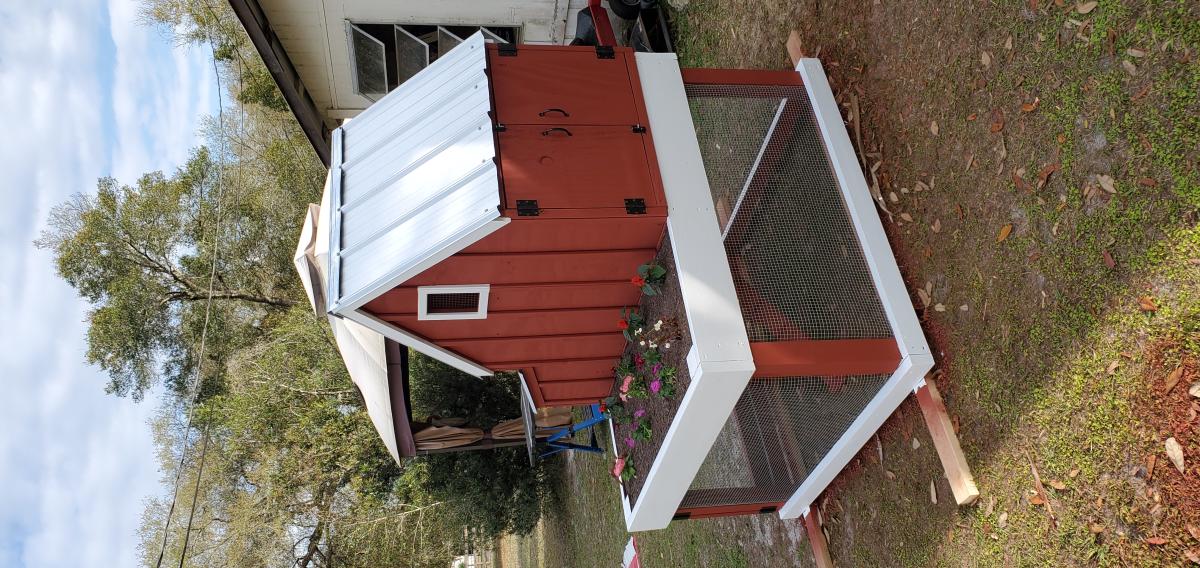
Chicken Coop with planter
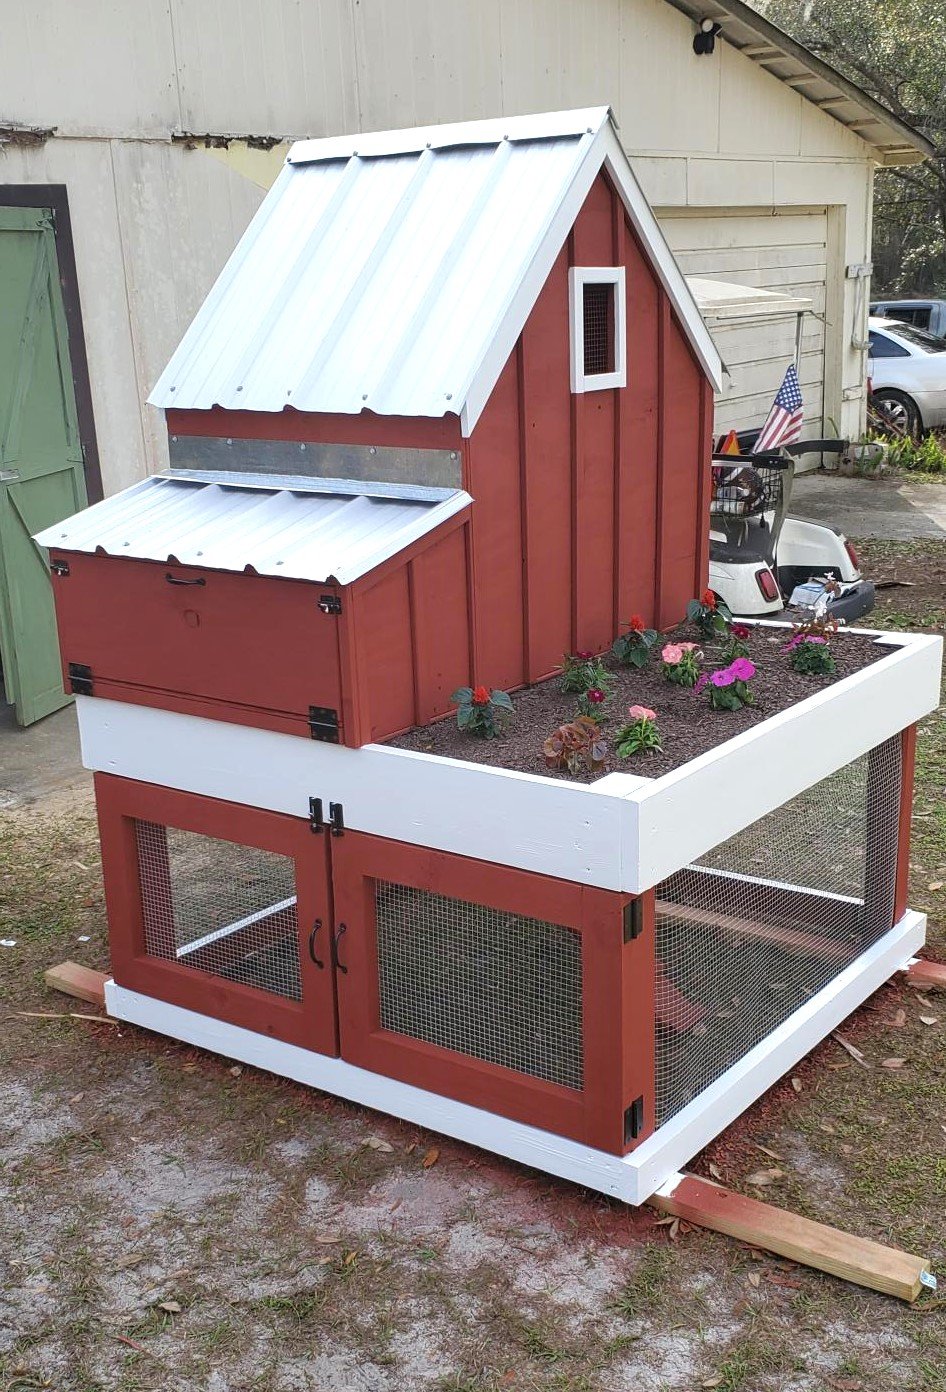
Finally got around to building this coop, turned out well and the plans were spot on, only thing missing in plans were the size of the hole in the clean out tray, shows you where to put it but not how big it is. This cost me about $550 with today's prices If I'd built it a couple years ago when this plan came out probably could have done it for $350. Sorry about the sideways pics, Not sure why it rotated my photos couldn't get them to upload straight.
Built from Plan(s)
Comments
Queen Anne High Chest of Drawers
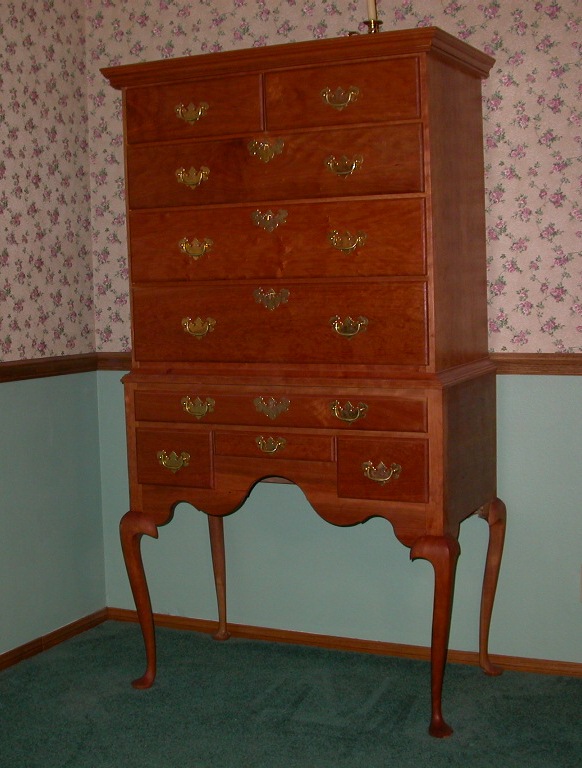
Here is a High Chest of Drawers (Highboy)I built. The original was built in 1748 by Christopher Townsend in Newport, R.I. It is made of Cherry with Maple as secondary wood. It took about 300 hours to build. All joinery is either mortise and tenon or dovetails. I worked hard to avoid any nails or screw, but the back it held in place with nails. All wood started out as rough lumber and I milled all wood myself. Moldings are of my own design, but based on the original. Brasses are from Horton Brasses. Drawers are all wood-on-wood with no glides, per original. I made a little tiger maple foot stool to get to the top drawers. All escutcheons have working locks.
Estimated Cost
$1100.00 plus $300.00 for the brasses
Estimated Time Investment
Week Long Project (20 Hours or More)
Finish Used
Minwax Antique Oil Finish, paste wax.
Recommended Skill Level
Advanced
Comments
Mon, 11/07/2011 - 14:55
Beautiful!
You are extremely talented! (And I bet you have fabulous tools!) I am jealous!

Mon, 11/07/2011 - 15:15
Thank you, it was a tad of work!
Thanks for the compliments. Yes, I did make it wholly by hand. All it was was a series of smaller tasks, just a whole bunch of them.
I has slowly accumulated most of the tools required. I have a jointer, router table, planer, band saw, table saw and a hollow chisel mortiser.
The cherry is getting richer over time, so it actually is getting better with age. I really like 18th American furniture. I prefer to work with Cherry, Walnut, and Tiger Maple. All rough wood only, no milled boards of any kind.
Farmhouse Bed in Weathered Gray - Queen Size

Ana,
I want to take a minute to thank you for your website and all the free plans. You inspired me to make my first piece of furniture. I made a farmhouse bed using off the shelf lumber. The stain is weathered gray. I used your link to making your own stain (vinegar and steel wool). The bolts are 3/4 inch and are decorative. Also, I notched the posts so they can support the full weight of the rails. Thanks again, I can't wait to start on my next project!

Estimated Time Investment
Week Long Project (20 Hours or More)
Finish Used
Per instructions on this site for aging wood.
Recommended Skill Level
Intermediate
Comments
Wed, 10/23/2013 - 06:44
Catalogue Perfect
This is a really nice piece. It looks like you bought it, it is so finished. Well done.
Too many Christmas Toys
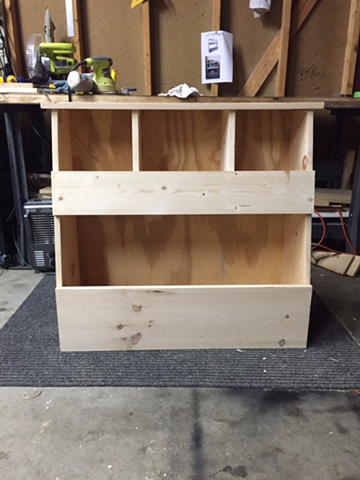
What do you do when your child gets too many toys for Christmas? Build a toy box of course. I went with a 1X6 instead of 1X4 as the top front apron, yes it’s not easy to put books in, but when you have a 9 month old I was more concerned with a place to put Legos so I won’t step on them. That small change made a world of difference. The toy box is sturdy which is what I needed, knowing he is going to use it to pull up on while learning to walk. I primed it and then painted the front two aprons and sides with chalkboard paint and the remainder grey to match the table I made in the same room. The chalkboard paint takes a ton of coats and requires a lot of waiting (neither of which I am good at), but I think the outcome was worth it.
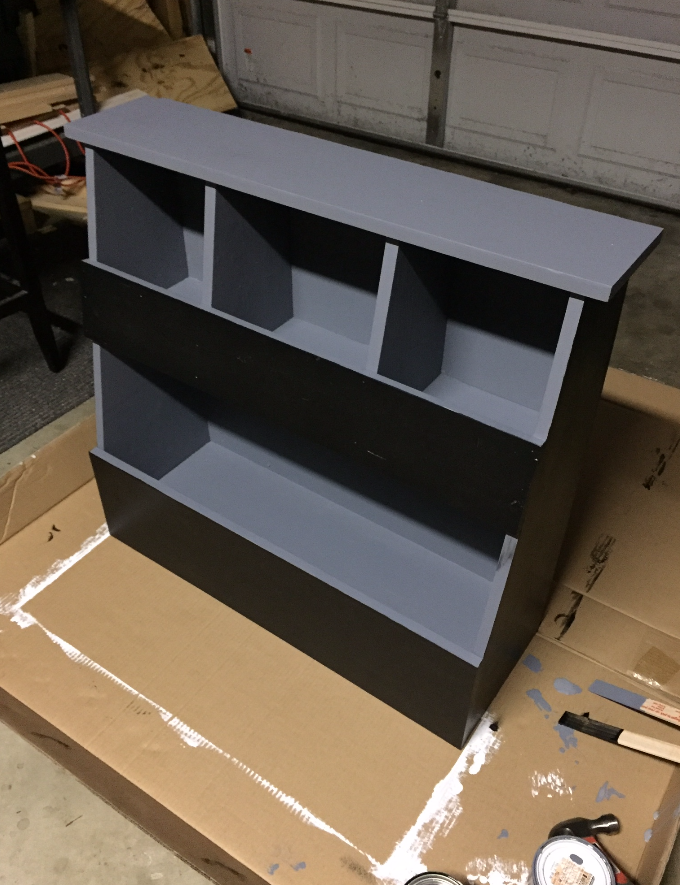
Estimated Cost
$50
Estimated Time Investment
Day Project (6-9 Hours)
Finish Used
Primer, Chalkboard Paint and leftover other paint. Primer was a must on this project, knowing kids will spill on it coupled with chalkboard paint I don't think you can get around it.
Recommended Skill Level
Beginner
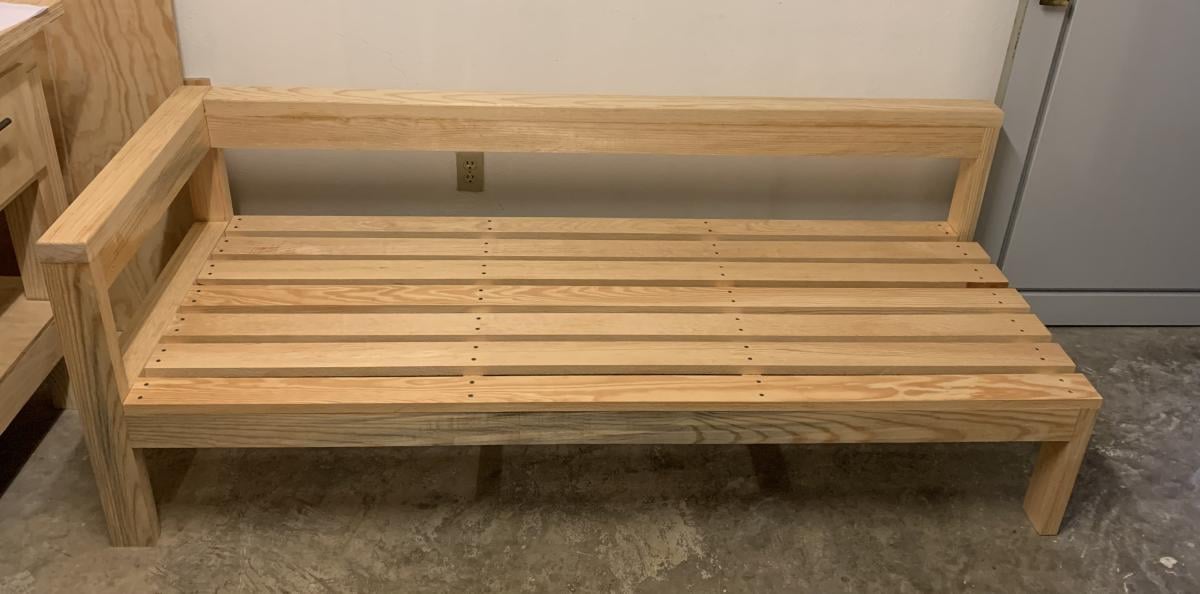
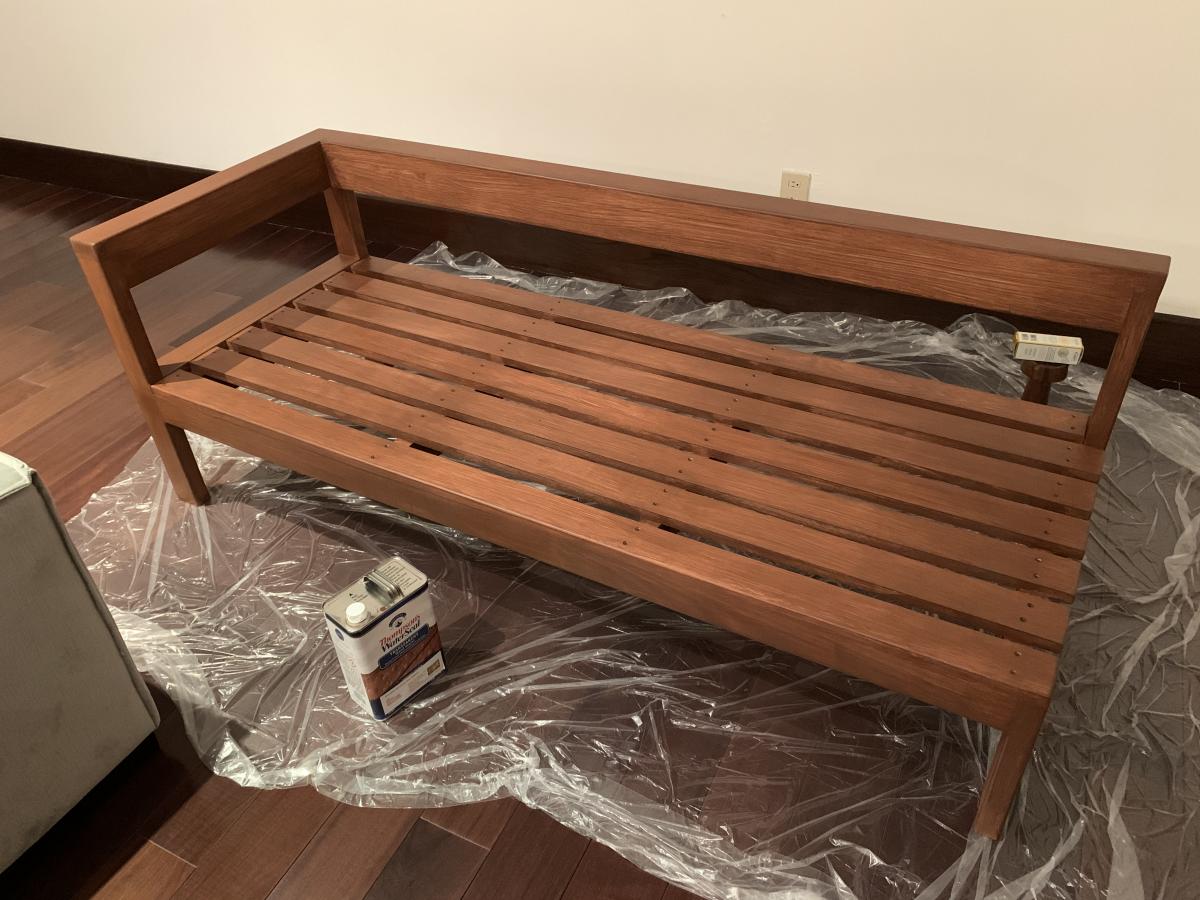
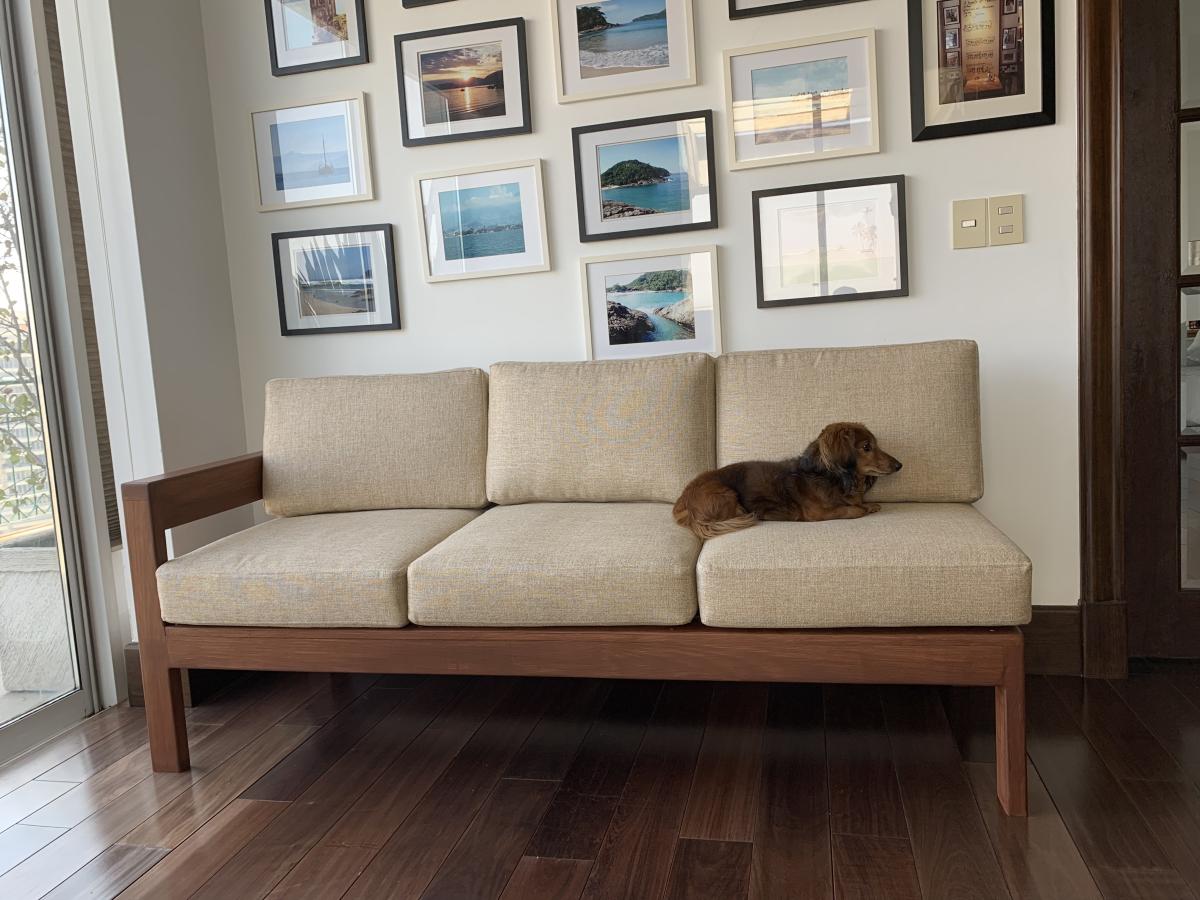
Patio sofa
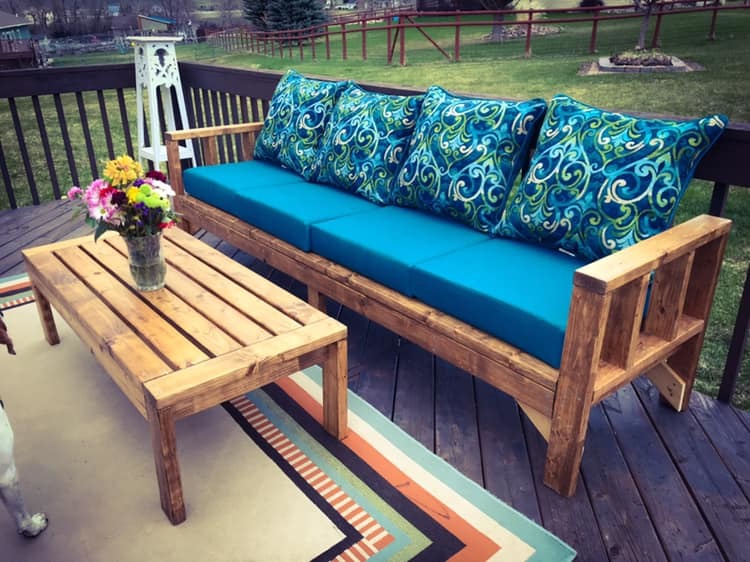
Went with regular cheap studs and extended the couch to make 4-across seating. Probably should have used better wood because it was hard to find studs that were straight and not full of burrs and knotholes! AND...studs are actually 1.5" x 3.5", so keep that in mind if you go that route when you're cutting from detailed plans because your dimensions will be off slightly. Staining and adding spar urethane coat took the longest amount of time. Cushions are 24" x 24" from Lowe's. Wood = $80, Cushions = $180. A little extra for screws and a few pieces of hardware. This pic shows the couch without a back brace that I added later. It's a beast, too! After all that wood the couch probabaly weighs close to 150 pounds!
Built from Plan(s)
Estimated Cost
$280
Estimated Time Investment
Weekend Project (10-20 Hours)
Finish Used
Minwax Puritan Pine Wood Stain, Spar Urethane
Recommended Skill Level
Beginner
2x4 sectional
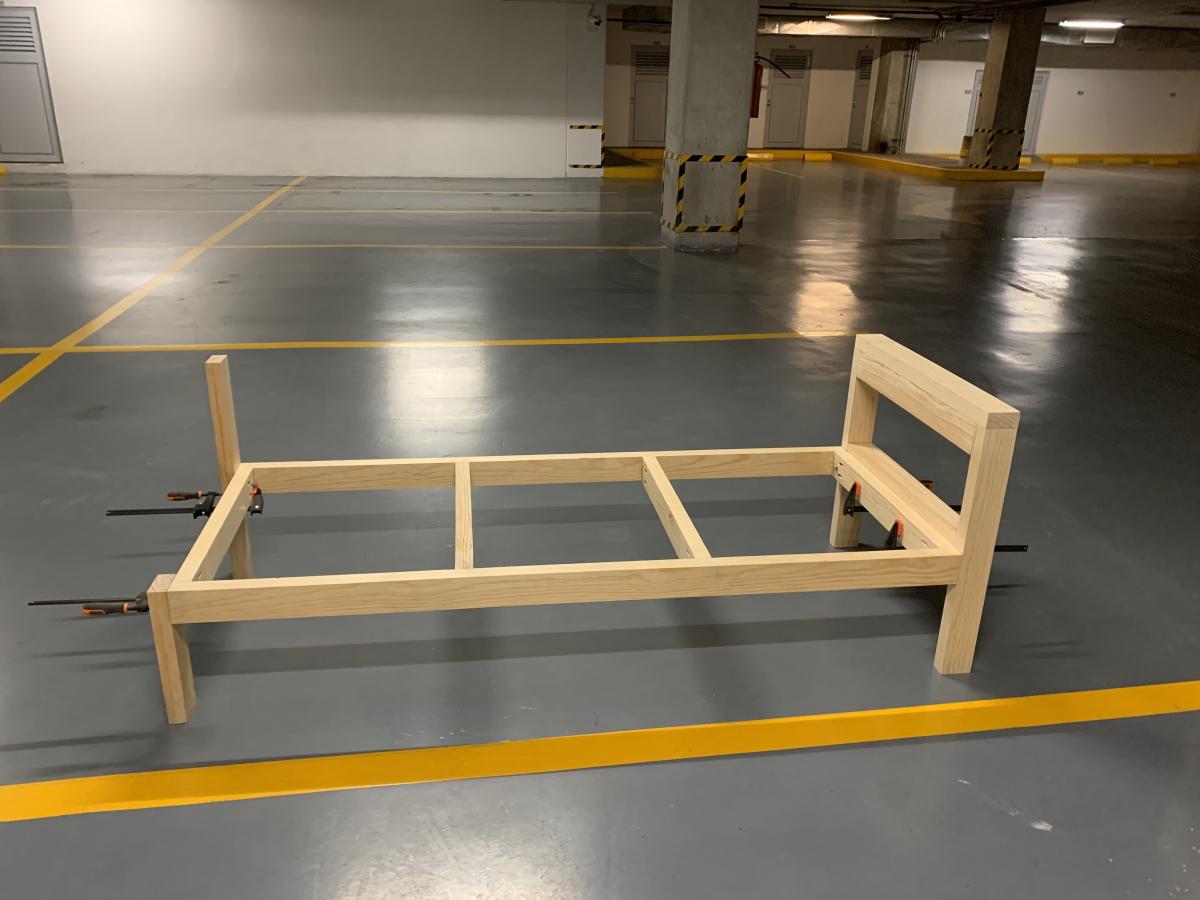
After building my workbench and some shelves to organize my makeshift wood shop, I went online to find practical first projects. Stumbled upon the Ana White site and really liked the simplicity of the pieces and the thoroughness of the plans (cut list, pictures, etc). Had the wood dimensioned at a local lumber yard and started building. Upon completing the first bench - sealed with a tinted Thompson’s water seal - found a local upholster to make the cushions. Now to find a place to put them that the wife approves. Build already approved by the pup (see last photo).
Built from Plan(s)
Comments
Bi-plane Shelf
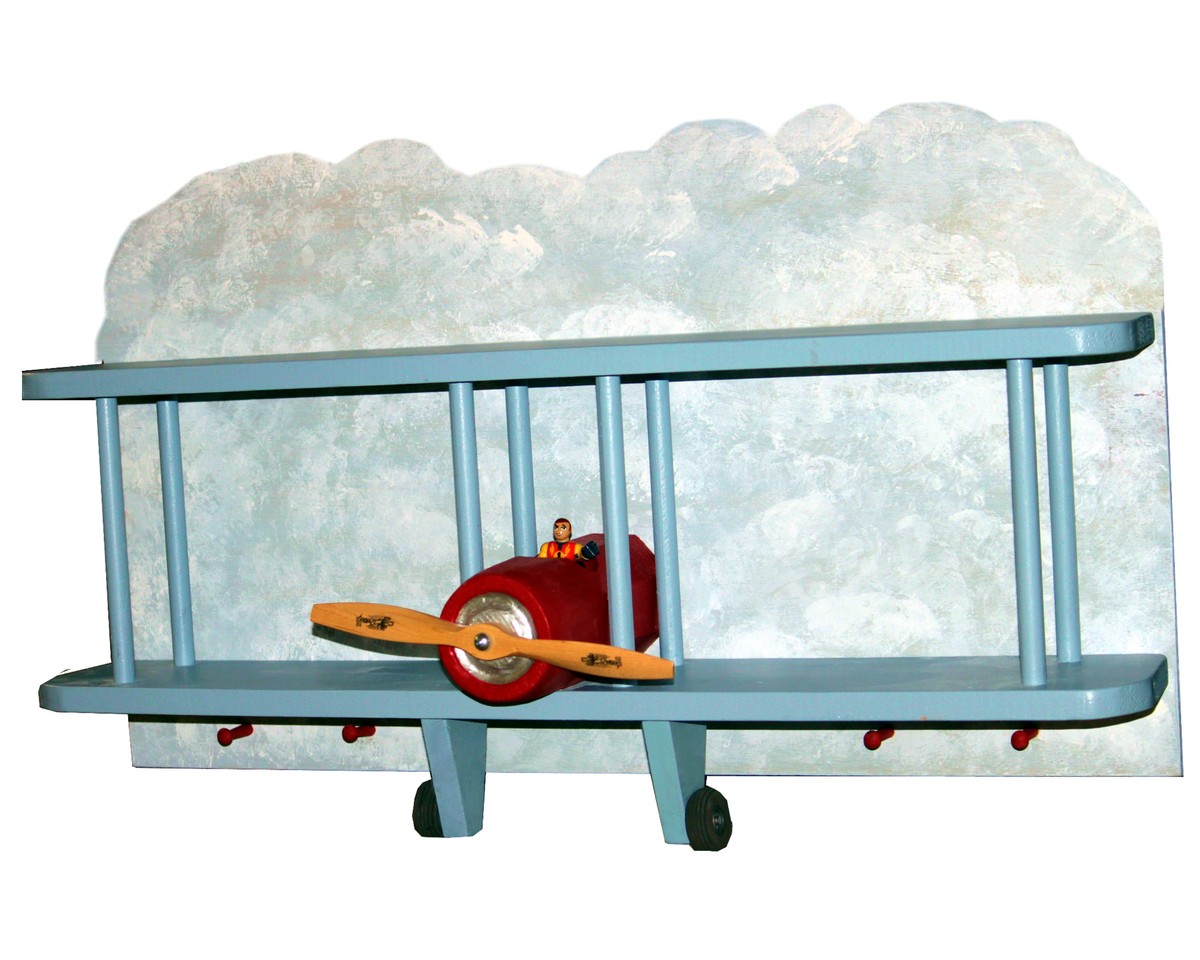
I got inspiration from your pattern, but decided to make it more realistic since my four year old grandson is a stickler for detail. Because I had scraps, the only cost for me was the propeller and wheels from a hobby store (about $8).
The body of the plane was cut from a scrap of 4X4 post; the corners were cut off at 45 degree angles to make it more rounded (sanding rounded it more). I used a dremel to carve the engine indentation. I used 5/8 inch dowels for the wing struts (only because I grabbed the wrong drill bit; you could use 1/2 inch). The wheels were attached to 2 1/2 X 4 inch pieces, which I mitered to make smaller at the bottom.
The backing was cut to fit the length of the shelf and 18 inches high. I painted the background a soft blue and then applied white for the clouds. After attaching it to the plane; I decided to add some pegs.
This is a Christmas gift for him because we are going to redo his room after the first of the year. I will be building him a loft bed from Ana's plans and adding some more airplane decor.
Built from Plan(s)
Estimated Time Investment
Afternoon Project (3-6 Hours)
Finish Used
Paint and spray polyurethane
Recommended Skill Level
Beginner
Comments

Tue, 11/08/2011 - 14:58
Professional job!!
Your altered design is so professional looking. I have seen plans in a woodworking magazine that makes the bi-plane shelf very realistic, but I would never be able to build it because I don't own the tools. Yours is one any of us could build. Thanks for sharing.
Simple Outdoor Bench
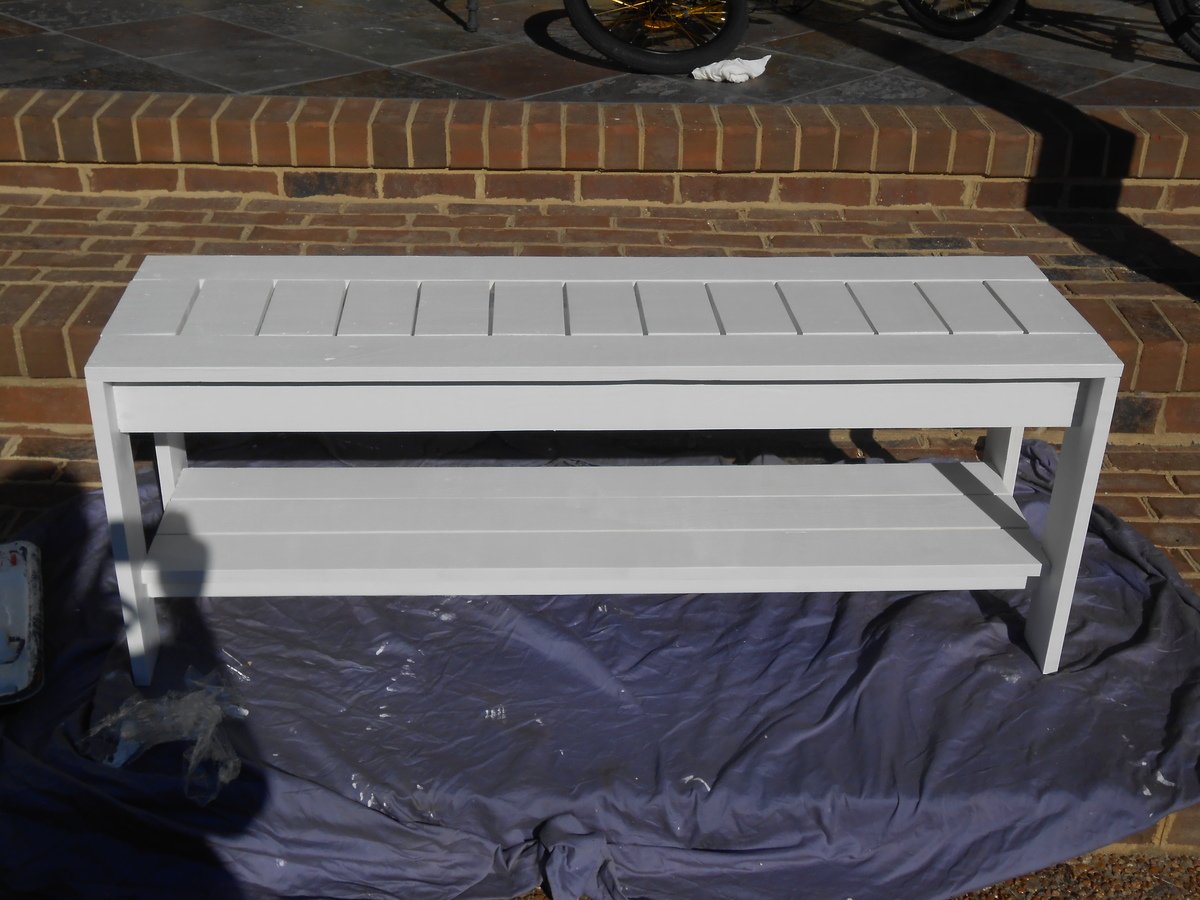
I had to modify the plans. The Size is 14" x 48". I also added a shelf at the bottom for shoes. Can't wait to replace the ugly shoe rack at the front door with this! I also used 1 x 4's for the apron. I found 1"x4"x14' at homedepot for only 3.40per piece!! So I was able to build this for less than $15. The wood has more knots than the other 1 x 4's, but if you look thru you can find some good pieces. I'm going to use this same wood to build the outdoor sectional too.

Built from Plan(s)
Estimated Cost
14
Estimated Time Investment
Day Project (6-9 Hours)
Recommended Skill Level
Beginner
Farmhouse Table
Not the best picture. This was my first project using plans from this site. What a breeze! Took about 8 hours total to build and 2 hours to finish (sand/paint/stain)

Built from Plan(s)
Estimated Time Investment
Day Project (6-9 Hours)
Finish Used
Paint (Legs) (just an off white i had laying around), Stain (Table Top - Grey Minwax), Polyurethane Satin finish (Table top - Clear)
Recommended Skill Level
Beginner
Spa Vanity for Bathrooms
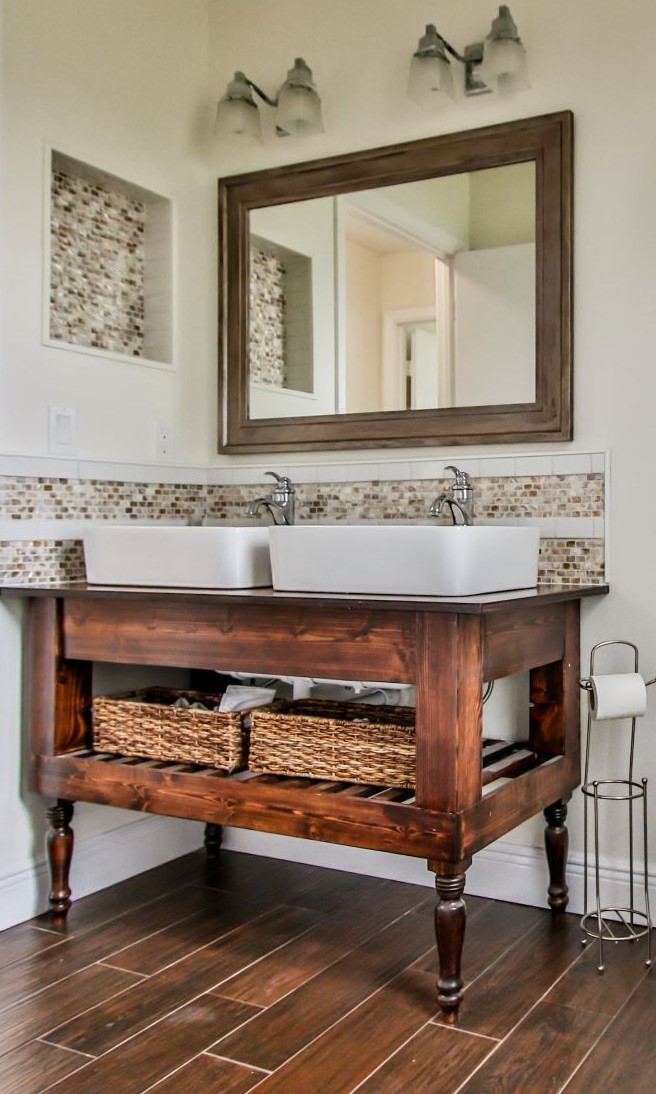
I love this vanity, It is one of the first serious pieces of Ana's that I have made. We altered the leg from the 4X4 posts to a premade turned leg, which we think turned out awesome. Mom was a real skeptic before we started, but now she is hooked too!
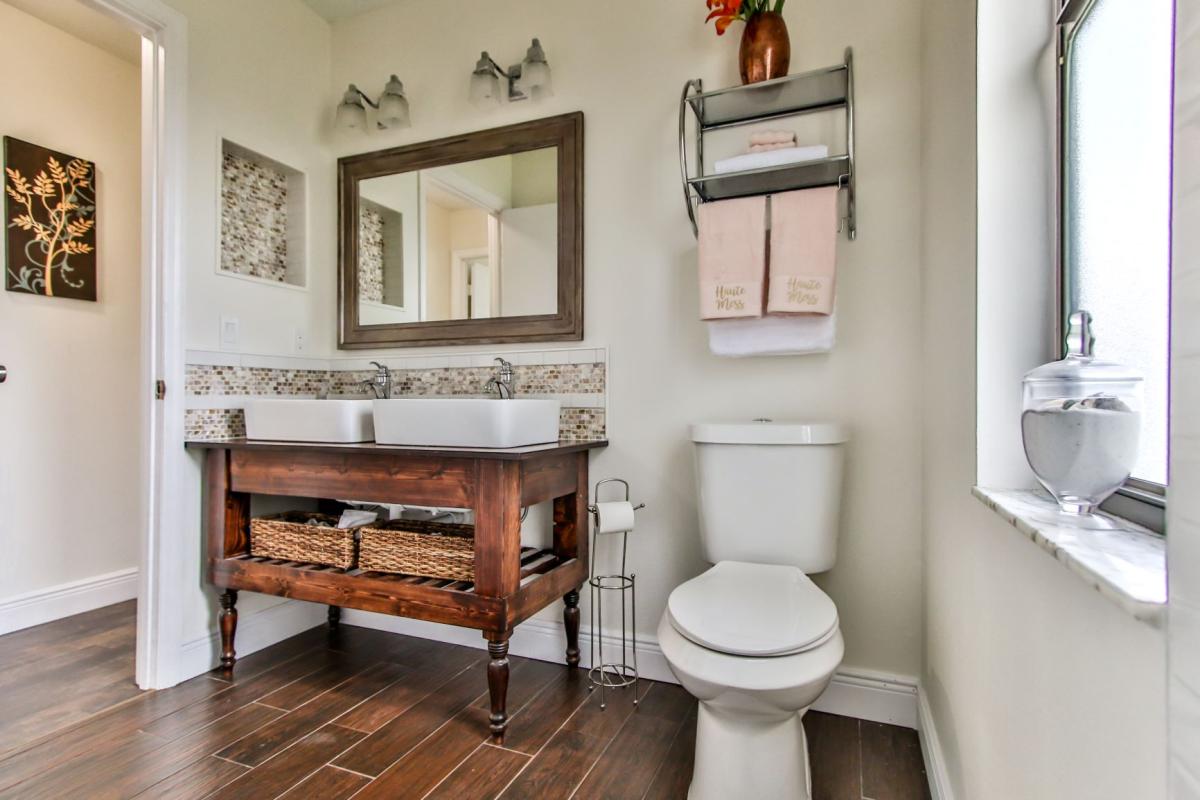
Built from Plan(s)
Estimated Cost
Around $100 since we made 3 we were able to use off cuts for additional vanities
Estimated Time Investment
Afternoon Project (3-6 Hours)
Finish Used
Carrington
Recommended Skill Level
Beginner
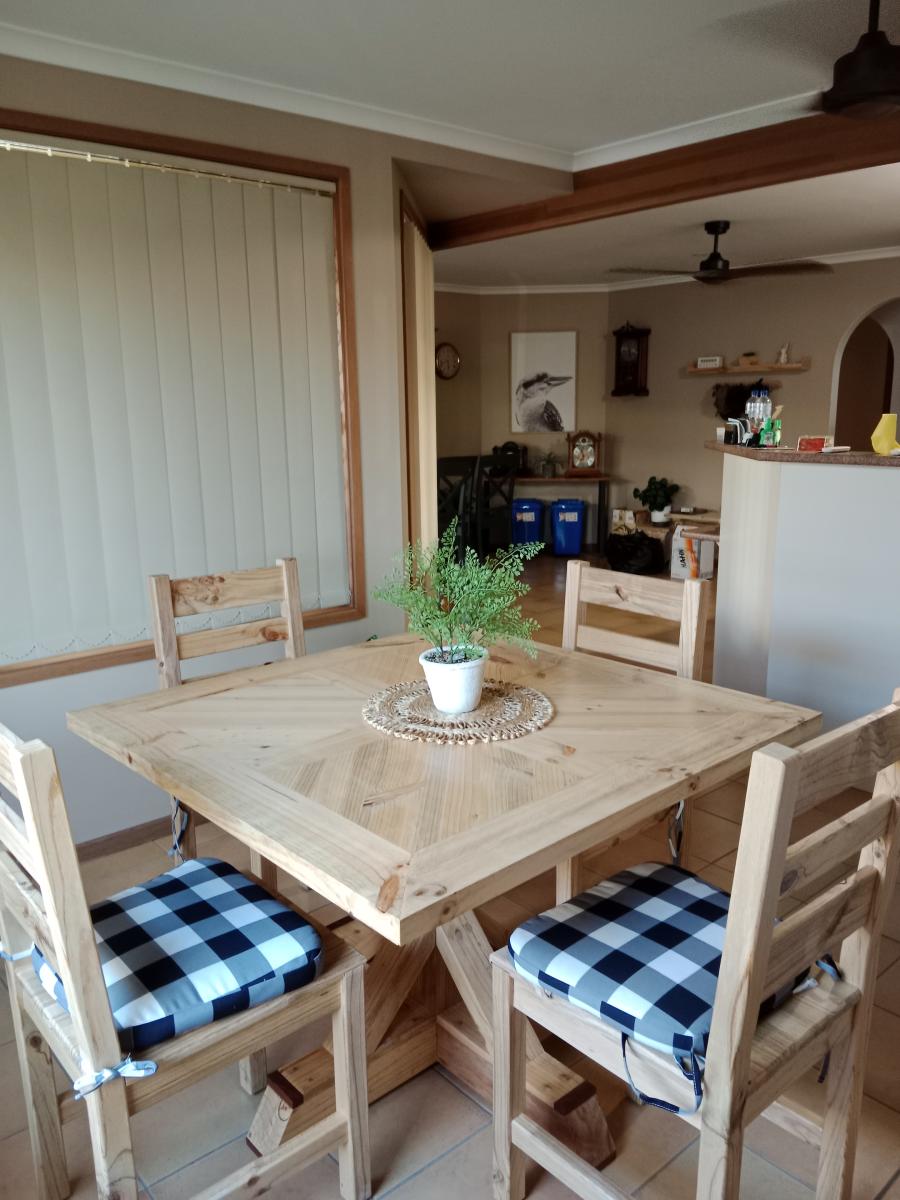
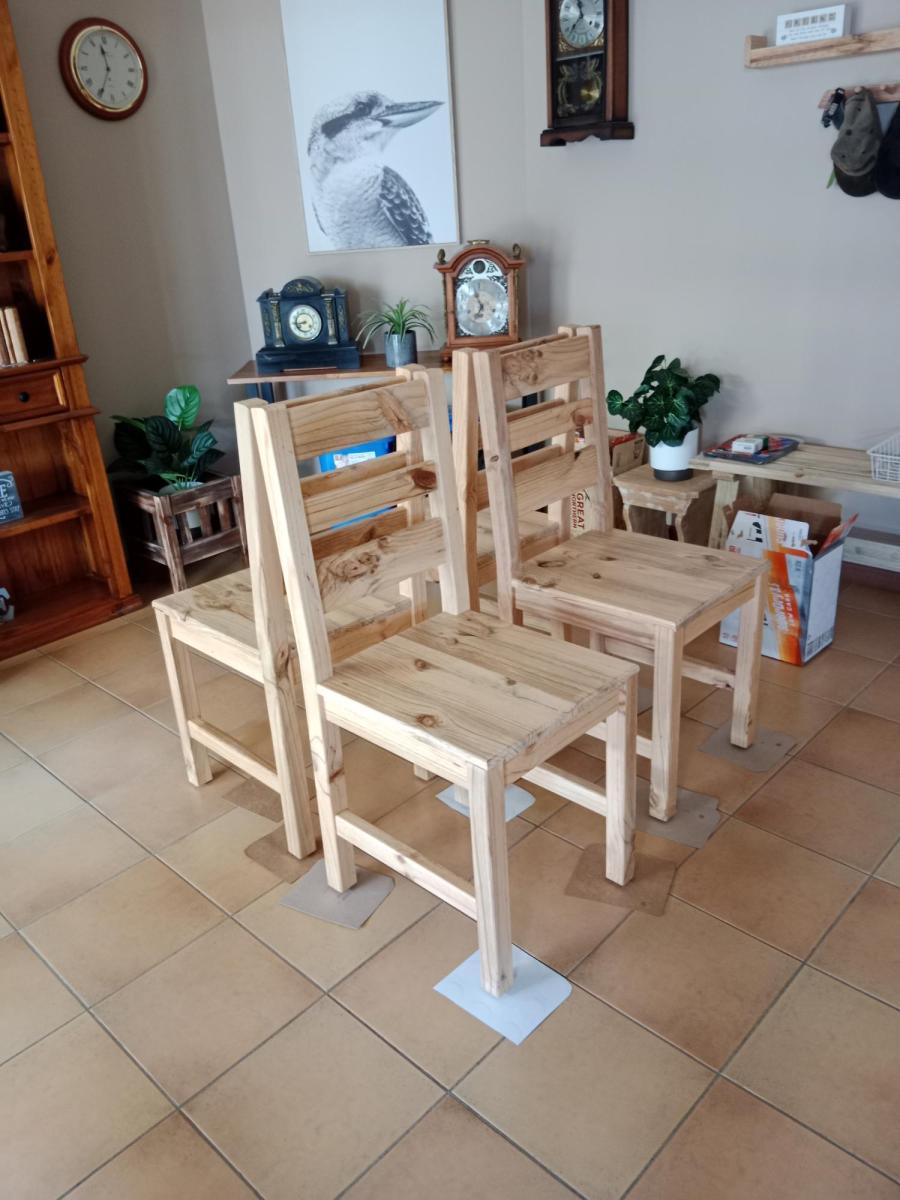
Dining chairs for X based pedestal table
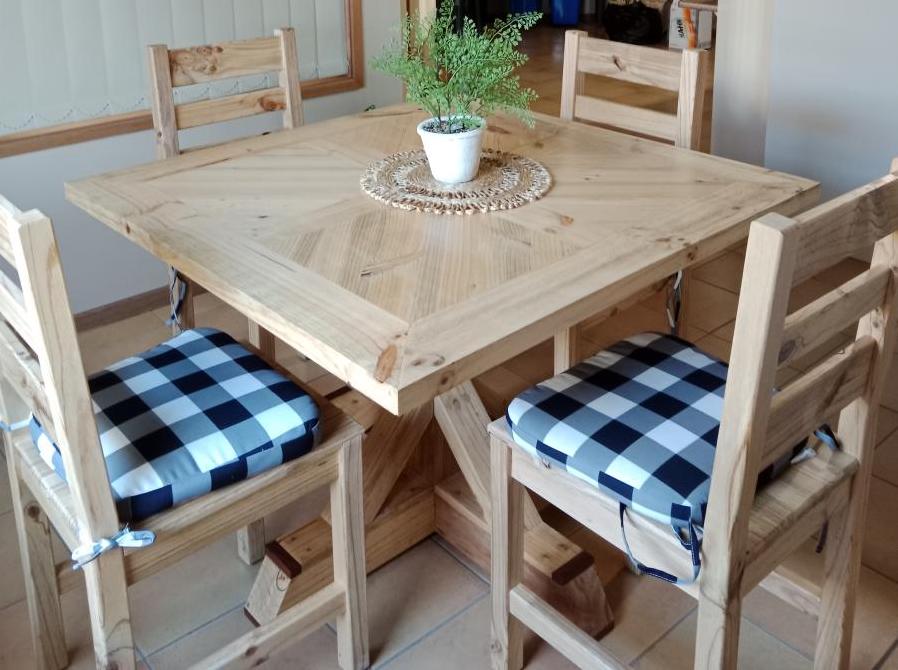
I made the 4 chairs to complete the dining suite. The table was made from the X based pedestal table plan.
The timber was all cut from 200mm x 50mm pine sleepers and finished with Cabots clear finish.
Built from Plan(s)
Comments
Mon, 03/06/2023 - 13:35
Love the look!
What a beautiful set! Thank you so much for sharing your amazing work:)
Farmhouse Table and Benches
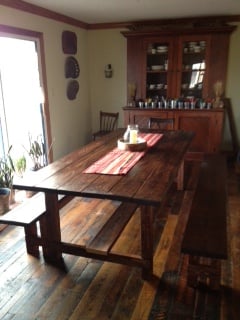
We built this Farmhouse table in a week. Unfortunately, we didn't get it completely put together for four months. Now it is finished. It is our first project. We used pine and fir boards from our local lumber store. It is finished with red chestnut and dark walnut stain and then a couple coats of briwax dark walnut (love that stuff!!). The table is 96" and pictured here without the 15" bread boards that go on either end. The benches are 8' as well.
Built from Plan(s)
Estimated Cost
$125
Estimated Time Investment
Week Long Project (20 Hours or More)
Finish Used
Red Chestnut and Dark Walnut Stain and Briwax Dark Walnut
Recommended Skill Level
Beginner
Comments
Sat, 05/24/2014 - 01:12
nice stain job!
I loved your stain. I see you used two types of wood and two types of stain. Can you tell me more? Did you alternate the wood pieces? Did you stain the red chestnut first and followed it with dark walnut? I'll probably copy what you did :)