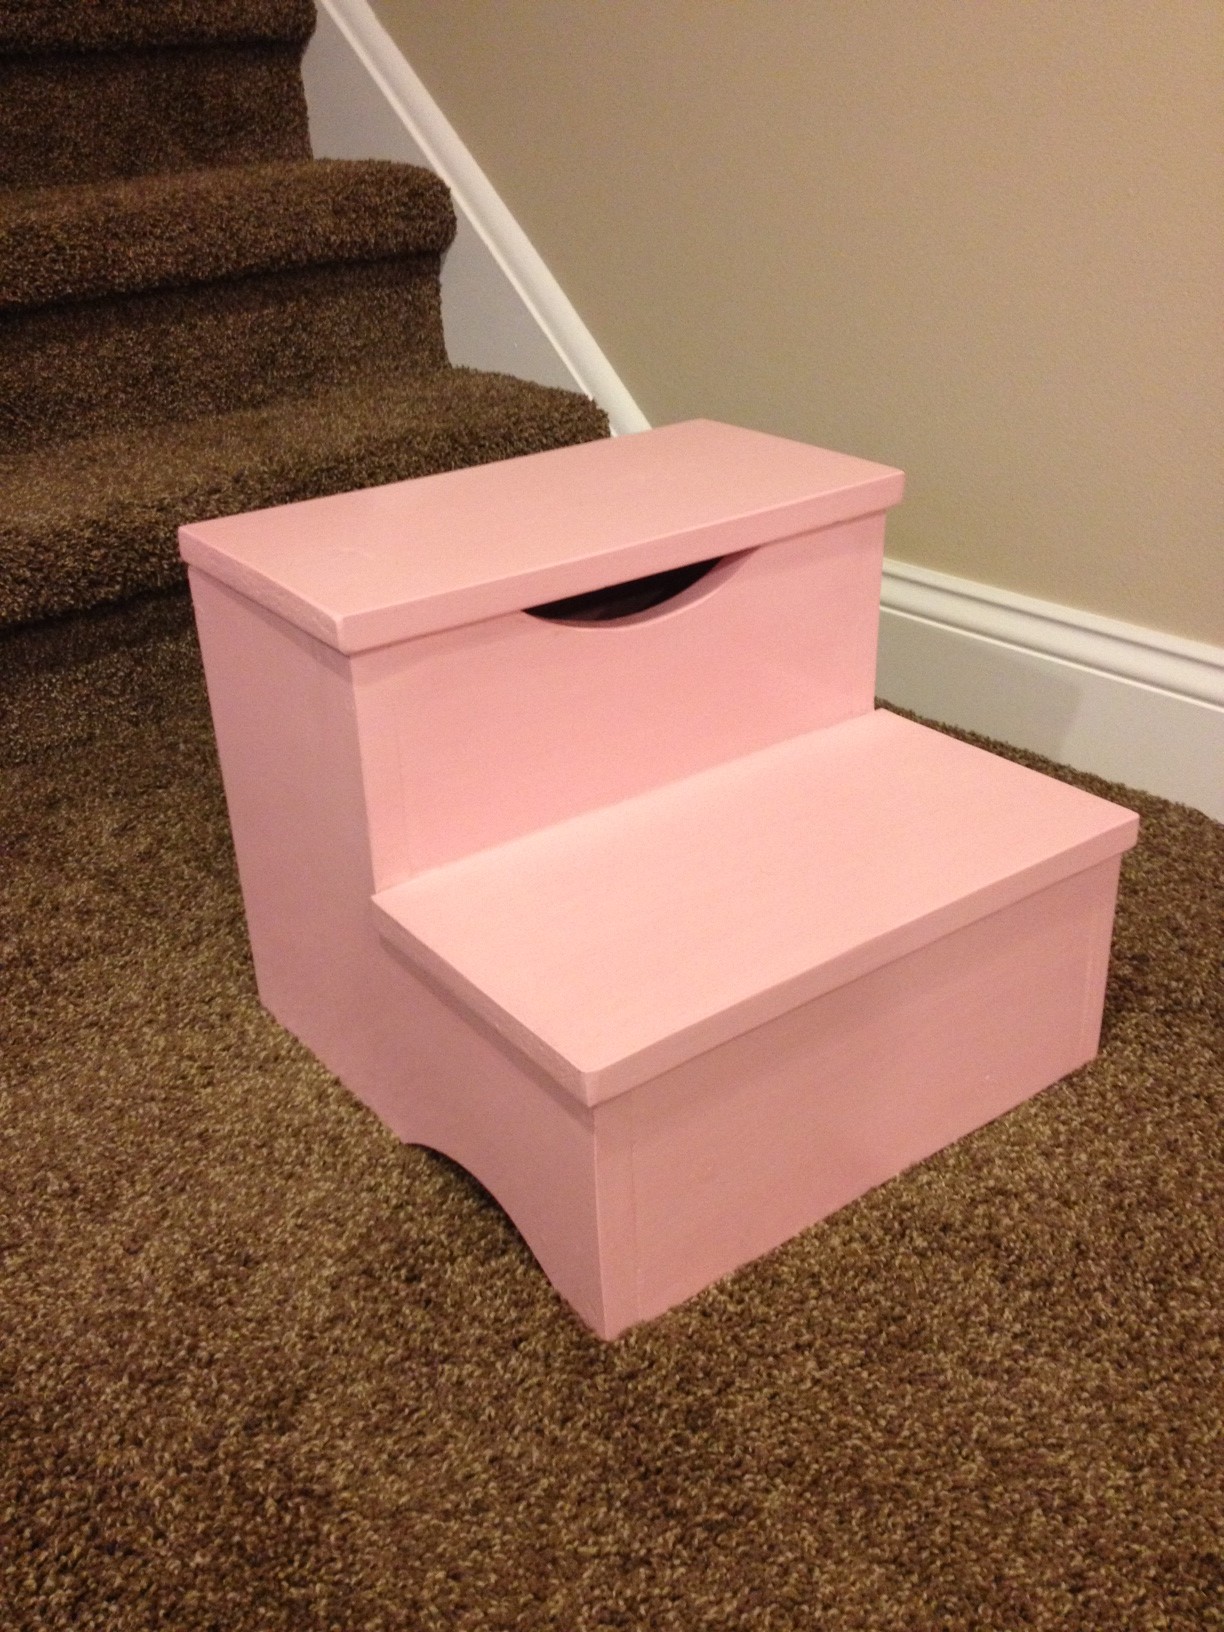
Fancy X
First large build I did by myself. Took a long time because I pre-drilled for every screw. Gave this table and bench to my brother. Made new table in hours- no need to predrill except for the 1x4 on the bottom.
There were no exact instructions so the project was just eyed. We used finishing nails to put it together so it would be easy to take apart if a mistake was made, then later we added the screws. Bought a can of rustoleum paint in navy blue. I get pallets for free from my mothers work, and we had screws laying around, so essentially the project was free.
Ask for materials used
We loved the look of the farmhouse x table but my wife liked the slatted look of pallet furniture, so I replaced the 1x12 boards on the bottom with 1x4 cross pieces. I also changed the dimensions somewhat to fit in the space intended for the table so I got rid of the x frames on the ends because their angles changed with the dimensions of he table. Now our cabin looks even more rustic!
Built my in-laws a new pantry closet. I wanted to give them as much pantry storage as possible so I followed Ana White’s slide out pot rack plans. My mother in-law loves the new space saver for her pots!
I loved this plan. Could not find anything else close. There is details on pocket screws from another user. I loved this. I did use plywood but edge the front and rear with a 1x2 (planed thickness to be flush with plywood). I also pocket screwed the 1x2 to the plywood. I loved this and it is way cleaner than exposed corner moulding.
Wed, 05/22/2013 - 06:45
do you remember what color and brand of stain you used and what type of paint for the lettering?
thanks,pam
I built a wooden toy truck using a leftover 1x4 board in my garage. For this build I used Ana White's plans for the wood wheelie cars. This was a quick and easy project and my first project using my scroll saw. Not too shabby for my first go at toy making. However, I am not happy with the finished toy. If I did it all over again, I would take my time with the finish. Also, the driver was not perpendicular to the truck's body when I created the holes for the axles, so the truck leans slightly. My son does not seem to notice its flaws, so I will try to overlook them as well! Check out the blog link for more project details!
Pretty happy with how it turned out. Will take our 4 year year old a bit to get comfortable with the ladder. Wish our room was long enough to add the stairs. Good plans though and thank you Ana White for making them available online.
My son needed a bed for his new apartment and this is the design we chose. The cuts are 1x4 pine stained different colors. He loves the bed!
I fell in love with this bench the moment I saw it, and convinced a friend to let me build it for her! I used 2" brads and glue to hold the woven pieces together. I found it necessary to add a center support under the bench seat to keep it from "creaking." I also used 2" brads to hold the seat slats on; although the instructions say to use 2" screws, *I* certainly don't see how that's possible with the 2x4 supports on their sides underneath! It was a fun build. More info and pictures on my blog.
Slide out spice drawers. Simple build from 1 piece of 1 by 3 and 1/4 inch plywood for base.
I love the way these chairs came out, thanks for the plans. I used pallet wood for the slats and rounded everything over with my router. Also added a 2x4 across the top of the back to give it a more solid look.
This was a last minute, first completed, wood project right before Christmas! I wasn't sure about my own skills and if I would complete it in time, but behold it only took 3 evenings (spare time) to complete! This was really simple and gave me time to learn what I was truly capable of and any areas I could improve upon. We finished it and on Christmas morning our little girls, 2 and 3 years old, got their very own princess dress up area. I'm excited for those two girls to make the best sister memories together. Thank you so much for the plans!
My husband and I built this together, we stuck to the plans provided for the Martha Inspired Craft Table, however we left off the trim around the drawers for a simpler look. The drawer pulls were purchased at Home Depot. We used poplar wood that we stained with Georgian cherry gel stain from General Finishes.
These worked perfectly for the space in our tiny house. Loved the way they turned out!
I built the above corner bench based off of the frameless drawer bench plans (they are on the shelf help site) which are very similar to the essential entryway bench plans, but the drawers are included. The long bench is 60", the shorter side 42".
For the carcass i did use the shelf help pre cut plywood.
When I started the project beginning of 2021, there was no tutorial for the corner part yet, so I was very glad to see I did the right way when the corner 'add on' came out, also found on the shelf help site).
The shaker fronts were shown in the barn door console plans, so I adopted that.
I get loads of compliments and obviously even more when people hear I built it myself.
The hardest part about this project were the drawer slides and getting them to line up and work as expected. The I broke the soft close on one of the big drawers during final assembly and still didn't bring myself to exchange the slide to a working one... 😊
But overall I'm really proud of it!
Tue, 10/05/2021 - 12:03
Thank you so much for trying out Shelf Help, what a grand project!
Well I told my sister that I bought a saw and some tools and I was going to attempt to build my own dining room bench... being the snarky "younger" sister that she is, she suggested I start with a cutting board instead. :)
But hey... go big or go home I figured, so I tackled my first ever carpentry project: the Triple Pedestal Bench from Ana's plans!
I attempted to cut down the measurements for the top from 106" (in the plans) down to 70" (to fit my table) BUT I screwed up my measurements (I suck at math...shocker!) and ended up with an 86" long beautiful beast of a bench
somehow... so beginners mistake! At least now I have some practice under my belt for when I have the time to tackle this project again and start over and make a new one that actually fits my dining table...
And while it's far from perfect, I absolutely love it... it turned out better than I had hoped and I still have all my fingers and limbs attached! Thank you God !:)
I built the Twin Storage Bed twice in a (very) full week of vacation. The project was big, but straightforward. The headboards are my own design, and are really strong with the addition of a 1x3 on the outsides to support.
The kids were part of the building, so they were especially excited to sleep in them....over the week I was building them, we moved them out of cribs, onto the floor in crib mattresses, then to bigger mattresses, and finally to their big-kid beds.
What a great set of plans! The only glitch was that I cut the supports for the middle according to plan (15-1/2") and discovered when I assembled the beds they were a little too short for comfort. So I used them to add to the piece on the back of the long boxes, and used pre-fab particle board to make the cover, which probably works better with our foam mattresses anyway. I drilled a couple of holes in the smaller of the particle board sheets to make it easy to lift off and use the middle for storage of some items.
Thanks for the support to do my first big project!
The bed in grey, also made the backboard taller (and doubled support on back) because the bed will have a box spring (photo 2). Awesome plans, love the look already. Excuse the background mess. The back wall is part of the same project! Thanks again for the plans!!
Note to future builders, learn from my one fatal mistake, be really picky on your quality of wood. I had some slight frame issues because on a bad board that resulted in about a 1/4 inch bow on one side. My slats are all use rival but you can see some done touch both sides...that is the bow. Still no one will likely notice but me.
Second, there was no info on spacing along the frame for attaching the 2x4 to the 2x6. I used 12", maybe overkill.