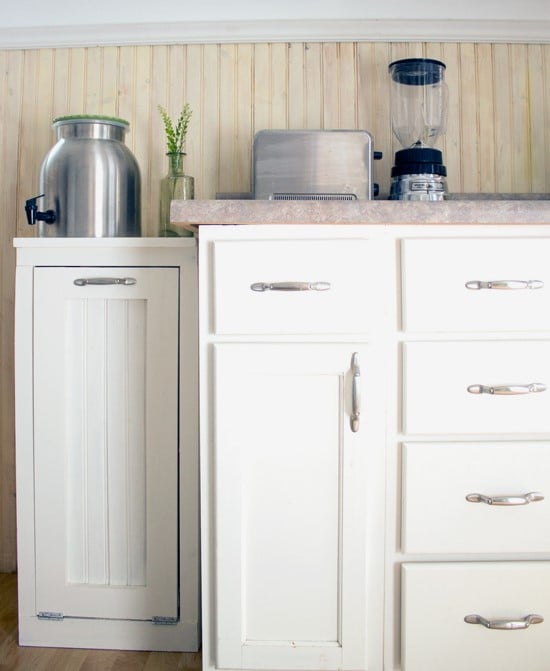
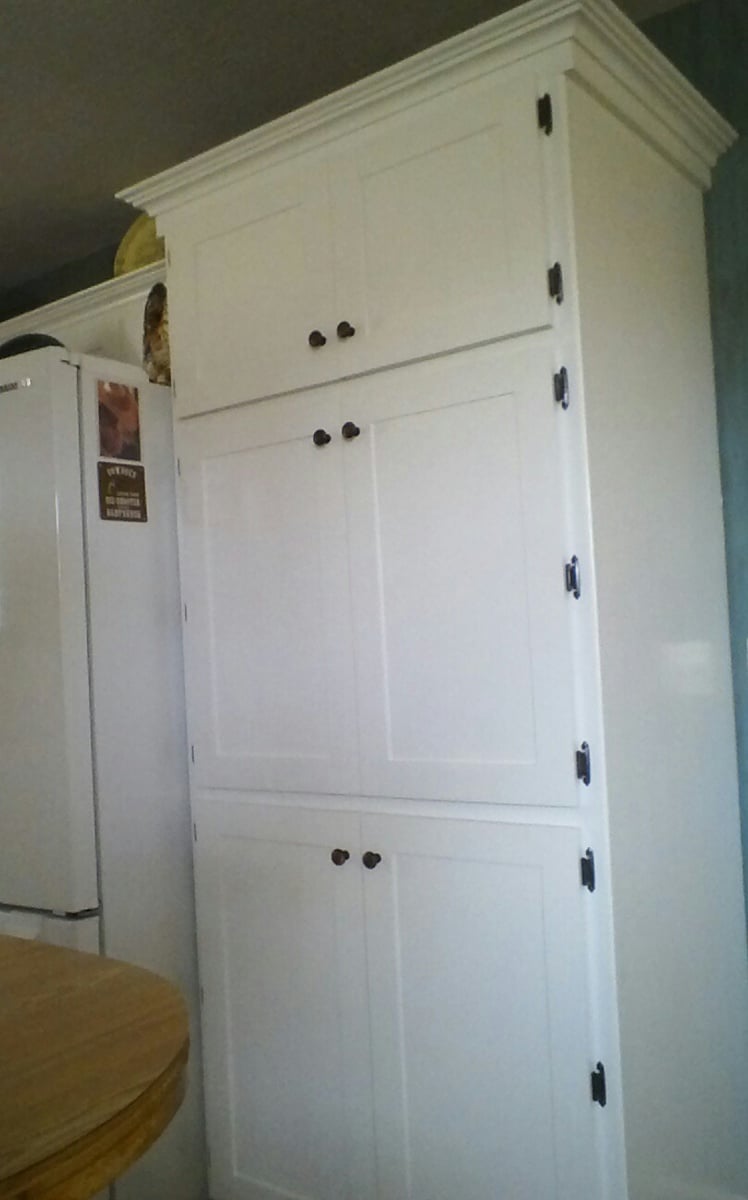
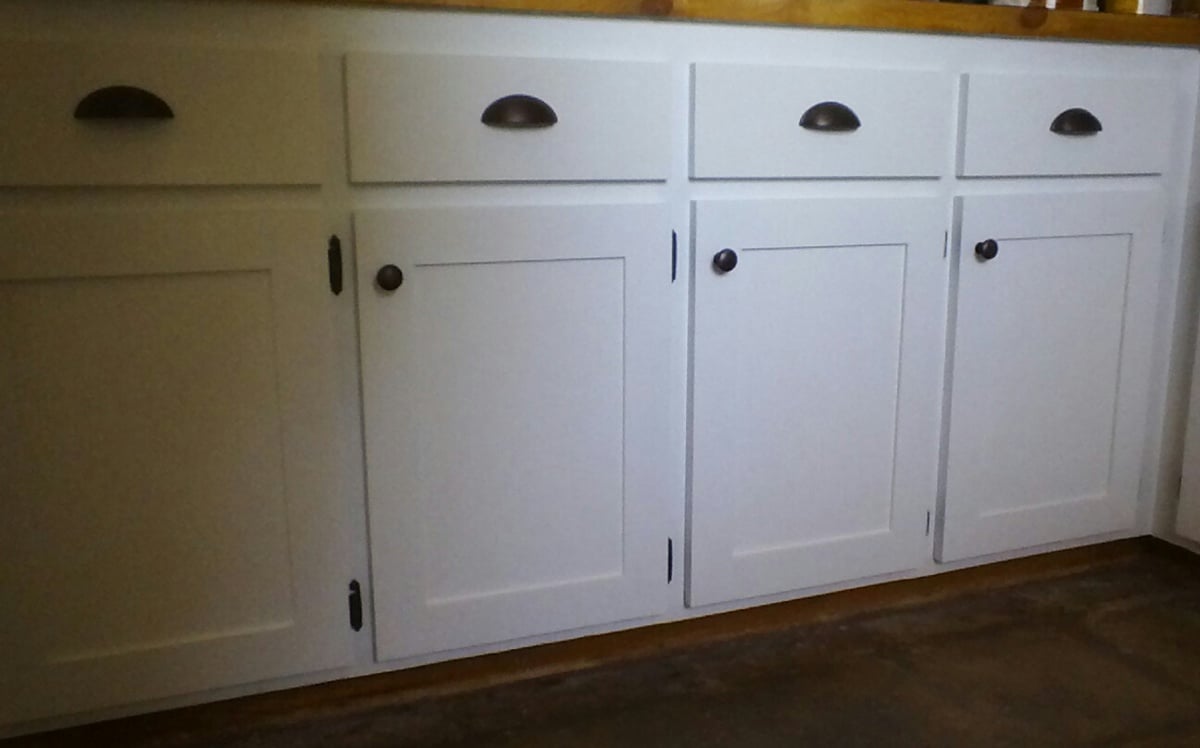
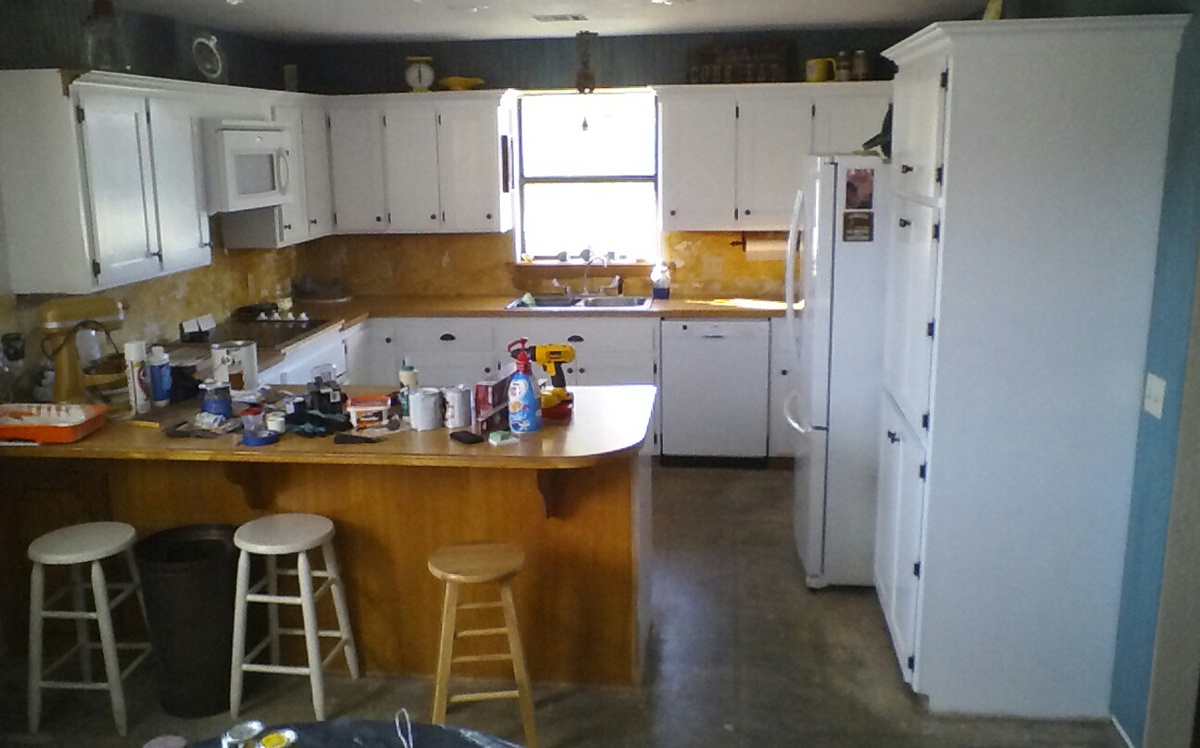
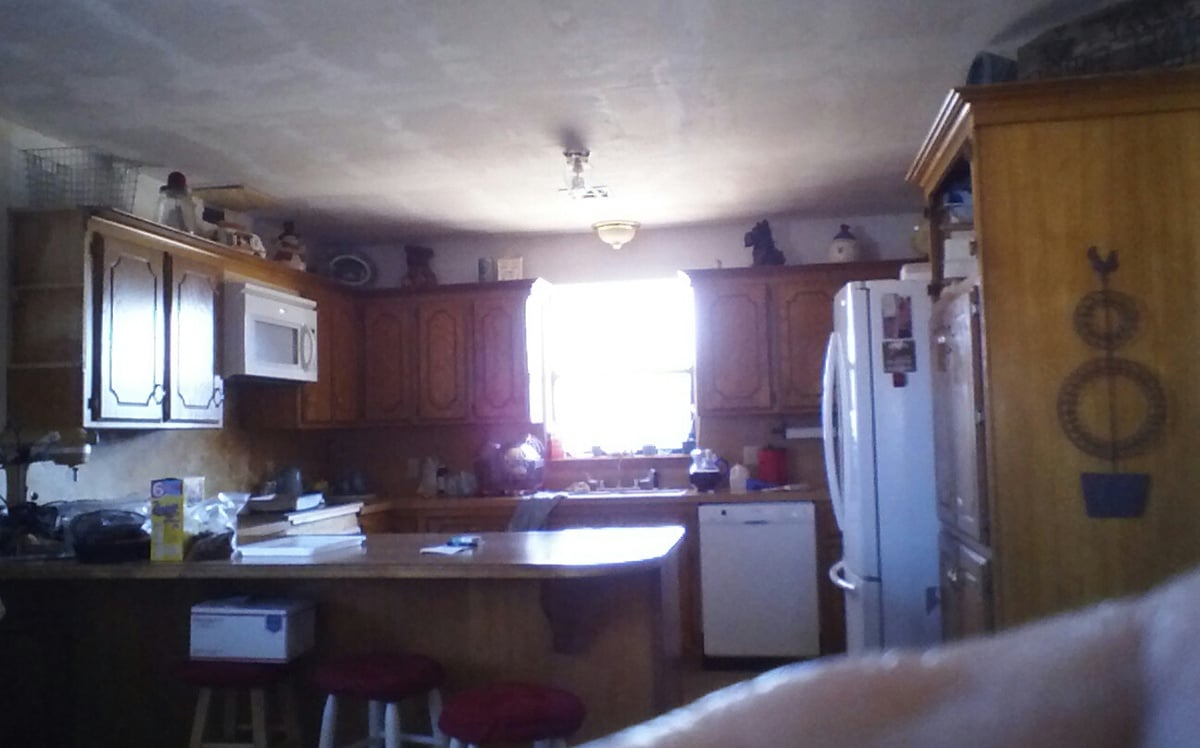
Community Brag Posts

We did it! Our first every project!

Submitted by parwald on Sun, 05/03/2015 - 10:58

We are in desperate need of toy storage in our playroom. We are planning to build several more of these bulk bins.

Built from Plan(s)
Estimated Time Investment
Day Project (6-9 Hours)
Recommended Skill Level
Beginner

Comments

kcasabella

Sat, 04/09/2016 - 21:03

They turned out beautiful! What type of wood did you use, if you remember, and did you paint before assembling?

parwald

Sun, 11/20/2016 - 10:39

It was just standard pine. We painted afterwards with grey paint leftover from a kitchen project.

Folding Sewing Table

Submitted by cchalifour on Wed, 11/24/2021 - 19:36

Built this Folding Sewing Table for my daughter.
- 18 mm Baltic Birch
- Birch leds

Built from Plan(s)

Comments

barnboard cooler

Submitted by Nickles on Sun, 06/28/2015 - 10:35

I followed a killer bee plan for a rustic cooler that I found on your site. tweaked it a little and I'm still adding to the décor on the outside

Estimated Cost
Around $15 if you have glue and screws already. I also had the barnboard from a barn we tore down last year.
Estimated Time Investment
Afternoon Project (3-6 Hours)
Finish Used
no finish
Recommended Skill Level
Intermediate

Logan Entertainment Center

Hello everyone! I built the Logan entertainment center for our apartment and it is amazing! I used Ana's plans with a few modifications. This was the first projected I finished and while it's not perfect, I love it and I learned a lot in the process. Because I was learning to build as I went, it might have taken me longer than someone who has more experience. I built this project over several months and it took a long time, but it was totally worth it. Check out more details about my experience over at my blog. 

Estimated Cost
$300-400
Estimated Time Investment
Week Long Project (20 Hours or More)
Finish Used
I did one coat of primer and two coats of Benjamin Moore Advanced paint in Decorator's White.
Recommended Skill Level
Intermediate

Indoor Dog Kennel

I love my dogs, but their wire kennels were an eyesore. Removing them completely was not an option, but I was tired of looking at them. I went back to my first-ever rehab project, and took it one step further to create a one-of-a-kind castle for my pups.
The original piece of furniture was an old console-style TV cabinet. Sliding doors on the front revealed the TV, and two lids on top contained the tuner and a turn-table.

Armed with screwdrivers, hammers and a dremmel, all components were removed form the cabinet, leaving just the shell. (PLEASE be sure you remove all sharp, potentially dangerous, screws, staples and what-not’s from the inside of the cabinets, to avoid injuring your pet! The dremmel allowed me to cut off and grind down stubborn screws.)

To cover the holes in the top cabinets, I used old checker boards. The cubbies are now a great place to store dog treats and leashes.

OPTIONAL: The back panel of the cabinet I used had holes from the TV components. I elected to replace the back board with a new sheet of peg board. (The peg board allows for much-needed ventilation.) In order to get the size perfect, I traced the old back onto the new and marked the original screw holes.

I vacuumed the inside to remove all construction debris and polished the exterior with Pledge. Then, I inserted an old comforter into the kennel, and stood back as my two pups launched themselves into their new abode.

The doors can stay open during the day for them to enter at their own will, and close for bedtime. And my eyes no longer hurt.

Estimated Cost
Cost of Cabinet (will vary)
Estimated Time Investment
Afternoon Project (3-6 Hours)
Finish Used
I did not elect to change the finish, but it could be painted to match any decor if you want.
Recommended Skill Level
Beginner

Comments

Barbara Cash

Thu, 08/11/2011 - 18:41

This was such a great idea. I love the old console. I love to build but I love it so much more when I can use old wood or repurpose parts of old furniture and industrial pieces. I feel creative. The checker boards are great. Do you have a blog?

Beffus (not verified)

Wed, 08/24/2011 - 09:33

I wish I thought of this or saw it long ago! I have 2 huge ugly crates in my living room...I am now on the hunt for 2 much better looking living spaces for my "other babies"! Love love this idea so much looks beautiful!

Tv console

Submitted by Anonymous (not verified) on Sat, 01/12/2019 - 23:16

This project was fun. The hardest part was trying to find barn door hardware. I did end up finding one on amazon but it was still too long and had to cut it down. Very doable in a weekend.

Built from Plan(s)
Estimated Time Investment
Weekend Project (10-20 Hours)
Finish Used
Mission oak gloss
Rust-Oleum gray chalk paint
Recommended Skill Level
Intermediate

Take off of cubbies/with drawers

Submitted by Anonymous (not verified) on Wed, 02/08/2023 - 09:00

Thanks for the inspiration! First time building something this massive. I have 10 foot ceilings. Bookcases are about t 9 foot tall.

Built from Plan(s)

Comments

Ana White Admin

Wed, 02/08/2023 - 15:43

Superb job, this looks amazing! Thanks for sharing. Would love to see it when it's all finished!

Patio tables

Submitted by Anonymous (not verified) on Fri, 03/03/2023 - 05:06

Fun and easy project. If I did it again I would definitely follow the directions to stain the wood first. My first Ana-White project. I’m hooked!

Built from Plan(s)

Comments

Farmhouse storage bed w/drawers (king)

Submitted by Anonymous (not verified) on Fri, 03/10/2023 - 11:51

Seen this awesome plan on Anas site and had to build it in KING SIZE. The drawers are enormous, the bed is rock solid. I love it

Comments

Planters!

Submitted by Anonymous (not verified) on Fri, 04/14/2023 - 03:50

These planters are exactly what we needed to warm up this blank siding! The smaller planters are made from pine, the larger from cedar.

Comments

Seasonal And Holiday

Twin over Full Bunk Beds

Submitted by bohman825 on Sun, 01/08/2012 - 15:47

I wanted my kids to have more space in their shared room, but I did not want to pay a ton of money for a new bunk bed. My husband and I found a plan for this bunk on Ana-White and fell in love with the design. It turned out so great that we will still be using it in our next home whether it's needed or not. We did change a couple of things on the plan that we didn't care for. The first is that we added a side rail for safety. Secondly we also traded the 1x6 boards on the head and foot boards for 1x4s on the top but kept the 1x6s on the bottom.

Estimated Time Investment
Weekend Project (10-20 Hours)
Finish Used
Stain: Colonial Maple and polyurethane.
Used a sponge brush to apply stain and dry cloth to wipe off. Used a brush to apply poly.
Recommended Skill Level
Intermediate

Comments

Tony (not verified)

Mon, 01/09/2012 - 06:31

The guardrail looks great. How did you attach it to the corner post?

bohman825

Mon, 01/09/2012 - 17:39

With pocket screws on the bottom and then one screw through the 1x4s into the post before the 2x4 on the top goes on. And then the 2x4 is screwed onto the 1x4 and post with trim screws.

NicoleS (not verified)

Fri, 03/23/2012 - 04:36

How much did it cost you to build this bunk bed? I'm wondering if we can build this one as it turned out great looking!

NicoleS (not verified)

Fri, 03/23/2012 - 04:37

About how much did it cost to build this bunk bed? I'm wondering if we can build it since it turned out great looking!

Jillian (not verified)

Wed, 03/28/2012 - 13:02

Cost us about $300 and over an entire weekend of time spent on this project.
It's not for beginners. My husband has had many many years of experience in carpentry and woodmaking.

Good luck to you.
Also, he changed a few things in the plans we found in order to make it look better.

Thank you

Jillian

Jillian (not verified)

Wed, 03/28/2012 - 12:59

Cost us $300.00 to make and almost non-stop making it for the whole weekend. And then stained for hours.
This is with many years of experience in construction and woodmaking.

This is not a beginners project and then expect it to look amazing.
My husband changed these plans a bit to make it look better than the other ppls that we've seen on here.

But, good luck to you and make sure to have plenty of room and time.
Also, we had to make this bed in 10-15 different pieces and put together in the bedroom we wanted it in. There is absolutely no way it will fit otherwise.

Jillian

bohman825

Sun, 04/08/2012 - 15:26

Yes you'd just have to change measurements for queen instead of a full.

rdaneel

Sat, 10/25/2014 - 22:25

I don't see how you could put the fill/twin over a queen since the queen is longer.  Obviously you could spin the queen around and make it an L-shape but then you are looking at a different build.

Jesse and Jillian (not verified)

Thu, 12/06/2012 - 09:53

Yes any size would work as long as you have the room and the extra materials.

rdaneel

Sat, 10/25/2014 - 22:28

I really like the look of this ... I'm going to try to replicate!

What does the bottom of the guard-rail look like?  Did you space out your slats a little more than the original design?  I like the 2x4 topper instead of the 1x6.

hmagnani

Sat, 02/28/2015 - 16:46

We made this bed over the course of a week, both of us have extensive experience in woodworking and building. Ours is very wobbly on the long axis. We had a friend who is a structural engineer come in and take a look. He offered suggestions to shore it up and nothing really worked. The 3/4" overlap is not enough to secure the side rails, imo, and we used a variety of brackets to make it not wobble, to no avail.

This bed is coming apart in a few weeks and will be stored. If it is ever used again, it will be as two separate beds. I spent about $400 on this. My son never felt safe sleeping on the top bunk and has slept on the bottom exclusively.

Just my $0.02.

Six cube shelf

Submitted by Anonymous (not verified) on Sat, 02/20/2016 - 12:06

Really fun project. My dividers were a little off, but for kiddo storage- it's not too shabby. Bins were on sale at target. Because I trimmed the whole case out in 1x2s- 11x11 was the size I needed. The labels were extra, but totally worth the cost in my opinion. Loved this project and love the organization it brings!

Built from Plan(s)
Estimated Time Investment
Day Project (6-9 Hours)
Recommended Skill Level
Beginner

Doll High Chair

Submitted by angiemicn on Wed, 02/08/2012 - 01:20

I love this design, Ana has created the perfect toy, esp to give as Birthday presents! The size is perfect, very sturdy, I put mine together with Kreg Jig. I've made 7 so far, the first time I made it, I didn't have a 1x8, and ended up Jigging 2 1x4's together. Worked so well, I do it every time now. I like to make these, fully sanding the piece before I put it together, and letting my niece or whoever is recieving it, paint it themselves. It's a great way to spend an afternoon with your aunt
Blog is under construction, I will be posting additional high chairs as I make them

Built from Plan(s)
Estimated Cost
15 if I bought the wood, use scraps and leftover screws
Estimated Time Investment
Afternoon Project (3-6 Hours)
Finish Used
Kilz primer, and semigloss paint. This is a project I let the kids paint, and I always tell them, "It always dries different." When they go down for their nap or bed, I come behind and touch it up.
My nieces have used glitter pens to write their names on them, and I've spray Poly'd which holds up well
Recommended Skill Level
Intermediate

Comments

Easiest Teen Platform Bed

Submitted by Anonymous (not verified) on Mon, 02/03/2020 - 09:05

https://www.ana-white.com/woodworking-projects/easiest-teen-platform-bed

This went really well thanks for posting the plans!

Estimated Cost
$185
Estimated Time Investment
Day Project (6-9 Hours)
Finish Used
50% espresso 50% english walnut minimax stain
Recommended Skill Level
Beginner

Comments

Mimi's Faux Mantle with bookshelves

Submitted by JoshuawG09 on Wed, 05/25/2016 - 18:15

Made from the modified Mimi's Faux Mantle design from another brag post.

Estimated Cost
$350
Estimated Time Investment
Week Long Project (20 Hours or More)
Finish Used
I used Valspar furniture paint. However, I will never buy it or use it again. It's just over priced paint.
Recommended Skill Level
Beginner

Comments

laurenwalker

Tue, 12/19/2017 - 22:01

Are you able to tell me how wide this is from the end of one bookcase to the other? I'm trying to find out if it will fit in my living room. Thanks!

modified bench swing

Luv your site. Took your bench swing plan and modified it a bit (shortened depth) and then created a small pergola to hang it from. Just need to stain/poly to finish it off. Thanks for your plan and website it is very inspiring.

Estimated Time Investment
Weekend Project (10-20 Hours)
Recommended Skill Level
Beginner

Laundry Room Storage and Organization

Submitted by Anonymous (not verified) on Thu, 06/20/2024 - 10:33

When looking for ideas/plans for designing my mudroom I came across Ana’s plans for the bench with drawers. I’ve NEVER built anything like it, or cabinetry, or anything like that type of stuff, but with her videos and plans I was able to design my own layout and make it all completely by hand and by myself. I’m in love with how it turned out!! Her designs/plans are so easy to follow and customize!! I can’t wait to do more in my house.

Mikishea Mauss on Facebook

Built from Plan(s)

Puppet theater

Submitted by petera on Fri, 12/28/2012 - 12:03

I was able to use the lemonade stand plans for GRACE'S TOWN to make a puppet theater for my kids.

Estimated Cost
$50
Estimated Time Investment
Weekend Project (10-20 Hours)
Finish Used
Minwax golden oak stain
Recommended Skill Level
Beginner

Two-tone Large Cube Shelf

Submitted by Anonymous (not verified) on Tue, 02/21/2017 - 09:43

Large cube shelf made to fit 13" cubes or milk crates, for my two and a half year old son. For the larger cubes, I added 2" to the measurements for each cube, so 6" to the horizontal and 4" to the vertical measurements. Total shelf measures 46.5" wide by 35" high by 13.5" deep.

Built from Plan(s)
Estimated Cost
$75
Estimated Time Investment
Day Project (6-9 Hours)
Finish Used
Body: white latex primer, two parts paint to one part water.
Trim: special walnut stain
Everything: Minwax Paste Wax
Recommended Skill Level
Intermediate

Adirondack chairs

Submitted by Anonymous (not verified) on Sun, 01/17/2021 - 18:39

Thanks for the awesome plans Anna! God bless.

Eddie Jimenez

Comments

Seasonal And Holiday
Back