Community Brag Posts
outdoor daybed combined with sectional

Last year, I found these plans and with the help of my brother we modified them so they could be used with or with out cushions and to add storage underneath the day bed. I found the cushions on clearance from Crate and Barrell and managed to get them all for around $250. I finally finished staining the furniture this past weekend and thought I would share the finished result. The shade is a $8 curtain that we stretched across the top. We have had a lot of good times using this furniture!!


Estimated Cost
$500 (half are the cushions)
Estimated Time Investment
Weekend Project (10-20 Hours)
Finish Used
Sikkens solid stain. Oxford Brown
Recommended Skill Level
Intermediate
Comments
Sun, 06/17/2012 - 10:17
This is gorgeous! What an
This is gorgeous! What an awesome place to kick back on a summer night
Sun, 06/17/2012 - 10:17
This is gorgeous! What an
This is gorgeous! What an awesome place to kick back on a summer night
Fri, 03/20/2015 - 23:41
Plans for this project
I am interested in the plans for this piece and love the added storage.
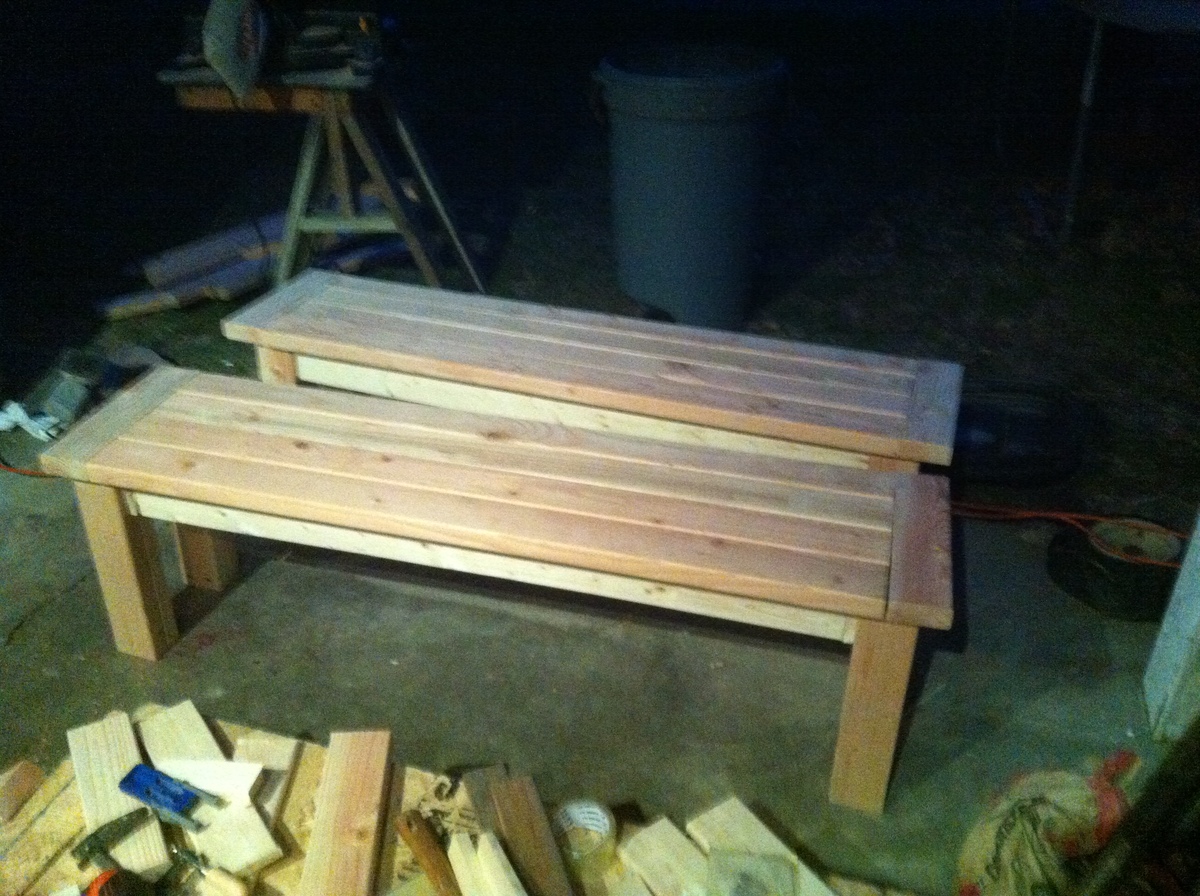
Sturdy and Well Made - Excellent plans to follow!
Excellent plans and a great build! We had a blast and LOVE our new table that will go in our new house once built.
We have now stained the benches but have not taken any photos. We also added the brackets shown in the photos.
Built from Plan(s)
Estimated Time Investment
Weekend Project (10-20 Hours)
Finish Used
Minwax Dark Walnut
Recommended Skill Level
Intermediate
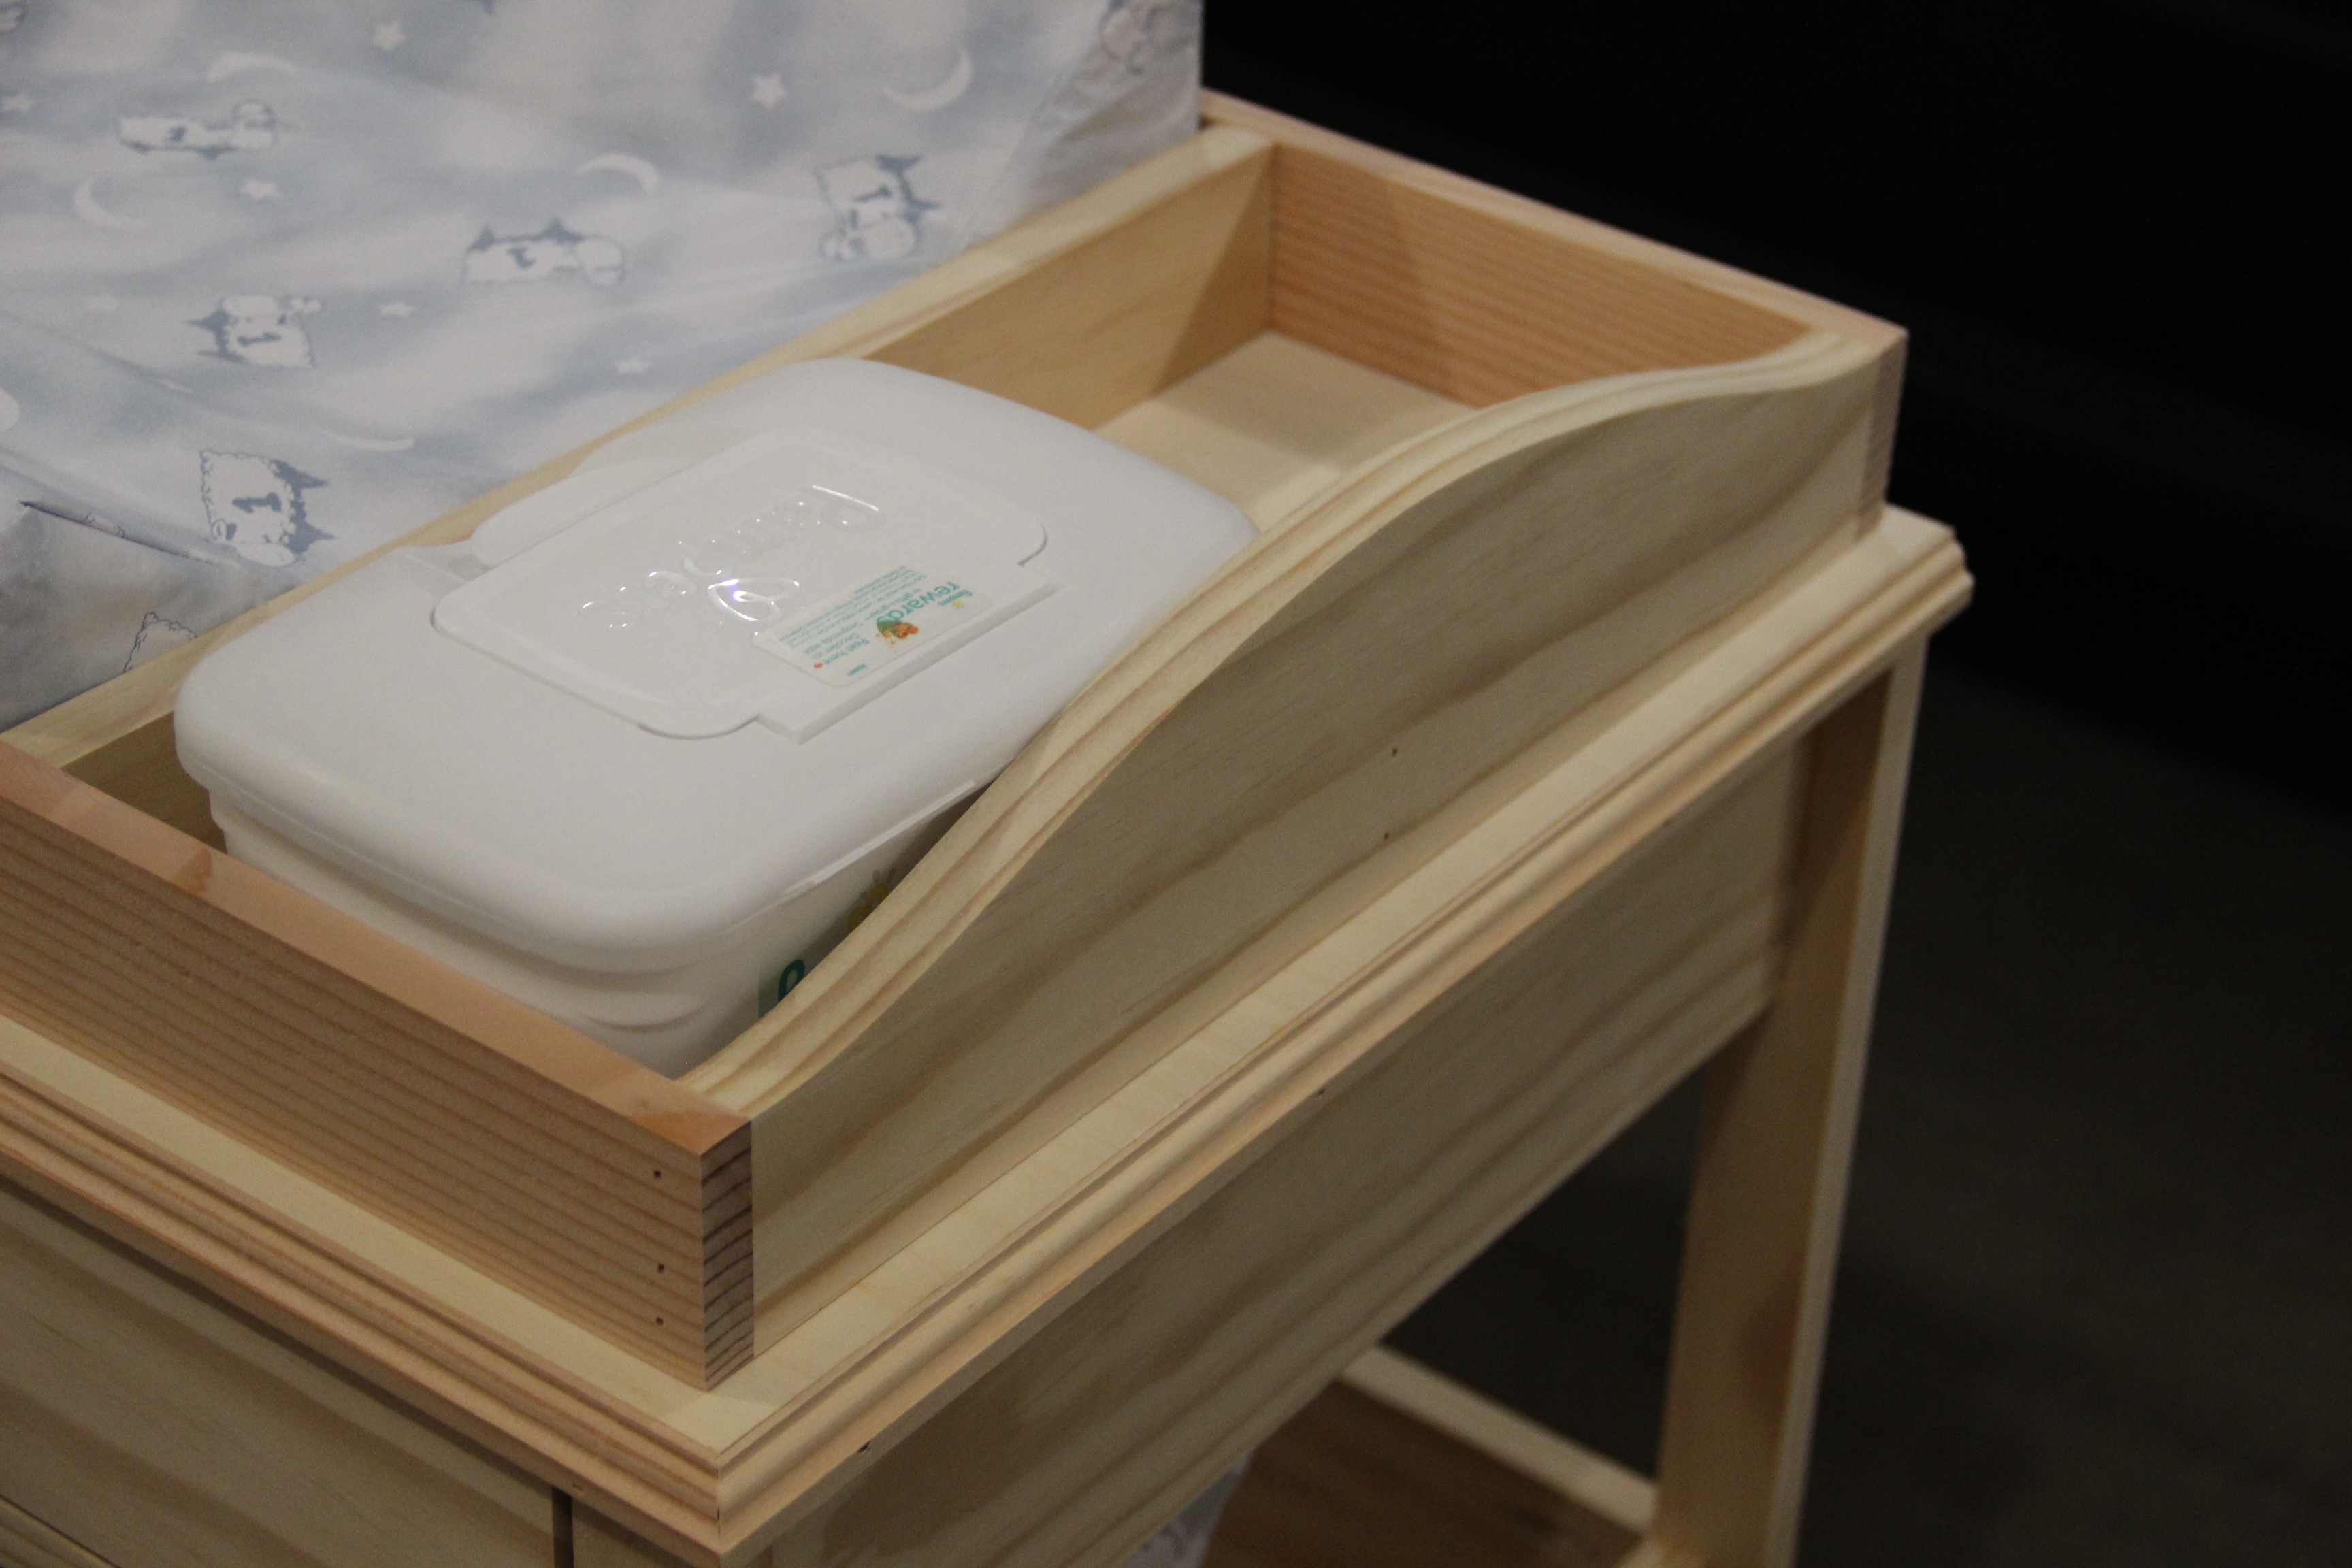
Changing table
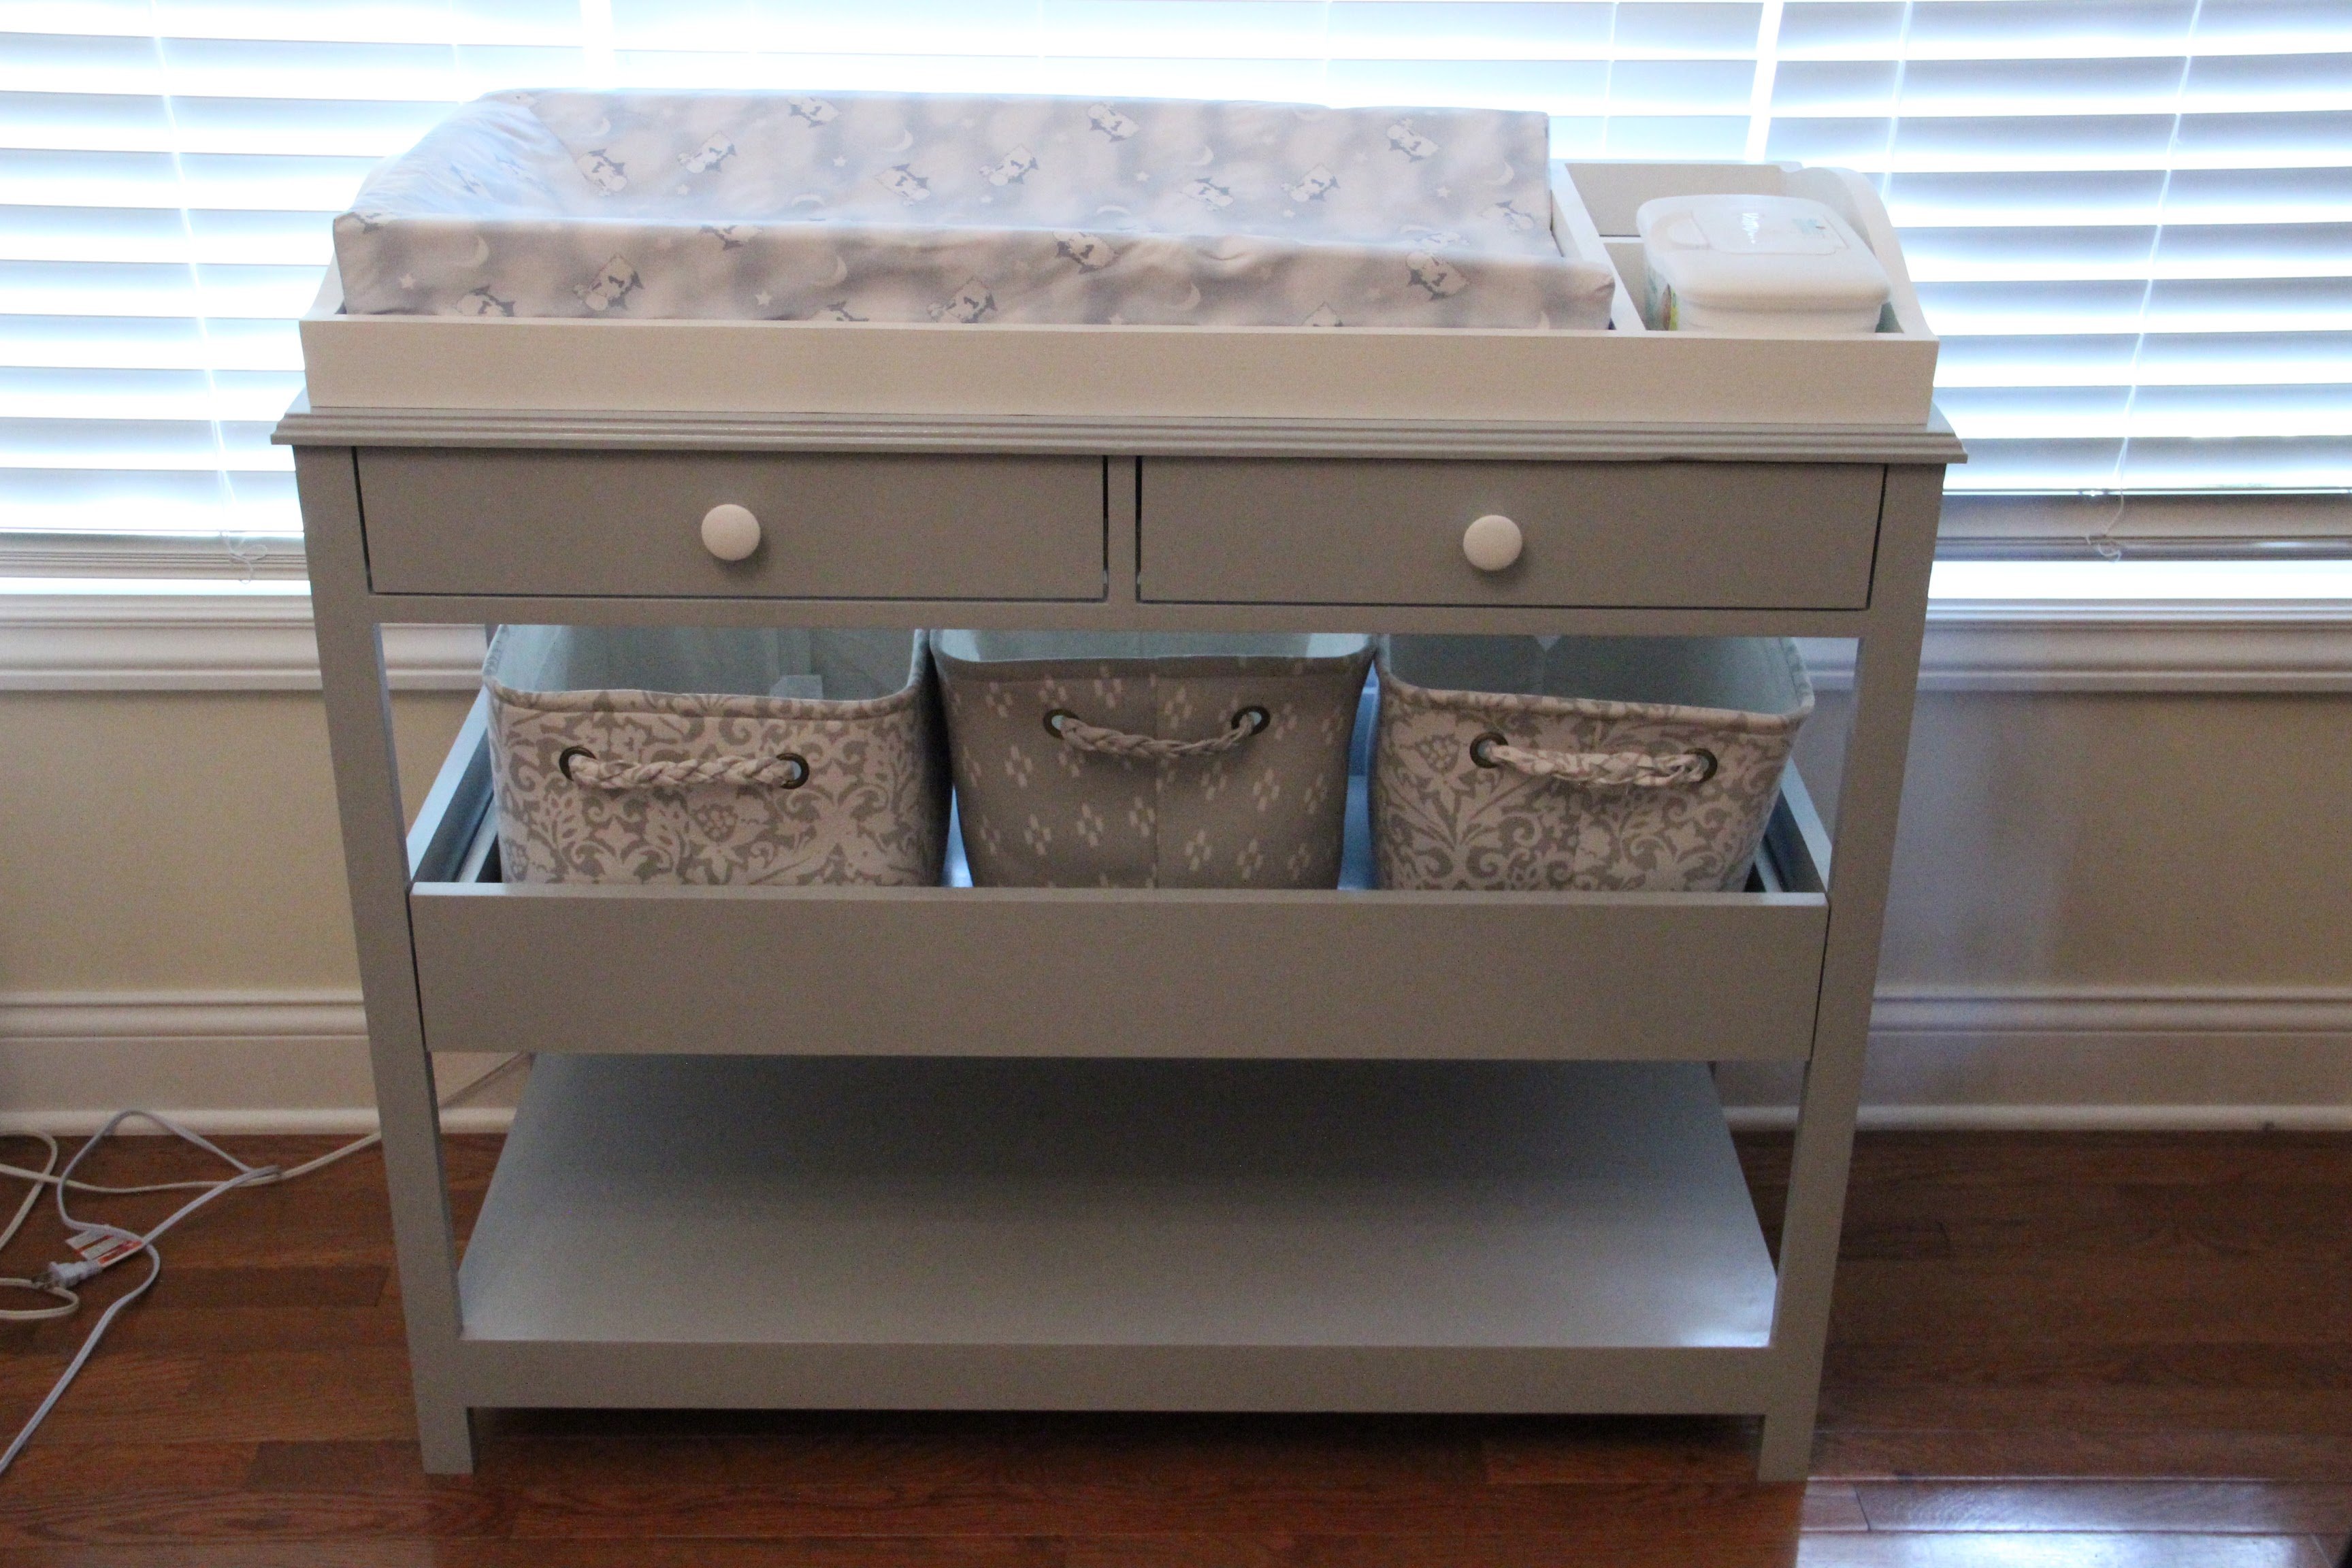
With the arrival of our first baby in 10 days, the wife wanted a changing table. My only vision of a changing table was the ones in public restrooms. With the help of Google, I came across all the great diy ideas on this site. I combined 3 plans into 1 and came up with this. The project took 2 days to build. Next step is to prime and paint.
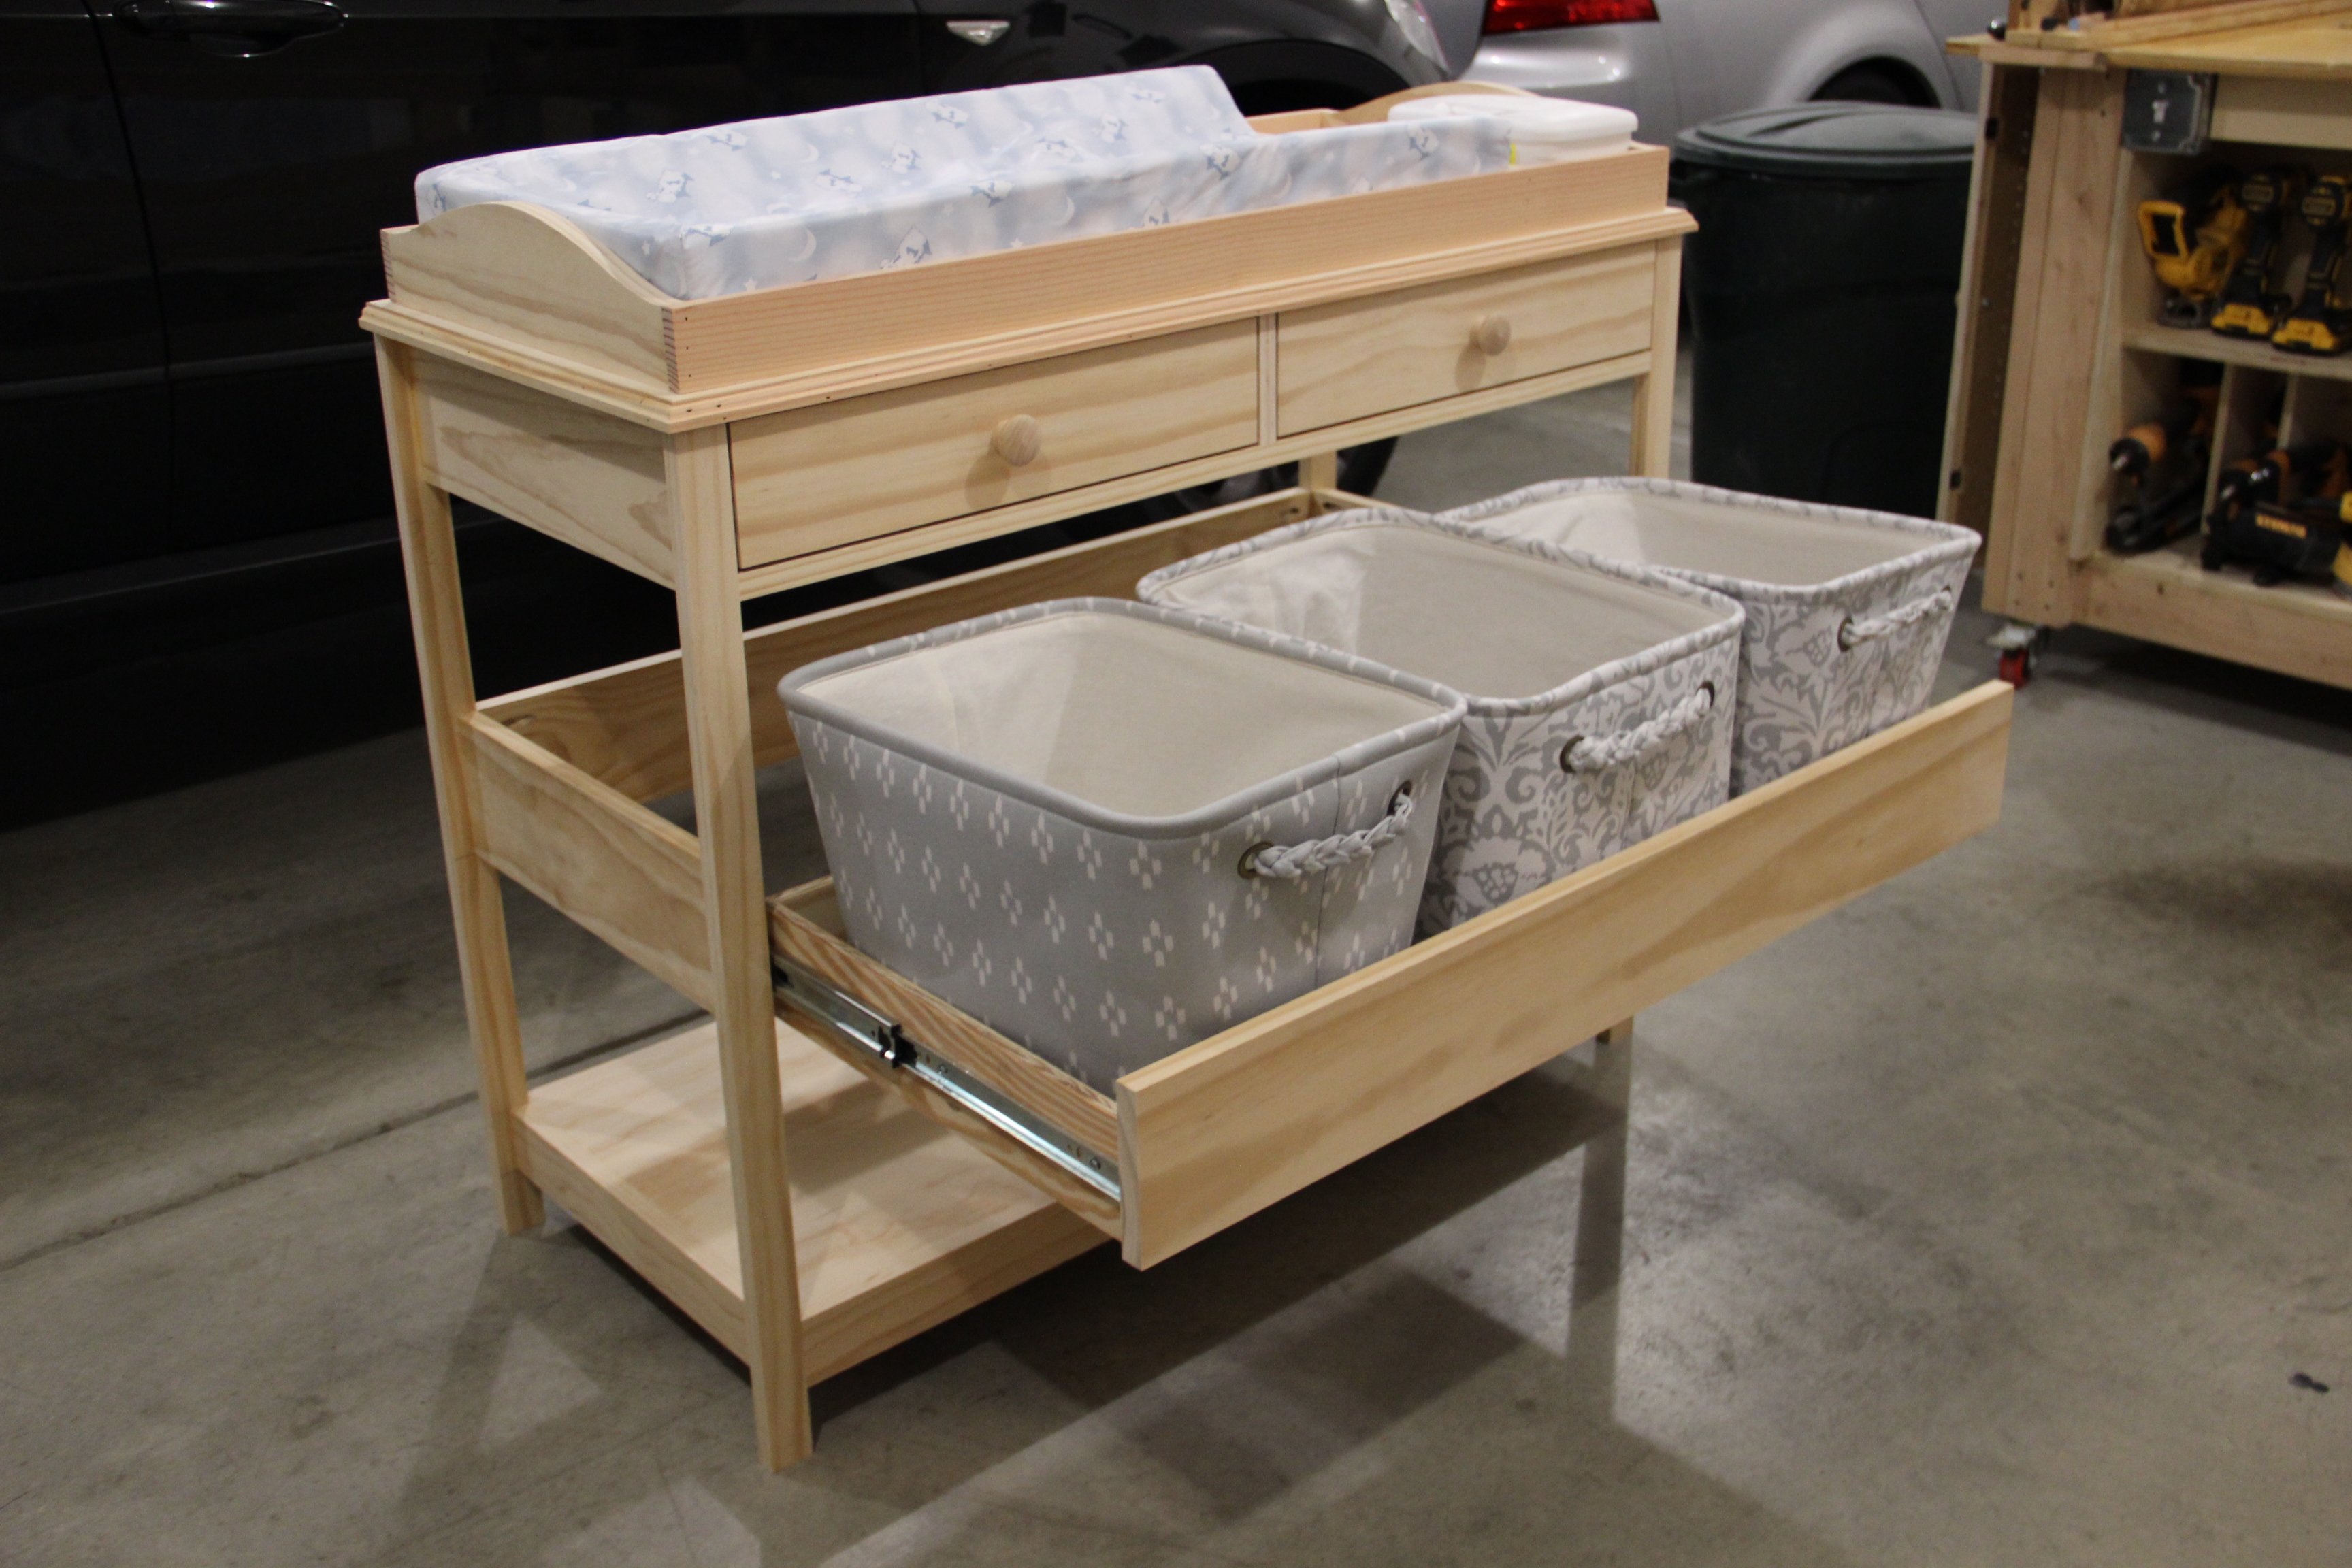
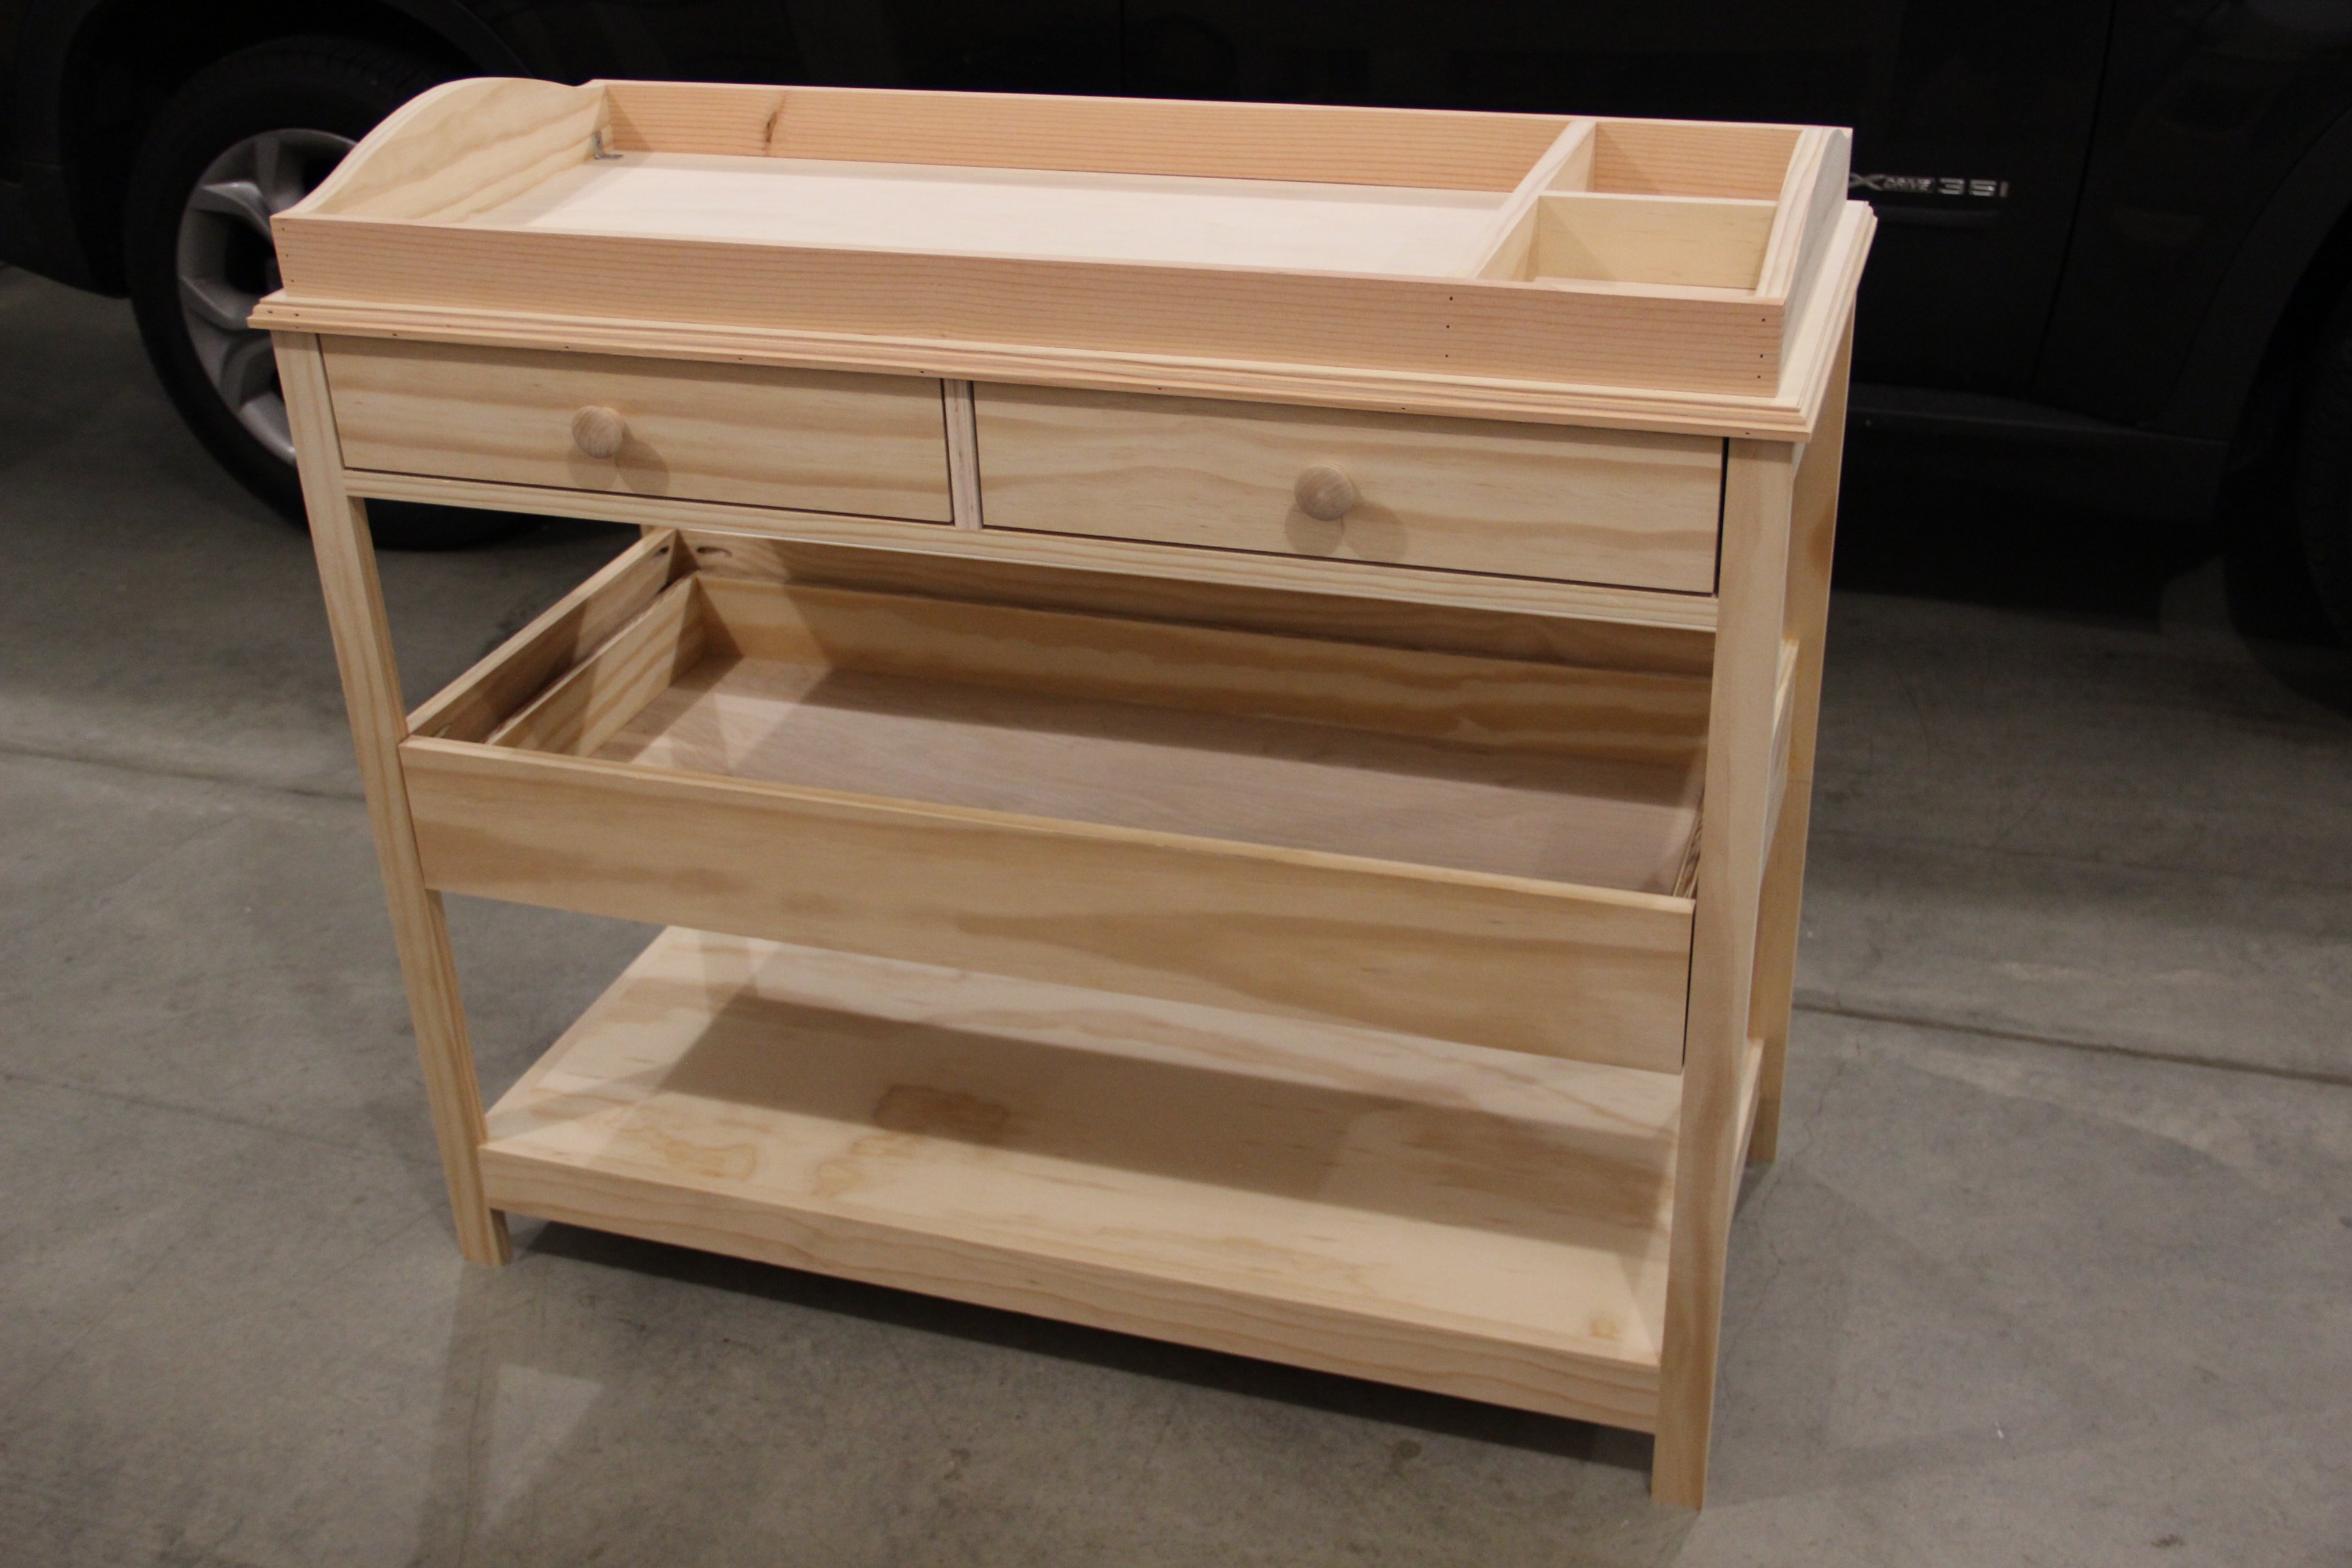
Built from Plan(s)
Estimated Cost
90 - 100
Estimated Time Investment
Weekend Project (10-20 Hours)
Finish Used
Primer and paint
Recommended Skill Level
Intermediate
Comments
Tue, 12/24/2019 - 11:37
Ultimate + Changing Table plans
I live this changing table. I made the "Simple Changing Table" but would like to make this one. Are there plans for this one? Thanks!
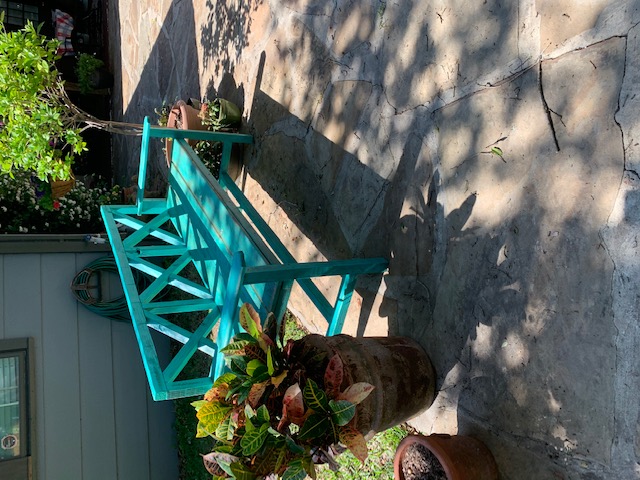
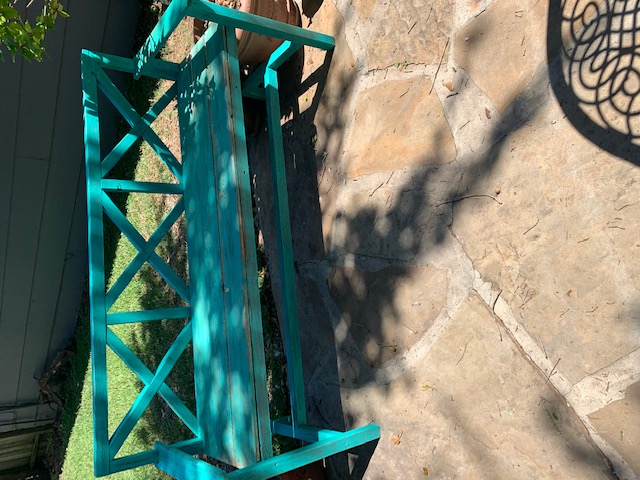
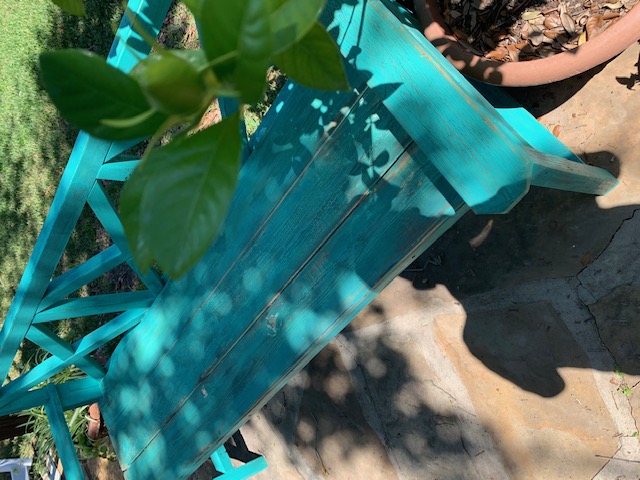
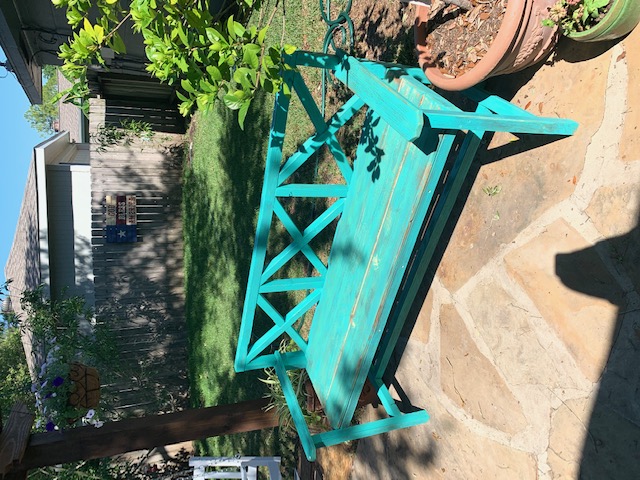
Bench Reclaimed Wood
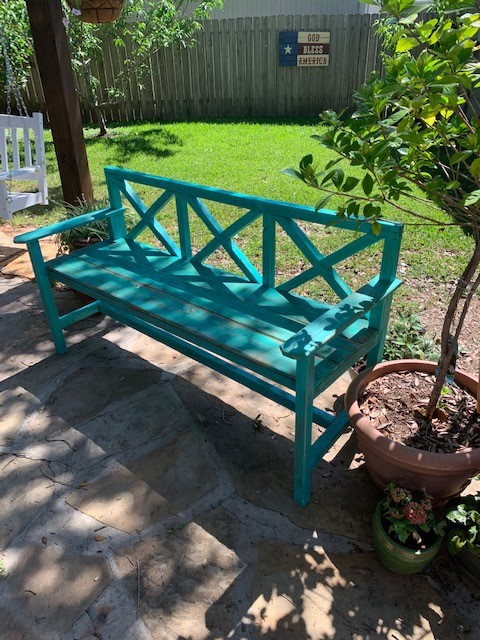
I used the Ana White plans from the Large Porch X Back Bench. However, I downsized it to 2X2 instead of 2x4's for a lighter project. I used the wood I salvaged when I replaced my fence. It was about 15 yrs old. I cut off the rotten parts and used the good parts. It was pressure treated and still in very good condition. I cut down the 4x4's to 2x2"s via my table saw as well as the framing of the 2x4's. I used leftover treated 2x2's from a pergola I recently completed for the X back. I used leftover fence planks for the seat. The only cost I incurred was 3" screws and wood glue. I had a gallon of the paint in my garage that I had purchased at Walmart a few months back for another project for $7.
Built from Plan(s)
Estimated Cost
$10
Estimated Time Investment
Afternoon Project (3-6 Hours)
Finish Used
Latex Paint turquoise
Recommended Skill Level
Beginner
Custom Headboard
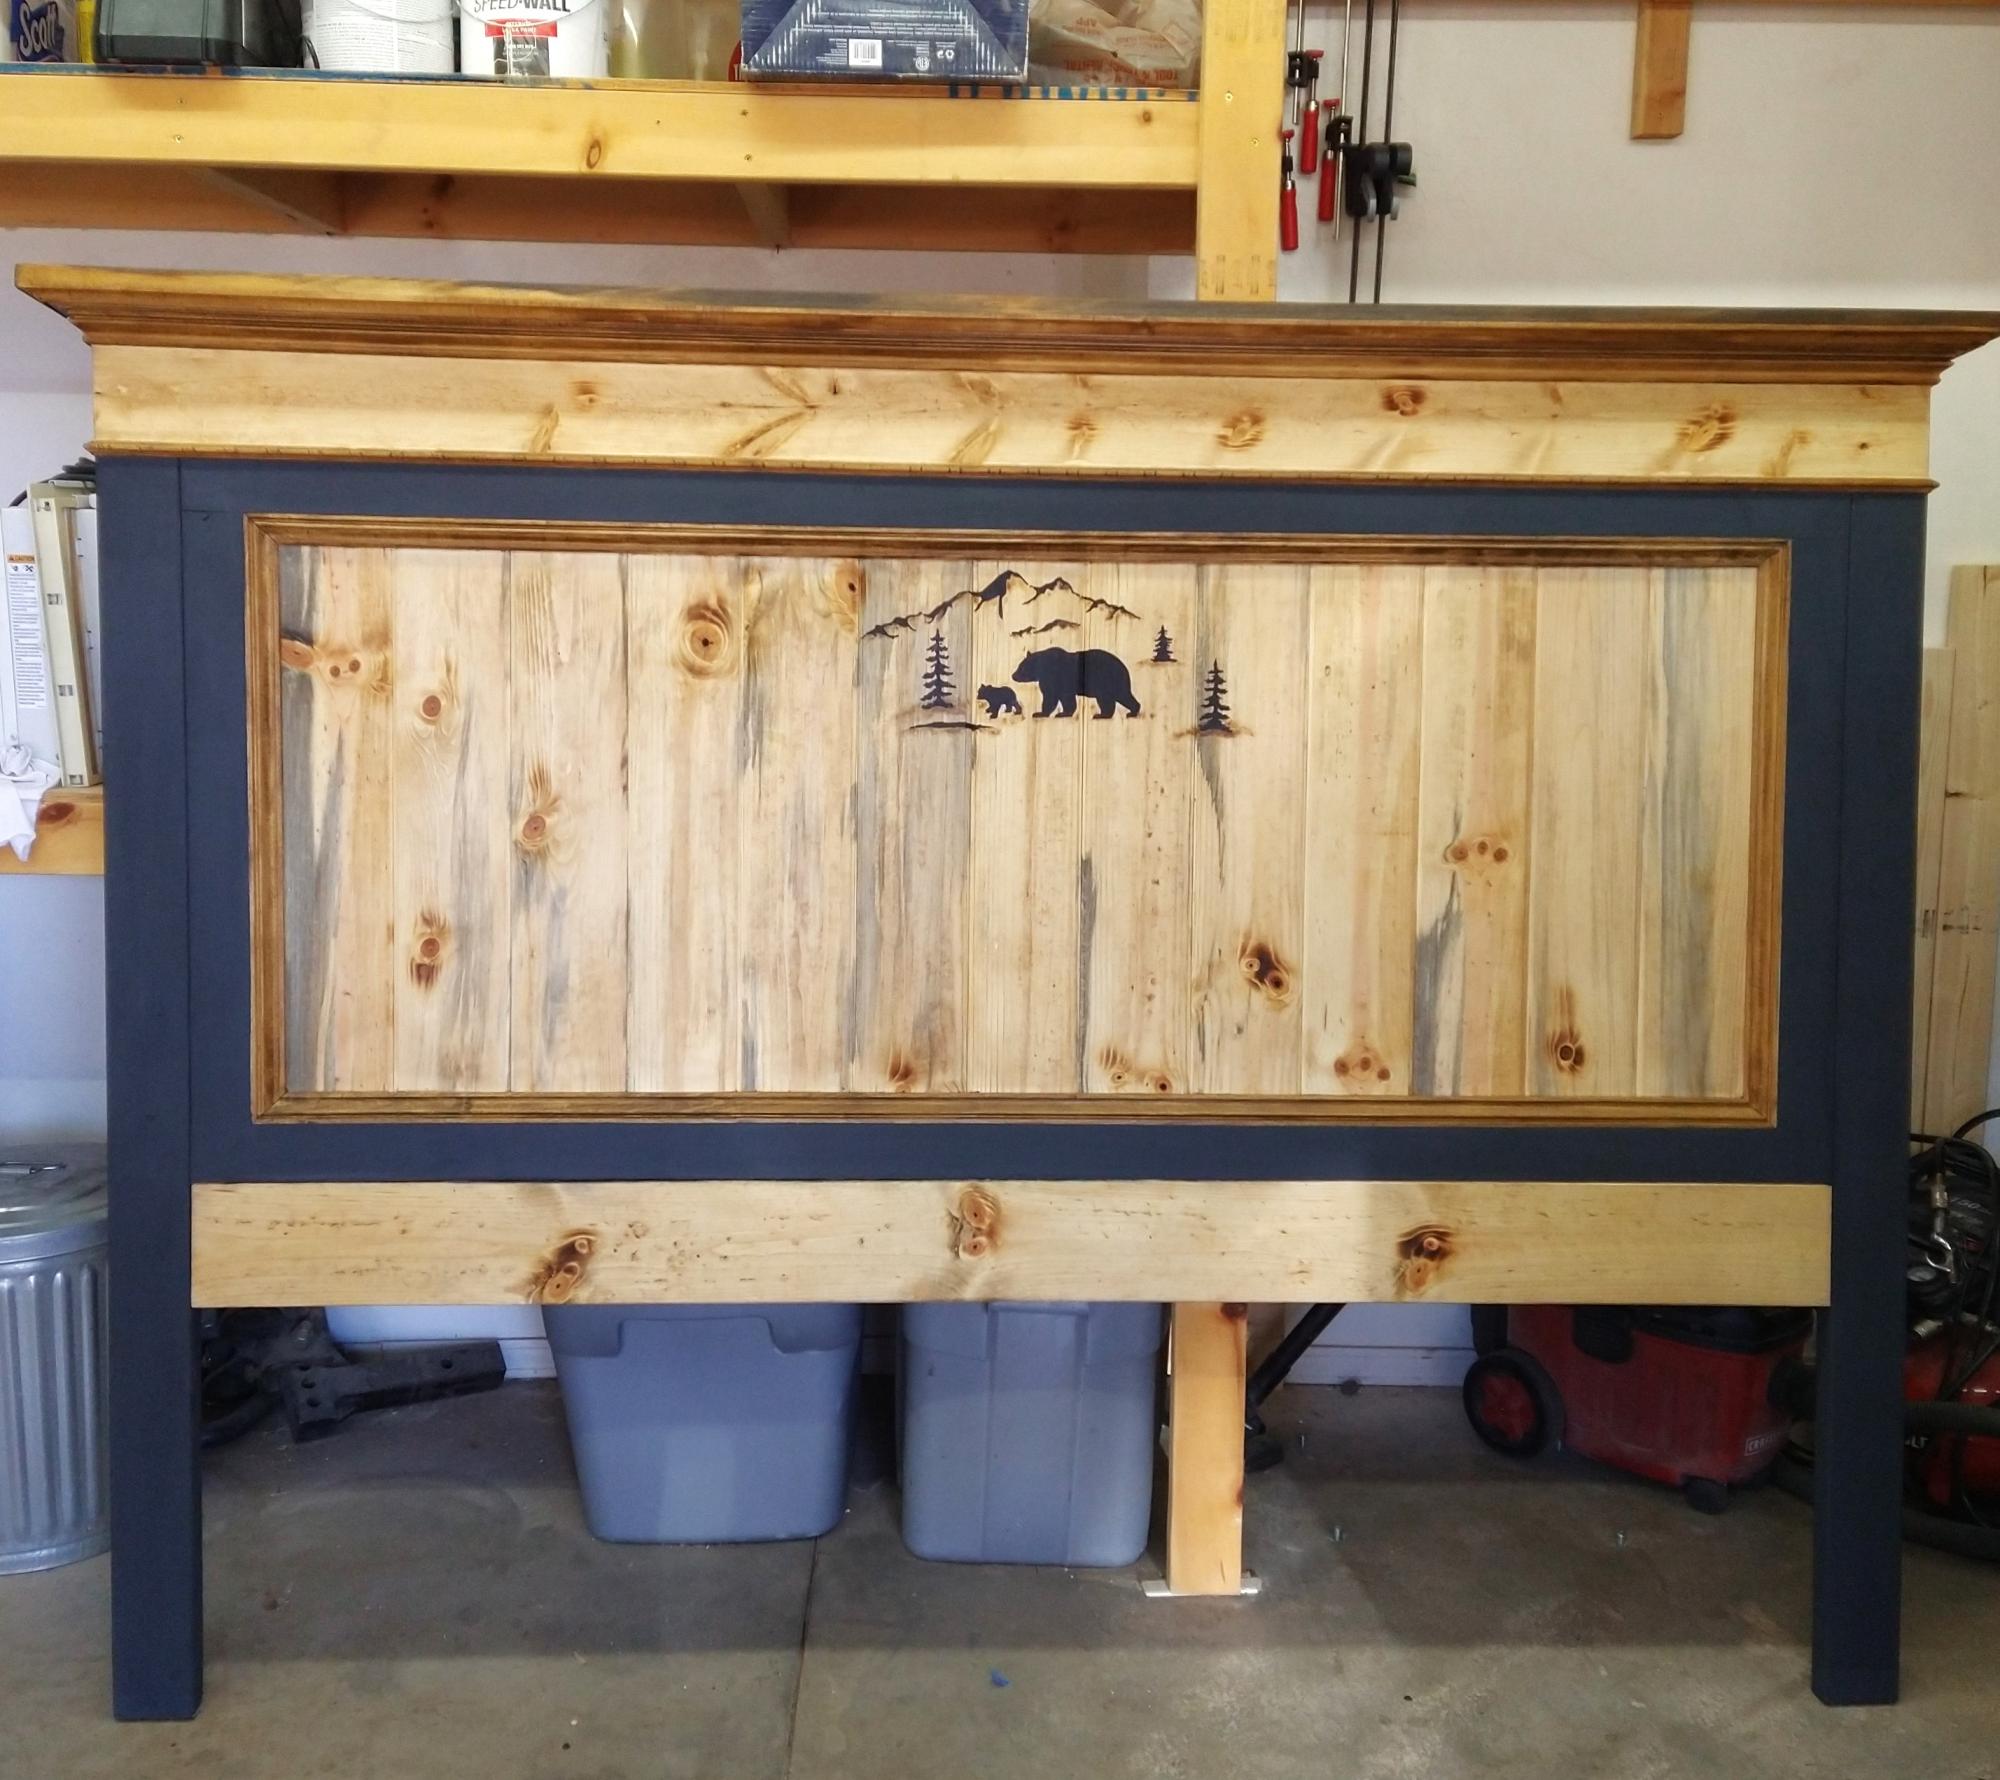
We built the Fancy Farmhouse King Bed (headboard only) modifying it by making it a bit taller and adding a little shelf on top with custom trim. Thanks Ana for such a great website and free plans!
Kelly Babb
Built from Plan(s)
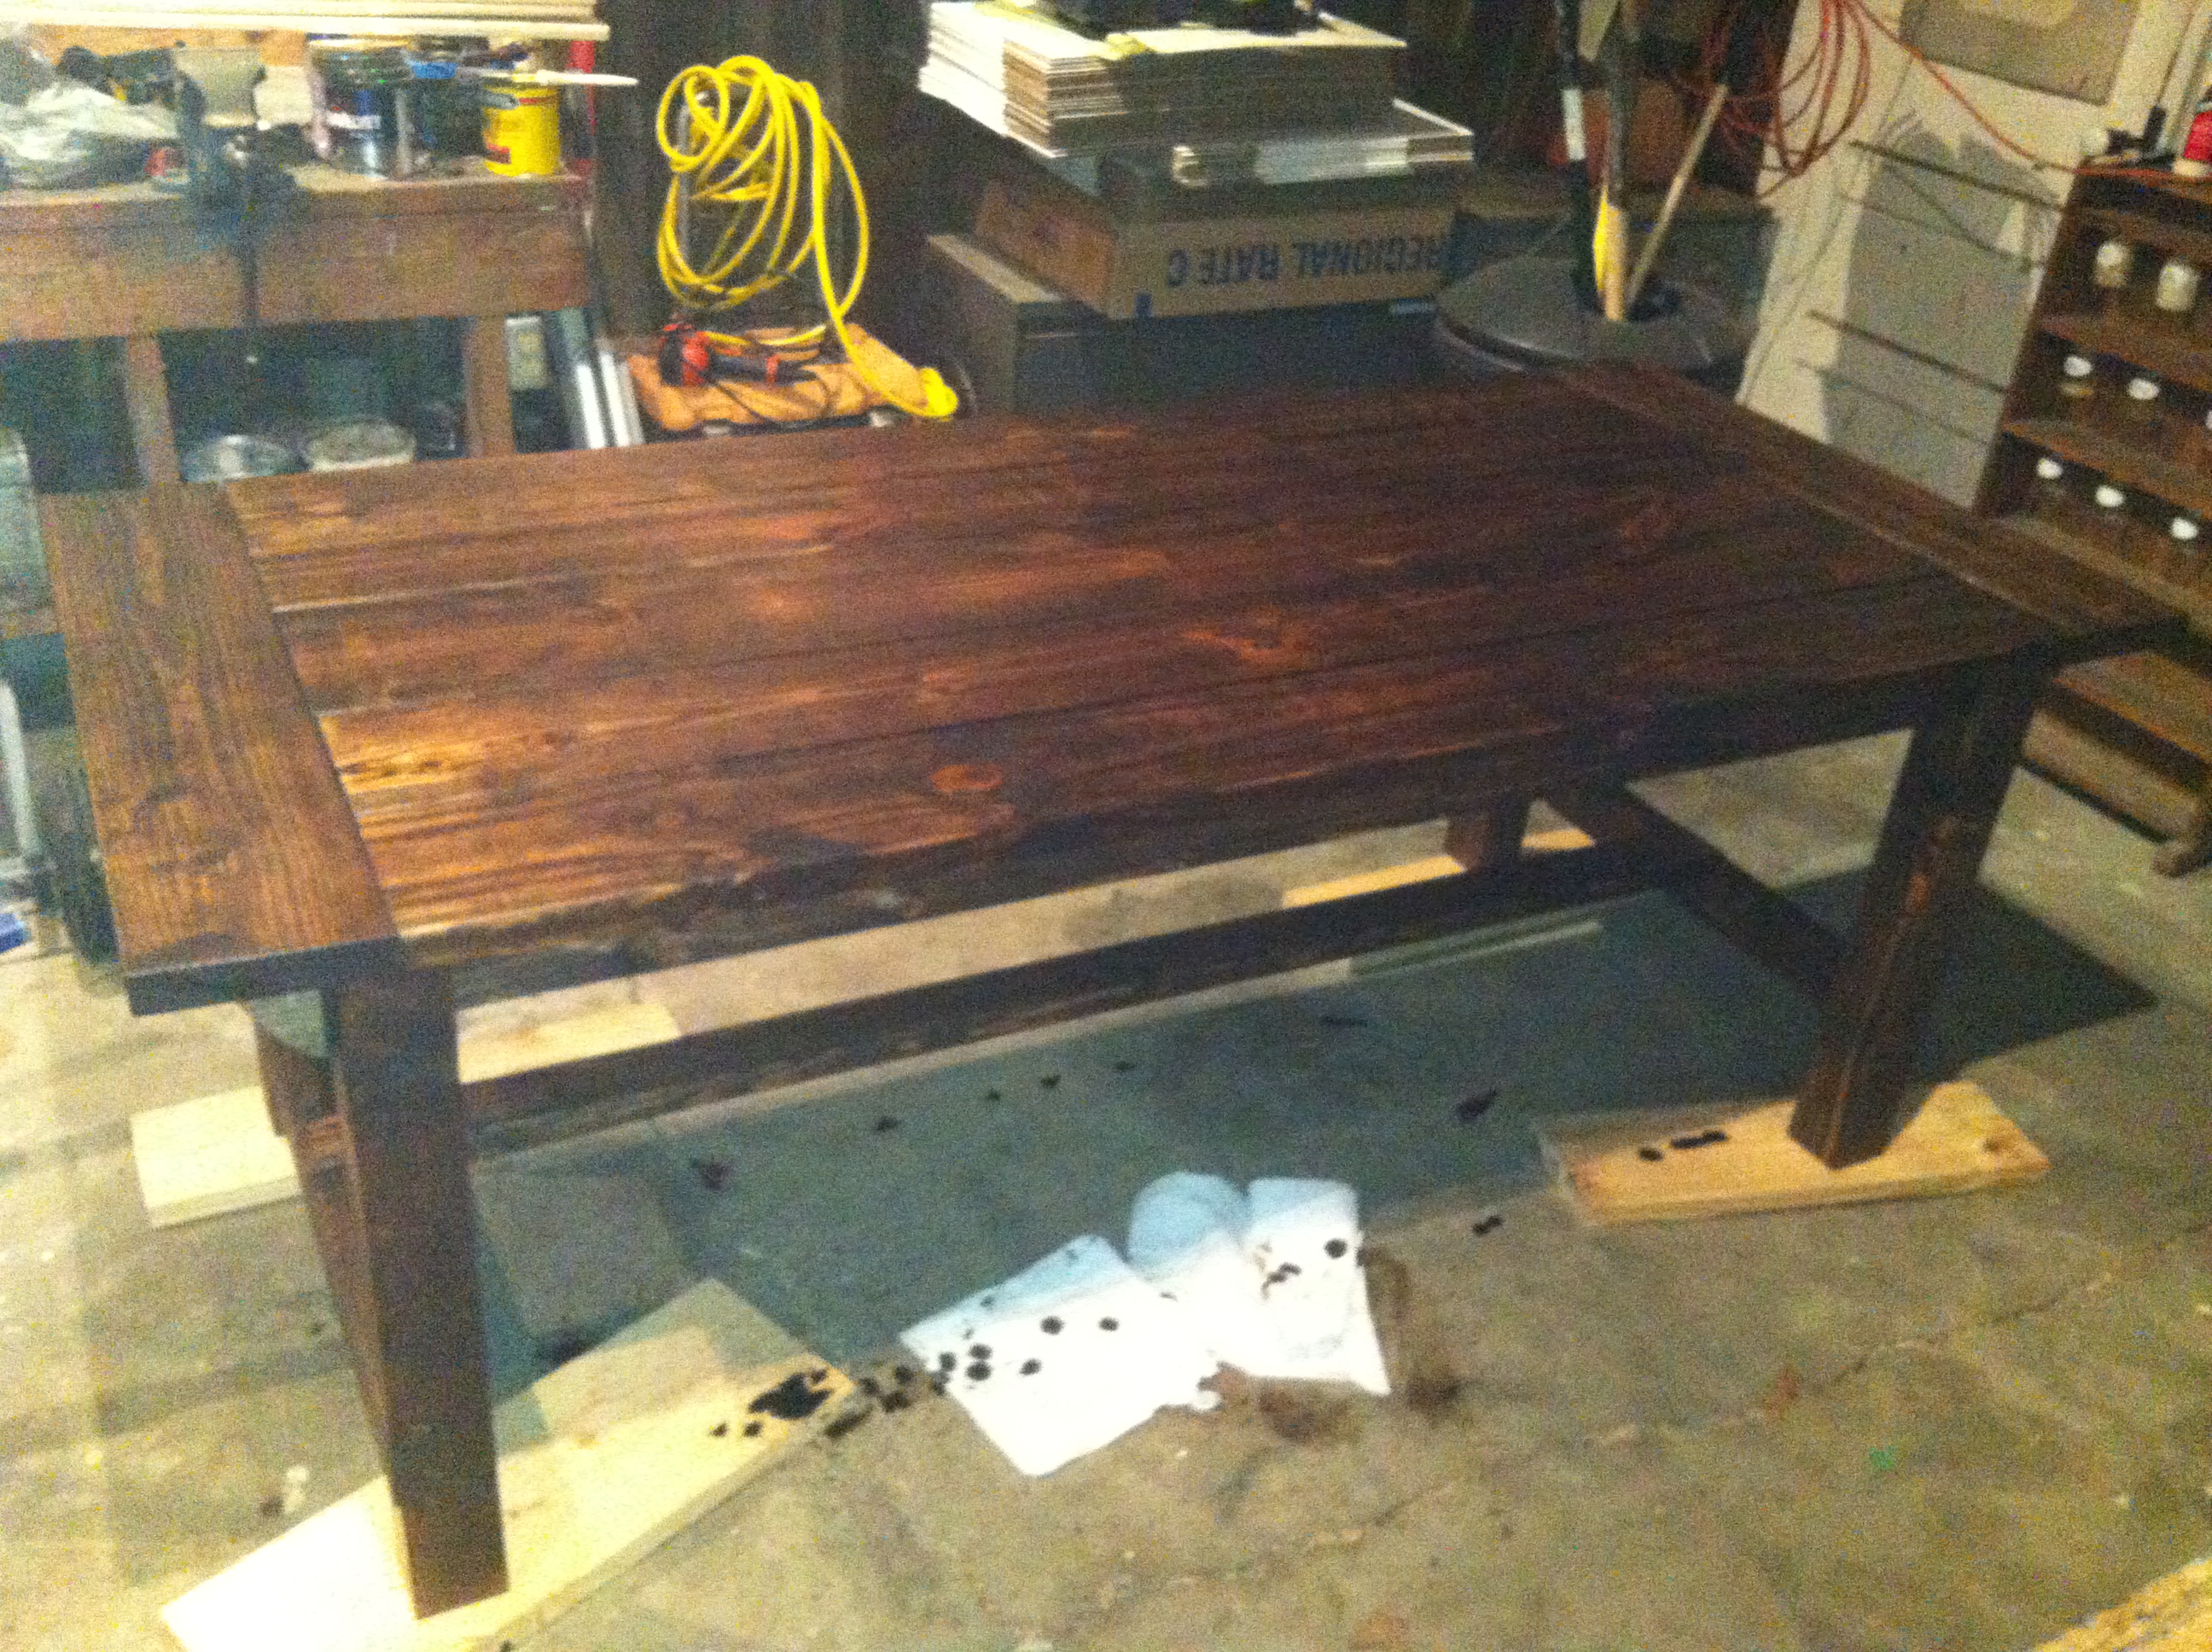
Fancy Picnic Table - Definately worth the extra little effort!
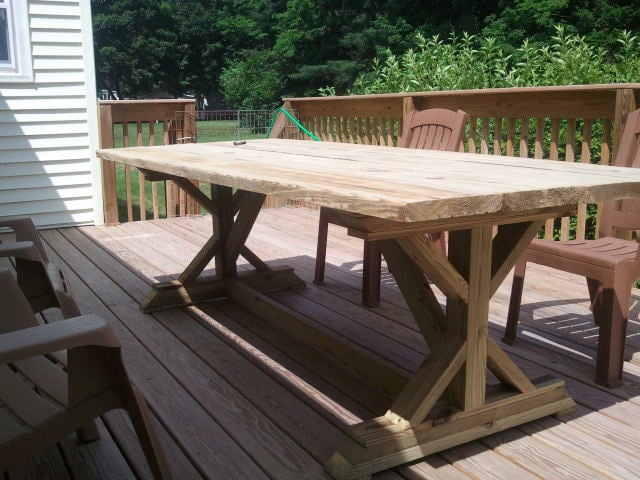
Needed a table for our deck, but didn't want to spend the $400-500 on sets at the store. Followed the plan for the most part and it was fairly easy to build. The only thing I did differently was in building the ends was put the "X" supports in after making the "I" shape in case I was off with my cuts.
Spent an hour cutting all the pieces on a Friday night and about 3 hours assembling Saturday morning. Table was ready to eat lunch on!
Built from Plan(s)
Estimated Cost
$90 (thanks to the Veteran discount at Lowe's)
Estimated Time Investment
Afternoon Project (3-6 Hours)
Finish Used
None, yet... plan to stain at the end of the summer once the wood dries out.
Recommended Skill Level
Beginner
Comments
Wed, 06/20/2012 - 12:12
This is amazing! I really
This is amazing! I really want to build this, but the plans seemed really confusing to me. Did you use a kreg jig for this?
In reply to This is amazing! I really by benfoldsfivealive
Thu, 07/05/2012 - 12:05
I did not use a Kreg jig
I did not use a Kreg jig because i dont havd one and I didn't try to hide my screws. I did pre-drill all my holes so that I didn't split any boards... and my dad is a carpenter so he helped me attach the 2 cross pieces (which is the only part I had trouble with) to the ends, which we did by just angling the screws in. I will try to take a few more detailed pics in the next few days so you can get a better idea of how I did it.
In reply to This is amazing! I really by benfoldsfivealive
Wed, 06/20/2012 - 19:15
Posted an explanation of how
Posted an explanation of how I made the side pieces. Hope it helps!
Mon, 07/02/2012 - 03:37
Quick question
Hi, great build !
Could you please explain how and from where did you screw the curved pieces at the bases ?
same question for the table top boards ?
Thank you!
In reply to Quick question by I Rub (not verified)
Thu, 07/05/2012 - 12:03
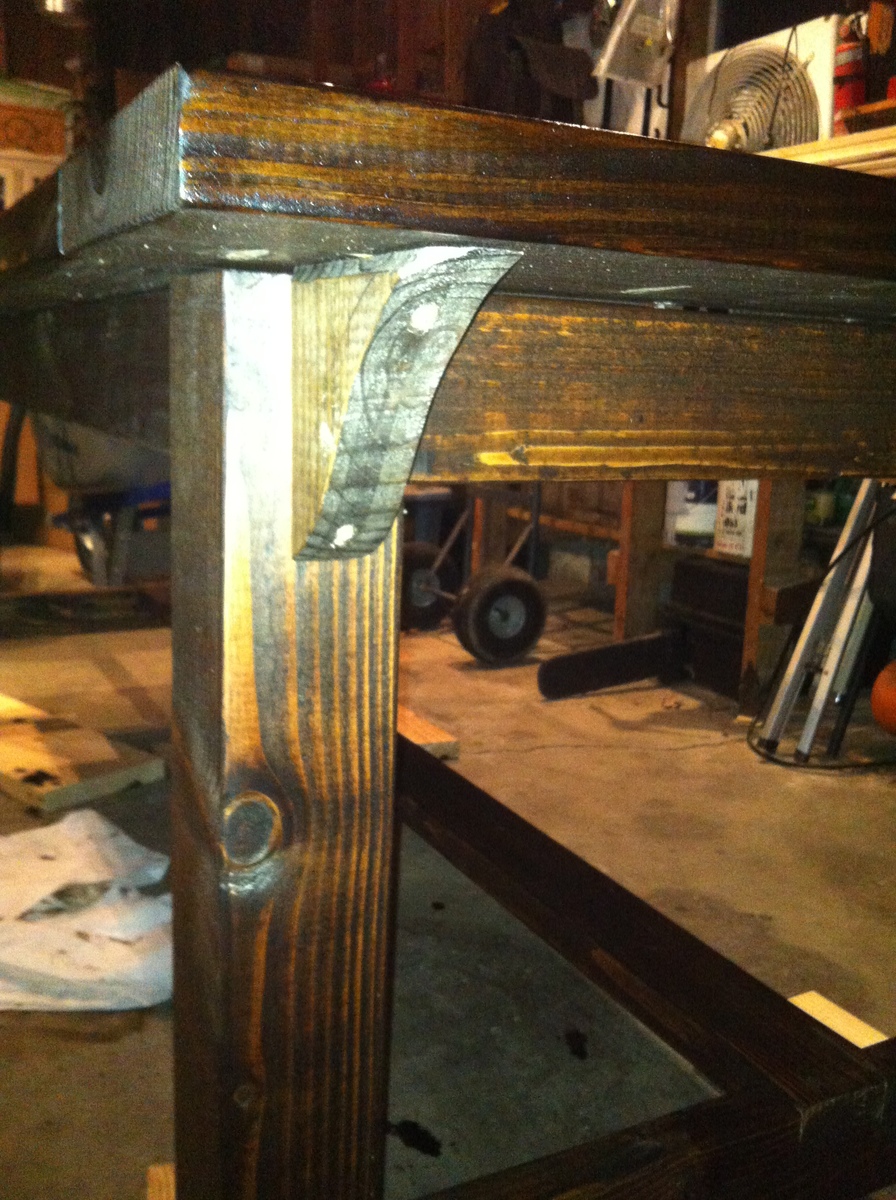
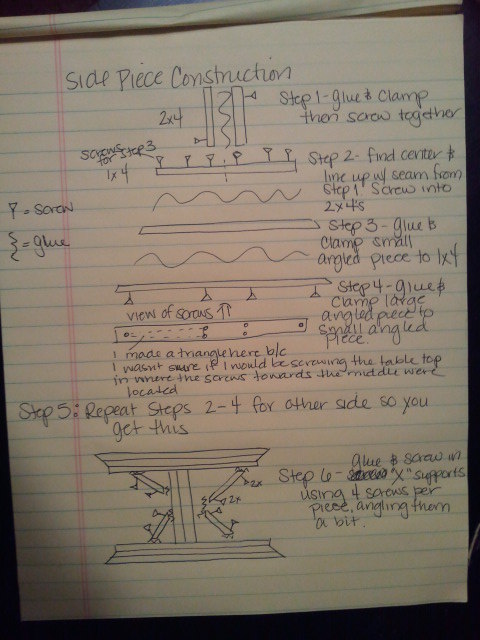
Screw Locations
If you look at the first drawing I have attached it will show you where to screw the curved pieces in. I screwed through the 1 x 4 to attach the smaller curved piece. Then I would screw through the larger curved piece into the smaller curved piece to attach it.
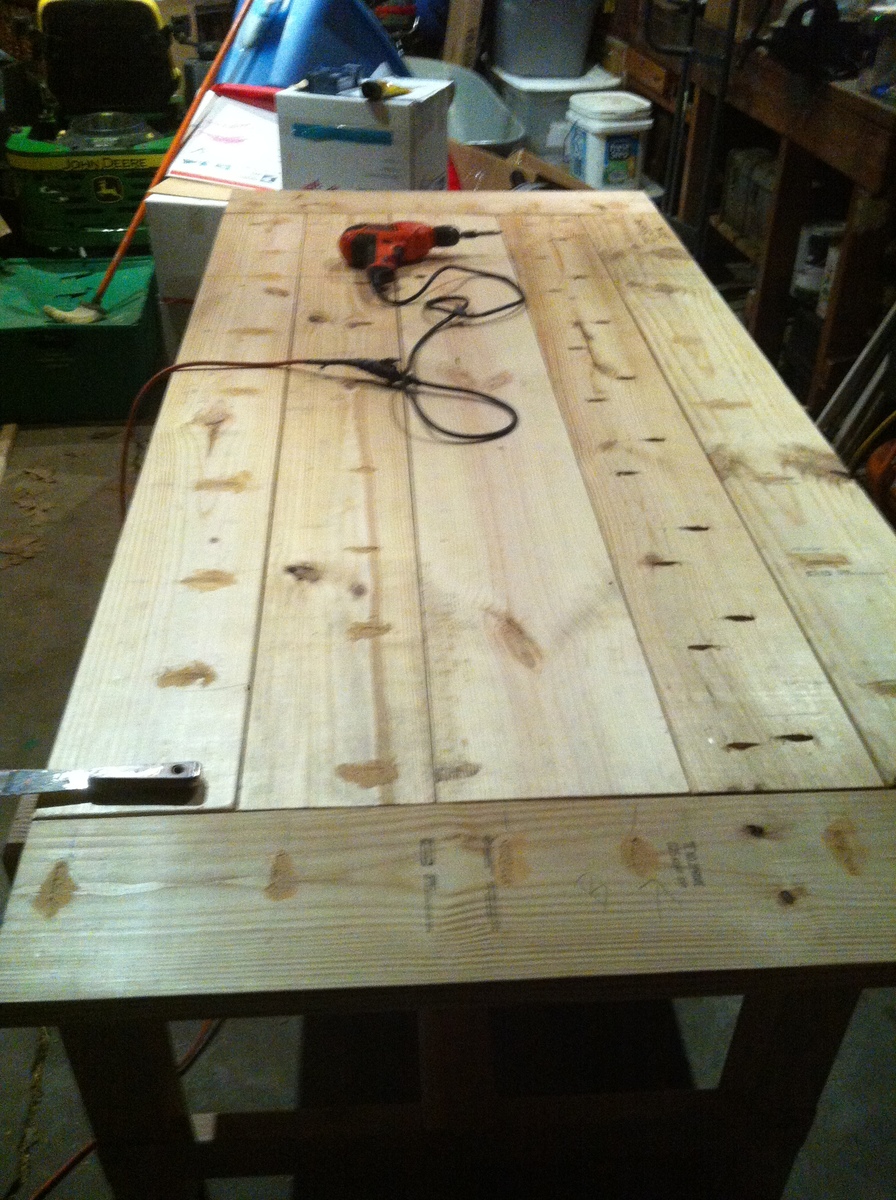
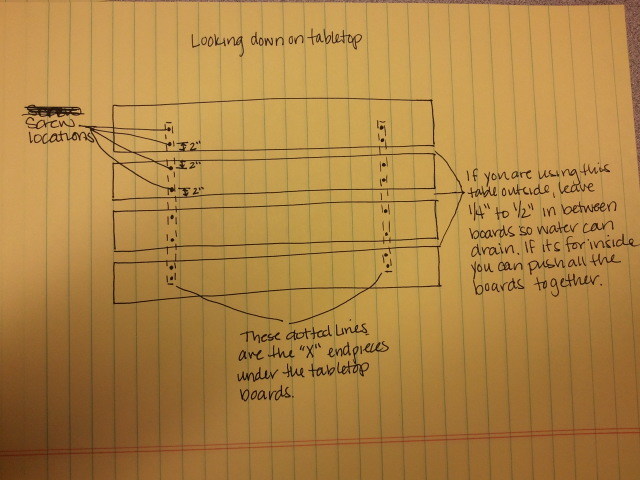
The table top pieces I screwed in from the top into the side pieces that you build first. I used 2 screws per board per side. The 2 boards in the middle should have screws at least 2 inches in from each side. The 2 boards on the end will have one set of screws 2 inches from the side that is next to the boards in the middle. The second set of screws will end up in about the middle of the outside boards. I'm going to attach another drawing to explain. Let me know if this helps.
Mon, 07/09/2012 - 11:22
Thank you!
I plan on building the table this week, will use your advice. Much appreciated.
Sun, 07/15/2012 - 16:20
Thank you for posting this. I
Thank you for posting this. I started the project yesterday and I started with putting the cross braces on first and it did not turn out leveled. I thought that I would try to put it together first and then add the cross braces but was scared if it would hold. Thanks to your post I feel more confidant about it. I am going to make a run to the big box store and start over. Its okay because this is my very first build and I am just happy with my first 45 degree cut with my new circular saw ;) I guess its a learning process.
Thanks again for your post,
Gus
In reply to Thank you for posting this. I by Gus (not verified)
Thu, 07/19/2012 - 07:58
Glad I could help! Good luck
Glad I could help! Good luck with your build!!!
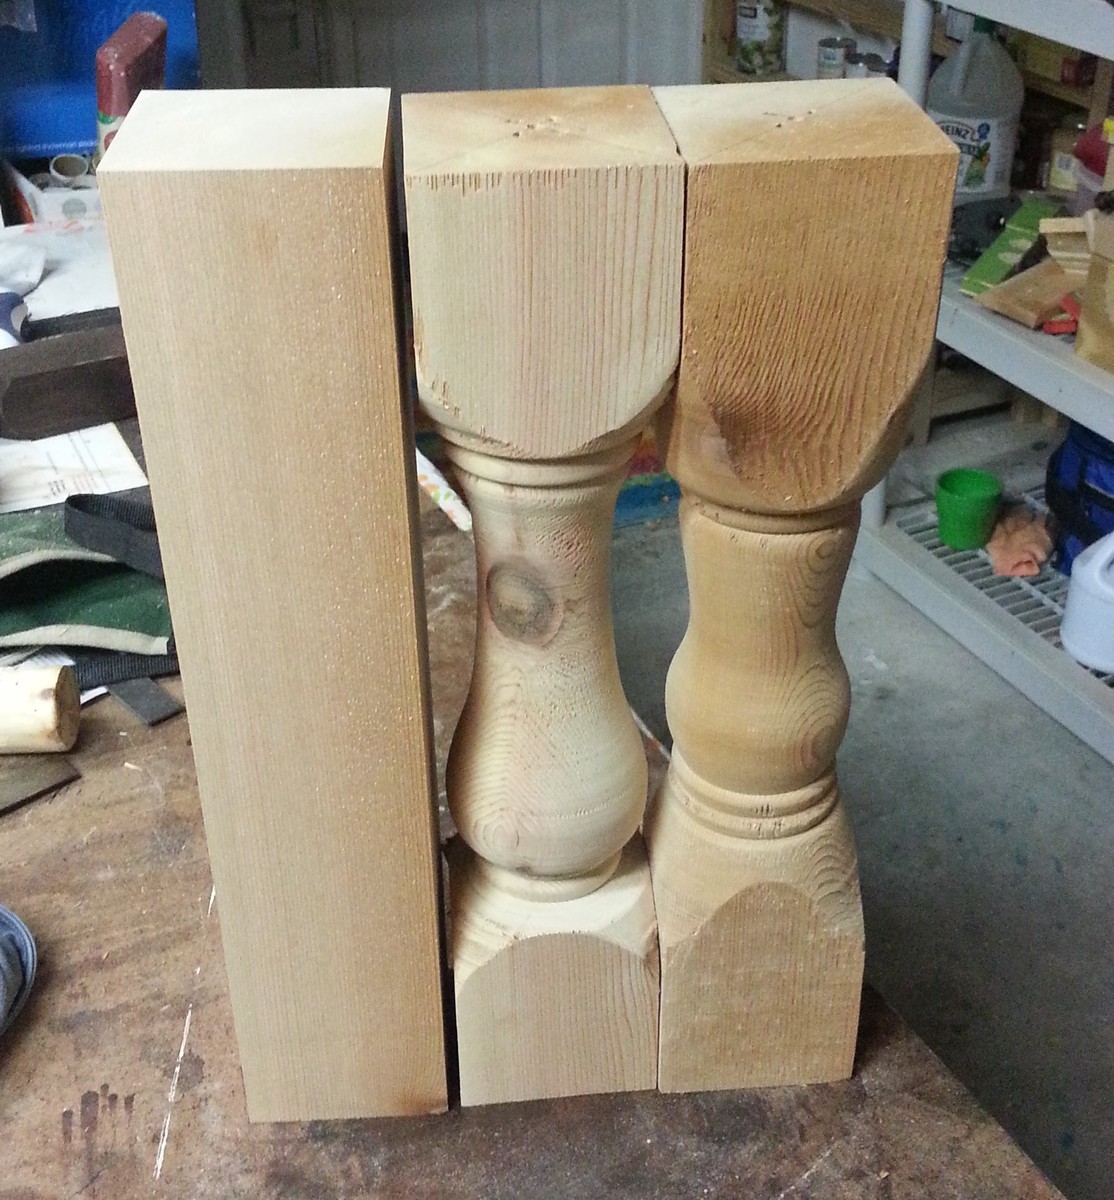
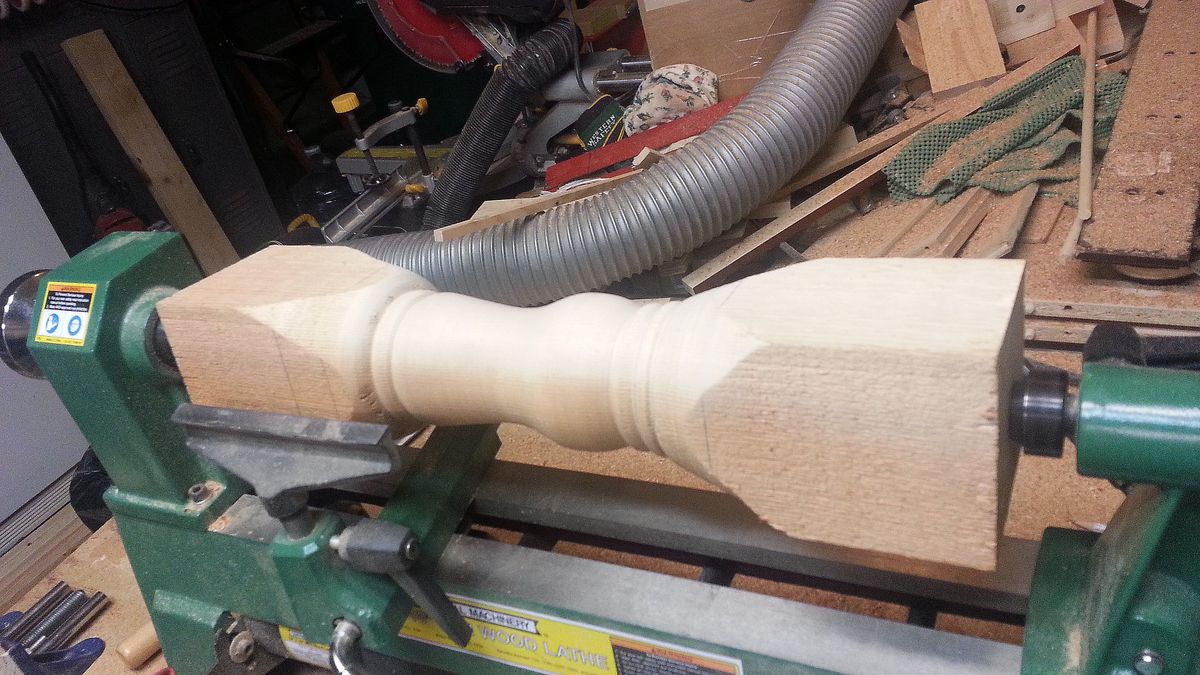
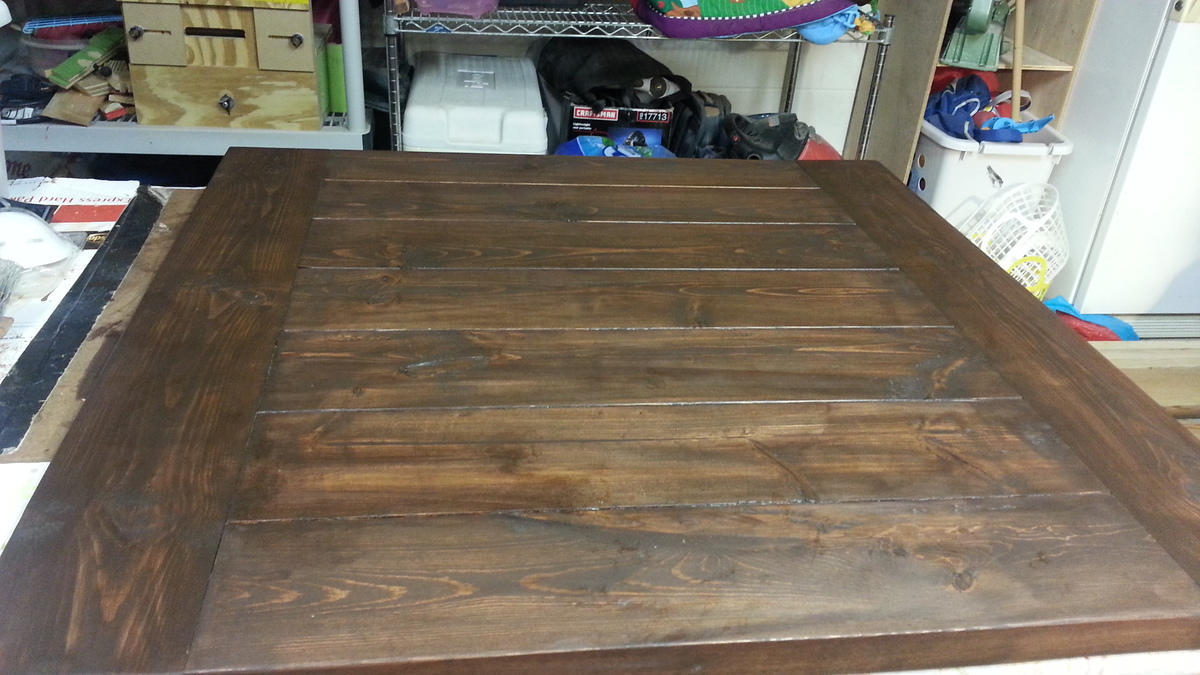
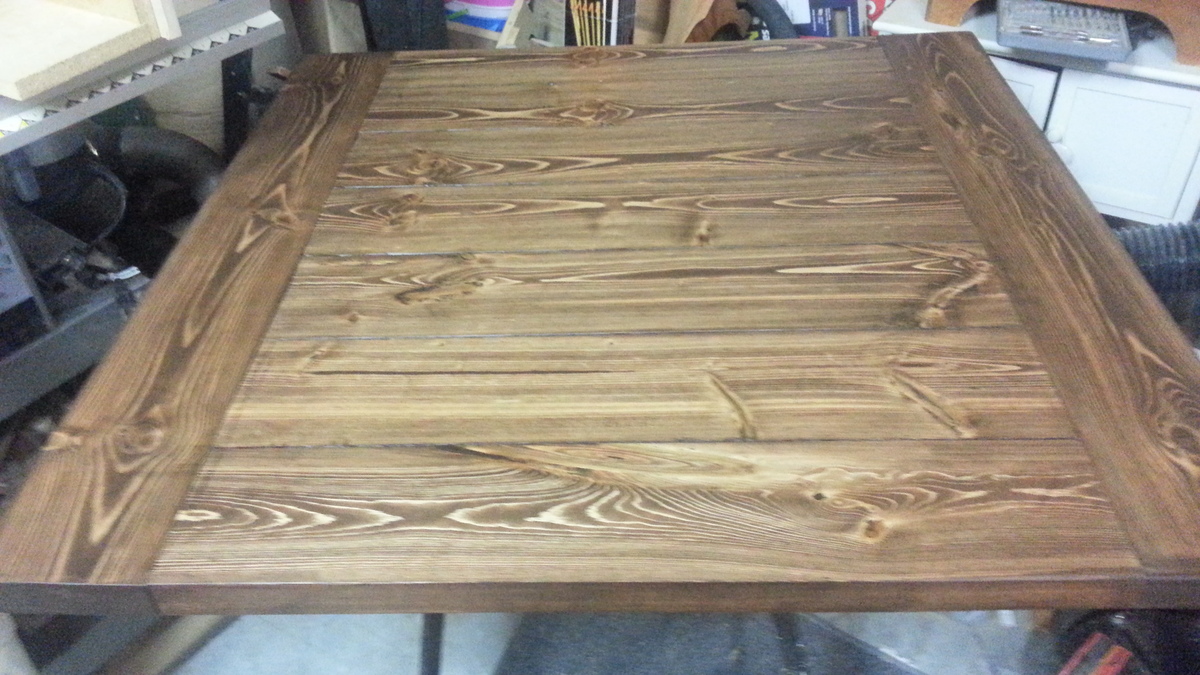
Corona Coffee Table From Cedar Posts Hand Turned
-This is a gorgeous table and I am very happy with how it turned out. I could not possibly pay for the turned legs at $40 each! Even if I did, it would be worth it, as this is a piece of furniture that will last several lifetimes.
-I used very rough 2x6s for the project, so I had to do a lot of work to get them square and smooth
-I did not purchase the legs, I purchased a 8 ft piece of the best cedar Home Depot had, which actual dimensions are only 3.5x3.5, so the legs are not quite as chunky as I would have liked.
-I turned the 18" legs on a brand new mini-lathe I purchased from Harbor Freight, $150 after coupon. For the price of the legs, I chose to buy the machine and make them myself!
-I also used 1x4s for the lower shelf rather than a sheet of plywood, I felt the smooth bottom did not match the planked top. (The bottom is not done yet)
-The assembly was very straight forward and easy
-This is the first project I made it a point to stain completely PRIOR to assembly! It turned out so much better, I also glued and screwed all joints with my Kreg Jig.
It's quite a massive heavy table that will last generations, my children dance, climb, sit etc all over it and its been in use about a month now. Two coats of the poly have held up very nicely so far, and the matte finish does NOT show dirt or fingerprints, where a glossy finish would!

Built from Plan(s)
Estimated Time Investment
Week Long Project (20 Hours or More)
Finish Used
***Varathane Wood Stain Dark Walnut - This stuff is amazing!
***Minwax pre-stain conditioner.
***Varathane ULTIMATE POLYURETHANE WITH SOFT TOUCH
-Very strong word of caution, as a previous builder mentioned this can get very dark quick, that's ok if that's the look you are after. I actually did that and then resanded and hand planed back to nearly plane pine and re-sanded and re-stained.
-
Step sand from 120, 180, 220, 320 (optional). Sand entire surface evenly with each grit sandpaper, this will leave a baby's butt smooth surface! This also closes the pores in the wood so they don't soak up as much stain!
-I usually don't use the pre-conditioner but since this was my second attempt I did not want too much color, I like the natural wood grain to show through. And beside dark is not what Shanty2Chic had going anyway.
-Dont let it sit more than 5 minutes! I have found this stain nearly applies best like a rubbing compound, like waxing a car, in a circular motion at first and then with the grain as it dries.
-The polyurethane dries VERY quickly also and be sure to go in the direction of the grain
http://www.homedepot.com/p/Varathane-1-Qt-Matte-Soft-Touch-Polyurethane-266233/203331997
Recommended Skill Level
Intermediate
Kids Workbench
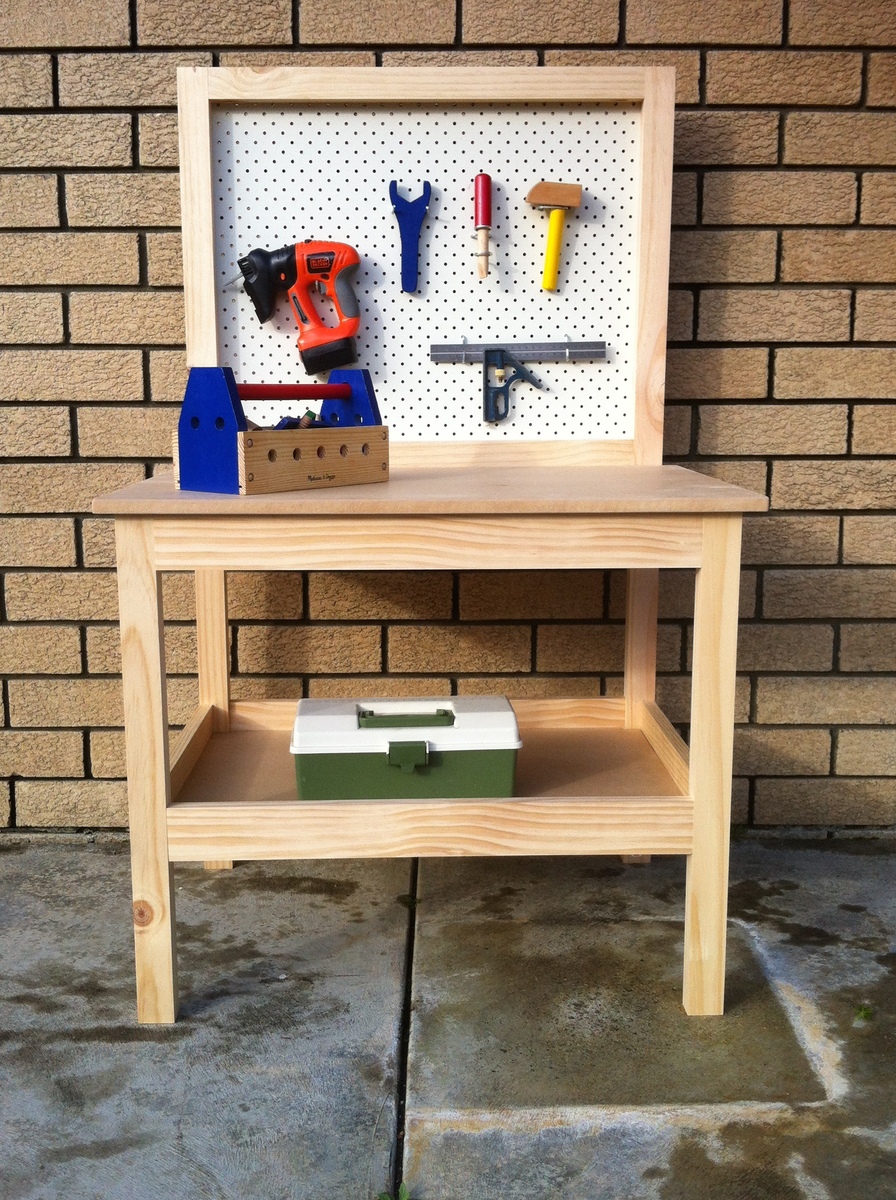
Was a quick and simple project, i mainly worked off the pictures rather then the instructions. The best part was that the project required me to go out and buy a Kreg Jig to get the nice pocket hole finish, which i now wish I had done years ago.
Estimated Cost
Approx $65 after buying all timber and screws from Bunnings
Estimated Time Investment
Afternoon Project (3-6 Hours)
Finish Used
None
Recommended Skill Level
Intermediate
Farmhouse Bedside Table

My daughter has been begging for a nightstand so she can have a lamp and put her glass of water on. I found this plan and thought I would be able to build it. My husband helped some to speed up the process. (he cut some of the wood for me).


Estimated Cost
$50
Estimated Time Investment
Day Project (6-9 Hours)
Finish Used
Linen White from Rustoluem and Dark Walnut stain
Recommended Skill Level
Beginner
Laundry Room Solution
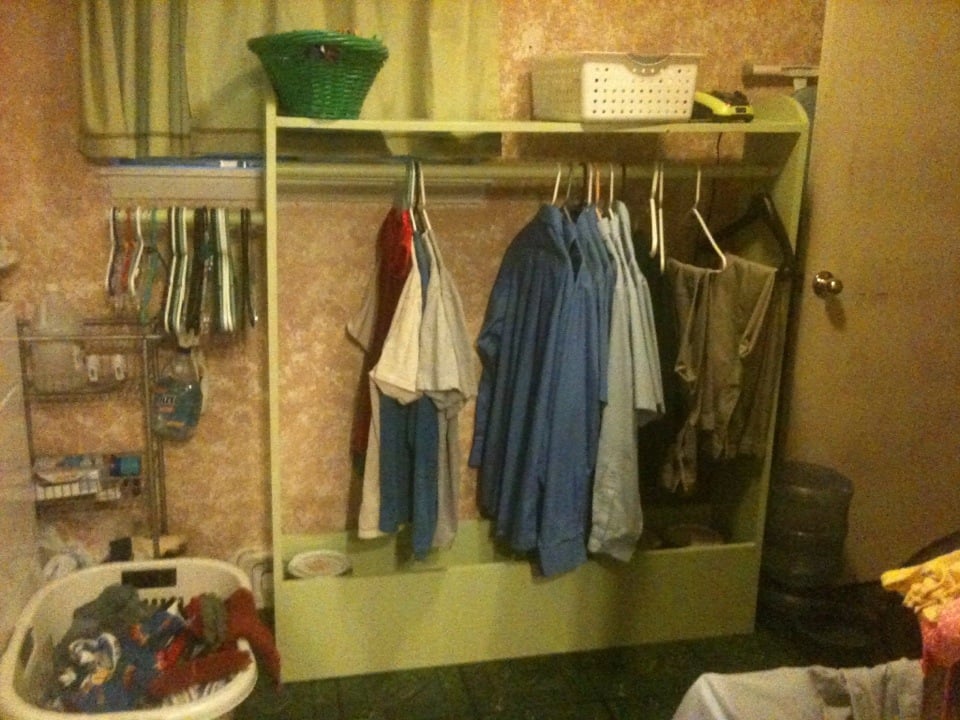
I needed a sturdy place to hang clothes in my laundry room as I took them out of the dryer. I saw the dress up center and it was perfect (just needed to be altered to fit adult clothes)
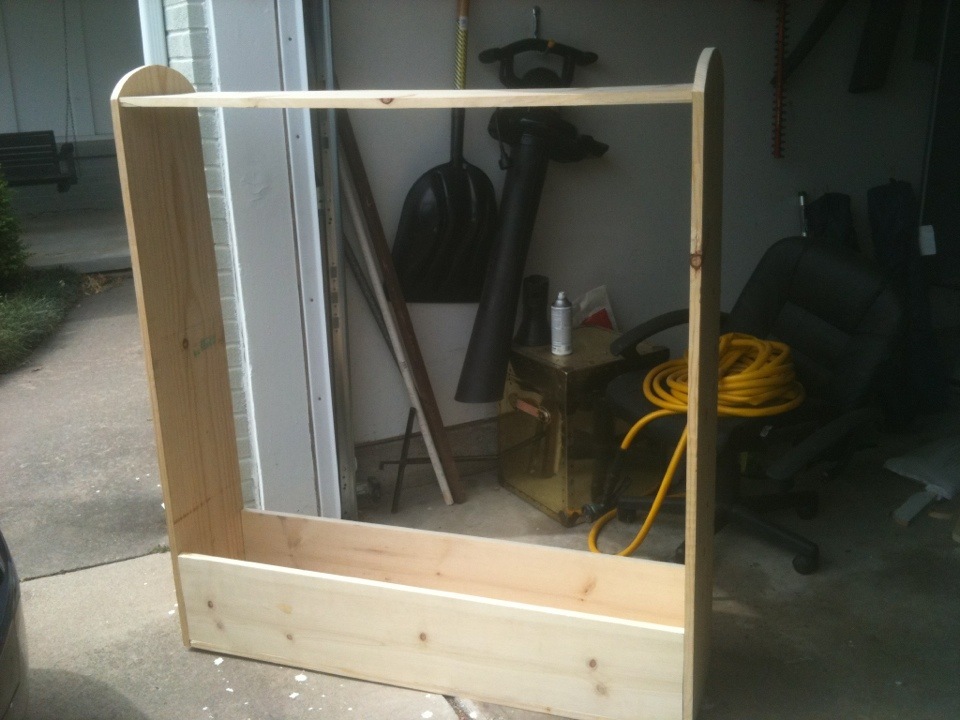
Estimated Cost
$30
Estimated Time Investment
An Hour or Two (0-2 Hours)
Finish Used
Primed and Painted with Behr Paint I had on hand
Recommended Skill Level
Starter Project
Comments

Tue, 06/26/2012 - 09:56
I'm glad to see I'm not the
I'm glad to see I'm not the only one who thought this project could have a grown up application!

Fri, 06/29/2012 - 02:36
I thought of doing this
I thought of doing this myself. I like the addition of the 'hanger holder" on the side. Great job!
Bench
My first project, not directly from Ana White but combination of Ana White and benches I've seen on other sites.
Estimated Cost
$17
Estimated Time Investment
Weekend Project (10-20 Hours)
Finish Used
MinWax Gel Stain Dark Walnut over early American. Top coat is polyacryclic
Recommended Skill Level
Starter Project
Why Papouli is Avery's Favorite Grownup
I built this for my granddaughter. I made a couple of design changes because I worked with wood that I already had in my shop. It's select pine with acrylic paint sealed with UV-resistent acrylic laquer. Great plan! Thanks!
Built from Plan(s)
Estimated Cost
$25.00
Estimated Time Investment
Day Project (6-9 Hours)
Finish Used
Acrylic paint, UV-resistent laquer. For Number two granddaughter, I think I will try milk paint with a satin urethane seal.
Recommended Skill Level
Starter Project
Outdoor Living Space - Inspired by Ana's Plans
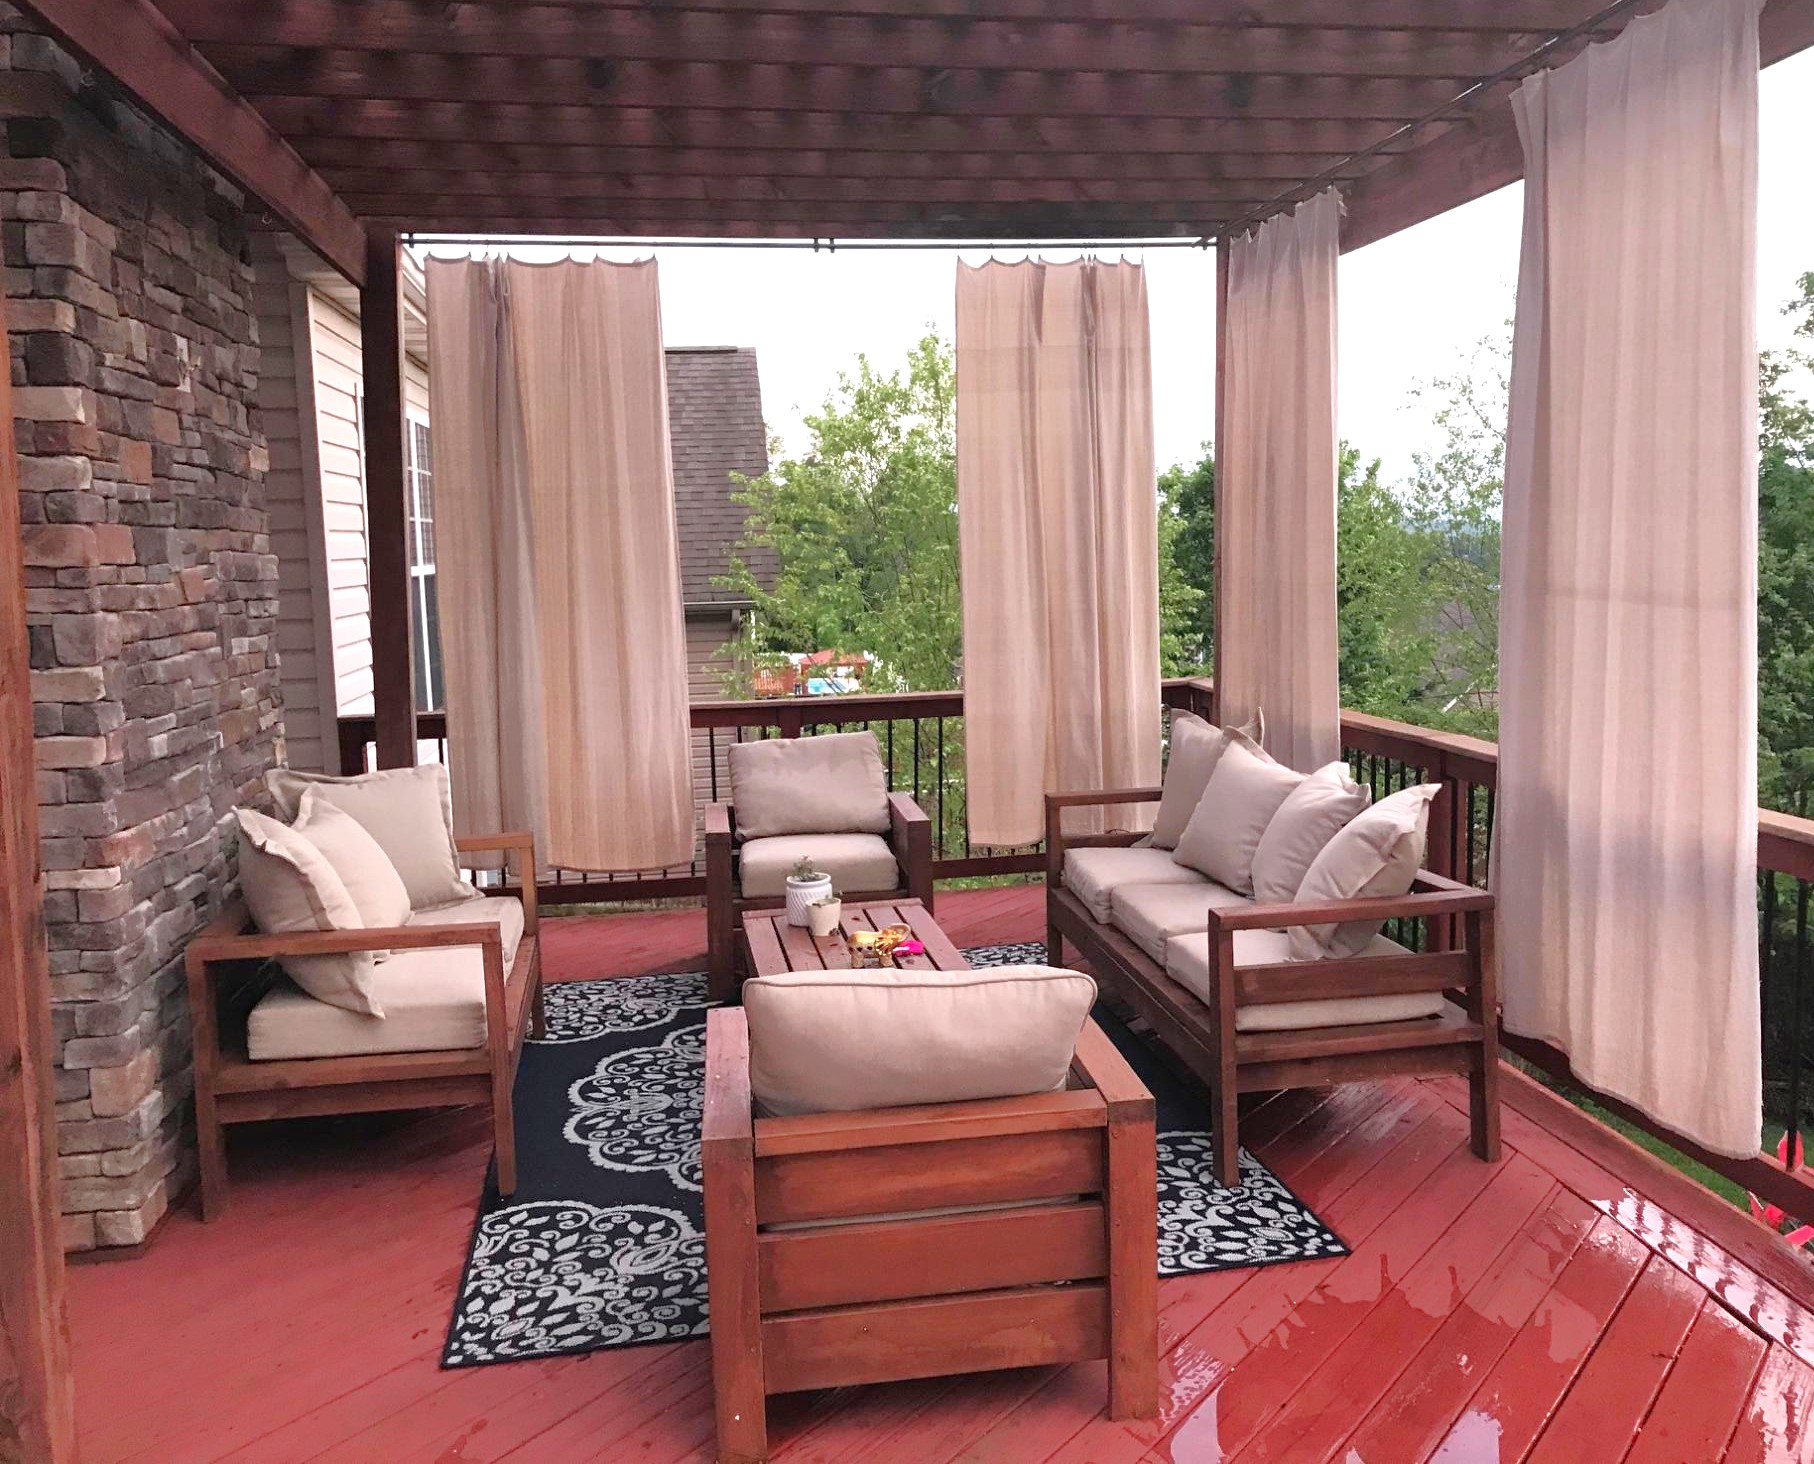
My wife and I were looking for a way to make our deck more enjoyable. I came across Ana's plans a year or so ago, and after building the couch and chairs, I decided to make a loveseat, add a rug and outdoor curtains. Hopefully one day I'll add some lights and an outdoor fan to complete the look.
Built from Plan(s)
Estimated Time Investment
Weekend Project (10-20 Hours)
Recommended Skill Level
Beginner
Comments
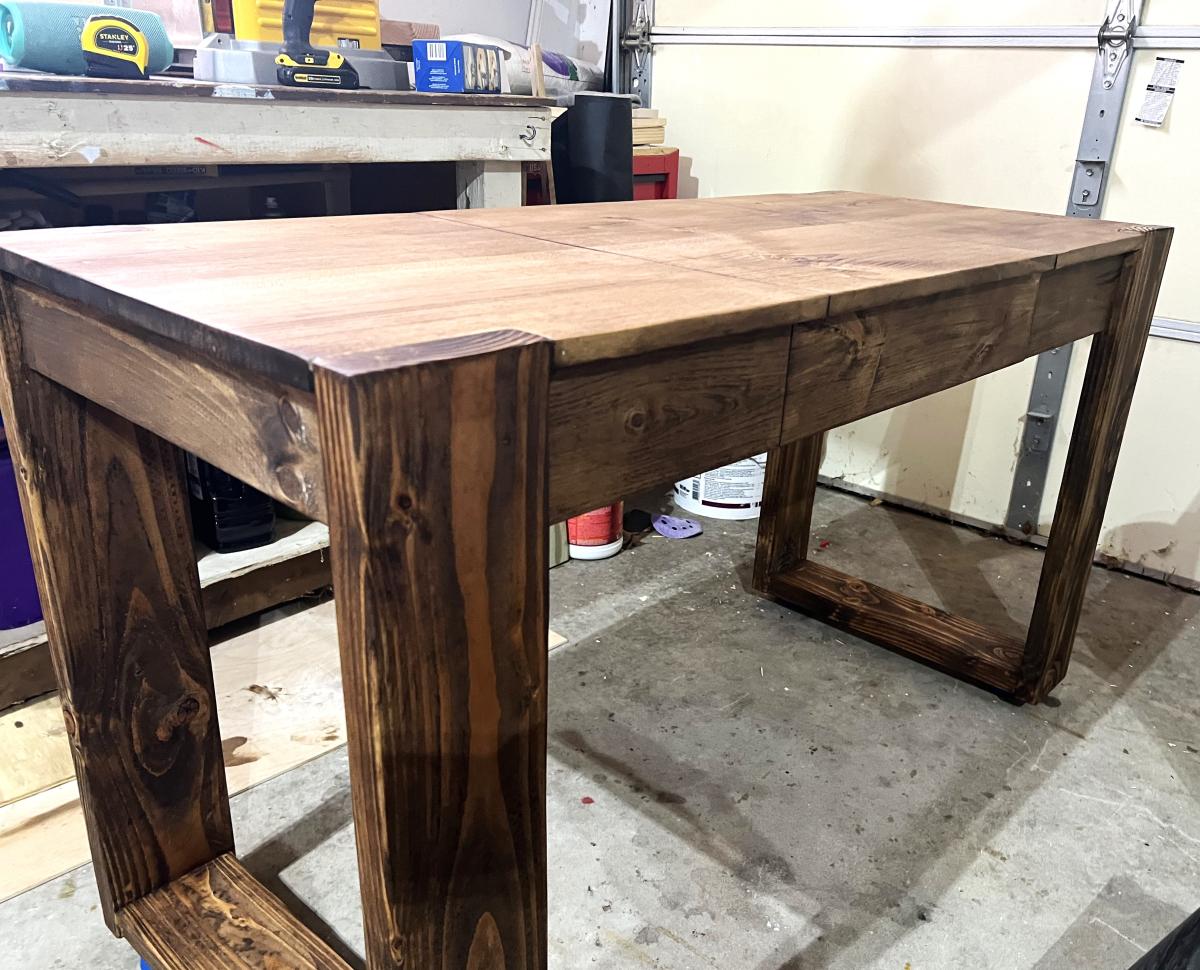
Chunky Leg Storage Vanity
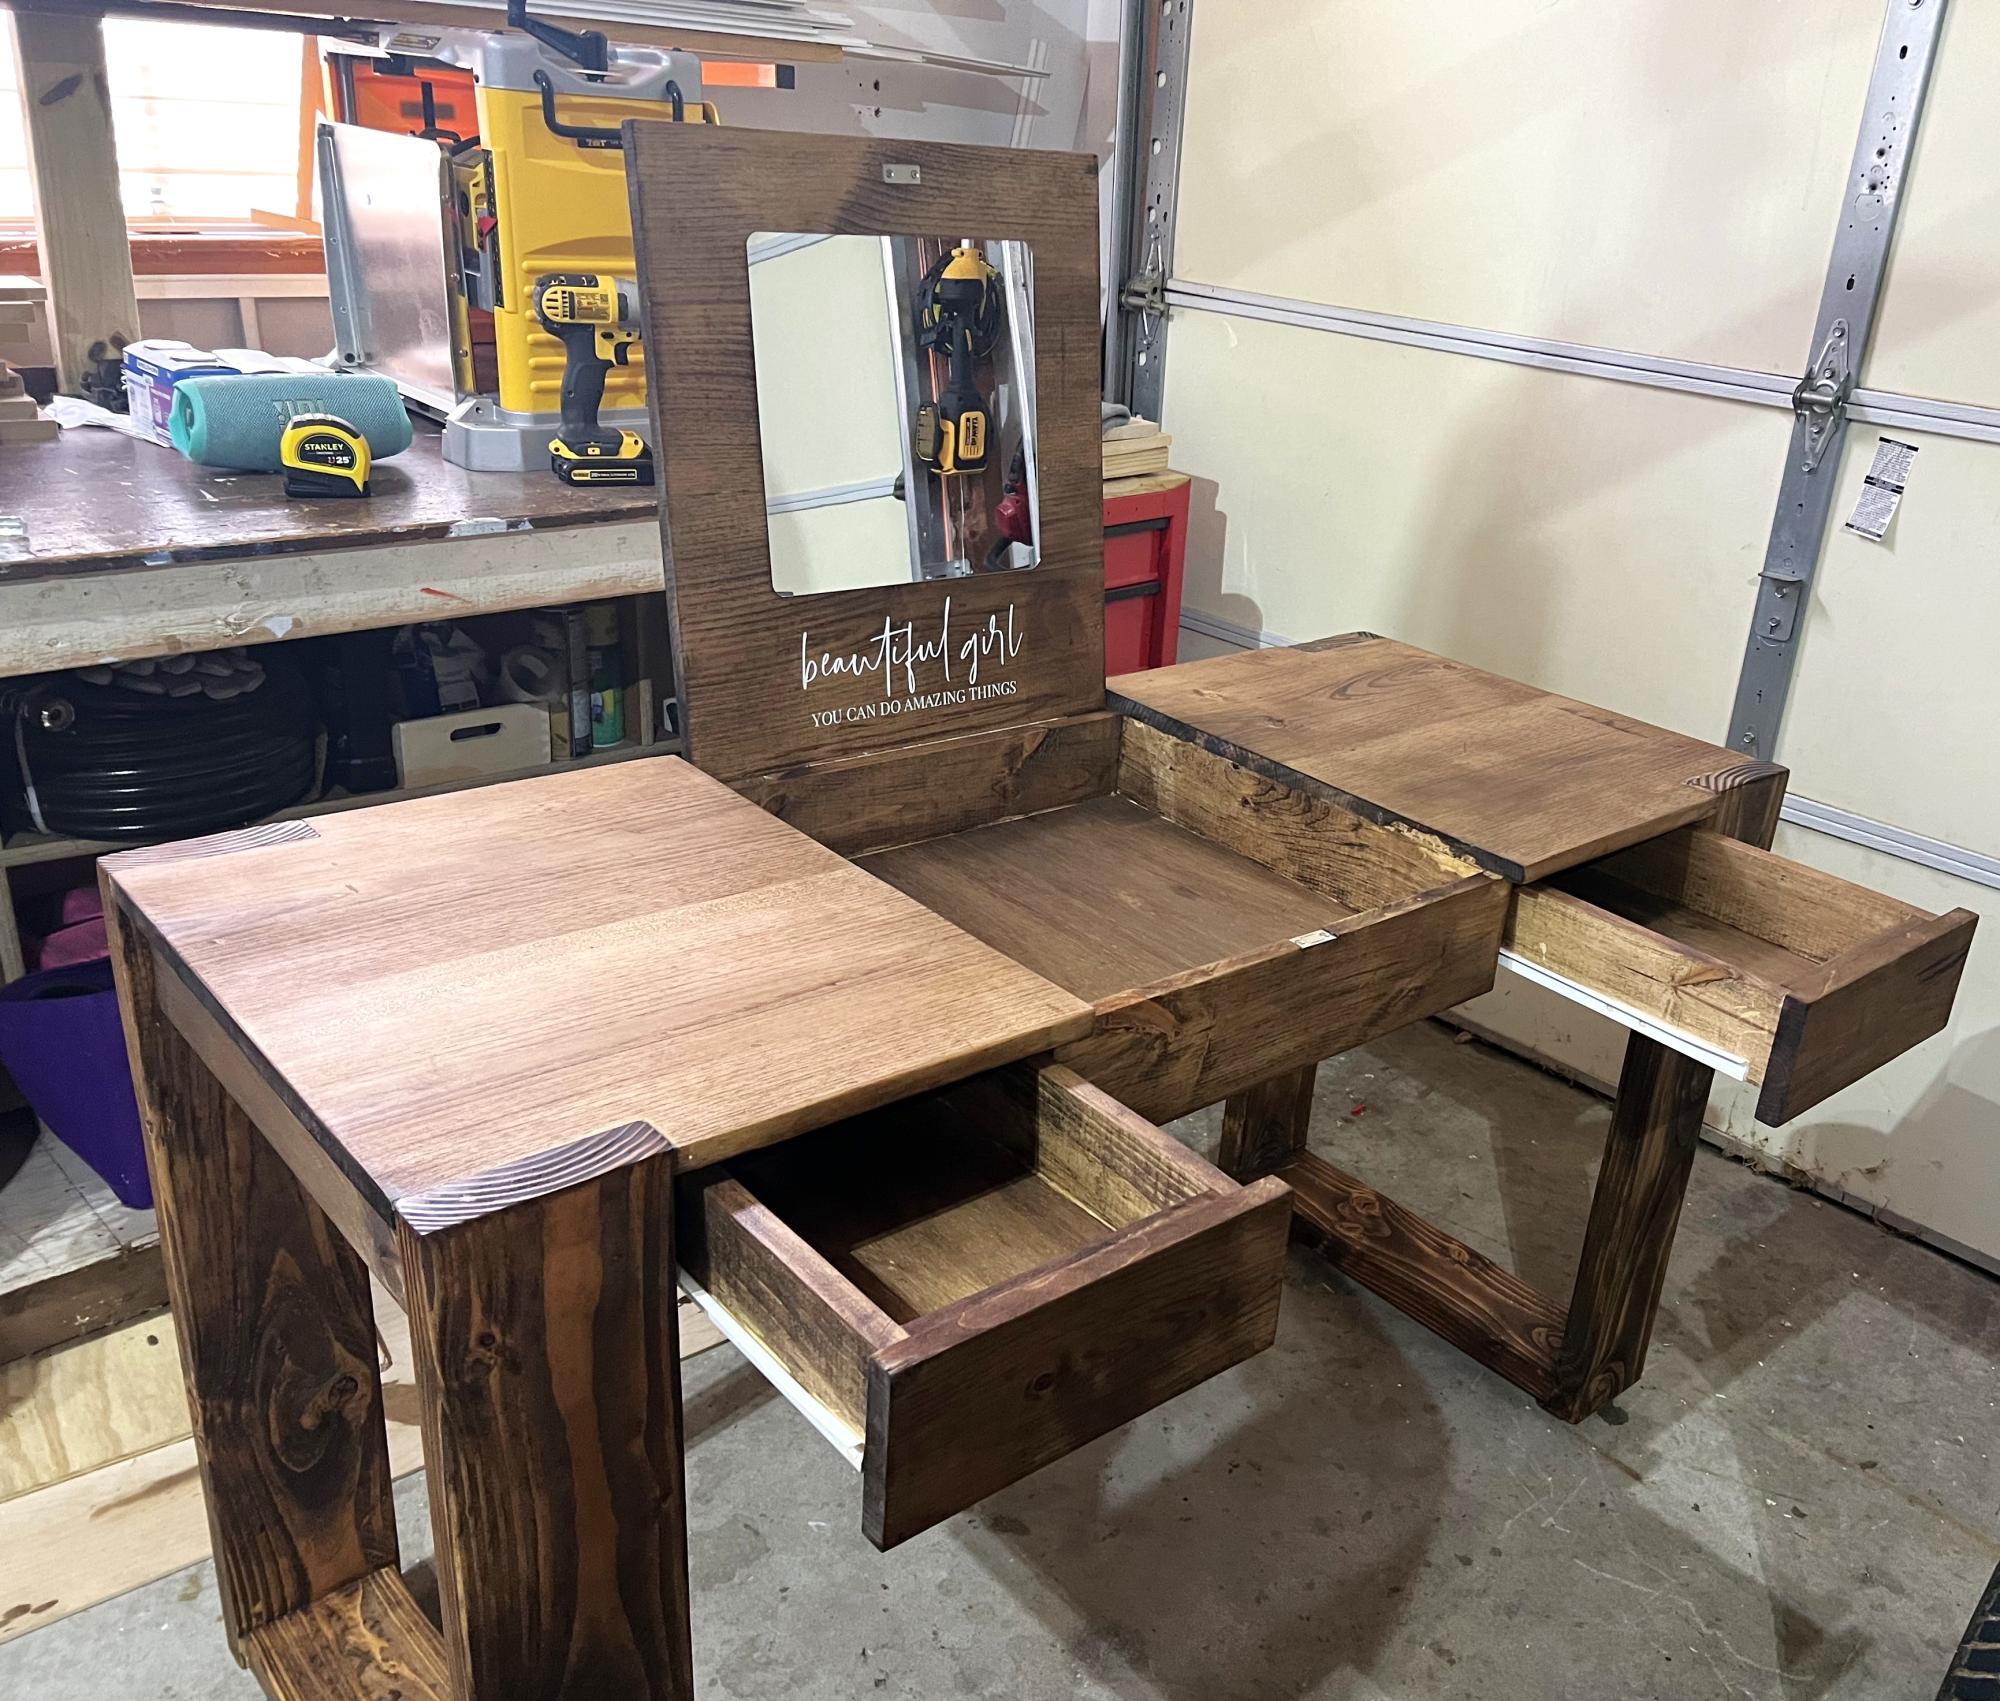
Hi! I love Ana White's plans! I used the chunky leg desk plan and added drawers and a flip-up vanity top! :) https://www.instagram.com/bow_and_timber/
Built from Plan(s)
Rolling Sofa C Table

In search of a sofa table for the sectional we found this site and plans and upgraded using wood instead of MDF and using back splash tile on the top to give a custom feel.
Estimated Cost
75.00
Estimated Time Investment
Day Project (6-9 Hours)
Finish Used
Stain and tiles.
Recommended Skill Level
Beginner
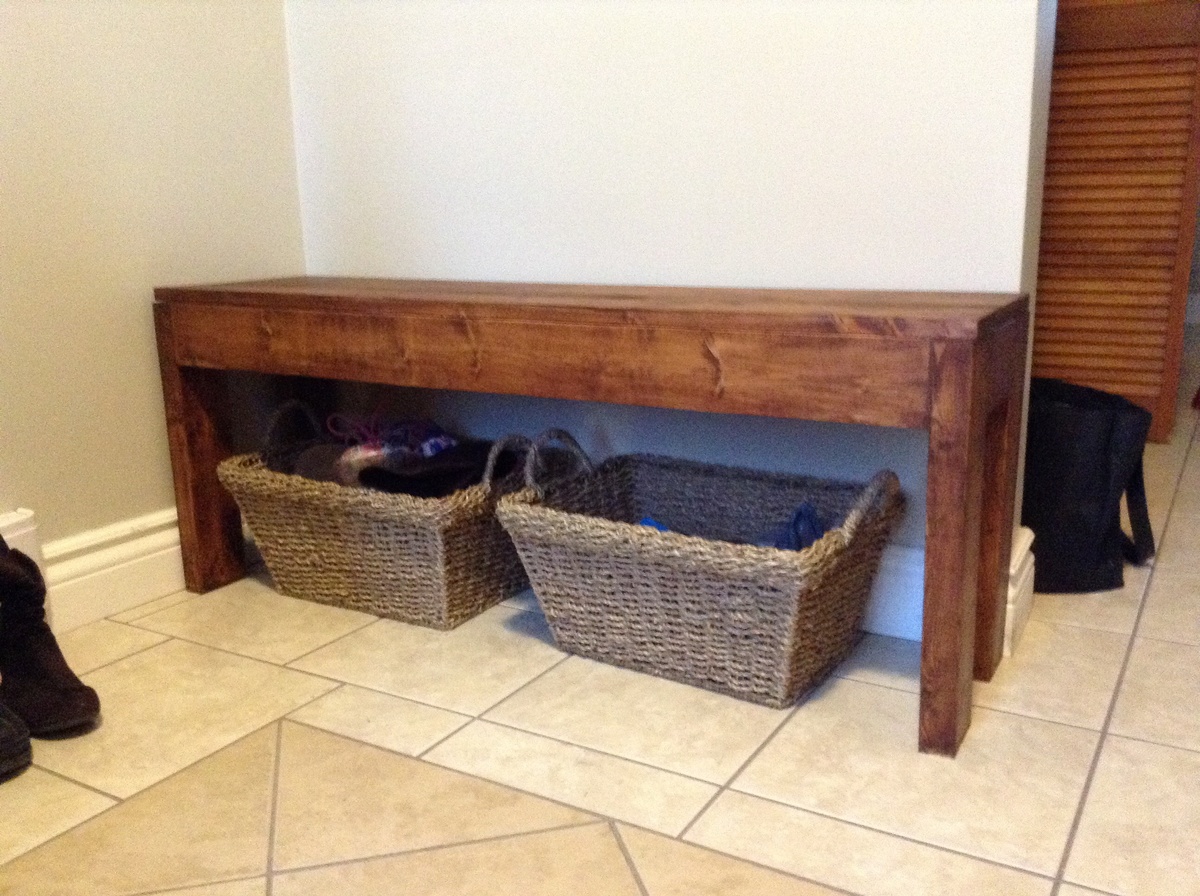
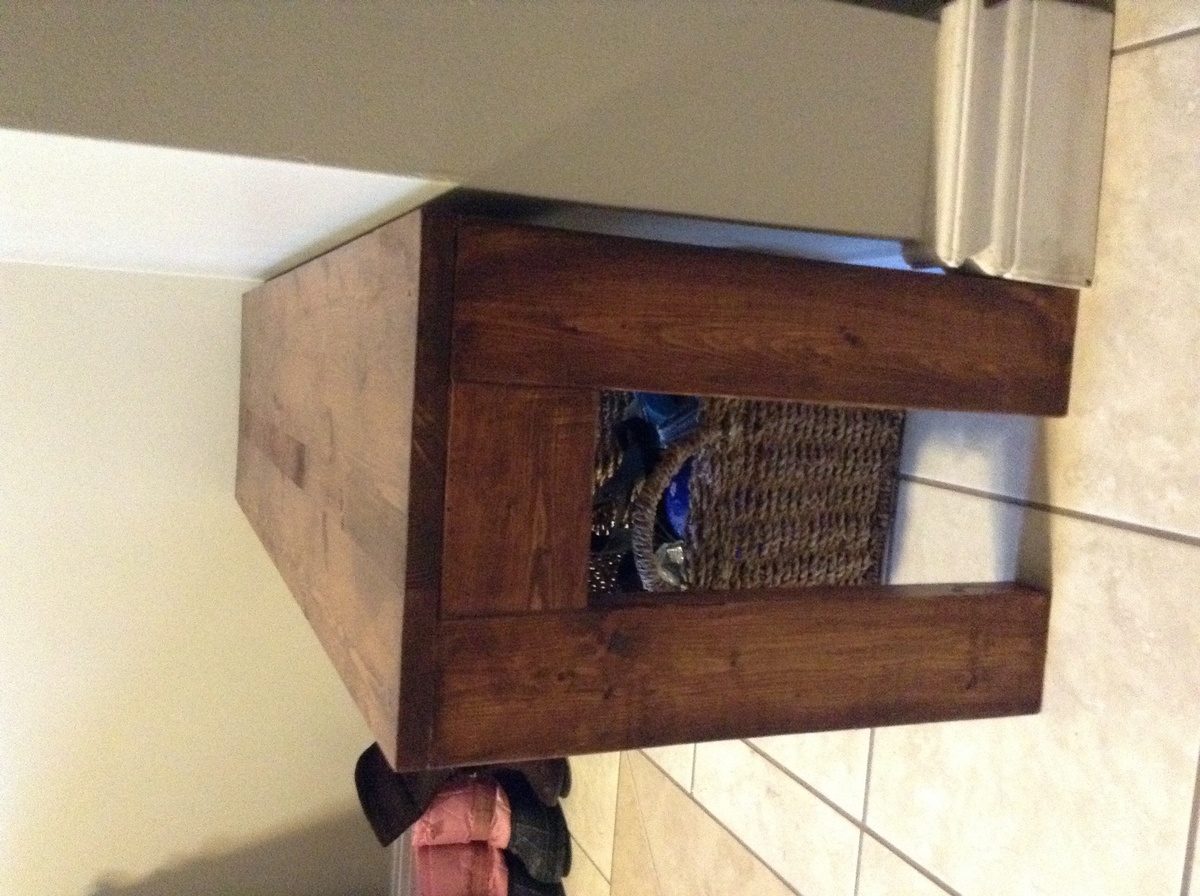
Multi-tone Shoe Bench
This was the easiest and fastest project ever! We built it out of 2x12's instead of 1x12's but i wish we had done it with 2x16's because baskets are a little hard to find in these dimensions and I would like it a little deeper. But I still love it!
When we bought the wood, we had Home Depot just make all the cuts for us. so when we got home, we just had to assemble it. It went together in about an hour {we did have to make a few adjustments because we used 2x's instead of 1x's but nothing too hard}. We decided to add some screws to the 1x4 back and side rails instead of just nails so that they would be more sturdy. We have 3 kiddos and know that they will be pulled on, walked on, ran into a lot.
The finishing took me about a day to do with lots of breaks in-between.
We stained the seat with Minwax Dark Walnut and then taped it off so that I could pain the rest white. After 3 coats of white paint, I sanded the edges and rubbed the same stain all over it. It made the edges dark and make the paint an off white. Then we put two coats of clear coat on top.
We used some scrap beadboard that we had instead of plywood. I love the finished look!!!
It cost us about $50 or less for the wood. I don't know exactly because we had a few other supplies to get there too. But it was cheap!
Estimated Time Investment
Afternoon Project (3-6 Hours)
Recommended Skill Level
Beginner
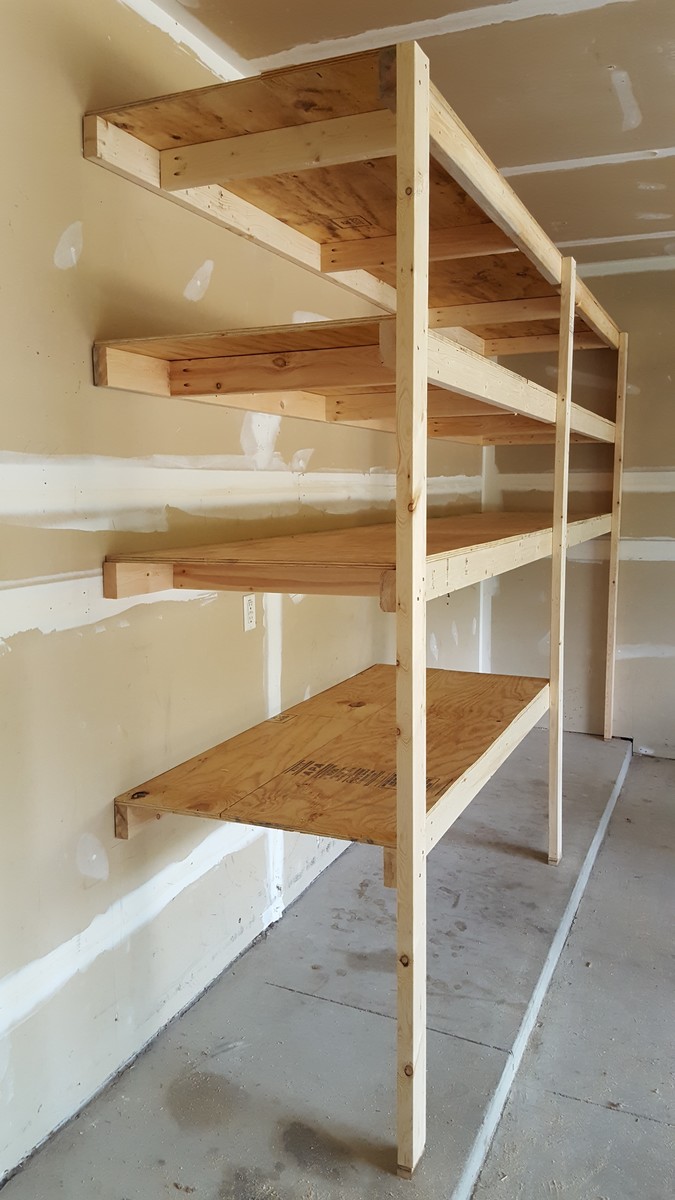
Garage Shelving
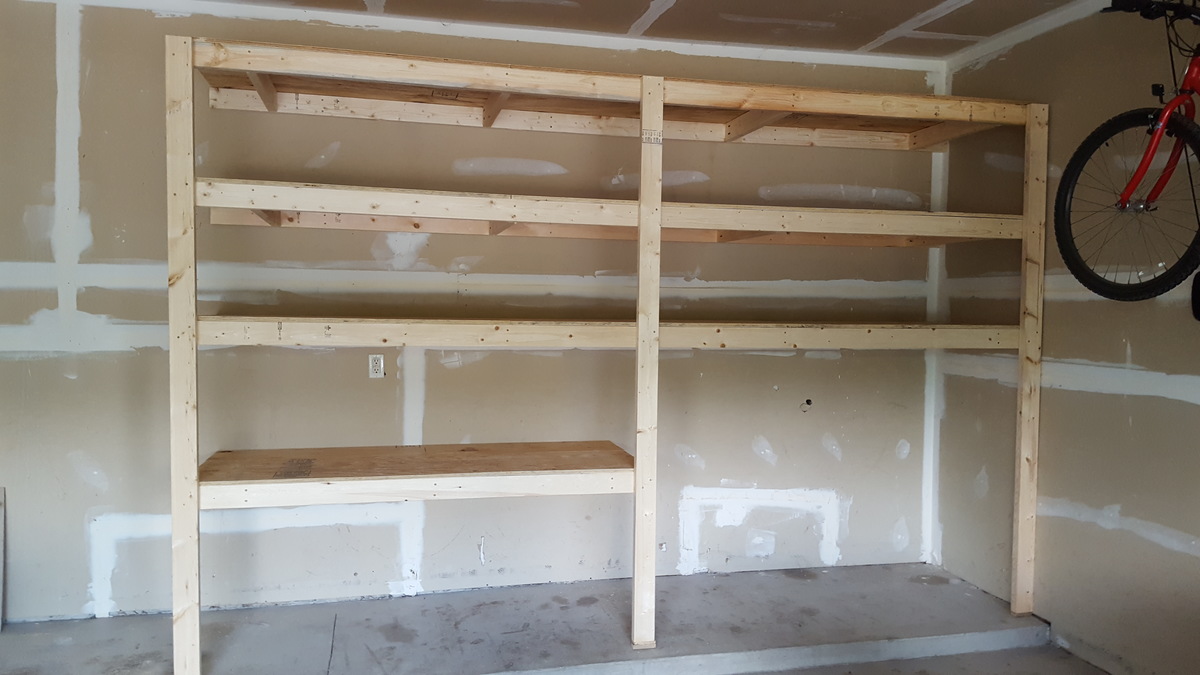
I am a beginner diy'er and this was one of my first projects. Also it was my first time using the Kreg jig and I loved it! My shelving system was around 8 feet tall, 12 feet wide and 30 inches deep. I added some extra cleats to support my deeper shelves (30") and also used thicker (5/8") plywood. This was a fun and easy project to do! Thanks so much!
Estimated Cost
$150
Estimated Time Investment
Day Project (6-9 Hours)
Finish Used
none
Recommended Skill Level
Beginner
Raised Bed Garden Mother's Day Present
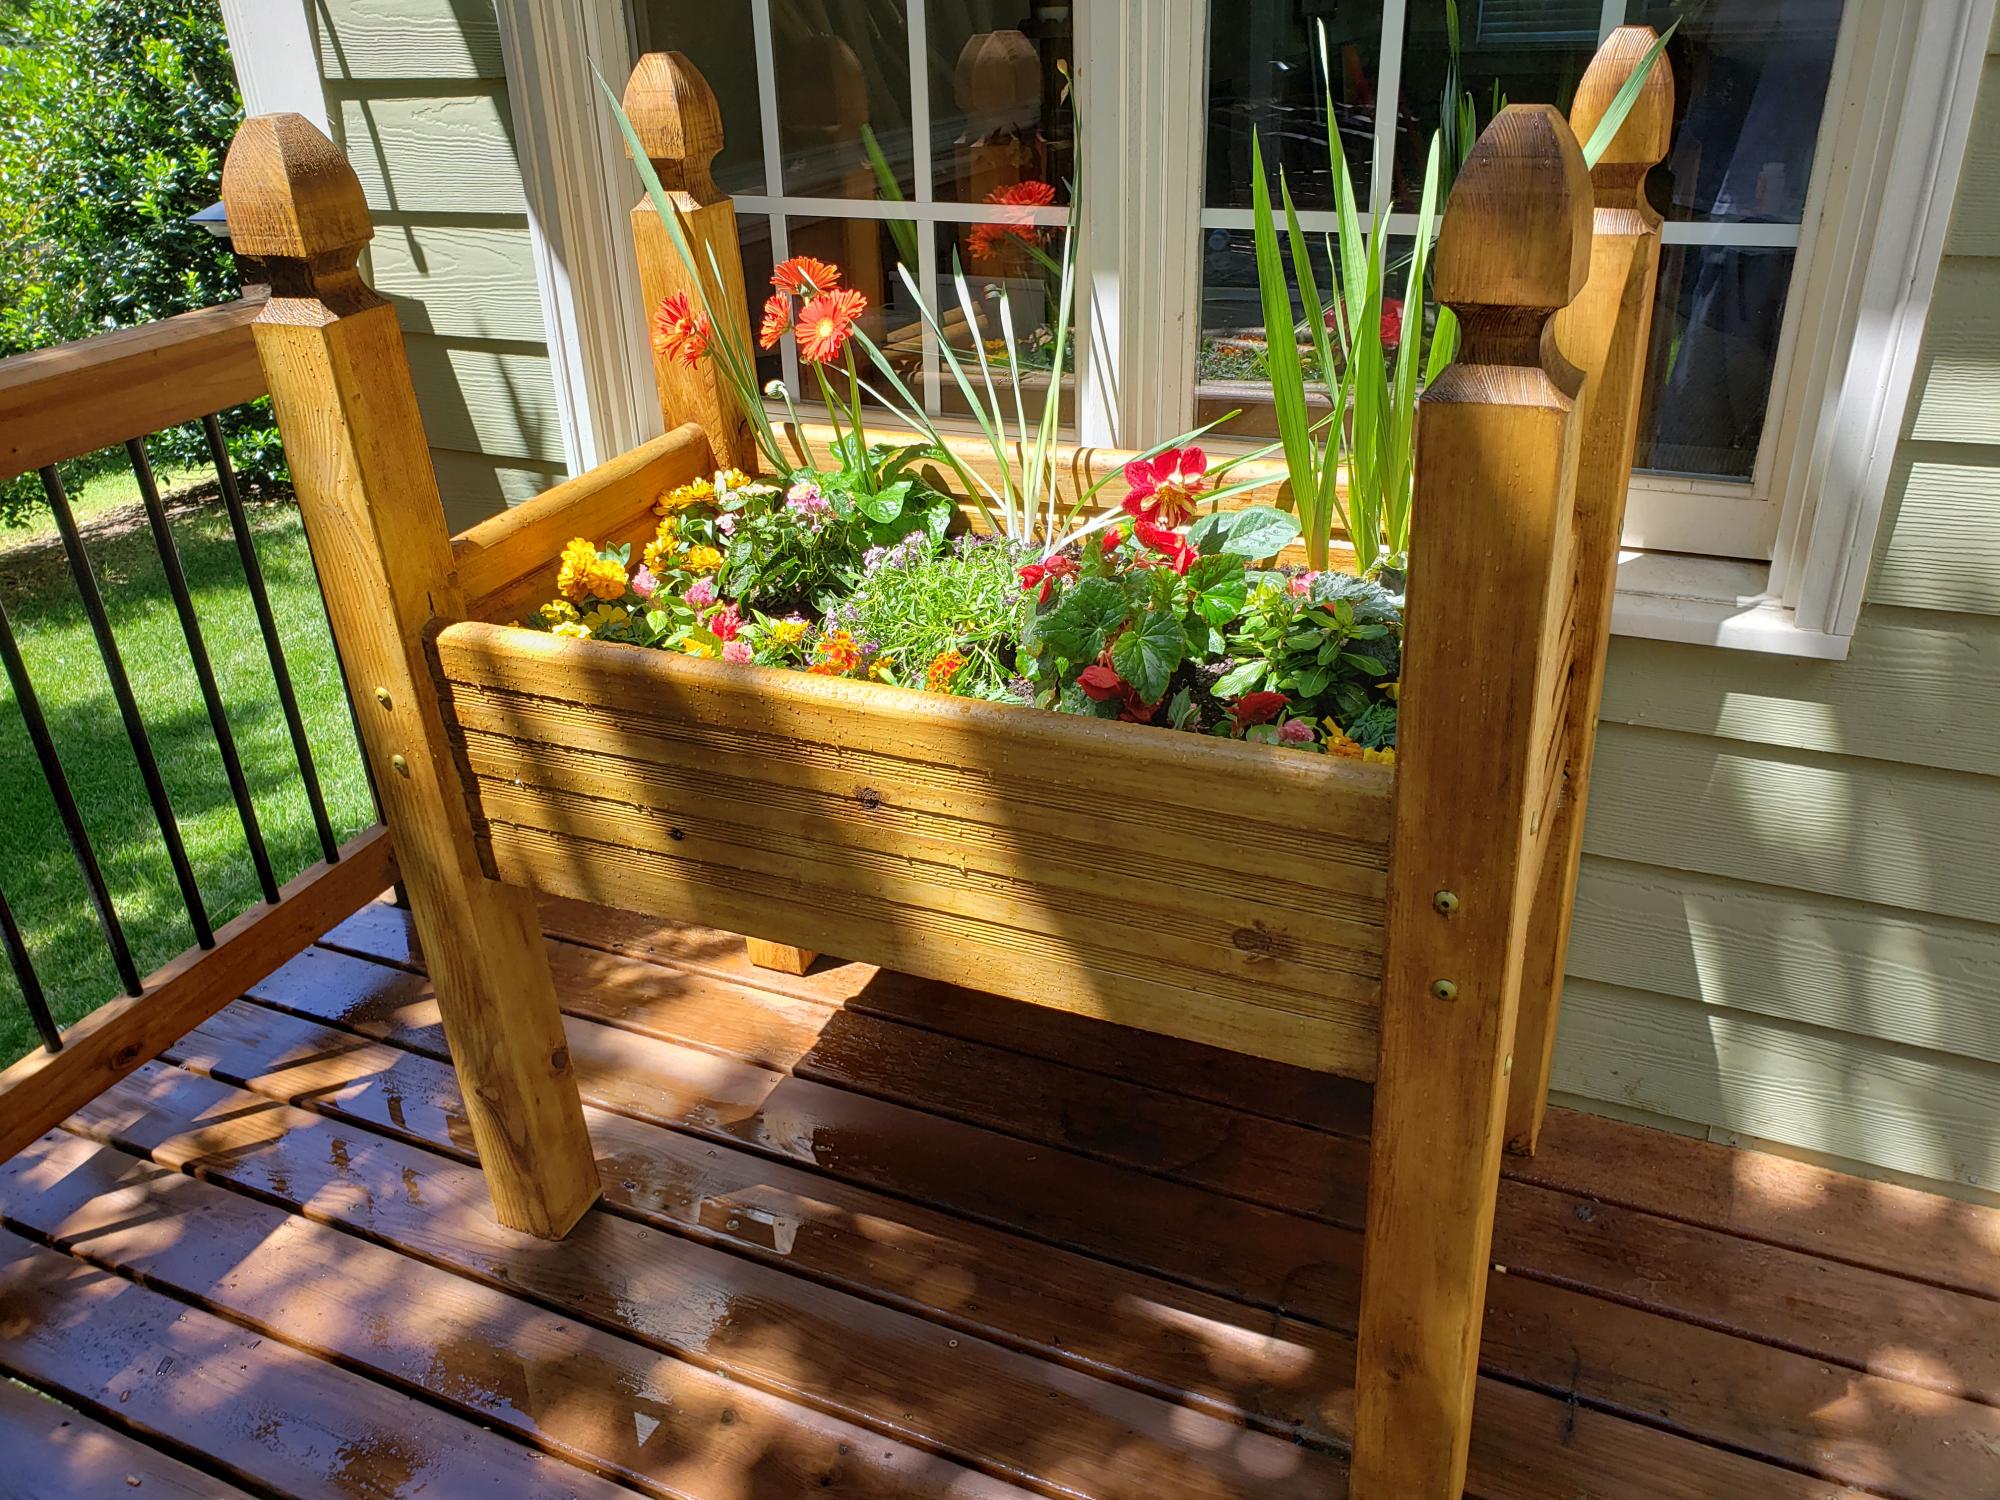
My 15 year old daughter and I built this as a Mother's Day gift. We used basic ideas from plan, but while looking for wood we came across stair treads and decking posts that we thought would work. We were very happy with the results. This thing is very solid and much better quality than the more expensive kits you can buy.
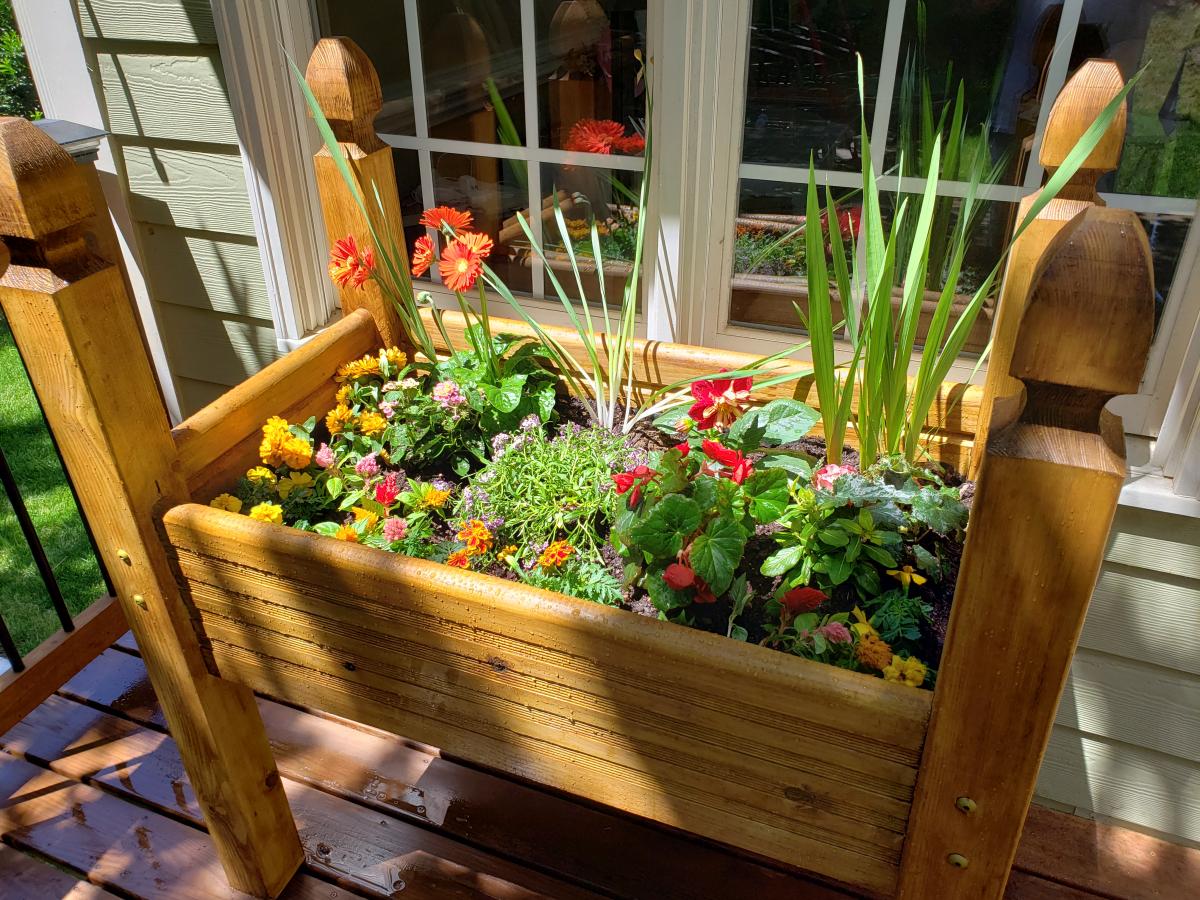
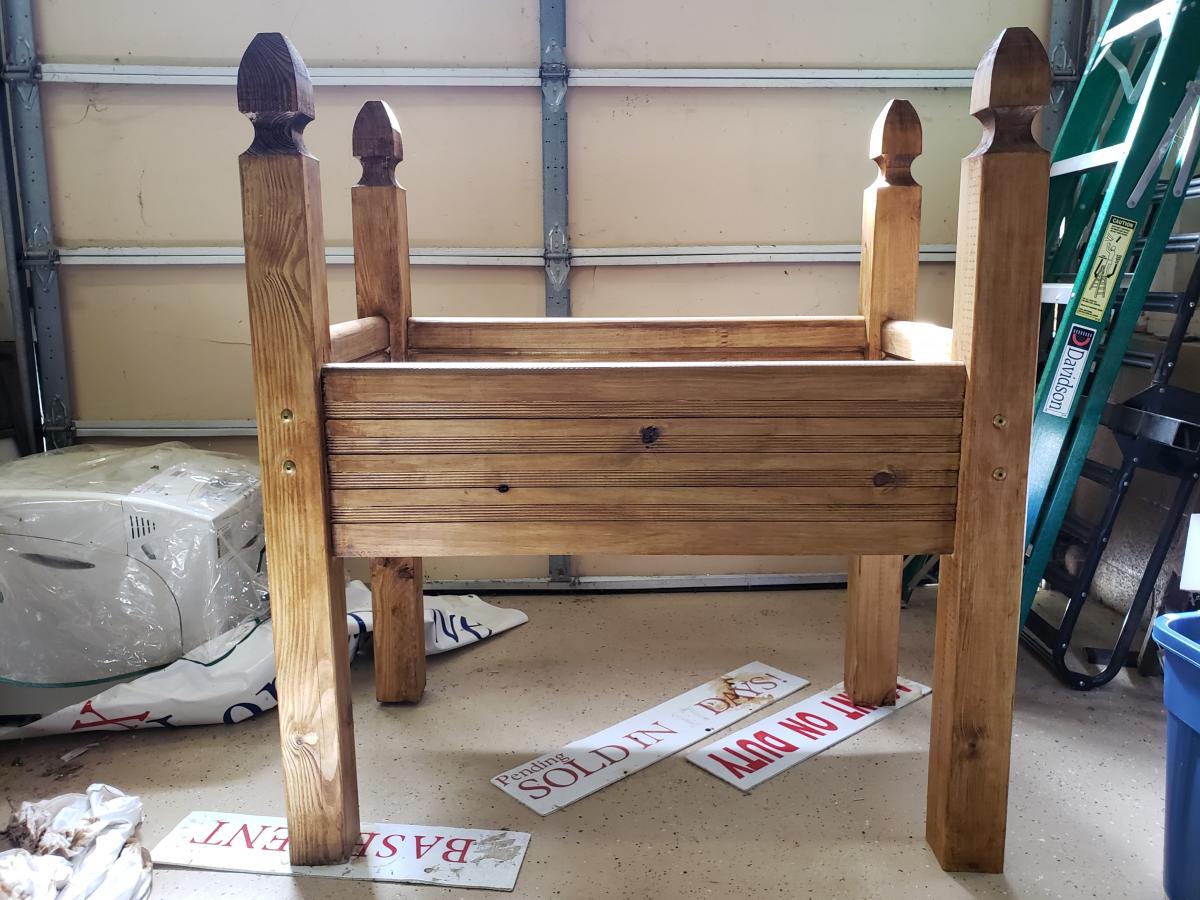

Built from Plan(s)
Estimated Cost
$130 plus plants and dirt
Estimated Time Investment
Weekend Project (10-20 Hours)
Recommended Skill Level
Beginner
Little Boy's Upholstered Toddler Bed
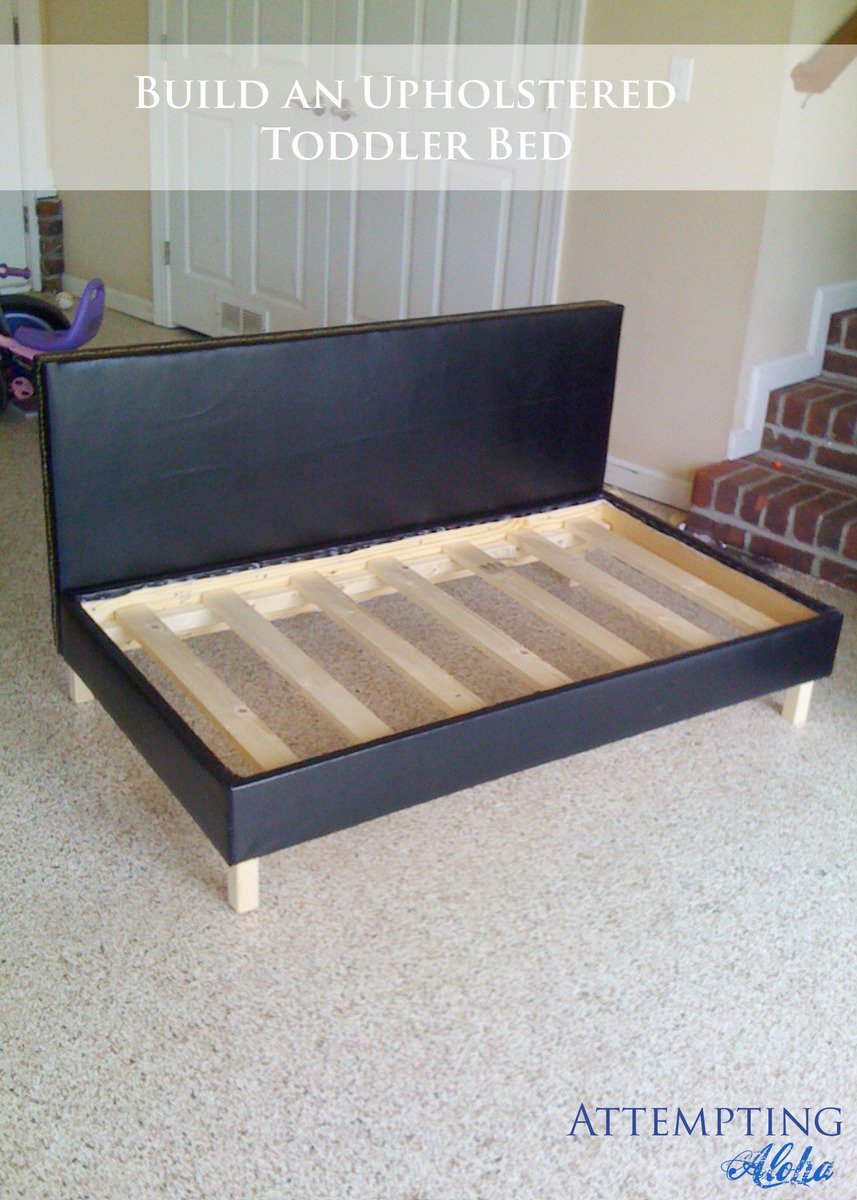
Such a darling bed and plans. I'm so glad I found it! I built it with a friend for her little boy, so he could use it as a couch later on, and it is just darling with the black pleather and nailhead trim she picked out.
I marked it as an intermediate project more for the upholstery part of it. I'd call it a beginner building project, though. :)
Thanks, Ana!!
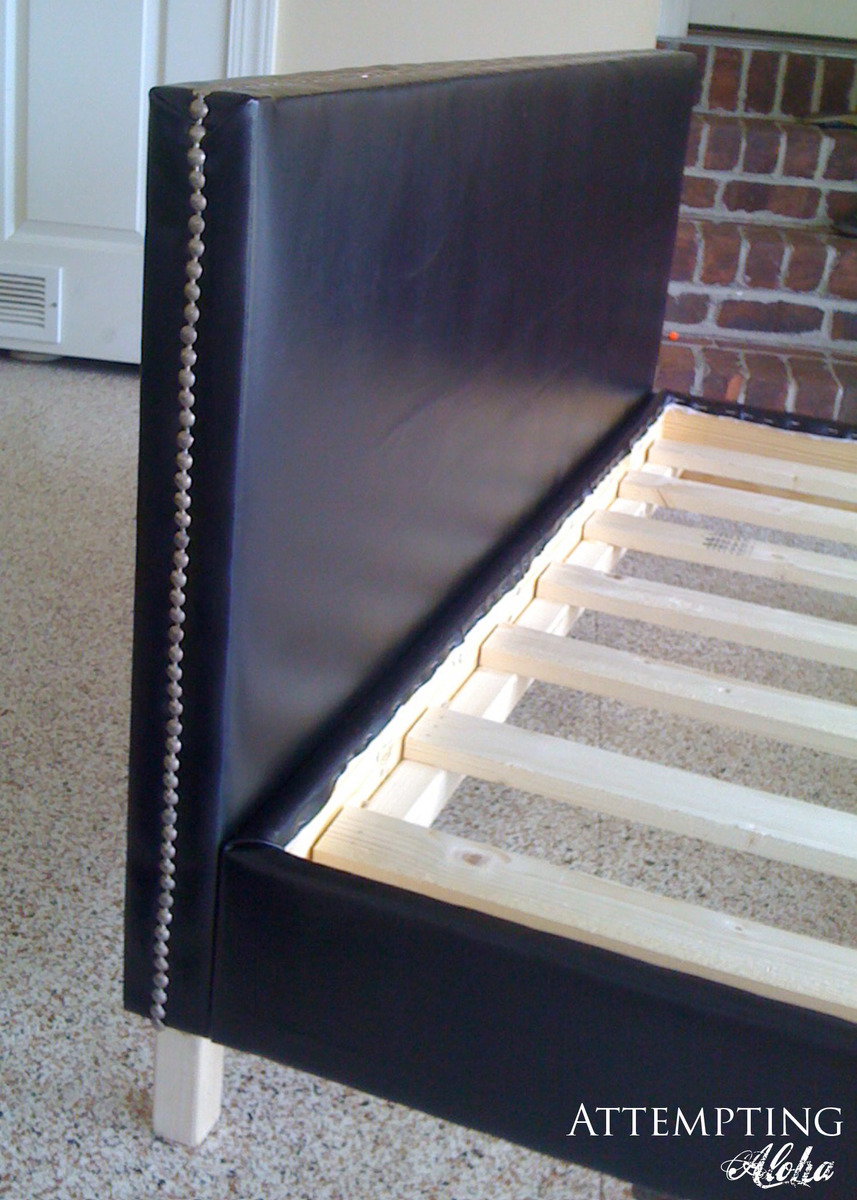
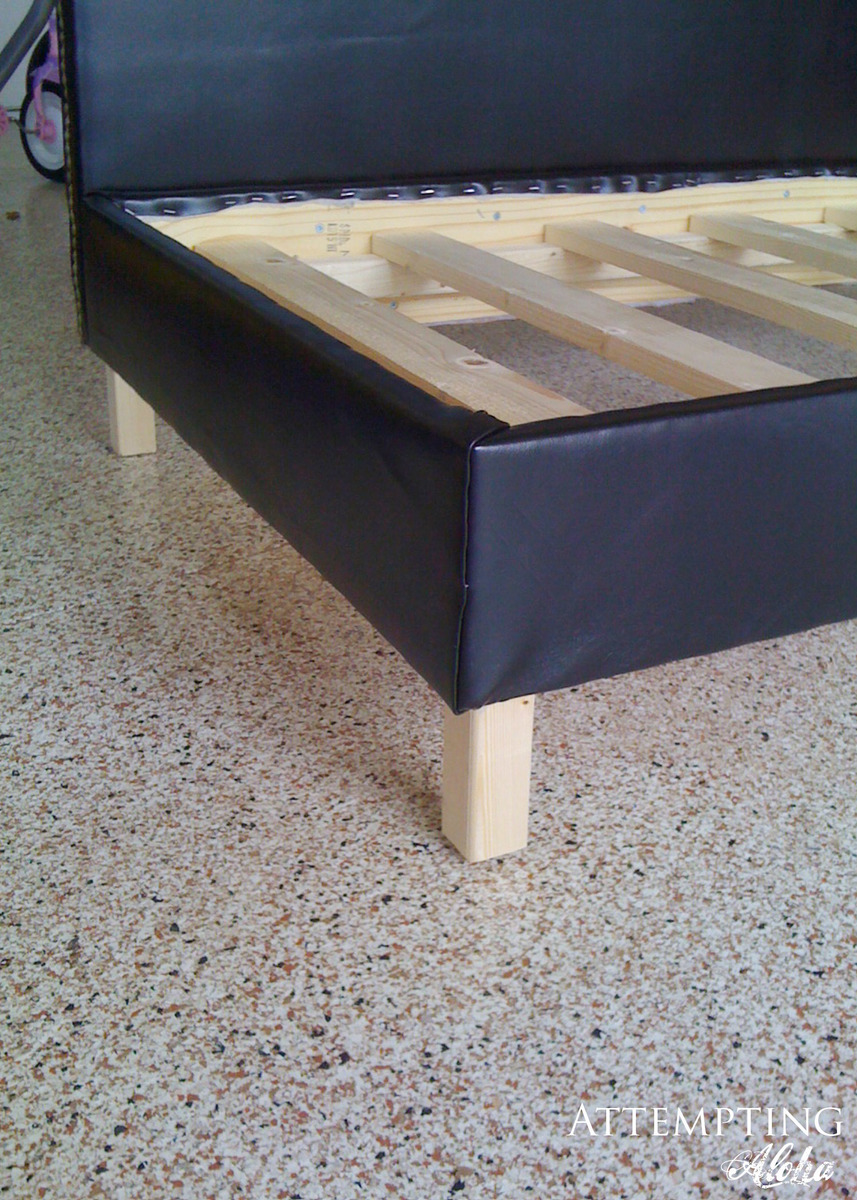
Built from Plan(s)
Estimated Cost
$60
Estimated Time Investment
Day Project (6-9 Hours)
Recommended Skill Level
Intermediate
Comments
Wed, 07/04/2012 - 04:34
That looks great! I never
That looks great! I never would have thought of doing it with pleather. I've been trying to decide what seating to make for my son who lives in a one bedroom apartment and needs a place for his sister or friends to crash when they come to visit. I'm going to show him this and see what he thinks.