Community Brag Posts
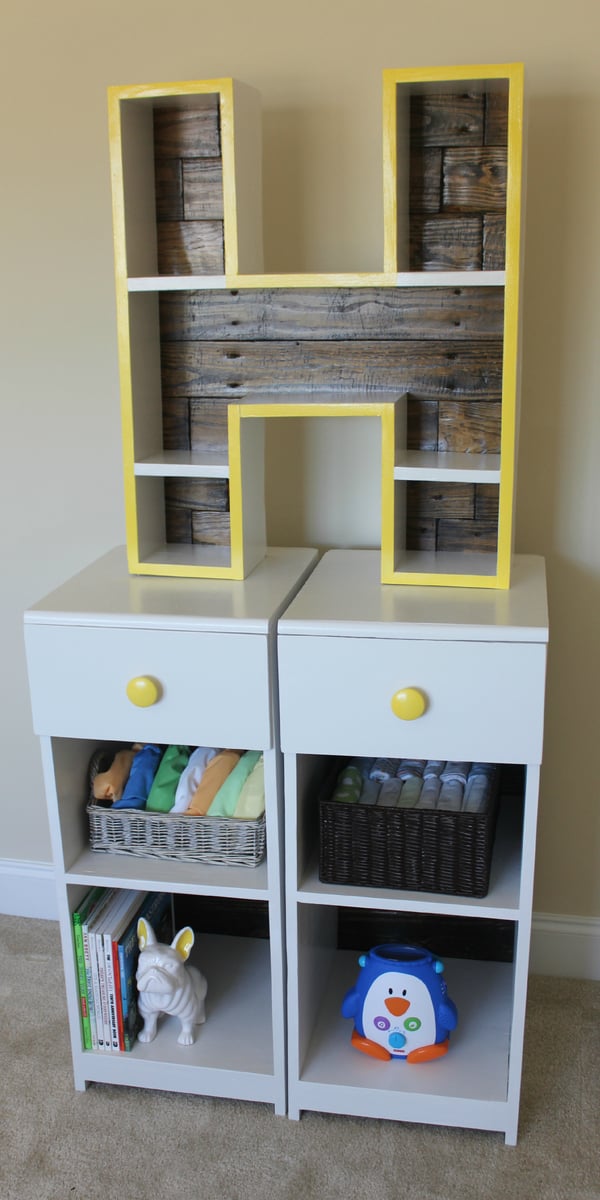
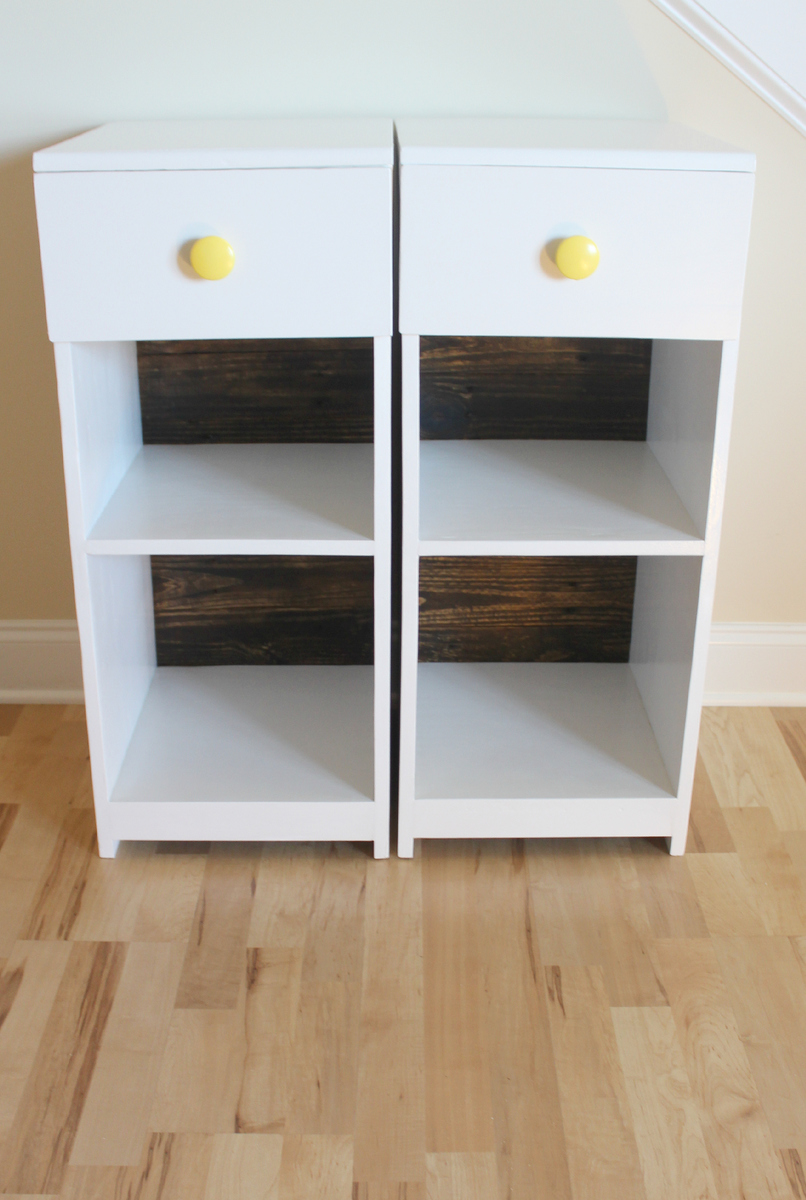
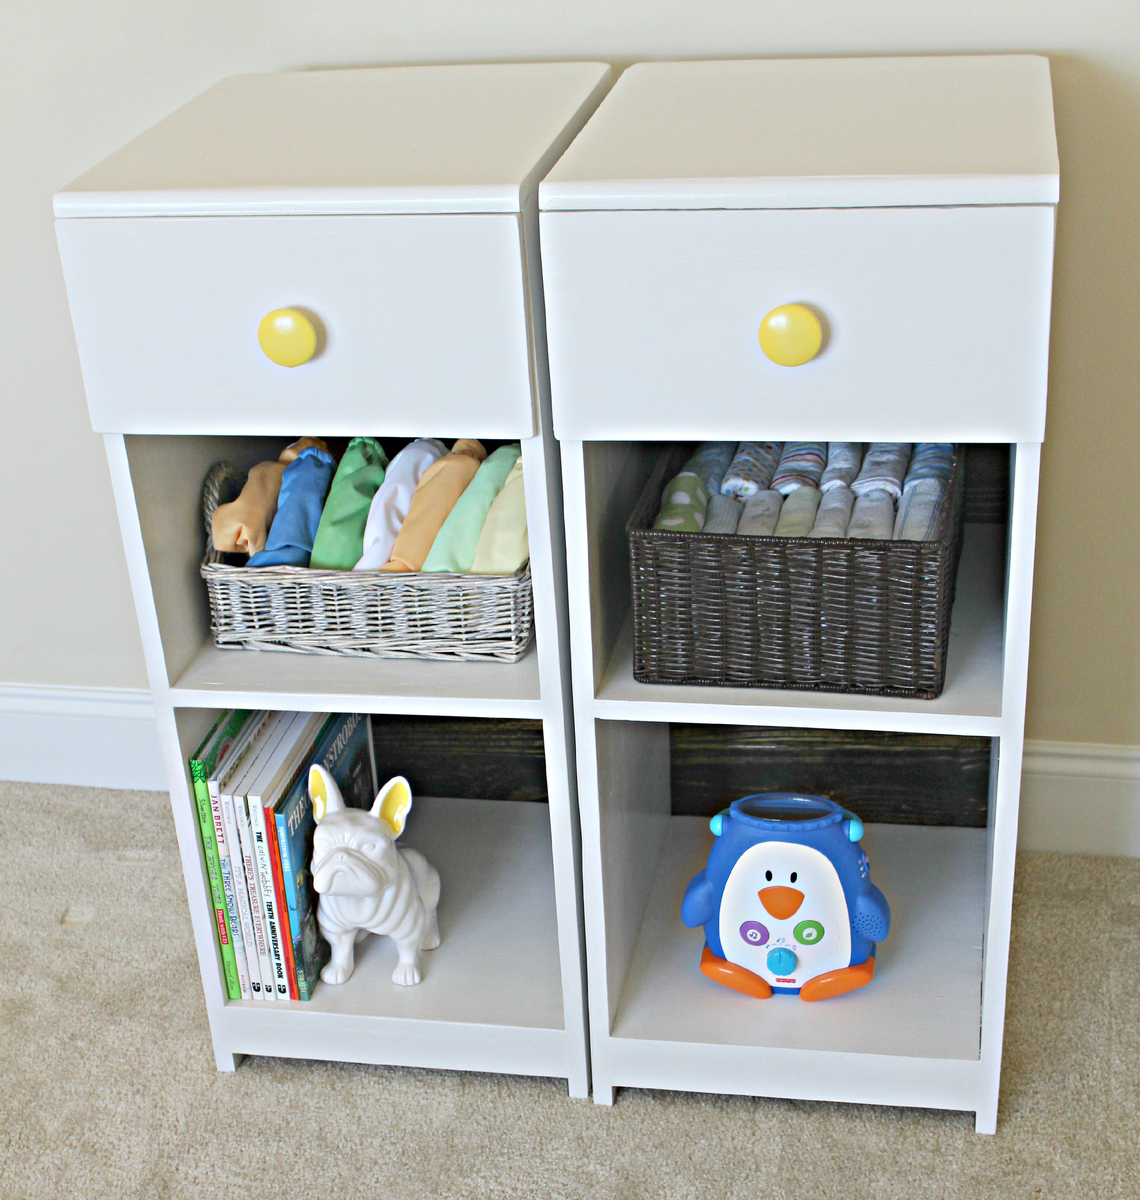
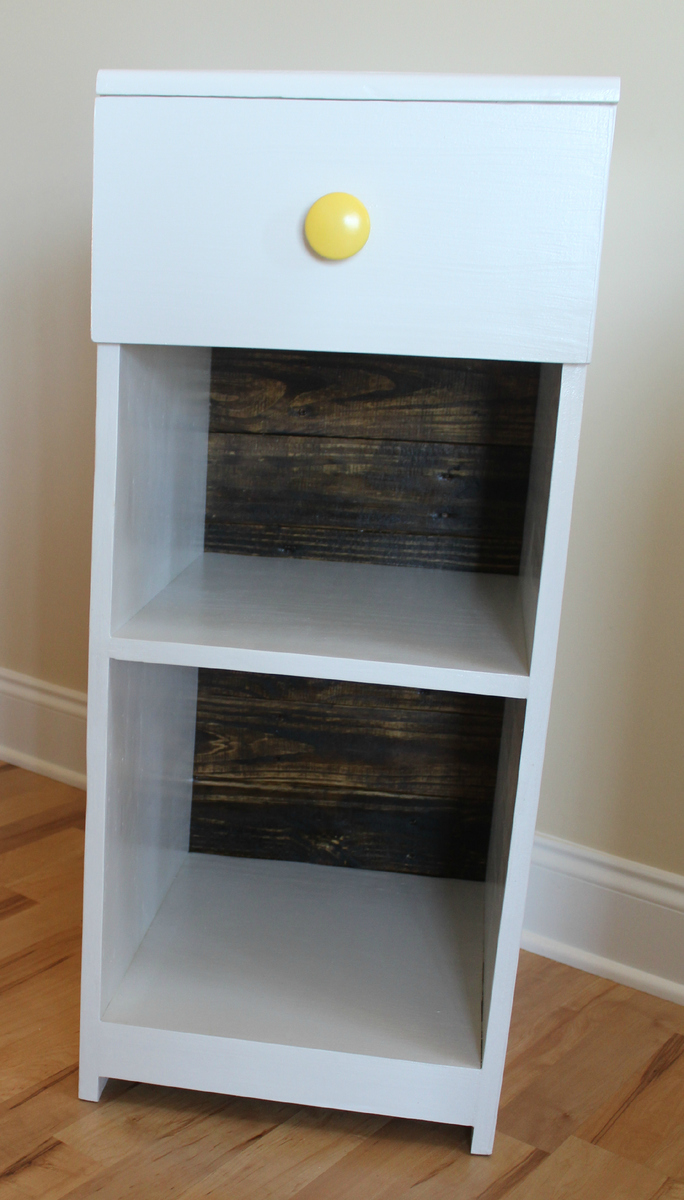
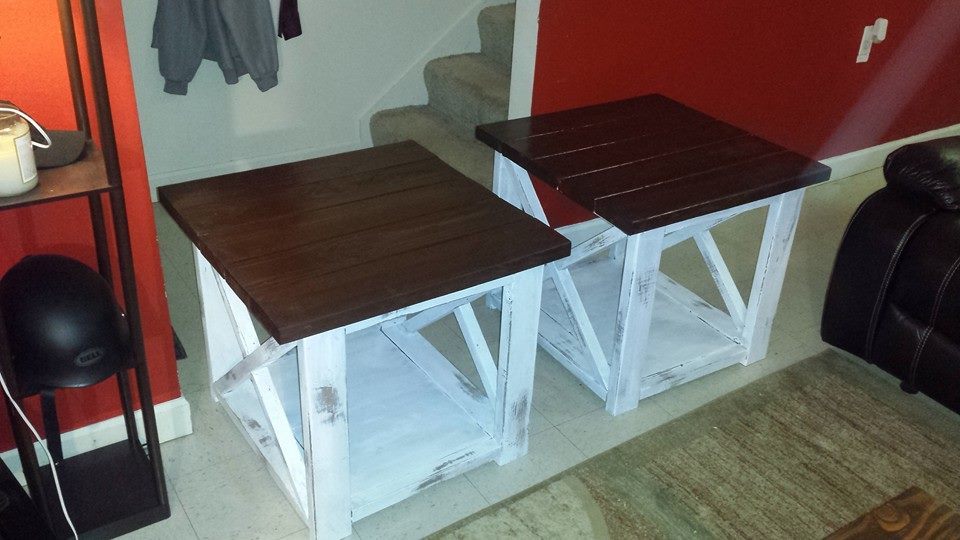
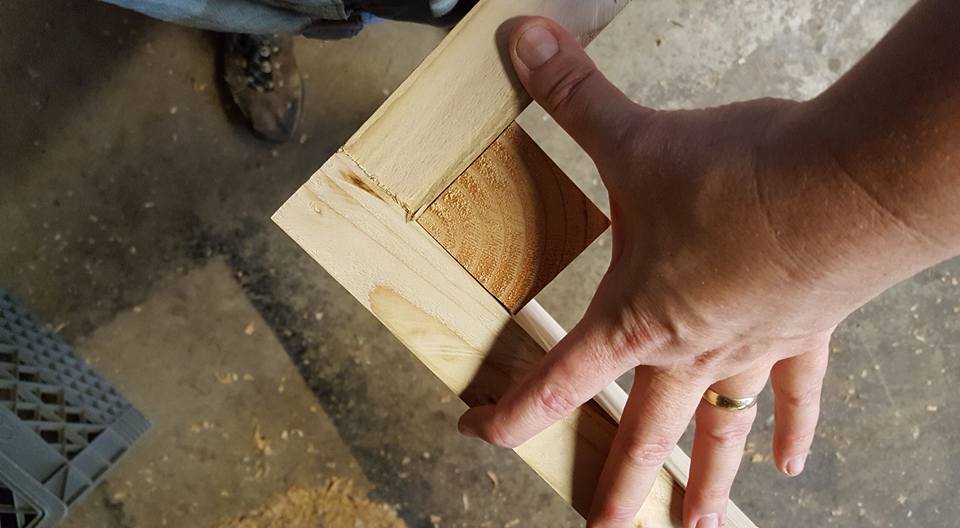
Madison Changing Table: Part 1 (Side Bases)
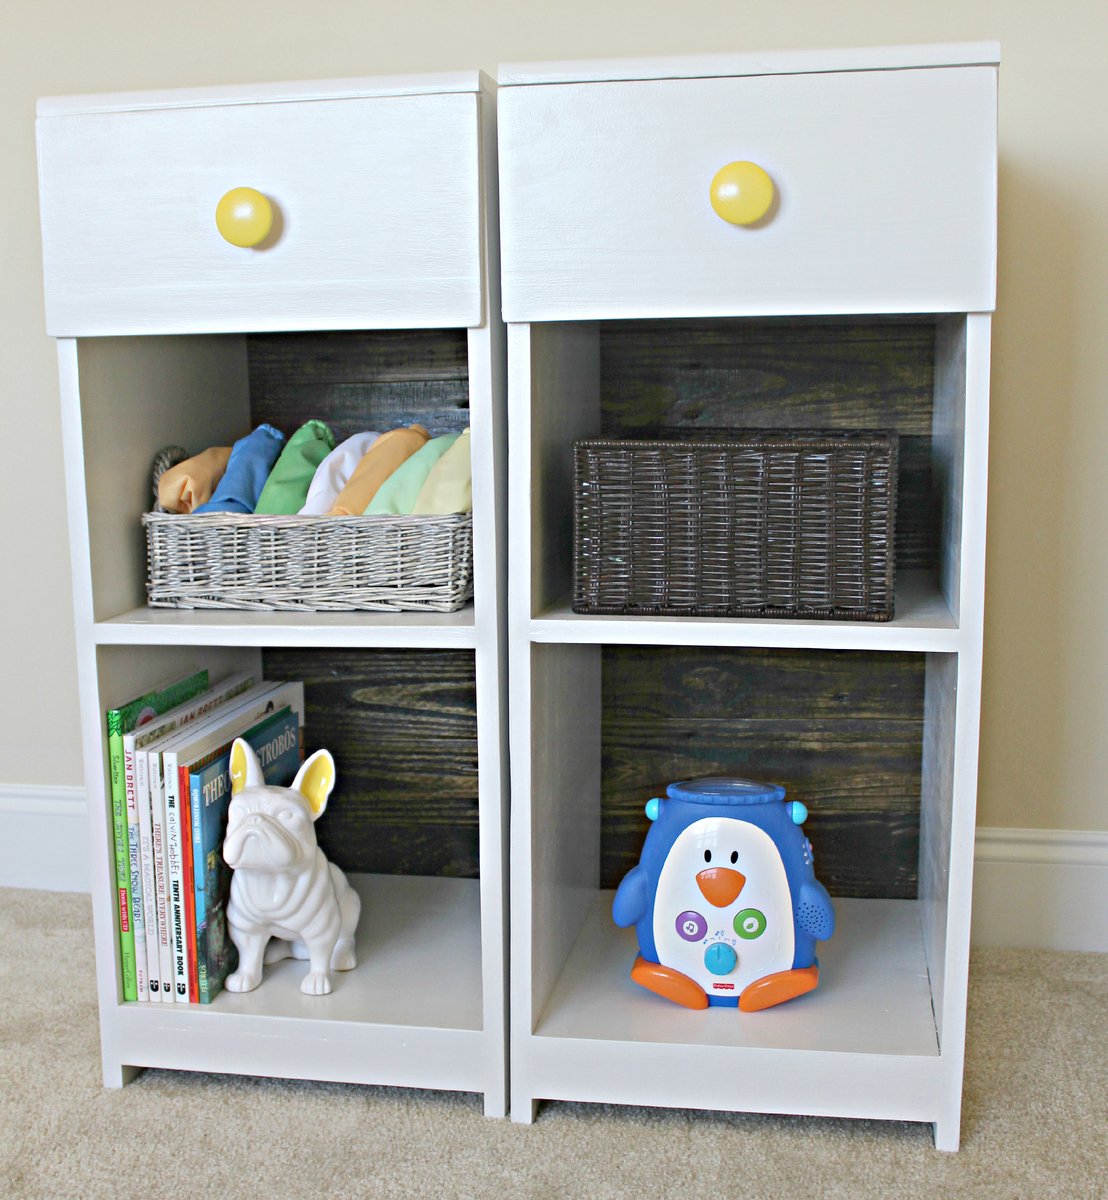
Still working on part 2 and part 3 of this project. We've been eyeballing this project for awhile and are so excited with the results! We love that we can potentially use these as bedside tables in the future.
We wrote out how we did everything on the blog: http://thehuth.blogspot.com/2012/10/madison-changing-table-part-1-side-…
Built from Plan(s)
Estimated Cost
$60 (for both tables)
Estimated Time Investment
Weekend Project (10-20 Hours)
Finish Used
Behr Irish Mist Paint and Minwax Satin Polycrylic
Recommended Skill Level
Beginner
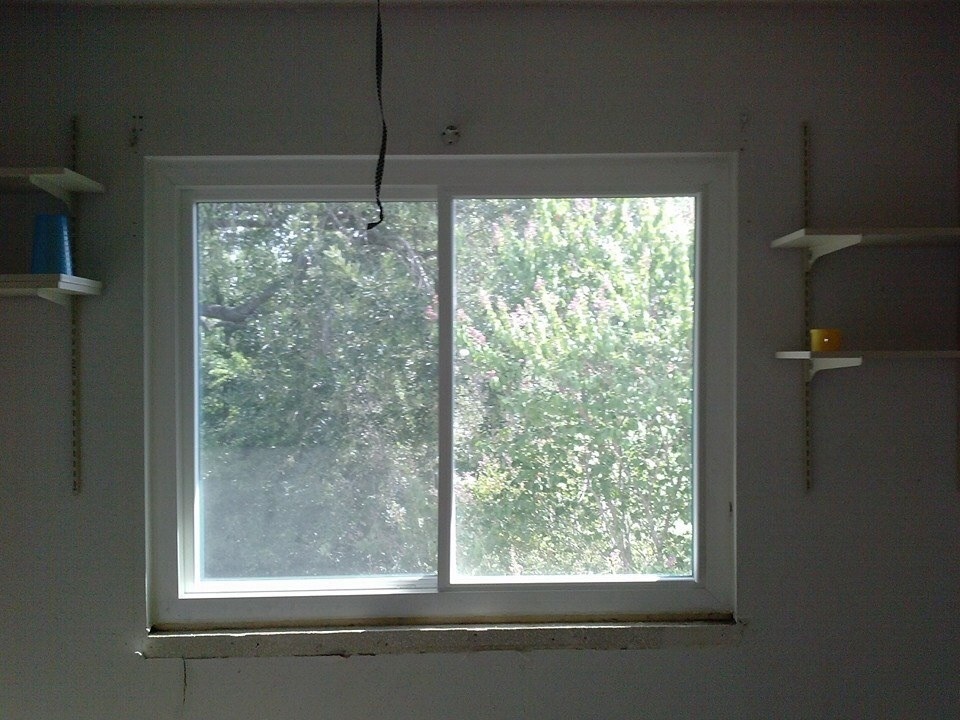
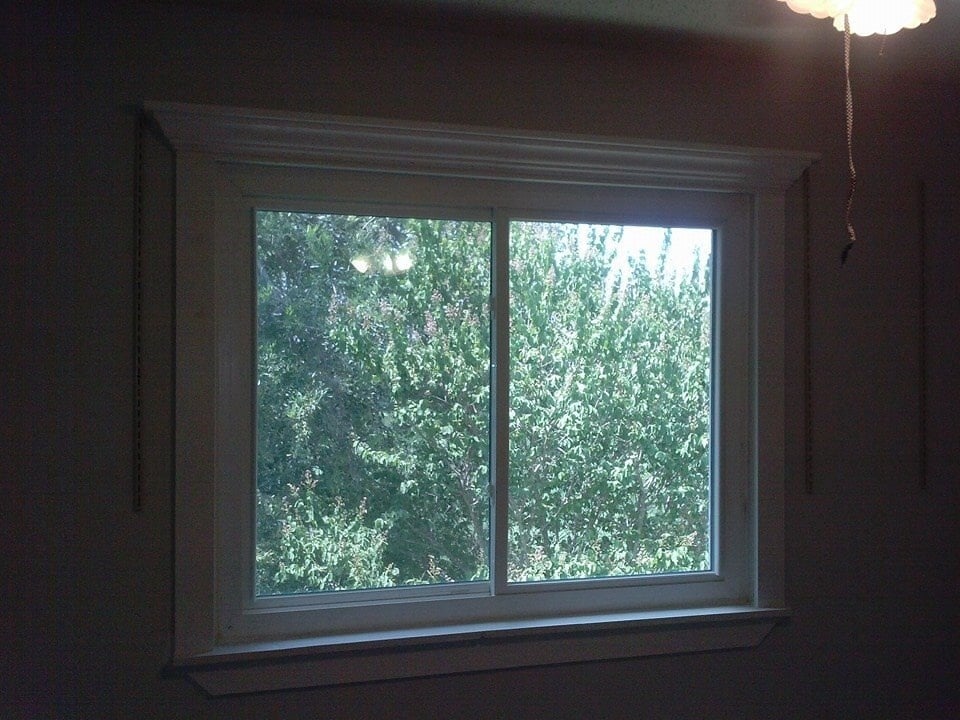
Crown ledges used as trim for window!
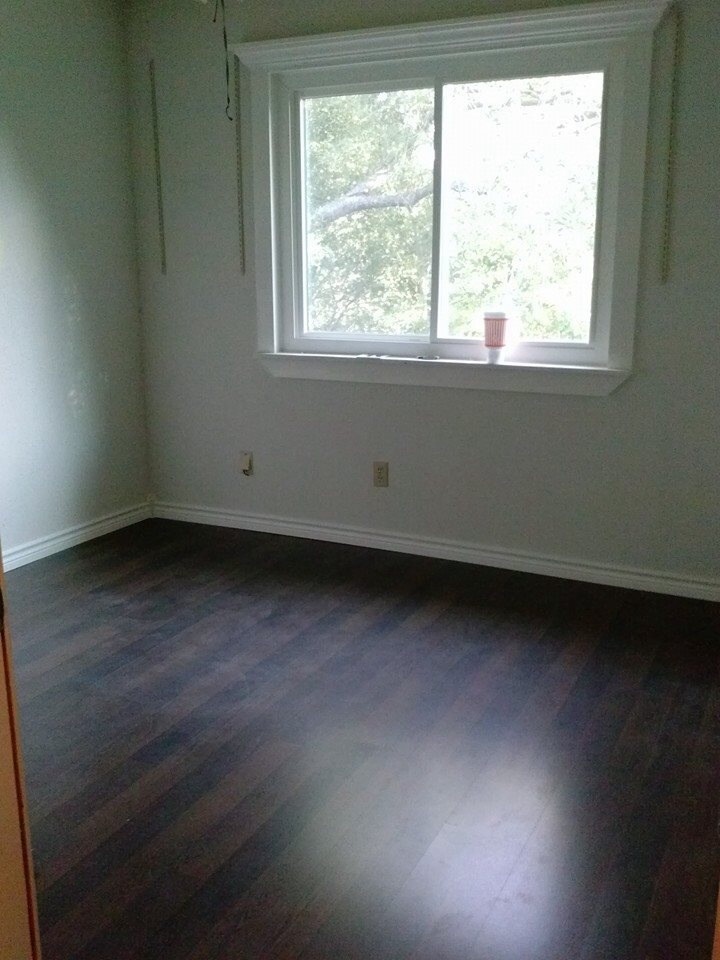
I took the plan for the crown ledges and put it above the window then added pre primed 1x4s as the trim also.

Built from Plan(s)
Estimated Time Investment
Afternoon Project (3-6 Hours)
Recommended Skill Level
Intermediate
First Project

First try at building something. Start up cost in tools is not reflected in the estimated cost. Learned a couple of valuable lessons in cut accuracy and order of work. For us, we will buy/cut/sand/paint/assemble. Dont let Home Depot cut your plywood. They did a terrible job.
Estimated Cost
$30
Estimated Time Investment
Day Project (6-9 Hours)
Finish Used
Valspar Furniture Paint
Recommended Skill Level
Beginner
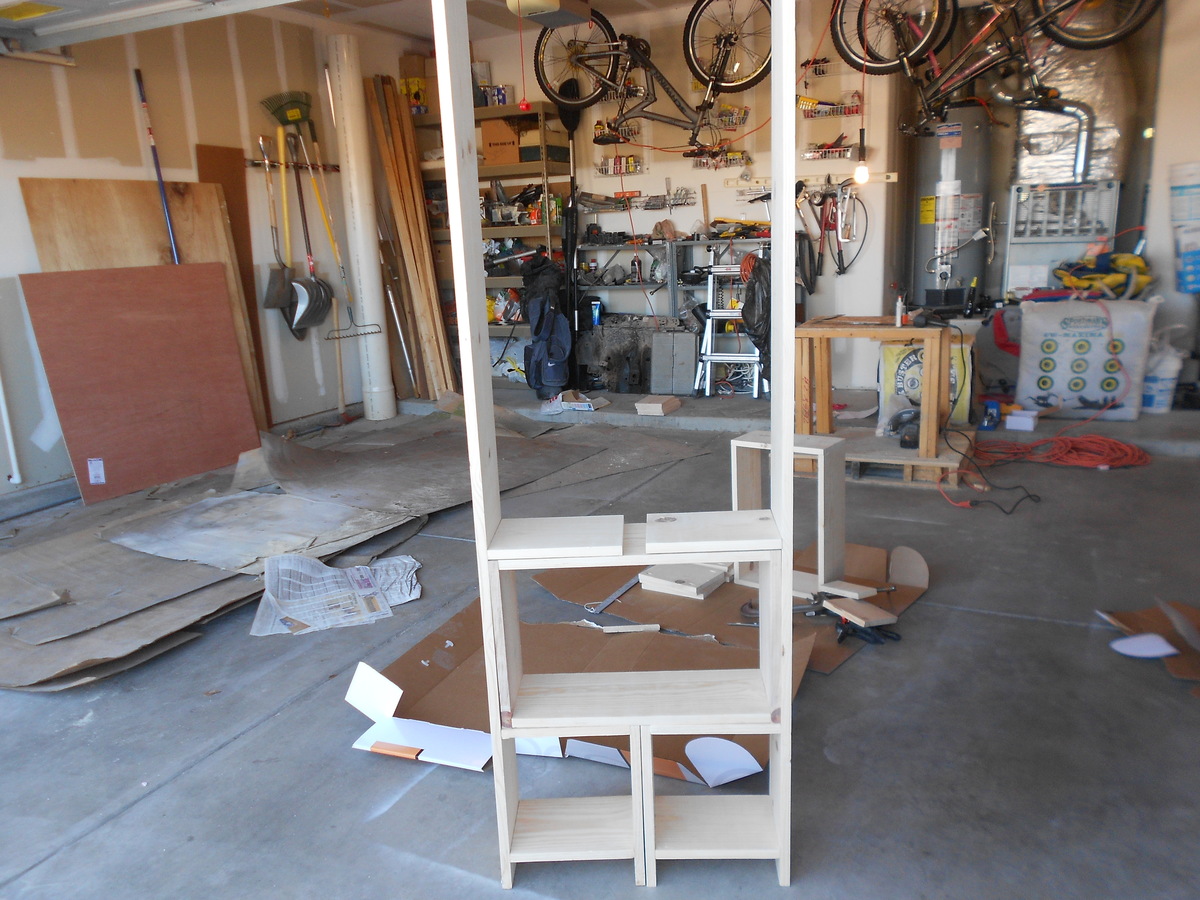
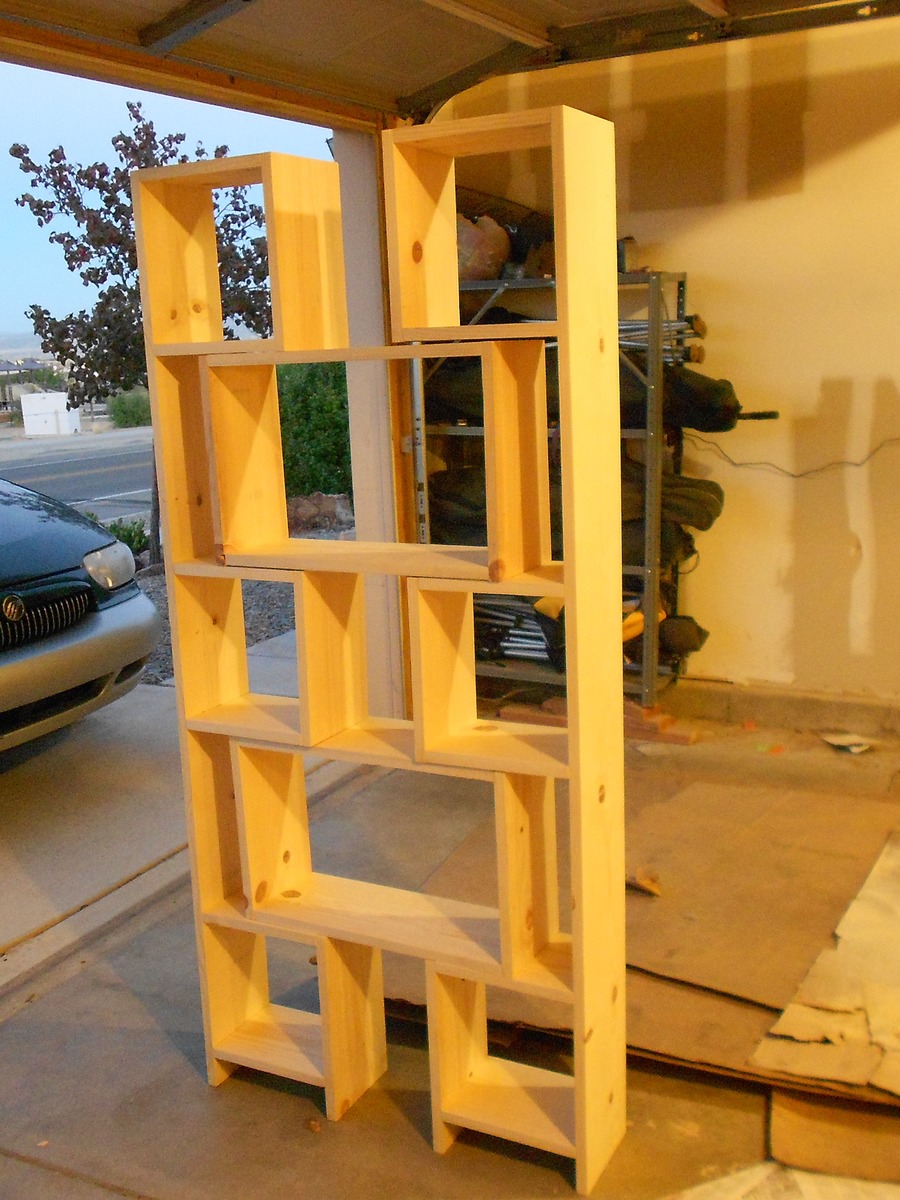
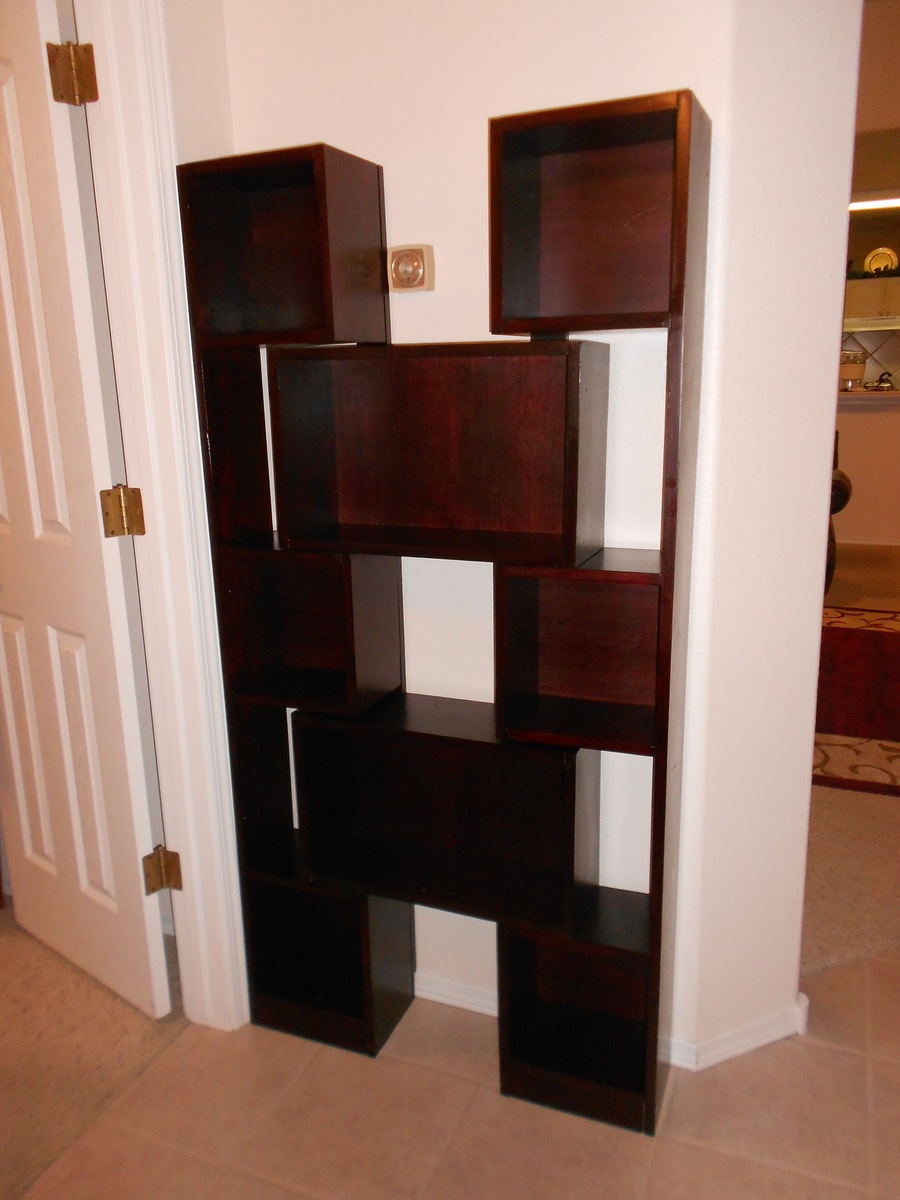
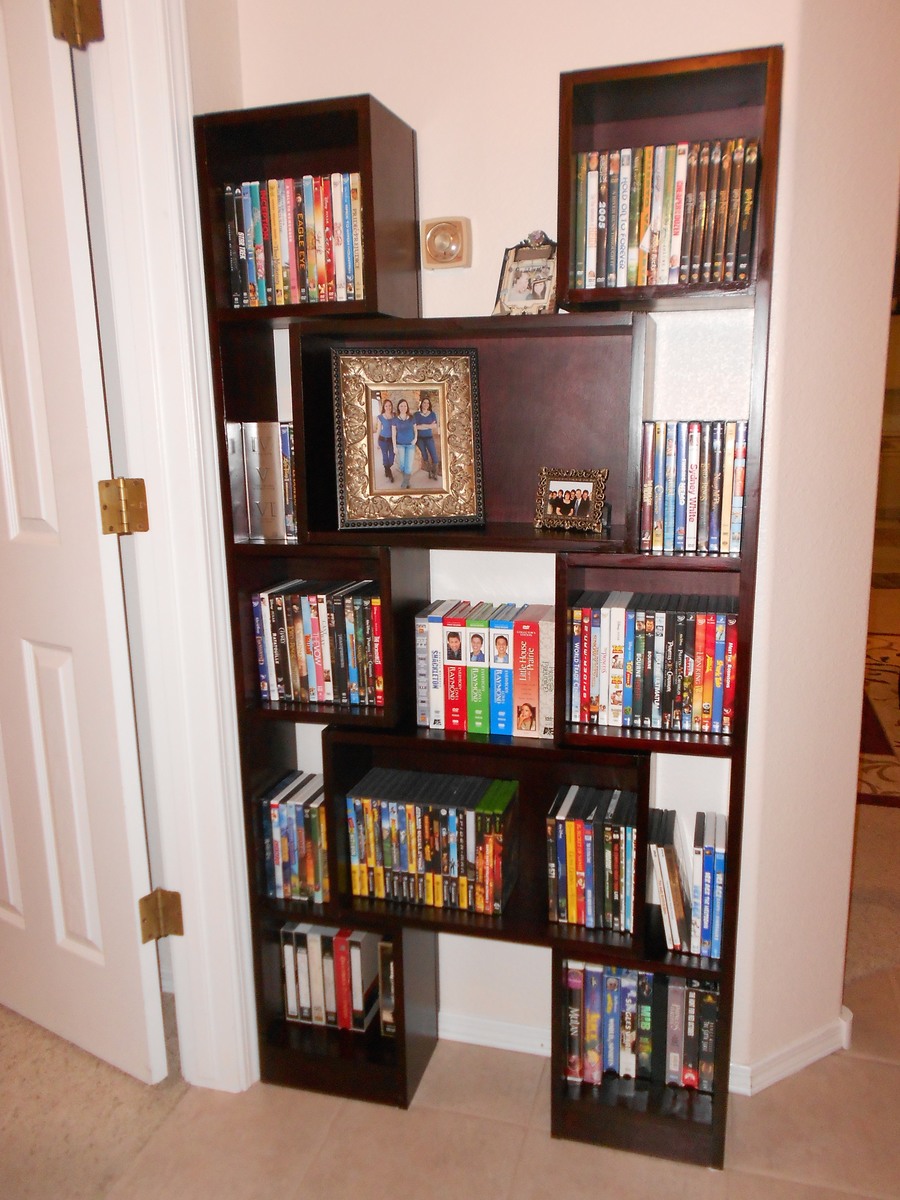
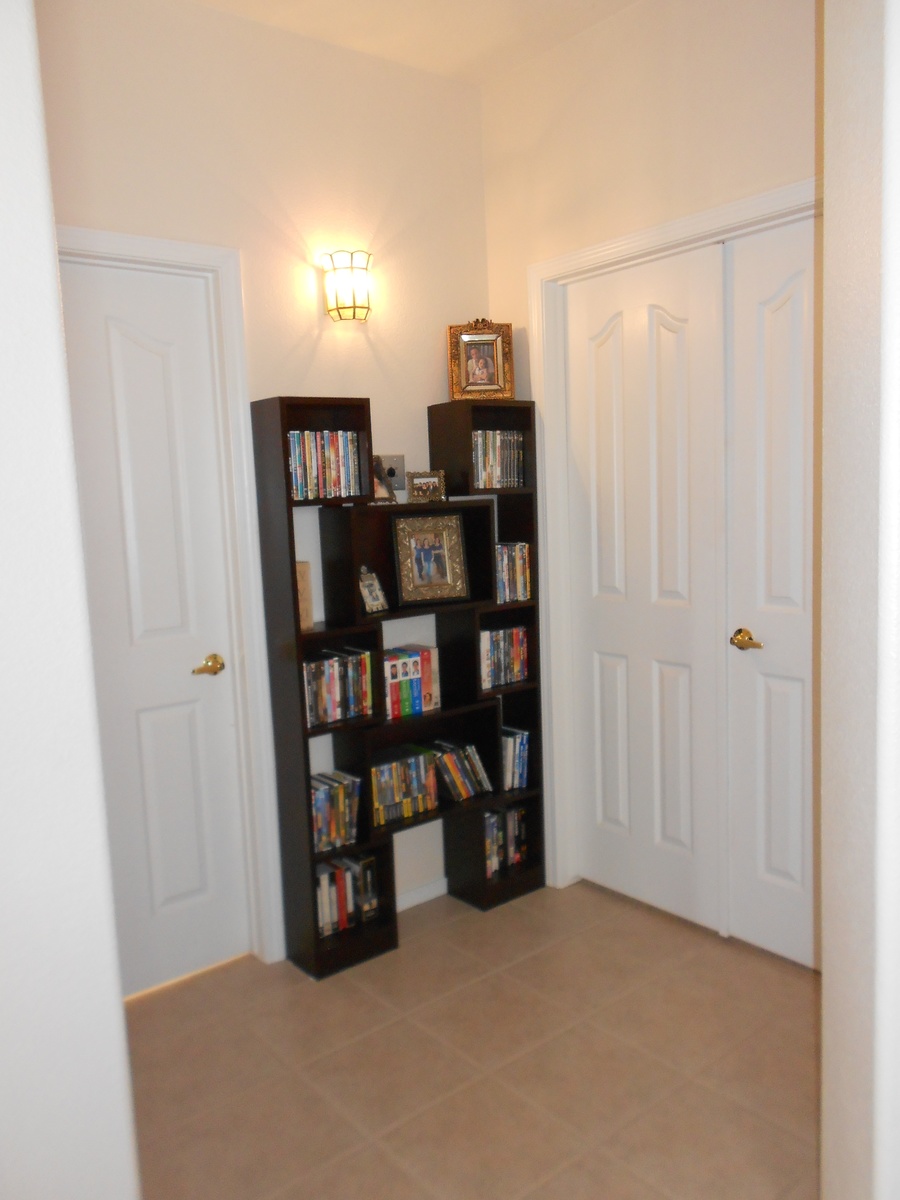
Fits around my thermostat!!! Downsized Puzzle Bookcase for DVD Storage
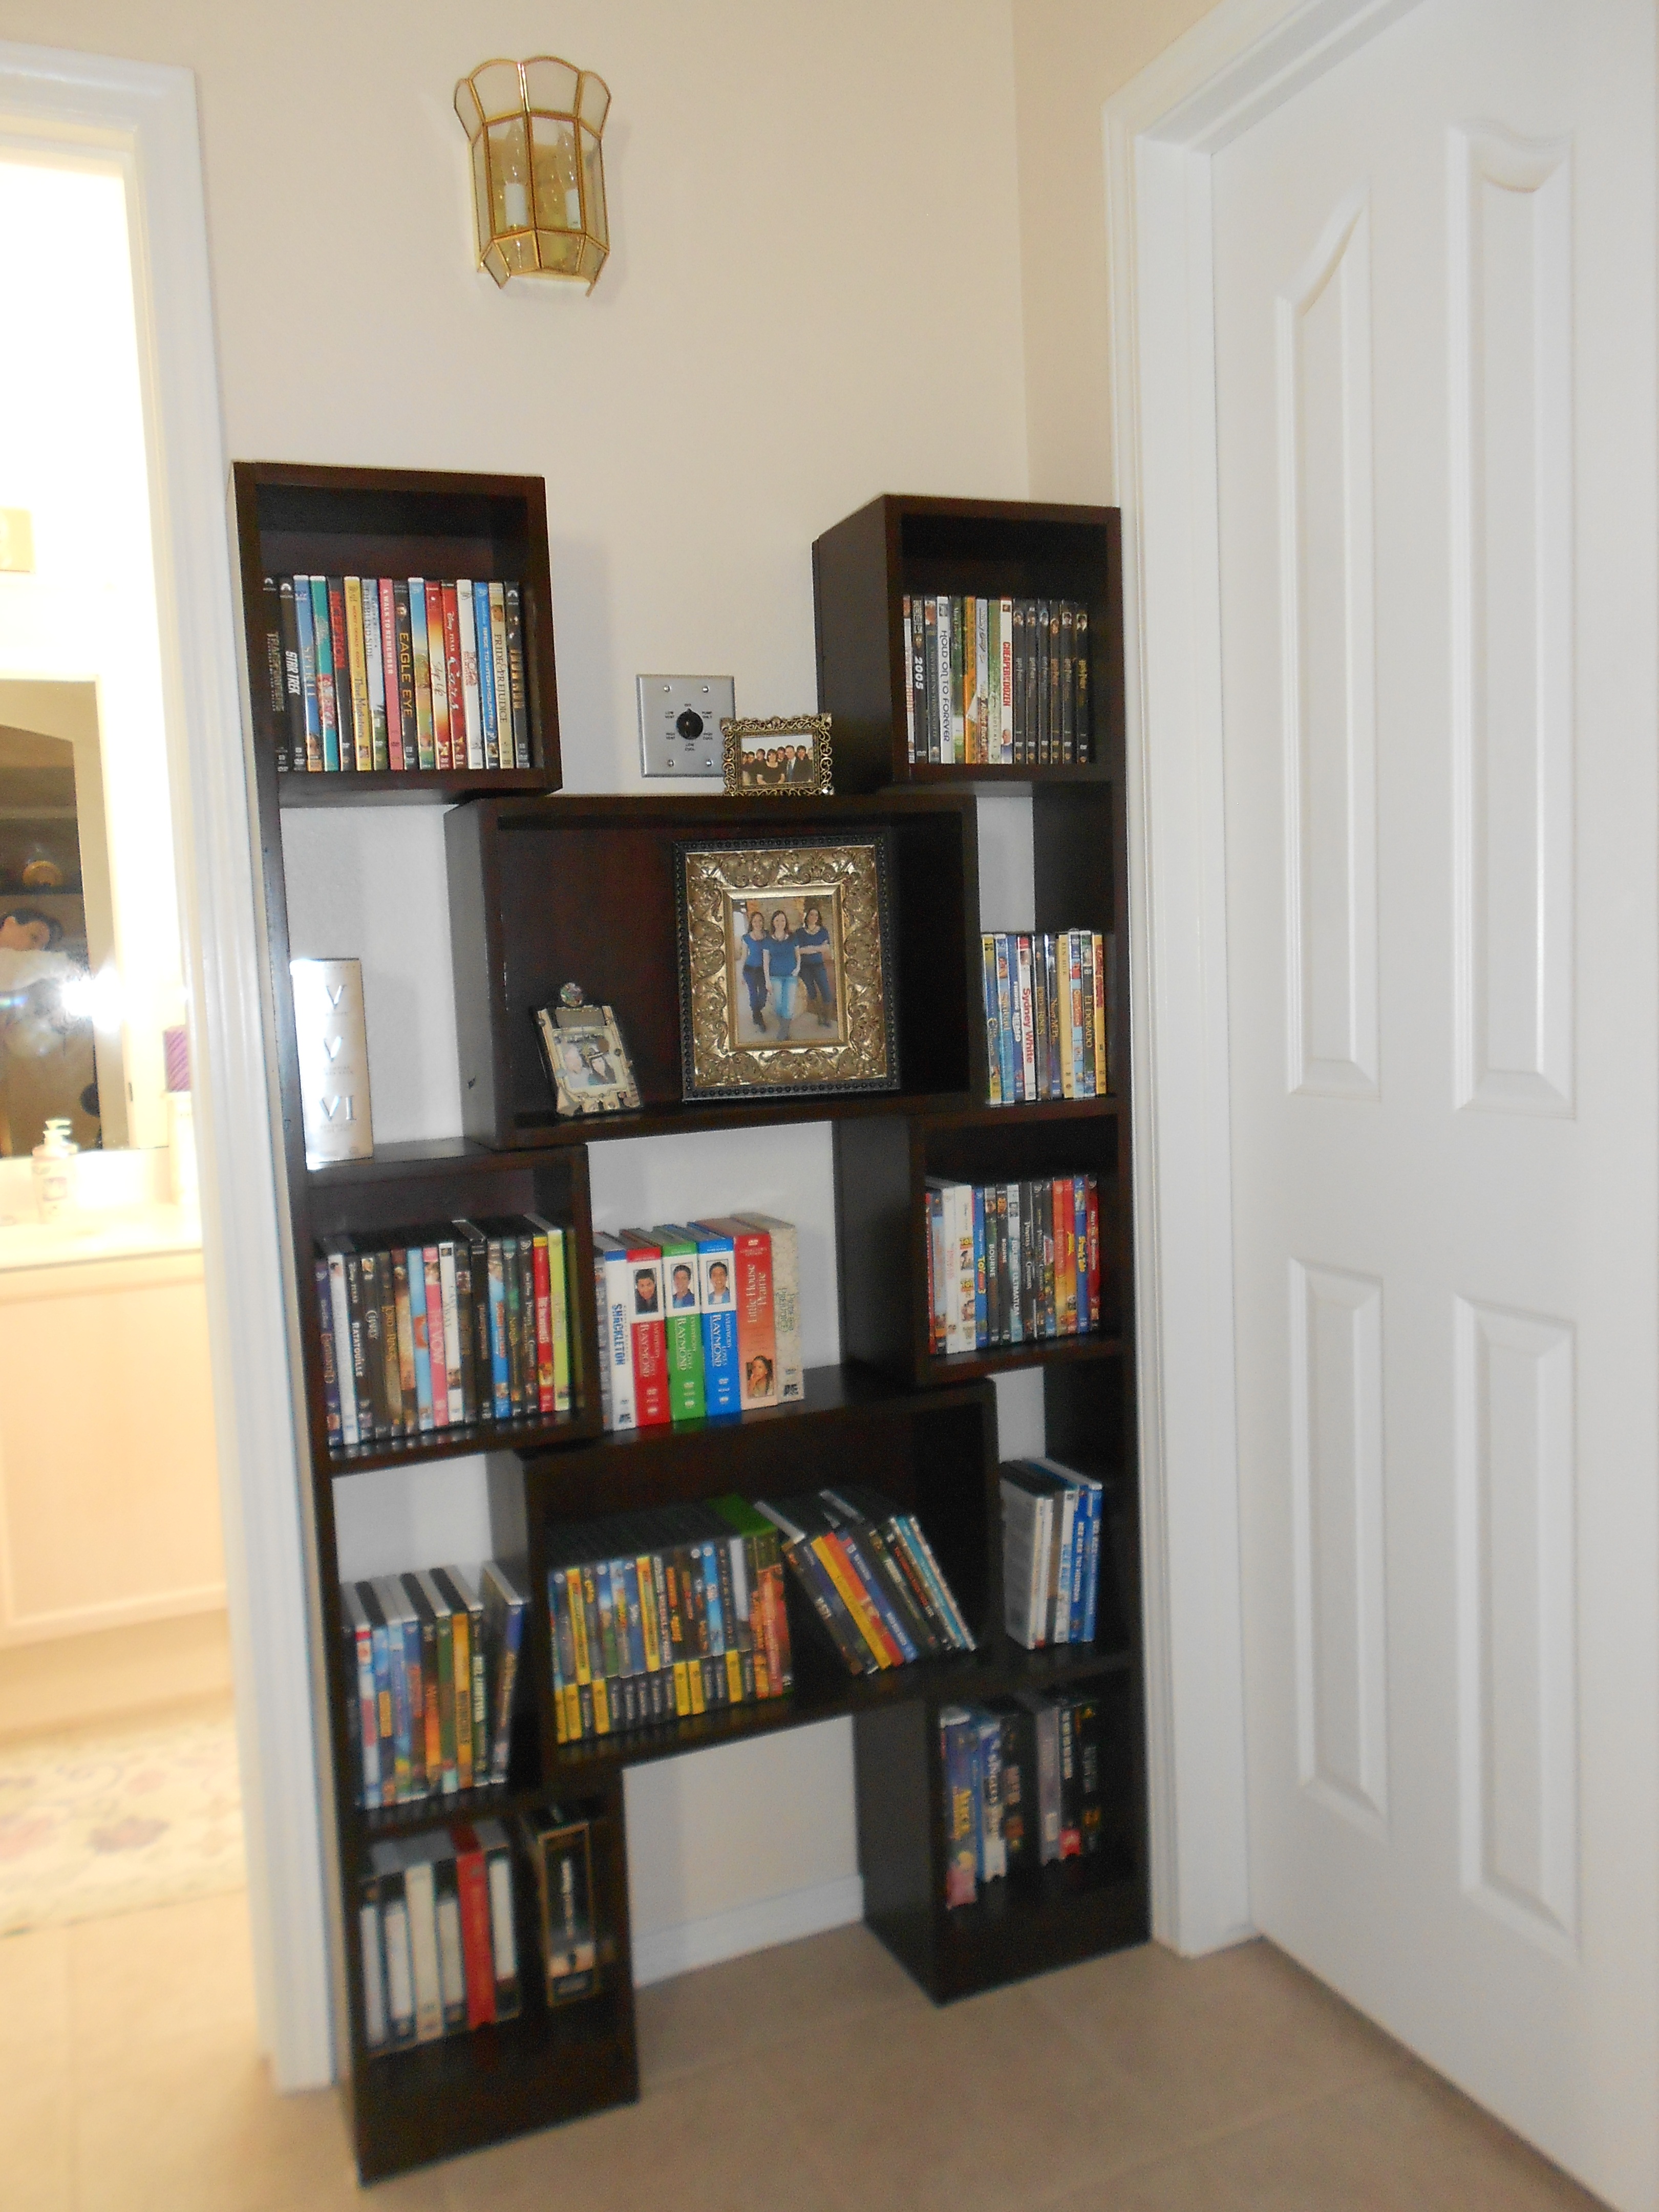
This was my first build and I learned a lot, like it’s better to just invest in some decent clamps at the beginning of the project rather than waiting until near completion. Anyone with any experience at all and with more than 2 clamps could have finished this project in a fraction of the time. However, I enjoyed every minute of it. This project took a week to complete only because of the wait time between finishes. The bookcase itself went together surprisingly fast, especially once I got more clamps. The hardest part was making it square. This plan was the perfect solution for my thermostat placement problem. I had been searching high and low for DVD storage to fit within the confines of my space. It had to be low profile to leave the doorway clear and it had to allow the thermostat on the wall to be accessible, yet big enough and wide enough to fit all our DVDs. This puzzle design couldn’t have been any more perfect. I was so excited to find it. I just made a smaller version. It expands to exactly the space I need. Many thanks to Ana and this wonderful website! I have spent countless hours studying and reading on this website. I am now thinking about building in every spare minute I have!
Built from Plan(s)
Estimated Cost
$60
Estimated Time Investment
Week Long Project (20 Hours or More)
Finish Used
Minwax Red Elm Gel Stain and 2 coats Minwax Bombay Mahogany Poly Shades
Recommended Skill Level
Starter Project
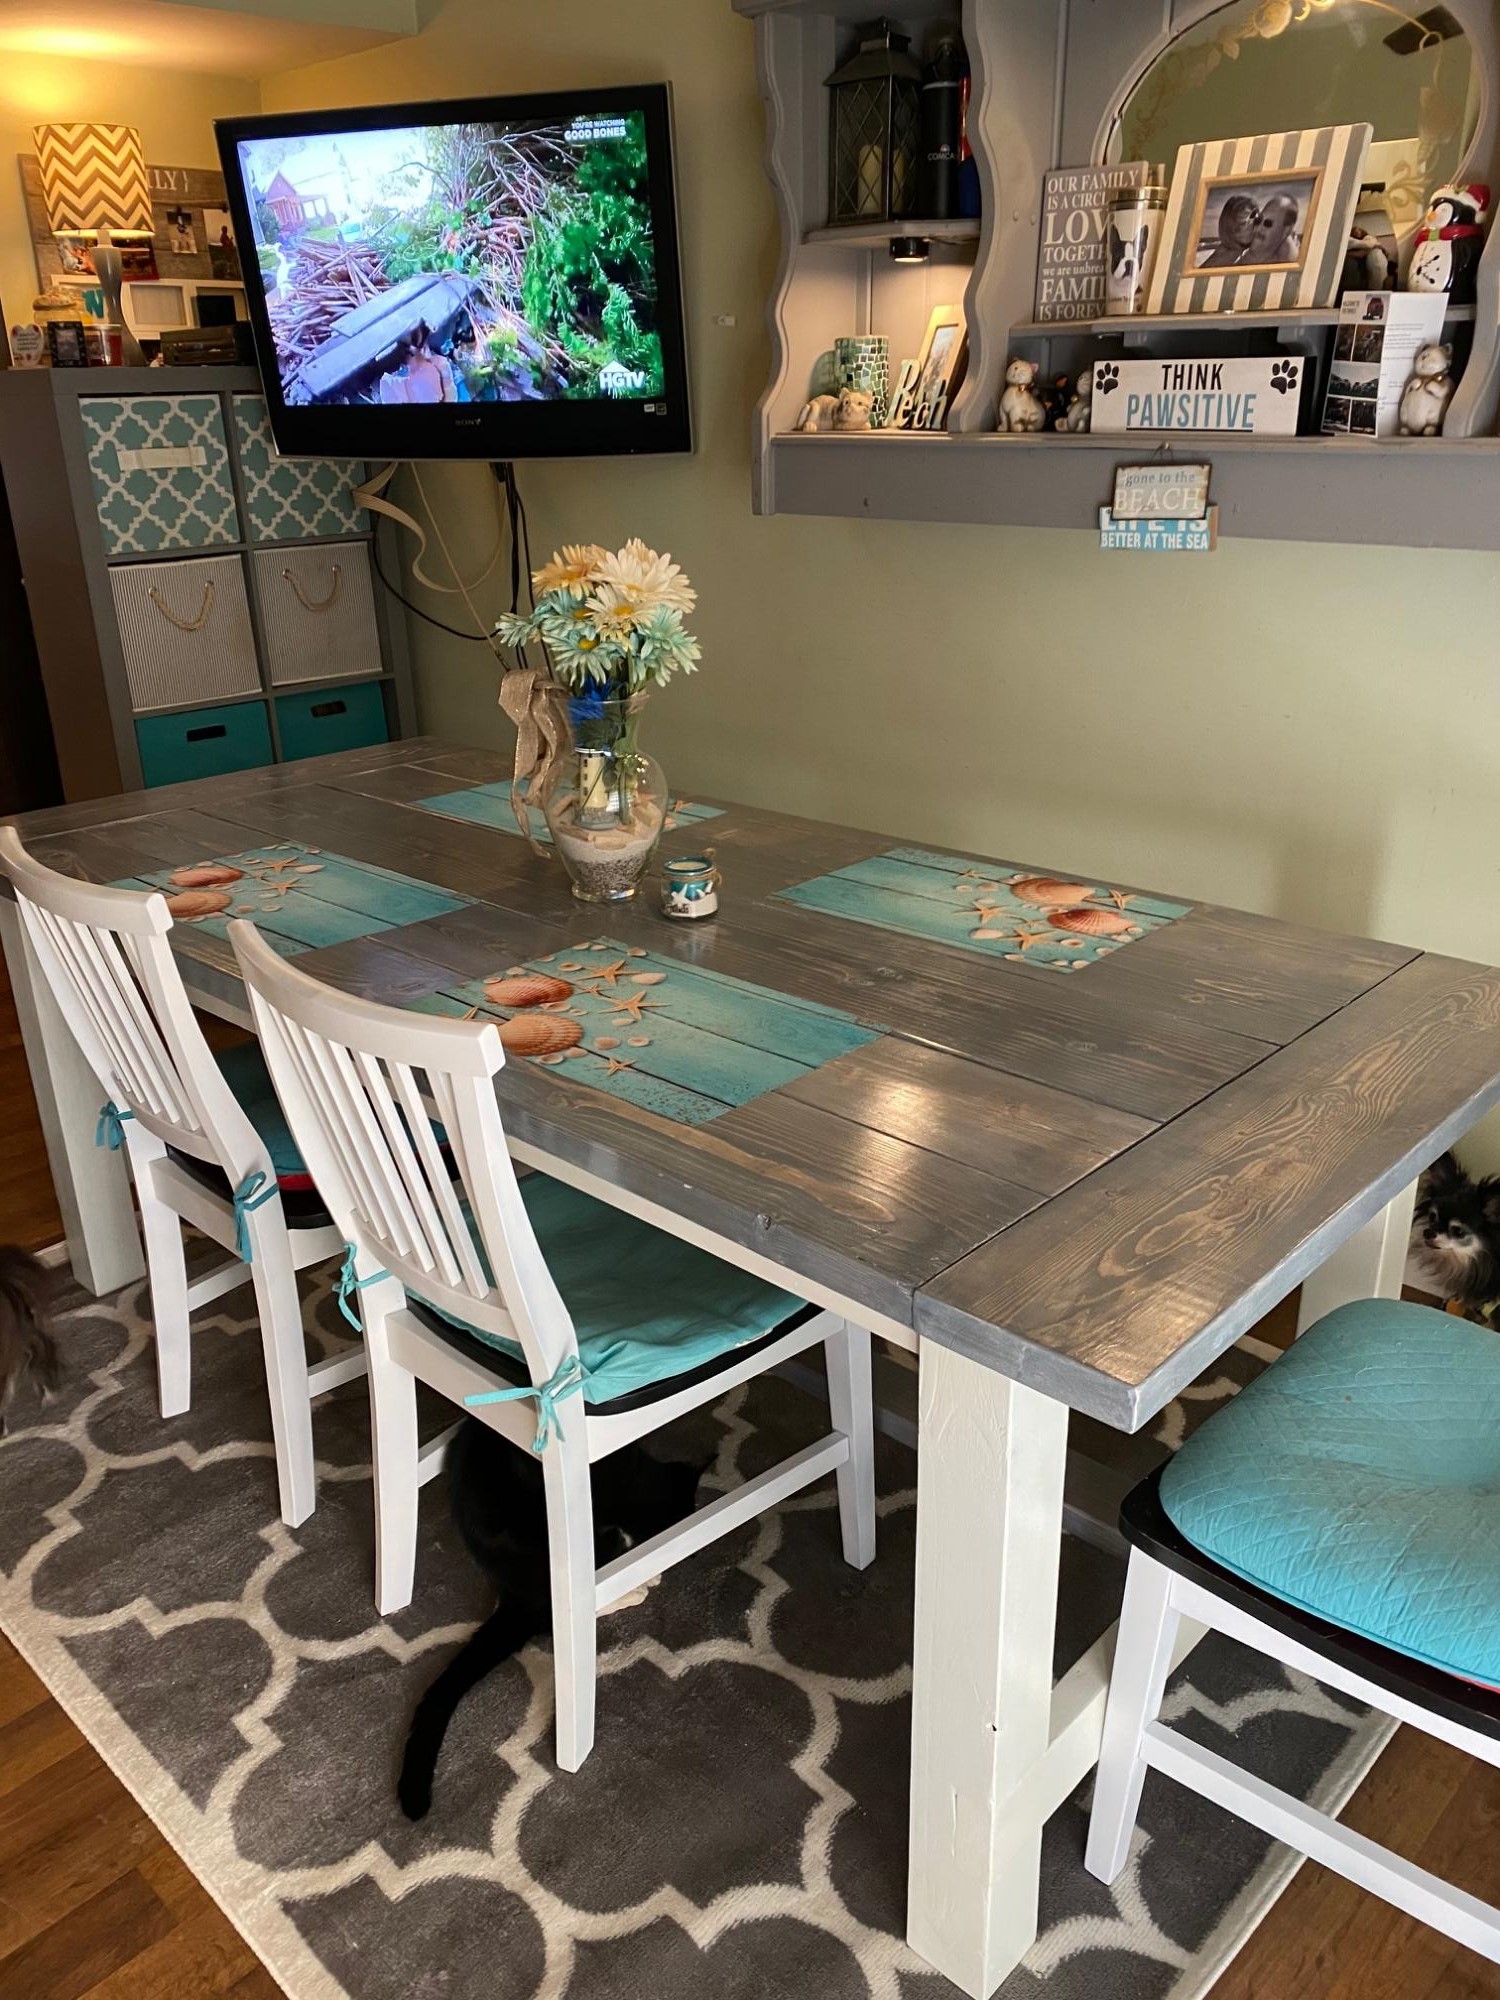
$157 Custom Farmhouse Table with Bolted Plank Top - Restoration Hardware Inspired with Salvage Grey Wash Finish
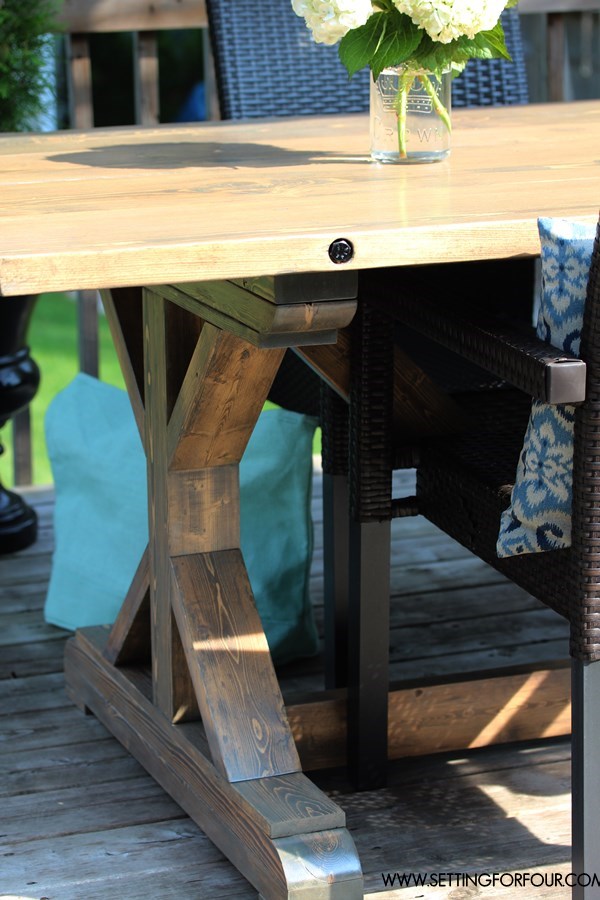
My family needed a new outdoor dining table so my husband and I made this DIY Restoration Hardware Inspired Farmhouse table with Salvage Grey Wash Finish! I combined two popular RH table styles, the rectangular X-base Table and the Brickmaker’s Table, to come up with this distinctive innovative design: an X-base bottom with an industrial bolted plank table top! This will blow your mind....this table cost us only $157.00 to make, just a small fraction of the the RH $4690.00 price tag for their tables! We started with Ana White's Farmhouse Table plans, added inset lag bolts to the planked top and then gave our table a customized salvage grey wash finish to add a touch of gorgeous grey to a dark walnut base layer. We've had many fun dinners on our large farmhouse table with family and friends! See my blog post for all of the steps and materials!
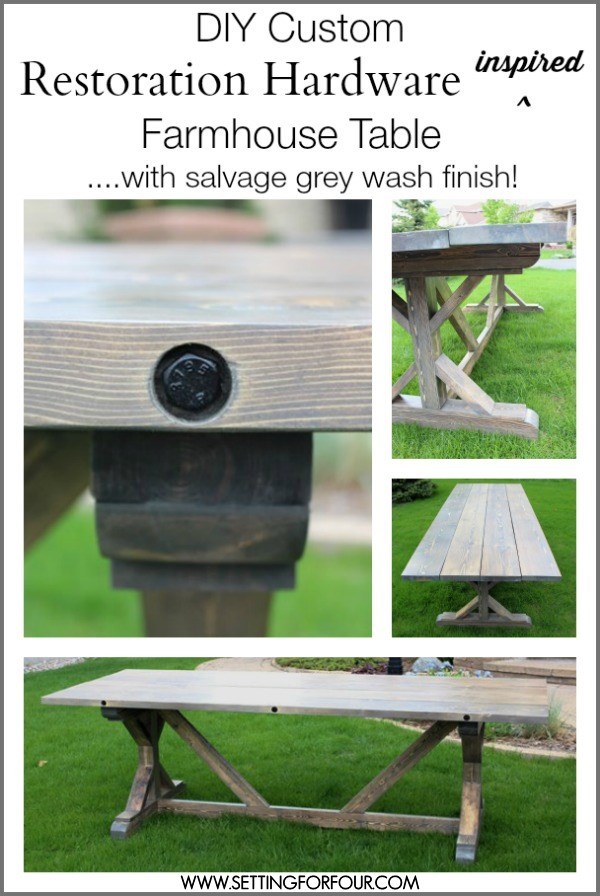

Built from Plan(s)
Estimated Cost
$157.00
Estimated Time Investment
Week Long Project (20 Hours or More)
Finish Used
Customized Salvage Grey Wash Finish.
Recommended Skill Level
Intermediate
Corner cubby unit
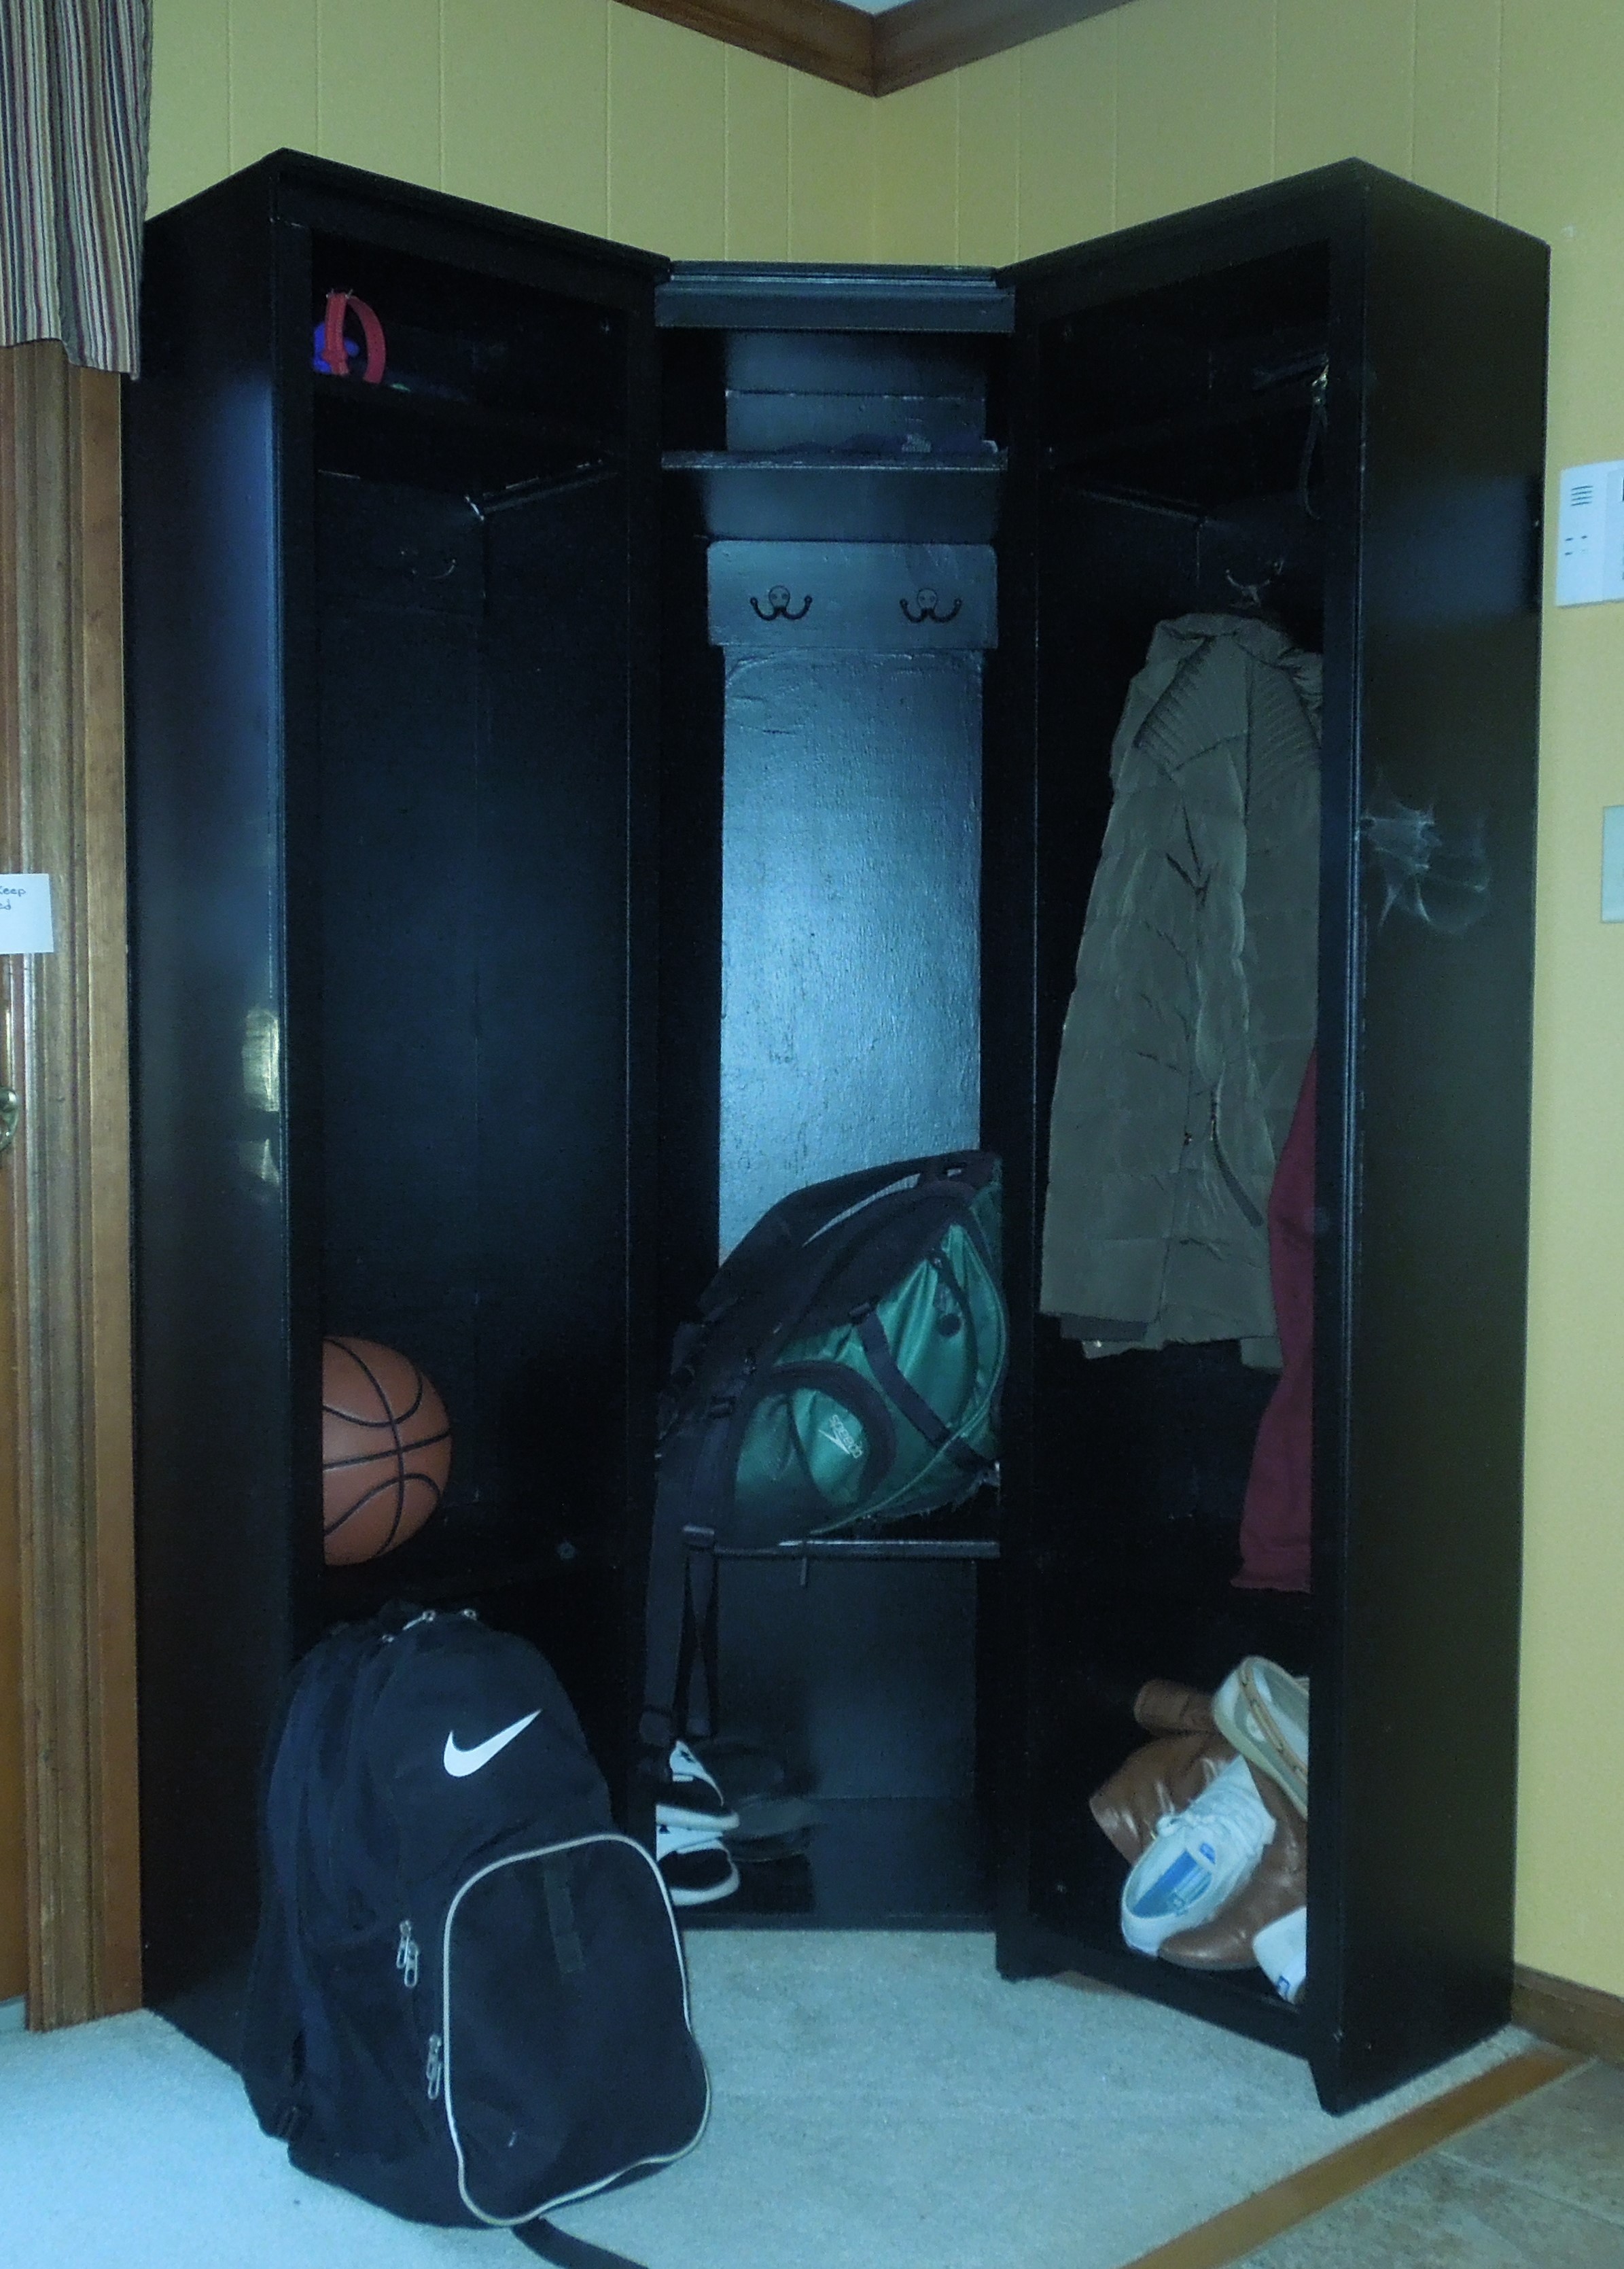
My daughter asked of I could make cubbies for three grandchildren, and the single unit on this site seemed perfect. After I made the first two we could see that there was not a good way to fit three into the designated space, so I decided to make a corner unit and bolt them together. They love it!
Built from Plan(s)
Estimated Cost
I spent about $300.
Estimated Time Investment
Week Long Project (20 Hours or More)
Finish Used
black enamel
Recommended Skill Level
Intermediate
Farmhouse King Size Bed
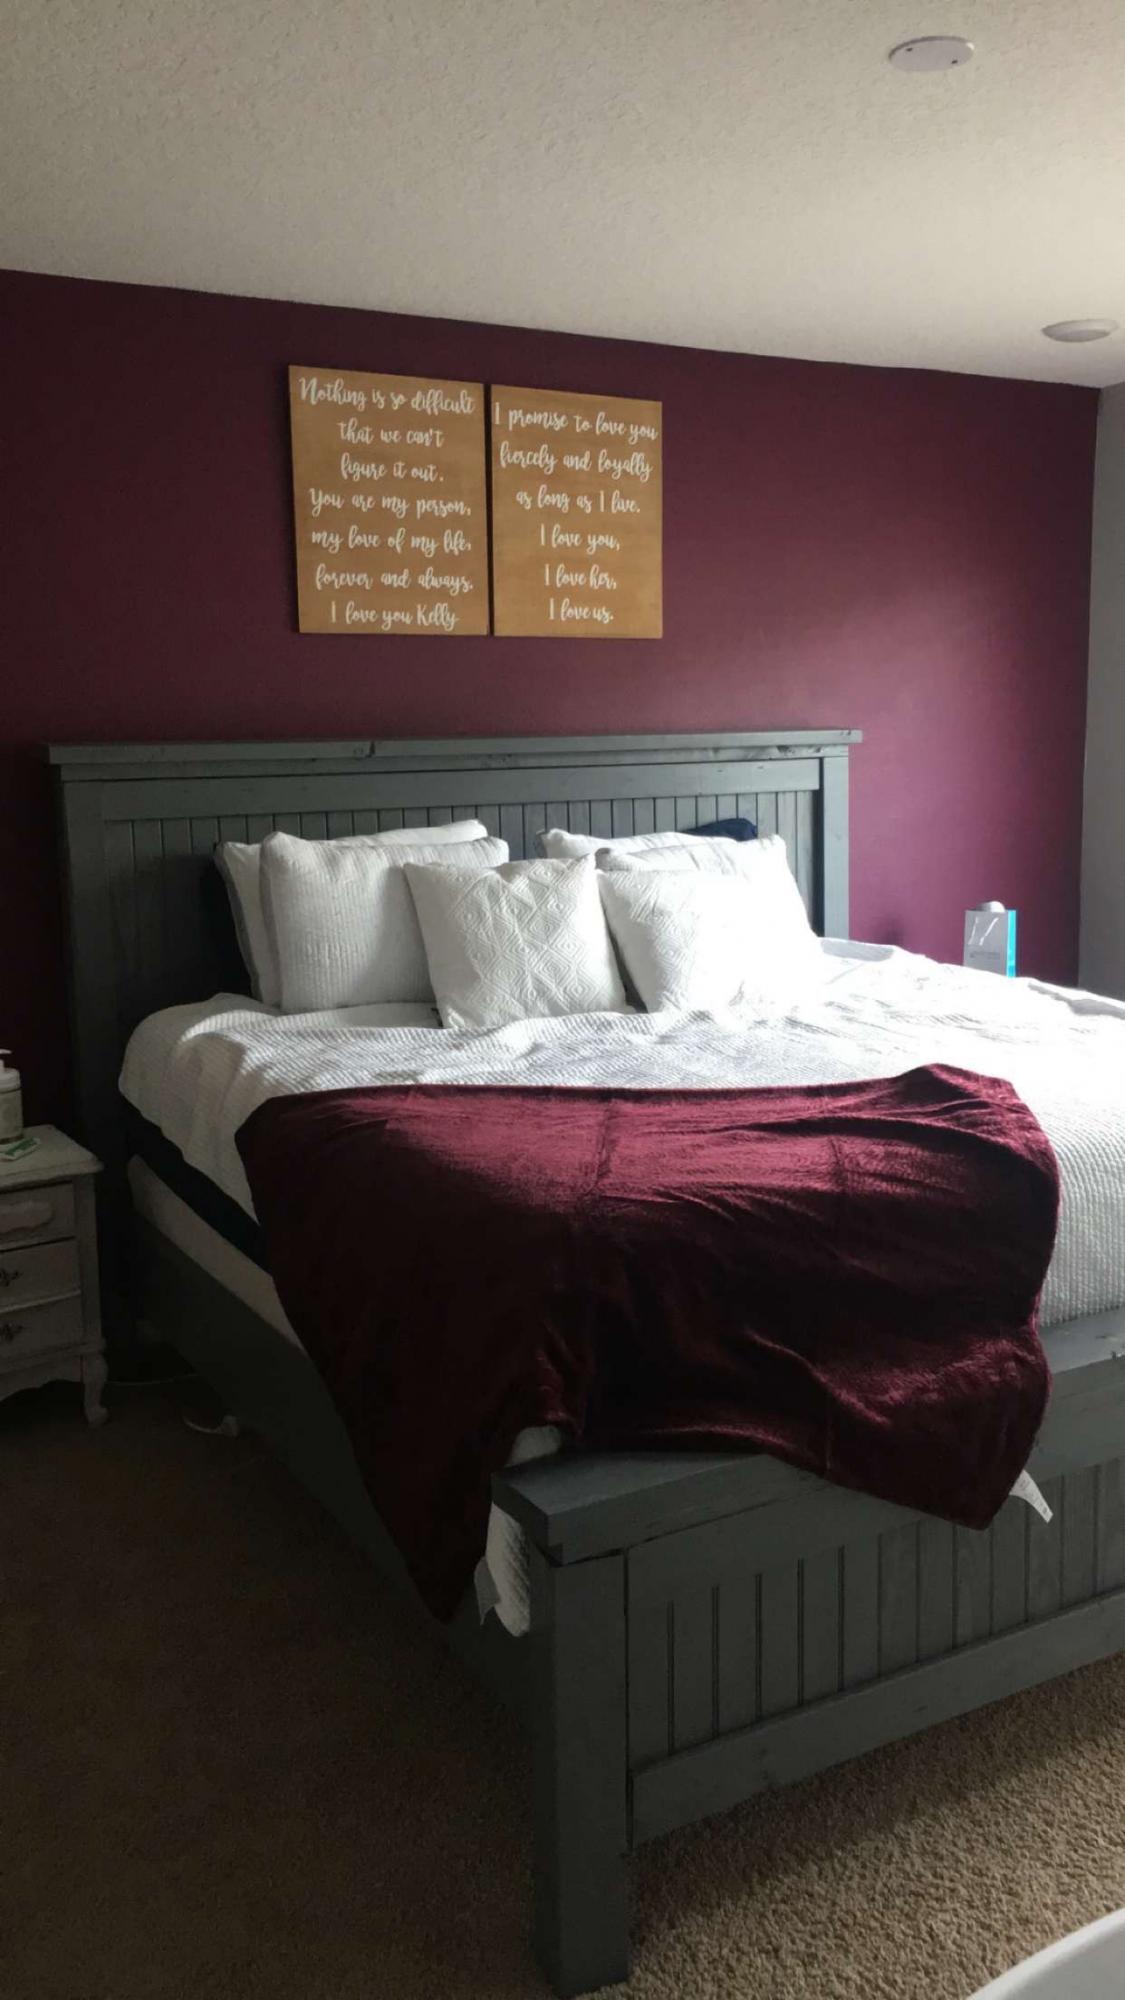
Made from the plans
Built from Plan(s)
Pallet Shelf Spice Rack
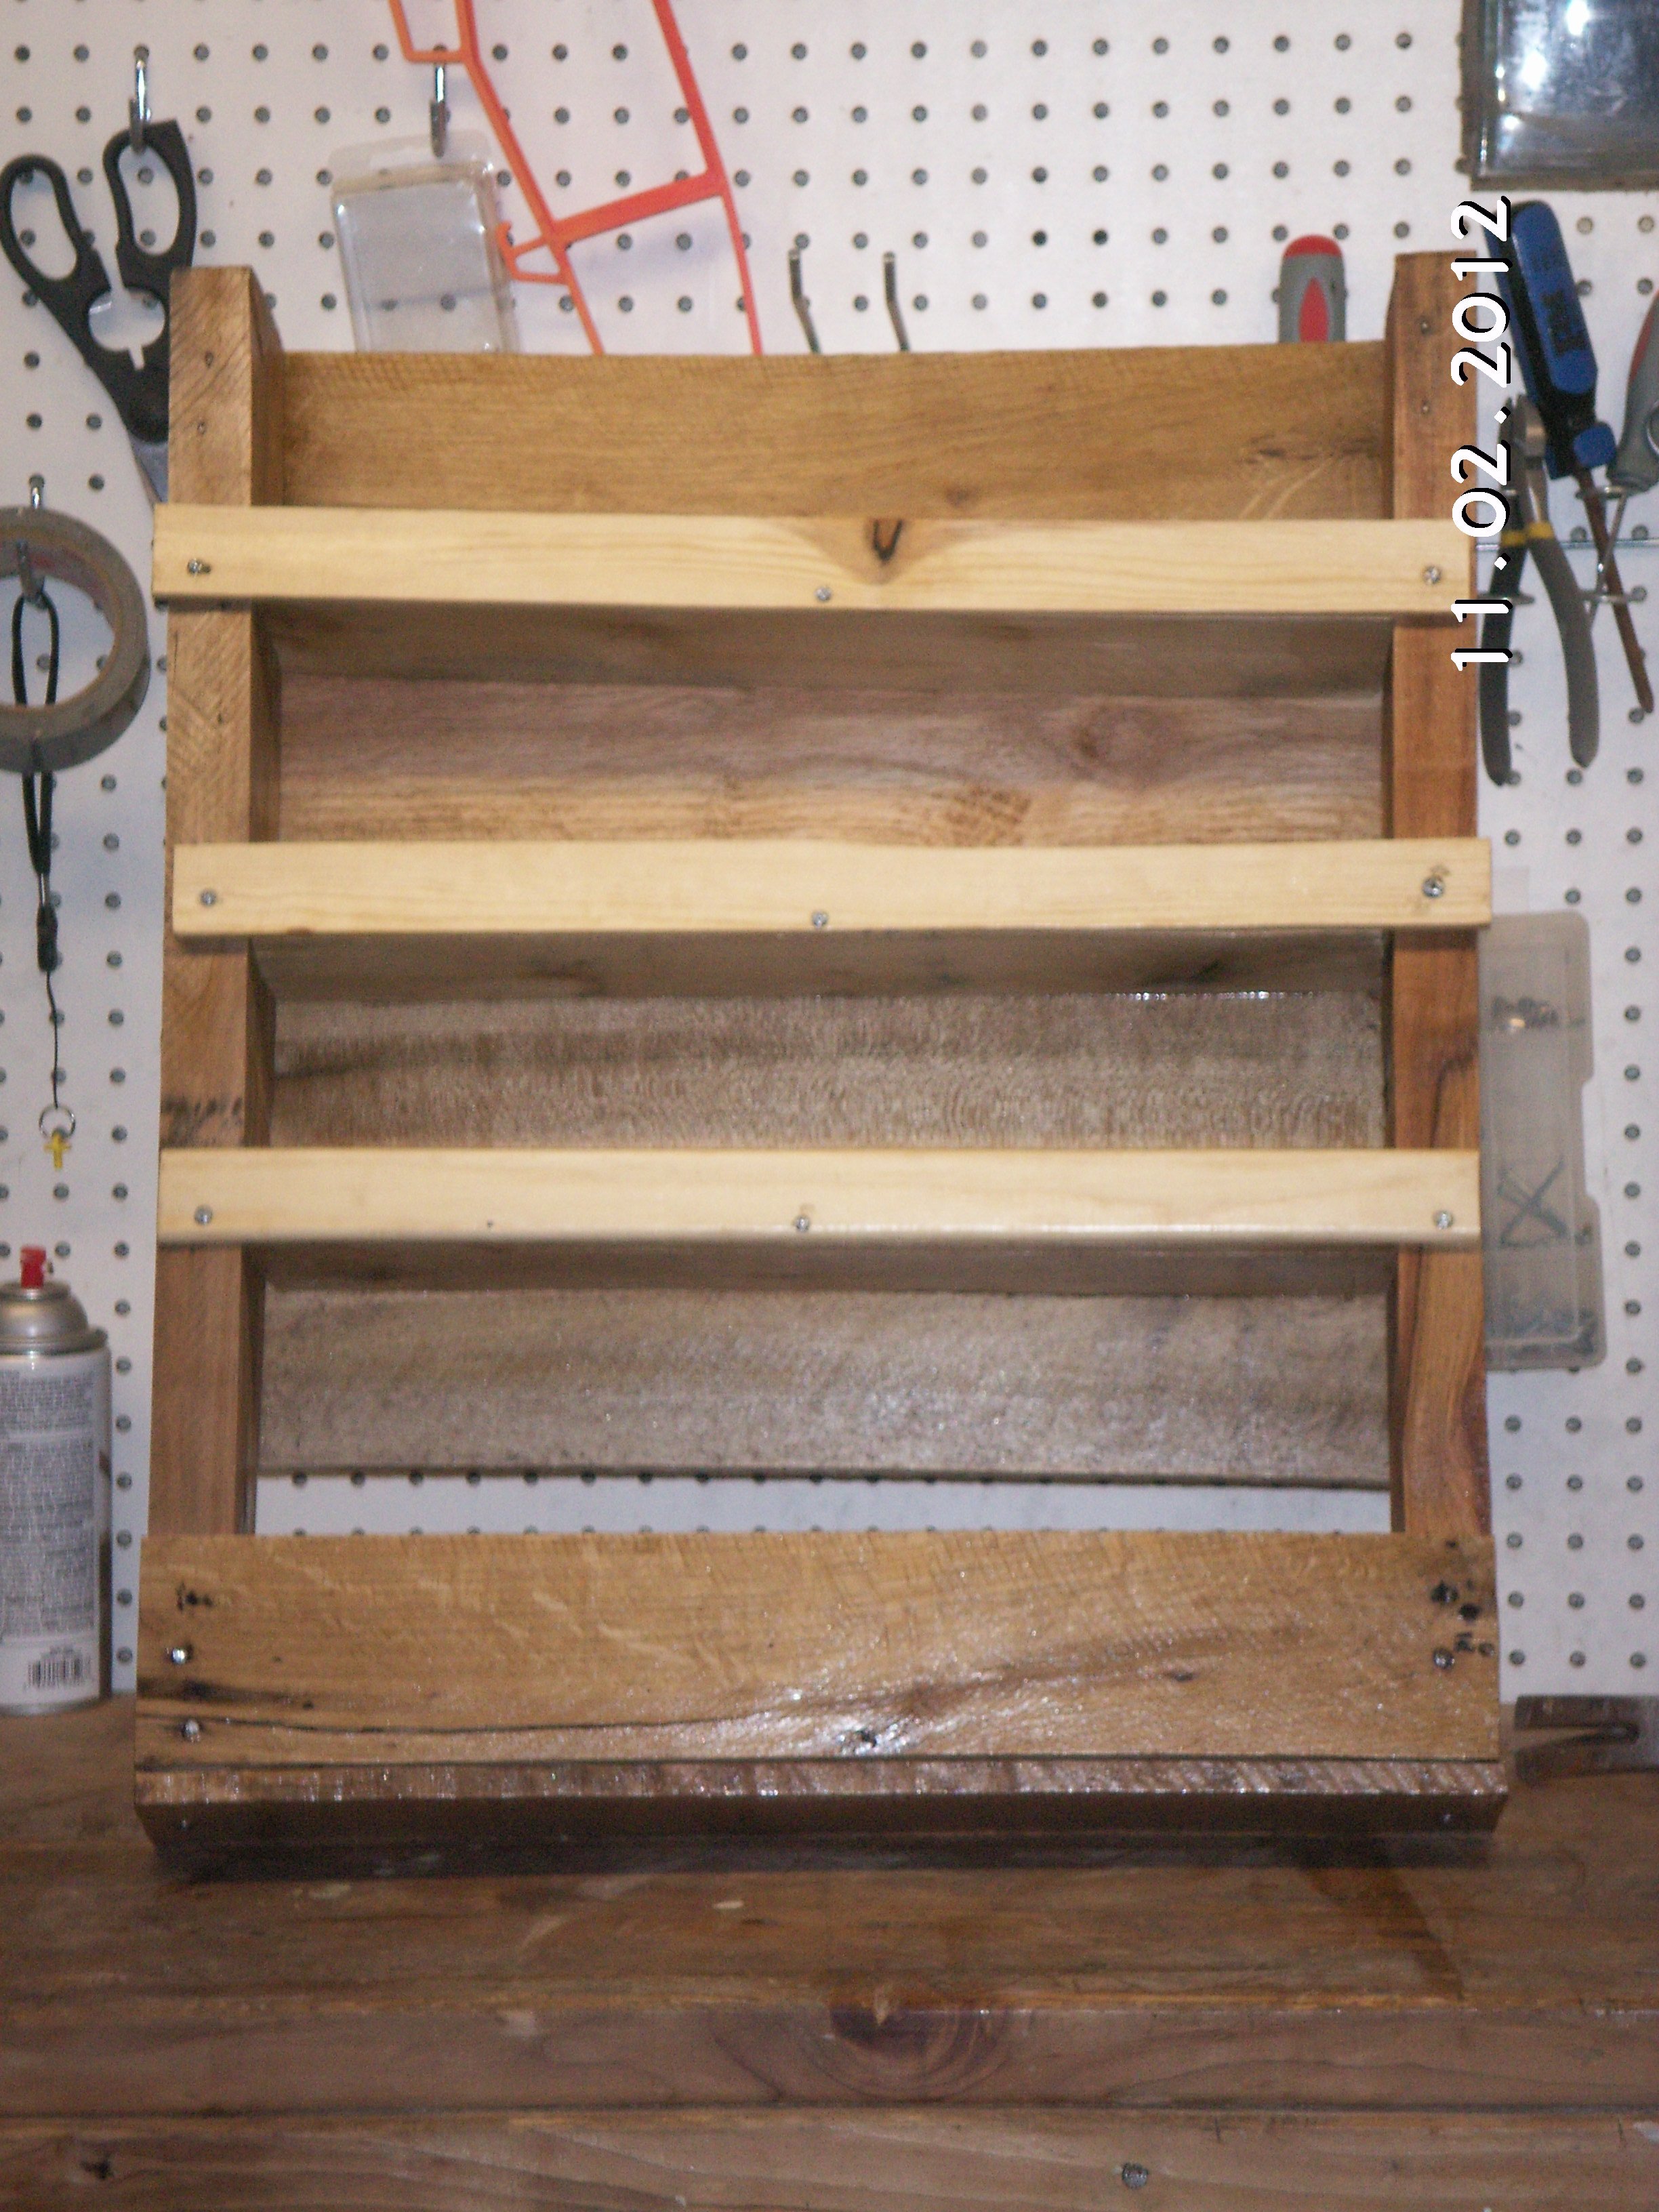
My mother lives with me and we loved the Pallet Shelf Project and made a back door shelf/coat rack. Then, task maker that she is, she decided we need a spice rack in the kitchen, and viola. Still needs another coat of minwax, but should be ready to hang tomorrow! Thanks Ana!
Finish Used
Minwax
Recommended Skill Level
Beginner
Rustic X Tables

I stained the top with american walnut and used chalk paint on the bottoms.
Built from Plan(s)
Estimated Cost
120
Estimated Time Investment
Weekend Project (10-20 Hours)
Finish Used
Walnut and chalk paint
Recommended Skill Level
Beginner
My version "Michaela's Kitchen Island"
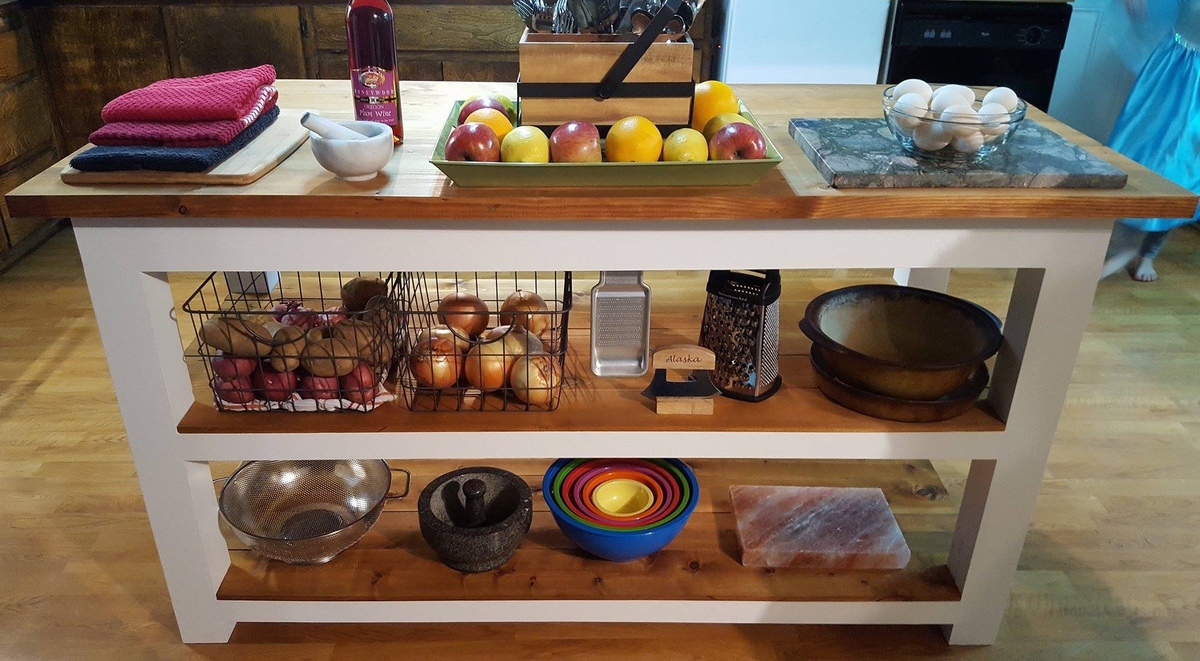
Built from discount 70% off lumber from Home Depot. I planed and cut down to size with a Ridged planer and table saw, then screwed together with kreg pocket screws. Since I will be kneading bread on it, I used a natural coffee stain and then butcher block finish..
Built from Plan(s)
Estimated Cost
$120
Estimated Time Investment
Week Long Project (20 Hours or More)
Finish Used
Coffee stain with butcher block mineral oil and bee's wax.
Recommended Skill Level
Intermediate
FARM HOUSE TABLE
Thank you Ana for these plans! This is the updated farmhouse table that uses pocket holes. I thoroughly enjoyed making this table. I was so pleased with it and myself for what I had accomplished on this project! It turned out beautifully and my family and friends love it! It wasn’t that difficult to do, you just need to take your time and it will come together . Once you learn the set up of the kreg pocket hole jig, it really isn’t that difficult to do at all and so worth doing. I’m off to build a matching coffee table and tv stand. (Also plans found here)
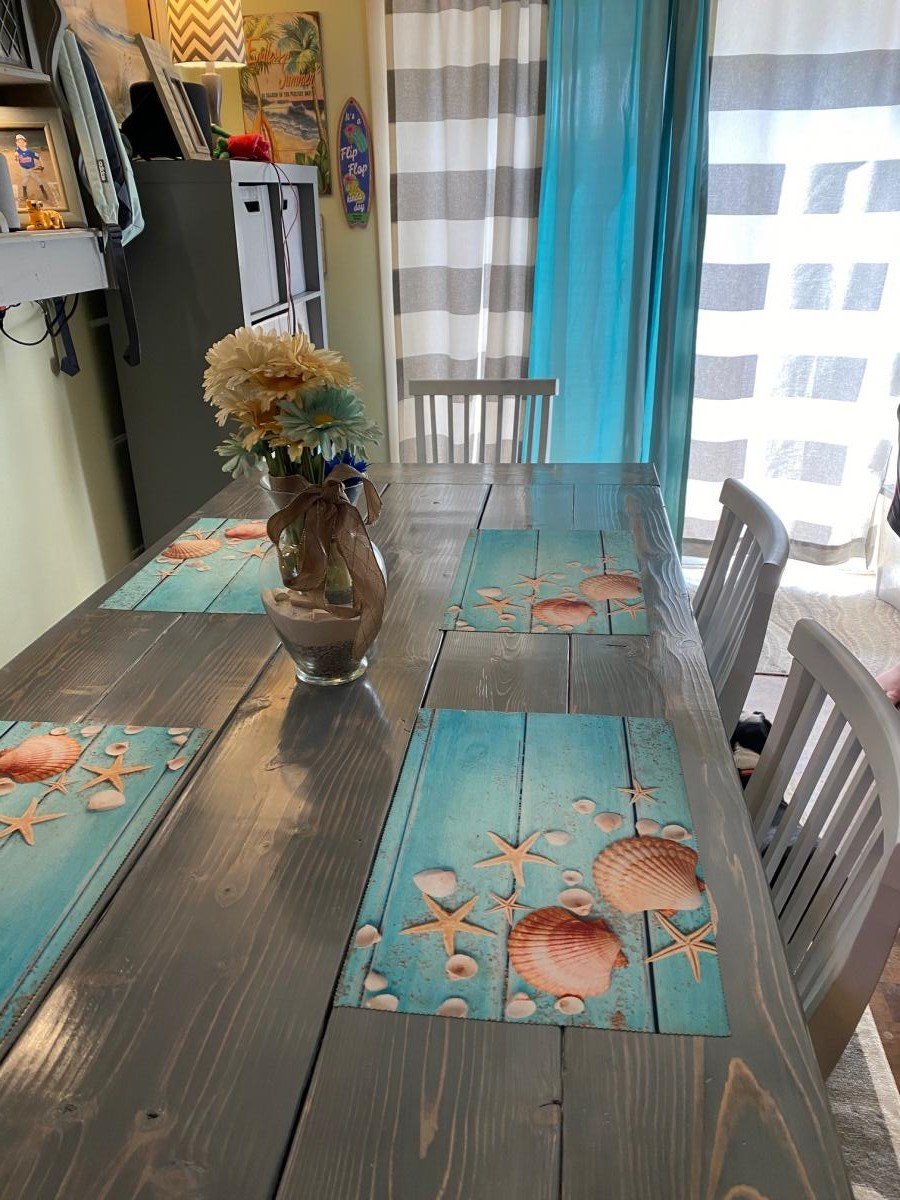
Built from Plan(s)
Estimated Cost
$150
Estimated Time Investment
Weekend Project (10-20 Hours)
Finish Used
White satin paint, white wash (over stain on table top) weathered gray stain. Fast drying polyurethane 3 coats.
Recommended Skill Level
Intermediate
Read the Contract before Signing
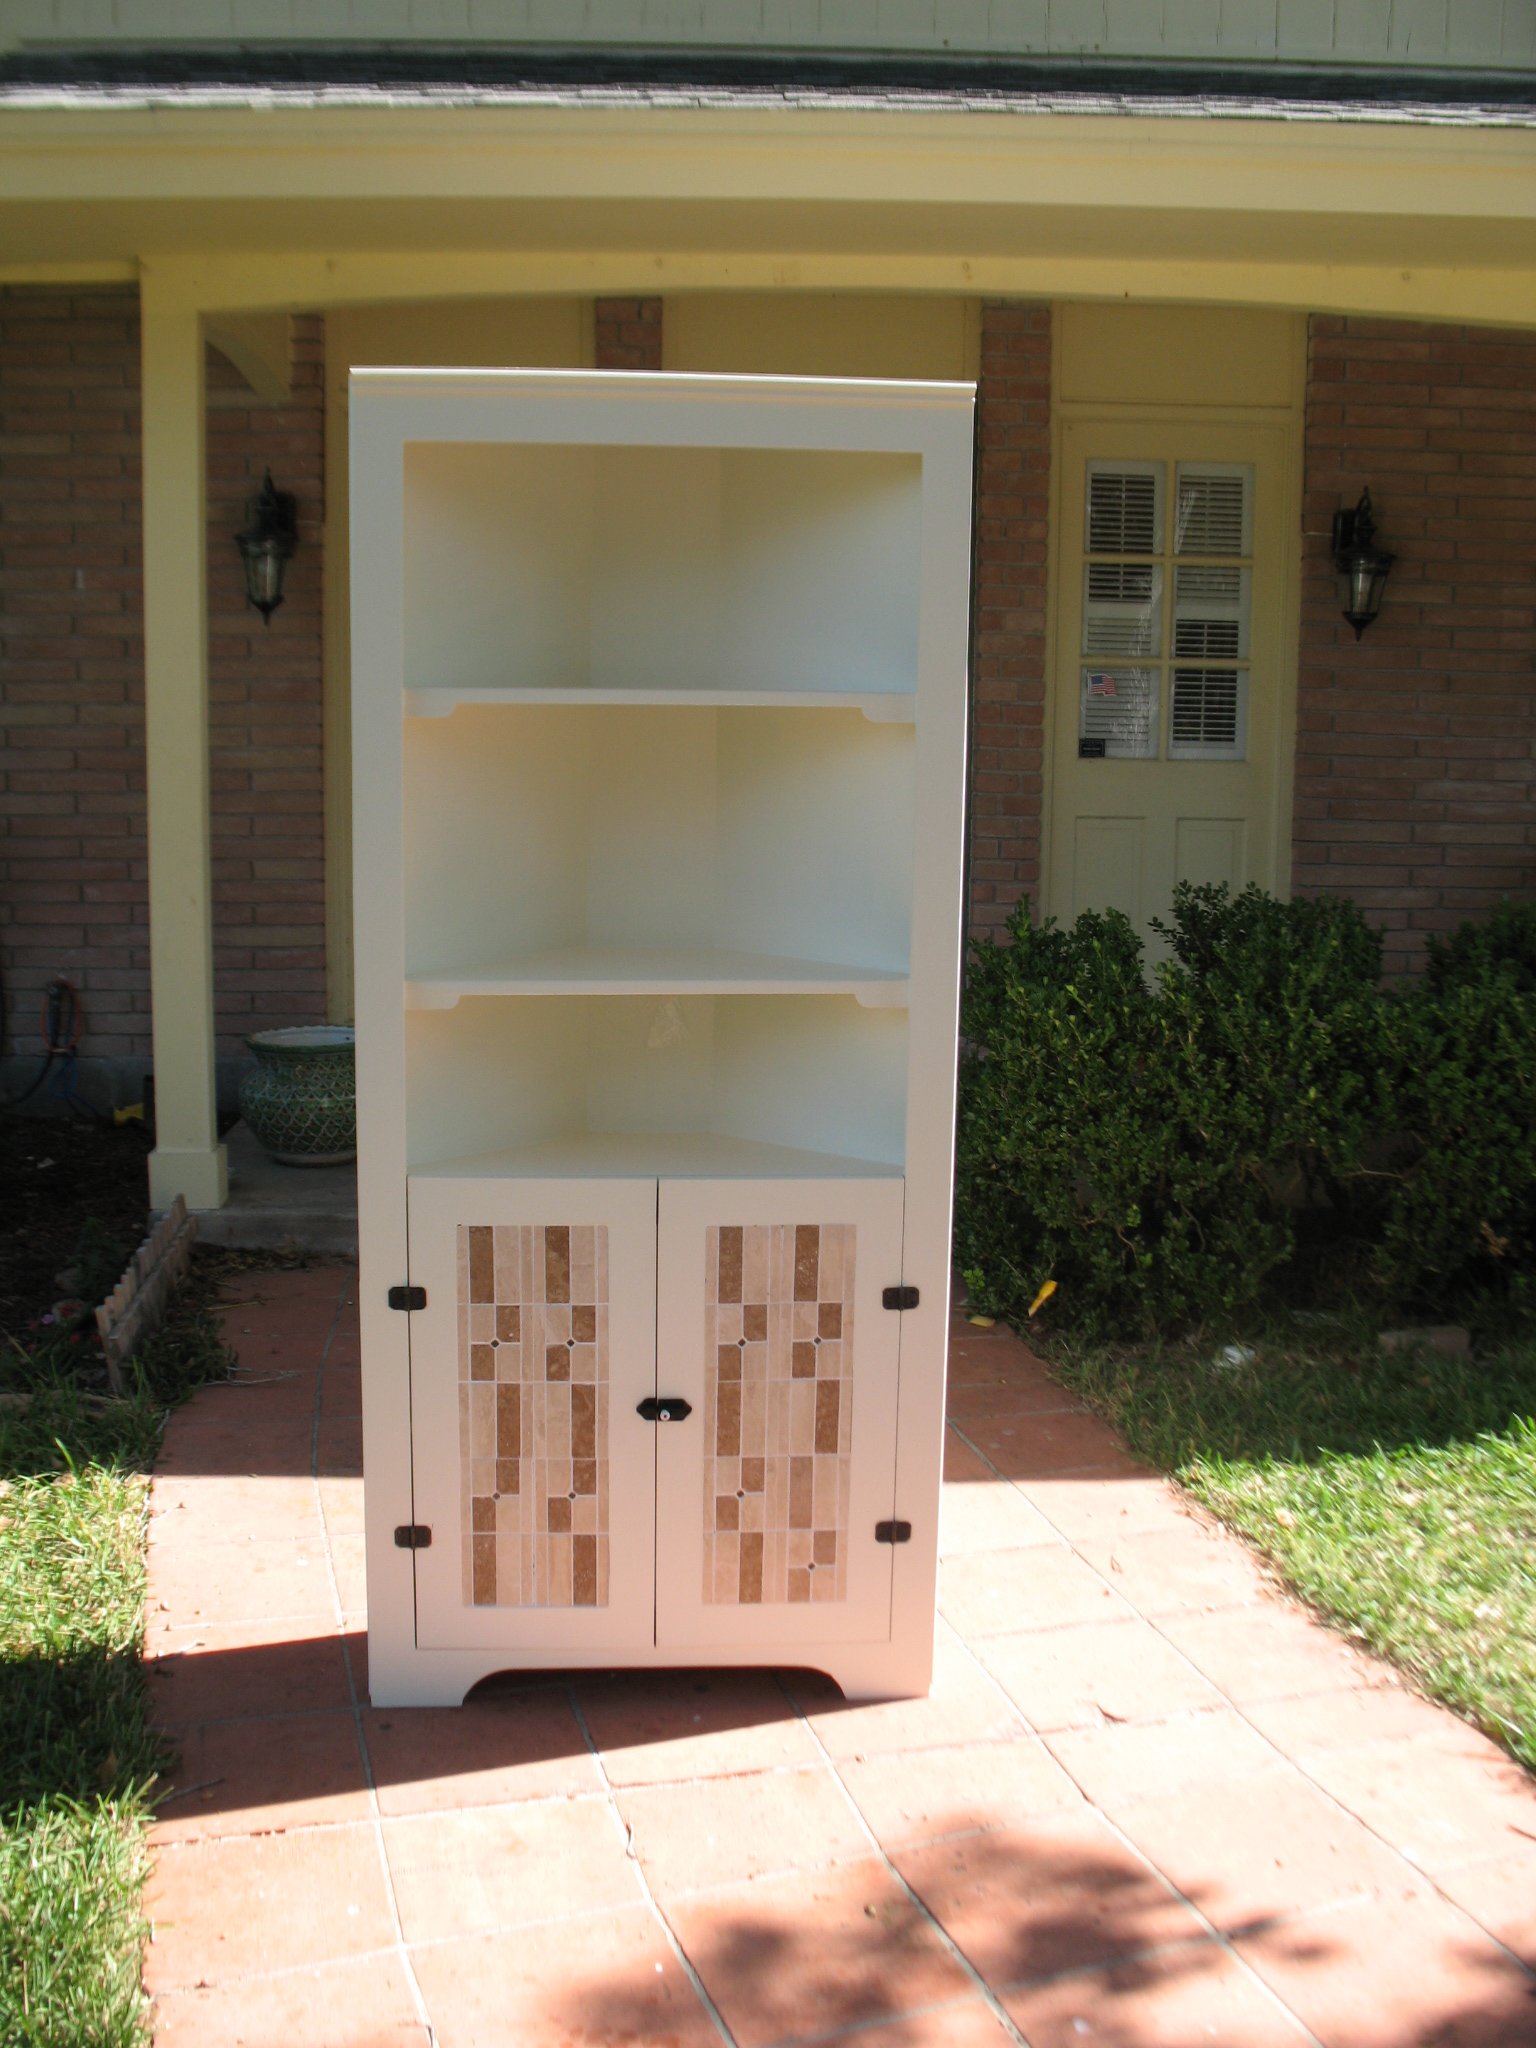
The wonderful wife wanted a corner cupboard so I built the one you see in the pictures. Before I go further I would like to warn anyone attempting this project to please follow the instructions in the plan. I didn't and built the frame first but quickly discovered that it is the back and shelves that determine the final dimensions of the frame. I got lucky and the fit was ok. Here are a few things that I did:
1. I filled in the rough joints made by the plywood sides meeting the front frame and back by gluing in 1/4" round dowels. Looks pretty good.
2. With help from Habitat for Humanity ReStore I found the 1/2" thick stone to fill the void made by the door frames. Looks pretty good I must say.
3. I have a trademark called a "Conversation Starter" in many of my projects. Another name is called a mistake or oversight. Look closely and you will see that I grouted in one of the four stone sections upside down and the center jewel is out of place.
4. I could not find decent hardware locally so I went to Kennedy Hardware in Zionsville, Indiana and found the black cast iron hinges and clasp.
5. I did not read the contract with my wife and discovered that I now must repaint the entire dining room to match the corner cupboard. Read before Signing.
Building the cupboard was a fun project that will test all of your abilities and patience. Just remember follow the instructions and keep it square and level in all dimensions.


Built from Plan(s)
Estimated Cost
I think I spent close to $200 because the hardware was $30 and the stone for the doors was $24 and I bought the higher grade pine for the cupboard and door frames.
Estimated Time Investment
Week Long Project (20 Hours or More)
Finish Used
Three coats of Behr Pearl White (it contains primer) with lots of sanding pre-paint and light sanding between the first two coats. I found that using the foam brush for the last coat keeps the brush marks to a minimum.
Recommended Skill Level
Intermediate
Comments
Sat, 11/03/2012 - 23:53
Happy wife, happy life ;)
I love it, looks great. I'm sure you wife is very happy with her new piece of furniture (& getting the room painted). Remember ... happy wife, happy life ;)
In reply to Happy wife, happy life ;) by Juanita_r
Mon, 11/19/2012 - 17:33
The Female Mind
Juanita I need for you to explain to me the female mind. We have only been married for 45 years and I still do not understand. The corner cupboard became paint the dining room. I did that. Next the floor needed upgraded so I am almost finished laying a new oak floor. As I neared the end I have been informed that the wallpaper needs to be changed. So the $150 corner cupboard has become the $1000 room makeover. I should have seen it coming!
Sat, 04/13/2013 - 13:39
Going to get it in writting
Well Jake first let me say very nice job. My wife had mention wanting a Corner Cabinet for one of the bed rooms and pointed this one out. ( I was unable to keep her off this site after I finished the hutch ) I was looking at it and then read what all you had to do afterwards LOL. So I am going to get it in writting that I get to build my workbench for the shop, after this build. Again Nice Work
Baby changer

My first build.using these plans I had to convert to u.k. Sizes and alter slightly but it turned out really well
Built for upcoming event.
Estimated Time Investment
Week Long Project (20 Hours or More)
Recommended Skill Level
Starter Project
Comments
Thu, 08/21/2014 - 07:33
This looks beautiful! Thank
This looks beautiful! Thank you for sharing. And congratulations on the new baby in your life, whether it's a child, grandchild, niece/nephew, friend... :)
Loft bed with stairs
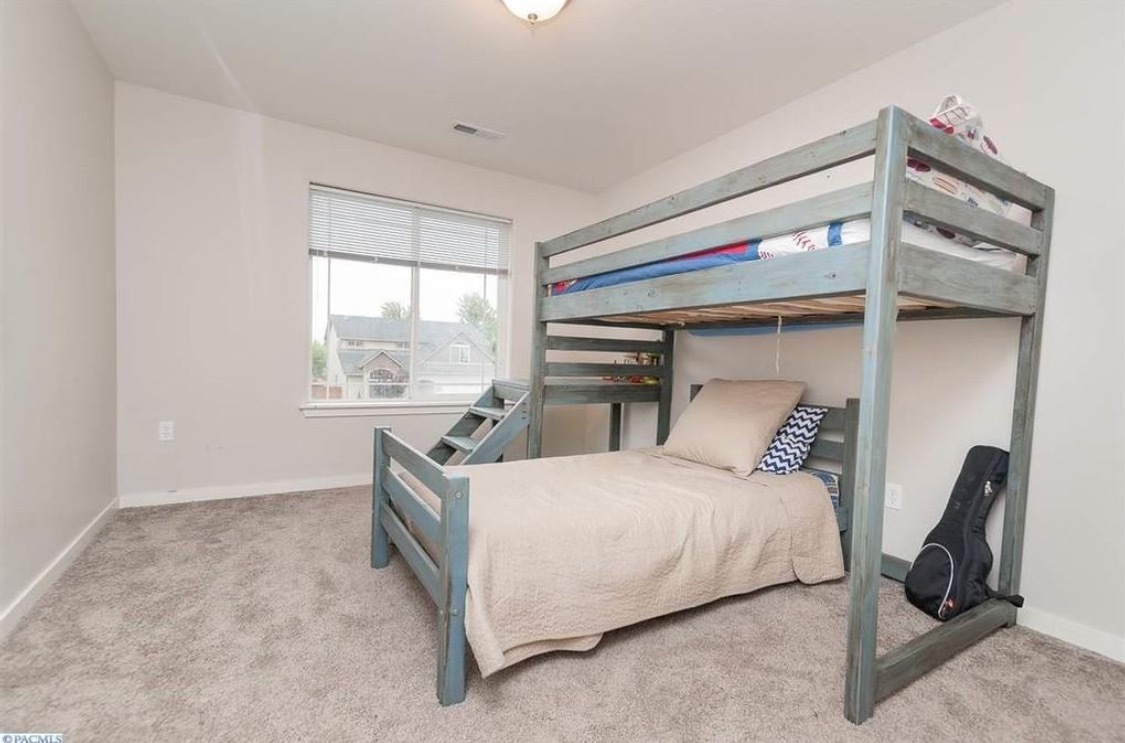
This project was so fun to make. When we have a bigger room, we will put a slide on the other end. My son loves his bed!!
Built from Plan(s)
Estimated Cost
$80
Estimated Time Investment
Day Project (6-9 Hours)
Finish Used
Used homemade chalk paint with antique wax sealer.
Recommended Skill Level
Beginner
Comments
Mon, 12/14/2020 - 11:28
Did you use larger boards…
Did you use larger boards for the posts in your build? I noticed the connecting boards seem to be centered. Looks fantastic and would love if you could share your modifications!
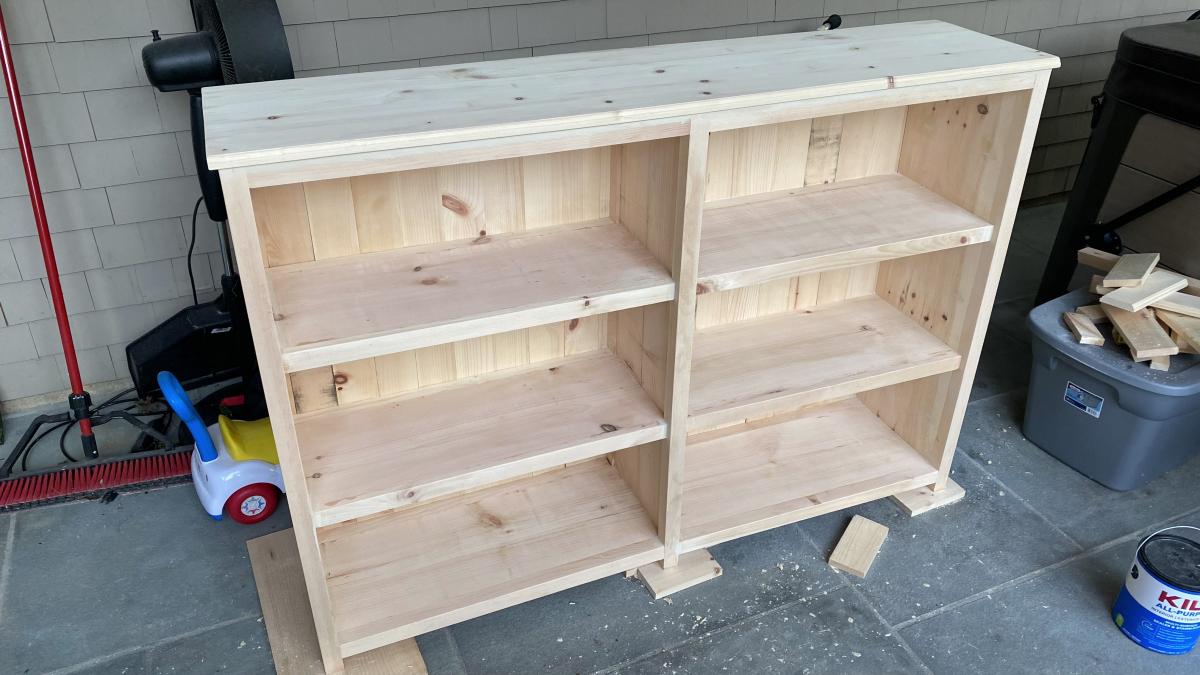
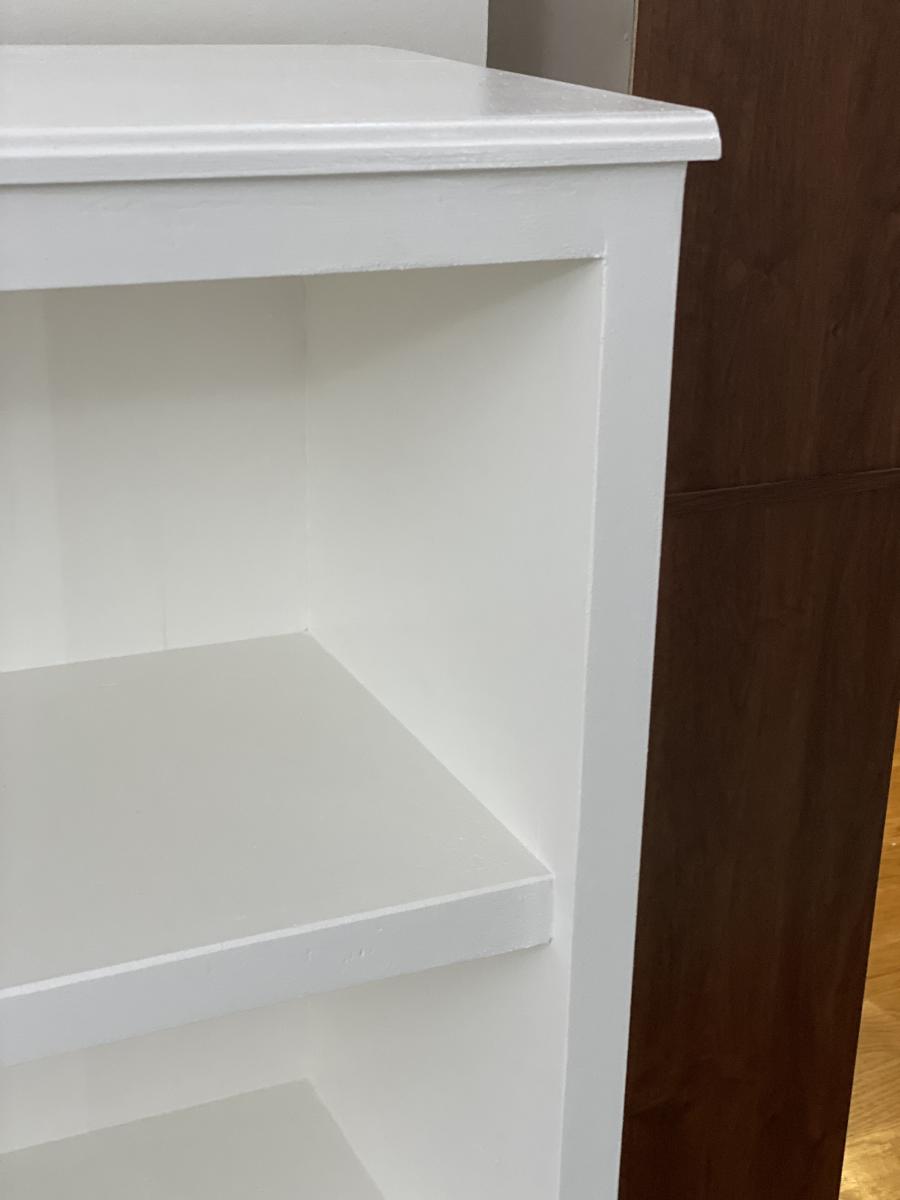
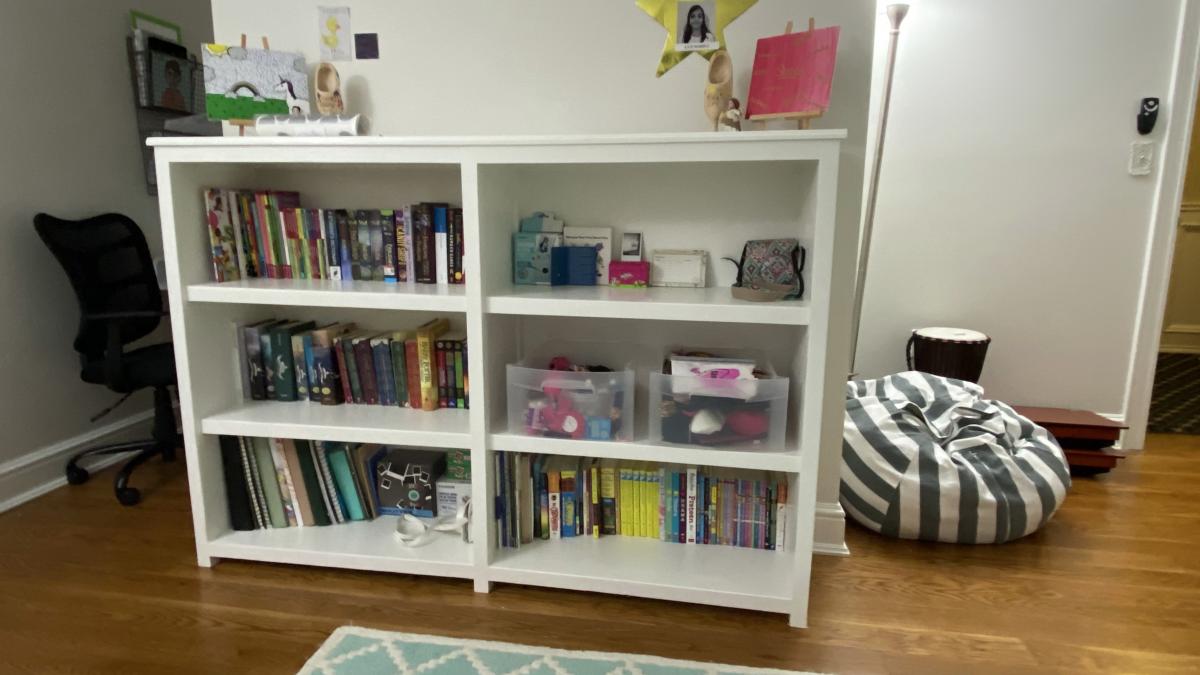
Kentwood Style Double Bookshelf
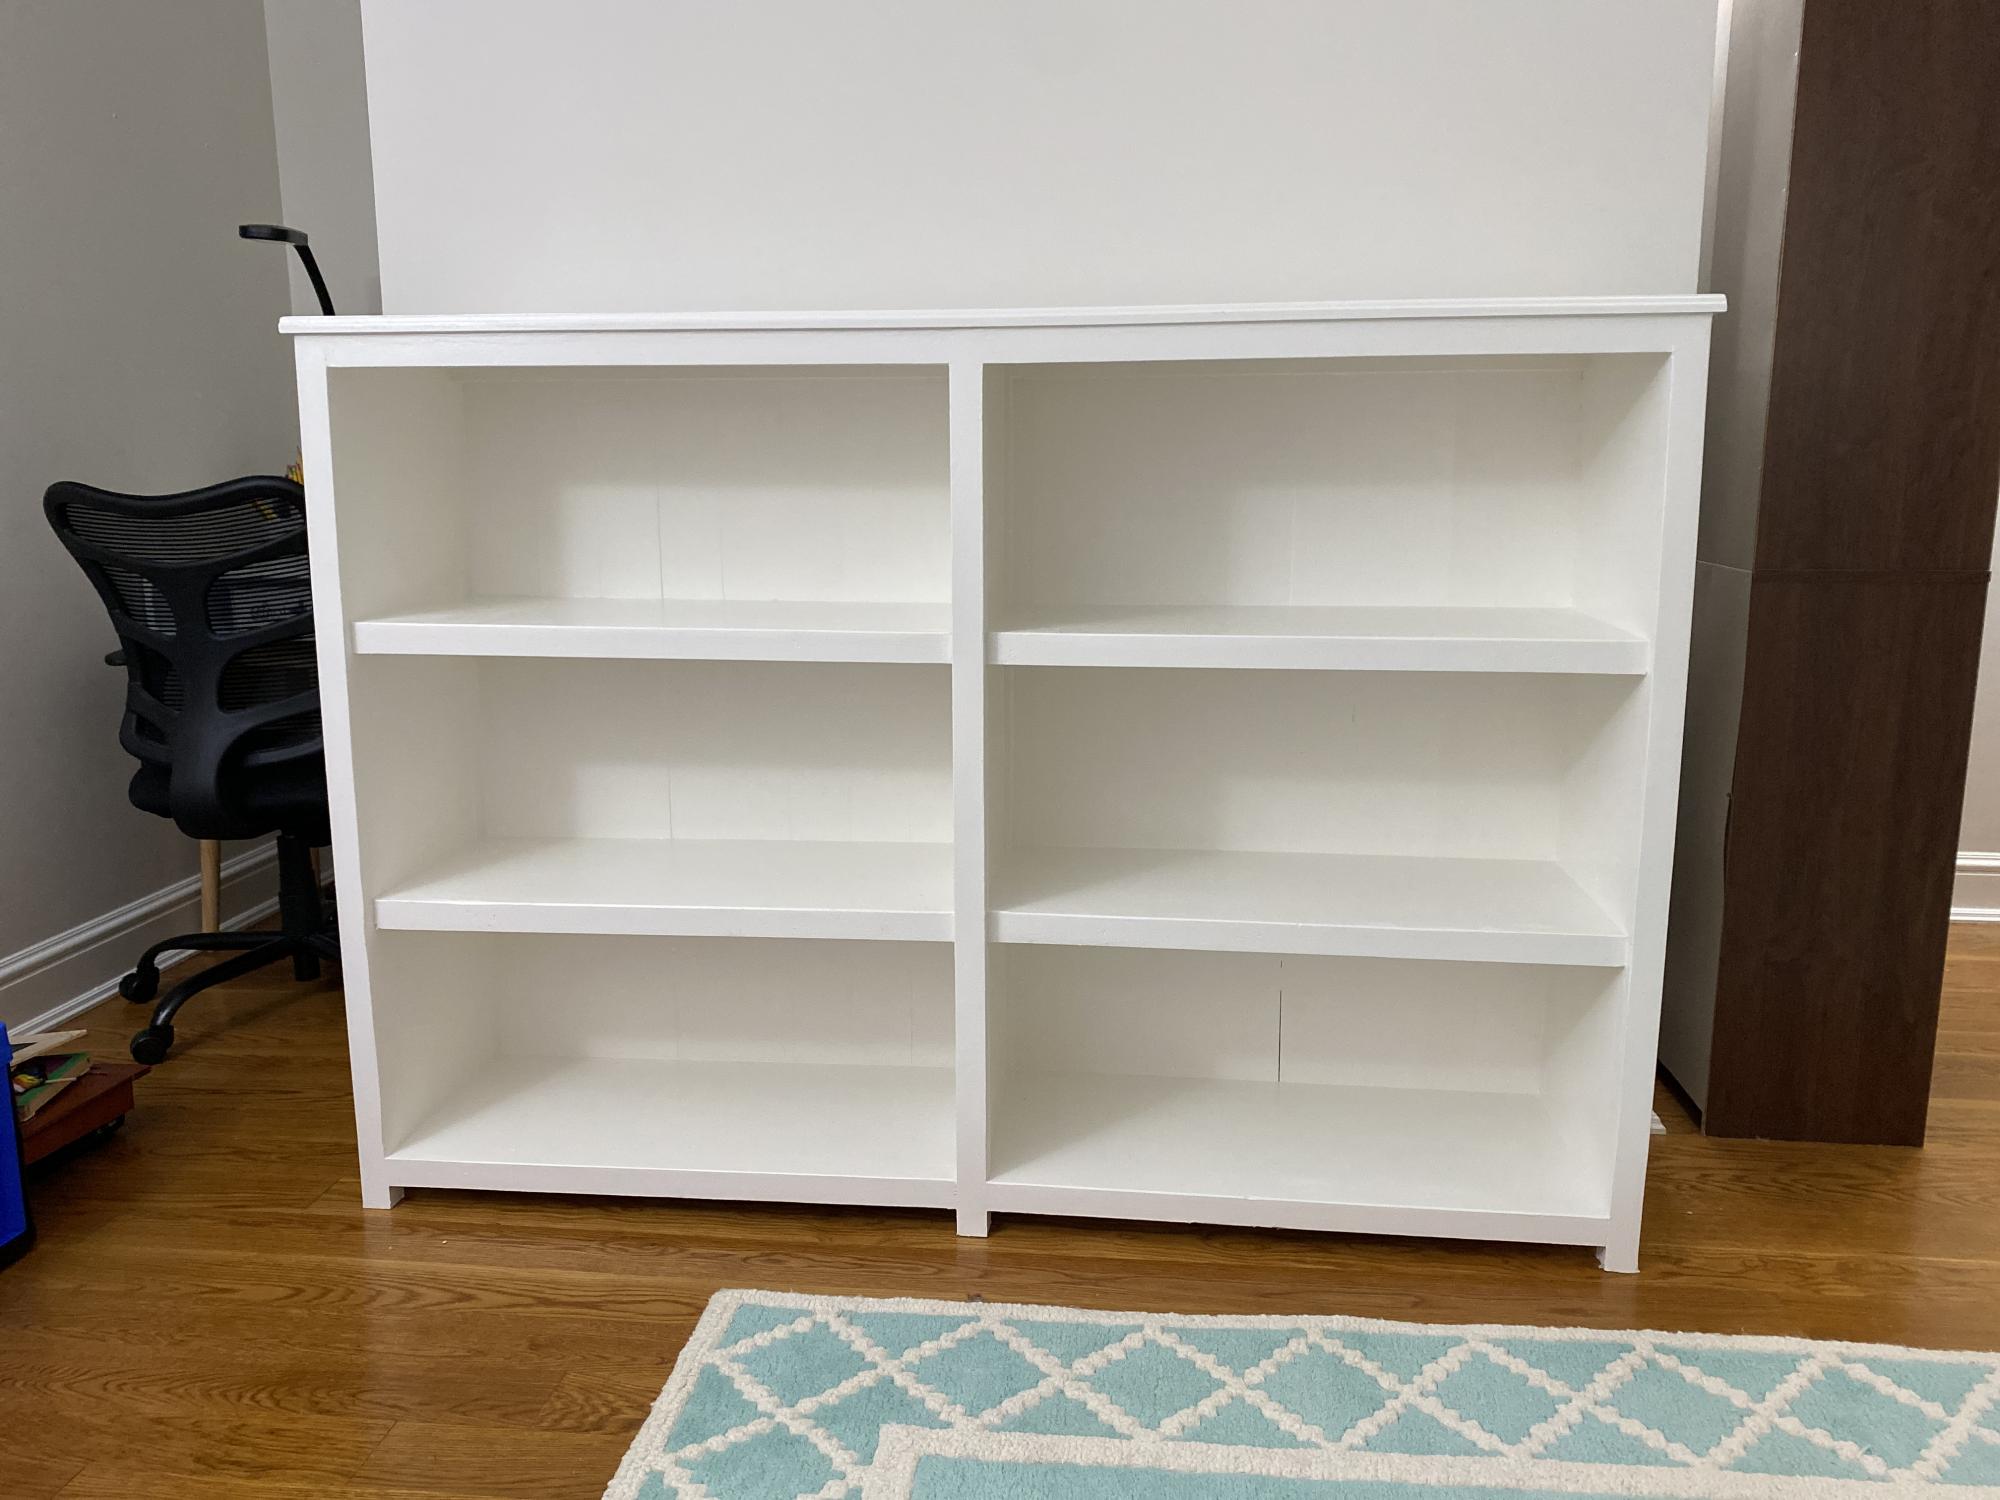
This was my first project, and I did it together with my two oldest children (13 & 11).
We started with the basic Kentwood Bookshelf plan, but wanted to have it a little shorter to make use of the tabletop. We also wanted it wider to fit a specific location in my daughters' room.
Broadly sticking to the Kentwood instructions, we measured the longer space we had and what that would mean for each of the measurements for the cuts. It was tricky to get the measurements right for the 1 x 12s in the middle which had to be a little longer than the 2 x 2 and 1 x 2 frame fronts to fit snuggly, but we got there.
We finished the top and back with 1 x 4 boards instead of planking. It added cost and weight (whole thing probably weights 150 pounds), but hopefully it will last a long long time. We routed the front edge of the table top to give a nicer finish.
Painted it white in the end. Tried to put a clear coat over it, but made a mistake of using an oil-based clear coat which turned the whole thing yellow. Had to sand it down and repaint. Ugh. Lesson learned!
We're very happy with the results.
Built from Plan(s)
Estimated Cost
$300
Estimated Time Investment
Weekend Project (10-20 Hours)
Finish Used
White paint which matched the trim in the room it's in.
Recommended Skill Level
Beginner
Carnival Birthday Party Ticket Booth
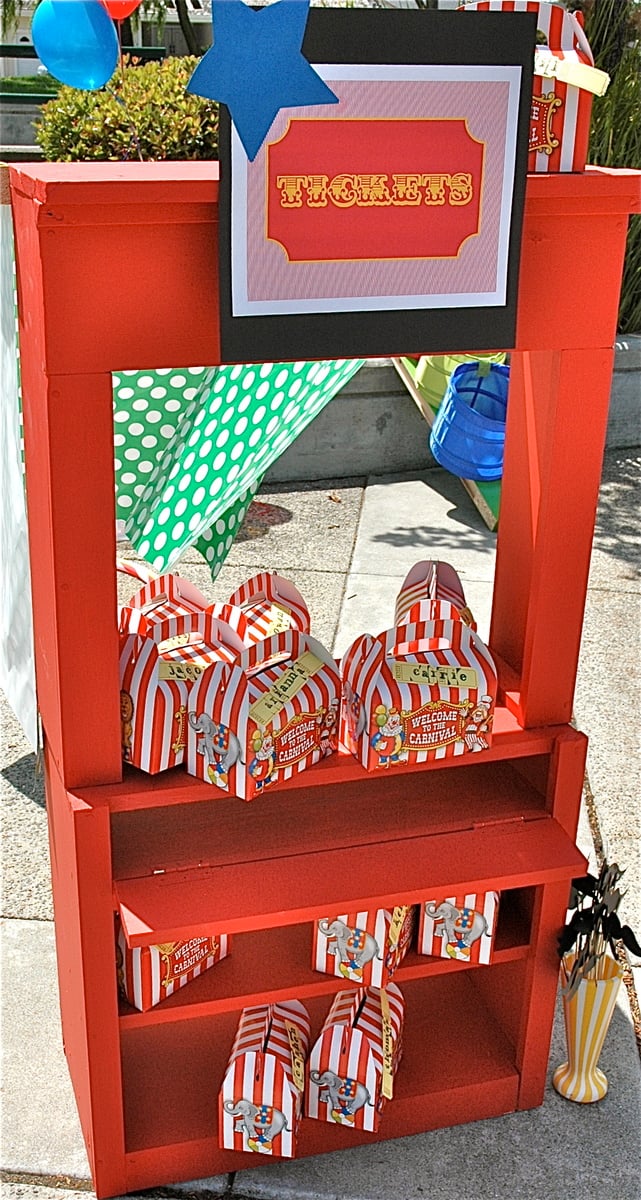
I was planning a carnival birthday party for my 4 year old son and just *had* to have a ticket booth. The Library from Grace's Town was perfect! The ticket booth doubled as a photo booth later in the day. It was my first time building anything and it was fairly easy for a first-timer although I will admit getting a little bit of help from my brother-in-law and father. :-)
Built from Plan(s)
Estimated Cost
Less than $50
Estimated Time Investment
Weekend Project (10-20 Hours)
Finish Used
Primer with Candy Apple Red paint
Recommended Skill Level
Beginner
Farm House Desk
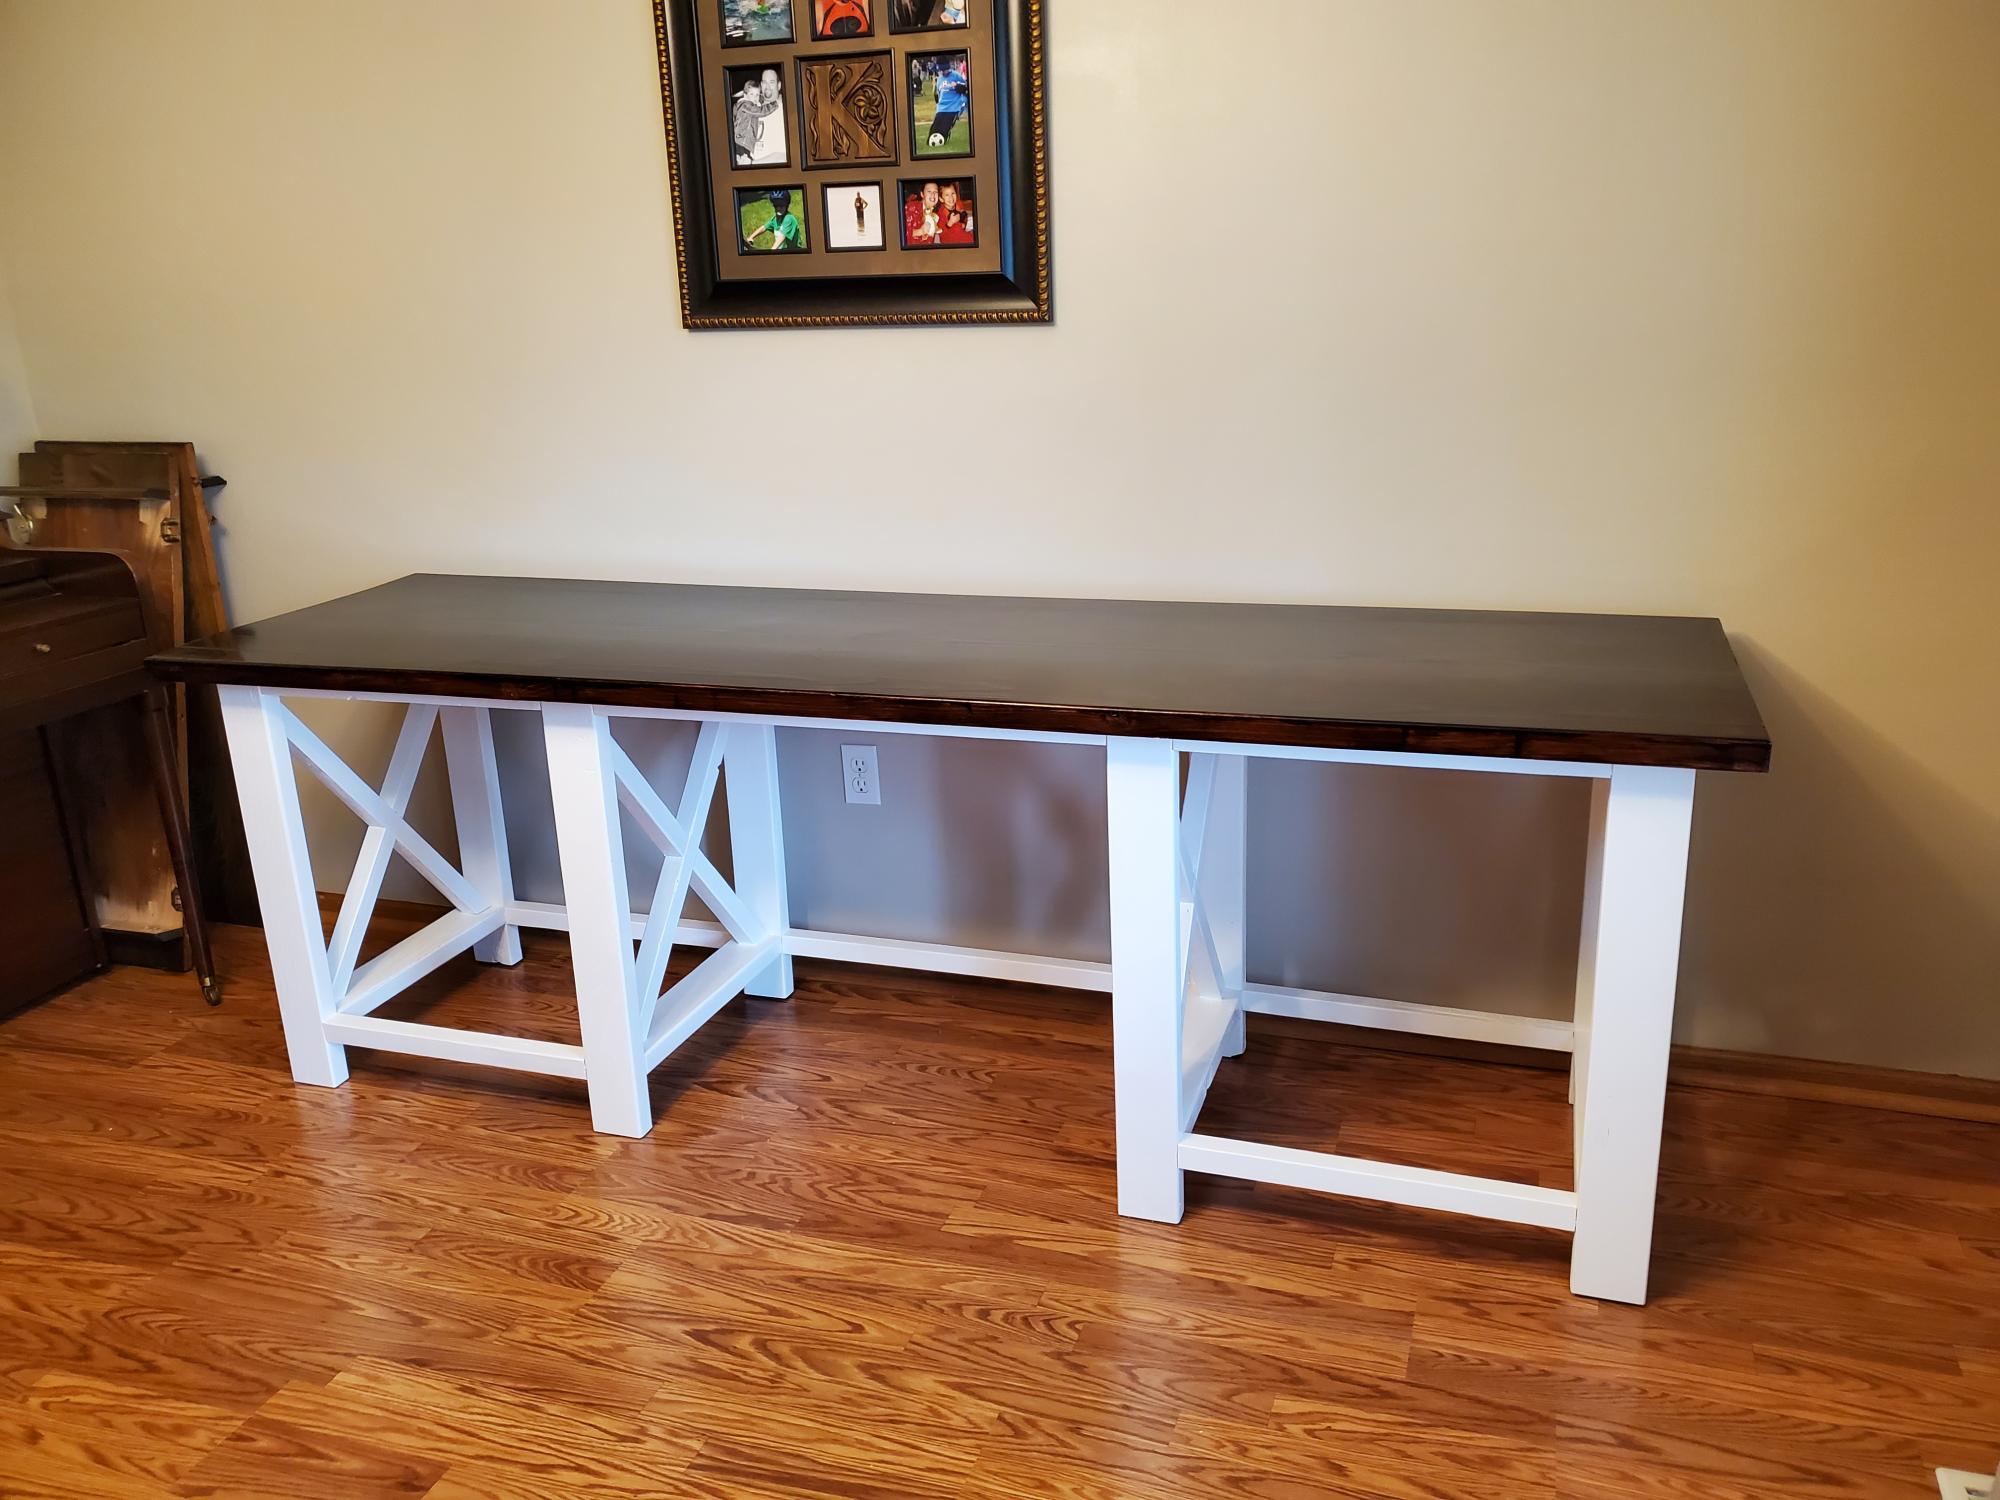
After learning I'll be working from home permanently, I asked my husband to use his talent to make me a desk. I have been sitting on a barstool since March and it just wasn't comfortable.
Viola. An Ana White farm house desk. It turned out wonderful and I'm so much more comfortable. He just needs to add the shelves when there is room in the garage again (he's now fixing our son's car with his brother!)
Built from Plan(s)
Estimated Cost
100
Estimated Time Investment
Weekend Project (10-20 Hours)
Finish Used
White enamel paint and minwax polyshades
Recommended Skill Level
Intermediate
king storage bed

this project is our first ever try at furniture building. It took us two years to finish! Not because it was hard (although it is a bit fussy) but because we had a medical set back of a year, and we only work on this project on weekends.
We used a cheap table saw, and have learned our lesson, none of the cuts were really straight. We have since bought an expensive good one, and so think our next projects will go faster, more easily.
We modified the finish details on the drawers to put beadoard faces on things.
We will be designing a headboard to match, and I will be glad to share photos of that when it is complete (give us another couple of years!)
Anyway - the bed is verysturdy, and the drawer capacity is HUGE. we have had it in our room for 8 hours so far, and we love it. Can't wait to go to bed tonight - but not untilI fill those drawers. :-)

Estimated Cost
$200
Finish Used
glossy paint - Benjamin Moore, color is lily white
Recommended Skill Level
Beginner
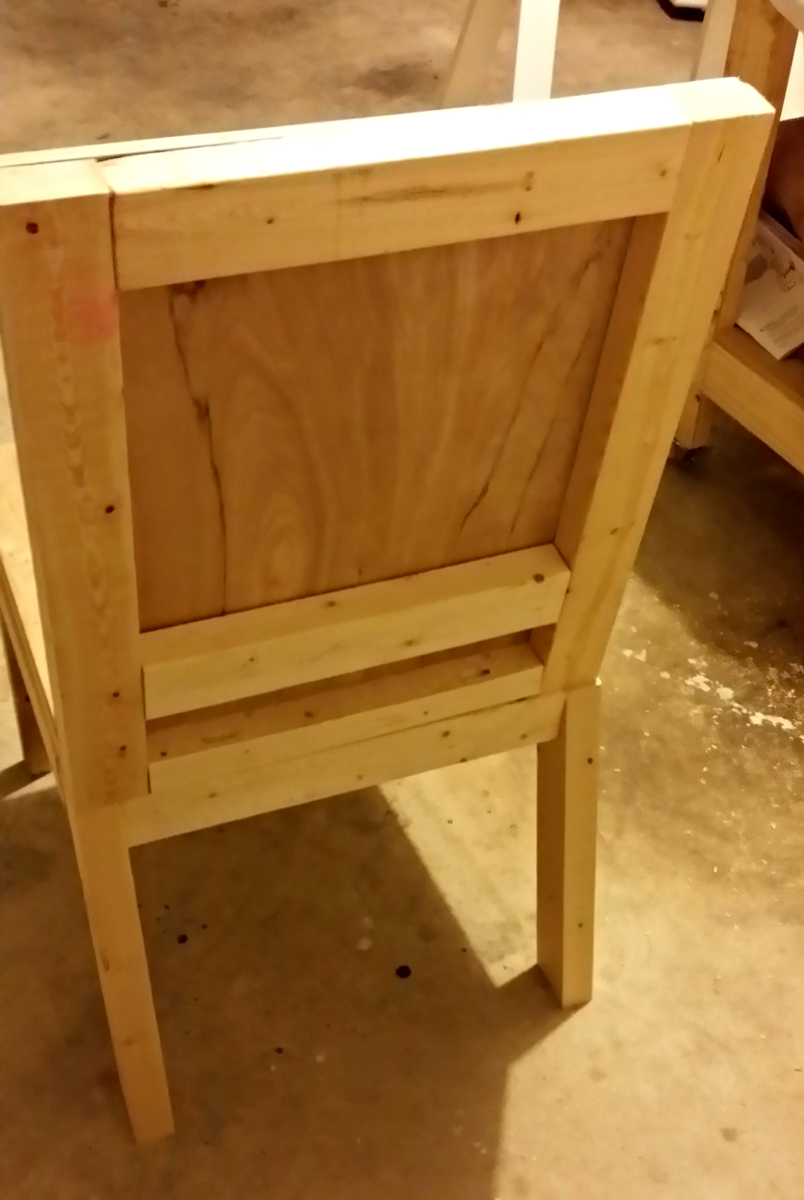
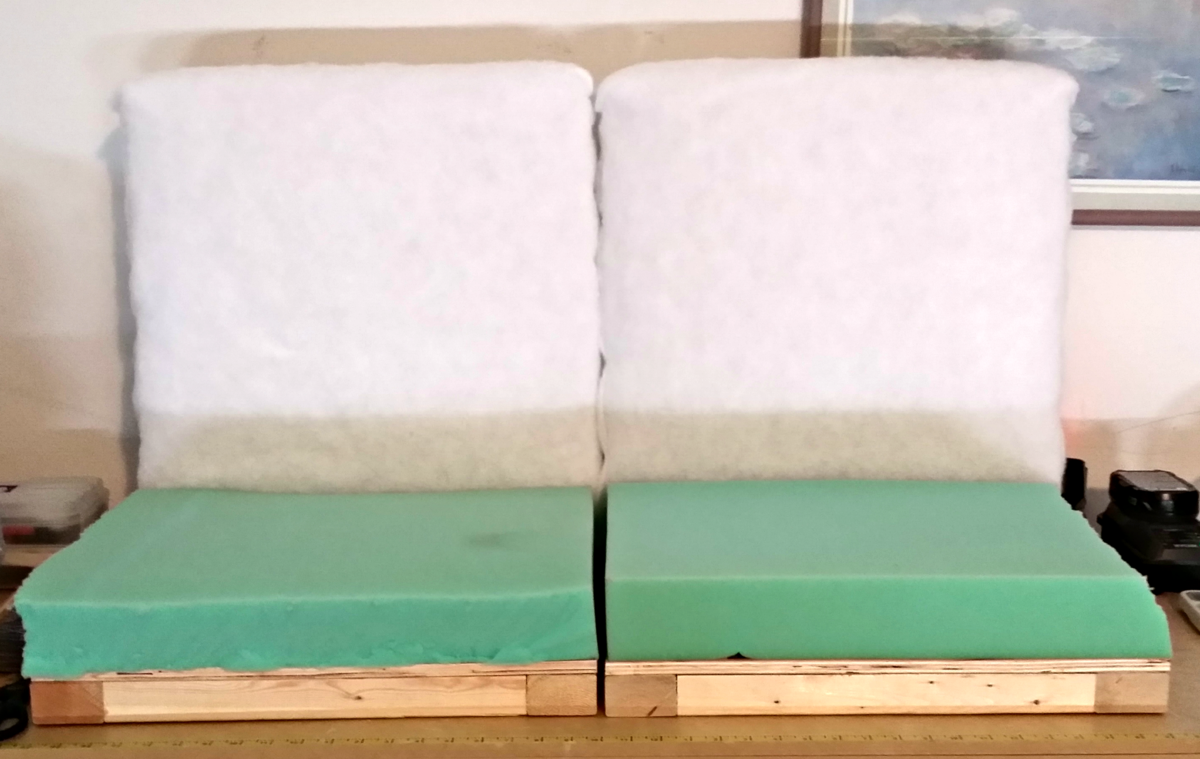
Complete Diningroom Set
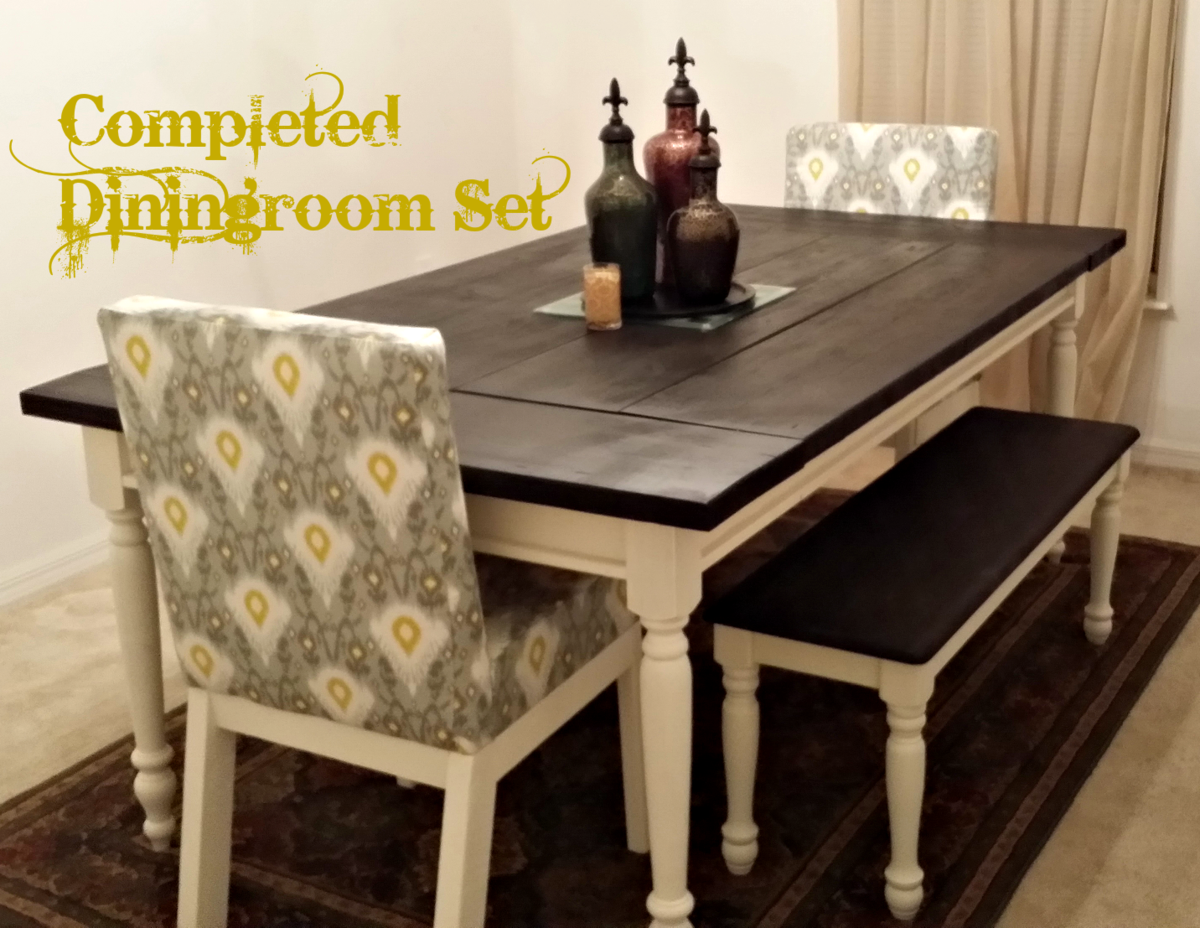
I have lived in my house for over 9 years and have never done anything to it until recently. I have made the commitment to move away from plain white walls and boring "plug-n-play" furniture. I discovered Ana's site a few months ago and have been a daily visitor. I made this dining room set with the confidence Ana's instructions gave me and I am forever grateful.
I made a few adjustments to the Parson Chair, making it longer in the back and used 5 degree angle instead of 15 and made the seat wider for our hefty hips and I used all 2x3s for the "chair bones".

Built from Plan(s)
Estimated Cost
A little over $350 for everything including fabric
Estimated Time Investment
Week Long Project (20 Hours or More)
Finish Used
Rustoleum Kona, Olympic Milk Paint White, Satin Poly
Recommended Skill Level
Intermediate
Comments

Fri, 08/29/2014 - 10:42
Awesome project!
You did such a beautiful job on these! The chairs, bench, table, and finish all look spectacular!
Sun, 04/03/2016 - 17:33
Bench question
I really like the matching bench. I am going to make this table for my daughter and she wants a bench with it. I am wondering where you found matching legs short enough for the bench? I have been looking but what I find are legs for end tables but they are too long. Seems the bench-top height should be a standard 18 inches. Thanks for any help.