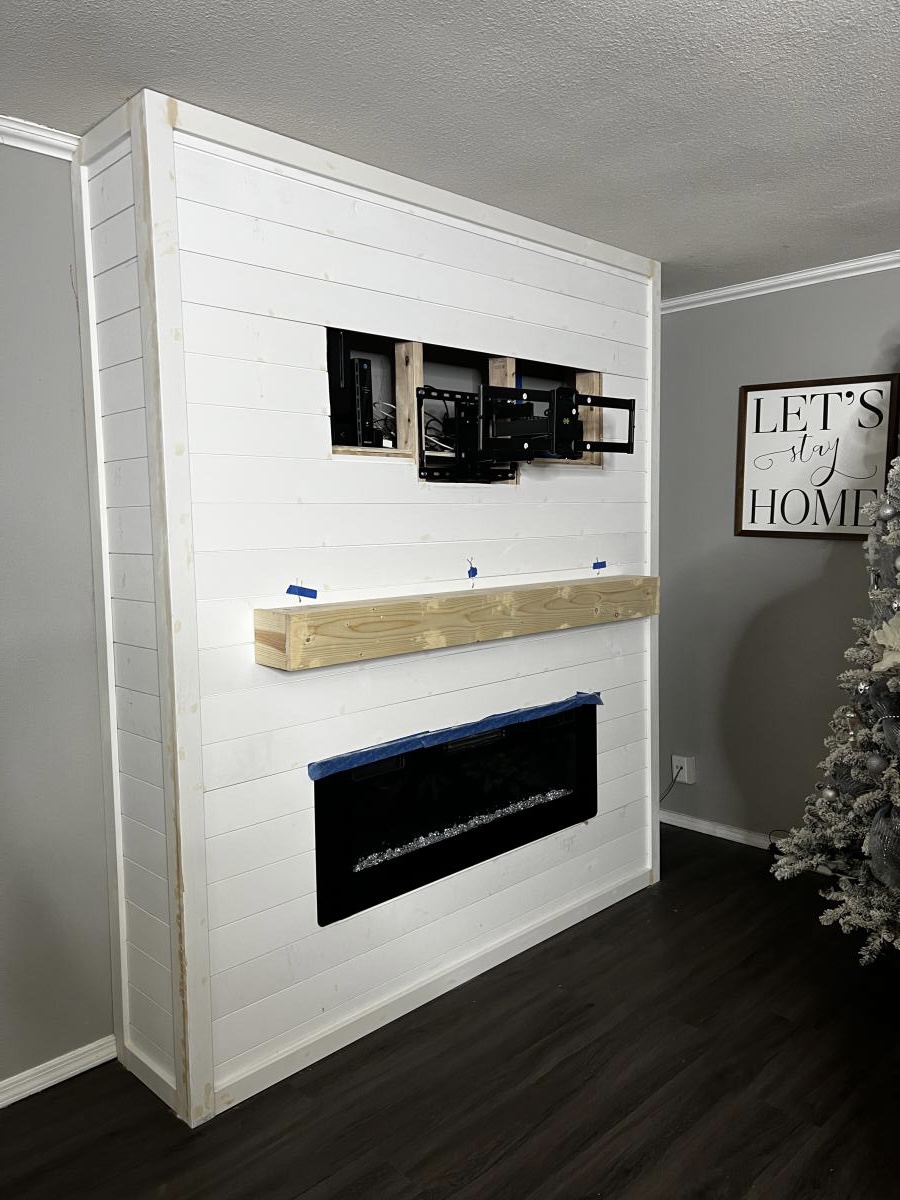
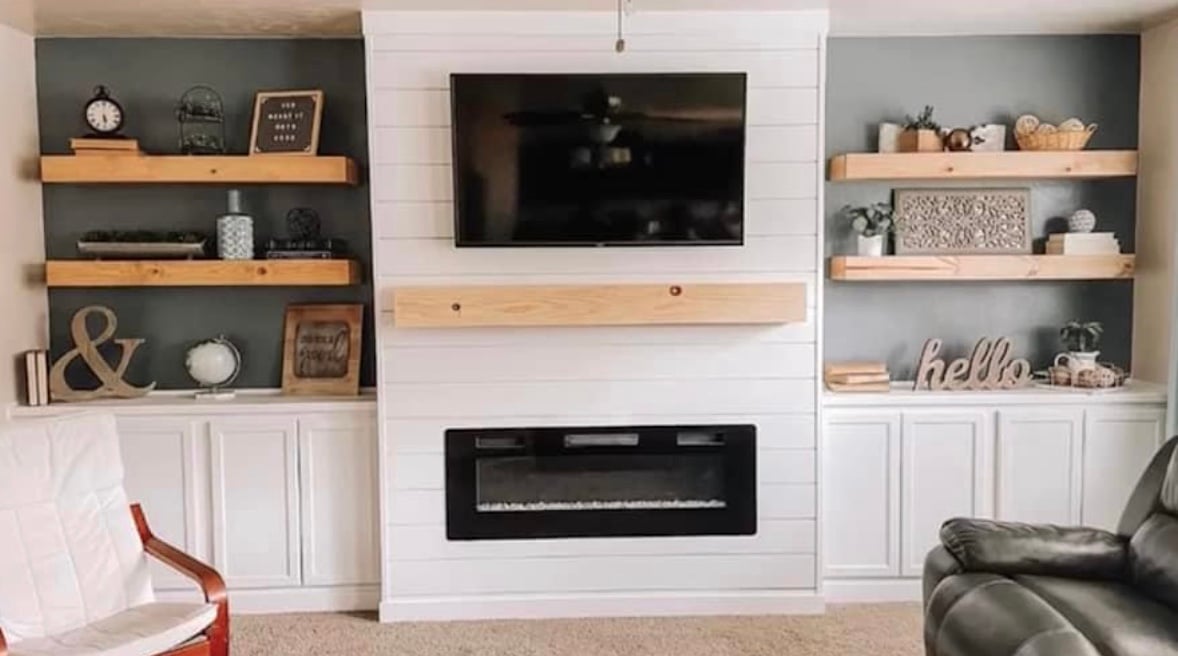
Community Brag Posts

Shiplap Fireplace

Submitted by Anonymous (not verified) on Tue, 12/20/2022 - 19:10

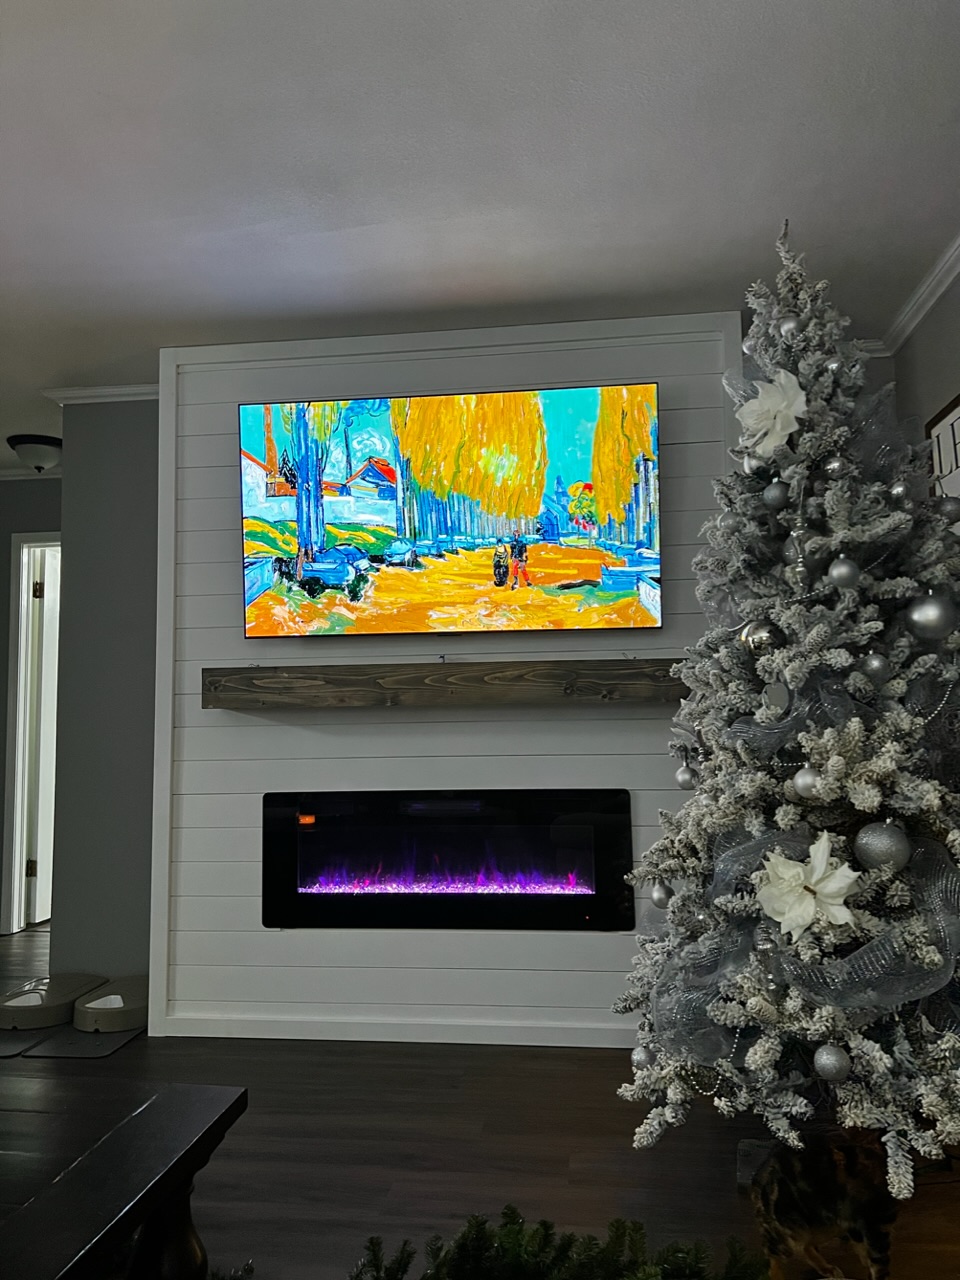
We did the Easiest Shiplap Fireplace in a weekend, thanks to Ana’s plans. I convinced my husband to help me build this by upgrading to a 65” tv and adjusting the dimensions. We also built a shelf behind the tv to hold our receiver and Xbox that is hidden when the tv is in place. Ana’s tutorial was amazingly and gave us the confidence to finally build something that’s been on our list for 2 years!

Comments

Laundry Pedestals

Submitted by stressure on Sat, 09/10/2011 - 23:01

Washer/Dryer/Shoe Rack Pedestal Project. Modified with additional base cap moulding for the front.

Estimated Time Investment
Weekend Project (10-20 Hours)
Finish Used
Paint
Recommended Skill Level
Beginner

First build - kitchen trolley

Submitted by John L on Sun, 09/29/2013 - 05:25

First build, mostly recycled from old bunk beds with much inspiration from this site!

Top is bed slats, rails and uprights are cut down bed parts. Base is mdf, shelf new pine boards. Pocket holes left uncovered as still amazed at construction with these things.

Took longer than it ought as slats were all round-edged so hand planed to make them more usable. Might take a weekend from new wood, including finish.

Painted by now-grown daughters to make a family project, everyone happy!

Estimated Cost
GBP 40 (USD 60) as wood was mostly reclaimed
Estimated Time Investment
Weekend Project (10-20 Hours)
Finish Used
Craig & Rose acrylic moonstone grey, (UK) Danish oil on bare wood.
Recommended Skill Level
Beginner

Flip top bench

Submitted by Crakes84 on Tue, 12/15/2015 - 06:41

I made two of these as gifts. I modified the plans for a smaller bench length and width. They are 33in long on the top with a 1.5 overhang. I chose to place the 1x4 on top at the end as it was easier to stain and finish. Instead of wood glue since it was finished I used 3 pocket hole screws in the back, 2 corner braces with antique bronze finish on the ends under overhang and 2 on the inside of the storage area and gorilla glue.this made it very solid. It also made positioning it easy as I screwed the corner braces to the bottom side of the 1x4 face. I measured for a 1in overhang and 3/4 of an inch for the thickness of the back board. By doing so I could simply place the board on top of the bench and center it for 1.5 in overhang on ends then simply screw in the remaining screw hole in the inside of the storage  compartment.

Estimated Cost
50bucks
Estimated Time Investment
Day Project (6-9 Hours)
Finish Used
Min wax honey oil stain and 3 coats of minwax semi gloss poly
Recommended Skill Level
Beginner

Our “Treehouse”

Submitted by Anonymous (not verified) on Tue, 02/05/2019 - 12:56

We started with the clubhouse bed but were concerned our three year old may be just a hair too young to sleep up top. We surrounded the bottom and placed some 2”x2” and plywood underneath to keep his mattress off the floor. Wrapped it up with fairy lights strung all around top of the inside. Turned out great!!

Built from Plan(s)
Estimated Cost
Too much lol
Estimated Time Investment
Week Long Project (20 Hours or More)
Finish Used
Dark walnut stain and polyerithane.
Recommended Skill Level
Beginner

Faux Fireplace

Submitted by Anonymous (not verified) on Thu, 12/29/2022 - 05:37

Small space faux fireplace. Thank you for the plans for the faux fireplace. Easy to make and has been used for every holiday.

Comments

Trash Can Cabinet w/ Bead Board Insert

Submitted by dhunt on Sat, 09/17/2011 - 22:00

My mom bought a similar one several years ago and I've been wanting something like this ever since...so glad I came across this site so I can proudly say I built it myself whenever someone asks!

Estimated Cost
$50-$75
Estimated Time Investment
Day Project (6-9 Hours)
Finish Used
Olympic One
Paint and primer in one!
Recommended Skill Level
Intermediate

Comments

shammrocky

Sun, 05/19/2013 - 13:44

I would like to purchase something like this, but I cannot find it any where. I actually want to make it into a laundry hamper where it is deep enough to fit two tall thin laundry baskets. Can anyone help me on this?

dia

Thu, 10/10/2013 - 20:59

Absolutely adore how yours turned out. Such an elegant look. Please share the color you used. Can't really tell if it's black or a very dark brown. Thanks and congrats on the gorgeous result!

Debbie440

Mon, 11/25/2013 - 16:23

Yes, I agree, this turned great. I'd also like to know what color it is?

Farmhouse Table

Hi Everyone,

I decided to make this table for my growing family. Total length is around 7ft, perfect for family dinners or entertaining

Estimated Time Investment
Weekend Project (10-20 Hours)
Finish Used
Extra tough matt coat
Recommended Skill Level
Intermediate

Comments

Sam Richards

Wed, 10/02/2013 - 12:55

Hi all, this is my first build. It's loosely based on the farmhouse table plans without the breadboard ends but with dowelling down the joins to prevent warping

Square Farmhouse Table

Submitted by Anonymous (not verified) on Fri, 12/18/2015 - 20:12

This is a 5x5ft square farmhouse table that I built for my dining room. It's all kiln dried construction lumber. I bought a thickness planer to get this right. I got tired of the twists in the boards that made it impossible to get the table top flat and consistent. It's completely worth it. I cut all the boards down from 2x12 lumber to 10 inch width. I routered the edge of each plank with 1/8 bit to give it a small crack in between the planks. I sprayed the new varathane poly, water-based, and it came out perfect. I ended up with 4 coats.

Estimated Cost
250-300
Estimated Time Investment
Week Long Project (20 Hours or More)
Finish Used
Varathane Dark Walnut
Recommended Skill Level
Intermediate

DIY Bailey Dog Chair for Dogs with Megaesophagus

Hello everyone, today I’m sharing details on something I built recently: a Bailey Chair for dogs suffering from Megaesophagus.

Dogs with megaesophagus have an enlarged esophagus. This makes swallowing food difficult. Eating while in an upright position helps and the task of keeping the dog vertical is easier when the dog is sitting in a Bailey chair.

This blog post is less of a detailed how to and more of showing in progress photos. Adam, over at Lazy Guy DIY, has put together a great tutorial on how to build the Bailey Dog Chair. I followed his instructions with very few modifications.

CLICK HERE to read my build details and see more photos!

Estimated Time Investment
Afternoon Project (3-6 Hours)
Finish Used
clear spray
Recommended Skill Level
Beginner

Helping me get organize

Submitted by jojo on Sat, 09/24/2011 - 13:20

My laundry room is really small and laundry baskets were always in the way. I needed a way to organize it better. I thought it would be really cool to have a way have the baskets more accessable and take up as little space as possible. I started thinking up a plan when I decide to check and see what might be here and found the perfect project. My husband and I modified it just a little. Instead of building 2 smaller units and stacking them we decided to build it all in one unit. We added a shelf in the middle to help stablize it more. We also made wood side supports and only used them for the top 2 baskets in each section leaving the other two baskets to sit on the shelf and the bottom peice. We built it in just a few hours but because I used oil based paint to finish it, it too a while longer for it to dry.

Built from Plan(s)
Estimated Time Investment
Afternoon Project (3-6 Hours)
Finish Used
Oil based, high gloss white paint.
Recommended Skill Level
Beginner

Comments

Lap Desk

Submitted by miki0225 on Tue, 10/01/2013 - 17:07

Made 2 of these for my daughters. Then had a request for one from a teacher for a homebound student awaiting a liver transplant. I love that this site has given me the opportunity and means to help serve others. Thank you Ana!!!

Built from Plan(s)
Estimated Time Investment
An Hour or Two (0-2 Hours)
Recommended Skill Level
Starter Project

Farmhouse Buffet Table

Submitted by kterrell on Mon, 12/21/2015 - 21:05

The goal of this project was to create a buffet / serving table to compliment the large farmhouse table I made a while back.   We have been using a folding table for a buffet line at large family gatherings and that just didnt seem right when placed next to the giant 10' table.  (info for the table: http://www.ana-white.com/2014/07/big-farmhouse-table)

The build is similar to the farmhouse table, but the materials are a bit smaller due to the size of the table.  The legs are 2x3's and the table top itself is made of 2x6's outlining a 2' x 5' section of tile. All of the other materials (stretchers and apron) are made from 1x3s.  The tile is set so it sits about 1/8" higher than the wood.  This is to allow hot pans and plates to be placed directly on the tile without a trivet or other separator.  The tile sets on a 3/4" piece of MDF supported by small 1x2 slats underneath.


All of the joinery is accomplished with glue and Kreg Jig / Screws. 


Estimated Cost
$70 in lumber.

Cost doesnt include finish materials or screws as I had them onhand already, but would probably cost $20 or less.
Estimated Time Investment
Day Project (6-9 Hours)
Finish Used
pre-conditioner (brushed), traditional american stain, 2 coats of tung oil finish and 1 coat of rub on poly (all applied by cloth).

Recommended Skill Level
Beginner

Farmhouse bed and nightstand

Submitted by Anonymous (not verified) on Fri, 01/13/2023 - 05:00

Queen size distressed farmhouse bed and nightstand with expanded metal inserts in door and headboard that we made rusty and then clear coated.

Built from Plan(s)

Comments

Halloween Yard Sign

I made this yard sign just in time for Halloween. I FINALLY found a use for some of my scrap wood. This was a fun project, start to finish in one day. I used stain and paint to add bold color. Details are on my blog.

Estimated Cost
FREE
Estimated Time Investment
Day Project (6-9 Hours)
Finish Used
Minwax Gel Color stain in Onyx and Crimson
DecoArt Americana Multi-surface paints
Recommended Skill Level
Starter Project

Christmas present doll bed for Reagan

Submitted by Anonymous (not verified) on Thu, 12/24/2015 - 15:40

Made this for my granddaughter Reagan's American Girl doll.  I made the bed and my wife made the sheets and blanket and pillow.  Your plans were awesome!

Estimated Cost
18.00
Estimated Time Investment
Day Project (6-9 Hours)
Finish Used
Paint
Recommended Skill Level
Intermediate

Corner bookshelf

Submitted by Anonymous (not verified) on Sat, 02/23/2019 - 18:49

Made it taller and added a shelf

Estimated Cost
280
Estimated Time Investment
Week Long Project (20 Hours or More)
Finish Used
Minwax jackobean and polyurethane
Recommended Skill Level
Intermediate

Comments

Easy planter boxes

Submitted by Anonymous (not verified) on Mon, 01/16/2023 - 11:39

Loved building these planter boxes!
I was able to use my laser to addd some personalization.
I also added small wedges at two levels in all four corners. This not only made it very sturdy but with a half lap “x” it creates two levels to pick from for different size pots

Built from Plan(s)

Comments

Double Double Loungers

Submitted by Gimbler on Tue, 10/04/2011 - 15:10

I had an idea in my head of what I wanted for deck seating/lounging in my mind but just couldn't seem to get to the "nitty gritty" of creating workable plans. Then, while googling through images of double loungers I stumbled onto Ana's site. Wow! I felt like a fish that had just found the water! With the detailed plans generously provided for a double lounger I was able to create my "vision" with just slight modifications. The loungers are actually two chairs and two ottomans that fit together or come apart depending on how much "togetherness" the situation calls for. And best of all - almost all the materials were left overs and cut pieces from another deck and fencing project. For cushions (not in this photo) I used two inexpensive "Hide A Mats" folding beds from Costco that I covered with waterproof duck fabric. I can't thank you enough, Ana, for taking the time to share your talent so freely. I'm truly grateful. As is Jake, the Redbone Coonhound, who insisted on being in the photo!

Estimated Cost
About $150 for hardware and cushions - lumber was scrap and leftovers from another project.
Estimated Time Investment
Weekend Project (10-20 Hours)
Finish Used
Olympic semi transparent deck stain.
Recommended Skill Level
Intermediate

Comments

Gimbler

Tue, 10/11/2011 - 06:34

We really enjoyed these over the summer - and if Buck is anything like Jake I'm sure he'll take advantage of any available "creature comforts". :o)