Community Brag Posts

Farmhouse Storage Bedroom with Drawers

I started this bed months ago, thinking I would have plenty of time to get it done in a weekend. Ha! Well actually to tell the truth most of it was done in a weekend...but, maybe I should start at the beginning... Beware this is a picture heavy post, I tried to do collage photos as much as possible to cut back...
Comments
Mon, 01/03/2022 - 10:34
Awesome Storage Bed!
That is gorgeous, love the natural look and hardware choice!
Baxter's elevated feeding station
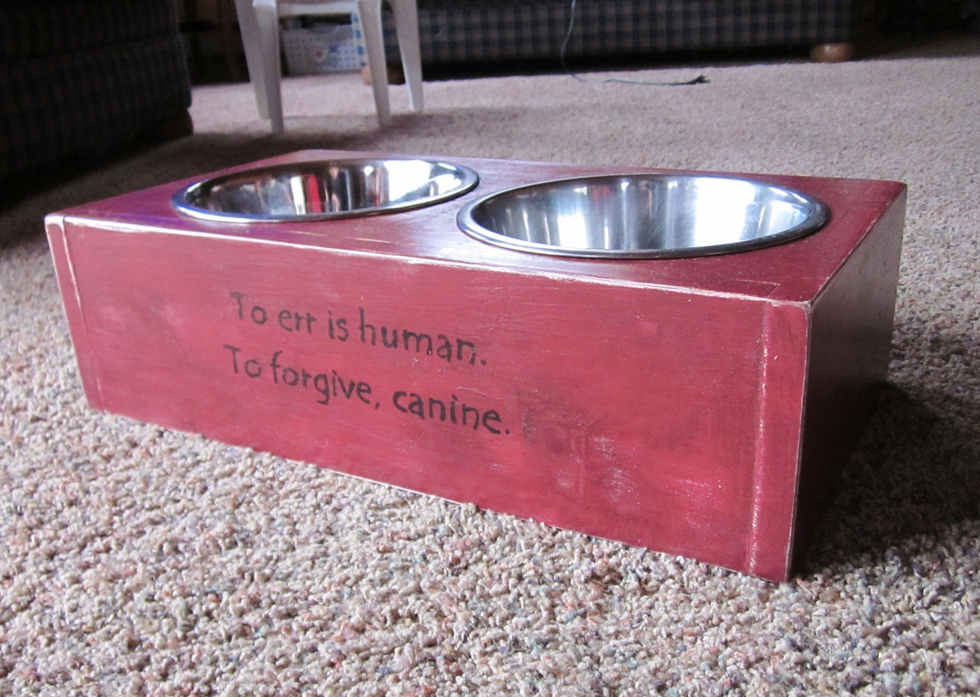
I saw Ana's plan for an elevated dog dish, but our little cockapoo (still a puppy) wasn't really ready for that height. So I made a basic box and cut out the holes in the top for the bowls. He is still growing, so when he's a little taller, I'm going to put tennis balls on the bottom as feet which will raise it up a little more. Thought I would dress it up with a quote I found somewhere online.
Used some leftover paint and glaze from making the pantry and finished the same way.
Estimated Cost
Scraps used . . . . estimated at less than $10
Estimated Time Investment
An Hour or Two (0-2 Hours)
Finish Used
Valspar Red Cabin paint
Valspar Antiquing Glaze
Valspar Antiquing Glaze
Recommended Skill Level
Starter Project
First time project
This was my first attempt at making anything. Thank you to Ana for providing such easy plans and the encouragement to try something. I think I'm hooked!
Built from Plan(s)
Estimated Time Investment
Day Project (6-9 Hours)
Recommended Skill Level
Beginner
Comments
Sun, 05/31/2020 - 13:21
Beautiful! where did you get…
Beautiful! where did you get the cushions from?
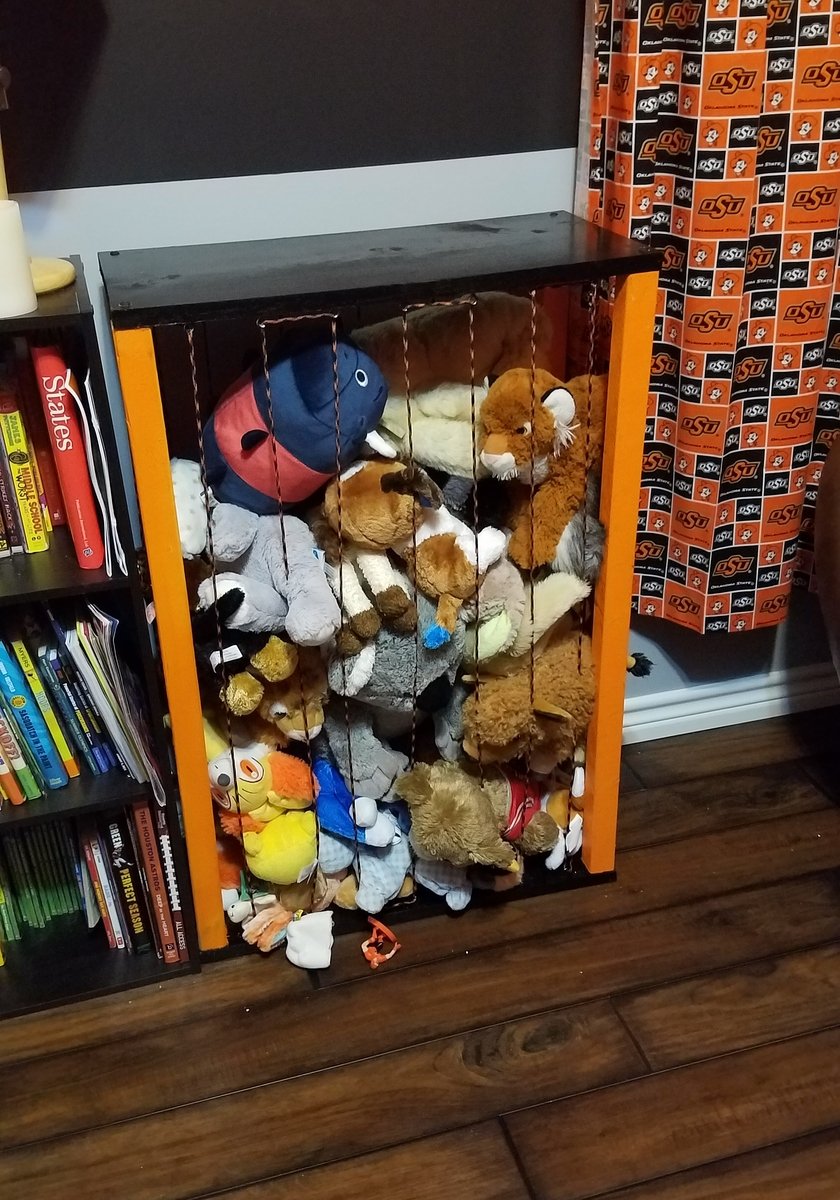
Toy zoo
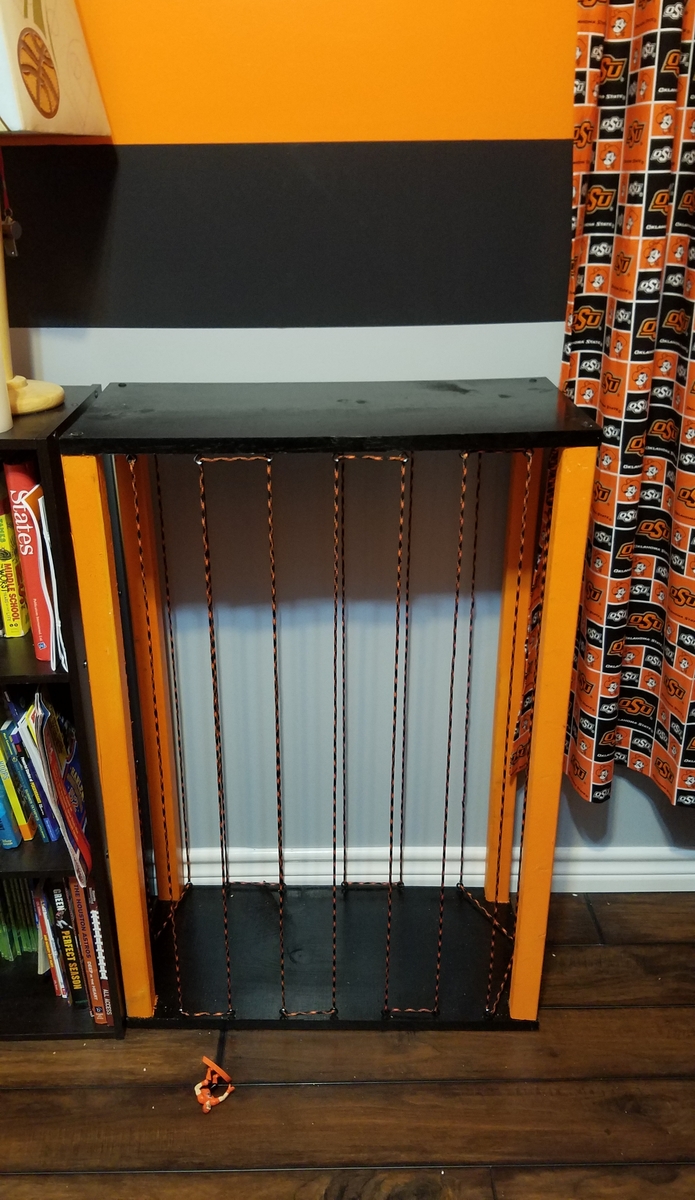
My son has a very specific color scheme in his room (Go Pokes!), and finding something to keep his toys in, that looks like it belongs, is simply impossible. I chose to do it cheap and quick way, but it came out exactly like I hoped it would. I really liked the eyelets idea, and since I wanted the zoo to be movable and able to serve as a shelf, I just screwed them in directly into the top and bottom
Built from Plan(s)
Estimated Cost
$35
Estimated Time Investment
Afternoon Project (3-6 Hours)
Finish Used
Spray paint
Recommended Skill Level
Starter Project
Gallery Shelves
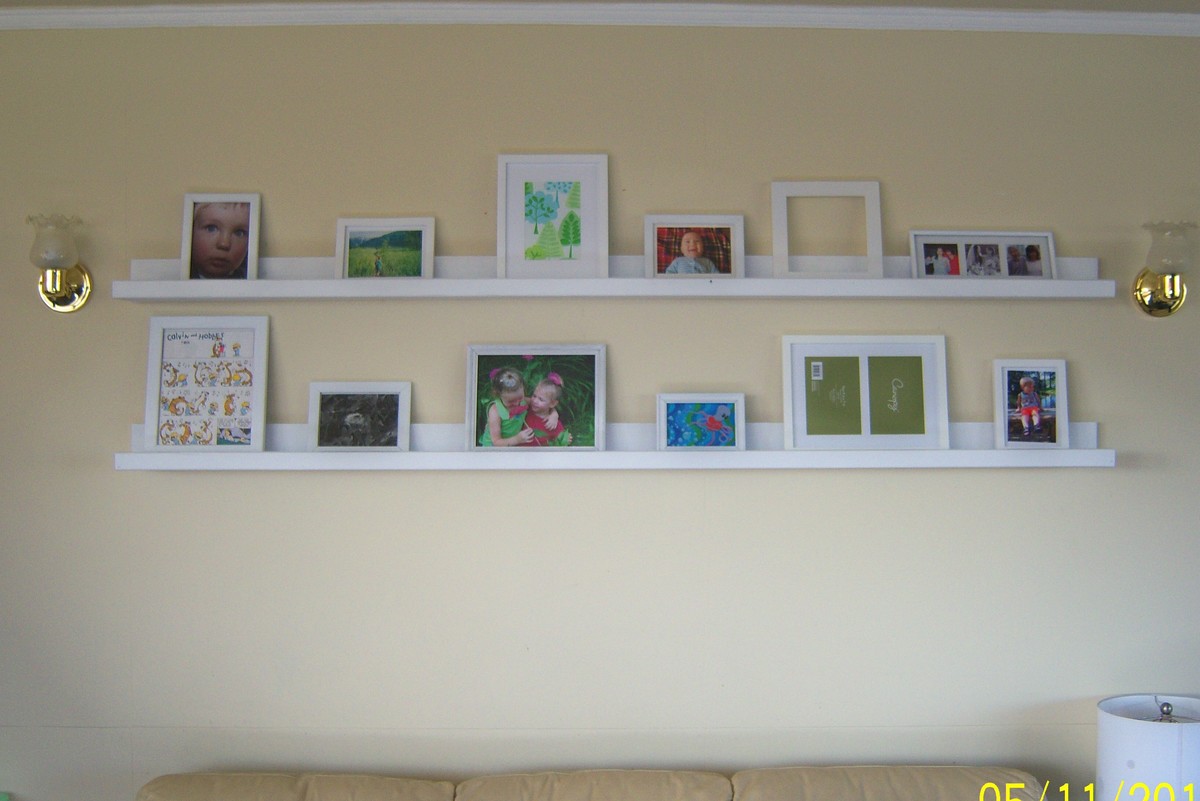
I live in Ketchikan, Alaska right smack in the middle of a rain forest, so I had been waiting for a sunny day for quite a while so i could get outside and get these built and painted. I got all the wood and about a week later my day came, I got outside and had them built, primed, and painted in less than 3 hours. I painted all my frames the next day and had my husband help my put them up. I have gotten SO many compliments on them and they look so great in our living room, after we put them up, I realized how naked that wall had looked before!
Built from Plan(s)
Estimated Cost
30 dollars
Estimated Time Investment
An Hour or Two (0-2 Hours)
Finish Used
Used a spray on primer, then finished with 2 coats of semi-gloss white. The frames I spray painted first, but as that didn't cover the black and brown frames enough, I went over that with some of the leftover paint.
Recommended Skill Level
Starter Project
Owen's bench
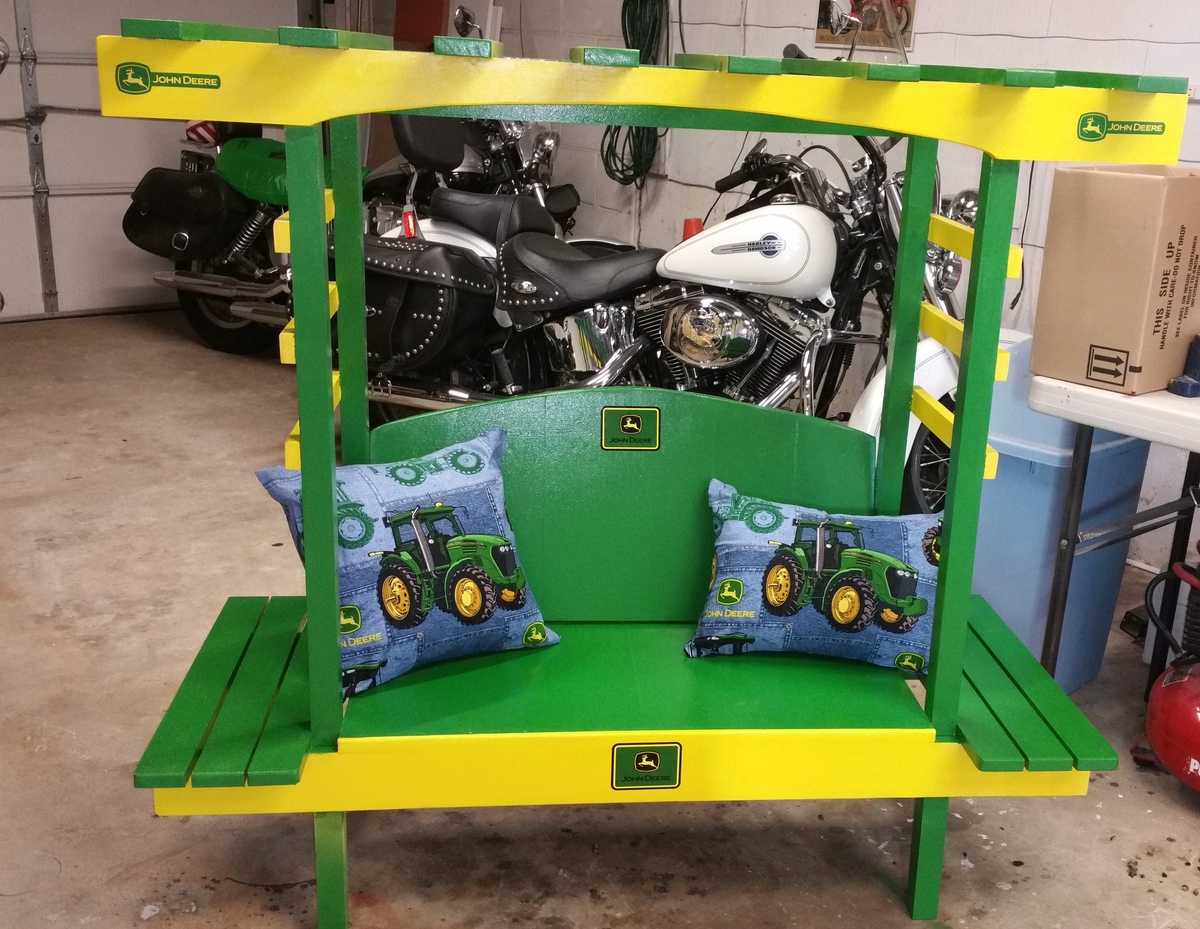
I made this for my grandnephew and it was really easy to build. I put it together first using a power brad nailer and then went back and screwed it all together for extra strength. The cut/build took just a few hours. The painting took several hours since I didn't prepaint and had to tape off where the colors were different (lesson learned for next time).
Built from Plan(s)
Estimated Cost
Approx $100
Estimated Time Investment
Afternoon Project (3-6 Hours)
Finish Used
Exterior Enamel
Recommended Skill Level
Beginner
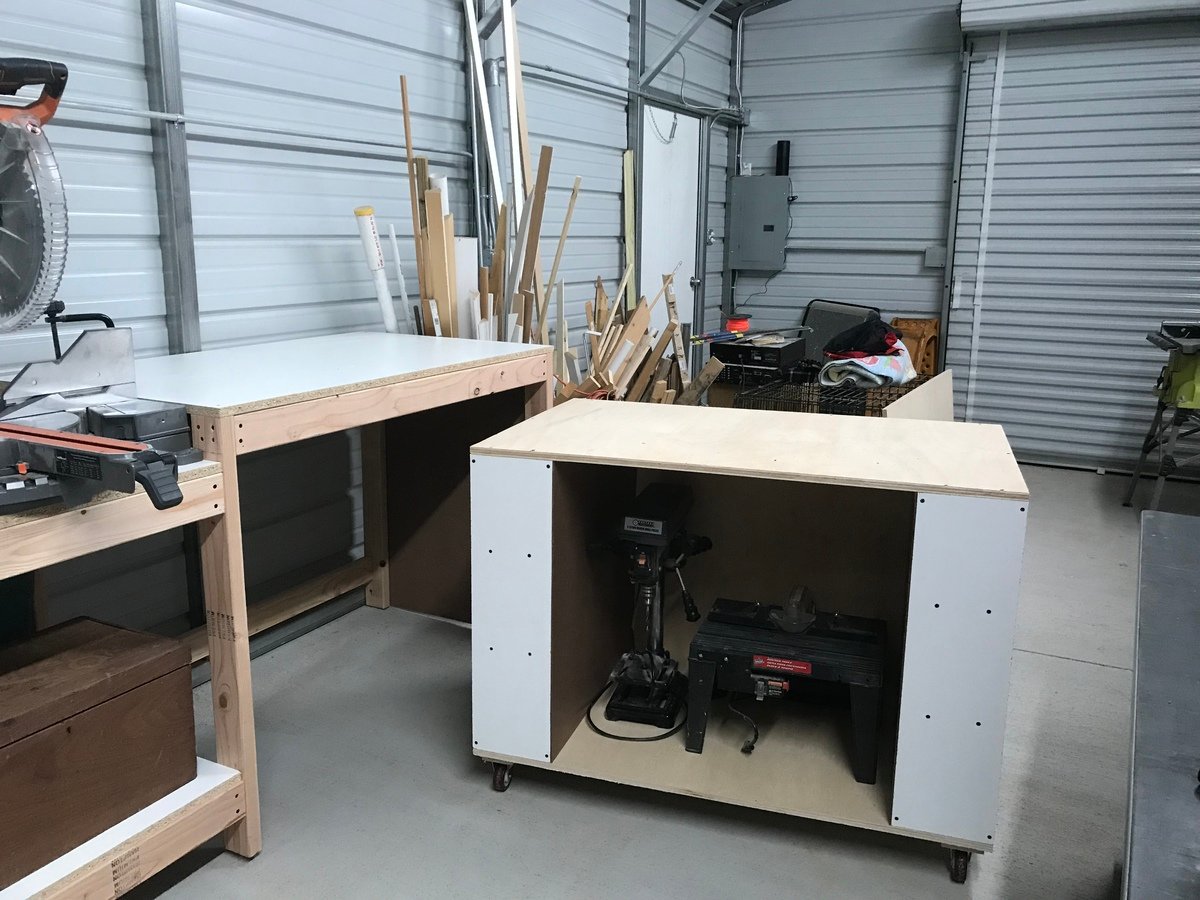
Workshop Now in Session!
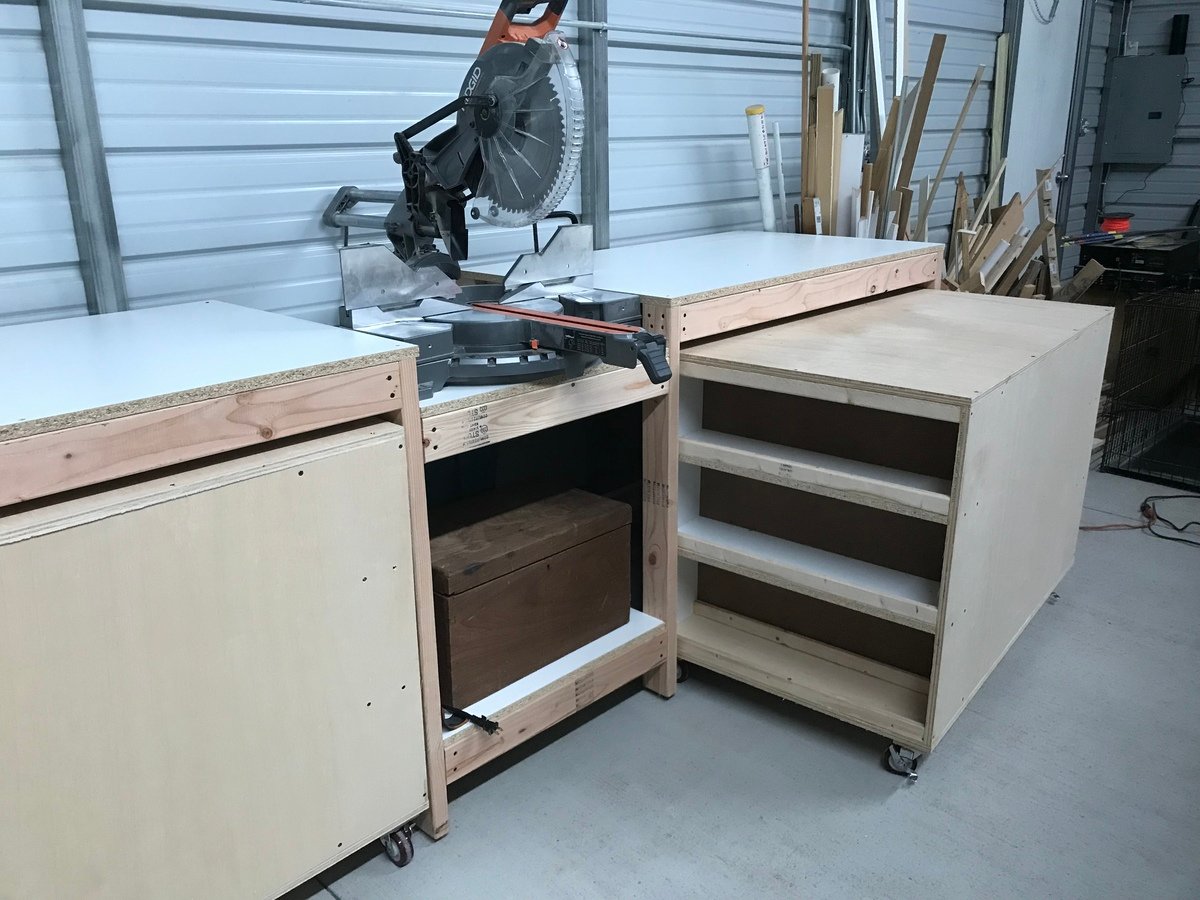
Easy instructions and simple design. One cart houses table saw, and the other I plan to make a router table. I did make a slight modification in design by adding T-nuts and 5/16” bolts for feet. (My shop floor is crowned). I also used 3/4” melamine white panels for table tops. Difficult to work with but cheaper and has a smooth surface. (Be careful using for structural parts due to glue not impregnating through melamine)
Built from Plan(s)
Estimated Cost
$250
Estimated Time Investment
Weekend Project (10-20 Hours)
Recommended Skill Level
Starter Project
Comments
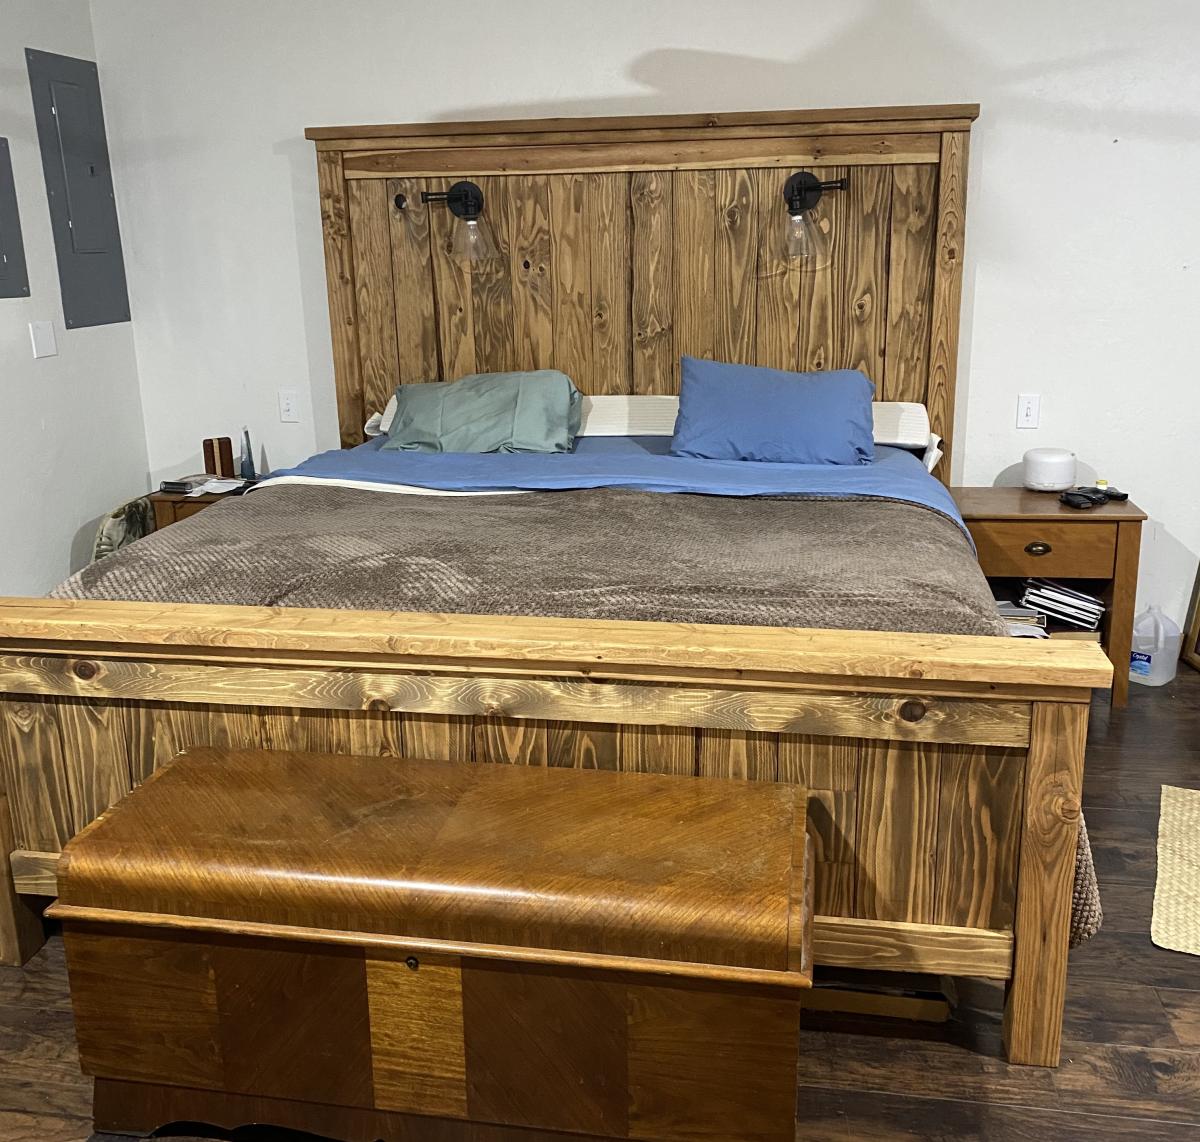
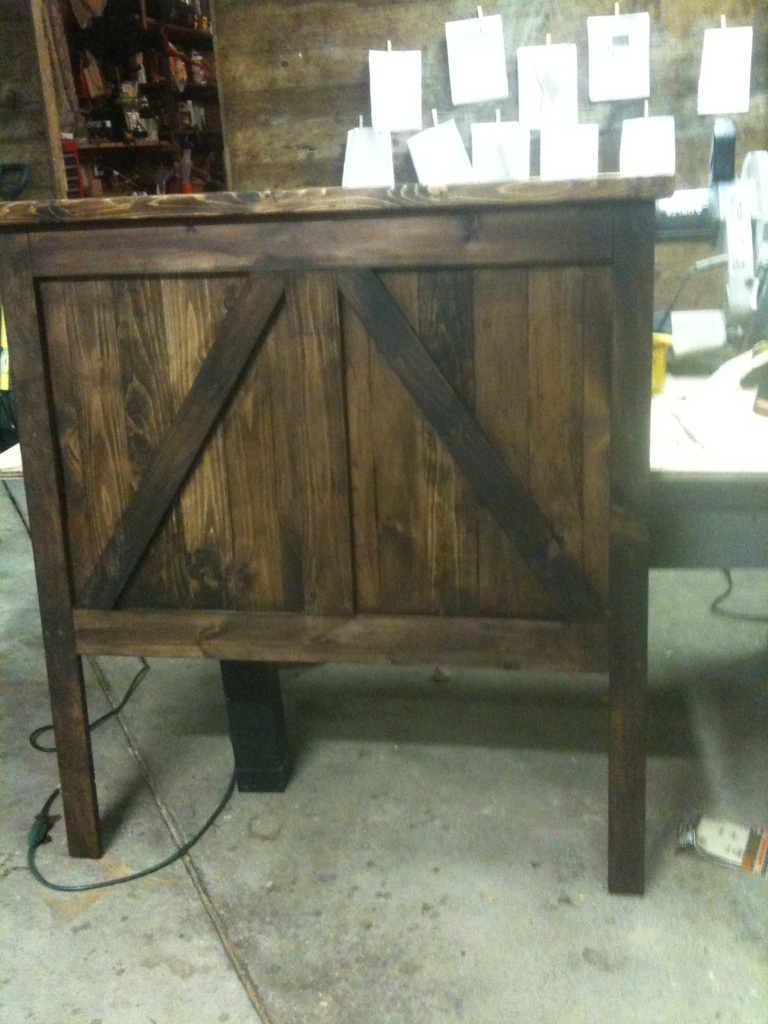
Farmhouse King size bed frame
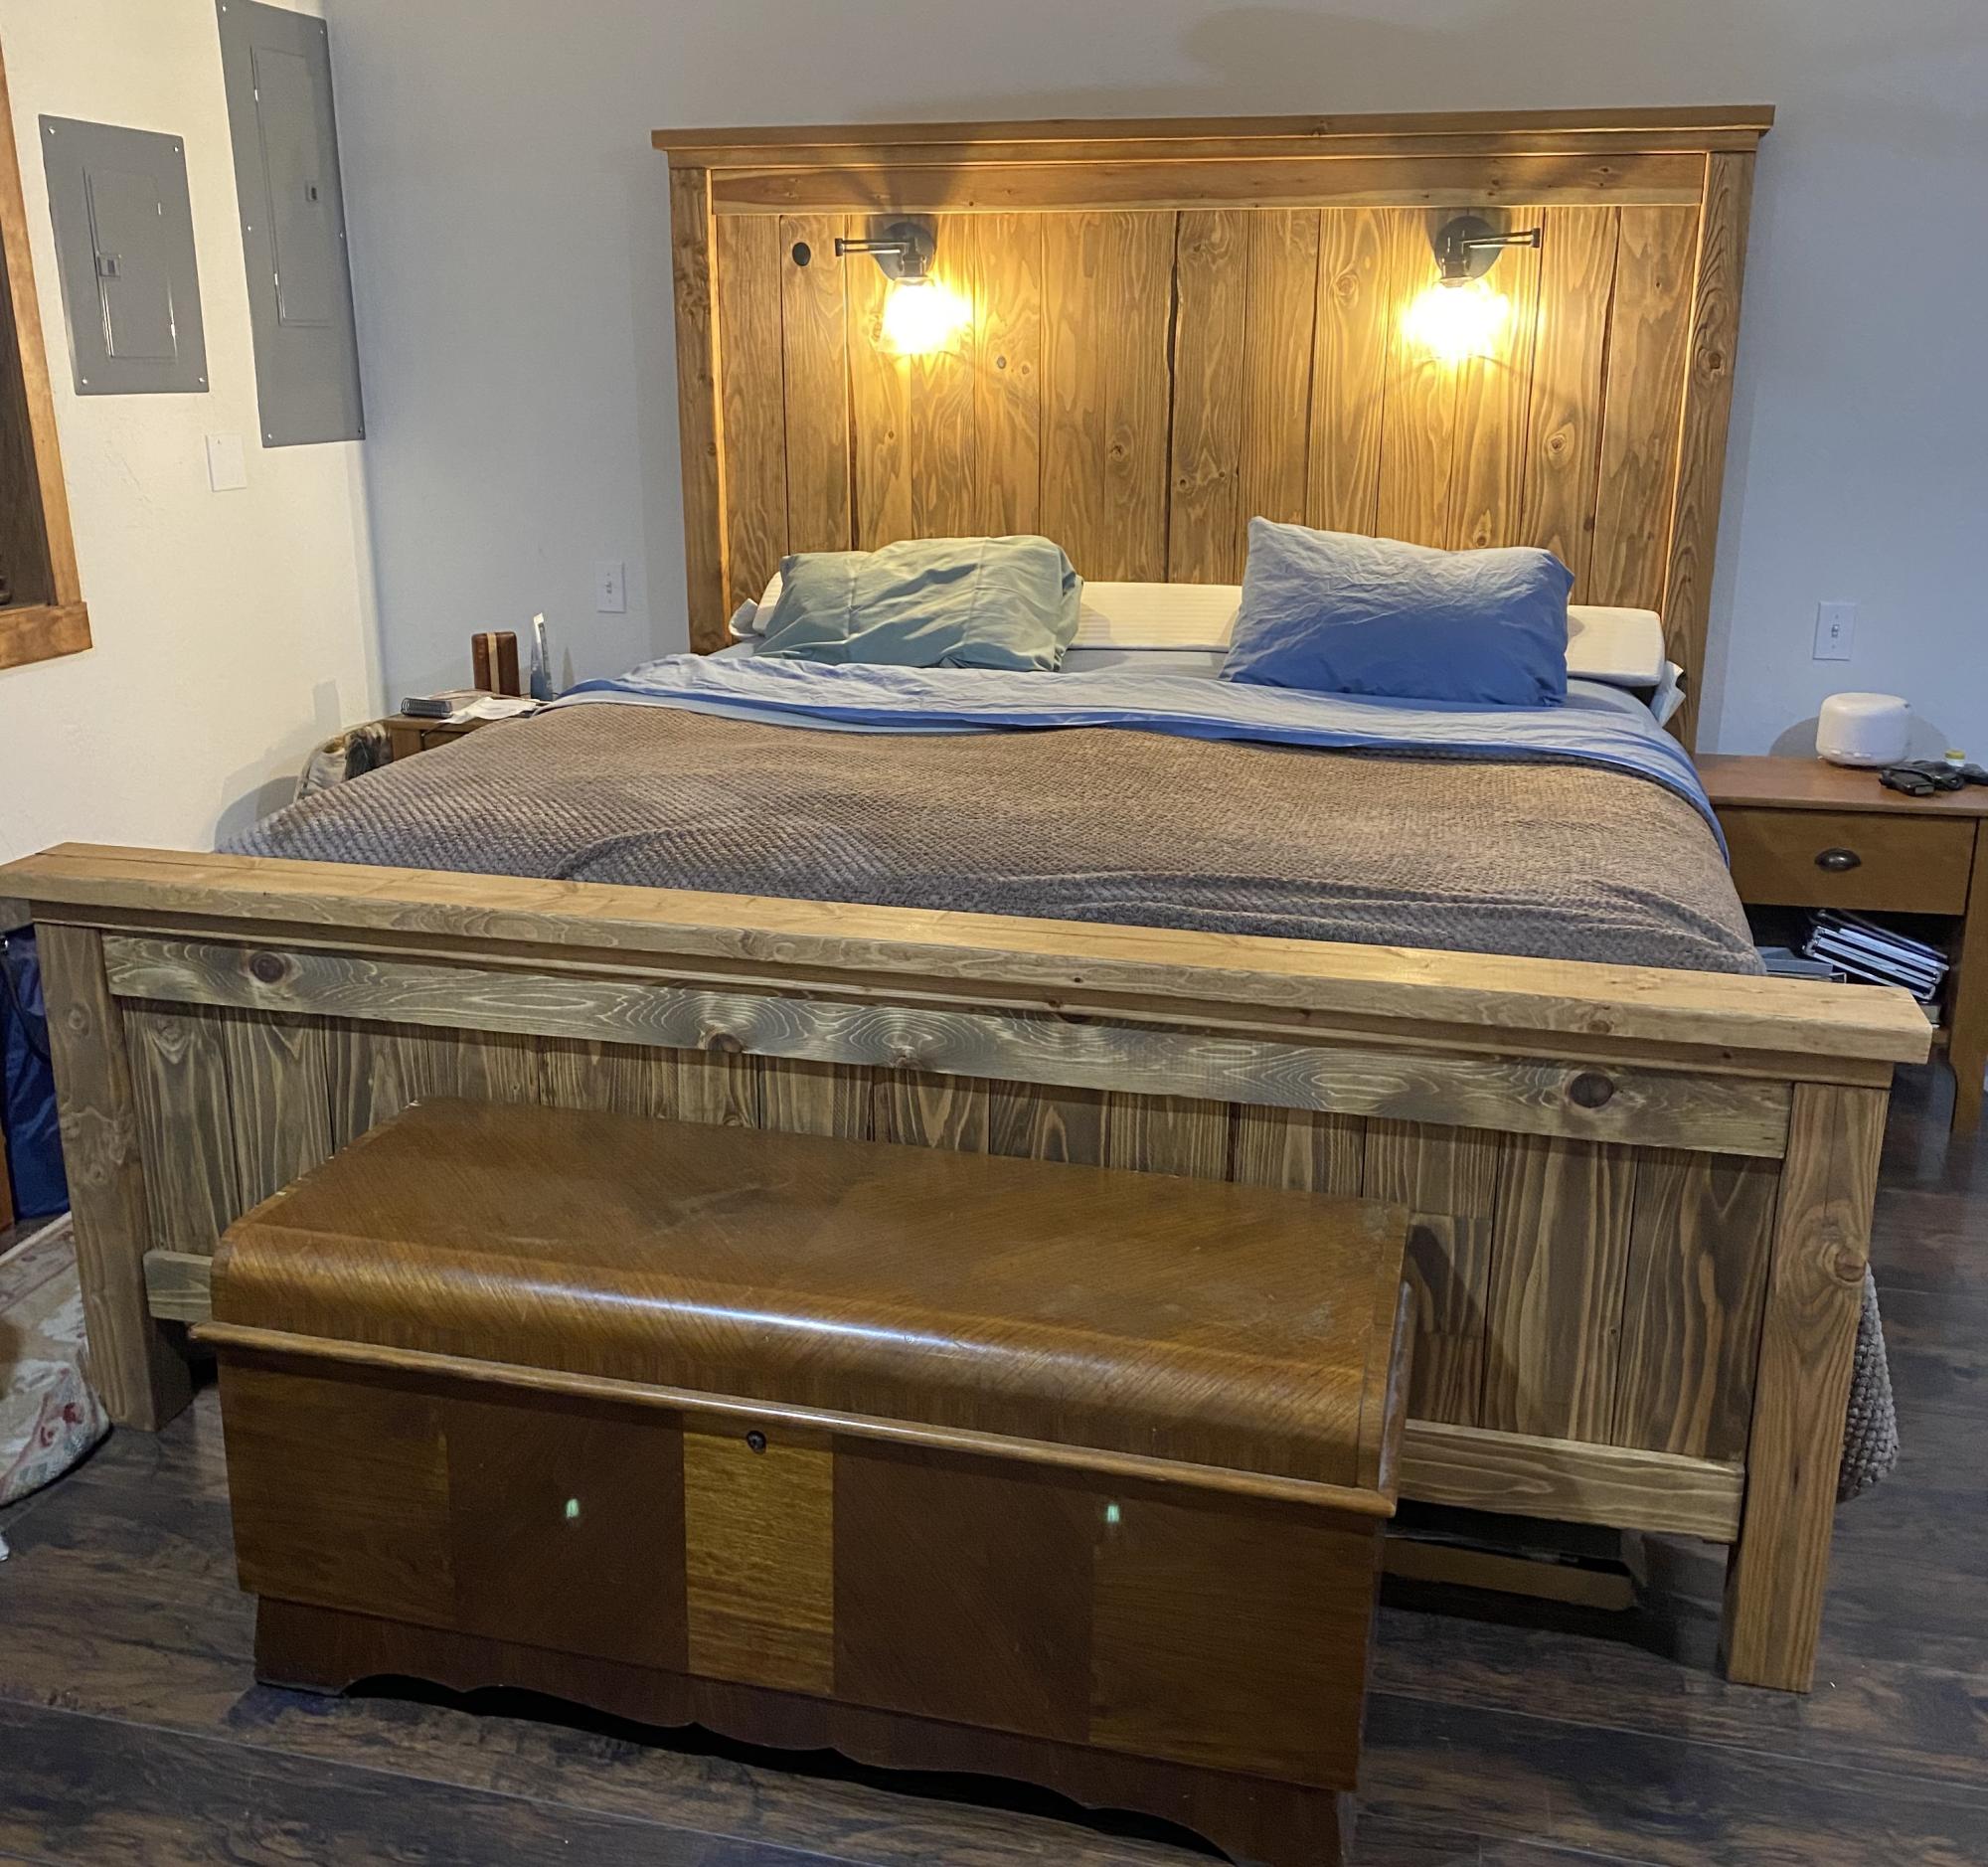
Found the plans on your site for Farmhouse bed frame, thank you!
Made a spectacular Christmas gift for Hubby!
I ended up buying a few more pieces of 1x6 as I opted not to waste the 4x4 posts, and added 14” height to the headboard and 7” height to the footboard.
I actually forgot about my lights on the wall, so what to do? Drilled holes in the headboard and wired them through! Love opportunity solving! 😂👍🏼
I should’ve moved the Hopechest for the photo, but you get the idea. Next project, matching side tables!
Built from Plan(s)
Comments
Ten Dollar Ledges
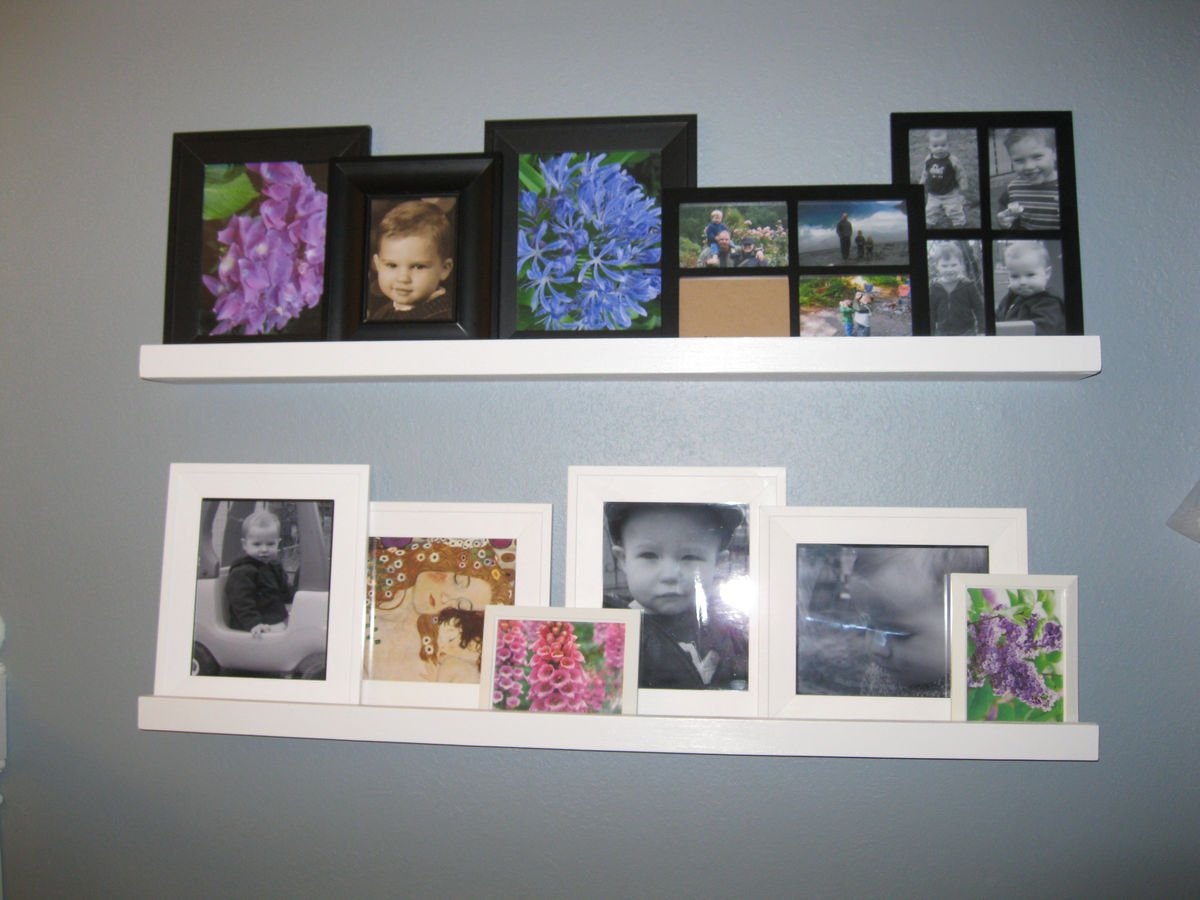
I needed something for my living room wall and then I found this plan. I love it! My husband helped me knock these out really fast. I sanded them then used primer and 2 coats of white trim paint.

Estimated Time Investment
An Hour or Two (0-2 Hours)
Finish Used
Primer, White interior high gloss trim paint.
Recommended Skill Level
Starter Project
Homemade "First-Ever-Creation" Washer/Dryer Pedestal!

This was my first wood project... ever. But I didn't want to dish out the $500 for the back-saving store pedestals. This thing is big and sturdy. I have a few random comments below that may help out others with my little experience.
- Lowes does not cut 4x4s. Only 2x4s. Also, call Home Depot to make sure their saw is working before you grab all the wood on your cart :)
- Careful about adding trim to the outside of the pedestal (by outside I mean with left/right side, as opposed to the front). That extra piece of trim will increase the width of your table and it may not fit in your home's spot.
- Wood Putty is ok but cannot be sanded and always stays soft. Wood FILLER on the other hand hardens. I used this extensively to help spiff up my poor trim job. Especially the corners.
- Speaking of poor trim job, I was told after the fact that you should clamp down the trim before you nail. Everytime I tried to nail a piece of trim it would wiggle out of place.
- When wood glue drips, it becomes hard to sand and leaves a mark under the pain it not cleaned up well.
- I didn't know what a countersign drill bit was, but when I dished out the Hamilton for one I found out that any ole drill bit may have sufficed. I'm gonna need some clarification on this, but I ended up pre-drilling almost all of my holes because my electric drill was not powerful enough to screw into the wood.
That's about it. It was a fun first project, but I definitely could've used a few more helpful details, or at least someone who knew something about wood to point out how little I actually know!


Estimated Cost
$150
Estimated Time Investment
Weekend Project (10-20 Hours)
Recommended Skill Level
Starter Project
Comments

Sun, 07/14/2013 - 01:35
Congratulations!
It's amazing to see all that you have learned on your first go at building! You've done a great job; have you been bitten by the building bug now? I know I have! =D
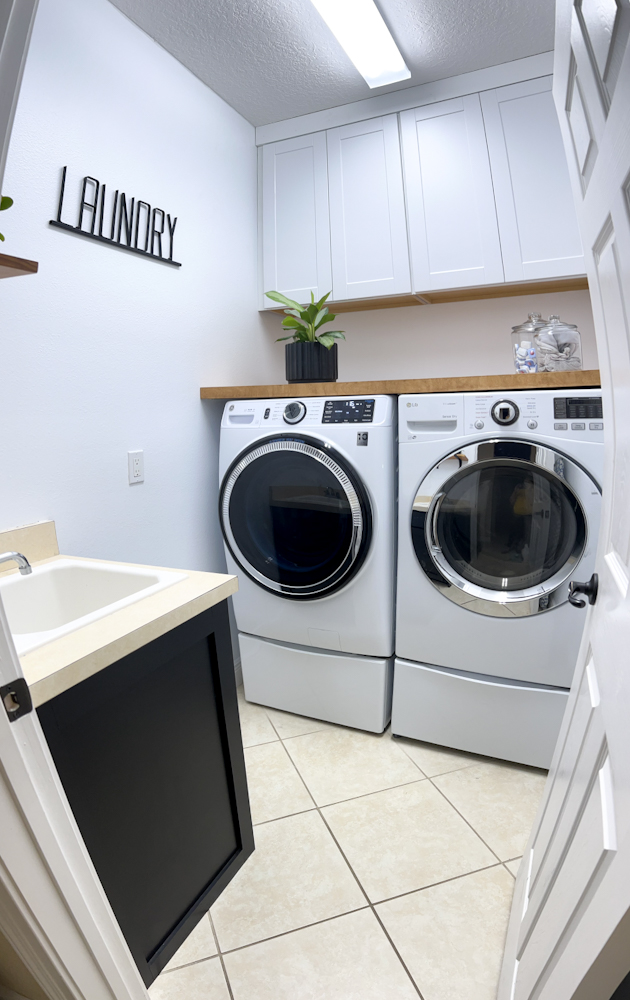
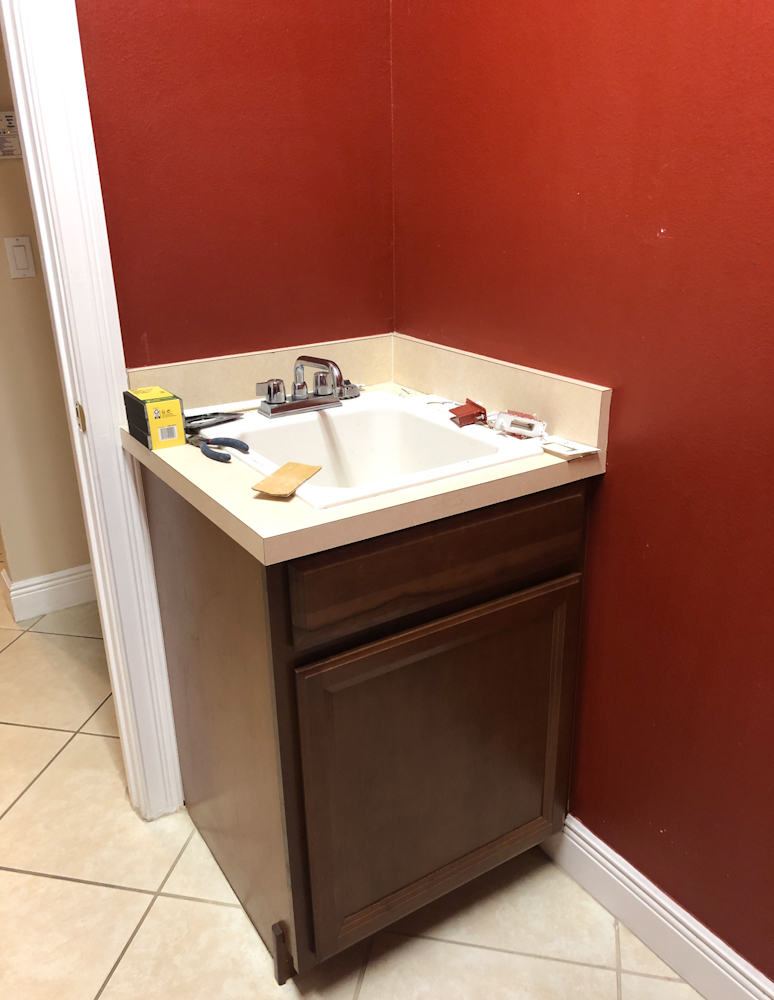
Shaker Style Cabinet Redo for Laundry Room Renovation
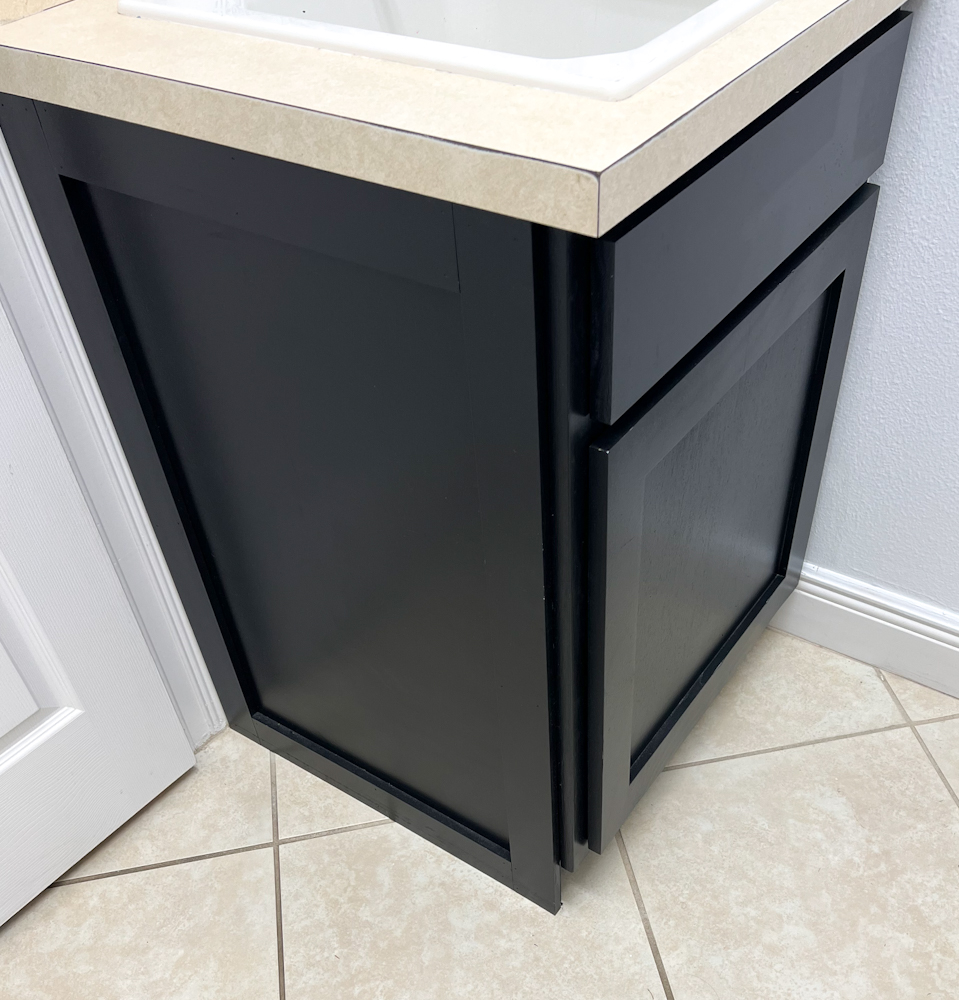
This was my first time being involved in a renovation. At our last house, my husband (who works in trim carpentry) did all the work to my decor instructions. This time I wanted to be involved and do the work alongside him. Using Ana White's instructions we were able to reface our laundry room cabinet to be the shaker style cabinet that I love. Keeping with a modern theme, we painted it black. I've included the before and after photos of the cabinet as well as the cabinet in context to the entire laundry room that was renovated. It came out awesome. Thankful for all of her helpful posts.
Built from Plan(s)
Comments
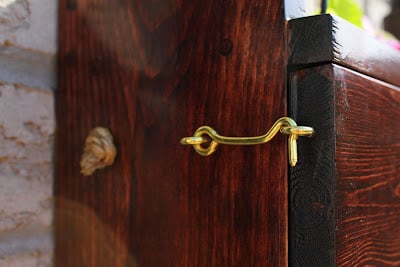
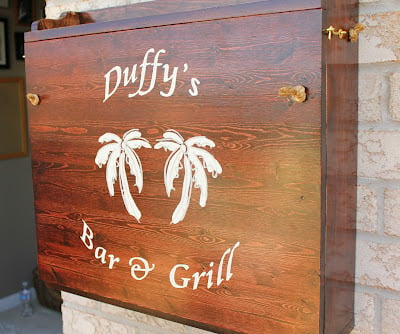
Fold-down Backyard Bar
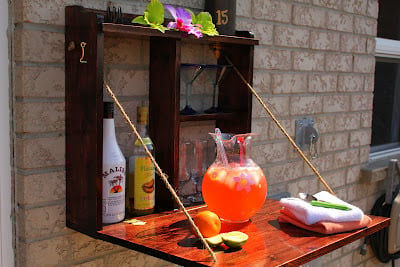
Hi Ana,
I saw your link on Facebook to the fold-down bar by Home Depot, and I wanted to show you the one we built last year. We're pretty proud of how it turned out! It was easy to build - we just used a reference photo we found on the web and built it to our own specifications. We have a very tiny backyard with absolutely no space to set up a drink area, so this works perfectly. It folds up out of the way when it's not needed (and doesn't have to be packed away for the winter!)
After installing it, I handpainted the back (bottom) with an inside-joke between my husband and his friends. "Duffy's Bar and Grill!" is how they answer the phone whenever one calls the other.
I hope you like it!
Barb Steadman
Newmarket, Ontario, Canada
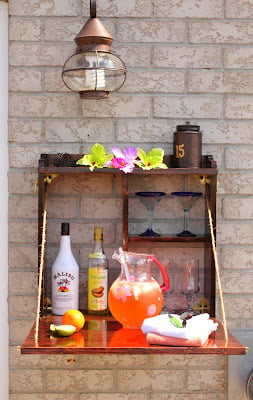
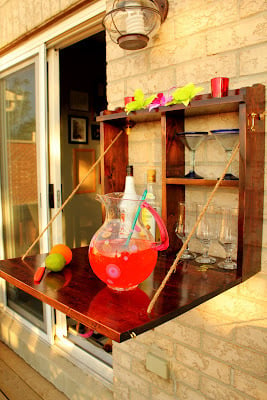
Estimated Time Investment
Weekend Project (10-20 Hours)
Finish Used
Red Mahogany stain (MinWax), Polyurethane topcoat
Recommended Skill Level
Intermediate
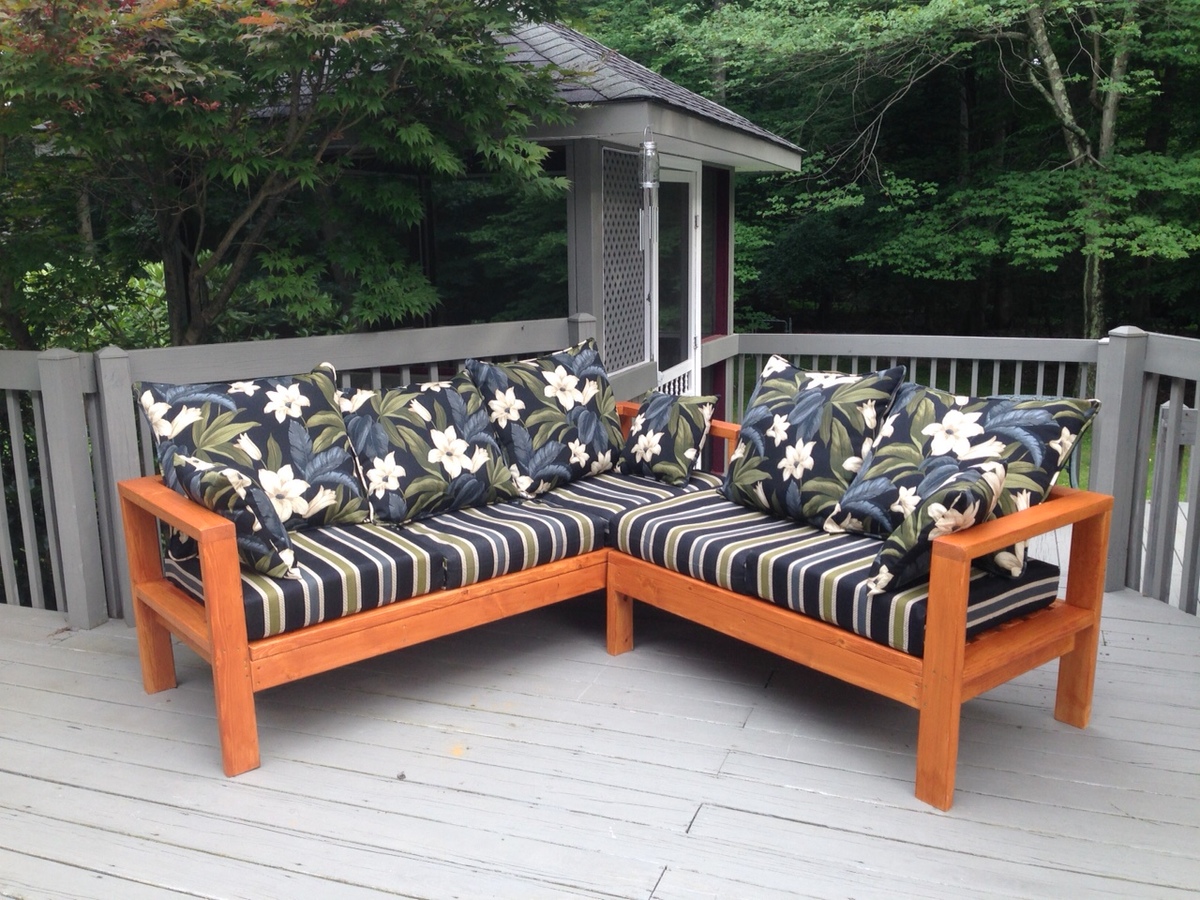
Outdoor furniture
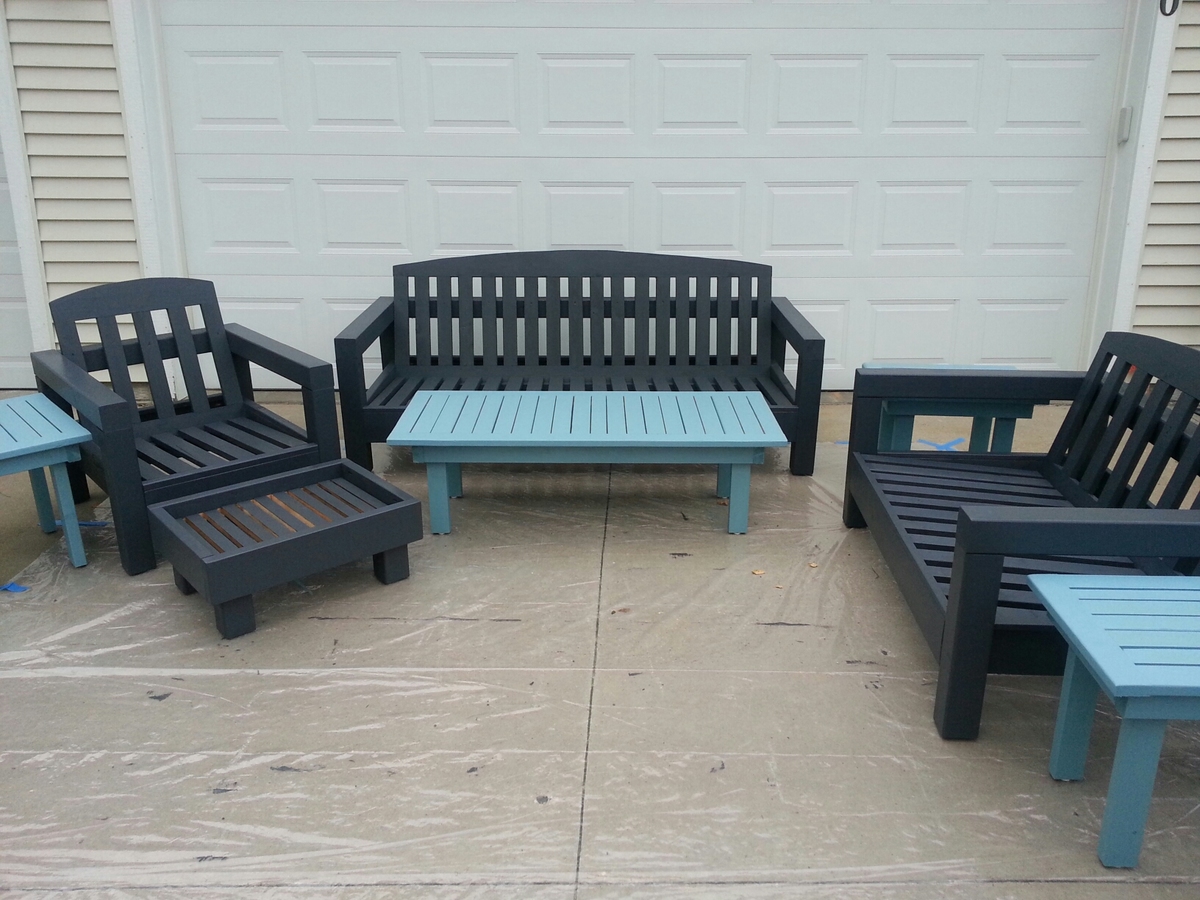
I built this set of furniture and tables over two full days and spent another whole day on the finish. Thanks for your inspiration and plans to get this project from a list to something we can enjoy. Cushions (Sunbrella) were purchased at clearance from Restoration Hardware (not shown) last year. The plans were changed slightly for the cushions and choice of lumber dimensions utilized (4x4 cedar instead of 2x2). That's a heck of a lot of pocket screws--the mounted jig is required for this much work.
Built from Plan(s)
Estimated Time Investment
Week Long Project (20 Hours or More)
Finish Used
Cabot solid color acrylic decking stain, generously applied by brush.
Recommended Skill Level
Intermediate
Comments
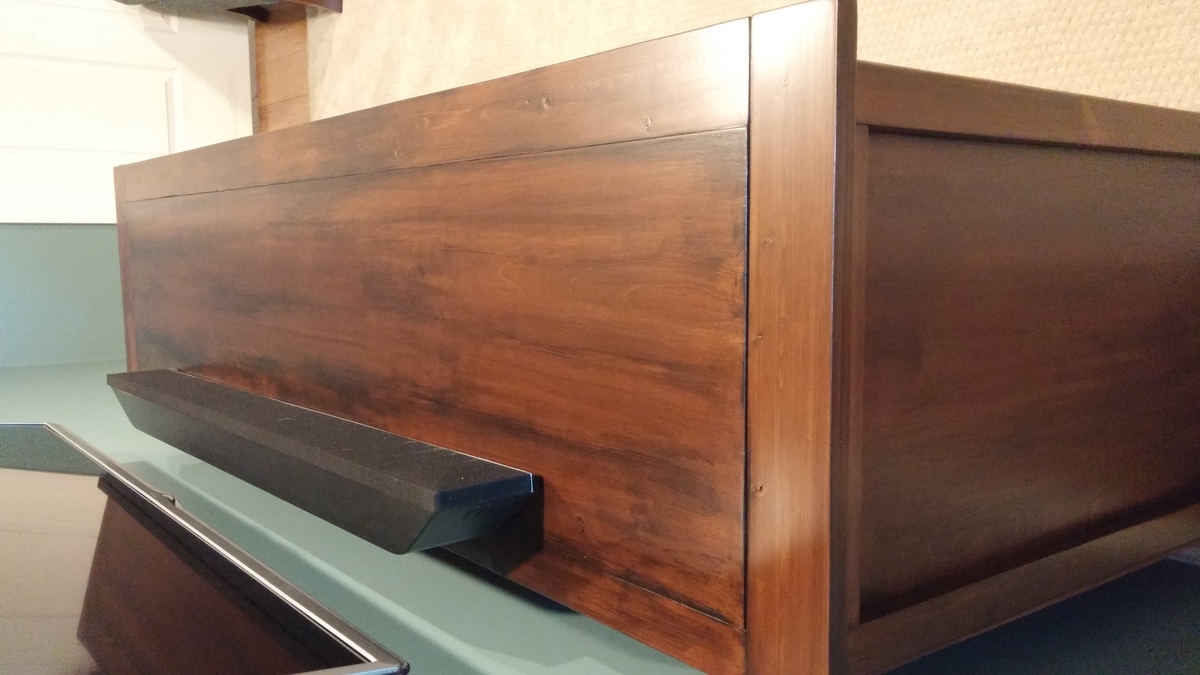
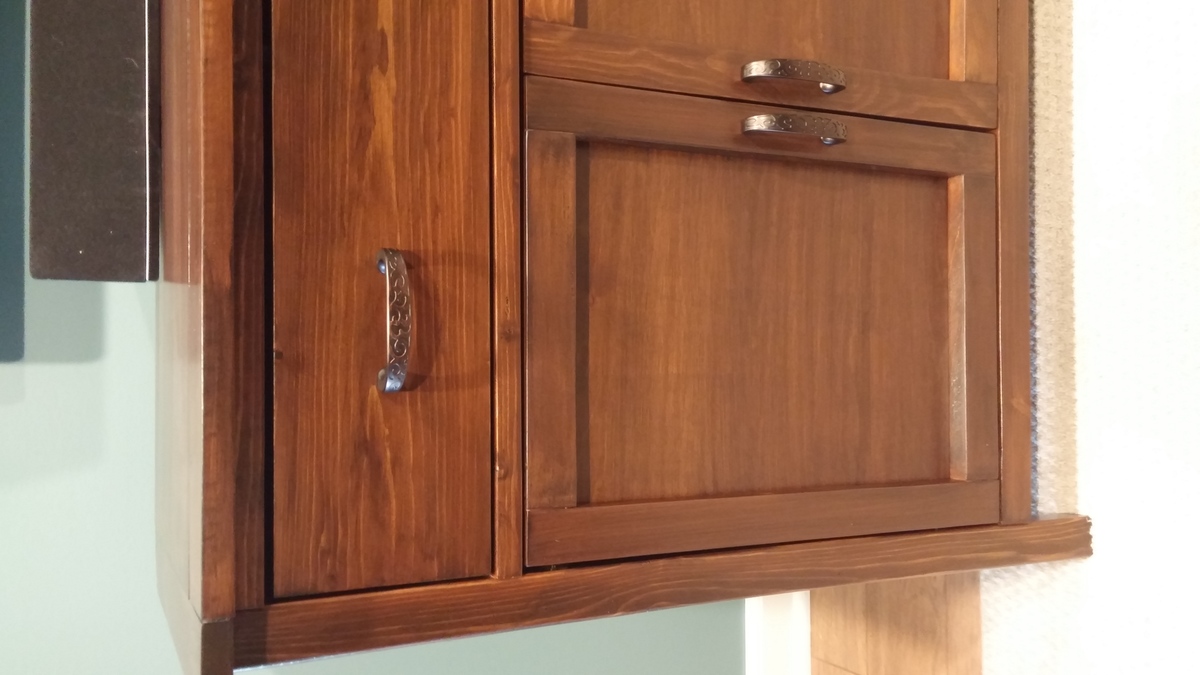
Benchmark Media Console

Our version of the Benchmark Media console. We shortened the width to accommodate our space, and decided to do 4 doors instead of two. Had some trouble with them not being square, might redo the doors if we get around to building the matching bookcases, but it's not something I can't live with for now. Used General Finishes light brown dye stain, followed by GF shaker maple water based stain, GF Pitch black glaze, and Endurovar satin.
Built from Plan(s)
Estimated Cost
$250 (not quite sure, but think the wood was around $150, plus screws, hinges, hardware and finishing supplies)
Estimated Time Investment
Weekend Project (10-20 Hours)
Finish Used
General Finishes light brown dye stain, Shaker Maple, Pitch Black glaze, Endurovar satin
Recommended Skill Level
Intermediate
Convertible benches
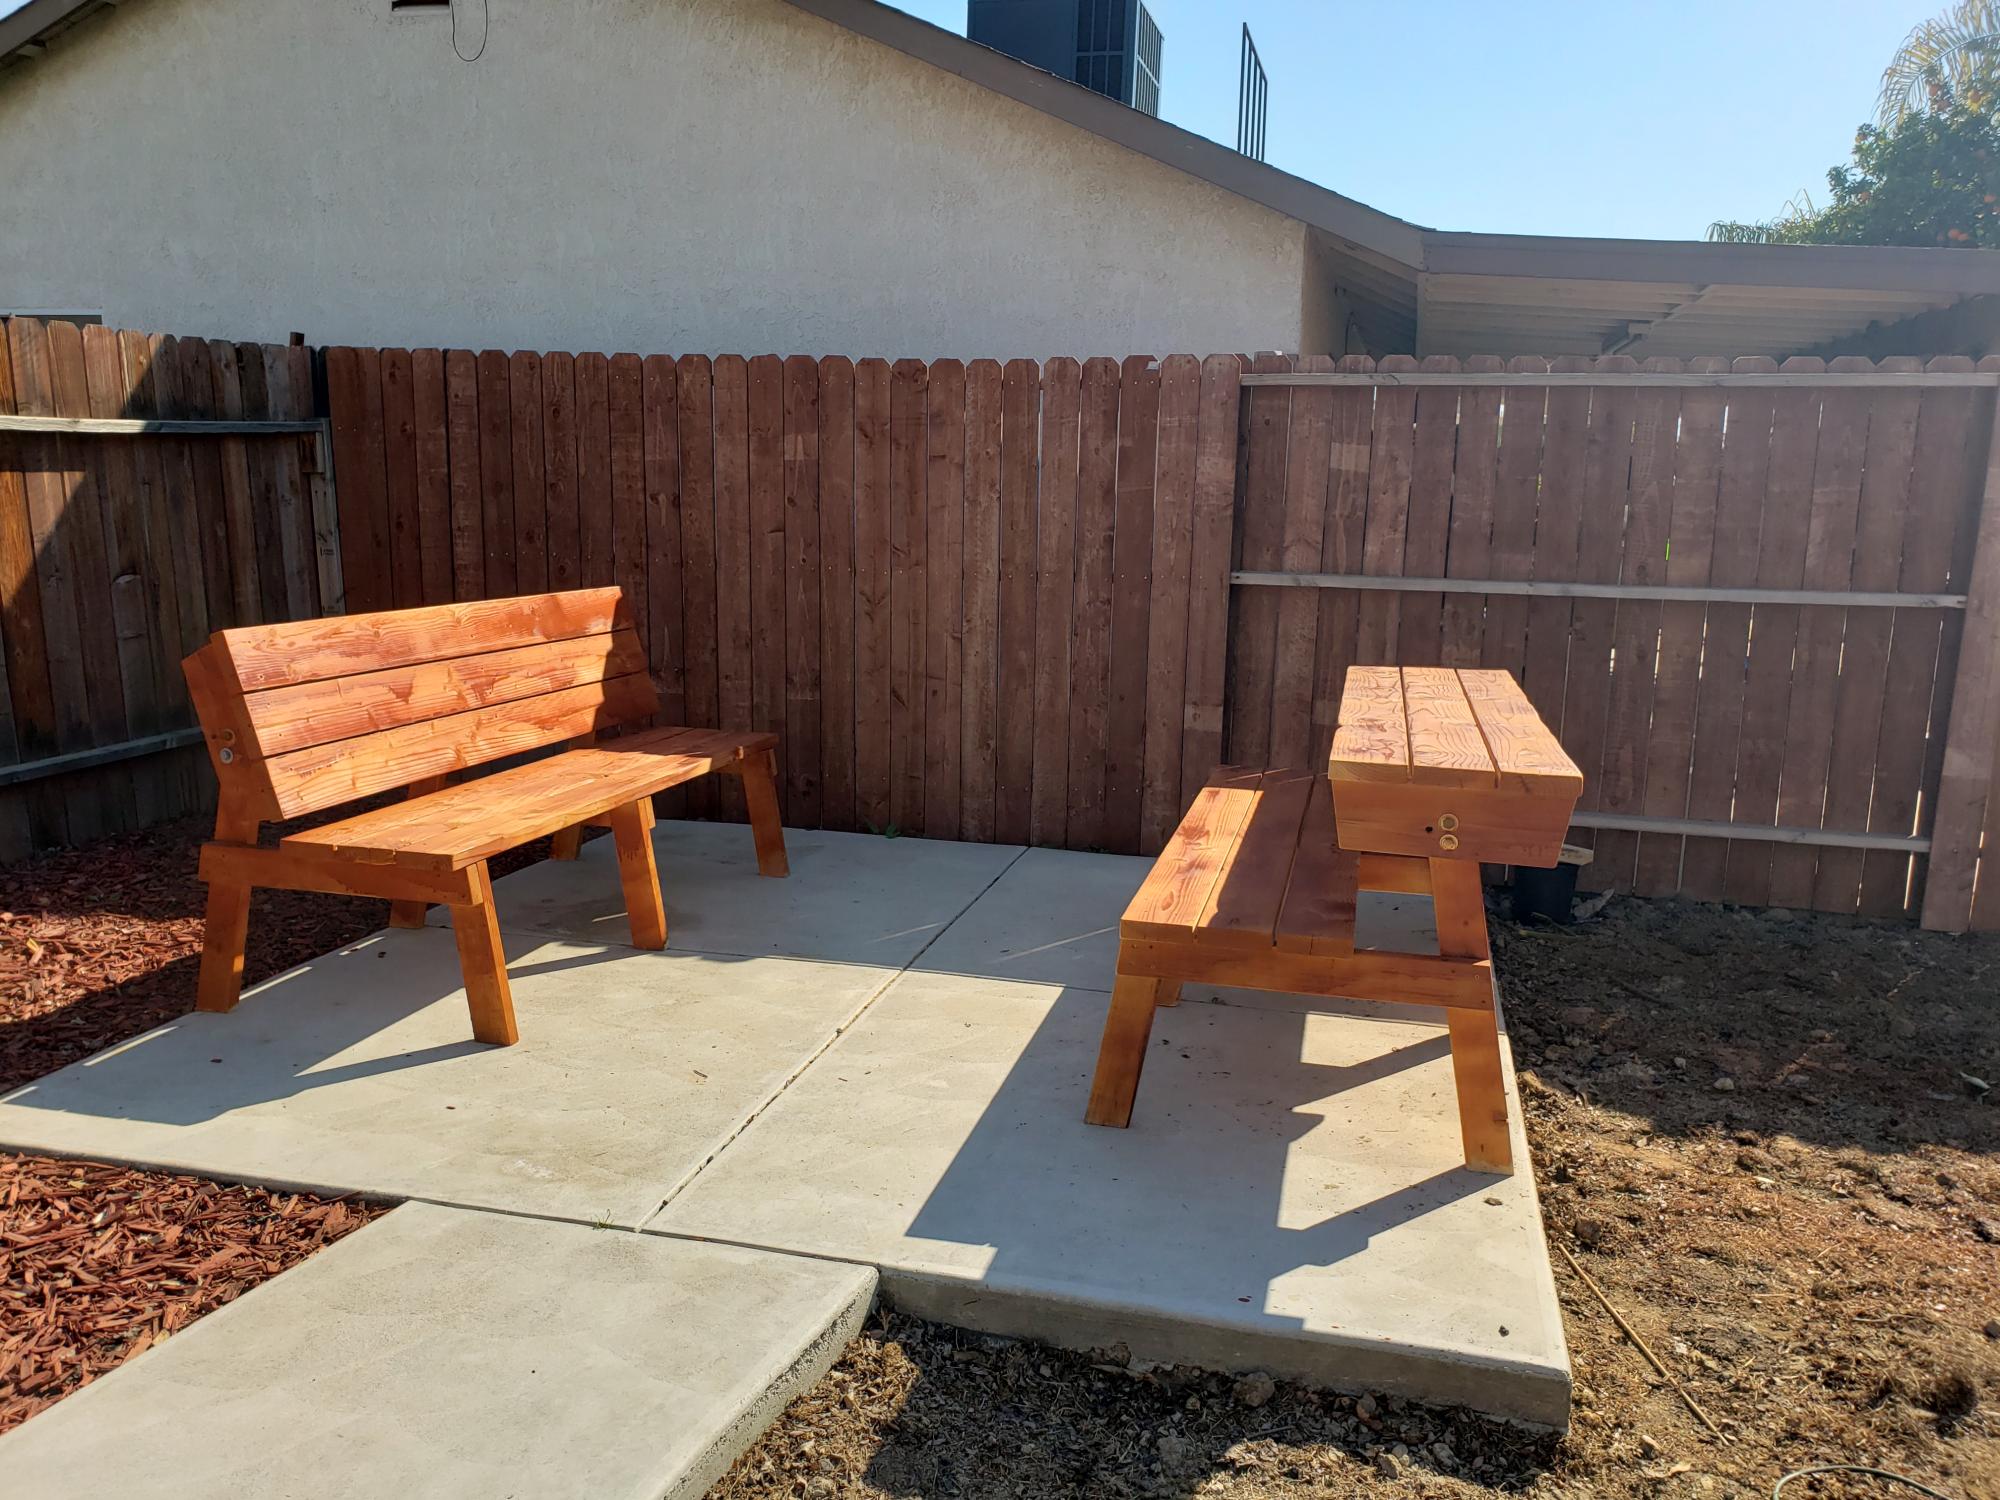
We love these benches! We actually just leave one of them in bench form and the other in table form for everyday use.
Built from Plan(s)
Comments
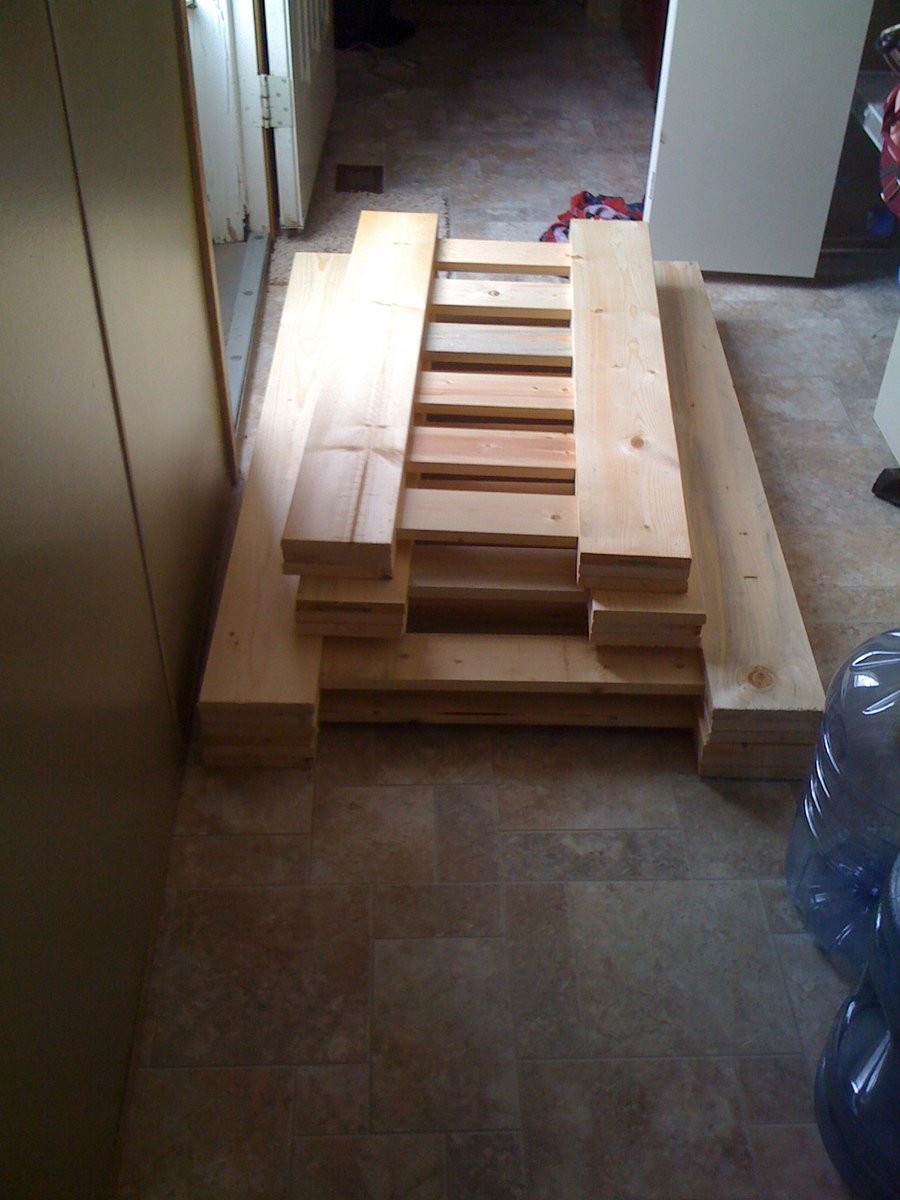
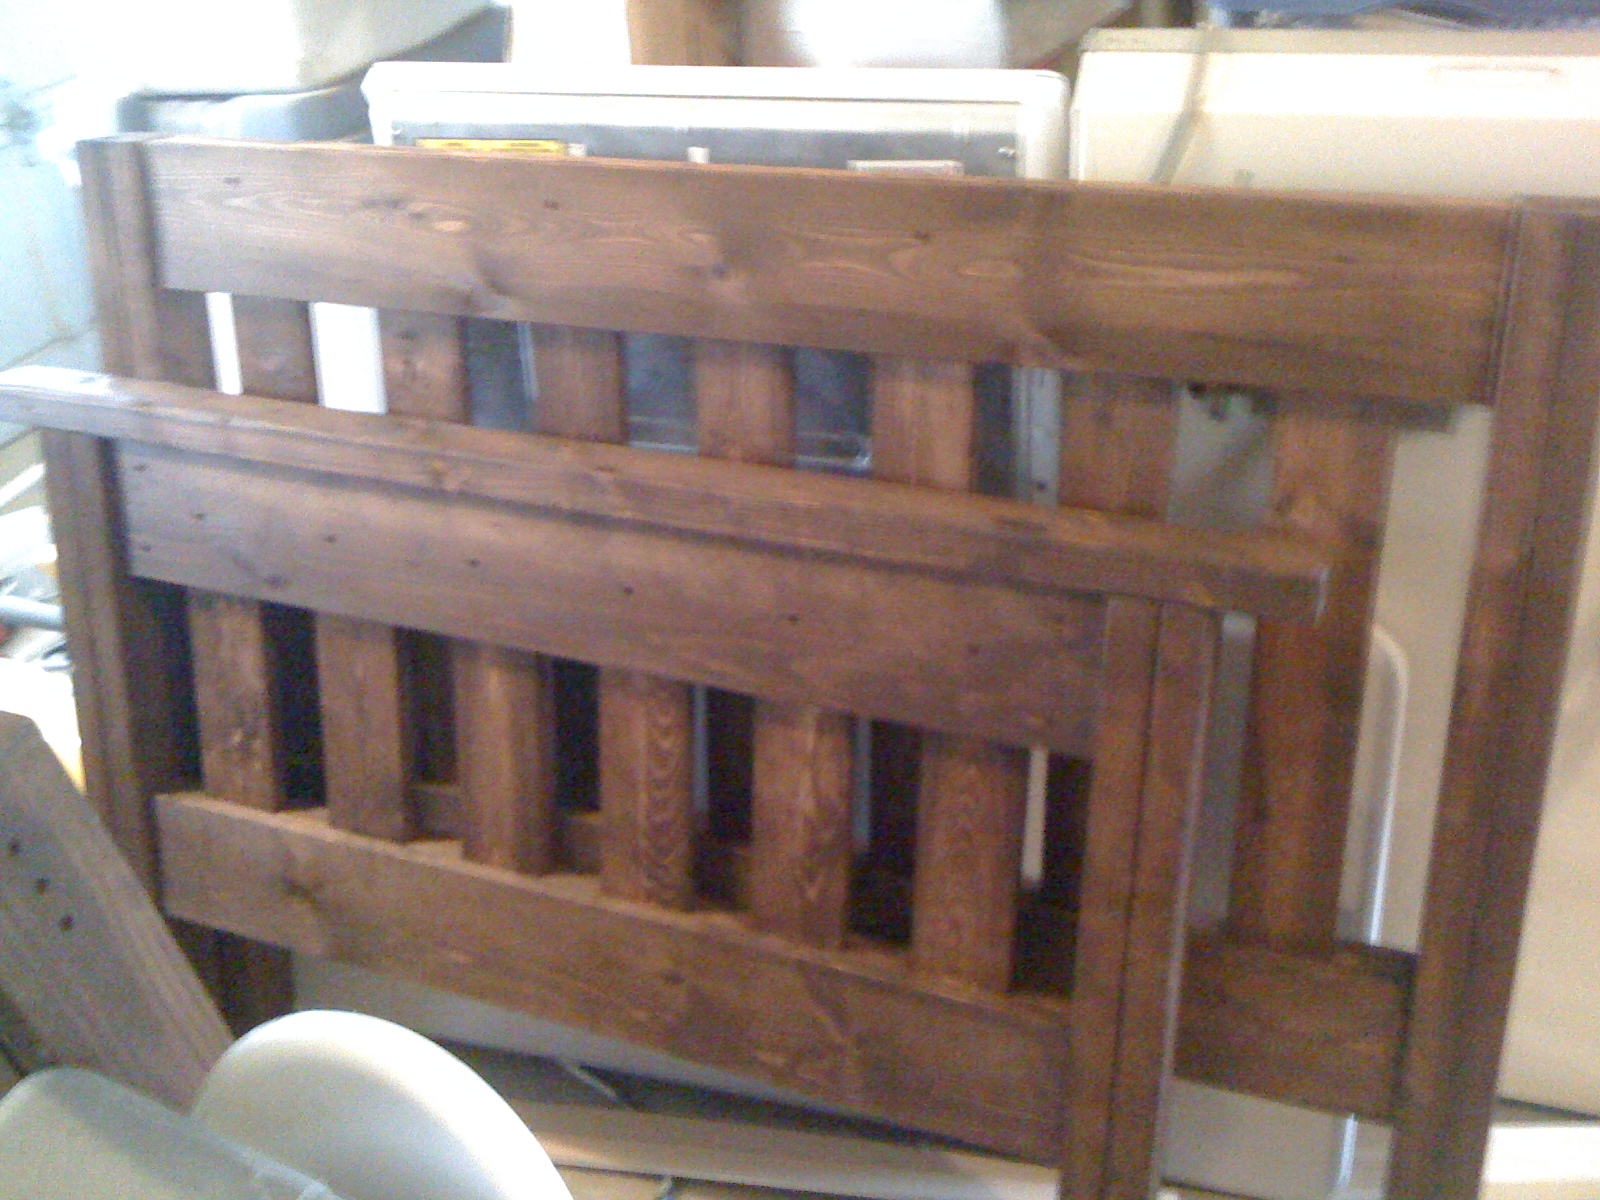
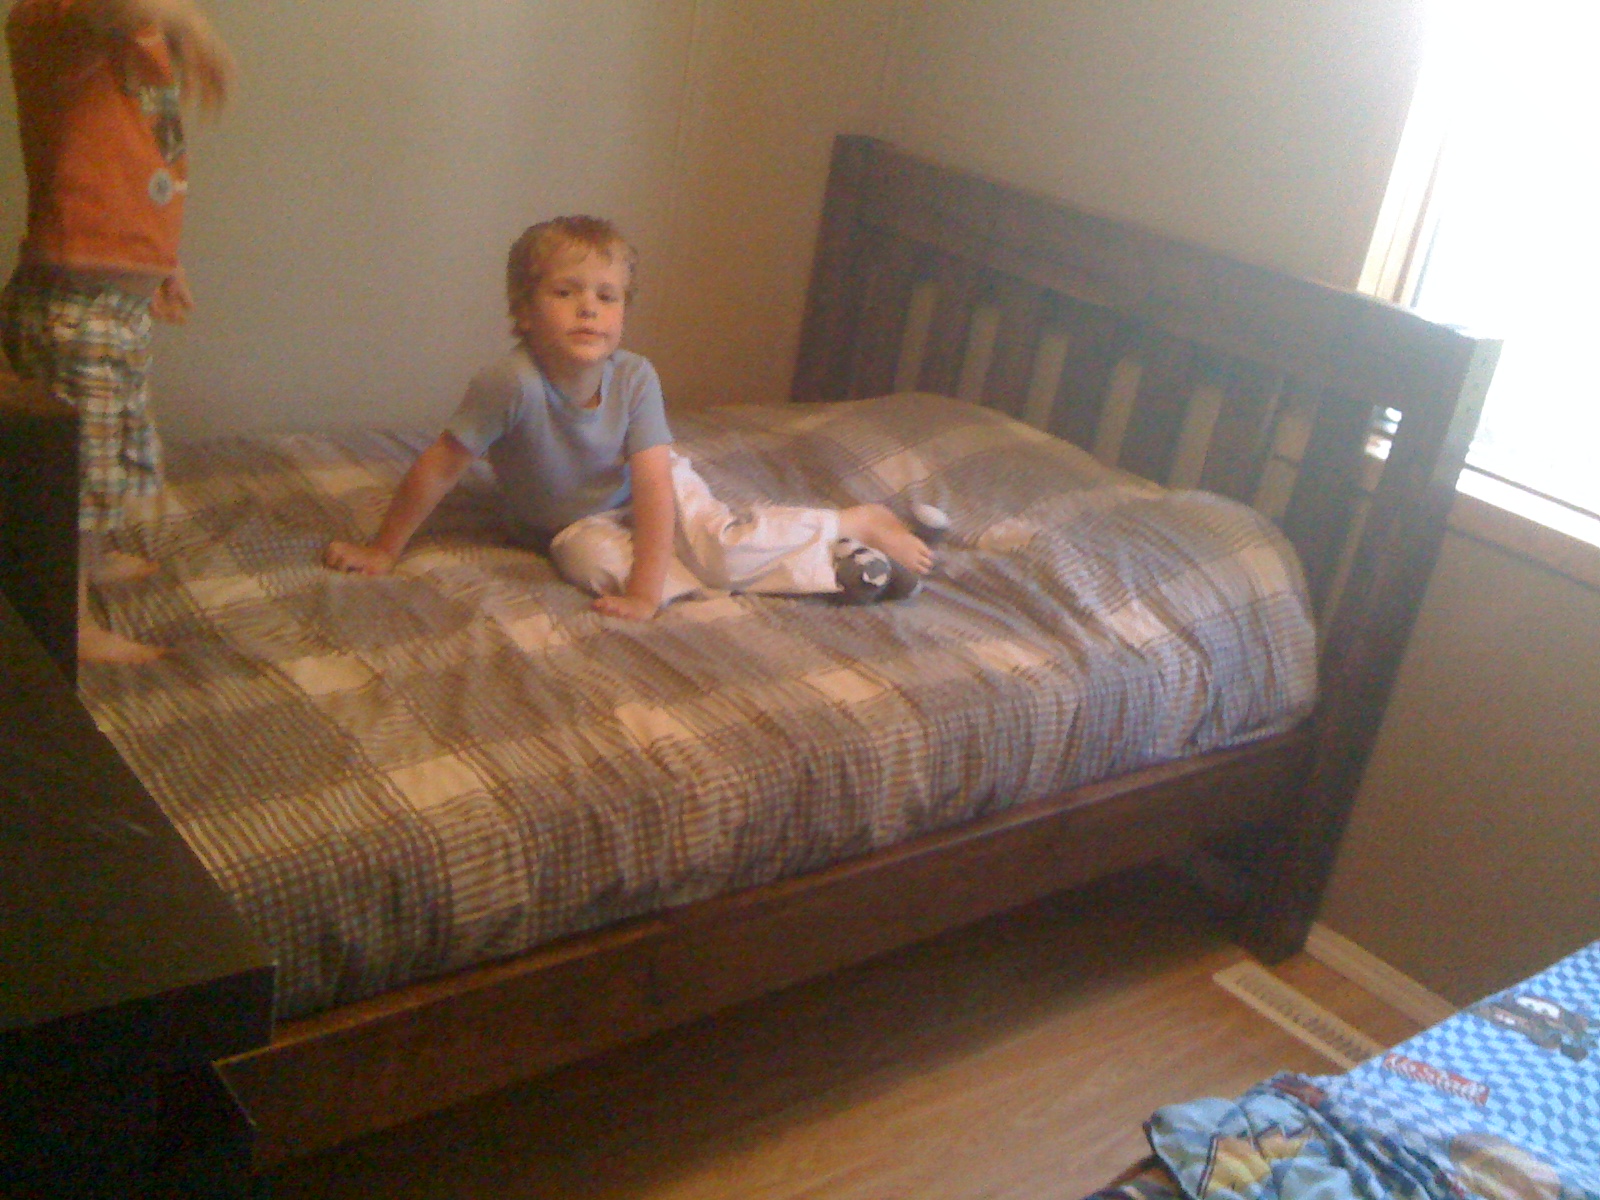
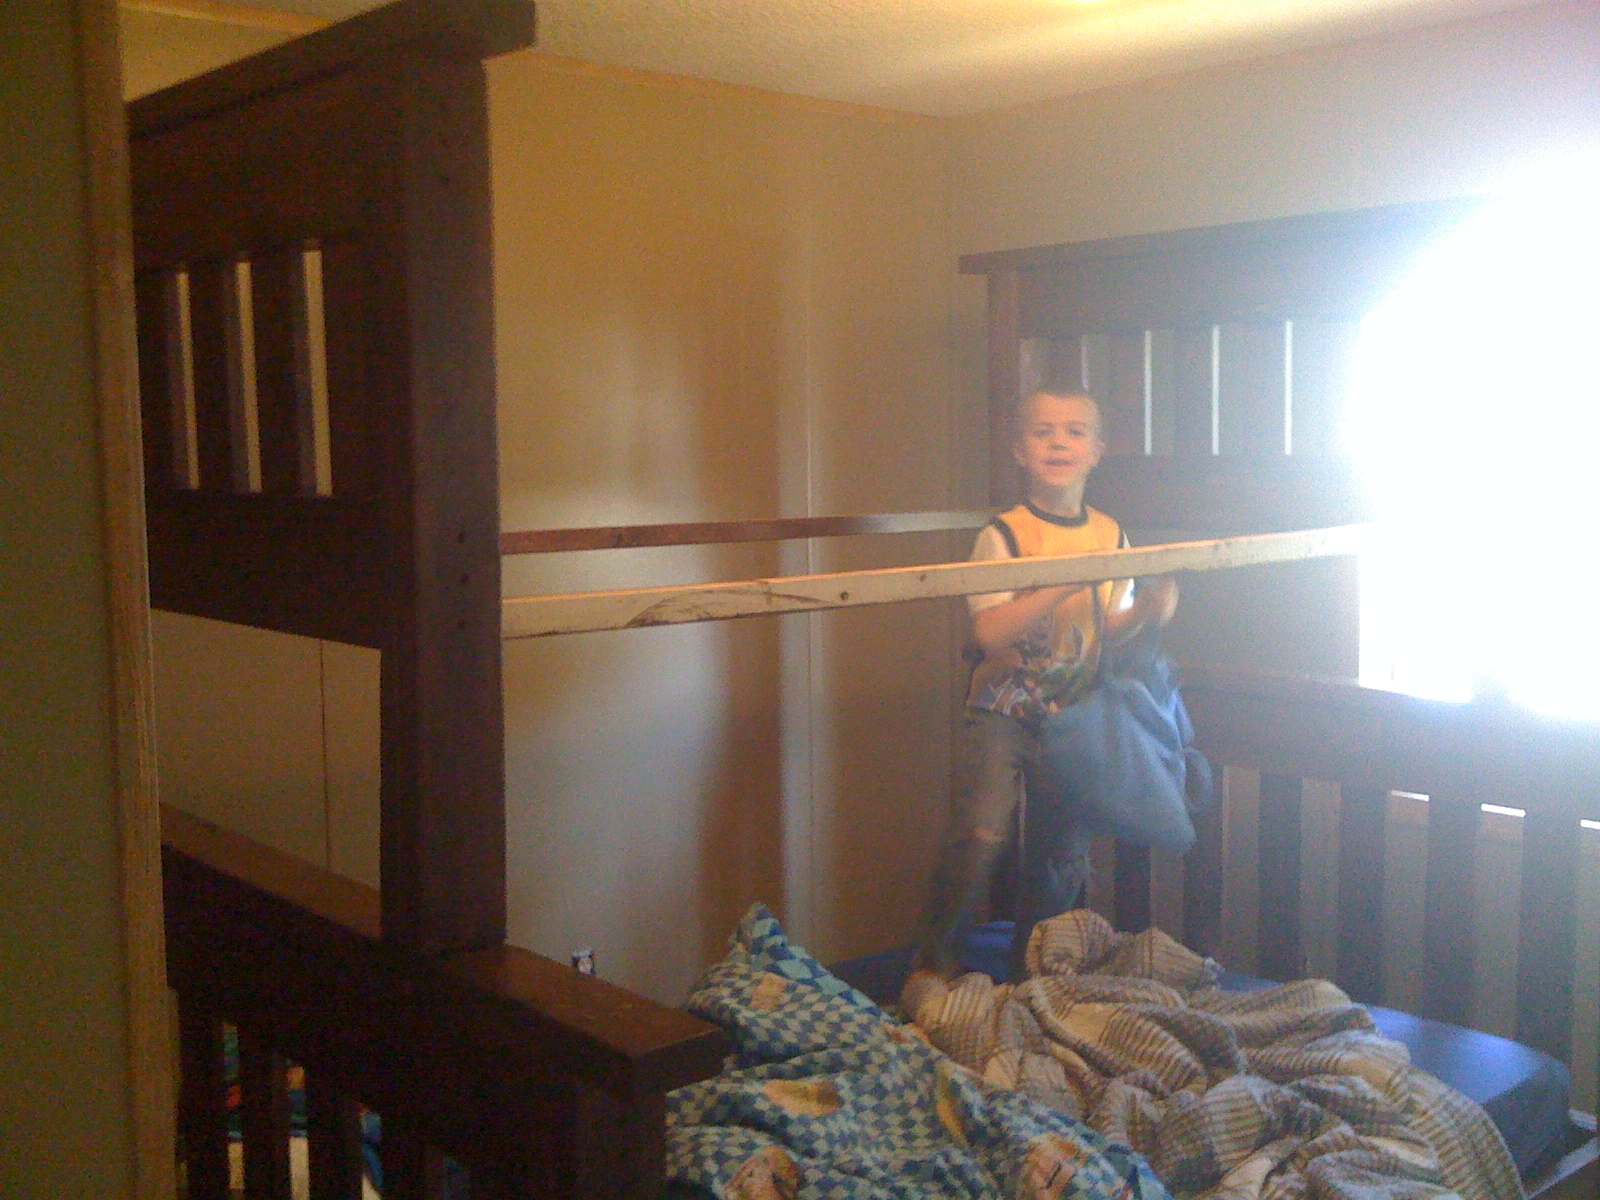
Bunk Beds
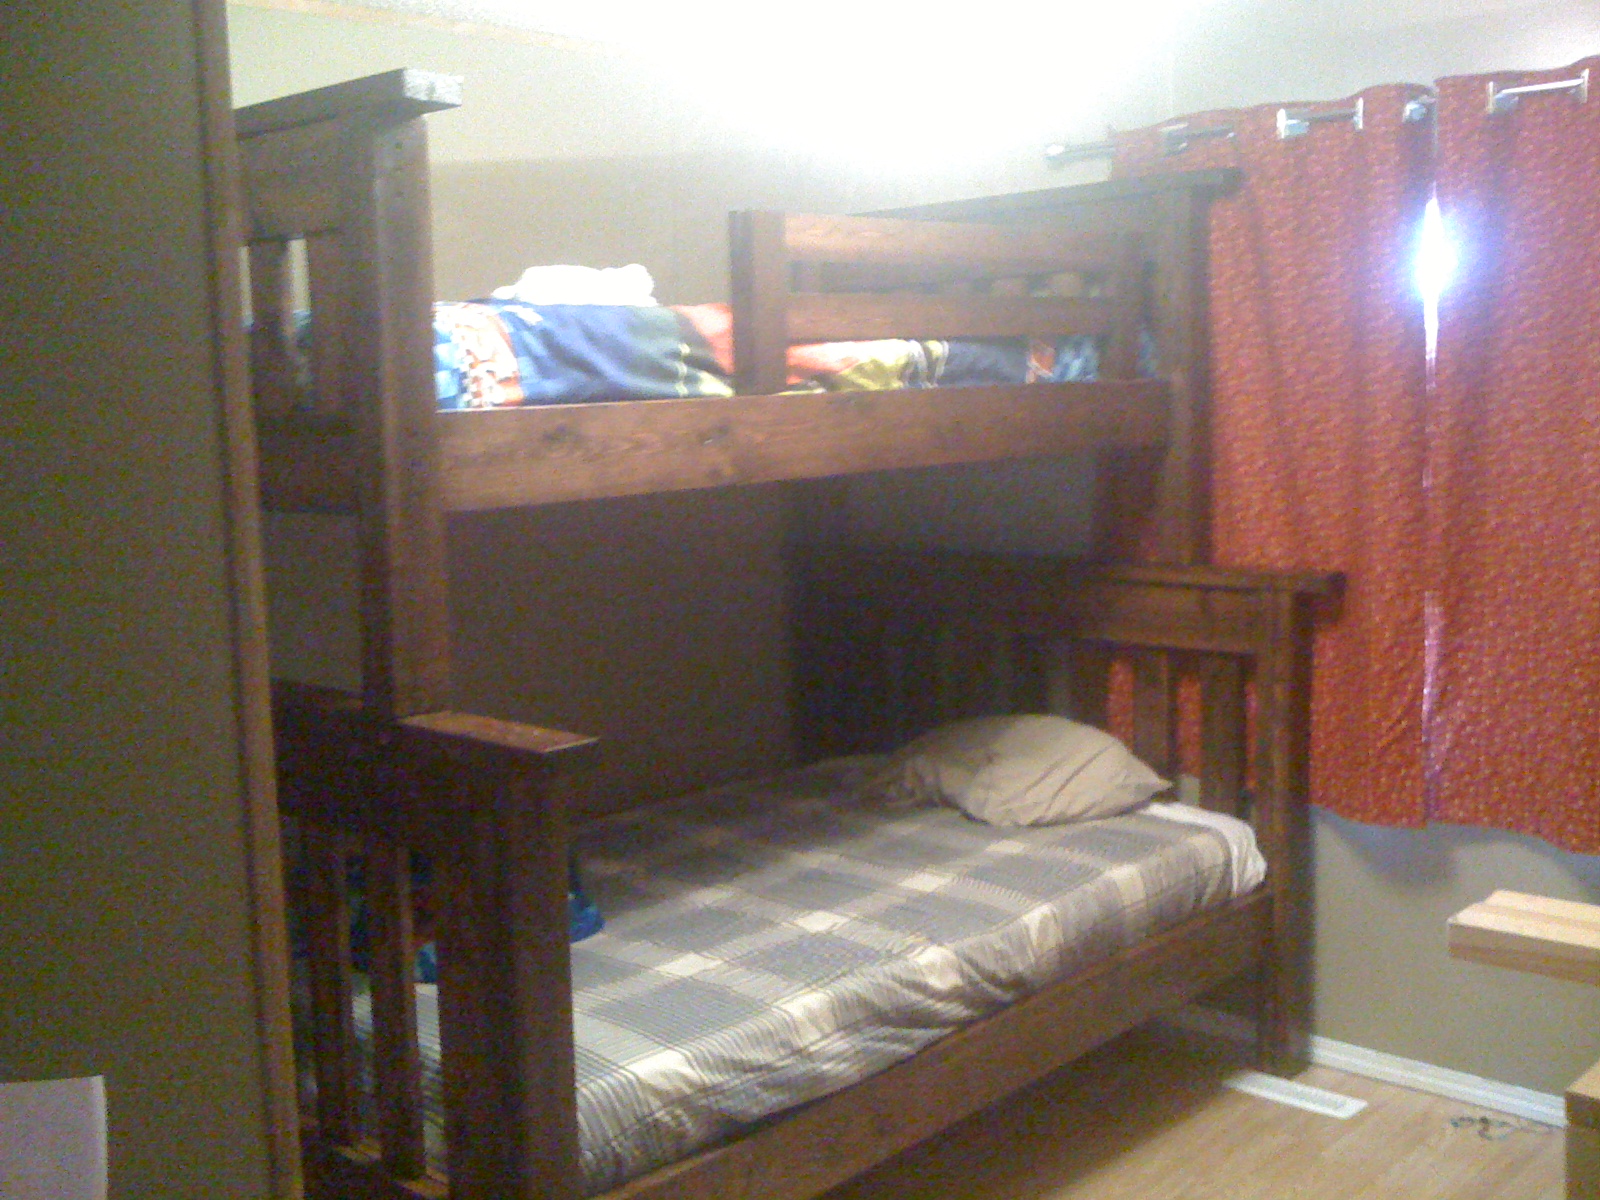
I had so much fun building these beds! Thanks Ana for providing the plans for these. My boys absolutely love them. This was my first furniture build and now I can't wait to tackle some more. The bottom bunk is using an odd-sized mattress, so I had to change the plans a little, and the ladder has since been attached as well.
Estimated Cost
$250-$350
Estimated Time Investment
Week Long Project (20 Hours or More)
Finish Used
Varathane Dark Walnut and Clear Finish. The finish is what took the bulk of the time building this. The bed itself went together incredibly fast.
Recommended Skill Level
Beginner
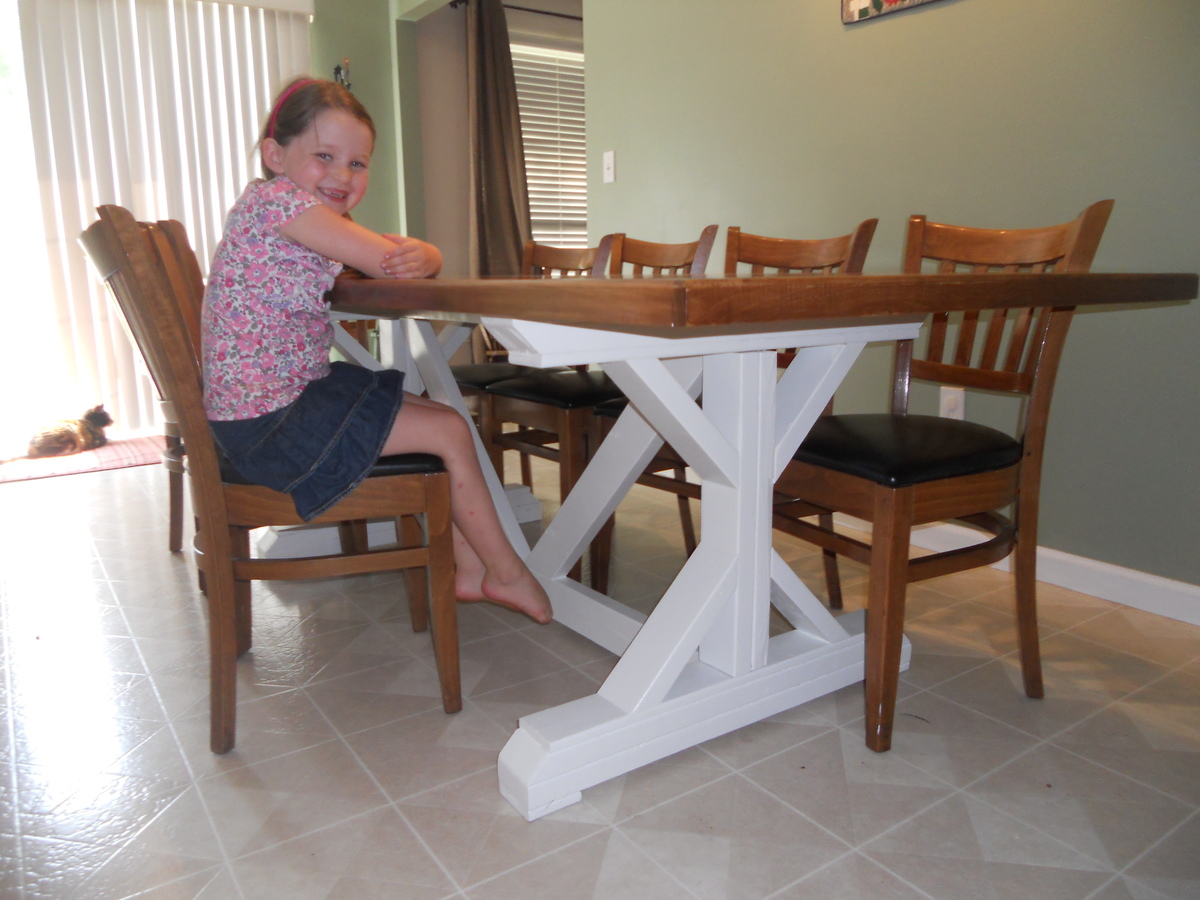
Farmhouse X Table
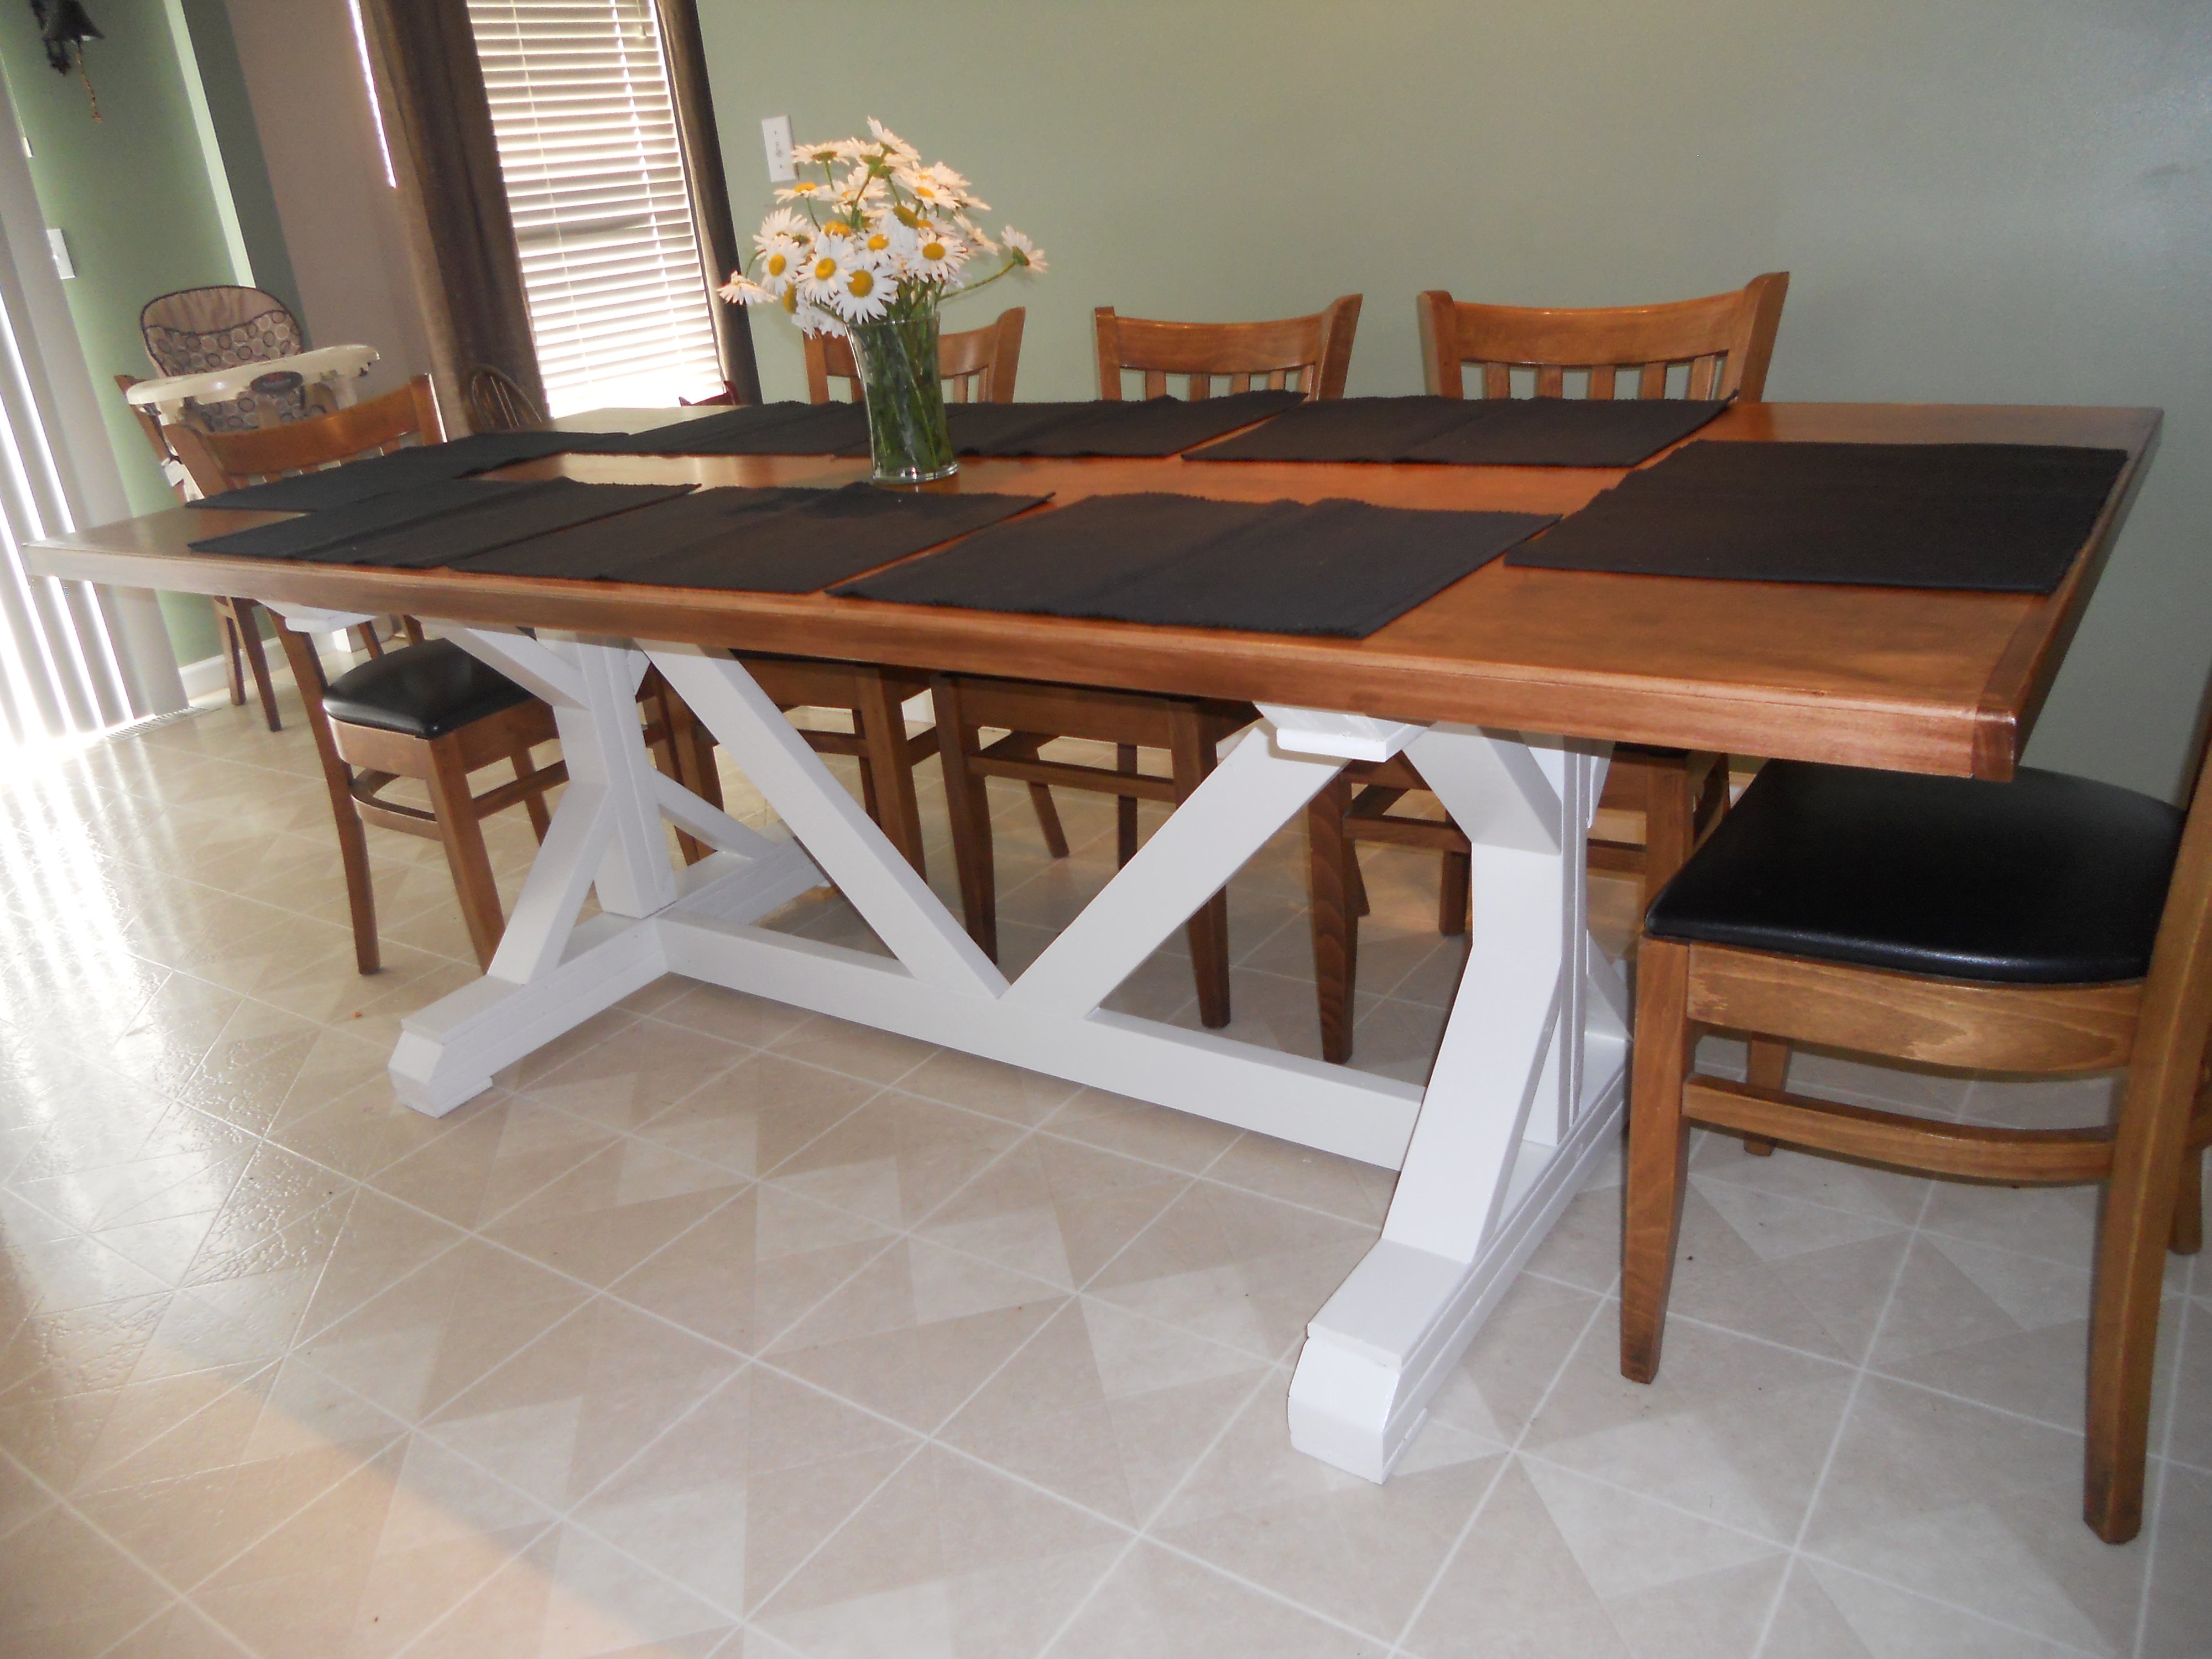
My first project! Used the plans on the website, but tweaked the top a bit. Made the top from maple plywood with maple 1x2 edge, so I would have a smooth top. Also changed the length to 86" to fit my kitchen. Assembled the base with glue and screws, sanded and filled the holes, then painted it. Attached the top with pocket hole screws. Worked on the project for around 10 hours, but took me 10 days to finish because the kids are home on summer vacation!
Built from Plan(s)
Estimated Cost
$100 for wood, finish supplies, and screws.
Estimated Time Investment
Weekend Project (10-20 Hours)
Finish Used
Base is painted with 2 coats white high-gloss paint for easy cleaning. Top is stained with 2 coats Bartley Chestnut Gel Stain and 3 coats Zar Satin Polyurethane.
Recommended Skill Level
Beginner
Bar
Built this exactly from your plans. Used aged barrel for stain. I love it!!!!
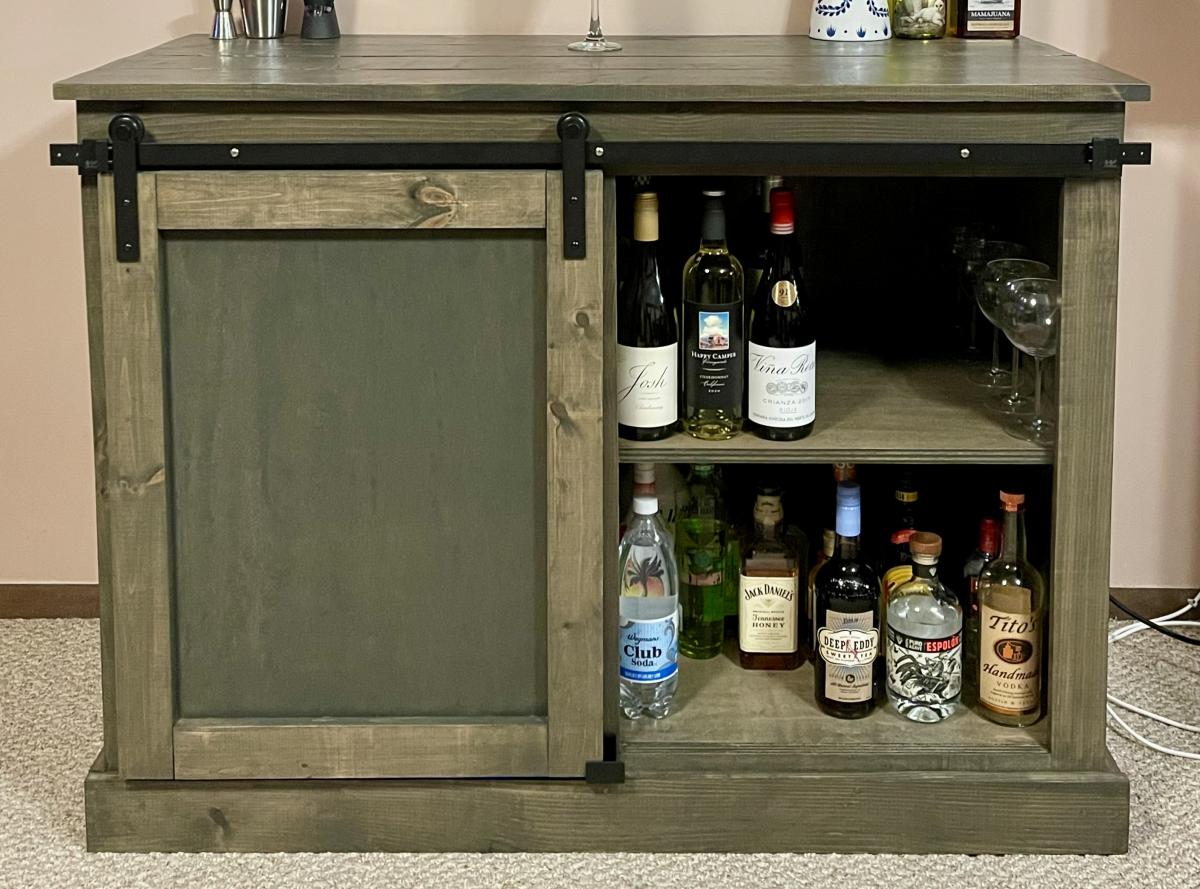
Built from Plan(s)
Comments
Mon, 03/14/2022 - 14:17
Sweet mini bar!
That's awesome, love the finish choice! Thanks for sharing:)
Stackable kid's chairs

My daughter needed chairs to use at her art/play-dough table. I used pallet wood for everything except the legs of the chairs. The legs were from some scrap wood that I had. I made two chairs and plan to make two more. They are each a different color.
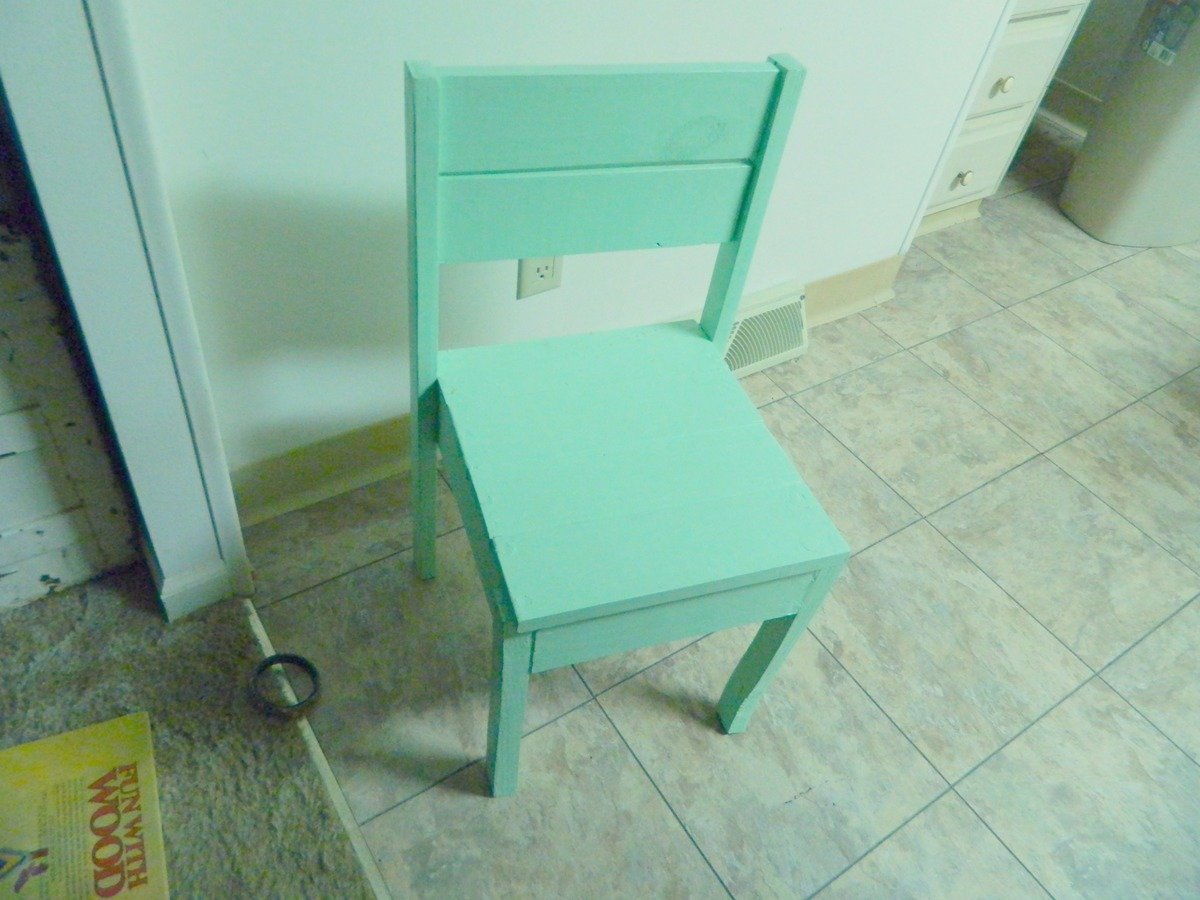

Estimated Cost
free
Estimated Time Investment
An Hour or Two (0-2 Hours)
Finish Used
Can of oops Mint green Behr eggshell finish water-based paint and some leftover light blue spray paint.
Recommended Skill Level
Beginner
Comments
hedwardaustin
Fri, 12/20/2019 - 12:32
Plans for this?
Plans for this?